How to make a beautiful box with your own hands from cardboard. How to make a cardboard box with your own hands. Video: how to make a heart-shaped box
After analyzing several MK packages, I found an option that suits me quite well for now. This way you can make a box of any size and color for a box, plate, etc. There is nothing new in the box design itself. The main thing that I “invented” for myself was making my own “designer” paper. It's hard to find nice paper in a small town, so here's what I suggest you do.
1. Materials:
- Whatman paper or cardboard,
- napkin or corrugated paper
- sheet of tracing paper
- PVA glue
- scissors
- ruler
- pencil
2. Determine the size of the box so that you can then draw a diagram.
Size of the bottom of the lower part: add 1 cm to the size of the product itself.
The size of the side parts is equal to the height of the product or slightly higher.
The size of the folds for the bottom part: 1 cm less than the size of the side part.
Cover size: 0.5 or 1 cm larger than the bottom.
I make the size of the side parts of the lid 3 cm.
The size of the folds for the lid is 2.5 cm (for a simple box you can do without them)
For example: the size of the box is 5X5X4. Box dimensions: bottom 6x6 cm; sidewalls 5cm; bend 4 cm. Lid 7x7 cm, sides 3 cm, bend 2.5 cm.
Now we determine the dimensions of the square, which will be the basis of our diagram. Add 4+5+6+5+4=24cm. This is the length of the square, which we will draw on whatman paper.
In fact, making all the calculations is not as difficult as it seems))) If you do it once and understand the principle, you will easily make them in your head without any papers or notes.
3. Draw a square on whatman paper, in our case with long sides = 24 cm. Cut it out.
4. Now we mark the square on each side according to the scheme: 4cm - 5cm - 6cm - 5cm - 4cm. We connect all the points and get the following diagram.
Here are the shaded parts that we then cut off.
5. Now, actually, let's start making paper. To do this, you can use a regular napkin of a suitable design and size. Or corrugated paper, then the box will be plain. The square we cut out of whatman paper. grease with PVA. Here it is important to coat the entire surface well, especially the edges, but there should not be too much glue so that the napkin does not get wet.
While the glue dries slightly, iron the napkin with a hot iron so that there are no wrinkles. Corrugated paper does not need to be ironed. Then we place the napkin on whatman paper, cover it with a sheet of tracing paper and carefully iron it with an iron. I didn’t get it right the first time, it requires some skill))) This is what happens.
6. Now we cut off the excess parts of our square. We get such a figure.
7. Make cuts along the red lines.
8. Carefully bend everything using a ruler
9. We wrap the flaps and folds inward and get a nice box. More precisely, its lower part.
10. For the lid of the box, we repeat all the operations, only the dimensions of the square will be different. In our example, 2.5 cm + 3 cm + 7 cm + 3 cm + 2.5 cm = 13 cm
As a result of all the described manipulations, such a box appears
Everything is done quite quickly, in about an hour I did 6 of these things
And this is what the finished product might look like in beautiful packaging.
Gift wrapping is a responsible matter, because even the most desirable thing, carelessly wrapped in newspaper or stuffed into a simple bag, will not make the impression that the giver expects.
Of course, buying gift wrapping is not a problem today. The stores will offer a wide variety of options: boxes, bags, etc. But all the same, standard packaging will not be able to convey the range of feelings that you want to invest in a gift.
Therefore, many are interested in how to make a gift box using scrap materials.
Decorating ready-made boxes
The easiest way is to decorate a finished box of a suitable size. This can be done in different ways. For decoration, colored paper, bows, decorative flowers, beads, sparkles, pieces of lace, elegant braid, etc. are used.


You will need to decide for yourself how best to decorate the box, depending on the reason for the gift and the personality of the recipient. It is clear that if a gift is being made for a girl, you can use more decorative elements. And if this is a gift for a man, it is better to show restraint. If desired, you can use a photo of the person for whom the gift is intended to decorate the box.

When decorating, it is advisable to emphasize for what reason the gift is being given. For example, if it is the New Year holidays, then use snowflakes, Christmas tree cones, tinsel, etc. in decoration.
Simple box
It is not always possible to find a ready-made box of the right size, so you can very easily fold a box from paper or cardboard.

Even a child can make the simplest version of the box; to make it you will need:
- cardboard (preferably colored);
- ruler;
- pencil;
- scissors;
- hole puncher;
- ribbon.
If you don’t have colored cardboard on hand, you can cover ordinary white cardboard with colored paper.

First of all, you need to draw a template on a sheet of cardboard:
- in the center of the sheet you need to draw a square, this will be the bottom of our box;
- now on each side of the square we draw four more squares of the same size as the first, we have a figure resembling a cross;
- Now we carefully round the upper corners of the four squares (except for the central one).


To get it straight, you should use a template or compass:
- the resulting template should be cut out and the side parts bent upward;
- in the upper part of each side part, holes should be punched with a hole punch;
- thread a ribbon through the holes and tie it with a bow.


You can decorate such a homemade box to your liking using rhinestones, beads, and ribbon bows. But using the technology described, it is worth making only a small box, since a large one will not hold its shape.
Square box
To make a rectangular, or rather square, box from colored paper with your own hands, you will have to tinker. Here is a description of the work sequence:

- take a square sheet of thin cardboard or colored paper;

- draw two lines diagonally with a pencil;

- bend one of the corners of the square so that the corner falls exactly at the point of intersection of the diagonal lines;

- a second time we bend the same edge of the cardboard square so that the edge of the fold falls on the diagonal line;

- We do the same with all the other corners of the square;

- as a result, we got a sheet divided into small squares by fold lines;

- draw a bottom contour in the center, consisting of four squares;

- Now make cuts from two opposite corners to the intended bottom.
Now we begin to fold the box, the assembly diagram is as follows:
- fold the square from the wide (uncut) sides with the corners towards the center;

- then raise the sides;

- fold the paper on the wide side, forming the two remaining sides of the box;

- Now we wrap the cut out parts of the square, finally forming a box.
If you need to make a lid for the resulting package, you need to make a slightly larger box in the same way. That is, at the first stage, make a square 3-5 mm larger than the first.

Having mastered this technique, you can learn how to make boxes of various shapes: in the form of a pyramid, cone, cylinder, etc.
Book-shaped box
Today, instead of a material gift, the hero of the occasion is often given money; a box made in the shape of a book is very suitable for a monetary gift. Let's look at how it can be done:


- first of all, you need to make a rectangular box of the required size from cardboard; it is important that the bills that you plan to give fit freely into it;


- Now you should start assembling the “binding”. To do this, cut out two rectangular sheets of cardboard in length and width 1 cm larger than the manufactured box. You also need to cut out another strip, its length should be equal to the length of the sheets, and the width should be 0.5 cm greater than the height of the box made;


- we take the material from which we will make the binding, it can be plain or colored paper, thick fabric (for example, denim) or artificial leather;


- We lay out the blanks on the material, placing a narrow strip between two cardboard sheets. The gaps between the parts are 2 mm, a three-centimeter allowance is left at the edges;


- glue the cardboard to the material and cut out the blank along the intended lines, cutting off the corners;


- now we need to wrap up the allowances and glue them to the cardboard, we have a semblance of a book binding;


- We glue the previously made box onto one of the inner surfaces of the binding;


- We glue ribbons in the center of the top and bottom “lids”, with the help of which our box will be closed.


Now all that remains is to decorate the top part of our book box. You can decorate it with flowers and bows, beads and sparkles. The exclusive box is ready.
Of course, you will have to tinker with making gift wrapping. Perhaps not everything will work out the first time, but with a little practice, you will be able to make unique packaging that will not be found anywhere else.
Instructions for making original boxes contain templates and diagrams that make it easy to complete the craft using scrap materials. Based on your own imagination, you can supplement the models with various decorative elements, or independently create or improve the proposed drawing for future packaging. Options have been developed for men, women, children, suitable for any type of celebration: birthdays and weddings, New Year, Valentine's Day and so on. Decorative boxes are also used to store items and trinkets and fit harmoniously into the interior of the room.
Pull-out box
This option is easy to implement and suitable for gifts for any occasion. Wrapping, colored paper, scrapbooking paper or cardboard are suitable for making crafts. The latter is used to enhance the strength of the box.
The paper parameters for making packaging with a removable lid depend on the size of the gift, the average is 215*215 millimeters. The sheet should be square, the work should be done without cuts, the parts should be glued together with a glue stick or PVA glue.

According to the indicated scheme, a package with an original lid is created in a few minutes. When making the latter, the parameters of the box are taken into account, which are advisable to measure with a ruler and add 4-5 millimeters.
The lid is made of the same paper or a matching color. The packaging is decorated with beads, using special glue, ribbons, lace, and so on.
With non-removable lid

To make a box, a template is printed, the product is cut out, folded along the marked lines and glued. If you need to change the packaging parameters or shape (give it a rectangular appearance), you can make a drawing yourself. To obtain a durable box, the product is made of cardboard.

By making several cube boxes of the same size, you can put together an original puzzle package of 4 or more gifts.

Cake
A composite box of individual elements in the shape of a festive dessert is mainly used when holding a celebration in a large company. In this case, the packaging can be personalized or presented with a cake with predictions placed in each cell.

To make it, you should print a template or draw your own according to the proposed layout. Fold the paper along the dotted lines and glue. The cake usually consists of 10-15 pieces, but their number can vary depending on the number of guests.

Pyramid
The box is designed for packaging small gifts: sweets, toys, jewelry, hairpins, cufflinks, lipstick, nail polish, and so on.

To make a craft, you should use the template and photographs of the master class. In the cut out layout, the elements highlighted in color are carefully folded. The pyramid is assembled without the use of glue, connecting the parts with decorative threads. To make holes, it is convenient to use a hole punch or manicure scissors.


Square box
Universal packaging with a removable lid is intended for gifts for any occasion. It is preferable to make it from cardboard; use Moment glue to glue the parts.

The template consists of 2 parts - a lid and a box. The product is cut out, the elements are bent and glued. The packaging is decorated with braid, stickers, ribbons, rhinestones, and so on.


Quick option
The box is made from a square sheet of paper. The method is simple to implement.


According to the instructions, the paper is folded several times and cuts are made in the indicated areas. The box is folded and secured with glue and double-sided tape. The lid is assembled according to the same scheme from a sheet larger than the original by 5 millimeters. The product is decorated with rhinestones, ribbons, buttons, beads and other elements.
Strawberry
A bonbonniere in the shape of a ripe berry is ideal for packaging sweets.

To make the product, cut out a template consisting of 2 parts: berries and leaves. The paper used is colored, for scrapbooking or cardboard.

The strawberry box is bent along the dotted lines; a needle and thread are used to fasten the elements. The leaves of the berry are sewn or glued as desired.

Lock
The open box is made in the shape of a padlock. The product is made from cardboard or paper.

For manufacturing, a template is cut out, bent along the dotted lines, and the touching elements are glued together. The box is decorated with rhinestones, beads, and ribbons. If you wish, you can make a key from cardboard, scrapbooking paper or packaging paper and hang it on a thread, cord or string to the lock.

House
An elegant bonbonniere is made of thick paper or cardboard. To glue elements, it is preferable to use PVA or Moment glue.

The template is cut out, bent along the dotted lines, and the contacting parts are glued together. To make the roof, rectangular sheets are used, which are attached to the upper folds. Paper parameters depend on the size of the house.

If desired, you can decorate the box with a ribbon tied in a bow on the roof. In this case, it is glued to the side walls and threaded into a pre-made slot. Decorate the house with stickers, flowers, bird figures and other elements.

flower bud
The gift box is made from packaging, colored paper, scrapbooking paper, and cardboard. The work is carried out without the use of glue.

The template is cut out and folded along the dotted lines. A gift is placed inside the box, a bud is formed, connecting the “petals” to each other.


Spiral box
The packaging is made of thick paper of different colors.

For manufacturing, use the proposed template or create your own. The design is printed in 10 pieces of different colors and cut out.
The elements cling to each other with their upper parts and turn slightly to the right. As a result, a kind of snowflake is formed. Then the product is turned over and the parts on the other side are assembled using the same pattern.

Carrot
The vegetable-shaped case is made of colored paper or cardboard. They pack sweets, nuts, berries, seeds, etc. in a box.


The template is cut out and folded along the dotted lines. An incision is made in the marked areas. The box is assembled, fastened with glue and cut parts. Carrots are decorated with green leaves made of paper or fabric, ribbons, and lace.


Origami
The box is made of paper or cardboard; the method is fast in execution. No glue is required during operation.


The template is cut out and the parts are folded along the dotted lines. Before assembling the box, it is recommended to walk along the contours of the product with a ruler. The packaging is assembled by fixing the “petals” together.

Origami with clasp
The box is made of paper or cardboard. The flower at the top of the lid forms a lock.

To make the packaging, the template is cut out and slits are made in the indicated places using nail scissors or a stationery knife. The box is assembled by placing holes on top of each other, and flowers are threaded into them, fixing the product.

Chest
The closed box is made of cardboard or thick paper.


To make the packaging, a template is cut out, the “wings” are bent and glued. In the indicated place, a slot is made into which a recess is inserted, forming a lock.

Apple
Sweets, nuts, and berries are packed in a fruit-shaped box. Bright marmalade worms will be an original surprise.


To make the packaging, the template is printed on a color printer. The product is cut out and folded in the shape of an apple according to the diagram given in the instructions.
The fruit is decorated with a curly cutout and a leaf placed on a toothpick.

Flat box
It’s easy and quick to make flat packaging in which you can present gift certificates, theater tickets, cinema tickets, etc.

To make it, cut out 4 identical circles and bend them in half. Then the parts are glued to each other, as shown in the figure. The box is folded and secured with tape.
Children's
Animals
An unusual animal figurine box will help to please and surprise your child. The craft is easy to do and can be done by children themselves to make a gift for friends and relatives. Decorative elements and imagination will turn the packaging into any representative of the animal world.


To make the box, use a standard template for similar cases. It is cut out, the edges with recesses are bent and inserted into pre-made slots. Next, the box is turned into an animal: ears, eyes, nose, paws, tail, etc. are glued on.

Basket
The original packaging is ideal for young fashionistas. You can put a lot of miniature things in it: sewing supplies, decorative elements (beads, seed beads, stones, rhinestones), hairpins, rubber bands, stickers. To enhance the strength of the basket, it is recommended to make it from cardboard.

Make a box from a mock-up that contains 5 equal-sized squares arranged in the form of a cross. The parameters of the figures are arbitrary and depend on the purpose of the packaging. The locations for the holes are preliminarily marked with a pencil and pierced with a hole punch at the same distance.

The sides of the box are carefully fastened together by passing ropes, threads, ribbons, braid, and so on through the holes. The best option is a cross stitch.

The handle for the basket is made of any material that can hold its shape: thick paper, cardboard. It is sewn to the box or glued; you can use a rivet or a pushpin, bending the sharp tip from the inside.

Geometric figures
Miniature boxes in the shape of three-dimensional pentagons, rhombuses, triangles are suitable for packaging sweets, small toys, notes, etc.

Boxes are made according to templates corresponding to the shapes:
- Figure 1 - pentagon;
- Figure 2 - triangle;
- Figure 3 - rhombus.
Crafts are made from colored or wrapping paper. The template is cut out, folded along the dotted lines, and secured with an adhesive pencil.


Candies
Sweets, nuts, miniature toys, confetti, etc. are packed in bright boxes. The product is made of colored paper.

The template is cut out, the squares along its edges are removed, folded along the dotted lines, and glued.

You can draw the layout yourself, increase the number of sides of the candies, change the size of the packaging, and add new elements. Products are decorated with stickers, bows, ribbons, and so on.

LEGO
In packaging in the form of a LEGO constructor you can put parts from it, toys, figurines, sweets and other miniature items.

For manufacturing, a template is cut out, consisting of 2 parts: a box and a round element to create convex parts. The product is folded along the dotted lines.

The boxes are carefully folded and glued. Convex parts are obtained using a template by cutting out several circles on it and gluing them on top of each other.


Men's
Classic version
Packaging for the stronger sex is presented mainly in a simple style with a minimum number of decorative elements. If desired, you can paste images on masculine themes: cars, alcoholic beverages, watches, cigars, tools, etc.


The product is made according to the proposed scheme; the parameters of the box depend on the size of the gift. The layout is cut out and bent along the dotted lines; the work is done without the use of glue. In order for the rounded edges to bend beautifully, it is recommended to first draw a knitting needle or nail scissors along the contour, leaving a light furrow. It is important not to damage the paper sheet.
Small cuts are made on the top of the box, indicated in the diagram as the letter “G”. The notches are connected to form a kind of lock.
Shirt with tie
The spectacular closed packaging is presented in the form of a paper case with decorative elements: a tie or bow tie.

Make a box from durable paper or cardboard. To do this, print a ready-made template or draw your own layout according to the specified diagram. The folds are indicated by a dotted line. The box is assembled, the contacting elements are carefully glued together, it is better to use PVA or Moment glue. The folded collar makes the case closed. If desired, it can be glued to a shirt.

Make a tie or bow yourself or use a template. They are made from colored, packaging and any other paper, cardboard or fabric. Then the decorative elements are glued to the box.

Case
The closed box is made in a classic style. It is made from thick paper or cardboard.

The template is cut out, folded along the dotted lines, and glued together. In order for the rounded edges to bend beautifully and correctly, first draw along the contour with a knitting needle or nail scissors, leaving a light furrow. It is important not to damage the paper sheet. The recess is inserted into a previously made cut - a kind of lock is obtained.

Women's
Corset
In the packaging, you can present underwear, perfume, sweets, a bottle of wine, champagne and other exquisite gifts in the form of a piquant item of women's wardrobe.

The process of making a box is quite labor-intensive; the size and decorative elements are chosen at your discretion. The work is done on thick paper using templates. It is easy to draw such layouts yourself, adding new elements if desired.
Initially, the front and back parts of the corset are cut out, the layout is folded inward along the dotted lines, and the side parts are glued together.


Next, templates are used to make cups for the corset and the bottom of the package. From 2 small parts you get 1 cup. To do this, they are cut out, the element with 2 dotted lines is bent along them in opposite directions. Another small template with 1 dotted line is glued to the inner fold of the part, which remains on the edge when connecting the parts. The result is a convex part - a cup with side notches, with the help of which it is glued to the corset. Then the second cup is also made and attached.
The large round template is the bottom of the package, which is glued to the lower inner folds of the corset.
Next, the item of women's clothing is decorated. To do this, using nail scissors, holes are made through which ribbons, ropes, ribbons are passed, flowers, beads and other elements are glued. If desired, you can make and glue straps, decorating them with lace.
Diamond
It is advisable to pack jewelry in a box in the shape of a precious stone: brooch, ring, pendant, chain, etc.


To make the product, cut out a template and use double-sided colored paper or cardboard. It is recommended to use black, blue, light blue, gold, silver and other catchy shades. The craft is assembled and glued together according to the master class.

shoe
In a shoe-shaped box you can present sweets, gift certificates, theater, cinema or ball tickets.

The packaging is made from thick paper or cardboard. To do this, cut out a template and bend it along the dotted lines. The part between the heel and the boat is removed. The elements of the product are carefully glued together. The shoe is optionally decorated with paper flowers, rhinestones, beads, and so on.

Dress
The open box is made of colored paper or cardboard. Cosmetics, sweets, jewelry and other small items are packaged in it.

To make it, a template is cut out, bent to give the shape of a dress, and glued together. If desired, the layout can be changed by experimenting with the style of clothing. The product is decorated with rhinestones, beads, ribbons, and lace.

New Year's
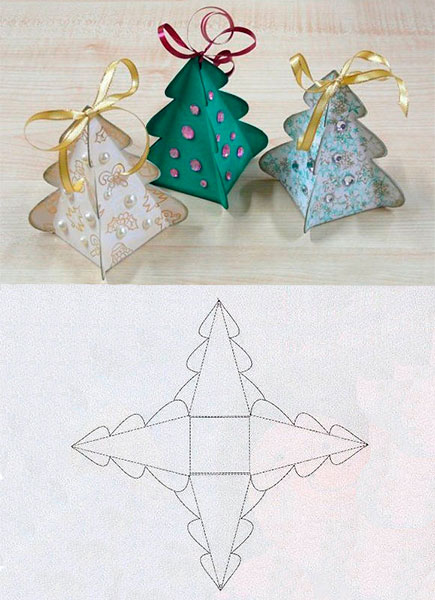
Christmas trees
Sweets, Christmas tree decorations, figurines, etc. are packed in boxes in the shape of a New Year symbol. They can be done in several simple ways.
Option 1


The templates are cut out, and an additional side layout can be used if desired. It is printed on another, preferably bright-colored, paper in the amount of 6 pieces and pasted on the Christmas tree.


Crafts are carefully folded along the dotted lines. The ribbed side projections are carefully glued together; for this you can use Moment glue. The bottom is secured using recesses that are inserted into the slots.


Additionally, the Christmas tree is decorated with beads and rhinestones. You can cut out a star and secure it to the top with a colored toothpick.
Option 2
The instructions for making the box are as simple to follow as possible and are suitable for working with young children.

Print the template or create a similar one yourself, adding new elements. The layout is cut out, bent along the dotted lines, and the side protrusions are carefully glued together.
The craft is decorated with beads and rhinestones, imitating Christmas tree decorations. To hang a box on a Christmas tree, ribbons, ribbons, and strings are attached to the top.

Snowflake
The shaped box is made on plain white paper or cardboard. The rays of the snowflake make the packaging closed, forming a kind of lock.

The template consists of 2 parts: the box and its bottom. The layouts are cut out, folded along the colored lines, and the side parts are glued together.

The upper elements of the box are alternately connected, securing the snowflake rays together. The bottom is glued to the folds.


With Santa Claus
The box is made of thick paper or cardboard. The packaging is suitable for sweets, small gifts and surprises.

The finished template is printed on a color printer and cut out. You can stick it on cardboard if you need durable packaging. The product is bent and the elements are fastened, forming a box.
With a snowman
Packaging is done on white paper or cardboard. The product does not require additional decoration.

For manufacturing, a template is cut out, the elements are folded and fastened, forming a box.
Valentine's Day
Valentine boxes are ideal for surprising your loved ones. There are several ways to create heart-shaped packaging, all of them are simple to implement and take a minimum of time.
Valentine 1
Make a box from thick paper or cardboard. The use of glue is not required; the heart at the top of the product forms a lock.

The template is printed on a color printer and cut out. If you wish, you can create your own layout according to the proposed scheme. The product is bent along dotted lines, and cuts are made along solid straight lines. The halves of the hearts are connected by inserting one into the other.

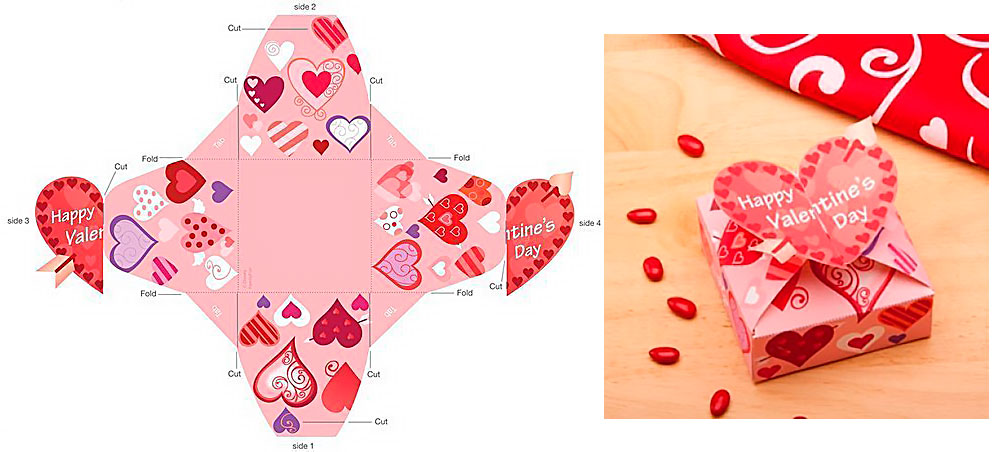
Valentine 2
The heart-shaped packaging consists of a box and a removable lid. The product is made from paper or cardboard.

The template includes 4 parts: the sides of the box and the lid and the bottom for them. The elements are cut out and bent along the dotted lines in the shape of a heart. The bottom of the box and the top of the lid are glued to the corresponding folds.


Valentine 3
To make packaging, double-sided colored paper or cardboard is used.

The template is cut out and folded along the dotted lines. The result is a square box, the halves of the heart are connected to each other, forming a castle.

In the style of “Love is...”
The design of the original packaging is based on the famous chewing gum “Love is...”. The box is ideal for gifts to loved ones.

The packaging is made of cardboard or thick paper. To do this, print and cut out a template consisting of 2 parts: a box and a removable lid. The product is folded along the lines and glued together. The packaging can be decorated with ribbon.


Birthday
Gifts for the birthday person can be packed in any boxes, decorating them with thematic images: balloons, cake, age, candles, crackers, confetti and so on.
Cake 1
The product is a closed package with a removable lid.

For manufacturing, a template is cut out, consisting of 2 parts: a box and a lid. The layout elements are folded along the dotted lines, and the contacting parts are glued together. The packaging is decorated with a burning candle made from rolled paper or a cut-off part of a cocktail stick, and an artificial flame.

Cake 2
The box is made mainly of colored paper. It is convenient to use a glue gun to glue elements together.

2 strips are cut out of a sheet of paper, one of which is 2 millimeters longer than the other. At a distance of 5 millimeters from the edge, a vertical line is drawn on both parts. 
Strips are bent along it and fringe is cut into narrow pieces. Then 2 cylinders are formed from the parts, gluing the edges.

A larger cylinder is outlined, a circle is cut out, and glued to the bottom - this part is the lid of the box. The second circle is drawn with a diameter 4 millimeters longer than the previous one. The circle is attached to a smaller cylinder to form a box.

The packaging is closed with a lid and decorated with lace, fringe, braid, and ribbons. Candles are made from cocktail tubes cut into pieces. The flame is made from pieces of yellow paper. The candles are glued to the lid of the box.

Box with removable lid
The packaging is a retractable box made using the origami technique and a removable lid with an open top. The product is made of thick paper or cardboard.

An origami box is assembled from a square sheet according to the proposed scheme. The dimensions of the product are arbitrary.

When making a lid, cut out a strip of paper, marking on it the parameters of the box - the bottom and sides. According to the photo of the master class, a square-shaped slot is made in the middle of the layout. The lid is assembled and glued. If desired, it is made closed, by attaching a square cut from a file to the back of the slot. Decorate the packaging as desired with ribbons, cards, lace, stickers and other elements.

Wedding
Gifts for newlyweds, invitations and surprises for guests are packed in boxes.
Tuxedo and wedding dress

A tuxedo box is made using a template, which is transferred to cardboard or printed on paper. The layout is cut out, folded along the dotted lines, and glued together. A cut is made in the area marked with an arrow, and the elements are folded outward to form a tuxedo collar. The contacting parts are glued together, the recesses are inserted into pre-made slots. Decorate the box with a fragment of a shirt with a bow tie and a handkerchief in your pocket.

To make a wedding dress, the template is printed on white paper and cut out, the product is folded along the dotted lines, and glued. The packaging is decorated with ribbons, lace, rhinestones and other attributes.

Handbag
The box is made in soft colors and decorated with a bow.

The template is cut out and the elements are bent. Incisions are made in the marked areas, and the area under the handles is removed. Assemble the box in the form of a handbag, connecting the parts using slots and glue, and attach a bow.

Bonbonniere 1
A package of sweets is presented to guests as a sign of respect and gratitude.

The template is cut out, bent along the dotted lines, forming a pyramid, and the side ribbed parts are glued together. In areas marked with a “plus”, punctures are made using nail scissors, a stationery knife, a hole punch, and so on. Ribbons and strings are inserted and tied into the hole. The packaging is decorated with the names of the newlyweds and the wedding date.
Bonbonniere 2
The candy box is presented in an original shape with a rounded bottom.

To make the product, print out and cut out the template, carefully bend it along the dotted lines. In order for the rounded edges to bend beautifully, it is recommended to first draw a knitting needle or nail scissors along the contour, leaving a light furrow. It is important not to damage the paper sheet. Contacting elements are glued together. In areas marked with a “plus”, holes are made into which ribbons, ropes, ribbon, etc. are inserted. The names of the newlyweds and the wedding date are marked on the box.
When it comes to giving a gift, packaging is one of the most important elements. Regular gift wrapping has almost gone out of fashion; I want to pleasantly surprise a loved one, starting with the wrapper.
But gift boxes are not cheap. This problem can be easily solved, you just have to learn how to make cardboard boxes with your own hands.
DIY square box
A square box is the simplest and most common option for gift wrapping.
It’s not difficult to do, the main thing is to follow the instructions and choose the right material.
You will need:
- Scissors;
- Pencil;
- Ruler;
- Thick cardboard;
- Template (alternative to ruler and pencil);
- Glue or double-sided tape.
To begin, select a sufficiently durable material from which you will build the box.
You can take a plain white option and color it yourself, or by finding a template on the Internet.
When the template is ready, it's a small matter. Cut out the printed or drawn sketch, bend the cardboard along the dotted lines, and glue using the semicircular ends. The matter remains with the lid, which is also done according to the usual scheme, the main thing is to take into account the dimensions of the box.
Take a square sheet of paper and mark it diagonally. Then bend any of the corners to the intersection of the diagonals.
Then fold the same edge again so that this side coincides with the diagonal. After these manipulations, unfold the sheet. You should get clearly defined lines.
Do the above steps for the other parties. Each half of the sheet will be divided into four parts.
Make cuts from the top small “triangle”, crossing the top three lines to the last bottom one.
The sheet is cut from two opposite sides. The whole sides are folded once towards the center, the second time, bending them upward. The sides fold inward.
Apply glue to the small top triangles and bend them inside the lid. The box is ready!
Rectangular box with hinged lid
A box with a hinged lid is easier to assemble because less materials are used and less time is spent.
In order to make such a gift box you will need:
- Scissors;
- Thick cardboard (the color is at your discretion, on plain white you can print a beautiful drawing and also color it yourself; colored cardboard will save you from unnecessary hassle);
- Scissors or stationery knife;
- Pencil and ruler (if you want to draw a template yourself);
- Glue.

First, create a template. Draw it or download it from the Internet. Downloading from the Internet will allow you not only to get a template, but also to beautifully color the cardboard.
Carefully cut out the resulting template along the lines. Next, it’s a small task: fold the box along the dotted lines and glue it at the joints.
To ensure that the material sticks together, do everything slowly and press the edges tightly. The box needs a little time to dry. After this, if you used plain, unpainted cardboard, decorate the box to your liking.
DIY round box
 This type of box is a little more complicated than a square or rectangular one, but it looks much more beautiful and is also practical for further use.
Despite the complexity of assembly, making such a box at home is simple.
You will need:
- Cardboard or thick paper;
- Compass;
- Double-sided tape or glue;
- Pencil;
- Scissors or stationery knife;
- Ruler.
You can download the template from the Internet, but you can also make it yourself. To begin, draw 6 circles on paper using a compass.
Three of them should be slightly larger than the others - they will go on the lid. Two strips are also cut out, one for the lid, the second for the base.
The length of the strips should be equal to the radii of the circles. When cutting strips, you need to add 2-2.5 centimeters to the width.
In this space it will be necessary to outline and cut out the “teeth” with which the work will be glued together.
After drawing the template, carefully cut it out. Take one circle and a strip. Lubricate the “teeth” well with glue and carefully begin to fasten the side wall and base.
Let the material dry, and then compact the workpiece - take the two remaining circles of the same size and carefully glue them on both sides of the base, thereby covering the seams.
Carry out the same manipulations with the other part of the box. When finished, let your craft dry and start decorating.
Strict style
 You can easily create a box without a lid that will close.
This is done using a simple template that you can draw yourself, or you can take it from the Internet.
In any case, you will need:
- Cardboard;
- Glue;
- Pencil and ruler;
- Scissors or utility knife.
In general, the principle of all homemade boxes is approximately the same - you need to cut, bend, glue according to a template, and then decorate to your liking. This case is no exception.
Draw a template or download it from the Internet. Carefully cut out the future box, fold along the dotted lines, and glue on the sides. The box will close at the top.

There are many types of boxes that you can make from cardboard with your own hands. Templates are easy to find on the Internet; the assembly principle is approximately the same for all. Therefore, it will not be difficult for you to choose an option for the occasion.
Greetings to all of you, dear audience. Holidays never end for us all our lives - as soon as Someone’s Birthday has passed, the New Year has already arrived, and then there are other winter-spring holidays... And for each of them we give gifts that we want to present at least interestingly. And what if not a DIY gift box will help with this?
I myself really like to congratulate my relatives in an original way. It’s very nice to see the smiles of those you congratulate. And cute boxes always contribute to this! After all, they are the first thing that catches your eye when presenting a gift.
How to make a gift box with your own hands
Gift packaging can be very diverse. But there is one rule - the cardboard or paper from which you want to make a box must be of the required quality. In this sense, classic children's cardboard is far from suitable.
Where can I get such cardboard or paper? First of all, in specialized stores for creativity or even scrapbooking separately. It’s good if there is such a store in the city, you say, but what if you don’t have one at hand or the prices are sky-high?
These leaves will be enough for you to make small souvenir boxes (for jewelry, sweets, toys, etc.). Your family will appreciate it
And now I suggest you proceed to the actual detailed photo master classes, which will also include a diagram for creating each individual box.
Master classes on creating boxes from cardboard and paper
Small boxes
First of all, I want to give you 5 designs with very cute patterns that will make this wonderful packaging:

The first one has red roses. If you want to impress your lover, then she is definitely for you.
Principles of working with templates:
- Print the layout you like on thick paper.
- Cut out the future box along the contour and cut in those places where there are straight lines (focus on the light scans - the location of the lines is the same everywhere).
- Fold the box along the dotted lines and glue it so that the parts with semicircular ends lie between the other two and the round ends point up.
- That's it, all that remains is to bend the lid properly.


And again roses, but more delicate.

And now there are two options for Birthdays - candies with balls and lollipops.


Large rectangular
This is perfect for large gifts (for example, wall clocks). You will need specialized binding cardboard to make the box really convenient. By the way, binding cardboard can also be purchased in specialized stores or on Ali.
The incision sites are marked in orange. The lid can be made the same way, but with slightly larger dimensions (2-3 mm).

For a man
If the gift is intended for a man, then I suggest choosing one of the following options.
Simple shapes are on trend - this is proven by the following 4 templates for creating strict, classic boxes. For these you will again need thick cardboard.


If the gift is intended for a loved one, then there should be more than enough romance ^^ There are butterflies, hearts, and all kinds of declarations of love. They can be made from thick cardboard or thick paper.


Heart
Heart boxes are very popular because you can use them to express your feelings. Or admit them


Cake
Are you getting ready for a party where everyone will need to be given a little surprise? Or maybe a wedding is planned? In both cases, cardboard pieces of cake will come to the rescue.
A beautiful and clear diagram is suitable for both the bottom and the lid.

Paper boxes
Boxes don't always need to be dense - sometimes it's enough just to create a beautiful picture. Then I suggest you use this convenient scheme of 6 different packages:

If you are going to a child’s party (or maybe you want to please your child), then make him a cute box in the shape of an animal.

Give such a boot to happy parents. Follow the traditions: pink for girls, blue for boys.

Boxes for the New Year
The mood can be created not only with the help of gifts) Just look at these 8 lovely boxes, each of which can also become an excellent New Year's decoration
This is especially necessary if for some reason there is no New Year's tree. The main thing in this packaging is to trim the edges beautifully and neatly.
Snowflake
Of course, this box itself is wonderful, but the silver paint on the tips of the snowflakes can add some zest.
Tip: Give something in this package to a girl who loves Frozen.

Bag
For giving a gift - one of the simplest options.

Box of sweets
For all lovers of beautiful New Year's favors and quick handmade items! Take a plastic cup with a smooth surface, cut the edge and cut the edge.
Fold the cut pieces inward so that they cling to each other. Place some goodies inside and cover the top with something cute.

Another option for candy packaging is a donut. It is a little more labor-intensive, but more effective.


How to decorate a box with your own hands
The design of the box can be very diverse - from simple shapes in the form of birds and hearts to intricate flowers and bows. I will write more about box decor in the future - don’t miss it.
In the meantime, subscribe and comment - see you soon!
Sincerely, Anastasia Skoracheva