Corrugated paper flower size. Master class, corrugated paper.
Have you just celebrated a friend's birthday, is it already a colleague's anniversary at work? Celebrated the anniversary, you need to go to congratulate the boss? The boss was congratulated, no idea how to surprise a picky aunt / grandmother / mother-in-law / mother's friend / neighbor? Come on, come up with a gift for someone who has everything. You just need to surprise this person with your skill and a gift made with your own hands from the heart! And for this, large paper flowers are suitable. By the way, if you still have a gift, then the box in which it probably lies can be decorated with paper flowers instead of the usual packaging.
corrugated flowers
Large, voluminous DIY flower installations can be done very quickly and at minimal cost. Corrugated paper is not very expensive, it is sold in rolls and is enough for many products. So get ready:
- paper;
- glue gun;
- scissors;
- a skein of thread;
- wire.
To make large flowers, we need a petal template. It can be cut out of cardboard and attached to corrugated paper.
Now you need to think about the core: it may consist of many small petals or you will need to prepare the stamens. Also, before assembling, consider whether the flower is meant to be wall-mounted or whether it will be on a stem. If the latter, then wrap the wire with green paper and start assembling the flower from the middle, i.e. from the smallest petals, using glue in the form of a gun.
The core of such a flower can also always be a delicious chocolate candy. It is attached to the wire and only then decorated with petals. It turns out a very original and useful bouquet.
In a similar way, using a stencil, you can create large interior roses that are placed in glass vases. There may be several such vases in the apartment.

giant peonies
How to make large peony flowers from crepe paper? In the interior, they look just gorgeous. By the way, you can even make a very interesting headdress, so take the following:
- several rolls of corrugated or crepe paper in suitable colors;
- glue;
- thread and needle;
- a balloon the size of a head;
- newspaper for papier-mâché.
First you need to make a base from a newspaper and a papier-mâché ball. On the ball you need to stick squares or strips from newspapers. There should be a lot of layers so that the base is dense. Leave the base for 24 hours until it dries, then gently deflate the balloon and cut the base.

Now you need to put one half into the other and sew them along the edge. It is also desirable to glue the edge of the halves.
Now let's start making petals. They should be of different shapes, prepare a stencil so that it is convenient to cut them out.

There should be really a lot of petals and they should be diverse.
![]()
Each petal must be cut in an amount of at least 10 pieces. Now each petal needs to be well stretched, and the base bent a little to the side so that you can later glue it to the base. The petals should be voluminous, this is the main point in the question of how to make high-quality large flowers from corrugated paper.

The thinnest petals go to the center, place a little more petals around the core, there may be a small distance between the rows. The edge of the workpiece also needs to be pasted over with paper of the same color.

Continue to fill the space with petals. Take your time before gluing, attach the petal, see how it will look.

Now you will need to prepare several very large petals, which will go to the external design of the workpiece.

As a result, you should get such a chic peony that can be used as a headdress for the holiday.

You can present such a flower as a birthday gift to a child. The birthday girl has never had such a charming gift.
In addition, such flowers can be used to decorate a wedding venue.

The master class of large paper flowers continues, the giant dahlia is next in line.

Such a flower can be made using a ready-made pattern, or it can be made from many petal details. So we will do. These do-it-yourself paper flowers are very easy to make. What we need?
- thick double-sided colored paper;
- PVA glue;
- scissors.
Cut out a circle for the base from the same paper. Then you need to cut a lot of squares for future petals, the larger the square, the larger the flower will turn out. Then each klaptik needs to be folded into a paper envelope, rolled up in the shape of a horn.
After that, all the horns need to be glued to our base, following the order, so that you get such a beautiful flower made by your own hands.

growth flowers
Large crepe paper flowers can be made even easier, with little to no stencil and lots of detail. Using this method, you can make growth flowers. These decorations are perfect for decorating a festive interior and will be the subject of attention for photographers.
To do this, you need to cut out a lot of circles from corrugated paper, they must be of different sizes: from huge to the smallest. The edge of the workpiece can be slightly processed with scissors - cut off with a wavy line. After that, all the blanks must be folded one into one, fastening the layers with glue.
In general, on our website you will find a lot of interesting workshops on large paper flowers, including full-length flowers.

There may be several such paper flowers around the room, but do not overdo it. Let fresh flowers be placed on the table. A huge rose can become the queen of the holiday.
According to the same principle, according to MK, peonies can also be prepared.

floral wall
Floral panels look very beautiful in the interior. It can consist of both multi-colored huge flowers, and flowers of the same color. Remember all our MK colors and create.

And here is a bright, but at the same time very delicate paper panel, a win-win option for a photo wall:

A wall of solid white flowers looks very gentle and beautiful.

Making large flowers out of paper is a real pleasure, a certain philosophy, an art. We offer you to watch a video master class on creating these wonderful jewelry:
Flowers are used to decorate most holidays. They can be huge for party decor, delicate for a bouquet, or with a sweet surprise inside. Such flowers can be made with your own hands from crumpled paper, which will not fade for a long time.
How to make crepe paper flowers for a party
Large flowers, also called pompoms, will become a bright decoration of the party. When choosing such a decor, consider the color scheme of the holiday.
For huge peonies, prepare:
- corrugated paper 7 colors;
- stationery clips;
- thin wire;
- scissors and thread.
- Unroll each roll of paper completely. Then fold in the form of an accordion, starting from the narrow part of the sheet. In this case, the thickness of the fold should not exceed 5 cm. Do not try to make the folds even, for this flower it does not matter.

- Secure the folded paper with paper clips on one side. So the edges of the paper will be in the same position.
- To create volume at the flower, it is necessary to cut the blanks. Arrange the colors in the desired order and cut each one 2 cm shorter than the previous one.

- Make the ends of the strips pointed or rounded. The more careless the cut lines are, the more natural the flower will become. Move the clamp to the center of the workpieces.

- Form petals. To do this, cut the fold lines on all four sides, but only to the middle.

- Remove the clip and unroll the paper rolls. Arrange the blanks on the table according to size. Lay the largest sheets first, then the medium ones and then the small ones on top.

- Wrap the paper together as a roll so that the smaller size is on the outside of it. Tie the wire in the center of the workpiece.

- Fix the wire on the roll with several turns around the axis. Fan out the edges of the paper.

- Lift one edge of the petal and press it to the middle. At the same time, slightly spread the workpiece in width with your hands.

- Bend in this way all the petals of the same color. Only then proceed to another shade.

- As you move on to the next circle of petals, lightly pinch all the leaves at the base where the wire is. This will give volume to the finished decor.

- If you find wide strips, you can cut along with scissors. But do not make petals too narrow, they will not hold their shape.

- Peony ready!

- You can decorate trees with them if the holiday takes place on the street.

- Or decorate a room for a celebration.

How to make crepe paper flowers for a bouquet
More delicate flowers are obtained for a bouquet. They have a small bud and stem. For crinkled paper chamomile you will need:
- yellow woolen and silk threads;
- white and green crepe paper;
- floral wire;
- stationery clips;
- green teip tape;
- glue, scissors.

- Place two fingers together and wind yellow yarn around them. The more layers you make, the more magnificent the center of the flower will be.

- Remove the threads from your fingers and tie them in the center. Use thin or woolen thread for this.

- Cut the yarn on one side. If necessary, trim the ends with scissors.

- Cut the wire into stems of the desired length. Apply glue to one end of the wire and fix the threads on it. Glue the part of the core that is not cut.

- Hide the junction of the threads and wire with teip tape. Wrap it around the workpiece several times.

- Cut white crepe paper into rectangles. Fold the workpiece to the height of the figure. Its length will correspond to the volume of the flower, and its height will correspond to the length of the petals. Clip the paper on one side. On the other side, make cuts in the form of strips.

- Give each strip an oval shape. Cut out the flower template carefully as the paper is thin.

- Expand the strip along its entire length and slightly spread each petal in its widest part.
![]()
- Attach the solid edge of the workpiece to the middle of the threads. Gradually begin to twist the paper around the wire.

- Continue winding the petals until you use the entire strip.

- Cut off a small piece of teip tape, cut it into narrow strips from one end. Then twist each part into a tube. Attach the resulting blank to the back of the bud.

- Decorate the white paper on the bud with green tape. It is not additionally fixed, since it has an adhesive base.

- When the flower is ready, slightly spread the petals and form a bouquet.

How to make crepe paper flowers with candy
Bouquets of sweets, which are decorated in the form of flowers, are becoming increasingly popular. Making such a sweet surprise is very simple.
- Cut crepe paper into strips.

- Roll a few times.

- Cut out the petals in an oval shape.

- Using a skewer, twist the wide part of the workpiece to the outside.
![]()
- Stretch the middle with your fingers to give the petal a rounded shape.

- Attach the candy to the skewer.

- Alternately apply the petals to the candy and tie them with a thread.

- Cut the green paper into narrow strips and wrap them around the skewer.

- Make several flowers in this way and collect them in a bouquet.

Making flowers from corrugated paper is quite easy if you follow these master classes clearly.
For another way to create flowers, see the video:
There is no occupation more pleasant than sculpting flowers, but it is better suited for this corrugated paper, handmade flowers always turn out more interesting than any store-bought artificial flowers. I want to offer you some entertaining options that are not at all difficult to cope with, and the result will pleasantly surprise and delight you, you can also involve children in this useful work, especially since we also prepared with simpler crafts.
Do-it-yourself corrugated flowers master class
Let's try to do something for the soul, in winter there is not enough sun, therefore, what can be more cheerful than sunflowers. These delightful plants are rightfully considered a symbol of the sun and summer. Here is the inventory that we need to create this little miracle: corrugated paper in dark brown, beige, yellow and grassy colors, stationery glue - a pencil, a twig, wire or thread, scissors.
We start by making the core, for this, cut strips about 6 cm wide from dark brown and beige corrugations. We cut one long edge of both strips so that a small fringe is obtained. Stretching the strips a little, put them together, then roll them into a tight roll, wrap the base with wire or thread so that the middle does not fall apart. We straighten the upper part with fringe into a fluffy circle.

To get sunflower petals, as it is also called, we cut 6x3 cm rectangles from yellow corrugation, cut off the upper edges to give a sharp shape, form the desired shape with our fingers, rolling the edges a little. For the flower, sepals will still be needed, we make them the colors of the grass like petals: we remove the upper corners and roll the edges with our fingers.

The leaves of a sunflower have a peculiar shape, a bit reminiscent of a heart, besides they are quite large, we make rectangles of 10x6 cm in size from green paper, cut out a plump droplet from them, and tuck the edges. We fix the leaves with glue on the wire - these are the stems, first mask the wire with a thin strip of green corrugation, smear one edge with glue and wrap the stem diagonally along the entire length. When all the components are prepared, we proceed to the assembly, turn the core with the fringe down, glue it evenly around the base with yellow petals, leaving small gaps, then glue the second and third row overlapping into gaps. Next, we fix the sepals in one layer with a slight overlap, now the sunflower itself is ready, now it is necessary to fix the main stem.

We thickly smear one end of the branch with glue and insert it into the warping of the sunflower, if necessary, you can additionally wrap it with wire. Now, in order to hide the unnecessary and make the transition from the cutting to the inflorescence, we take a piece of green paper 10-15 cm wide, 20-25 cm long, twist the long edge a little, and place the segment around the stem so that it hides the connection of the branch and inflorescence. We wrap the trunk with a corrugated ribbon, parallel winding the leaves along. The sunflower is ready for this, make some of these charming flowers, put them in a vase and you are guaranteed a great mood.

When it comes to flowers, the first thing that comes to mind is roses, where without them, a rose is a symbol of spring, love of beauty, they come in a wide variety of colors, sizes and even shapes. Let's learn to do corrugated flowers do it yourself roses. I can say that there are a lot of options for making roses, each of them is good and beautiful in its own way, we will consider two interesting ways, simpler and more complicated. For the first method, you will only need corrugated paper of any color to your taste, thread or elastic, it will take very little time, so this option is especially good when you need to arrange a large composition in a short time.

Take a corrugation of the chosen color, for example, scarlet, you need a segment about 25 cm wide, fold it in half along the entire length, while stretching the fold a little. Now you need to make twists along this fold - twisting, reaching the edge, bend it more than the rest of the tape, it remains to twist the resulting workpiece into a roll, do not make it too tight, giving it a round shape, straighten the slightly impromptu petals, we tie the base of the rose with threads. Such roses are well suited for decorating gifts or a room, you can slightly modify the blank and arrange a beautiful bouquet.

Corrugated flowers do-it-yourself roses
The next option is a little more complicated, but the result can hardly be distinguished from real roses. We will need: corrugated paper in three colors: green, pale pink, hot pink, artificial twig with leaves, floral green wire, hot gun, scissors, pencil or brush.

First, we take a bright pink piece of paper about 8 * 14 cm in size, you can adjust the size yourself, depending on what size you want to get a rose. We fold the segment in half, round the upper edge slightly with scissors, now stretch the edging a little, expand the segment - this will be the inner petal - the base, to make the product more voluminous, wrap the candy (or you can crumple a small ball) with this sheet, fix the base with clerical gum or threads. The tip is cut in the form of a tooth. Floral wire will serve as a stem, insert it into the base of the bud.
Let's start making the rest of the petals, fold the bright pink corrugation 8 * 14 cm in size, put it in four layers, cut out the petal, four at a time, now with a pencil or any thin stick we bend the edges of the petal, giving it a natural shape, distribute the petals around the harvested bud is slightly overlapped.
We will make the outer row from a pale pink color, we need a segment of 10 * 16 cm in size, we fold it in the same way as the previous one - in four, cut out a petal with slightly larger indentations along the outer edge, shape it with a pencil and place the second row around the bud. To decorate the base of the bud, take a small green segment, cut one side with deep cloves of different sizes, twist them a little with your fingers. We cut off a ribbon about a centimeter wide of the same color, wrap the blank around the flower, fix it hot with a gun to hide the joints, wrap it with ribbon, going down to the very bottom of the stem.

To make the flower more elegant, you also need to make a bud, everything is easier here, take an unnecessary bead, a small piece of pale pink corrugation, wrap the bead around it, fix the lower edge with an elastic band, and fold the upper edge with your fingers to form a peduncle from green corrugation, make a segment with twisted cloves and wrap the bud as well as the rose. We insert the stem into the base of the bud, wrap everything with a thin green ribbon.
It remains to assemble the structure, we attach stems with a rose and a bud to an artificial branch, wrap a green ribbon over the joints, straighten the petals, voila - a delicate rose branch is ready, again, if desired, you can make a whole bouquet, alternating colors. Also from corrugated paper, including from such roses, you can make delicious topiaries, as shown in detail in ours.

Charming crocuses are reminiscent of spring and can be a great gift for any holiday or interior decoration. To make them yourself, you don’t need so much: corrugated paper of several lilac shades, green and pale yellow, toothpicks, some thin wire, glue, semolina, scissors, well, you can’t do without diligence.
First, we will make the base of the flower - the stamens, for this we cut a small piece of pale yellow paper into strips a little less than a centimeter, twist each of them into a thin bundle, fold the segment, while straightening the flagella a little to the sides, fix the lower edge of the stamens with wire. Now we dip the very edges of the stamens in glue, and then in a bowl of semolina, wait until everything dries, so the stamens will become as similar as possible to real ones with pollen.

Now we will make the petals, for this, fold the lilac segment several times and cut out oblong petals, each one needs to slightly twist the edges with your fingers, on average you need six such petals per crocus. We wrap the stamens with overlapping petals, straighten them to give the flower the correct shape. We wrap the base of the crocus with wire and insert a toothpick as a stem.

We wrap the toothpick itself with a thin ribbon of green corrugated. Next, you need to make leaves, for crocuses they are long and sharp, so we cut green paper into strips, about 1.5 * 10 cm, sharpen the upper edge, tuck the edges slightly, attach the leaves to the base of the inflorescence with glue. If you make a lot of these crocuses of different shades, you can arrange a delicious basket, this is a great idea for a gift for March 8 to your beloved grandmother or class teacher.

A delightful magnolia will become a real decoration of the interior of your home, they look sophisticated and delicate, it is not so difficult to make it, especially after looking at our master class with step by step photos handmade ruffled flowers. For crafts, you need to pick up a beautiful branchy twig, cream and pale pink corrugated paper, also light green and green, threads or wire, scissors.

First, prepare the branch, remove all excess processes, cut it to the desired length. For the flower itself, we make petals, there are six of them each, the petal itself will be cream-colored, and the core will be pink. The petal should be elongated with a slightly pointed end, this is clearly visible in the photo. The core should occupy no more than a third of the petal, so prepare a creamy cut 18 * 4 cm in size, fold it six times with an accordion, draw the outline of the petal with a simple pencil, then carefully cut it out with scissors, for the middle we will take a pink cut 6 * 3 cm in size, so fold it six times, cut off the upper edges to give a sharp shape, also cut off the sides literally 1 mm each.

We grease the blanks with glue and put them together so that the middle is in the center of the petal from the inside. The edges need to be tucked out a little. The pestle is made from green corrugations, just take a narrow strip, fold it in half, then fold the edge with a fold. When the pestle is ready around it, we place the petals with a pink center inside, we wrap the base with wire, without cutting the ends, we wrap the wire with a thin light green ribbon forming a trunk.

The flower needs to be slightly carelessly straightened so that it looks like a real one. Similarly, we prepare several such flowers, 5-6 can be, depending on the size of your branch. To make the composition look more harmonious, we will make several buds, for this we take a small piece of cream paper, fold it several times along, and then in half, twist the bud with our fingers to give it the desired shape, tie the base with a wire rod. Sepals need to be made in a sharp triangular shape, twist the edges, as we did earlier. Attach the sepals to the bud.

Now you can start assembling the composition, attach magnolia flowers to larger branches, buds to small ones, decorate the junction with a narrow ribbon of salad-colored corrugations. We correct the leaves and petals, look what a delicate twig we got. To create beautiful colors, not only corrugated paper is suitable, but also cardboard and other types of this material, a storehouse interesting ideas you will find in our next master class. We wish you pleasant creativity and more creative ideas!
Modern mothers tirelessly monitor the development of their children: educational toys, pencils and felt-tip pens of all stripes, designers, Lego. What else is missing for a small person? Everything is trite and simple: the child lacks creativity. In order not to leave this niche of the child's consciousness unfilled, we will teach you how to make various crafts. This article will be relevant for mothers with small daughters: the text will tell you how to make flowers from corrugated paper with your own hands in stages. Photos courtesy of craftswomen of all ages will inspire you and your child to new crafts.
Black and pink flowers
Make such lighter than easy: stock up on scissors, corrugated paper, thread and a good mood.
Fulfill simple instructions to make a bouquet of black and pink flowers. It is better if you explain the principle of the craft to your daughter before the process begins. Let your child complete all the steps of creating magnificent flowers. Go:
- cook corrugated paper two contrasting colors: in our case it is black and pink. Let your daughter choose color scheme at her discretion: do not worry if the child prefers colors that do not match - the child's vision has not yet been formed. In addition, where should it be formed, no matter how creative flight of thought?
- Prepare a petal template on a regular sheet. First cut out rectangles 3 * 5 cm, then give them a rounded shape at one end.
- Fold pink crepe paper into several layers, attach the stencil. Align and attach to paper with sewing needles. Cut out. Do the same with black paper: after cutting out the petals should be less than pink ones.
- wrap the raw part of each petal with a thread in color. You should get corrugated "spoons".
- Connect several rose petals, holding them by the leg (the place where the thread is attached). The more petals connected, the denser a corrugated flower will be stuffed.
- Frame the flower with black petals around the outer circle. Fasten the workpiece with a common thread.
To speed up the process of creating flowers from crepe paper, twist your legs petals. Use a common thread to secure.
 To fulfill cornflowers, get paper saturated of blue color. stock up wooden stick (this can be a sushi stick or a twig from a tree).
Perform cornflowers according to the instructions:
- Expand blue crepe paper. Width paper sheet will be the length of the tape that you later use to make a flower.
- Cut the paper into stripes 3-5 cm wide. The choice of width depends on the purpose of production and the overall composition of the bouquet. One strip of a given width is enough for one cornflower.
- Cut the strip with a fringe. Intact the edge must be at least 1 centimeter.
- Wrap the cut strip in a sausage. Put the sausage on a wooden stick and tie tightly with a thread.
- Use paper in a contrasting color to make flower bed and wrap the stick.
Beautiful a cornflower blue bouquet will complement the delicate nursery of any girl.
Large flower for the interior
 If the child decides refresh room, suggest interesting option decorations big flowers from corrugated paper. Instruction to a stylish decor element is given in the photo. Follow the steps and in 30 minutes you will get a beautiful flower that the baby is not ashamed to show to his guests.
Large corrugated paper flowers will help to decorate the room and give it a festive look. They are popular at children's parties, perfectly complementing colorful balloons, posters and giving the room brightness and exclusivity.
To make such masterpieces is not difficult. Kids will need a little adult help to make their own giant crepe paper flowers.
To get a beautiful and spectacular product, you must first choose the right corrugated paper. It must be flexible and durable at the same time. Keep in mind that a product made of high-quality material keeps its shape and does not tear, does not change color when in contact with glue and does not spread. Corrugated paper made in Italy is of the best quality.
The size of the finished product is about 40 cm, and it will take only 20 minutes. To get started, you need to prepare a work surface or table and materials:
- 3 sheets of corrugated paper measuring 50 * 80 cm of the same or different colors. A smooth transition from a dark shade to a lighter one will look beautiful (reminiscent of the ombre effect);
- paper scissors;
- stapler;
- stationery glue;
- thick threads of similar color with paper.
To get a spectacular flower, you need to fold 3 sheets of paper on top of each other and make an accordion. The bend of one section should be approximately 5 cm. Next, the semi-finished product is tied in the middle with a colored rope. In this case, you need to leave a long end, they will fix the flower on the wall. The ends of the accordion must be rounded, which will give the petals the correct shape.
The next step is to carefully straighten the sheets, the edges of which are fastened with a stapler. The result is a beautiful three-layer flower. The thread must be passed through the hole, it must be on the back of the product.
The core can be made of paper, the master class for its manufacture is as follows: small sheets of corrugated paper are taken, preferably in a contrasting color, they are folded according to the principle of a large flower, tightly pulled with a thread. As a result, a fluffy and voluminous center comes out, which is attached with glue or sewn with threads to the main product.
Creation of a crepe paper peony
Making a beautiful peony out of paper is not difficult. He will be able to easily compete with the present, but has one advantage - he will please for a long time.
To make a crepe paper flower, you will need:

- 3 rolls of pale pink or deep fuchsia crepe paper
- PVA glue and Moment glue (or glue gun);
- stationery scissors;
- threads;
- Balloon;
- unwanted newspapers.
First you need to inflate a large balloon and tie the hole tightly to prevent air from passing through. Next, the ball is pasted over in several layers with small pieces of newspaper using the papier-mâché technique and left to dry completely. Then it is cut in half, and the top is inserted into the bottom. The joints are stitched with threads so that there is no delamination.
Next, petals are cut out of paper in the form of hearts of different diameters. Should be 6 sizes. Starting with the smallest ones, they gradually stick to the bottom of the cut out ball, forming a flower. After filling the container with the largest petals, the top is pasted over. The final touch is gluing a thread for hanging.
Tissue paper products
To make such a decoration, you will need 6 sheets of paper of the same color, which are cut in half and stacked on top of each other. A stack of 12 layers comes out, which are folded across with an accordion, the bend is approximately 2 cm.
The middle is necessarily fastened with a thin wire for beads. An organza ribbon is attached over the wire, it will serve as a fastener for the future ball. The ends of the product are not rounded, but cut off with a corner in the form of a triangle. Next, you need to very carefully lift all the layers in turn: 6 pieces up, 6 down. The result is a large and beautiful ball that will decorate the room and create an interesting design.
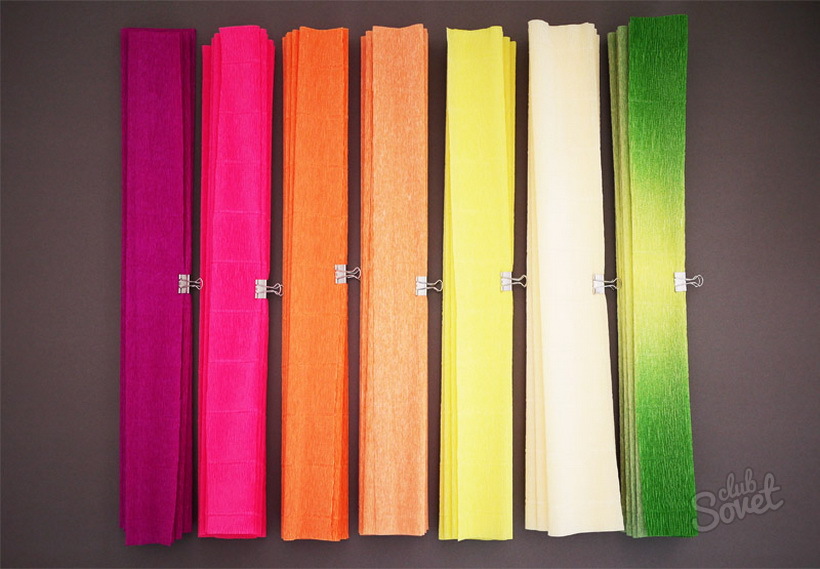
Various color variations of corrugated paper
Spring mood will be created by colorful flowers made of corrugated paper. To create them, you need to prepare:
- 7 colorful sheets, size 50*80 cm;
- 7 large stationery clips;
- thin wire for beads;
- small scissors.
 Lay out the sheets on the table and make an accordion out of each, fixing it separately with a paper clip. Colors can be green, pastel, yellow, orange, red, fuchsia and purple. Starting from green, they are cut to the required size - 20, 25, 30, 35, 40, 45, 50 cm. The edges are cut in the form of a triangle, each fold should be notched, not reaching the middle.
Next, remove all the clamps, and lay the paper in layers one on top of the other. In this case, you need to start with the largest piece, and the smallest should be at the top. They must be carefully rolled into a bundle and secured with wire. Then carefully straighten each layer, lifting it up. An ugly or inappropriate stripe is easy to touch up with small scissors. The finished product decorates not only children's parties, but also parties, wedding ceremonies and school evenings.
Ways to decorate a room
 There are many standard ways to decorate a room, but by giving preference to originality, you can achieve a stunning effect:
- placing large flowers along the path where the hosts or participants of the holiday will pass;
- creating compositions on hoops from several bouquets;
- hanging flowers on silver or gold threads vertically along the entire hall and stage;
- placing colorful bouquets or large crepe paper flowers in the middle of the stage on the wall.
Outdoor wedding ceremonies are gaining popularity, their highlight is graceful flower arches, which are often created from corrugated paper. During a photo session, such flowers will definitely not fade and will look great in any photo, warming the memory with wonderful memories.
Supporters of nature conservation use flowers made of paper not only as decoration for the hall, cortege, but also for the bride's bouquet. Its charm lies in its unfading beauty, and it is both large and light.
Corrugated paper flowers with chocolates inside will be a great gift for any occasion. To create such a masterpiece you will need:
- the right amount of round chocolates wrapped in foil;
- golden foil;
- corrugated paper of several colors, red, beige, yellow and pink are desirable;
- scissors and gold thread.
2 small rectangles are cut out of paper for each flower, one is larger, the other is smaller. Then they must be folded with an accordion and cut the edges, slightly rounding. To make the petals look natural, they are straightened. Each candy is wrapped in gold foil and secured with threads of the same color. Starting with smaller petals, carefully wrap each candy, then straighten and secure with threads. If you make each flower from 3 rows of petals, they will look even more natural and magnificent.
In a similar way, the most beautiful spring flowers are created - snowdrops and crocuses, which can decorate any interior. To create crocuses you will need:

- a piece of yellow corrugated paper from which stamens will be created;
- purple paper for petals;
- long wooden skewers;
- green paper for leaves and stem;
- green threads.
For stamens, yellow paper 3 cm wide and 7 cm long is taken, cut, not reaching the edge, into identical small strips. Then each piece is carefully twisted into a flagellum and smeared with PVA glue so that it does not turn around, and left to dry. After drying, the tips are re-lubricated with glue and lowered into semolina, while they are slightly shaken off to remove unnecessary grains. For the petals, strips are cut out of purple paper, the length of which is 15 cm and the width is 5 cm. They are folded into an accordion, the edges must be rounded. Each petal needs to be kneaded a little with your hands, giving naturalness. Then stamens are taken (5 pieces), and petals are wrapped around each. Everything is fixed with a thread or wire, a wooden skewer is inserted inside.
To get a natural spring flower, wrap the skewer with a piece of green paper and seal the edges so that it does not unfold.
After cutting out a few sharp leaves, you need to attach them to the finished skewer with glue. Creating multiple flowers with the kids guarantees a great time and decorating the room.


