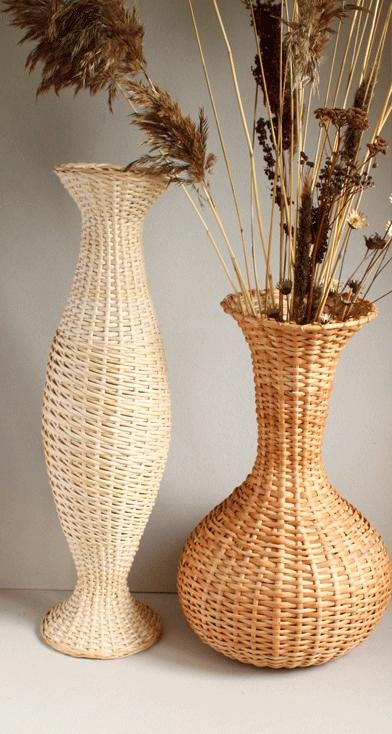
How to make a large vase. Alterations: Spectacular vases from glass jars and bottles
Have a desire to experiment and do something with your own hands? Have you been dreaming of a bright accent in a boring interior for a long time? Or maybe you don't know what to do with your child? In this case, we suggest you make a vase with your own hands. Different materials can be used for this, for which there is only enough imagination and desire, and in this article we will consider the most popular and simple ways to make a vase that do not require special skills and costs.
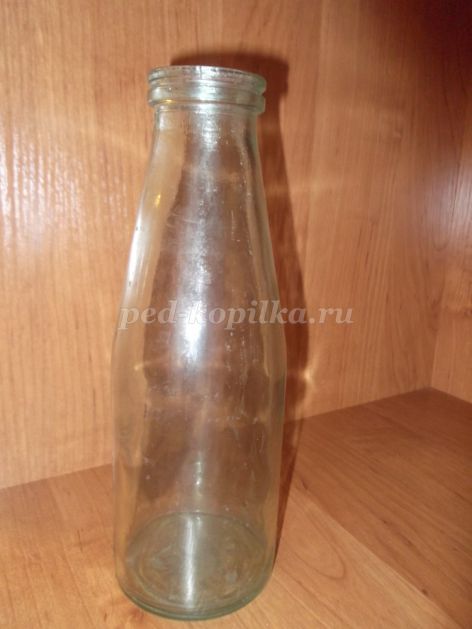
How to make a vase from a waste glass container
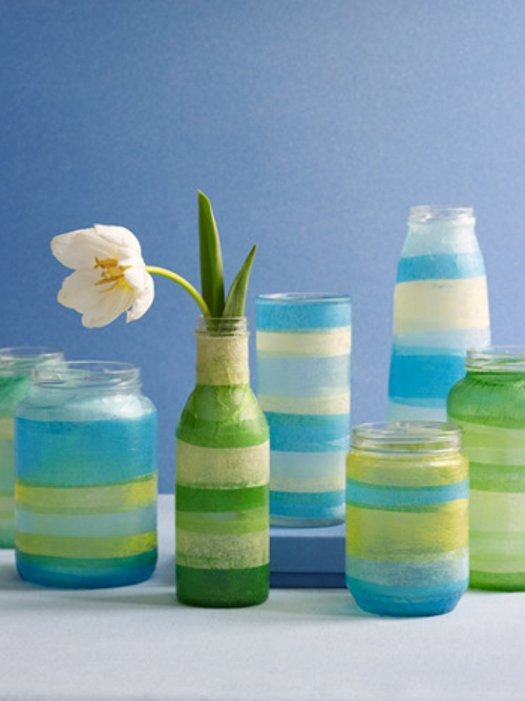
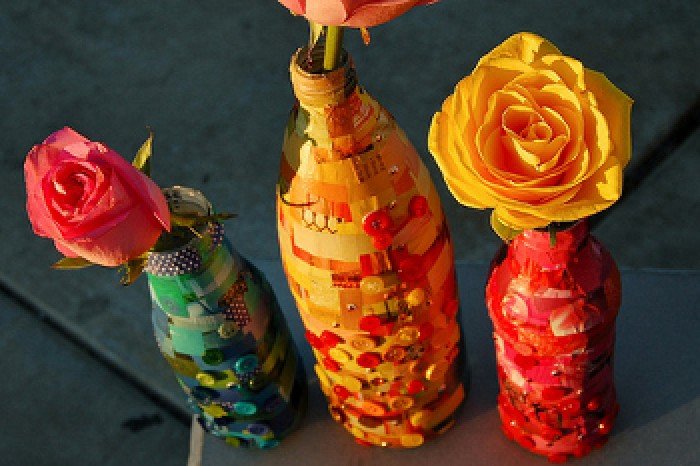
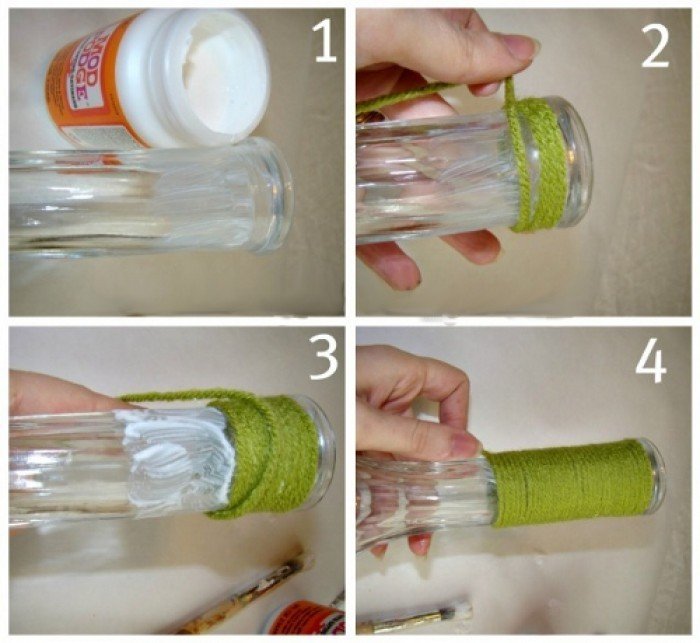
One of the most simple ways- make a vase from a jar or bottle. To do this, you just need to paste over the container with small pieces of magazine scraps, corrugated or wrapping paper of different colors. The finishing touch can be jewelry made from small beads, rhinestones or buttons. For gluing the decor, PVA glue will help, which is diluted in a 1: 1 ratio, or you can use special glue for decoupage.

You can also decorate such a vase with a thread or ribbons. In this case, it should be borne in mind that the glue dries quickly, so you need to apply it on small plot working surface. Step by step, we wind the thread so that there are no gaps, and as a result we get an original decor.
Cut the neck at home
To fit more flowers into a glass bottle, you will need to cut off the neck. A special cutting tool is not needed, because all the work can be done with the help of improvised parts.
Required tools:
1) Thick woolen thread (1.5 meters);
2) Solvent (alcohol, acetone);
3) Matches or a lighter;
4) A container with water;
5) Sandpaper or a bar for sharpening blades;
6) Goggles and gloves - safety is paramount.
The working process:
1) We outline the line along which we will cut the bottle.
2) We lower the thread into the solvent. Then we wind it on the bottle in the designated place in 3 layers.
3) Quickly set fire to the thread, holding the bottle horizontally.
4) After burning the thread, immediately lower the bottle into a container with cold water. The glass will burst exactly in the place where the heated thread was, due to the temperature difference.
5) We process sharp edges. With a bar for sharpening blades, it is better to perform this action in water.
Making a vase from a plastic bottle
In this do-it-yourself plastic bottle vase tutorial, you will see how you can create exquisite decor for your home using the most affordable and budget materials.
Method one: lace neck
We will need:
1) Plastic bottle;
2) Scissors;
Stages of work:
1) We mark the lines denoting the top of the vase and the boundaries of the beginning of the plastic "laces".
2) Cut along the markings.
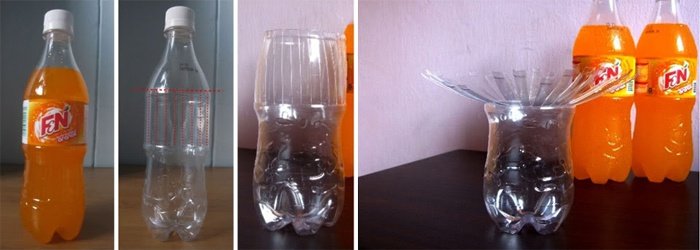
3) We bend the resulting strips from the center. We bend each petal in half and turn it so that it crosses two adjacent strips and reaches the third with an edge. We do this with each strip to get a kind of lace neck.
Method two: openwork vase
Necessary materials:
1) Plastic bottle;
2) Nail or soldering iron;
3) Marker;
4) Paint.
Step-by-step instruction:
1) Cut off the neck of the bottle. Use a marker to draw a pattern. You can do it any way you like.
2) Make holes according to the outlined pattern using a heated nail or soldering iron. Do not connect the holes, otherwise you will get big ugly holes.
3) Paint over the resulting vase with paint.

Vase of pasta
Pasta is an excellent material for decorating various surfaces, because with their help you can create original compositions. How to make a vase of pasta, you will learn from the following tips.
Any container can be used for such a vase. It can be plastic bottles, glass jars, and even self-made cardboard bases.
To begin with, we think over a composition of pasta and other decorative elements. You can stick around the future vase with plasticine, in which case glue may not even be needed. Or tie the base with ribbons or twine. Then we glue pasta and decorative elements according to the chosen ornament. For decoration, you can use any adhesive mixture, including self-made paste, as some experienced craftsmen do. Glue residues are removed with plastic stacks.
For coloring we use any paints, including food coloring. There are two coloring methods:
1) Add colors to an already completed composition, for example, by spraying a vase from a spray can.
2) Dip the used pasta into hot colored water before starting work.
We use the gifts of nature to make a vase with our own hands
In addition to pasta vases, vases made from natural materials, such as pumpkins and zucchini, will become an original decor element. The advantage is that the manufacture of such vases will take very little time and will not require special skills from you. However, such decorative elements are only suitable for short-term storage of dried flowers or a beautiful serving of a dish due to a short shelf life.
To make a vase from a zucchini or pumpkin, you need to carefully cut off the top and bottom of the vegetable, then clean out all the pulp. In the resulting curved cylinder, make through cutouts.
The finished product should be put on a small plate so that the dampness from the vegetable does not spoil the surface of the table.

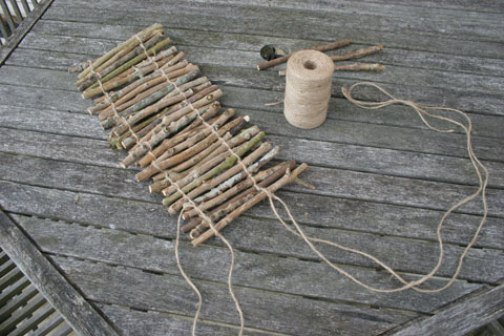
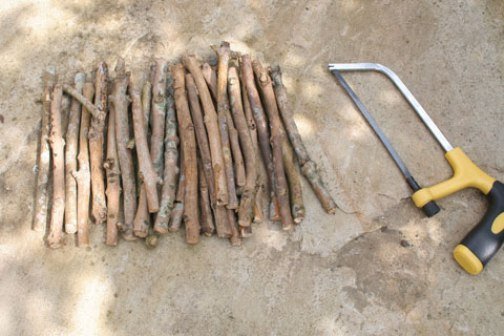
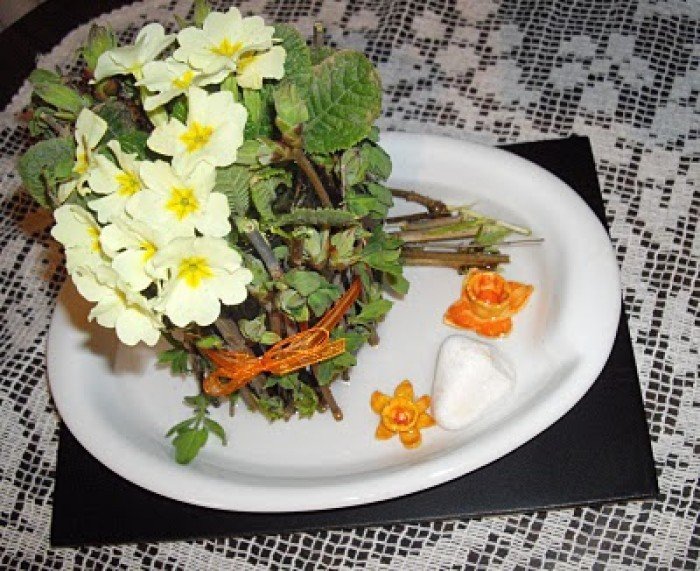
Vase of twigs: step by step instructions
Necessary materials:
1) Glass jar;
2) Bag fabric;
3) Branches;
4) Twine (strong thread);
Manufacturing steps:
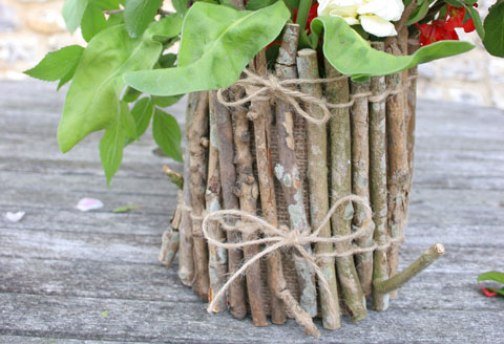
1) We collect several branches and break them into equal parts so that they are slightly higher than the container.
2) Cut off about 1.5 meters of thread. After adding each part, we tie a regular knot. We use two threads to connect the branches from above and below.
3) At a certain stage of work, we wrap the resulting “mat” of branches around the can to check the length.
4) We cover the container with bag fabric, bending it at both ends and fixing it with glue.
5) And finally, we wrap the covered container with branches fastened to each other.
This article has shown just a few of the many ways to make and decorate vases with your own hands. Were mainly considered options for making small vases and pots, but most of these tips are applicable to creating tall floor vases. The cost of such interior items is much lower than those bought in a store, however, such decor looks no less impressive.
You can learn how to make a floor vase yourself, as well as additional information on making other decorative elements from the video selection below.
Video on the topic of the article
Magical transformations of an ordinary bottle. Master class with step by step photos.
Description: the master class is intended for all, without exception, creative people who are fond of making crafts for the home with their own hands from waste material, which, in fact, are used glass bottles. I offer several ways to decorate bottles, as a result of which they turn into original vases that can be used to decorate the interior, as a gift, or an exhibition item. Teachers of kindergartens and schools can apply a master class in working with children to organize a circle or extracurricular activities.
Target: making a vase from a glass bottle using various techniques.
Tasks:
* develop the ability to see the unusual in the ordinary;
* introduce various ways of decorating a bottle: decoupage, stained glass painting, paper art;
* develop creativity.
Pollution is a very serious problem these days. environment waste of human activity. This is all kinds of garbage, lying not only near garbage containers, but also in our yards, parks, in nature. Wherever a person appears, he often leaves behind a garbage dump. In the spring of 2016, the children of my group and I often observed this picture and did what we could, clearing the groves near the kindergarten, the area around the spring and other beautiful places in our village.
In addition to these activities, the guys and I make beautiful vases from used glass bottles. As a result, there is less garbage on our streets. The guys are thinking about the fact that it is possible, it turns out, to give a second life to objects that are usually thrown away. Bring these things in kindergarten, where we subsequently make beautiful crafts from them.
Today I want to offer various options for decorating a glass bottle. This is a very interesting and exciting activity. Since the bottles are very beautiful and original in shape, I always felt sorry for throwing them away. Why, if you can turn them into beautiful vases?
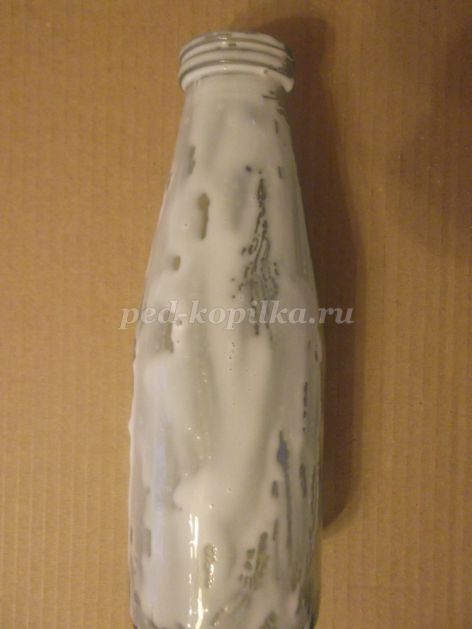
Note: before decorating the bottle, it must be cleaned of stickers and traces of dirt. Soak in water, remove stickers. We wipe the bottle with alcohol or acetone. Traces of glue are easily removed with a solvent or acetone. We put it on a rag and wipe the bottle. Naturally. We do this part of the work ourselves, without the participation of children. Be careful when using chemicals.
Having got acquainted with the decoupage technique and decided to master it, the first thing I did was decoupage bottles. These were my first crafts in this technique. With children, we also first mastered decoupage, making vases from bottles and cans. On March 8 this year, we gave such vases to mothers and grandmothers.
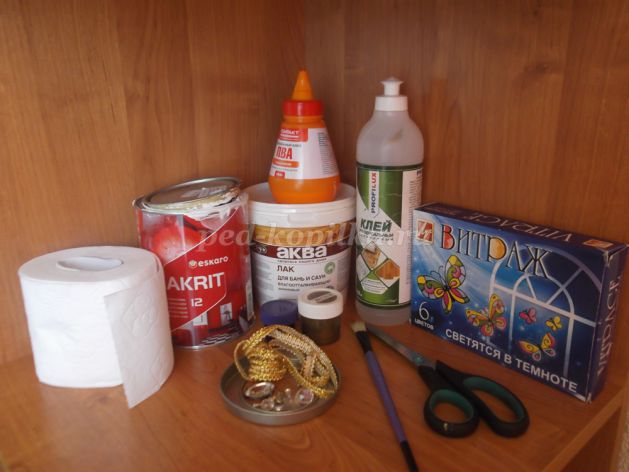
We will need:
* glass bottle of interesting shape;
* white acrylic paint and varnish;
* napkin with a pattern;
* sponge or sponge for coloring;
* flat brush No. 12 (bristle);
* scissors;
* PVA glue.

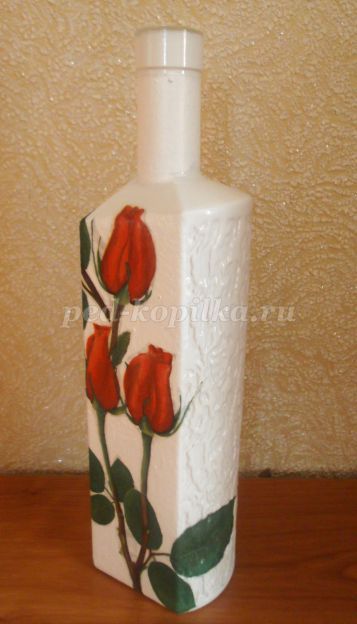
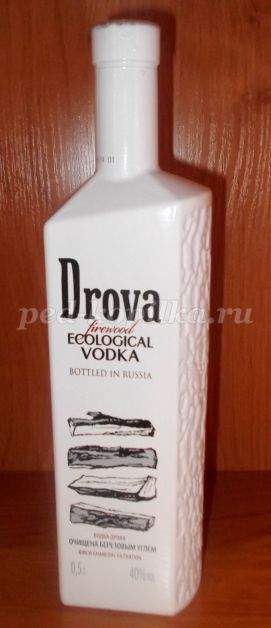
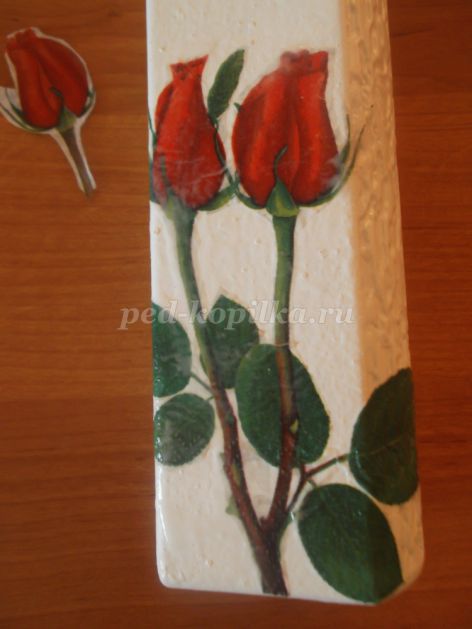
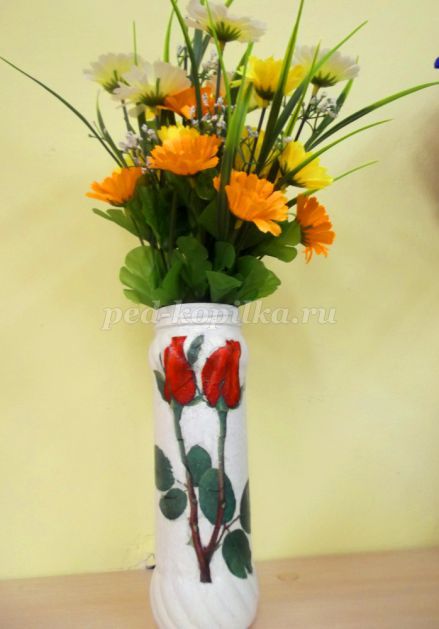
Today I have a very original bottle, asymmetrical in shape, with a relief pattern on one side.
Let's play with her form. There is a minimum of work here, since I will not do the background, I will leave the white color. Therefore, we paint only one side, where there is a picture and letters. We paint over with white acrylic paint using a sponge or a special sponge. I make them myself (glue a piece of sponge to a long stick from an old brush with any glue at hand. The sponge is ready. It allows you not to get your hands dirty with paint, as happens when using a regular sponge).

We choose a napkin with a pattern. I have a three-layer with roses.
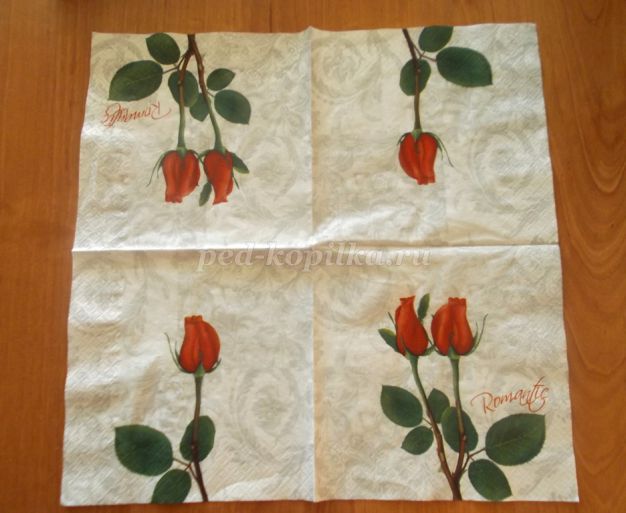
Cut out three roses very close to the drawing, being careful not to leave paper around the edges. Since there will be no background, with a carelessly cut out pattern, the edge of the napkin on the vase will be visible.

Remove two extra layers. We leave the top with a picture, and we will stick it.
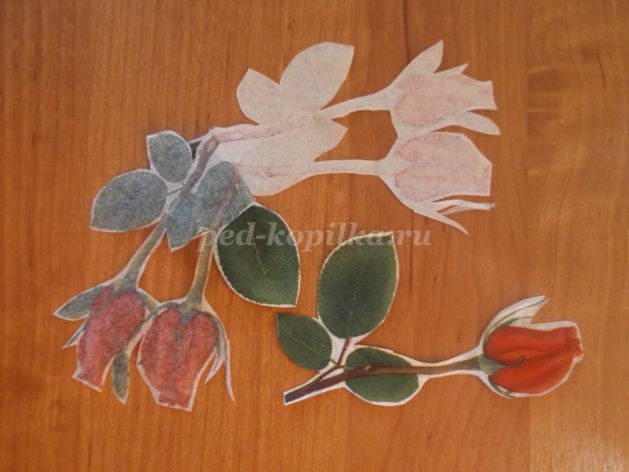
We will stick the picture on the front face of the bottle. Coat it with PVA glue. We dilute thick glue in a ratio of 1 to 1 for more convenient work.

We place the cut roses on the area smeared with glue.
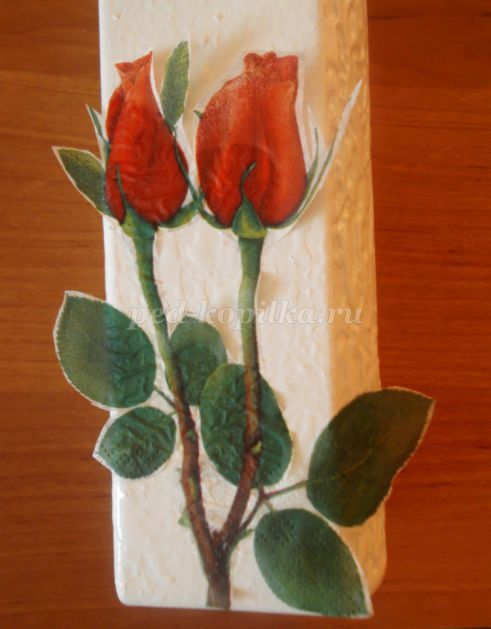
We smear with a wet flat brush on top, pressing and smoothing the pattern. (I also use my fingers for this purpose. With my index finger dipped in glue, I smooth out the wrinkles and better feel the material). Thus, we glue all three roses, placing them as we wish and creating a beautiful composition.
Result:
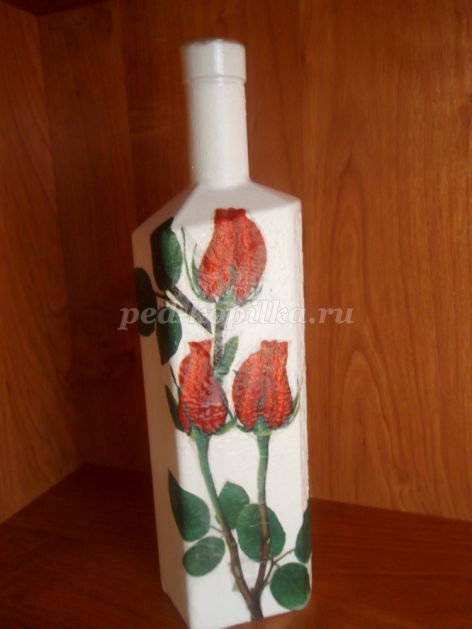
After drying, we cover only the area with glued roses with acrylic varnish (2-3 layers with intermediate drying). The rest of the surface of the bottle, in this case, do not touch.
Different angles:
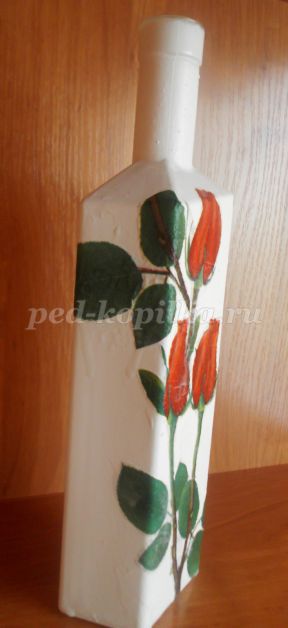
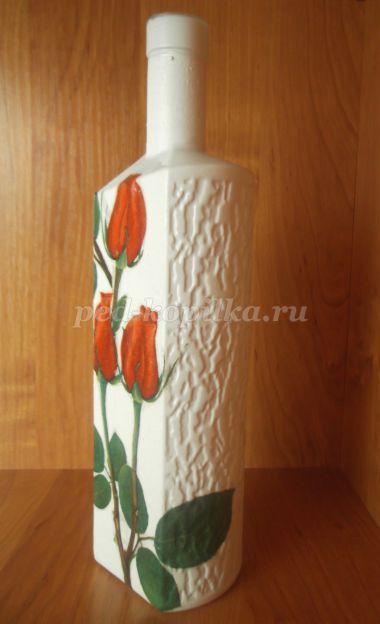
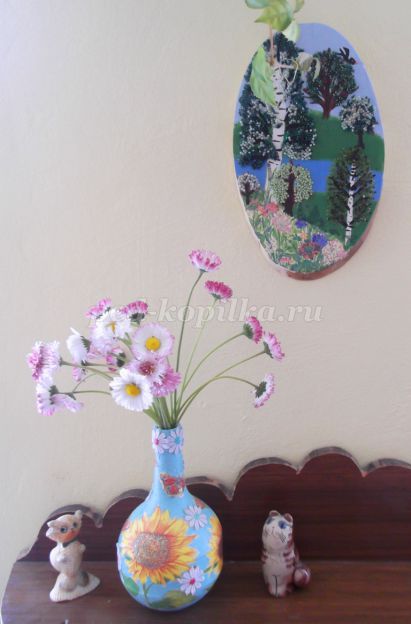
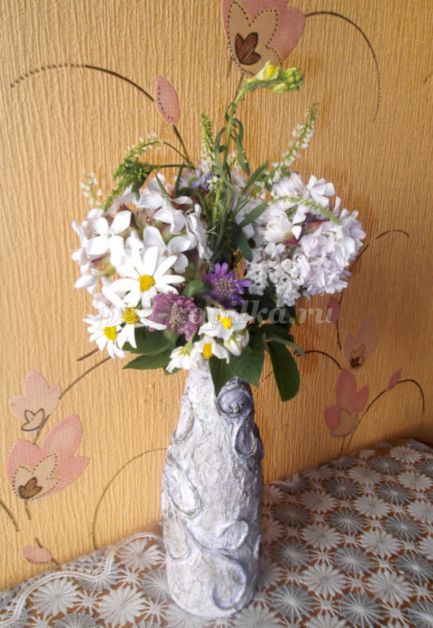
This is how it looks in the interior with flowers.


I offer various options for vases made by me at different times.

We use it in our group.
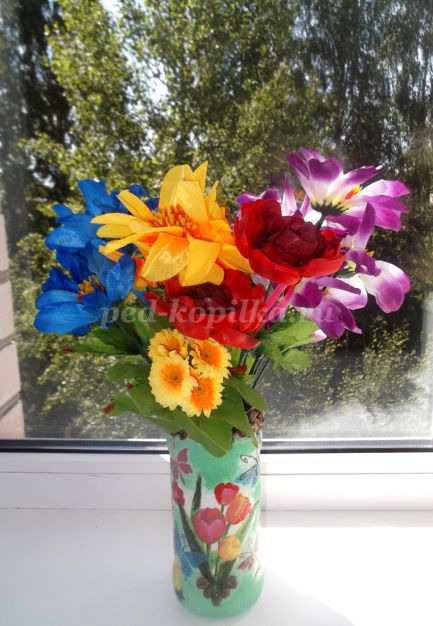
Winter version with a bouquet of artificial flowers.

This vase is already four years old and has not deteriorated at all, although we use it regularly.


And another one like this:

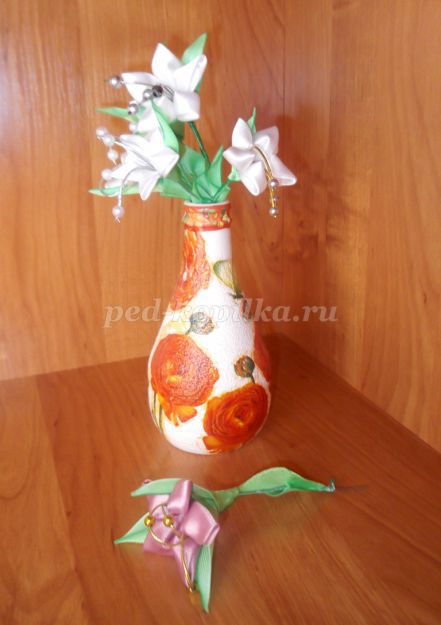
This composition decorates the shelf in my house. It looks, in my opinion, very harmonious.
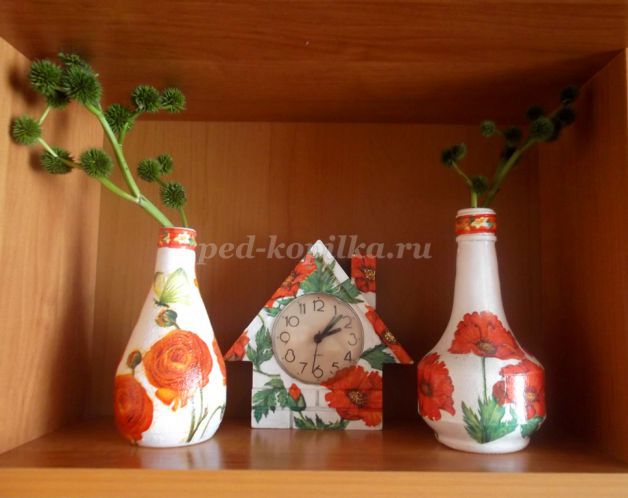
Several vases for children:


Of course, this is not all of our vases, but I think the essence is clear. Everything depends on you. Imagine, create and everything will turn out!
Beginner Tips:
1. When decoupage Always primed with white acrylic paint. Since the pattern from the napkin is translucent and very thin, it simply will not be visible without first painting it with white.
2. When working, one, two and three-layer napkins are used. Don't forget to remove the extra layers. Otherwise, your work will look rough and not quite aesthetically pleasing. You can use absolutely any napkins, sometimes the cheapest ones look great. But some are still not suitable for decoupage: they immediately blur and tear when soaked. We simply do not use them and do not offer them to children.
3. After completing each step, dry the product. Only then can you proceed to the next manufacturing operation. You can use a regular hair dryer to speed up the process. But it is better to wait for the varnish to dry naturally.
4. After gluing the napkin pattern, the fun begins: decorating the craft. You can draw and draw details, apply a background of a different color. The background will unite the disparate details of the picture into one whole and make the work perfect.
5. We apply acrylic varnish in two or three layers. If desired, you can use more durable varnishes, but first make sure that they do not change the color of your craft. Some varnishes are yellowish and may ruin your product.
6. Most importantly: there is nothing to be afraid of. If you don’t like the result of the work, wash it off, delete it and start all over again. The craft is tired - paint over with white paint and decorate again. I do this very often.
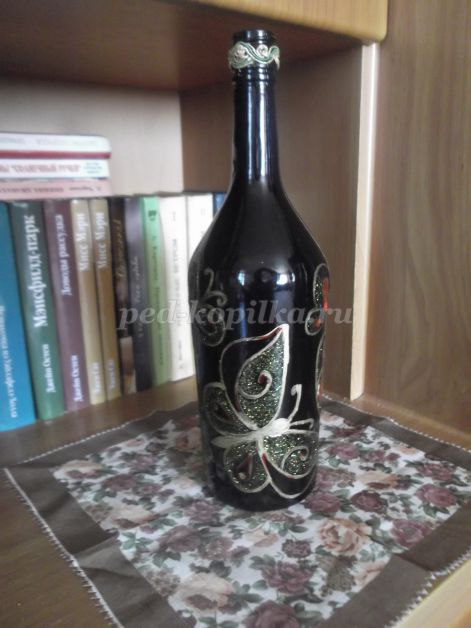
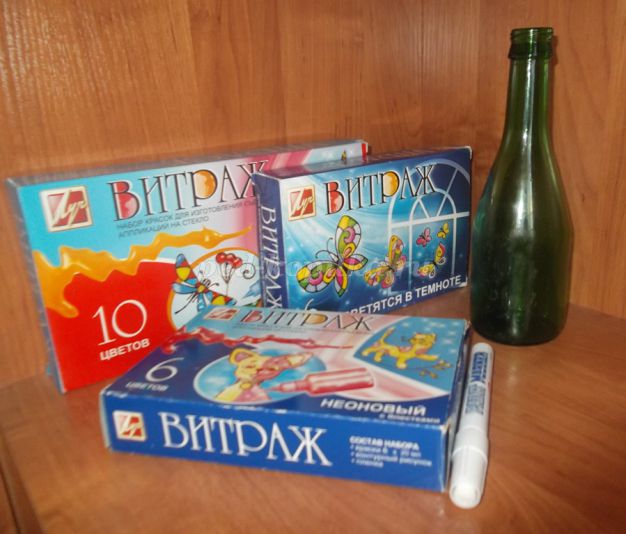
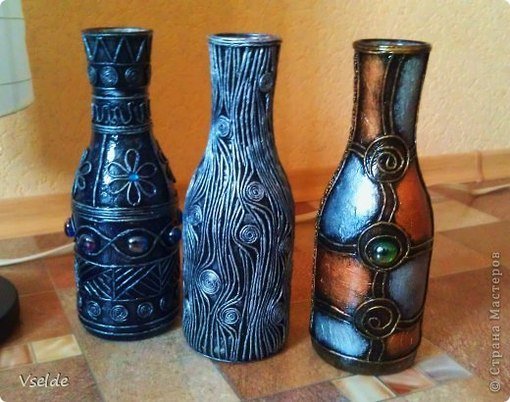
Option number 2. Stained glass painting of the bottle.
Recently discovered this technique. While I master it myself and involve children in this business. Today I offer three vases in this technique.
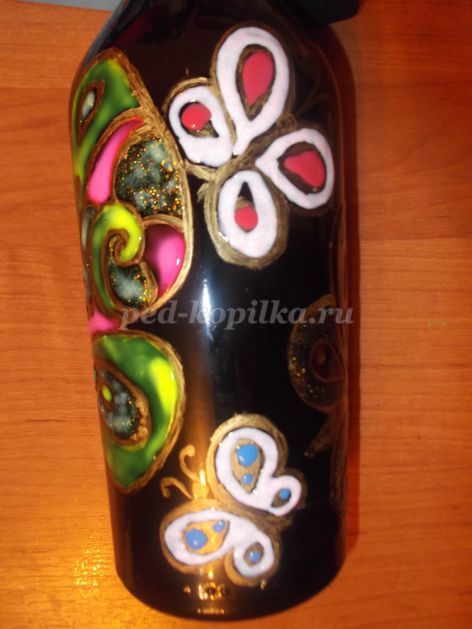
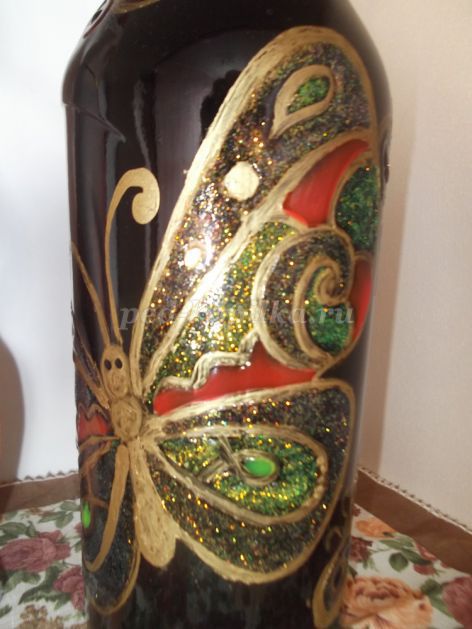
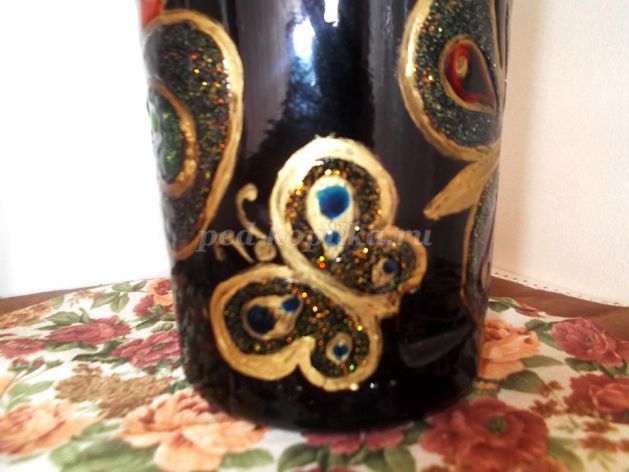
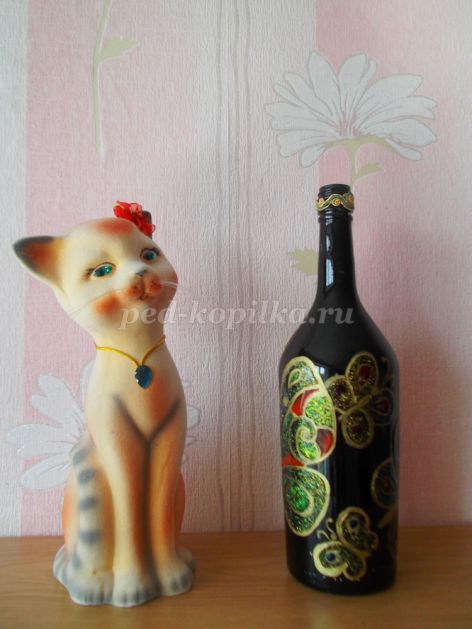
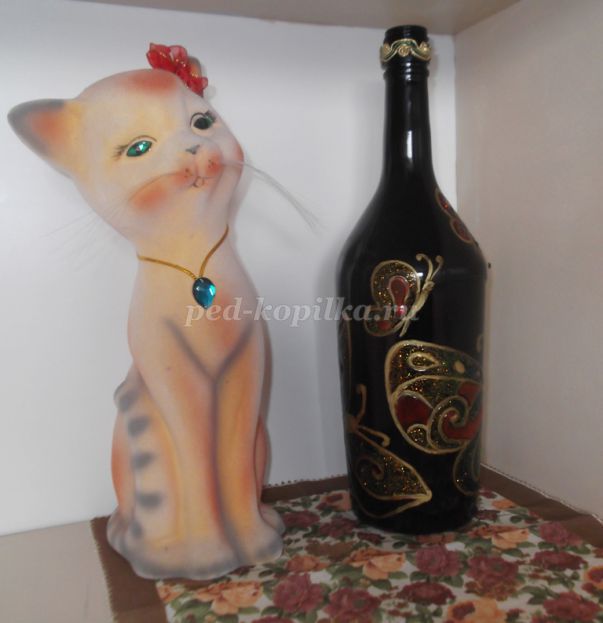
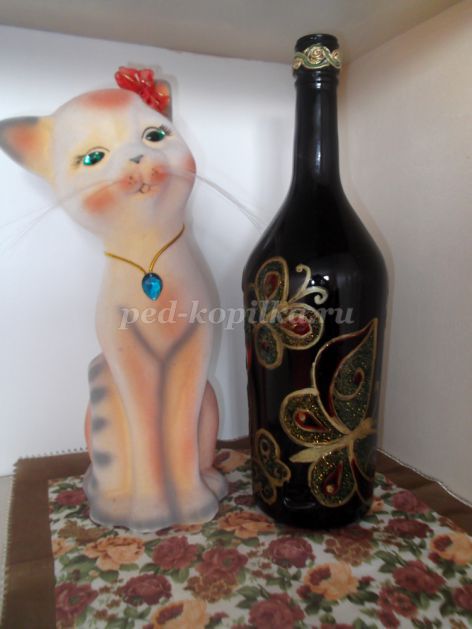
Vase with butterflies.
Materials:
* beautiful bottle from colored glass;
* bronze color marker;
* stained glass paints;
* patterns with the image of butterflies;
* scissors;
* braid for decoration;
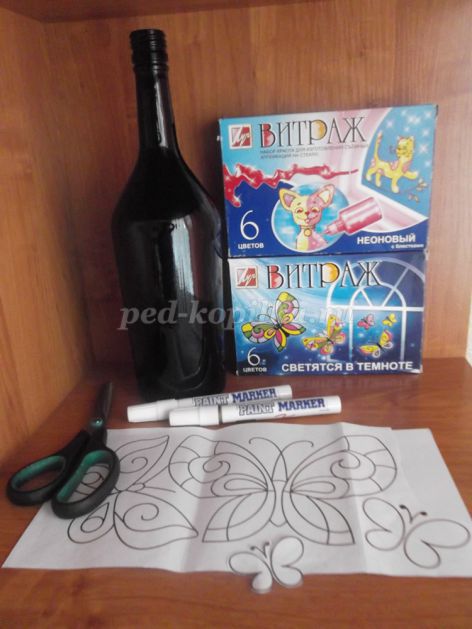
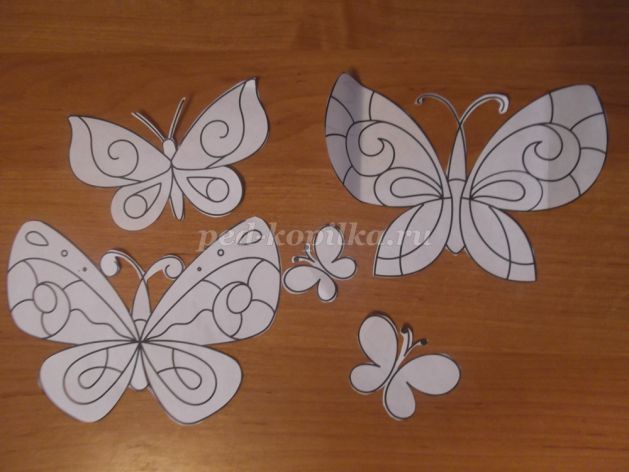
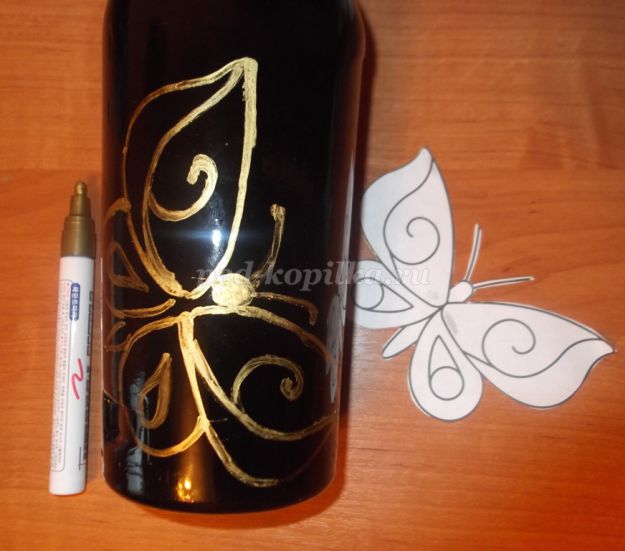
To make such a vase, you will need patterns with the image of butterflies. For example, these are:

Print and cut out.
We put the butterfly on the bottle and trace around the contour with a bronze-colored marker.

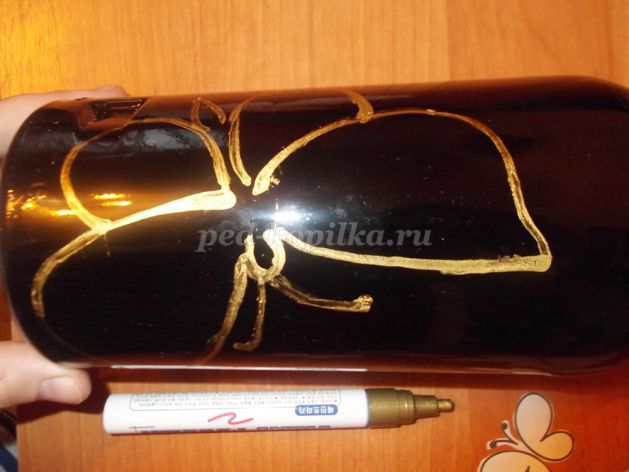
We redraw the drawing of the wings.
We select stained glass paints. When applying stained glass painting, I encountered the fact that it is not always possible to predict how the paints will look after drying. They change color. It also depends on the color of the bottle itself. Therefore, if you do not like the result, we wait for it to dry and carefully remove the fragment of the pattern that we did not like.
So, it is better to put the bottle on the table, placing a cloth on it so that it does not roll. Carefully apply the selected color of the stained glass window, without going over the drawn contour.

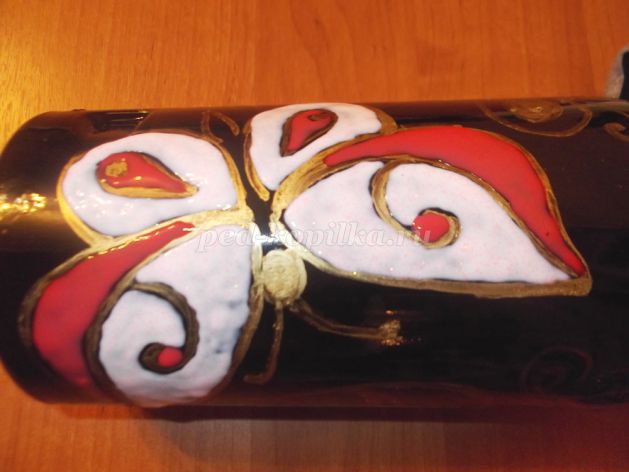
This is what it looks like after drying.
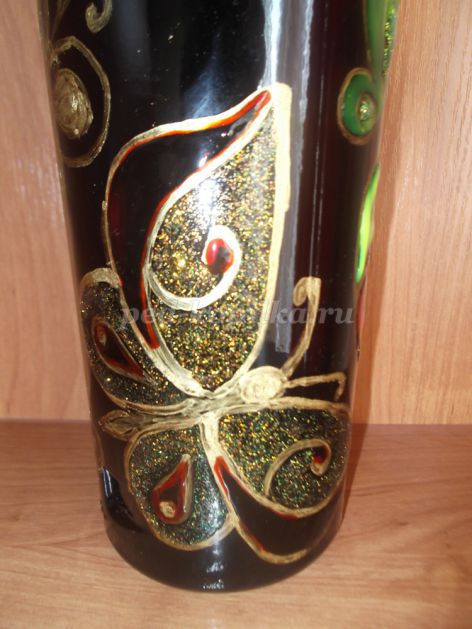
I used stained glass paint with glitter. I like the result. It is better to wait for the pattern to dry on one side, then move on. Draw stained glass small butterflies on the other side of the vase.
Dried up.
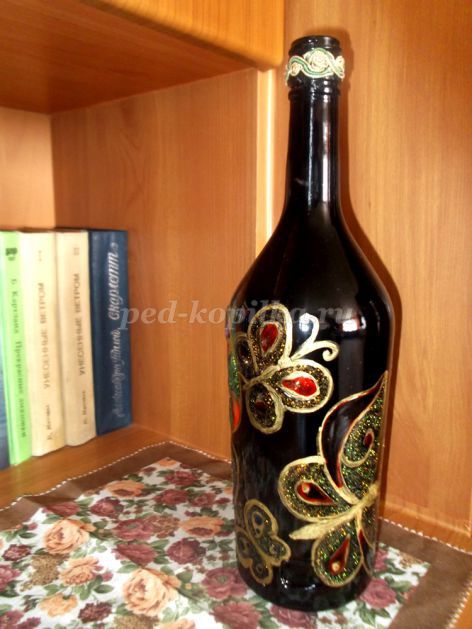
I propose to decorate the neck of the bottle with a beautiful braid, which in color echoes the painting.

Let's take a closer look at some vase angles.


This is what it looks like in the interior. It's beautiful even. If desired, you can put flowers in a vase.
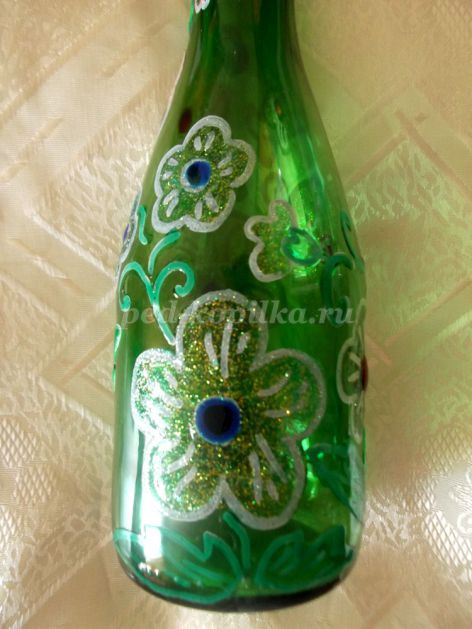
Vase with flowers
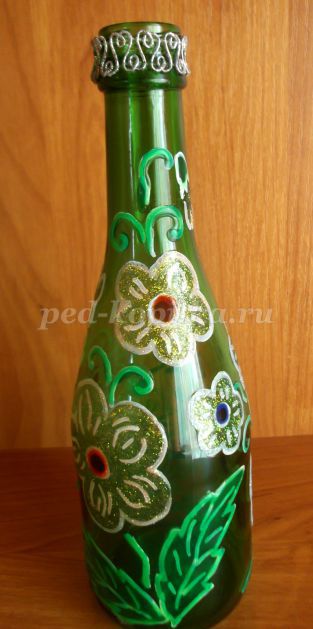
Materials:
* beautiful bottle of green glass lemonade;
* marker white color;
* stained glass paints;
* silver braid for decorating the neck of the bottle;
* universal polymer adhesive.
We randomly draw flowers on the surface of the future vase with a white marker. We just fantasize or find the drawing we like and redraw it.

I fantasized the simplest drawing.


We begin to apply stained glass paints. First, on one side of the vase, then, after the pattern has dried, on the other. Otherwise, if you immediately apply paint to the entire bottle at once, it can be smeared or the paint will flow. Will have to start all over again. Therefore, armed with patience, we do everything slowly.


For flowers I use a pink stained-glass window with glitter, for green leaves. Result:

On the other side are flowers with a blue sheen.
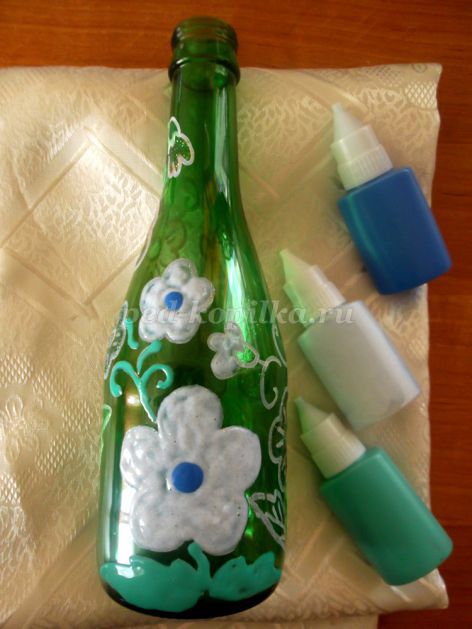
We glue the neck with a silvery decorative braid. We glue on universal polymer glue.
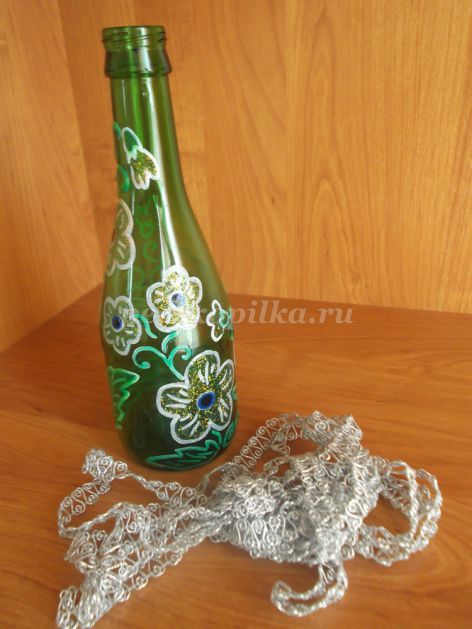

In the interior:

Vase "Summer mood"
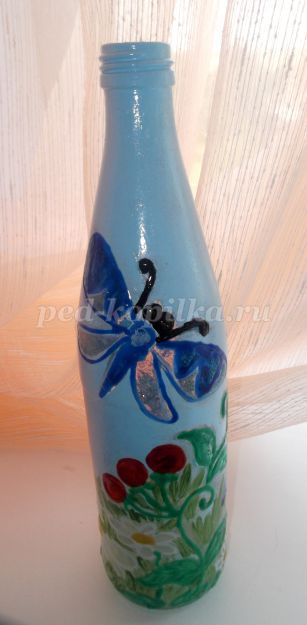
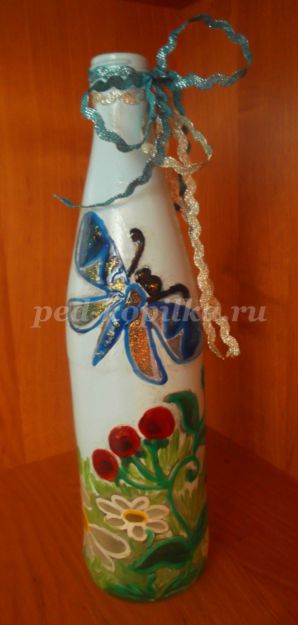
I will not describe the manufacturing process in detail. It is similar to the one described above. I'll point out the differences. This vase combines stained glass painting with acrylic paints on the background. Transparent lemonade bottle. A drawing was applied to it with a white marker: butterflies, dragonfly, chamomile, berries. Stained glass drawing. The blue background is made with acrylic paint, the grass is drawn in green. Lacquered areas painted over with acrylic paints. A decorative band is attached to the neck.


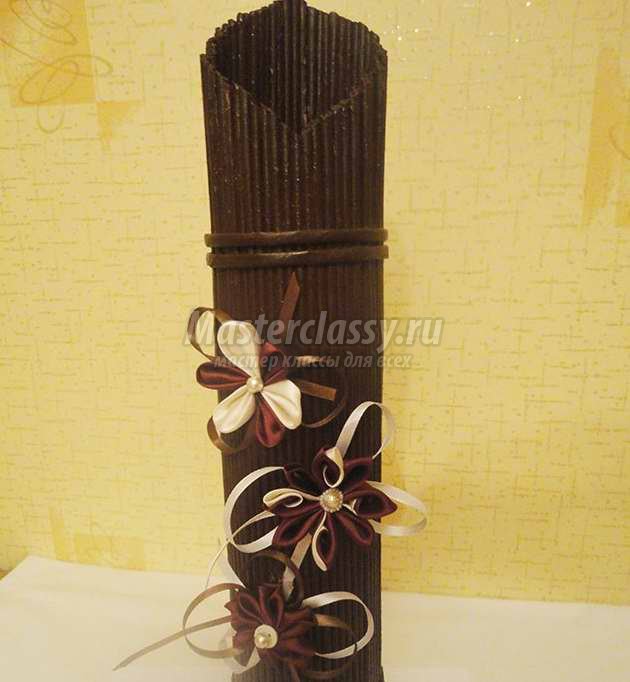
Option number 3. Vase in paper art technique.
Paper art translated from English paper art. For decoration, napkins, toilet paper and PVA glue are used, with the help of which an interesting texture of the product is created.
Materials:
* glass bottle of kefir;
* PVA glue;
* toilet paper;
* white acrylic paint varnish;
* bronze and purple gouache;
* Polish for hair;
* brushes for coloring;
* stained glass shine;
* decorative braid of gold color;
* pebbles for decoration;
* universal polymer adhesive.
We apply PVA glue to the bottle.
Tear off pieces toilet paper and paste them over the entire surface of the bottle, making folds.
Spring is the time of flowers. But where to put handmade or fresh flowers? Of course, you can buy a ready-made vase in the store, but it will be much more interesting to make it yourself or with the help of a little helper. Thanks to this article, you will learn how to make large and small, original table and floor vases with your own hands. Such a practical craft will decorate the interior of the room, and can also be presented as a gift.
Decoupage
Any most ordinary-looking vase, glass, jar or bottle can be turned into a piece of decorative art using the decoupage technique. And it is not necessary to buy specialized napkins or cards - make beautiful vase from paper, you can even use scraps of corrugated paper that are left over from past crafts.
Required for work:
- glass transparent container;
- multi-colored corrugated paper;
- glue;
- scissors (if needed).
1. Prepare paper by tearing it into small pieces of different sizes.
2. We apply glue to a small area of \u200b\u200bthe future vase, glue pieces of paper on top. Gradually add all the new elements, carefully smearing them on top.
3. After the entire surface is filled, once again spread with glue and cover the second with a layer of paper. We also cover it with glue on top. When it dries, it will become completely transparent.
From above, the finished product can be varnished.
These are the vases that can be made from a jar by pasting over it with paper strips.
forest gifts
To make a beautiful original vase from natural material, you will need:
- small capacity;
- plasticine;
- various natural material - seeds, acorns, chestnuts, leaves, etc.
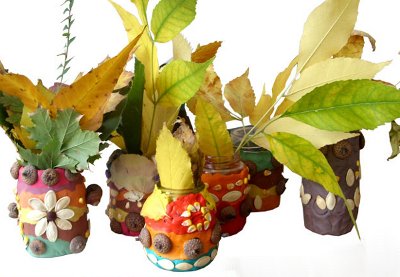
First you need to stick around our vase with plasticine. You can dream up using multi-colored plasticine to create various patterns from it.
We decorate the vase by gluing seeds, cereals, acorn caps, various dried flowers and leaves to plasticine. Children will be happy to make such a craft.
You can also make a vase of pasta using this technique. They can be planted on plasticine with a beautiful pattern, and then painted with any color and varnished.

![]()

From a plastic bottle
You can make a beautiful vase for storing various little things and or for flowers with your own hands from an ordinary bottle. This is where a little tutorial comes in handy.

Our vase will be decorated with twigs. For work you will need:
- cut off the bottom of the bottle;
- twigs;
- saw - if needed;
- sackcloth;
- jute thread;
- thermal gun.
1. We break or saw the branches into approximately equal parts. They should not be too high - a little higher than the container we prepared.
2. Take about 1.5 m of thread. Alternately tie one stick to another with a simple knot. As you can see in the photo, the branches are connected with a thread from above and below.
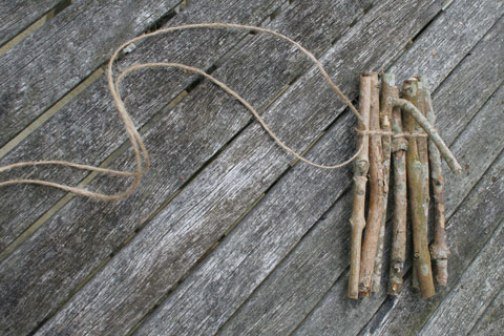
3. We continue to add segments, creating a "mat" of such length that it wraps around our container.
4. We wrap the plastic bottle with burlap, gluing it on top and bottom.
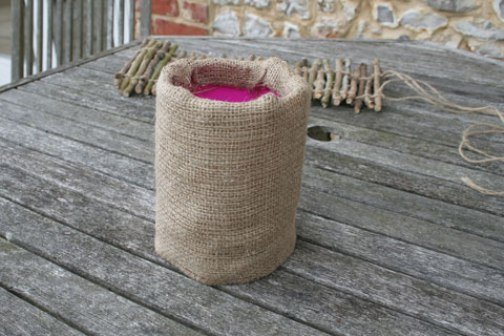
If you want to plant a flower inside, then make a few holes in the bottom.
5. It remains only to wrap the workpiece with chopsticks and tie the thread tightly.
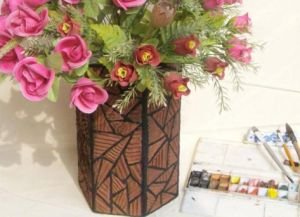
From cardboard
A decorative vase can be made from cardboard. The easiest way:
1. From the box we will make a hexagonal blank.

2. We cut corrugated cardboard into small triangles of different sizes. We glue them on the sides of the cardboard blank, leaving small gaps.
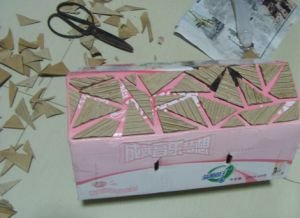

3. After drying, fill the gaps with putty.
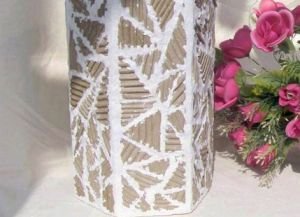
4. After drying, we paint the vase with different colors, making the “slits” darker.
from a pumpkin
Perhaps the most unusual option is a vase of zucchini or pumpkin. For them, either decorative pumpkins or ordinary young vegetables are selected.
![]()

First of all, cut off the top and remove all the pulp and seeds. Dry the workpiece well. It will become quite light, so the bottom can be strengthened. Wipe the skin with a swab dipped in oil, giving the product a shine.
It is also not necessary to cut the top evenly, you can dream up by making, for example, a V-shaped cut. And all sorts of patterns on such a vase look beautiful.
Video Compilation
Let's start with the fact that many are wondering what gift to present to their loved ones on their birthday or on March 8th. The answer can be found in the depths of the Internet by looking at master classes with a detailed description and photos. This article will show you how to make flower vases with your own hands. After all, such a piece of furniture will always decorate any corner of the house and create comfort in it.
Such crafts can be made using all sorts of containers and any material that is found at home: from a glass bottle, a tin can, etc. Almost everything is suitable for decorating a vase: paper napkins, magazines or newspapers, beads, beads, threads, corrugated paper. The main thing is to have fantasy, inspiration and a little time.
If there are children in the family, you can surely involve them in the process. As you know, all kids love to cut, glue or decorate something. There is no difficulty in the work at all, and this is the main thing.
Unusual bamboo vase
Such a product will surprise friends and guests. Indeed, at first glance, it may seem that it is made of bamboo. But in fact, from newspaper tubes. Weaving from newspapers is not a difficult process, but very exciting. Let's start!
To make such a beauty you will need:
Sheets from notebooks, newspapers, magazines (you need to choose one thing without mixing the types of paper);
A cardboard tube designed for winding wallpaper or paper towels is the basis for a vase;
Long needle;
Scissors;
Lacquer, stain or gouache paint.
To get started, you need to remove all brackets from the middle of the magazine. Using a knitting needle, form tubes, twisting them tightly. It is necessary that the tubes are of the same thickness, because if they are different, then the future product will look sloppy.
Next, take the base for the vase. Tubes will be glued to it. Even if there was no cardboard cylinder at home, you can use the most ordinary paper, twist it into the desired shape and glue it. But whatman paper is still not so dense, so you will need to put any bottle inside.
Now glue the entire base with tubes in a circle, close to each other. Glue two more paper tubes horizontally on top and bottom. And in order for them to find the desired shape, they must first be wound around the finger.
When the tubes are fixed, cut off the top of the pot horizontally or obliquely with scissors.
The finished work can be painted with gouache and varnished on top.
At the last stage of work, when the product dries out, you need to make the bottom of the vase. We take a thick cardboard and cut out a circle according to the size of the bottom hole. You can paint the bottom in the tone of the vase or in a different color, and be sure to remember to cover it with varnish, because. in the future, the vase may be damaged by moisture. The original bamboo vase is ready!
Making a vase using the paper-plastic technique
Who does not have ordinary paper in the house? After all, paper is such a material that is easy to work with, it is affordable and budget.
Paper is different in texture, color, thickness. For creativity, colored paper, cardboard or corrugated paper is used. You can also work with waste material, for example, with ordinary table napkins. Using such material, the product looks beautiful and non-standard. Such a gift can please everyone.
To work, you need the following tools and materials:
Double sided tape;
Scissors;
Crepe paper;
Glass bottle of any shape;
Paper napkins;
stapler.

To make a vase, take a bottle of champagne or wine and glue double-sided tape to it. You can glue in random order.
Cut a strip of crepe paper 2-4 cm wide. The width can be different, it all depends on the base. If it is even, then we cut off a wide strip, and if there are a lot of bends, then a narrow one. We stick double-sided tape on the bottle at an angle, rotating it.
Crepe paper takes the desired shape very well and this is its advantage. The strip that remains is cut off with scissors. This method is good because it is very fast.
Now we make flowers from paper napkins. This requires a template. Fold the napkin in half. We apply the sample to the resulting square, circle and cut it out. Get multi-layered flowers. We lay them out one by one with an offset. In the center we fasten with a stapler.
To collect a flower, you need to press each layer to the center.
At the final stage, we glue the finished flowers on the bottle. They can be located in different ways. You can glue the entire vase, or you can only part of it. On average, such work takes 1.5-2 hours. The work is easy and done fairly quickly.
Crepe paper flowers can be placed in a vase. This vase will decorate any corner of the house.
Decorative vase, tied crochet
You can knit not only sweaters, hats, scarves or napkins. You can also crochet great home decor items like vases. They knit in different shapes and sizes. For the base are taken flower pots, cans or other containers.
First you need to decide on the size and pattern of the future vase. The main pattern is knitted according to the scheme. It consists of individual elements. When all fragments are connected, they are stitched together.
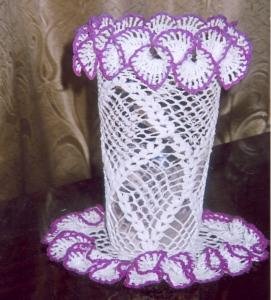
Now you need to take the form on which the knitted vase will be put on. It can be a glass jar, a floor vase, etc. We turn the form upside down and put it on the table. We stretch the finished product on the form, adjusting the pattern.
In order for the vase to become hard and stable, it is necessary to prepare the syrup. To do this, take sugar (700-800 gr.) And 0.5 liters of water. Put on fire and bring to a boil. The syrup should thicken a little. Let it cool down to room temperature.
We lower the workpiece into the solution, put it on the form upside down. Now you just need to wait for the product to dry.
To remove the vase from the container, you need to use a knife, separating each fragment from the form.
You can also separately knit decorative items - there is enough imagination here. It can be flowers, leaves or vines. Finished knitted elements are sewn to the vase.
DIY vase from plastic bottle
Flowers, piglets, funnels for liquid, vases and shelter for seedlings - all this can be done with your own hands from plastic bottles! Such a simple material, but such unusual and necessary things are obtained!

Let's look at one of the options for how to make a flower vase from this type of container.
You can choose a bottle of any shape, volume and color. For example, take a transparent one and a half liter bottle. From tools you need scissors and a candle.
So let's cut off the neck. We cut the strips vertically in increments of 1 cm. We sharpen the ends so that they look like flower stems.
We cut out flowers from foam substrates of various shapes, colors and sizes. Flowers should match the size of the stems. We fix them on the stems. For reliability, you can use glue. Using precautionary measures, we burn sharp edges with a candle.
In the course of work, you can add some of your decor elements. Such a vase can contain real or artificial flowers, and you can also simply store fruits in it.
Making such beautiful vases develops fantasy and aesthetic taste. And the material is not thrown into the trash, but acquires new life while filling the house with peace, happiness and joy.
Video on the topic of the article
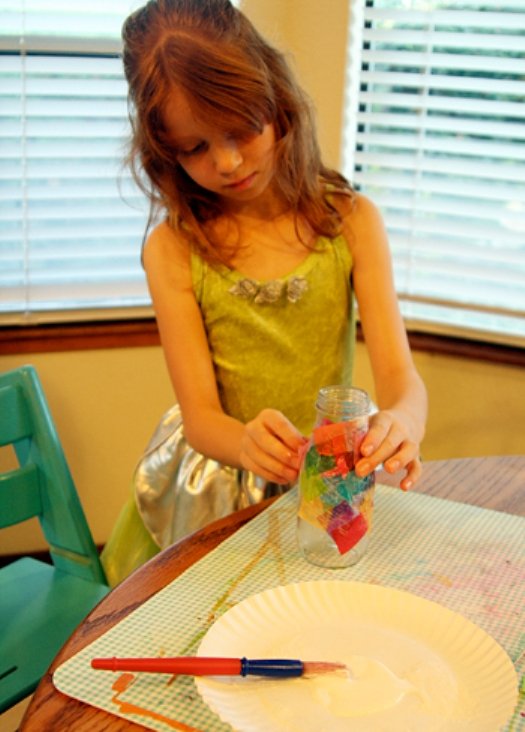
Take any transparent container: a glass, a bottle or a jar - and glue it with multi-colored squares corrugated paper using PVA glue, mixing it with the same amount of water.
Multi-colored corrugated pieces on the glass will look spectacular and pretty refresh the spring bouquet. Just do not forget to cover the paper with another layer of glue on top (then it will become transparent), and after drying - with varnish.
Vases, pasted over with strips of corrugated paper, also look interesting. different thickness. If you want to make such a beauty, make sure that the strips overlap a little. So the color transitions will be more original.
A do-it-yourself paper vase will be a wonderful addition to your interior, and perhaps an unusual gift!
How to make a vase from a jar?
To make this exquisite vase, you will need bright multi-colored electrical tape. Paste the jar with strips of electrical tape of different lengths and widths and evaluate how exclusive and original the vase you have turned out to be.

Vase from a bottle
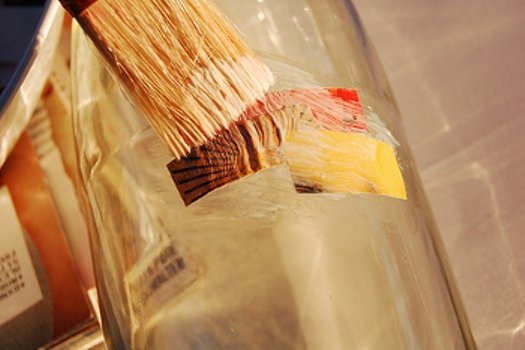
How to make a vase from a bottle? To start, find glossy magazine with bright pictures and cut its pages into squares.

Cut out pieces of one colors, such as turquoise, blue, cyan and purple. To glue them to a glass bottle, use PVA diluted 1:1 with water or decoupage glue. Cover the vase with a layer of varnish.
![]()
Use the glue gun to attach the buttons to the vase. Most importantly, don't be afraid to experiment!
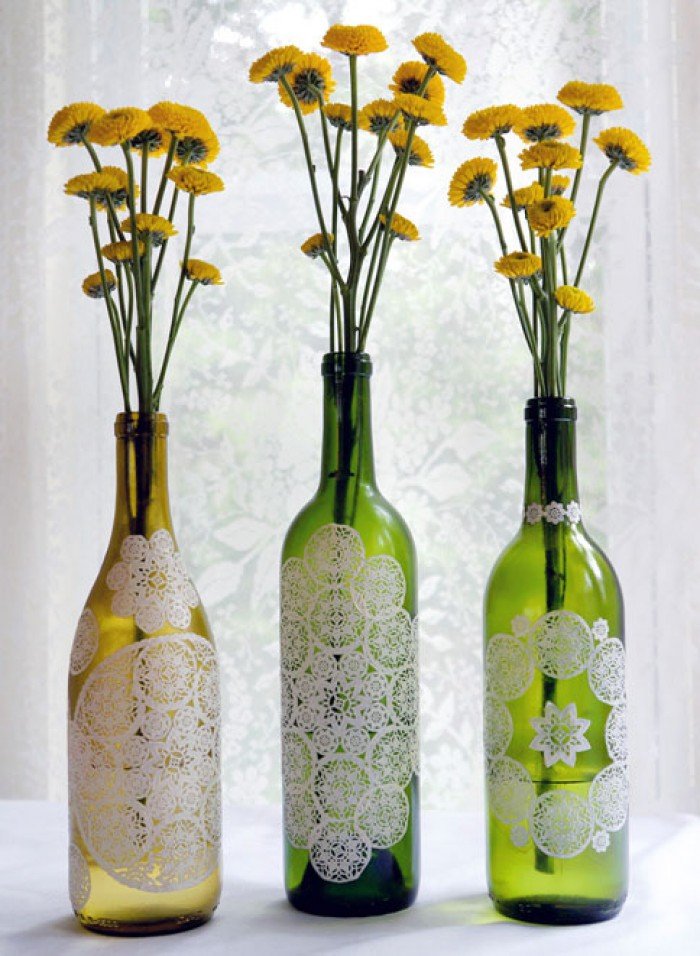
You can also make a vase from a glass bottle in another way - for example, by simply sticking elements of openwork napkins!
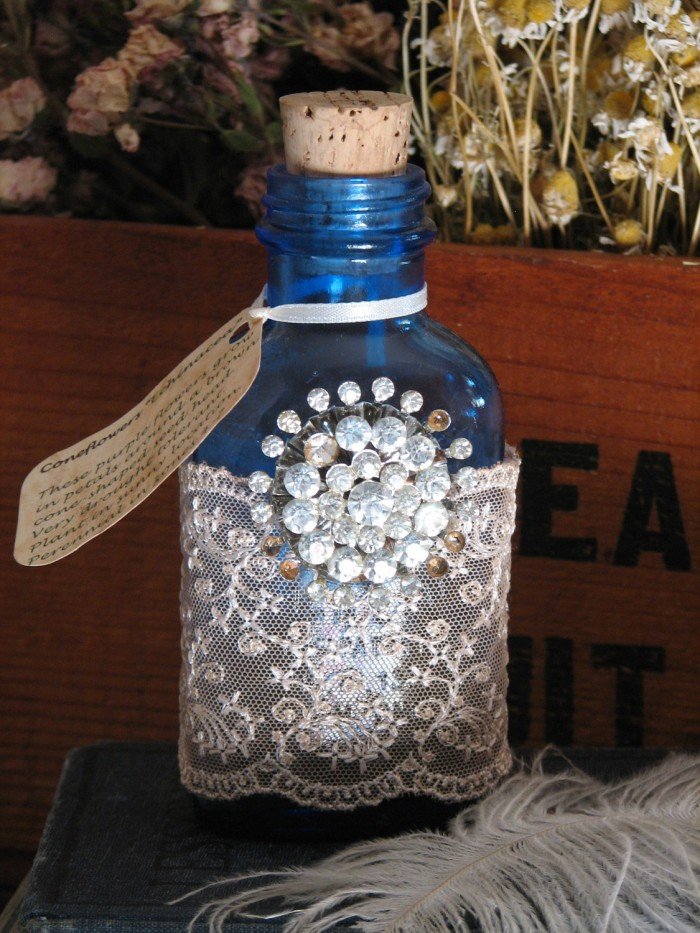
Or maybe turn a bottle into a vase with piece of lace?
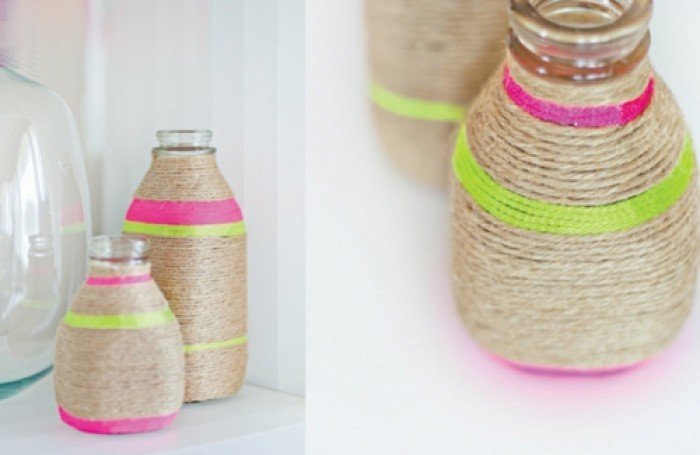
wrapping a glass bottle colored thread or yarn, You will make a beautiful spring vase.
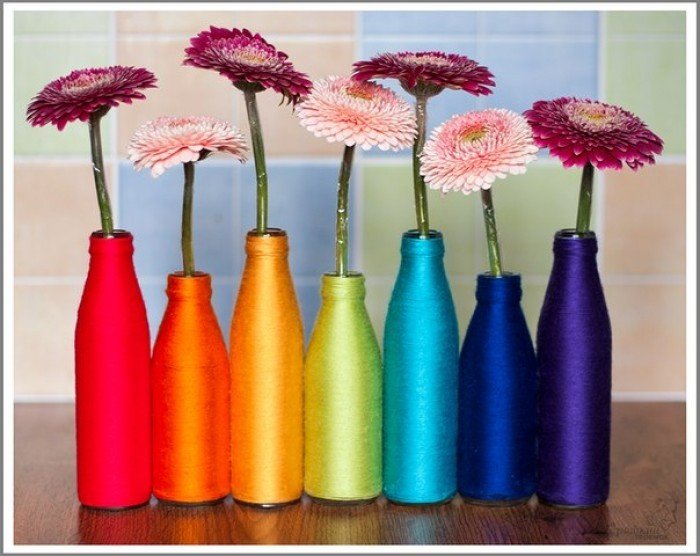
To better hold the threads on the glass, dip them on one side in decoupage glue or PVA, or spread them on a bottle. But remember that the glue dries quickly, so spread the bottle in parts and pull the thread taut.

To make the vase bright and original, use threads of different colors.
Decoupage - decorate a vase with your own hands
To beautifully decorate the purchased vase, you just need to cut out some cute drawing from a magazine or postcard and stick it on the surface of the vase. However, it is even better to purchase special napkins for decoupage, a primer and varnish: first we apply primer to the surface of the vase, then we glue pieces of the napkin with the desired image, and at the end we fix it with varnish! And it turns out such a neat vintage beauty.

How to make a vase from a plastic bottle?
To make this vase, you will need the help of your father or mother. Take a one and a half liter plastic bottle and cut several round holes in its upper part to insert the necks of the cut half-liter bottles into them. plastic bottles and glue with special glue for plastic.
![]()
Place a flower in each hole in the vase.
This is how bizarre and unique a vase made from a bottle made by oneself can be!
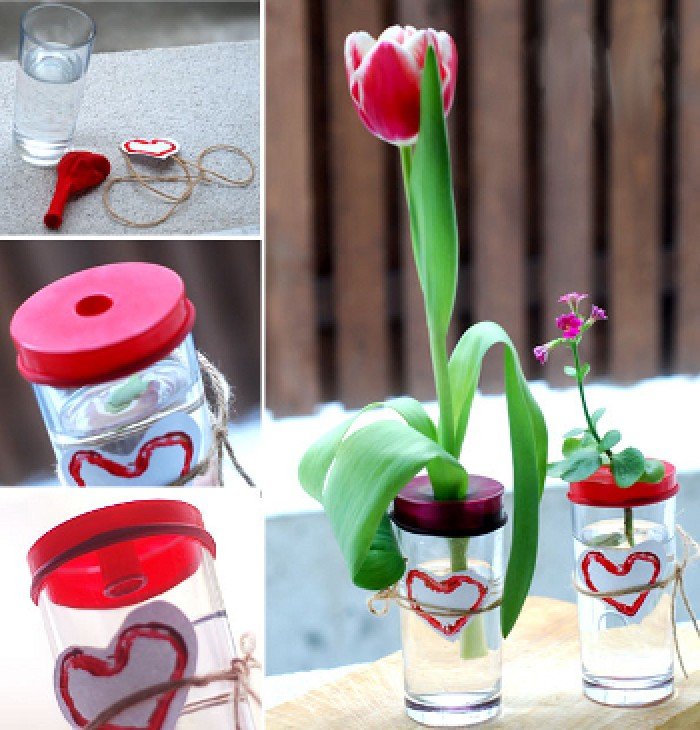
Vase of glass and balloon
Cut the balloon across at its widest point. Pull the top over the glass and tuck the hole into the glass. Tie the glass with a string, tie a bow. Voila! The vase is ready! You can put a flower in the hole of the balloon.
Plasticine vase
Oh, how interesting! Even a kid can make this vase. To do this, you just need to stick around it with plasticine and decorate it with various seeds, acorn caps or beads. Beauty!

Clothespin vase
Take a can of canned food and "garden" it with new wooden clothespins. That's all. The unique vase is ready. Just don't put water in it. Put inside a small glass of water, and already in it - flowers.
Vases from natural materials
cutting off birch bark(preferably with a cut or fallen one) and wrapping it around an ordinary jar, you will get an original vase, and at the same time you will take a piece of spring forest to your room.
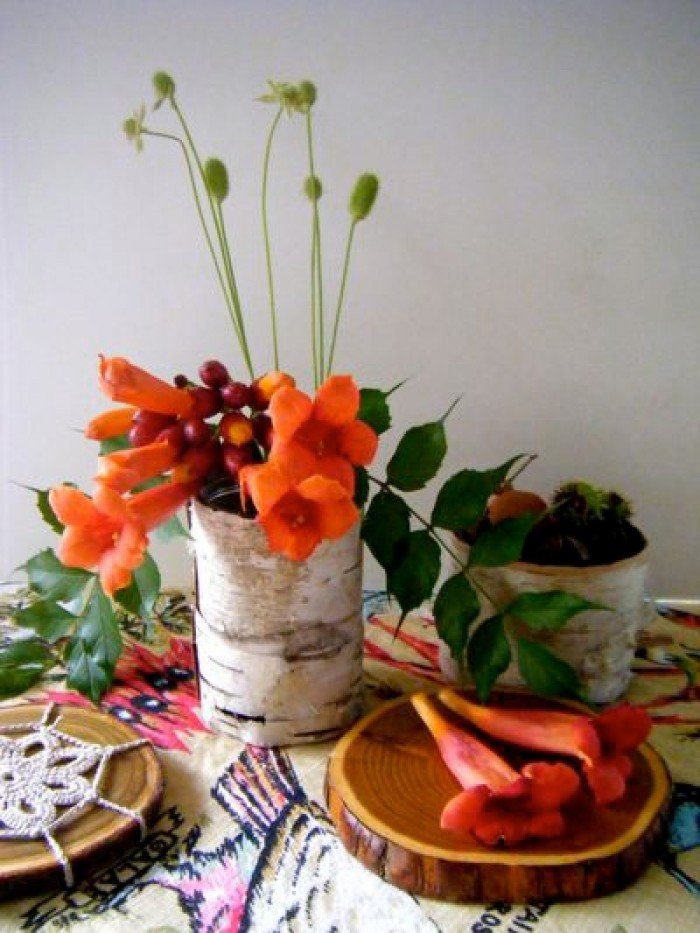
Perfect for making vase tree branches with which you can paste over a jar or flower pot.


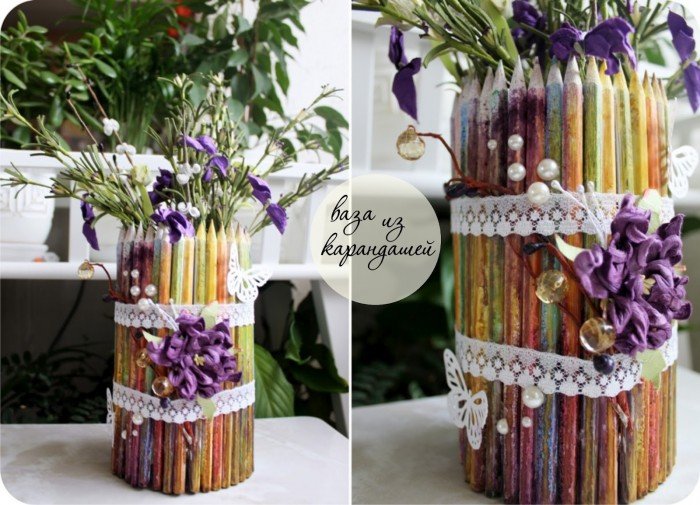
How about a vase of pencils?
Inside there may be a jar or a glass, and decorate it all with lace ribbons and beads.
I hope you liked my ideas, and you will certainly use them to create your own masterpieces. Good luck!