Download the program for the cutting plotter. PlotCalc - software for plotter: download software
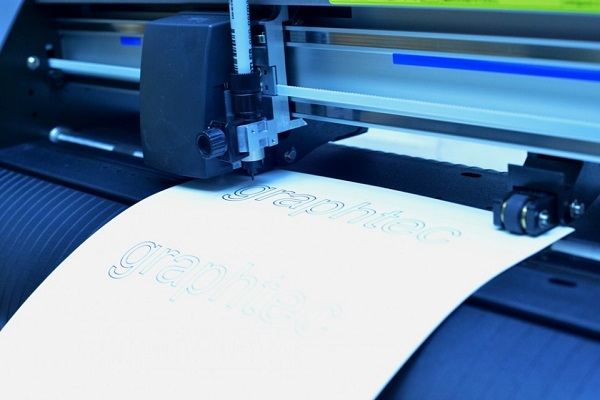
Large format printing has become an integral part of our lives. It is hard to imagine an enterprise that has never resorted to the production of plotter printed products. Posters, banners, huge signs, large stickers - all this and much more is printed on special machines that require careful and thoughtful operation. Such devices are usually called plotters, or cutter-plotters (devices operating on the principle of 2 in 1, printing and cutting at the same time). Let's try to understand the intricacies of operating this technique, consider individual examples and shed light on the nuances that must be taken into account before starting to work with the plotter.
These devices were invented in order to print and cut adhesive wide format products. But it helped to become truly mass plotters thermal transfer film. As consumables became affordable and reliable in quality, the popularity of plotters skyrocketed. Looking at any inscription or image printed on textiles, you can be sure that it was made using a plotter. However, like almost any inscription on the film.
Cutting (cardboard or paper) is also carried out by a plotter. According to the most common classification, such plotters are usually divided into the following options.

Software for work
The plotter works according to a predetermined algorithm. First you need to connect to a personal computer. The image to be printed is sent to the device, after which the cutting process takes place. The speed of work is highly dependent on the technology used by a particular model. Subsequently, the resulting material is applied to a metal or textile surface, depending on the need.
The plotter has software that carries out the process. Of course, the corresponding program must also be installed on the personal computer, without which it is impossible to send the drawing for cutting. The easiest way to do this is from Corel - CorelDraw, software for plotter printing.

If contour cutting is not carried out correctly, or the cut has shifted along the printed one, it is necessary to adjust software.
In addition to CorelDraw, you can use the program PlotCalc. It has a fairly simple interface, it is easy to work in it, and besides, it does not take much time to learn. Another well-known program for working with plotters is sign cut. The full version is paid, but you can download a trial version from the official site, which has some limitations. In general, the program menu turned out to be somewhat overloaded, but the functionality is impressive. With this utility, you can control the depth of cut of the knife, provided that this option is supported by the model itself.
Slightly less known program eCut. The main advantage of this software is that it allows you to cut files directly from CorelDraw. Files are written directly to the plotter port, bypassing the participation of drivers, therefore, the occurrence of errors and incompatibilities is minimized.
The following plotter output software is called OMEGA CUT. Used by "Omega" mainly for working with project documentation and is popular with those who work with plotters in this field. The functionality is limited by the scope, perhaps the programs can be described as average.
The principle of operation of the plotter, in addition to printing, also implies cutting. Of course, not all software is written with this function in mind. Simply put, not all plotter programs are suitable for a plotter-cutter and vice versa. For devices operating on the principle of 2 in 1, “native” software is most often supplied, developed and implemented by the manufacturer of the equipment. However, there is always an option to use third-party software if the capabilities of the pre-installed software cease to meet the requirements put forward.
If you just need to cut out pictures, then for this there is no need to purchase a program, the license for which is measured in hundreds of thousands of rubles. It will be enough to be limited to more affordable analogues. Also, if the work involves only printing, then you can limit yourself to the capabilities of the built-in software without investing a penny in the purchase of software. Of course, if in the course of work you have to resort to the services of a vector graphics editor, as well as print complex patterns, then you should think about expanding the functionality of the plotter software.
The algorithm for printing on a plotter
The algorithm for printing on a plotter (using Corel as an example) is as follows.
- You need to find and open the "file", in the window that appears, find page layout options and select one of them: quick print (using standard templates), previous settings, or resort to the current setting for the upcoming print.
- If the drawing includes a page layout, you can adjust this setting in the corresponding menu. The page markup includes several sub-items at once, in which many different values are controlled. Most of them have hint markers, making it clear which of the parameters will be changed. After completing all the manipulations, you can use the preview, and, if desired, undo the changes.
- Next, you need to proceed to printing (or output to a plotter) and in the "name" column, select the model of the plotter on which the printout will be carried out. In the properties, you can set the settings for the plotter driver.
- In the paper size section, you must use only standardized sizes to avoid confusion. It is best to stick to the format supported by the model. To find out what formats a model works with, you need to look at its performance characteristics.
- In the "print scale" column, indicate "according to paper size" or set it to the required size. The line thickness should also be scaled in strict accordance with the print scale.
- The "print range" column allows you to select from the following items: "all geometry", "drawing borders", "named view" or make changes to all these parameters yourself.
- After that, you need to set the required number of print copies.
- To send information not to a printer, but to a saved file, you can click on the item "print to file".
- After all the manipulations, the program will offer preview planned printout. If the user wants to print the document in its current form, it will be enough for him to click "ok", after which the file will be immediately sent to the plotter or queued for printing if the device is not available right now for some reason.
There are several short commands and hotkeys that can make typing much easier. By entering the "print" command in the command line, the user will start the printing process. And for quick access to printing, just click the menu in the explorer of an open program, hover over the “file” element and click “print”, then “quick print” (or hot key Ctrl+P).
Cutting various materials
Of course, to implement this function, a cutting plotter or plotter-cutter is required. The quality of the cut depends on a number of criteria.
- Blade sharpness. The newer the knife, the sharper it will be. Of course, for simple tasks, such as cutting paper, not the newest knife is suitable, but for jewelry work, where a lot depends on accuracy, the blade should be as sharp as possible.

- Source Quality, i.e. how complex and true the drawing itself is built. Sometimes it takes more time to finalize a file than it does to print and design. After all, if even one indicator does not converge somewhere, the structure of the figure will be violated.
- The mat should be quite sticky to hold consumables (fabric, vinyl, etc.) well.
- Customization for a specific material. Usually, all available settings can be viewed in the properties of the device itself. It is best to set them manually, because the technique will not be able to recognize the material on its own.
In order to try out new material in fact, you must always have some kind of drawing on hand. Test samples offered by the manufacturer do not always reflect the real picture, because. imply cutting circles and squares, in which there is nothing complicated.
It is highly not recommended to perform a complete template without preliminary testing - there is a high probability of incorrectly exposed material.

Another important factor in case cutting of several materials at once is meant. For each material you need to have a separate knife: blades for paper and fabric are quite different. Some experts mark the blades in order not to confuse them. For example, "T" - fabric, "K" - cardboard, etc.
If you plan not only to print patterns, then you will need to work with pressure and knife projection, setting the necessary in the system settings. The difference in fabric work is only in principle further use: cut for tailoring or appliqué. For cutting on cardboard, the height to which the blade will rise is important. Since the material itself “plays” easily, it is necessary to ensure that the cardboard is well fixed in one position when cutting to prevent distortion.

Film
Oracal film requires special precision in preparation to cutting. Since the vinyl base can be easily deformed, precision is required at the moment of fixation. The larger the image (picture, logo, etc.), the more carefully the layout designer should act. When working with this material, it should be borne in mind that cutting will be only an intermediate process. Vinyl film goes through several stages of processing before being finished. If we compare it with other materials, for example, fabric, then we can note a certain complexity during operation.
Paper
When working with ordinary wide-format paper, it is enough to simply monitor the sharpness of the blades and change them in time. Paper is very unpretentious in terms of cutting. Its shortcomings can appear during chemical and thermal reactions, but during the cutting of the pattern itself, the probability of a defect is not so high.
Considering all the above aspects, cut various materials With the help of a plotter-cutter, it will not be difficult. Of course, without a certain experience, there will always be a risk of spoiling a batch of blanks. That is why experts recommend trying cutting first on small test materials. It is worth starting the main cutting of any of the materials listed above only when there is confidence that the source file with the pattern is correctly built and all its parts are calculated and converge. It is also important to pay attention to technical condition tool, put the blades under the material and check their sharpness.
Conclusion
It is not difficult to work on the plotter, only a little skill and care is needed. All aspects of work have their own step-by-step algorithm, from choosing and installing a program for working with files to servicing individual elements of the device. Even if something does not work the first time, do not despair and give up. With patience, any of the stages of working with the plotter will be successfully mastered. It should be noted that the use of large format printing technology for the most part does not differ much from the operation of printers or any MFP. Certain specific nuances, of course, are present, but if you wish, you can study all these points and learn how to work with them.
Download PlotCalc 7.0.0
Please read the user agreement before downloading and installing:
1.0 Downloading or installing PlotCalc constitutes your consent. 1.1. When using paid functions that require an Internet connection, your data is sent to the plotcalc server, where it is processed and the result of the work is sent. 1.2.Your data may not be used for publication or transfer to a third party. 1.3.After uninstalling PlotCalc, your system will look the same as before installation. 2. Terms of use of the activation code. 2.1.After activation, restrictions on the operation time of paid plotcalc functions for the period of code operation from the moment of the first activation will be removed. 2.2. Simultaneous use of one activation code on several computers is prohibited, however, consecutive use is allowed first on one, then on another, etc. computers. When moving from one computer to another, you will need to re-activate Plotcalc, which lasts 15 minutes. 2.3. The number of repeated activations is not limited.
Removing PlotCalc
1. To remove PlotCalc from your system, click Start >> Control Panel >> Remove Programs
2. In the window that opens, select your version of PlotCalc and click Uninstall.
After the process is completed, the program will be completely removed.
Installing PlotCalc
1. Run plotcalcXn_Russian.exe file and install PlotCalc

2. Drag the PlotCalcStarter.gms file to C:\Program Files (x86)\Corel\CorelDRAW Graphics Suite Xn\Draw\GMS\ (where Corel is installed)

3. Launch CorelDRAWXn
4. Click Tools >> Options (Tools >> Options)
5. Select on the left Workspace (Workspace) and click the Import... button (Import...)

6. Locate the PlotCalcToolBar.xslt file and click Open

7. Click Next, Next, Next, Finish, OK

8. To display the PlotCalc panel, right-click next to the toolbars and in the list of panels, check the box next to PlotCalcToolBar

9. Everything is ready to go.
If the panel is not active or nothing happens when you click on the buttons, then do the following:
In CorelDRAW, press the ALT + F11 button - the VBA editor should open, if the editor does not open, then it is not installed, and PlotCalc will not work without the VBA editor. Run setup CorelDRAW and install VBA. If you are using a stripped-down (budget) version of CorelDRAW, then the VBA editor may not be in setup. After installing VBA PlotCalc will start working.
Voted for the program: 50 average rating: 2000001,5
Published in the collection of programs: July 17, 2010
Operating system: Windows ALL
Size of the program (distribution kit): 467KB
License type: Demo
The plotter calculator is a special program integrated into CorelDraw 11 or CorelDraw 10, which is designed to measure the length of curves (the length of the path of the plotter knife).
The program is embedded in CorelDraw, and a control panel appears with three buttons that perform the following functions:
Measuring the lengths of curves, and simultaneously calculating the cost of cutting, based on the value of the price per meter. (see screenshot 1)
Creating a layout scheme in a generally accepted scale on A4 (see screenshot 2)
Preparation of layout elements for cutting on a plotter. When cutting is performed on the plotter, the program automatically removes the fill, converts all elements into curves, etc. After cutting, the program marks the elements so that you can quickly navigate: which elements have already been cut and which have not.
Advantages over PLTV.exe:
The calculator for the plotter is integrated, which is very convenient for work, PLTV.exe is not.
Plotter calculator is much faster than PLTV.exe for large layouts (10-15 times faster)
The plotter calculator handles layouts of any size, PLTV.exe hangs when the layout is too big.
The calculator for the plotter provides 100% calculation accuracy, because it does not convert the curve into many short straight lines, and PLTV.exe thus. makes the calculation approximately, not exactly (PLTV.exe may be wrong 1%-20%)
The plotter calculator is designed specifically for designers involved in cutting on a plotter and has additional functions.
When adding the program to the catalog of our site, the link to Plotter Calculator 1.92 was checked by antivirus, but since the file is located on the server of the software developer or publisher, it can be changed, we recommend that before downloading the software to your computer, check the files in On-Line antivirus mode - opens in a new window and will be checked!
You can download Calculator for plotter 1.92 from the developer's link:
Download program | 467KB |
This version of Plotter Calculator 1.92 - demo version with a limited set of features.
We do not post on our website: crack, key, key, license and serial generators for the program Calculator for plotter 1.92.
If you liked this program, then share it on social networks:
This article will discuss how to set up a plotter for cutting from under coreldraw, using the list 720 entry plotter as an example. After installing the drivers and trying out the Artcut program that comes with the plotter, many users experience difficulty and ask the question: is it really possible to work with this? Of course, you can make a vector drawing in corel draw, and then import it into artcut. But it takes more time and is not very convenient. Therefore, plotter cutting from corel draws is what we need.
Installing the JCforCOL application to the CorelDraw program for the operation of List H cutting plotters.
1. Launch the app (downloads: 7124)
1.1. The "coreldraw setup" window will open

2. In the "CorelDraw setup" window that opens, in the "CorelDraw version" field, select the version of the program that is installed on your computer and click the "Install" button - installation problems may occur on 11 and x4 versions.

3. After installing the selected version, the "coreldraw setup" window will open, informing you that the application was successfully installed.

3.1. Click the "OK" button with the mouse.
4. Setting options in CorelDraw.
4.1. In the "CoreDRAW" window, select "Tools" from the top menu, then select "Options" from the context menu.

4.2. In the “Parameters” window that opens, in the “Command Bars” section, click the checkbox in the “OutPut to cutting plotter” box

4.3. Click the OK button, in the CorelDraw window, the OutPut to cutting plotter command will open.
5. Setting up the JCforCOL program.
5.1. Select the "OutPut to cutting plotter" command
5.2. Click the "cancel" button
5.3. Open JCforCOL App

6. In the "JCforCOL" window that opens, select the "Auto" function and enter the settings of the JCforCOL application

7. Set the settings as shown in the figure and click on the "OK" button.
1. Select your plotter model. (JCC-HS, JC-H).
2. When setting the "COM" parameter, you must select the port number on which the plotter is installed when connected via USB in the device manager.
3. Select the baud rate (USB connection - 57600)
4,5,6. Parameters responsible for the quality of cutting.
4 - "Close" (closure) - a parameter responsible for closing the start and end points of the vectors.
5 - "Sharp" (knife) - a parameter that depends on the angle of sharpening the knife. The parameter value is indicated on the knife box.
6 - "Precision" (accuracy) - is responsible for the quality of cutting the file.
7. Shows and resizes the page and layout dimensions.
8. Parameter update function.

If this function is not set, the plotter will cut a polygon instead of a circle.
8.1. Create any image in Corel Draw.

8.2. In the CorelDRAW window, select "File" from the top menu, then select "Export" from the context menu

8.3. In the "Menu" window, select the file type - "PLT", and click the "Export" button with the mouse
 PLT
PLT
8.4. In the Export HPGL window, select the Advanced tab. Set the value of the "Curve Resolution" function to 0. Click the "OK" button with the mouse

9. Select the "OutPut to cutting plotter" command. If your objects are selected, then click the mouse "Yes", if not selected, then - "No"
10. In the “Jutput set” window that opens, click the “Start” button with the mouse, while the “connect” inscription should be lit on the plotter, after which cutting will begin.

On this article plotter cutting from CorelDRAW (core draw) came to an end, if you have any questions, ask in the comments.