Printable valentines forms. Fairy tale world made of felt. Card with roses made of corrugated paper
Gloves with "Valentine"
A piece of soft fabric (thin felt or wool, which can be taken from an old hat, sweater or scarf) will do. Cut out two hearts from the fabric and sew them to both gloves on the back of the hand, as shown in the photo.
Mini heart-shaped hand warmer
This heating pad can be carried in your pocket. It will warm not only your hands in the cold, but also the soul of your loved one. You will need a small piece of wool, scissors, a paper stencil in the shape of a heart and a handful of rice or any other not very small grain. Cut out a heart from the stencil, then sew it partially, leaving a small hole. Pour the rice through the funnel into the heart and then sew it up. See the photo to make such a Valentine card with your own hands.

Candlesticks made from cans
If you are going to create a romantic atmosphere on Valentine's Day, you will, of course, need candles. And live fire can be replaced by LED garlands, which can now be purchased at a discount. “Heart” jars-candle holders are made from ordinary glass ones. First, you need to thoroughly wash and degrease them (by wiping, for example, with vinegar), and when they are dry, stick a paper stencil in the shape of a heart in the center of the jar, and paint the rest with aerosol paint in a bright red or crimson shade in two layers. When the paint dries, remove the stencil and place a lit garland inside.

Tea for Two
It’s a small thing, but it’s still nice when regular tea is brewed with such love. How to make a Valentine card with your own hands? All you need to do is sign a heart cut out of colored paper and glue it to a tea bag.

Red Velvet Pancakes
Master class on making your own edible valentines: add 2 tbsp to the regular pancake recipe. red food coloring and 2 tbsp. cocoa. Mix the dry ingredients separately: flour, soda, baking powder and cocoa, and then in a separate bowl, crush the butter, add milk, eggs, a little vanilla and food coloring. Mix, beat with a mixer and cook as usual. And to give the pancakes the shape of hearts, use cookie cutters.

Cherry tomatoes
This is our favorite Valentine's card that you can make every day! Cut small tomatoes at a 45-degree angle, place the halves together and prick them with a toothpick.

Romantic breakfast
This is how you can shape a hard-boiled egg. Using a rubber band and a wooden skewer or chopsticks, place the freshly boiled egg in the pan and wait 10 minutes. Add red game or a piece of salmon. And, of course, coffee in bed. Who wouldn't appreciate such a surprise?

Pizza for lovers
A very tasty pizza can be made in the oven in 15 minutes if you buy the right ingredients for it. Buy refrigerated (not frozen) thin pizza dough. It looks like a sheet rolled into a roll. Roll it out on a board, cut it and shape it into a heart shape. Then apply a layer of special tomato paste for pizza. There are very tasty ready-made ones in stores, but you can make the sauce yourself. Grate Mozzarella cheese (there is also a special variety, just for pizza), and add your favorite ingredients on top: cherry tomatoes, pepperoni or salami, salmon, basil, etc. Grease a baking sheet with olive oil and place in the oven preheated to 190 degrees. , for 15 minutes.

Bird feeders
This Valentine's card can be made together and hung in your nearby yard, in your own garden or city park as a symbol of your love. You will need: bird food (available at any pet store) - 3 cups, gelatin (about 2 bags) and cookie cutters (optional). Mix gelatin with cold water (½ cup). Wait a bit for it to absorb the water. Then heat another 1.3/4 cups of water in a saucepan and add the diluted mixture to it. Stir and add birdseed. You should end up with a paste that needs to be cooled and waited until it becomes viscous. Place it on greased foil and shape it into a heart shape. To make the food harden faster, you can put it in the refrigerator for about an hour. All that remains is to tie the ribbon.

Scrambled eggs on toast
Cut out a large heart shape in the center of the bread toast (again, you can use a cookie cutter or just a good knife). Lightly toast the bread in the toaster, then place in the pan and carefully crack the egg into the center of the heart. To prevent the egg from spreading beyond the toast, the pan must be well heated. Then everything will work out!
Romantic decor
You can instantly decorate your home for Valentine's Day using a hoop if you place it on the wall (of course, you don't need to drive nails in, the hoop is lightweight and will be held on with tape). Stretch a plain fabric onto a hoop and make an appliqué or simply write on the fabric what you would like to say to a loved one. Beautiful DIY valentines are ready!

And such a panel from prints can be made together with the kids for their beloved dad.

Valentines-Coffee Cuffs
Can you knit? Wonderful. Then you will need no more than half an hour to make such a Valentine card. You will always have it with you: in the car or in the office.

Cookies with icing
For those who love sweets, we suggest making cookies for Valentine's Day. And it’s not at all scary if it doesn’t turn out so beautiful. He will definitely be appreciated.

Sweet "hugs"
Agree, receiving just candy as a gift is not interesting. Well, who wouldn’t smile and be touched if the candies are held by such charming animals cut out of simple cardboard.

Box with emotions
A chest with wishes, compliments or just warm words, favorite phrases or the most memorable events from your life. Fantasize for your health. Tell us how you feel, how you know how to love and open your heart!


In ancient Rome, Lupercalia was celebrated in honor of the fertility gods.
This is a special holiday, which began with an oracle, which, when asked what to do to increase the birth rate, announced the ritual of corporal punishment of women with belts made from the skin of sacrificial animals.
The connection between this holiday and Valentine's Day will be discussed in this article.
A little history
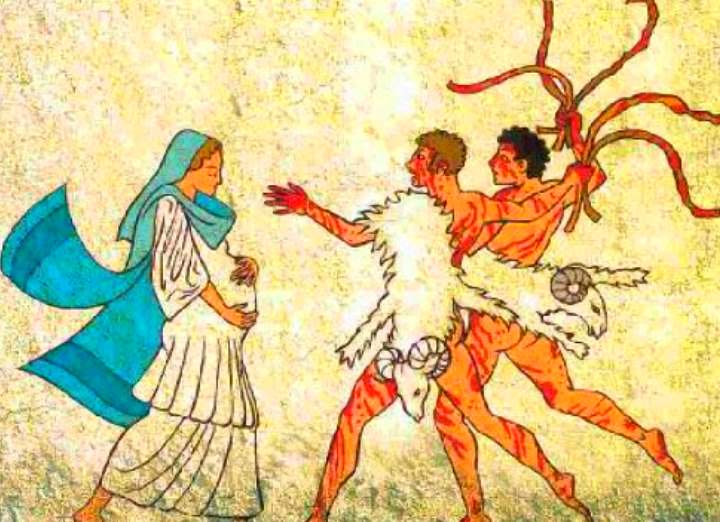 So, the celebrations were very loved by the ancient Romans.
After the feast, naked young men (lupercalia) ran around the city and hit women they met with whips. By the end of the evening, women were also naked.
The process of national extinction in Ancient Rome was actually solved with the help of lupercalia. These celebrations were banned with the advent of Christianity.
And then, instead of such a unique day of love, a celebration came in honor of the Christian priest - St. Valentine.
Marriage was prohibited in the army of Emperor Claudius. However, Saint Valentine secretly married the lovers. For this he was sentenced to death.
Now the celebration of Valentine's Day is secular. In Russia, this holiday became known quite recently - in the 20th century.
Valentine's Day
How did Valentine come about?
 Valentine is a symbol of the holiday.
When Saint Valentine was awaiting execution in prison, he saw the beautiful daughter of the prison guard and fell in love with her. He wrote her a letter of recognition, and it is called the first Valentine.
In the 15th century, the Duke of Orleans wrote love letters to his wife from prison, and in the 18th century, declarations of love written on a heart-shaped card became known as “Valentines” and became widespread.
How to make a voluminous valentine with your own hands
A voluminous valentine is made from paper, fabric or buttons.
Such works do not require much skill, but they look great.
Card "Valentine's Heart"
A voluminous paper valentine is made from white thick cardboard and also from red paper.

That’s it – the “Valentine’s heart” talisman is ready!
Postcard “Lovers”
To make such a voluminous valentine, you need to prepare a template from thick paper, then carefully cut it out with a blade, bend it at the folds and glue it to a scarlet base.
Quilling style
 Volumetric ones using quilling technique.
Using the quilling technique you can depict a voluminous heart. To do this, take narrow strips of colored paper (red0) and screw them onto a pencil.
The resulting paper ring is slightly pressed with your fingers, then loosened a little.
The resulting spirals are glued onto a prepared heart-shaped base.
You can also lay out a heart shape on a white cardboard card using spirals.
We use felt
The most fashionable trend is felt valentine pillows.
 Prepared multi-colored small pillows in the shape of hearts made of felt are glued onto a base of thick cardboard and the original card for Valentine's Day is ready!
One large voluminous felt heart decorated with beads is also a great idea for a voluminous valentine!
Balloon valentine
Volumetric valentine heart made of balloons.
A garland is woven from inflated balloons of the same diameter in a “four” pattern.
The garland is then shaped into a heart shape. A wire frame is used for this.
A great option for decorating a room for celebrating Valentine's Day.
Valentine's card from flowers
 Volumetric Valentine heart made of flowers.
This option for making a common gift for Valentine's Day is suitable for a young man in love.
To make a valentine, a wire frame is used; roses purchased in advance and prepared by florists for such a craft are placed on it.
Such a valentine will definitely win the heart of your beloved!
Valentine card made from artificial flowers
You can make a voluminous valentine from roses yourself by replacing real roses with fabric flowers.
Roses made of scarlet fabric are glued to a base made of thick cardboard. This valentine can be made in different sizes - from very small for wearing on the chest, to large for interior decoration.
Dear friends! Valentine's Day is coming soon, and valentines are an integral part of it. exchange them at school, lovers send them to each other to express their tender feelings. I suggest you approach this romantic moment creatively and not buy ready-made cards, but make other materials at hand. Little cute heart cards can be a gift not only for Valentine's Day, but also for any other holiday or even not for a holiday.
My son, at the age of 5-6 years, when he learned to cut out hearts, would give them to me every day, and inside it would always be written: “Mom, I love you!” Is there a more valuable gift for mom? Why don't we give each other such sweet reminders of our love more than once a year? It's so nice! Do DIY paper valentines just see for yourself. Arm yourself with scissors, glue, paper, cardboard, various small things for decoration, call your kids and get creative! Everyone will be happy!
DIY Valentines made from paper and more – ideas for creativity with children
We have already done different ones and shared our experience with you. How to make valentines with your own hands? Yes, very simple. There are a lot of options.
1. The simplest option is to cut out a heart from a sheet of cardboard folded in half, decorate the colored side, and write a message inside. Here everything depends on the author’s imagination and available materials.

You can decorate with paper, lace, cord, sequins, various designs, stones, anything!

2. A very cute valentine is made by gluing small hearts made of accordion-folded paper inside the heart.


3. You can make a traditional rectangular card out of cardboard and decorate it with hearts of various sizes from different materials. Cute valentines are made using the quilling technique.

For example, this Valentine card with cats just touches me! Everything was so well thought out!

4. Valentine cards with clasps, ties, and ribbons look beautiful. So romantic, the message is hidden from prying eyes.

5. There can be many different colored hearts on a postcard, or there can be just one, it’s a matter of taste.


6. Small DIY paper valentinescan be made by cutting out heart-shaped windows and attaching fabric of different colors to the bottom.

7. A wonderful valentine is created if you attach a voluminous heart inside the card.

To make it, you need to cut out a blank for the postcard itself, measuring approximately 15 X 18 cm, and bend it in the middle. Cut out a heart according to the template, make folds where indicated by the dash-dotted line. A large heart should have an outward fold, and a small inner heart should have an inward fold. Now you need to glue it to the inside of the postcard, and decorate the side parts and the front side using whatever materials you have at hand.

8. This version of Valentine’s card will be very impressive.

You need to carefully cut out the hearts along the contour using a stationery knife from white paper, and do not make cuts where shown by the arrow. Glue the main part onto paper of a contrasting color, for example red. There is no need to glue the cut out parts; they must be fastened along the cuts shown on the template. When opening such a valentine, the hearts form a three-dimensional composition. It turns out very beautiful.

9. A wonderful valentine is made with birds. It’s easy to do; the stencil for the birds can be downloaded below. Decorate the card with available materials. A very romantic option!


10. Beautiful woven valentine leaves also look original.

To make them, you need to cut out two identical blanks from paper of two colors. Variants of such blanks can be printed, the template is located below. Make cuts as shown on the template and carefully interweave the strips in a checkerboard pattern. The finished heart can be glued onto paper or cardboard, and a congratulation can be written on the reverse side.

But here is a slightly simpler option.

11. Volumetric valentines are a full-size gift.

To make such a three-dimensional valentine you will need cardboard, you can take foil for the heart itself, scissors, thread or fishing line. Cut out blanks from cardboard, as shown in the figure, make cuts, and fasten them together. Hang a heart made of foil or cardboard on a thread or fishing line. That's all! The Valentine card can be folded, it will be flat, you can unfold it and place it on the table. Such a gift can be made together with the child for grandparents.
12. Valentine cards with buttons look very creative. These bright cards are so easy to make. Surely, many people have stocks of torn buttons. Now you can apply them by decorating a card for Valentine's Day.

13. It will be interesting for children to make animal figures from hearts. For example, mice in love. They are easy to make; you will need red or pink, scissors, glue, a small pompom for the nose and thick threads or fishing line for the antennae. We cut out the hearts, glue them, decorate, everything is ready. In a similar way you can make an elephant, an owl, a ladybug. Makes a cute gift.


Since 1800, when mass production of valentines began, there has, of course, been no need to do so. On the eve of Valentine's Day, the shelves of many stores are filled with them. But it’s always more pleasant to receive a sincere love message written on a heart made with your own hands from the bottom of your heart. Lots of options! All you have to do is choose what is closest to you.

I hope you have found a suitable option in this article and will make it for your loved ones, family and friends DIY paper valentines, cardboard or other materials!
We will definitely return to the topic of handmade gifts for Valentine's Day! Have a creative day and creative inspiration!
If you want to keep abreast of our news, subscribe to the “Our Kids” news! Fill out the form below and receive them in your email!
Valentine's Day, previously unknown to anyone, is gradually gaining momentum. To make it easier, buy a ready-made card, but it’s not in vain that many people think about how to make a Valentine’s card with their own hands. A personally made gift is always better than a soulless factory gift. Moreover, the simplest techniques are accessible even to children, and the more complex ones will certainly amaze the recipient with their beauty. Go for it!
A self-made one would make a wonderful gift. And, of course, small gifts for and, given from the heart.
Although on Valentine's Day the dearest person, a wife or husband, can count on something more significant than a postcard, a Valentine's card will not be superfluous, demonstrating the full extent of love. Well, for friends, classmates, father, mother, grandmother, God himself ordered to make such small gifts - cheap, but with soul.
Let me add that even a child can make the simplest cards, for example, this “palm”, for which you need:
- fold a piece of paper in half, place your hand on the fold with the flat side
- trace the outlines with a pencil
- cut along the lines, trying to keep the halves connected

- cut out several hearts at once from red colored paper, 4-5 pieces

- attach them, folded together, to the joint inside the resulting palm card
- connect the inside of the heart with glue to hide the ends of the thread

- That’s it – a simple Valentine’s card with hearts inside is ready!
Original valentine using isothread for February 14, 2019
The combination of thread and paper is original, looks unusual, gentle. Even a school-age child can cope with the task; an additional bonus will be the opportunity to practice precise movements and counting. This valentine is made in this way:
Take: cardboard, tape, thick thread, scissors, a simple pencil, decorative elements as desired;

- A heart is cut out of cardboard (preferably red), using a pre-prepared stencil

- Use a pencil to mark points at equal distances along the entire perimeter of the heart, along the very edge (interval 5-10 mm)
- in these places, small V-shaped incisions are made with small scissors

- A thick thread is attached to the workpiece on the reverse side with tape

- then it should be passed through the first incision from the center to the twelfth


- there is a space left in the center, which is also better to fill, for this we take a new thread and wrap the heart from the first slot to the twelfth, again from the first to the thirteenth and so on

- All that remains is to decorate the finished wicker Valentine card along the edge with ribbons, bows, cardboard of a different color to obtain a more interesting design - and the gift is ready!

Making valentines with children
It’s easy to make a postcard together with your children, so that they can then present a gift to their grandparents, teachers, and educators. There are several simple options, for example, a voluminous paper heart. For it you need:
Take: colored paper, scissors, glue, a regular pencil, a plate slightly larger than a sheet of paper;

- place the plate upside down on a sheet of paper so that the edges extend beyond it at the top and bottom, trace with a pencil

- cut along the resulting lines


- unfold, make three more in each fold (that is, visually divide the resulting strips into three and fold each part three more times, changing sides each time you fold

- fold the resulting accordion in half, mark the middle
- Apply glue to the inner edges and glue the two halves together.

Decorating a wooden heart using decoupage
Fans of the decoupage technique can use it when creating a Valentine card. To work, you need to take a ready-made workpiece, sandpaper, acrylic primer, glue, napkins for decoupage, a fan brush, acrylic varnish, paints, and ribbons for decoration.

The procedure is:

- lightly sand the heart-shaped blank purchased at a craft store, removing sharp edges

- Using a sponge, cover the entire surface of the “heart” with primer, then wait 10-15 minutes for drying and cover, if necessary, with a second layer

- Trace the workpiece on a napkin and cut along the resulting outline

- carefully separate the topmost layer of paper with a bright pattern from the cut-out element, being careful not to tear the material

- Place a file or a piece of dense polyethylene on the table, place the cut-out napkin on top with the reverse side and apply glue from the center with gentle movements of the brush

- carefully transfer the paper onto the workpiece using a file, level it if necessary,

- slowly remove the plastic

- remove excess napkin around the edges, since the paper often increases in size when soaked

- After drying, coat the workpiece with acrylic glue-varnish

- paint the edges
- Decorate your Valentine's card with ribbons, bows, and other decorative elements.
Valentine's Day card using scrapbooking technique
Scrapbooking can be used not only for making albums. It's even suitable for Valentine's Day. You can make a cute, extraordinary card like this:
Take: cardboard of two colors, ribbons, beads, lace, rhinestones, glue, glue gun, artificial flowers

- take two pieces of cardboard in the shape of a heart, one slightly larger than the other (you can cut it yourself using scissors with curly edges) and stick them on top of each other

- cut out rectangles of different sizes and a heart and glue

- On a small heart in any shape, stick bows from ribbons (the edges are burned with a lighter), pieces of lace, beads, flowers using a glue gun

- add self-adhesive rhinestones if desired
- Glue a piece of pink paper in the shape of Cupid's arrow to the top right side of the heart on the reverse side
- place the larger heart behind the smaller one, use a utility knife, an awl, and a large needle to make a through hole in these two layers
- Use a clip (like for clothes) to connect the hearts, bend the metal strips and cover them with a small piece of paper so as not to spoil the appearance

- This is how we get a valentine card, which is rotated with the help of an “arrow”, revealing the dedicatory inscription.
Pendant for lovers on February 14th – quilling to help
A simple, beautiful, but patience-requiring way to decorate a card is quilling. The technique involves rolling thin strips of paper and joining the resulting rolls with glue to form a specific shape.
So, to make a gift for Valentine's Day we need:
Buy special paper for quilling, cut it into strips (it’s easier to buy ready-made blanks) in red, pink or other colors;

- screw each strip onto a base of different diameters, these can be pencils, pens, markers, thick knitting needles
- the edge of each roll is coated with glue to secure the shape

- rolls in any shape are placed on the workpiece, glued together, but not to the base

- When the entire base is filled with circles and they dry, the voluminous, transparent heart is ready.
What can be made from paper using origami
For fans of origami, I suggest you make a three-dimensional heart, for it you need:

- take a sheet of white or colored paper, cut out a square 21 by 21 centimeters from it
- fold the sheet in half

- then open it, turn it over and bend the narrow strip at the top

- fold the sheet in half again, fold the corner towards the middle, and do the same on the other side

- bend the corners halfway to the outer edge

- unfold, bend the corners to the fold line

- bend the leaves into triangles and insert the corners into the “pockets”

- We insert a pencil into the resulting hole, and then blow air into the cavity, straightening the heart. A voluminous heart for your loved ones is ready!

Master class on making postcards from paper and cardboard
You can make a unique moving Valentine card from cardboard or thick paper, which will delight your mother, your friend, and many acquaintances. A universal gift!

To do this we must:
Take sheets of paper of different colors. For example, rainbows, plus another sheet for the base, white or black, a ruler, a regular pencil, scissors, a glue stick, glue, a heart stencil;

- We trace all the sheets according to the stencil shape, cut them out
- from the main paper, cut out an even long strip the width of the heart using a pencil, ruler and scissors

- on the edge of the black paper you should place a stencil “lying down”, make marks with a pencil along the contour, draw a line along these marks (select only the tops of the two halves of the heart
- measure 7 mm higher along the strip
- The arrows indicate where the glue is applied

- apply glue only to these pieces with a brush and glue one leaf at a time, so we get a rainbow of paper

- Fold a line along the top edge and turn it inside out

- cut a piece of cardboard to the width of the base, glue it to the back of the main part

- cut out an arrow in the free part of the base
- wrap a thin strip of cardboard around the lower part of the base and the upper part under the heart, fasten the edges

- glue the lowest of the rainbow hearts on top
- now by moving the top over the bottom we get an inverted rainbow
- If desired, you can glue a heart with a wish to the free space on the base when opening it.
Video master class - making a three-dimensional Valentine using the kanzashi technique
Luxurious, like real flowers, decorating a valentine's kanzashi will not leave anyone indifferent. Despite the apparent complexity, the procedure can be easily mastered by anyone who knows how to work with their hands. Let's look at the process step by step:
You need to take: glue gun, tweezers, scissors, lighter, transparent glue gel, heart blanks, sandpaper, satin ribbons (width 5 cm for large roses and 2.5 for small ones, length about 5-11 cm for each petal) or felt, decorative decorations, leaves, foam for the base;
- a piece of tape 5.5 cm long for a small rose or 10-11 for a large one is carefully folded at the corners to one side to form a kind of rhombus, for this the corner is bent at a right angle, pressed, cut at an angle of about 25° with scissors and soldered with a lighter ;
- This is how you should process all the pieces of ribbon prepared for roses
- Next, we take one diamond, glue it along the long diagonal with a gun, wrap it in a roll with tweezers, additionally fasten one side with fire
- We wrap the next diamond around this bundle, also securing it with a glue gun
- this way we gradually get peculiar buds, not forgetting to fasten their lower part with fire from a lighter
- we form all the buds from the prepared ribbons in the same way
- take the base, cut it out in the shape of a heart using a stencil, paint it red, burgundy, white, you can just use your favorite color
- Using a glue gun we attach the buds to the upper flat part, small on the edge, large in the middle
- fill the gaps with artificial leaves (easy to attach with a glue gun and tweezers
- We decorate the lower part with rhinestones.
You can watch the video master class in more detail.
Valentines can be so different, but made with your own hands, they will definitely demonstrate your attitude towards a person, tenderness, love. It’s good for you to celebrate this beautiful holiday, and look for new gift ideas on our blog!
How nice it is to receive on Valentine's Day, which is celebrated on February 14 and dedicated to Valentine's Day, a small gift in the shape of a heart - the so-called “Valentine”! During my youth, such a holiday was unknown in Russia, and we gave gifts exclusively on February 23rd for boys, and on March 8th for girls :)
But the wonderful holiday of St. Valentine, not tied to any political dates or official celebrations, quickly fell in love with many and became very popular in our country. Give and receive valentines, notice symbols of hearts everywhere and plunge into the atmosphere of general mild insanity - why not?
Appeal to mothers and grandmothers!
If you are young in soul and body, if you are in love, give and accept signs of attention! If you are only young at heart, but your body no longer wants to fit into the atmosphere of a youthful holiday, spit on his grumbling and pick up glue and paper - your body is still capable of this?! Make a beautiful and unexpected valentine with your own hands, show your children and grandchildren a master class, prove that there is still “gunpowder on our street”!
And even though there was no such holiday in our youth, we knew how to make crafts better than the current “generation of computer geniuses.” Hands remember!
Of course, you can buy a ready-made postcard. But is it so pleasant for both the giver and the one receiving the gift? After all, by spending effort, thinking about who you are preparing a gift for, creating a surprise with your own hands, you experience unique feelings of joy and anticipation - and this is the very, unique atmosphere of a REAL HOLIDAY!
Moreover, such a thing, amazing in its capabilities, as the World Wide Web, offers us many options and ready-made solutions, even in photos, even in videos, in step-by-step lessons and master classes, with a detailed description and demonstration of the result.
This is the selection I have prepared for you today - choose the most interesting valentine option for you and - forward to creative success!
DIY Valentine's envelope made of paper - make with children!

Such funny animals that give valentine hearts can be easily and simply made from plain paper, together with children - I think they will at least not be bored! After all, you can invent and create absolutely any animal - a bear cub, a kitten, a bunny, and even one that no one has ever come up with before :) Show imagination in your image and accuracy in your work - and you will get a wonderful original valentine in the form of an envelope with a secret message for the holiday February 14, and more!
What to prepare:
- a sheet of cardboard or thick white paper
- red paper for the heart
- glue
- colored pencils or markers or paints
- scissors, ruler, pencil
- Take a regular-sized sheet of thick paper or white cardboard.

- Fold in half, make a fold.

- Make a cut along the fold with scissors - we will get 2 blanks for our valentines.

- Place the rectangle as in the photo. Using a ruler, use a simple pencil to mark two points 2.5 cm from the vertical edge and connect them with a line.

- Do the same on the other side. The result is a kind of margin 2.5 cm wide.

- Now place a line on top in a similar way 5 cm from the top edge, putting two points and connecting them with a line.

- Everything above the line will be our character’s muzzle. On the side you need to outline two semicircles - the paws with which he will hold the envelope. Draw the paws below the horizontal line, stepping back from it about 1 cm down.

- This is the face and paws of the future dog that appeared on the sheet.

- Take scissors and carefully cut out all the contours along the pencil lines. If you are making a Valentine card with children, help them cut out difficult places - like in our example, the ears of the dog.

- We bend the lower part upward - corner to corner. We color the pencil face with colored felt-tip pens or pencils. You can also make an applique from colored paper - here only your imagination will tell you how best.

- We bend the paws over the top and draw claws on them.

- From a piece of red paper, cut out a heart of any size you like and glue it in the center. Be sure to use red - this is traditionally the case on Valentine's Day - for some reason the hearts are always red or pink.

- Now let's make an imitation of an envelope - draw diagonal lines from the corners to the heart.

- Open our Valentine's envelope and use a colored pencil or marker to draw writing lines inside our gift.

- You can draw several hearts - it will be even more interesting. Well, don’t forget to write the message itself - after all, any Valentine’s card is a declaration of Love and Friendship!

- These are the kind of funny little animals you can create. Colored parts can be painted or pasted with an additional layer of paper of the desired color.

DIY voluminous paper valentine - 3D hearts for Valentine's Day.

Very beautiful, three-dimensional Valentine's card with 3D hearts. The postcard is beautiful, but quite difficult for possible beginners due to the numerous folds and slits - everything needs to be done carefully, so immediately make sure your hands are clean, press the paper not with your fingers, but with the plastic handle of scissors or another object. You will have to tinker, but we will definitely cope with you, because we have step-by-step photographs of the entire process!
To make it we will need to take:
- 2 sheets of pretty red paper for the hearts
- 2 sheets of standard size white cardstock (thick paper)
- black marker or felt-tip pen for outlining hearts
- strips with rhinestones on adhesive tape for decoration
- a simple pencil, a ruler, scissors, double-sided tape (but glue can also be used)

- Fold each sheet of cardboard in half, aligning the corners exactly so that there is no distortion.

- Let's put one cardboard aside and work with the second one - the base. Place the folded sheet with the fold facing you and measure a line 4 cm high, which is 3.5 cm from the edge. Symmetrically make the same line on the other side. We make the cut exactly along these lines.

- Now we remove the concept of two-dimensional space from our heads and move on to volumetric 3D modeling - we bend the bend between the two slots in the other direction. The design should look like the one in the photo below.
 This is the outer side, and on the inside (open our postcard like you open a book) you get this step. Did you manage? Wait, rejoice, these are just flowers!
- Now let's wrap our step inside the postcard and close it, moving to the outside. The outside of our card should look like this. Now we must do a similar procedure with the inner fold of the card - we will put 2 cm inward and 3 cm upward from the edges of the fold.

- We make cuts again along the marking lines.

- To make it easier to bend the sheet in this place, attach a ruler to the ends of the cuts and fold the sheet onto the ruler, iron the fold line.

 Now open the card again and redirect our fold in the opposite direction - so that you again get a protrusion-step on the inside of the card.
  Do this on the other side - now we should have 3 steps.
- At this stage we could have stopped, but we are not looking for easy ways. Let's take it one more step! Along the inner fold we again set aside the markings for the last cut - 2 cm from the edge and up.

- But we will only cut through one upper fold (and not the entire thickness!).

- Thus, we have another upper small step. Phew, you can breathe out, everything will go much easier from here on!

- We take our first cardboard - it will be the outer, front side - we need to attach our “stepped” model to it. It’s convenient to do this with double-sided tape, but you can also get by with regular glue - the main thing is not to pour a lot of it so that our valentine doesn’t wrinkle or warp. We glue both parts together and get a smooth cover on the outside and a stepped design on the inside of the valentine. Now you need to decorate it with hearts.

- Let's make a heart template - preferably 3 different sizes. Two or three large hearts, many medium ones and two or three small ones.

- Let's trace our pencil sketches of the hearts with a black marker and cut them out with scissors.

- Now is the time to show your artistic abilities - beautifully and highly artistically, with the taste of a true designer, we need to scatter our hearts at different levels so that it looks beautiful. If you can’t trust your taste, do it exactly according to the photo, maybe it will be good.
 It is very convenient to attach hearts to pieces of double-sided tape, but you can also use glue.

- Well, this is approximately how it all looks. Everything already looks elegant, but there is no limit to perfection - let’s do the last part of the design - decorate it with strips of rhinestones.

This is the kind of “heart-rhinestone” splendor we achieved! True, there was no room left for text congratulations, but with such an abundance of red hearts, words would probably have been superfluous! What do you think? 
“Heart in the palms” is a very simple and quick paper valentine. Can be done with children.
What materials are needed:
- red and white paper
- glue, pencil, ruler, scissors
- pink or red pencil (felt-tip pen)
- needle and thread

- We take our (or someone else’s!) hand with the thumb pressed, put it on a sheet of paper and trace it. Cut out the palm stencil.

- We bend thick white paper (or cardboard) in half and place our stencil on the fold line so that the “little finger” is along this line. We cut everything out to the fold so that the card can open like a book.

- From red, double-sided colored paper, cut out identical squares, approximately 6 cm per side. On one of them we make a diagonal fold and draw half a heart. This will be our template.

- We bend the remaining squares in the same way, fold them one by one and, attaching the template, cut out the hearts.

- We sew the resulting stack of hearts with a fold in the middle onto the inside of the fold of our “palms”, leaving a knot of thread on the side of the hearts. Then we'll close it.

- We glue the halves of the hearts that are outermost to the palms with glue.

- We also glue together the two halves of the topmost heart, at the same time hiding the stitching marks.
- We outline the “palms” with a pink felt-tip pen, not forgetting to draw on the details inside - folds and lines on the fingers. All! Our voluminous paper valentine is completely ready - you can give your loved one your heart in the palms of your hands!


Making this valentine is very simple, but there are some supplies that you will need to prepare. In particular, it is difficult to do without a hole punch - to create identical, even holes, and special curly scissors, since cutting out all these waves by hand on many parts is not at all interesting and will not be possible to do evenly - and here the sameness of parts and accuracy are important.
We will need:
- pink and white paper
- acrylic paints (yellow and white)
- glue
- green pencil or felt-tip pen
- round head pin
- a piece of beautiful ribbon
- hole puncher
- curly scissors
So let's get started!
- We “clone” the heart template of the size we need to the number of 7 pieces from a sheet of pink paper.

- Glue the pink heart onto a larger white sheet.

- Using curly scissors, we make a beautiful edge treatment, so that a white wavy outline appears around the pink heart, reminiscent of processing with braid when sewing.

- We will need 7 pieces of such blanks.

- Each heart needs to be decorated with daisies. To do this, take a pin with a round head and, dipping it in yellow paint, draw the centers of the flowers - 3 daisies, as in the photo below. Around each center we draw white petals in the same way.

- Using a green pencil, draw leaves - two for each flower.

- Use a hole puncher to make neat holes in each heart. We thread a piece of holiday ribbon through them.

- We tie a bow and trim the edges evenly with sharp scissors.

- Our gentle valentine with a chamomile mood is ready. It remains to write on the back of the first heart the name of the object of our donation, and on the remaining ones - your wishes, and everything that you would like to convey in words.
Exquisite valentine using scrapbooking technique - Master class with step-by-step photos.
This is what a closed valentine card looks like.
 By turning the paper lever, we open our postcard and there we see a surprise message.

To make this stunningly beautiful and elegant valentine, we will need materials sold in craft stores or scrapbooking departments (bookstores). There you can always find all the necessary parts, components and tools. It’s good that now all this can be ordered directly through online stores.
What to prepare:
- pink and white paper for scrapbooking (can be used for watercolors, or other thick paper)
- sticky half beads
- artificial flowers for scrapbooking
- piece of braid, piece of lace
- rivet with forked tips - brads (these are stud buttons with a flat flexible forked leg made of soft metal)
- glue and glue gun (can be replaced with colorless superglue)
- curly and regular scissors
When everything necessary is prepared, the process of creating a Valentine heart itself will not give us any problems - everything is quite simple.
- From plain white paper we cut out a heart template of the shape and size we need.

- Using the template, cut out a heart from pink construction paper.

- Tint the edges of the heart with a slightly pink pencil, a darker shade, to visually darken the border.

- We cut out a blank from red thick paper with a template applied to it, using curly scissors. We cut it so that the wavy edge protrudes beyond the edge of our template size.

- Glue the pink heart onto the red blank with a curly edge.


- Cut out a rectangle from red paper and paste it on top of the pink layer.

- Now cut out a slightly smaller rectangle from white paper and glue it onto the red one.

- And on the corner we will glue another small red heart. Our blank No. 1 is ready.

- Now let’s transfer the heart template onto red paper with a pencil, but we won’t cut it out yet. Our task is to make another red heart, slightly smaller in size than our template. To do this, inside the pencil outline we will manually draw another one - a little smaller. We will do the cutting according to it. This will be the second blank.
 This is what it should look like when you put the second piece on top of the first.
- For the second heart you need to make a bouquet decoration. Let's start with the ribbon - make two loops and glue them together at the base.

- We will make one larger loop from the lace braid and place it at the base, on the bottom layer. Glue this beauty onto the heart - place it not in the center, but slightly asymmetrically, as done in the photo below.

- Now we need 3 flowers. If there is a stem, cut it off to the very root. Using a glue gun, attach three flowers to the base of our decoration, covering the places where the braid is cut and attached.

- We transfer one half bead to our heart, gluing them along the edge of the heart.

- Now let’s cut out a “lever” from pink paper - cut a strip of paper in the shape of an arrow, cutting off the corners. Let's glue it to the back side of our second piece.

- Let's combine both blanks and use a sharp knife to make a small hole in the base of the heart.

- Take our rivet in your hands and insert the legs into the hole from the front side.

- On the reverse side, spread the legs of the bradsa to the sides and press tightly to the paper.

- So that these legs do not stand out, we will cover them with an appliqué in the shape of a small red heart.

- Check how our “mechanism” works - the upper heart should easily move over the lower one, revealing to us a secret message... Which we still need to manage to write on a small piece of white paper. But that’s a completely different story... :)

Valentine's card with moving rainbow hearts - Master class on video.
The fastest and easiest Valentine card in 2 minutes!
If you “slept” all February and only came to your senses on the 14th, when it’s too late to prepare surprises, but you definitely need to give something as a gift.. catch a simple way - How to quickly and easily make a Valentine card from paper with your own hands in just 2 minutes. This video clip lasts exactly that long, and by repeating all the simple steps after it, you will definitely succeed!
You can draw these hearts yourself or download them as ready-made templates.
 |
 |
 |
Download stencils of hearts of different sizes (for cutting out of paper) from the link below - they can be printed on any printer, they are selected in the size needed for printing.
Tricky question!
PS. Please share in the comments examples of your valentines - what did you give or make yourself, and what did they give to you? And, by the way, I have had an unresolved question for a long time - what is more pleasant - giving gifts yourself or receiving them from other people? How do you think?


