Weaving from newspaper tubes the country of craftsmen. Newspaper weaving.
Very often we throw away many things without thinking that they can find some useful application. For example, newspapers, we usually immediately send them to the trash can, but meanwhile they can serve us well, because they are the main material in weaving baskets from newspaper tubes. With their help, you can weave a huge number of a wide variety of baskets and baskets, chests and vases. Such products not only act as design elements of the room, but also carry a functional load. It is about weaving baskets from newspaper tubes that will be discussed in our today's article.
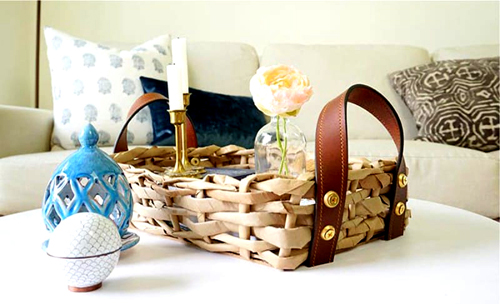
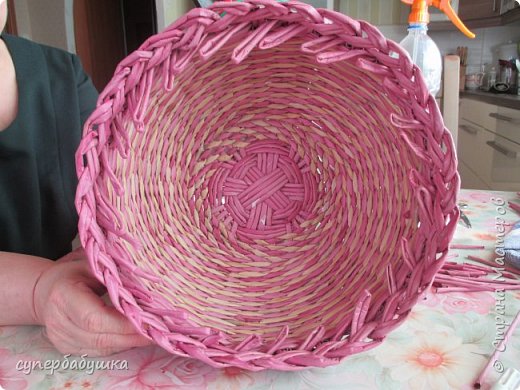
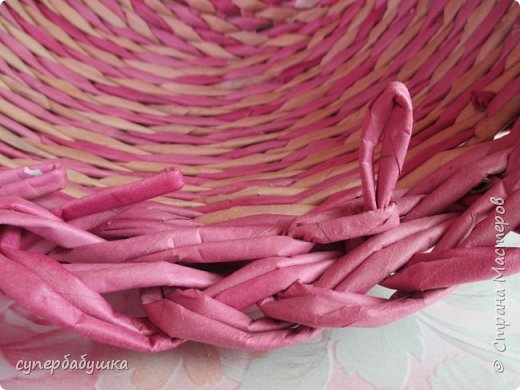
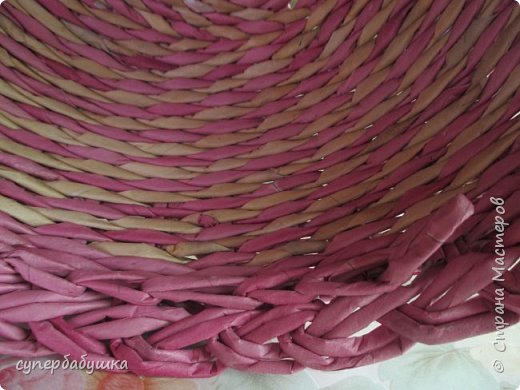
We all like wicker baskets, we often look at them in stores, but they are usually made of wicker or rattan, and therefore they are quite expensive. But baskets made from newspaper tubes can be a great alternative. In addition, you can independently weave them from improvised materials. It is enough to study a few master classes and try. To begin with, we propose to carry out simple types of baskets, on which you can hone your skills and after that proceed to more complex work. Here, for example, simple round-shaped baskets, they are perfect for beginners:
We showed you the simplest options for round baskets made of newspaper tubes, and then we bring to your attention weaving baskets from newspaper tubes, rectangular and square options:
New braiding ideas
After you learn how to weave the simplest basket models from newspaper tubes, you will probably want to make more complex options, interesting both in style of weaving and in functionality. We invite you to look at weaving from newspaper tubes new ideas for baskets:
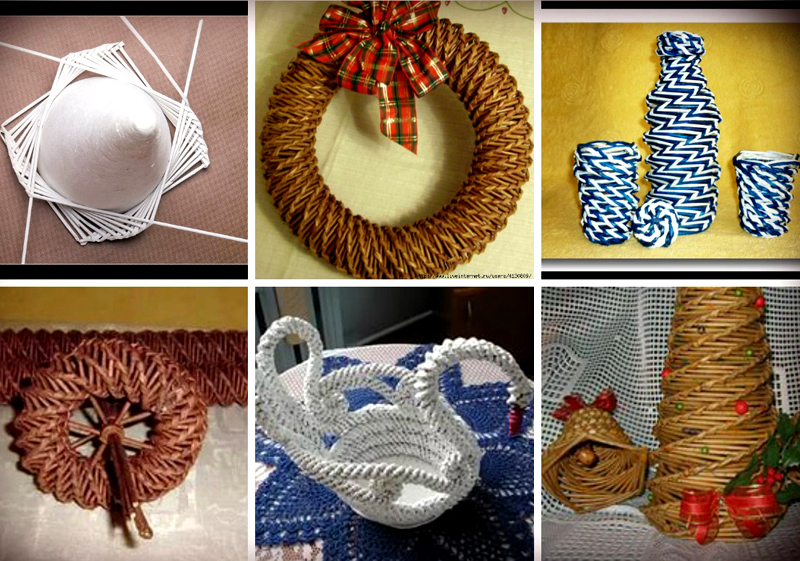
In addition to baskets, you can weave a lot of useful and beautiful things for the home. Weaving from newspaper tubes new ideas will greatly expand your options:
As you can see, weaving baskets from newspaper tubes is an interesting and exciting activity. This type of creativity will help brighten up your leisure time and will be very useful. It is worth noting the pleasure that you get from creating not only beautiful, but also useful things. Literally in one day you can make a new basket for mushroom picking, or build a vase for fruits, it will not be difficult to decorate a children's room with new wicker toys. Try new things, experiment, and the results are sure to please you.
Weaving a food tray tray from a vine: a master class
The article will be of interest, first of all, to people involved in weaving from a vine or other materials replacing a vine..
wicker things is a good classic. They will never go out of fashion. Made from environmentally friendly materials, they keep the warmth of the hands of the master and bring coziness and comfort to the house. Sometimes wicker trays, baskets or other things contain elements of wood, which gives them even greater strength. This is exactly what a wicker tray is, the description of the manufacture of which is given below. Such trays are often used to store fruits, baked goods or other products both at home and in retail outlets.
To weave such a tray,  you will need the following materials:
- shrub vine twigs prepared and peeled in advance;
- bottom cut from plywood with rounded corners: plywood thickness - 0.7 cm, bottom dimensions 40 x 50 cm;
- self-adhesive film (in this case, Oracal) in the color of wood, 40 x 50 cm;
- drill and two drills with diameters of 2.5 and 4 mm;
- scissors, knife, clothespins, awl, rags, pencil, ruler;
- container with hot water for steaming rods.
The technique of weaving a tray from a vine
1. First of all, holes must be drilled in the plywood bottom through which the vine will tightly intertwine with it. To do this, along the perimeter of the bottom, mark the holes as close to the edge as possible at a distance of 2.5 cm from each other. Drill them with a drill and a 4 mm drill bit.
2.
Along the plywood end also 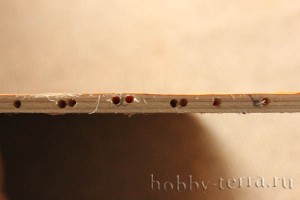 Mark the holes 1.5 cm apart and drill them using a 2.5 mm drill bit.
Attention! At the end of the plywood, select any holes located one after another and drill 1 more hole of the same diameter as close to them as possible. From this place, the “braid” bend will begin, which will decorate the end of the plywood bottom.
3. Paste the front of the plywood with self-adhesive film. Such a surface will not only add aesthetics to the product, but will also be moisture resistant, which is very convenient during operation.
4. Using an awl, pierce the film in the places where the holes are drilled.
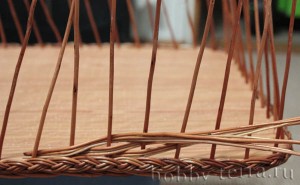
5. We proceed directly to the process of weaving from the vine. As mentioned above, the end of the plywood will be hidden under the scythe of the vine. You need to start weaving the braid from the place where 2 holes are drilled one after the other, as shown in the photo.
The "braid" bend is woven according to the following algorithm
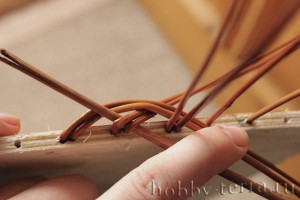
- After bending the third pair of rods, and weave the second pair over it, winding it up behind the first single riser.
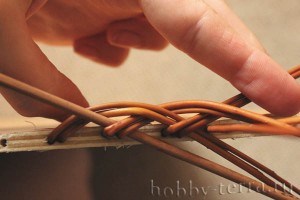
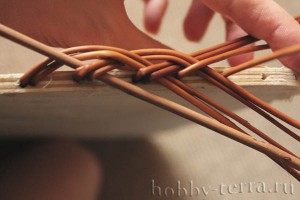
- Now bend the first single riser, and put two twigs of the first pair parallel to it. It turns out that three twigs will lie in the same plane.

- Lead two twigs of the third pair behind the next single riser, pressing down on them the three rods that have just been braided.
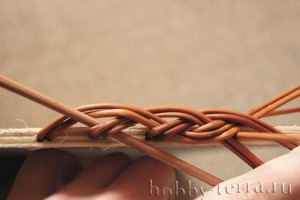
- Bend a single riser and put two twigs of the second pair in the same plane with it.
- And now Attention! as you noticed, the upper waves of the braid consist of two rods, and the lower ones - of three. In order not to disturb such a composition, from now on it will be necessary to leave 1 twig unbraided in the upper waves. To do this, weave the two longest twigs (as a rule, these are the first two rods on the left) behind the next riser, leaving the third rod (far right) unbraided.
- Bend the riser and put the bottom two twigs in the same plane with it.
Continue braiding through the last two steps.
When you come to the place where the spit begins, put two twigs from the upper wave behind the first riser of two rods. The next two rods will need to be led behind the second riser of two rods, while removing the twig through which they were bent. It remains only to weave 3 lower waves. To do this, insert 1 twig into the corresponding holes.
When you're done folding, cut off the protruding twigs that you left unbraided.
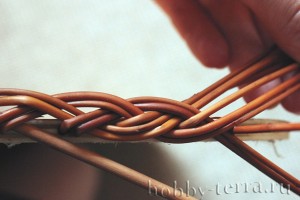
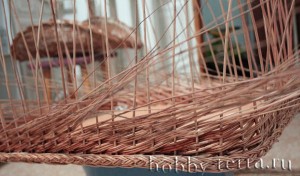
6. We turn to weaving the side of the tray. Insert 1 twig of the appropriate diameter into the holes drilled around the perimeter of the bottom so that their ends come out 5-6 cm from the bottom.
7. Now bend the ends of the rods over each other, as shown in the photo. The rods must be well steamed so that they can bend well and not crack.
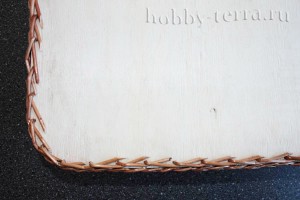
8. In order to weave the side of the tray, put 3 thin and long twigs behind each rack. Go around the riser on the right with these twigs and go behind the next one, as shown in the photo. Such weaving from a vine is called an ordinary. To weave a side 8 cm high, it will be enough to weave 5-6 rows in this technique.
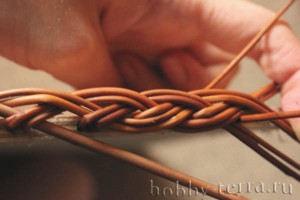
9. You can finish the board by weaving using the “rope” technique. It will give density to the product. But you can do without it.

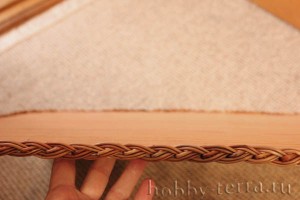
10. The edge of the board will be decorated with the same braid that we wove at the end of the plywood bottom. You also need to start weaving it with three pairs of twigs. Therefore, in any place, substitute another twig to the three racks following each other. At the end of the weaving of the braid, you will receive a finished tray.
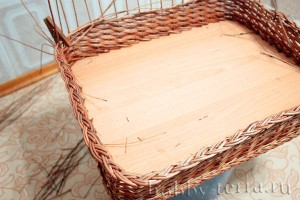
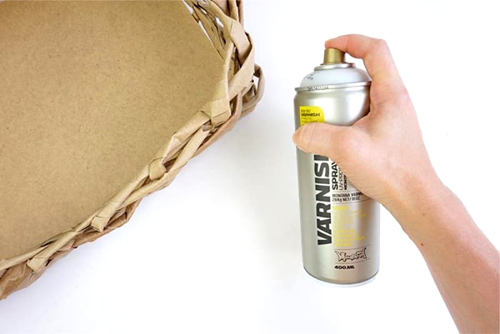
11. Coat the finished product with varnish.
Creative success to you!
Part 18 -
The correct application of this technology will be useful for creating your own products with unique aesthetic and functional characteristics. Not only wide opportunities for individual creativity should be positively assessed. Weaving from newspaper tubes will help to implement someone else's and your own new ideas with minimal financial costs. After reading this article, it will be easier to master the necessary skills and eliminate mistakes.
The example above illustrates the potential. But do not immediately try to create a similar, rather complex product. You should carefully study the technology, purchase the necessary components. It is useful to view completed projects.
The essence of the technique lies in the fact that instead of a vine for weaving walls and other structural elements, paper is used. With the correct use of the starting material, a durable product can be made. Separate parts are connected with adhesive compositions. Primers and paints are used to strengthen and create the desired appearance.

Tools and materials
For a specific project, additional details will be needed. So the handle for a heavy jug can be reinforced with a plastic insert. Inside, a bottle of a suitable size is installed to store the liquid. But the components listed below will come in handy in any case.

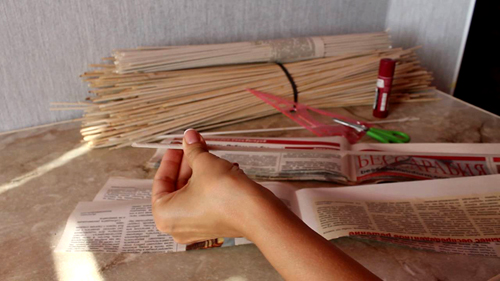
The easiest way is to use old newspapers as raw materials. But printed publications in this form became unpopular. If there is no stock, you will have to turn to neighbors, friends. The following are the features of other materials:
- Magazines can be used if you need to increase durability. They are made from thick coated paper. The tubes from it are obtained excessively rigid. They are difficult to paint in the desired color.
- Standard blank sheets of writing paper are better. Here the main advantage is the absence of drawings and inscriptions.
- It is convenient to roll the tubes from the cash tape. But such products are expensive, so a significant initial investment will be required.
Note! Special grades of thermal paper for cash registers darken when the temperature rises. This feature is capable of forming defects during the processing of wickerwork.
To connect the parts of the structure and fix the shape of the tubes, standard inexpensive PVA glue is used. Buy it cheaper in a large container.

It is difficult to work with instant adhesives. They harden too quickly, do not retain integrity during deformation. If transparency is required, an adhesive suitable for assembly and subsequent operation of the product should be selected.
For bending and precise positioning of the tubes, a thin, smooth wooden stick is useful. To fold paper, you need a metal needle with a ring or other extension at one end. You also need to prepare sharp scissors and a clerical knife. The quality of the edges of these tools will depend not only on the appearance of the workpieces, but also on the convenience of work.
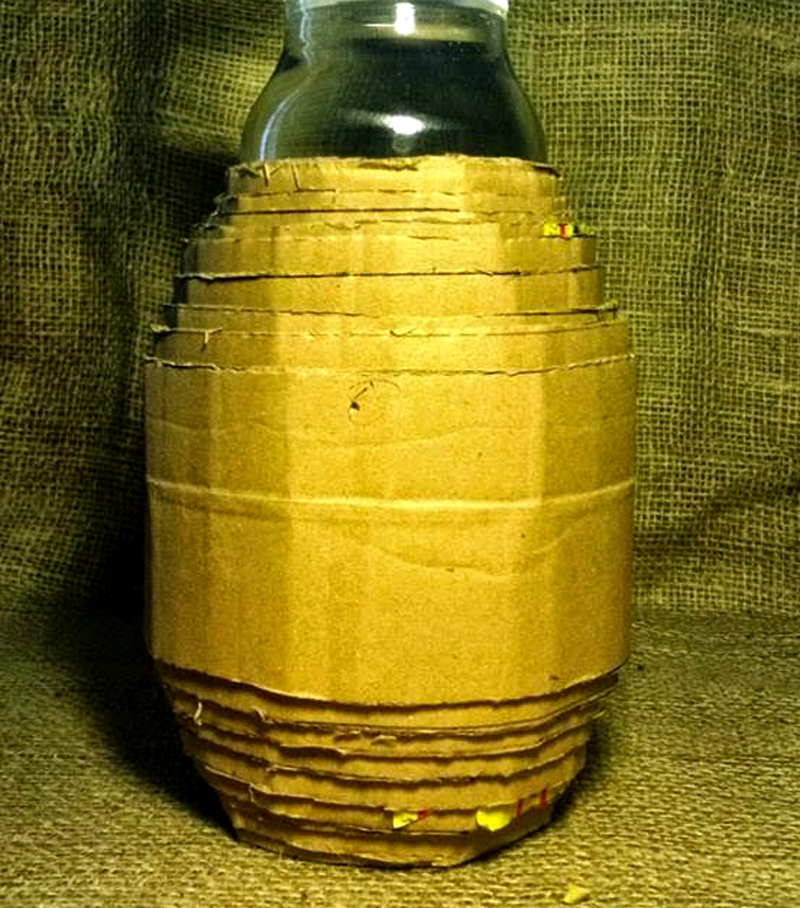
Such a blank is braided with paper tubes. In order for it to remain stable, sufficient weight is needed. In this an example of a light plastic bottle filled with water, and cardboard tape was used to expand the bottom.
Related article:
The article details how to create inexpensive and beautiful flowers from corrugated paper with their own hands, which do not fade with time and can be stored for a long time.
Decorative and functional processing
Here it is necessary to make certain corrections, taking into account the features of a particular plan.

It is more convenient to create such a product from tubes prepared in advance. They are painted in the desired colors. Subsequently, a pattern is formed from the corresponding blanks.
Note! If, after the paint has dried, the tubes are brittle, they can be sprayed with water before installation.
Before painting the product as a whole, a primer layer is applied. It can be made from a mixture of PVA and water with a small amount of acrylic-based clear varnish. The mixture is diluted to the desired consistency. Viscosity should not be excessive in order to perform thorough crevicing.
It is fashionable to apply stain and varnish, oil and water-based paints, ink, brilliant green and a decoction of onion peel on the prepared surface.

But paint in such a package is expensive. Spraying is intended for the treatment of large surfaces. A picture or pattern of a different color is created using a stencil.

Dyes are applied in accordance with the manufacturer's recommendations, or according to practice-proven instructions. It is necessary to fulfill the specified requirements for temperature and duration of drying. Sometimes you have to create multiple layers. Surfaces are protected from negative external influences with transparent varnish.
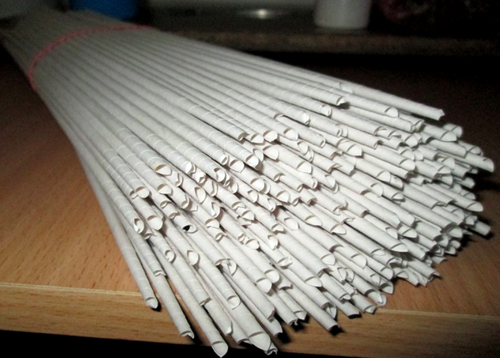
Create blanks
Experienced craftsmen use different solutions to implement their projects. From ribbons of thick paper, like from the flexible bark of a vine, pretty and durable products are also obtained. In Asia, they use the technique of weaving from very thin paper tubes. They create miniature decorative elements that amaze the highest quality even upon close inspection.
But this article will describe the "classic" blanks.
| A photo | Sequence of actions and important features |
 |
|
 |
|
 |
|
 |
|
 |
|
 |
|
What are the types of weaving from newspaper tubes: an overview of typical technologies
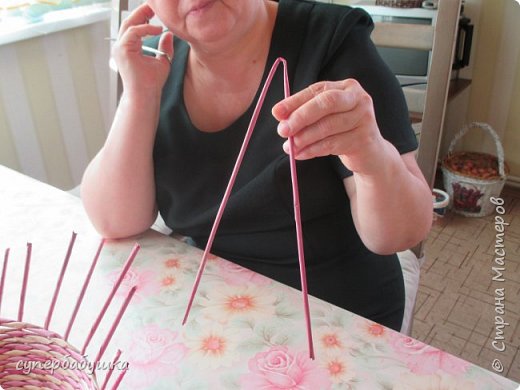
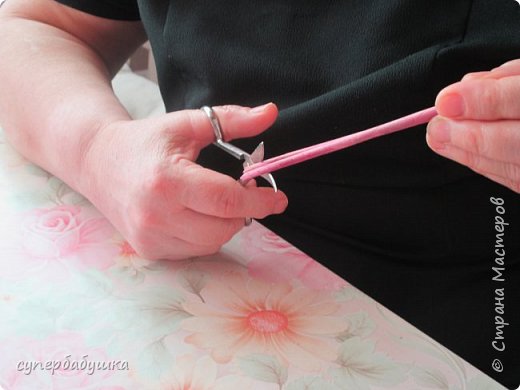
You should start training with a relatively complex methodology. Oddly enough, but weaving with a “string” is easier to master than a simple option, which will be discussed later.

Weaving from newspaper tubes for beginners step by step
The following table summarizes workflow features for different technologies. For beginners, it’s not difficult to make crafts from newspaper tubes step by step. It is enough to accurately repeat the operations that are described in the corresponding instructions.
| Picture | Actions and important notes |
 |
|
 |
|
 |
|
|
|
 |
|
 |
|
 |
|
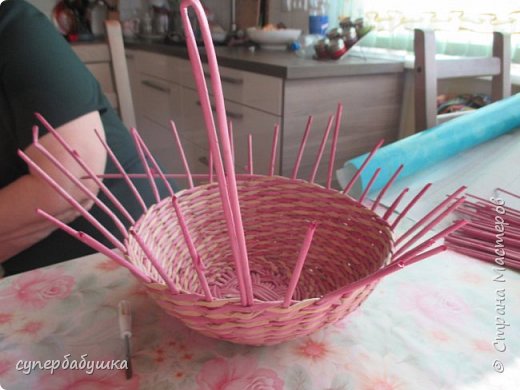
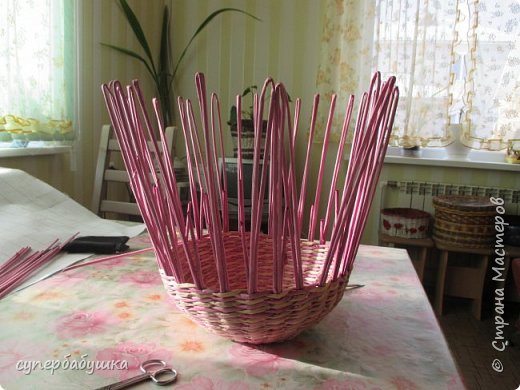
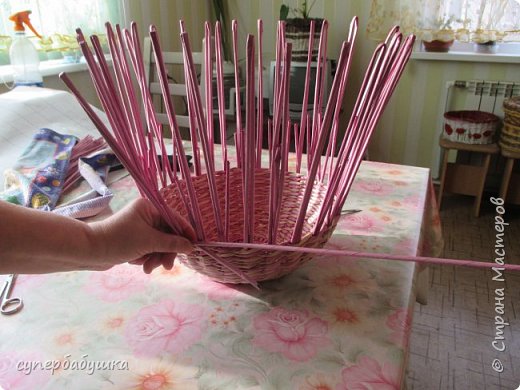
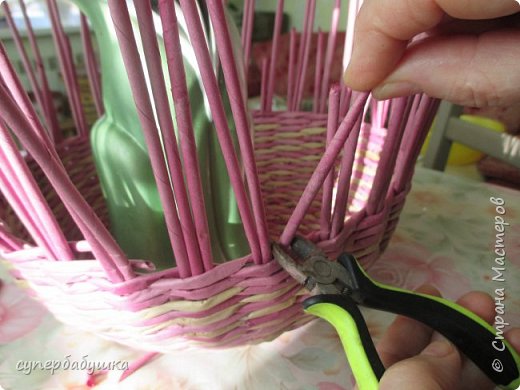
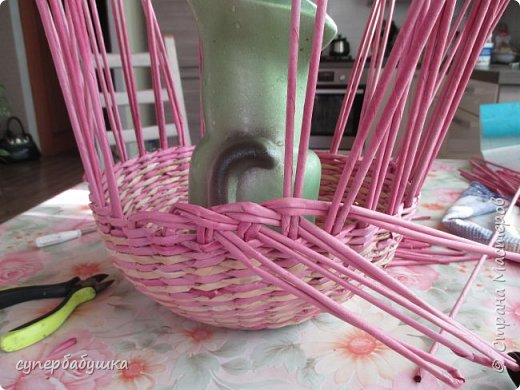
How to make a basket of newspaper tubes step by step: instructions and photos
Below is an example of weaving a basket from newspaper tubes. Photos are supplemented with comments that will help you perform the work correctly.
| A photo | Sequencing |
 |
|
 |
|
 |
|
 |
|
 |
|
 |
|
 |
|
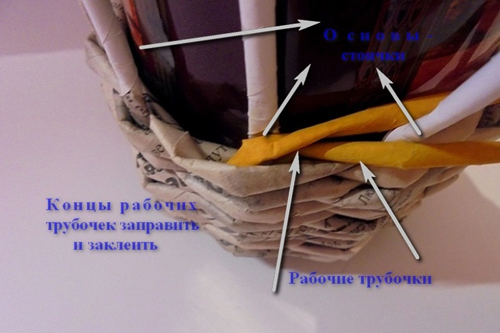
Note! When creating weaving from newspaper tubes, new ideas are used not only to determine with the main parts. Instead of belts, you can use handles from an old bag, a thick rope, a tape made of thick upholstery fabric. Appearance adjusted according to the chosen style.
Weaving from newspaper tubes of a rooster, other products with unusual shapes


This rooster is not just beautiful. In this capacious basket the owner can store various small things.

Such products are difficult to make from a vine. Paper is a soft material, so you can experiment with different shapes. To provide the necessary strength, it is reinforced with a frame, a strong inner insert, a primer and varnish coatings.
In such a frame, the wicker figurine looks solemn
A standard watch is turned into an exclusive piece with a wicker frame
Important! On the Internet, you can find many new ideas for weaving newspaper tubes. When considering examples, one should pay attention to the features of technological processes, the possibility of their exact reproduction on their own.
Article
And the problem with cutting and masking the tubules was solved almost in one fell swoop! Great! I give the master class without change.
I cut off soft sections from both ends, so that it would be more convenient to insert the tubes into the weave between the working tubes.
Here I showed how I am between the slave. tubes insert a screwdriver. The fact is that for me it is an indispensable tool for weaving. Firstly, the working part of the screwdriver is flat, thin and fits well between the working tubes, and when you turn it 90 degrees, it pushes the tubes well and creates free space between them and the bending tubes fit well there. I put them in very quickly.

Here is the tube inserted.
So we insert all the tubes for bending and try to plant them inside so that they are approximately the same height. Now I see that I have some taller, but it's not scary.
I weave 2-3 rows with a string to secure the inserted tubes.
I cut short.
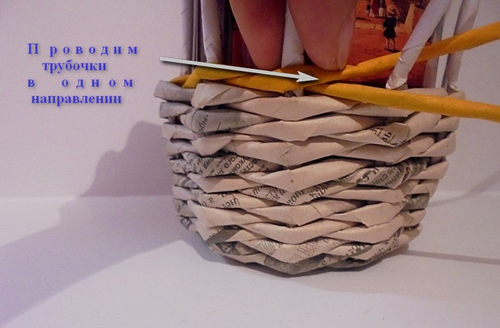
And I start to bend. I do the first row arbitrarily, but, of course, first imagining in my mind what I want to depict in the end. Here I have: in front of one, behind one, with access to the outside.
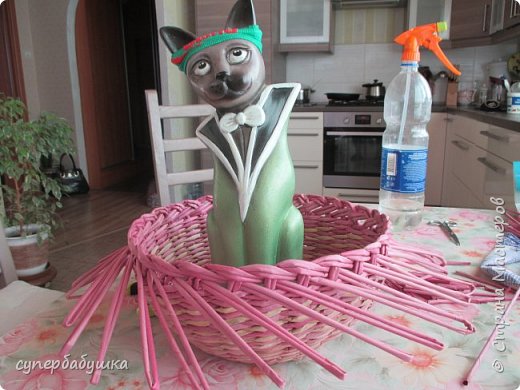
The row is woven. So far, of course, you have not seen anything new. The main idea is all ahead. And the cat helps me in the realization of this idea. He weighs down my basket with his body. The fact is that it is almost full of ten-ruble coins and is actually very heavy. And the bandage closes the crack on the head, where the coins fall.
I make the second row under one, on one, under one with access to the inside of the basket.
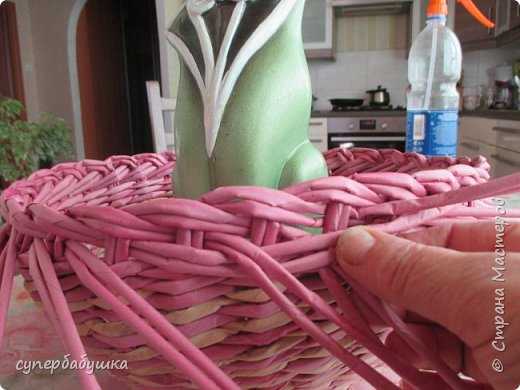
But, the most important thing is that the loop (the place where the tube is bent) looks out, see 2-2.5. (Ideally, as much as the distance between the uprights.
Another one for clarity.
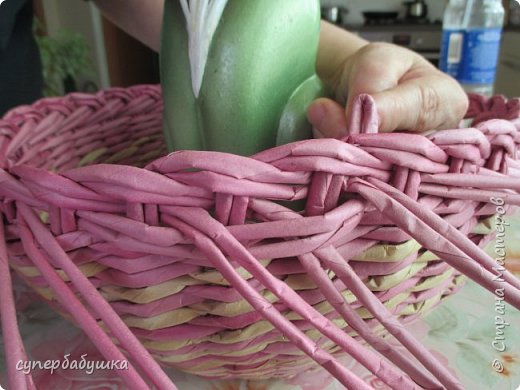
After the end of the second row, as a result we get this.
And now the most important thing. We throw an arbitrary loop on the next one.

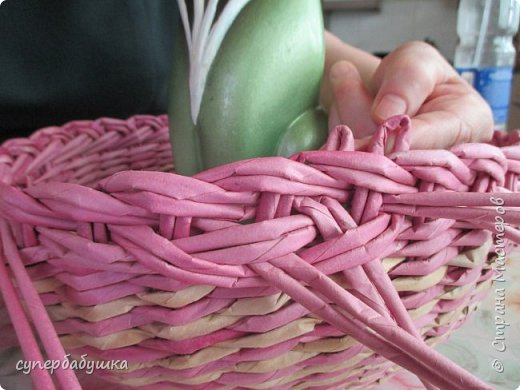
Next again to the next, and so on until the end. And in the end, cut and slip under the first loop only the last loop is needed. Of course, so that it does not crawl out, it must be glued. In order for this procedure with the last loop to be more successful, I begin to thread them into each other so that the longest loop is the last, so that it is more convenient to fix it under the first. And sometimes I don’t even cut it, but simply put it on the first one and glue it. It's not noticeable at all.
You can leave the length of the loops such that the loops are thrown not on 1 next, but on 2. And so each next on one already threaded and on one new one.
Such baskets can decorate your kitchen, country houses and also serve their intended purpose.
You can put some small things in them or even pick berries and put them on the table. You can also make Baskets for your children with them, thereby instilling in them needlework skills.
For manufacturing we need:
Newspaper, magazine sheets or colored paper. most of them are newspapers.
- a stapler with staples or glue to fix paper strips
- scissors
1. It took 20 sheets of newspapers to make this basket. Cut each leaf in half and fold lengthwise to make narrow strips. There were 40 stripes. 
2. Fold the pieces of newspaper in half lengthwise, then again lengthwise in a quarter, and then eight times, you will get strong ribbons. Depending on what kind of basket you want to weave, you can choose the number of strips from the newspaper and their width
3. Start weaving the basket from the center to the edges. For fixing, you can use a stapler or glue. Apply it with dots. You can remove the staples from the stapler after you've finished your basket weaving.
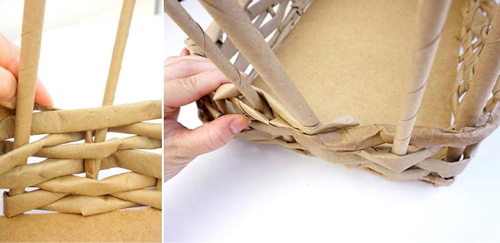
4. After the bottom of the basket is ready, you can start weaving its walls. Bend the walls at an angle of 90 degrees and weave them in a circle with long strips, making them from the same ones that were prepared earlier, fixing them with staples or glue.
5. When you finish basket weaving, your last row will not be quite beautifully completed. The ends of the strips of paper will stick out. To complete our product, we fold the paper side and glue it on with glue, putting it on top of the rim of the basket.


