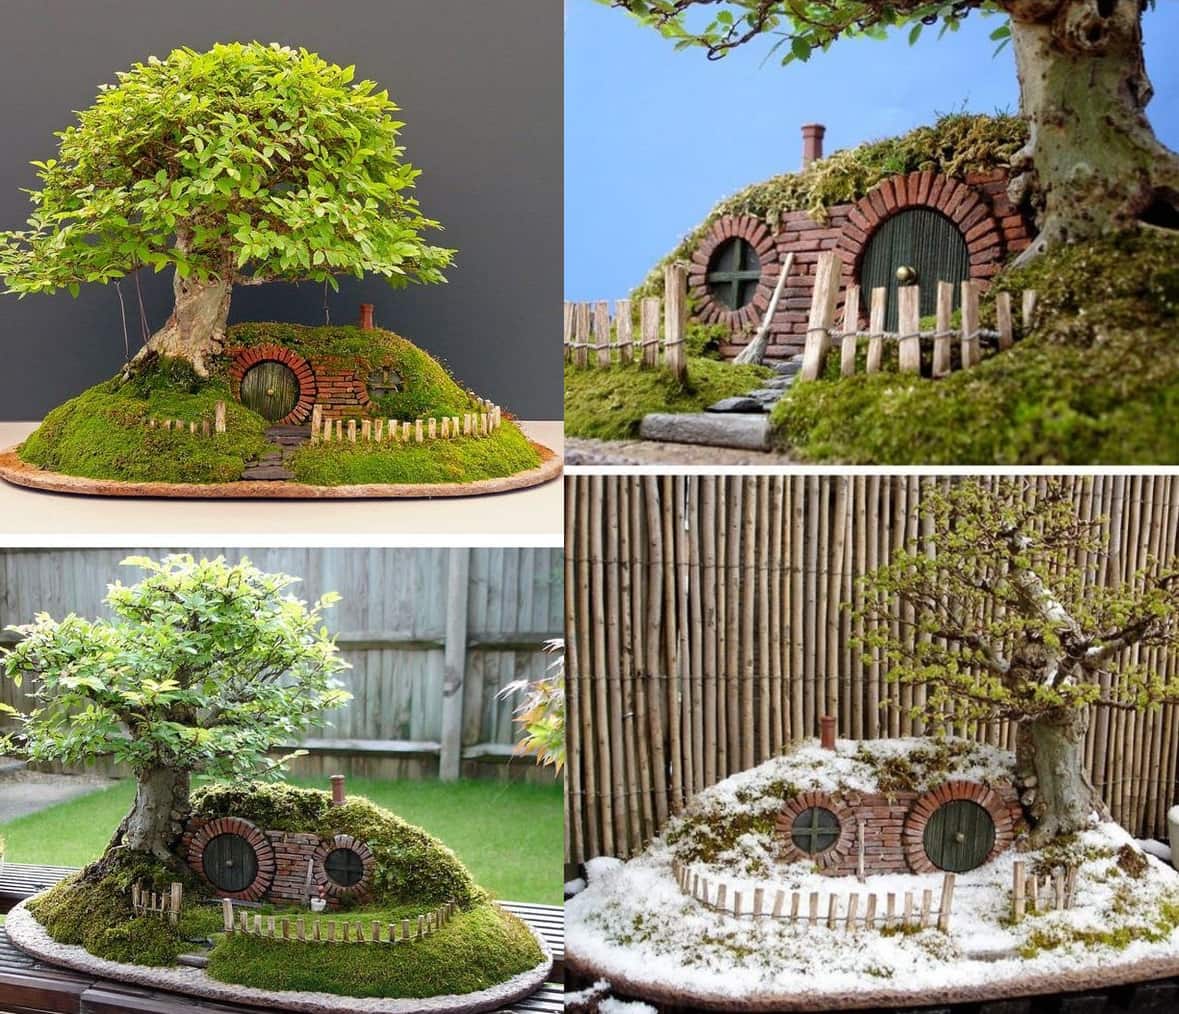
Do-it-yourself foam block crafts for the garden. Crafts from cans. Decorations at the dacha from tree twigs
In the summer, most gardeners and gardeners go to the country to take a break from the bustle of the city. The backyard territory can be decorated in an original way using the decor made. The site will be not only beautiful and landscaped, but also functional.
Original cottage decor ideas
Garden decor can be purchased at a specialized store, but you can make it yourself from old unnecessary items and other improvised materials. All family members can be involved in the process. There are many options for decorating the local area, so you need to show imagination and creative skills.
Old suitcases, chairs, basins, gardening tools and other objects that have outlived their usefulness can be beautiful decorations. garden plot which will bring it an unusual and unique look. Using large boulders or pebbles, you can create a decorative fence or animal figures. The most popular garden decor option is plastic bottles.
They are easy to bend, paint and cut. On the garden plot, you can make various animal figurines: hares, frogs, penguins, flowers, etc.
A palm tree from bottles will look unusual and original. An old bucket, pots, a basin, a watering can, a car tire can be used as a container for planting flowers. You can create very aesthetic things from wood - from branches or logs, fairy-tale characters, etc.
Thanks to the original garden decor elements, you can transform the site and not spend money on buying various garden decorations at all. This is not the whole list of original ideas for decorating the garden. You can fantasize, look for your own original ideas and experiment.
Crafts from improvised means
Before starting the implementation of interesting ideas, you should revise the old things that are on the farm. Crafts for giving perform not only a decorative, but also a practical function. Working on the site, receiving guests and having a tea party is much more pleasant, contemplating the creations made by one's own hands.
An old and unsightly object can be given a new attractive look with the help of multi-colored paints. An old teapot can be painted in a solid color, draw eyes and a mouth. At the output, we get a teapot from a children's cartoon about beauty and the beast.
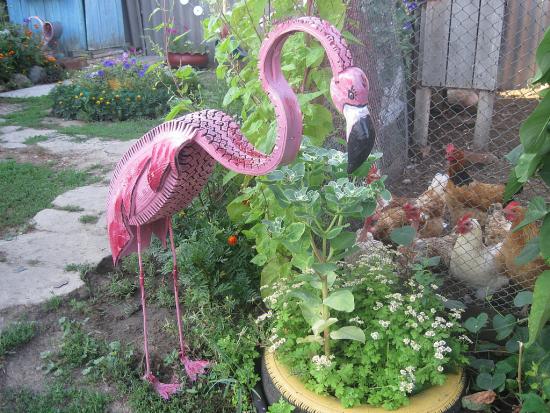
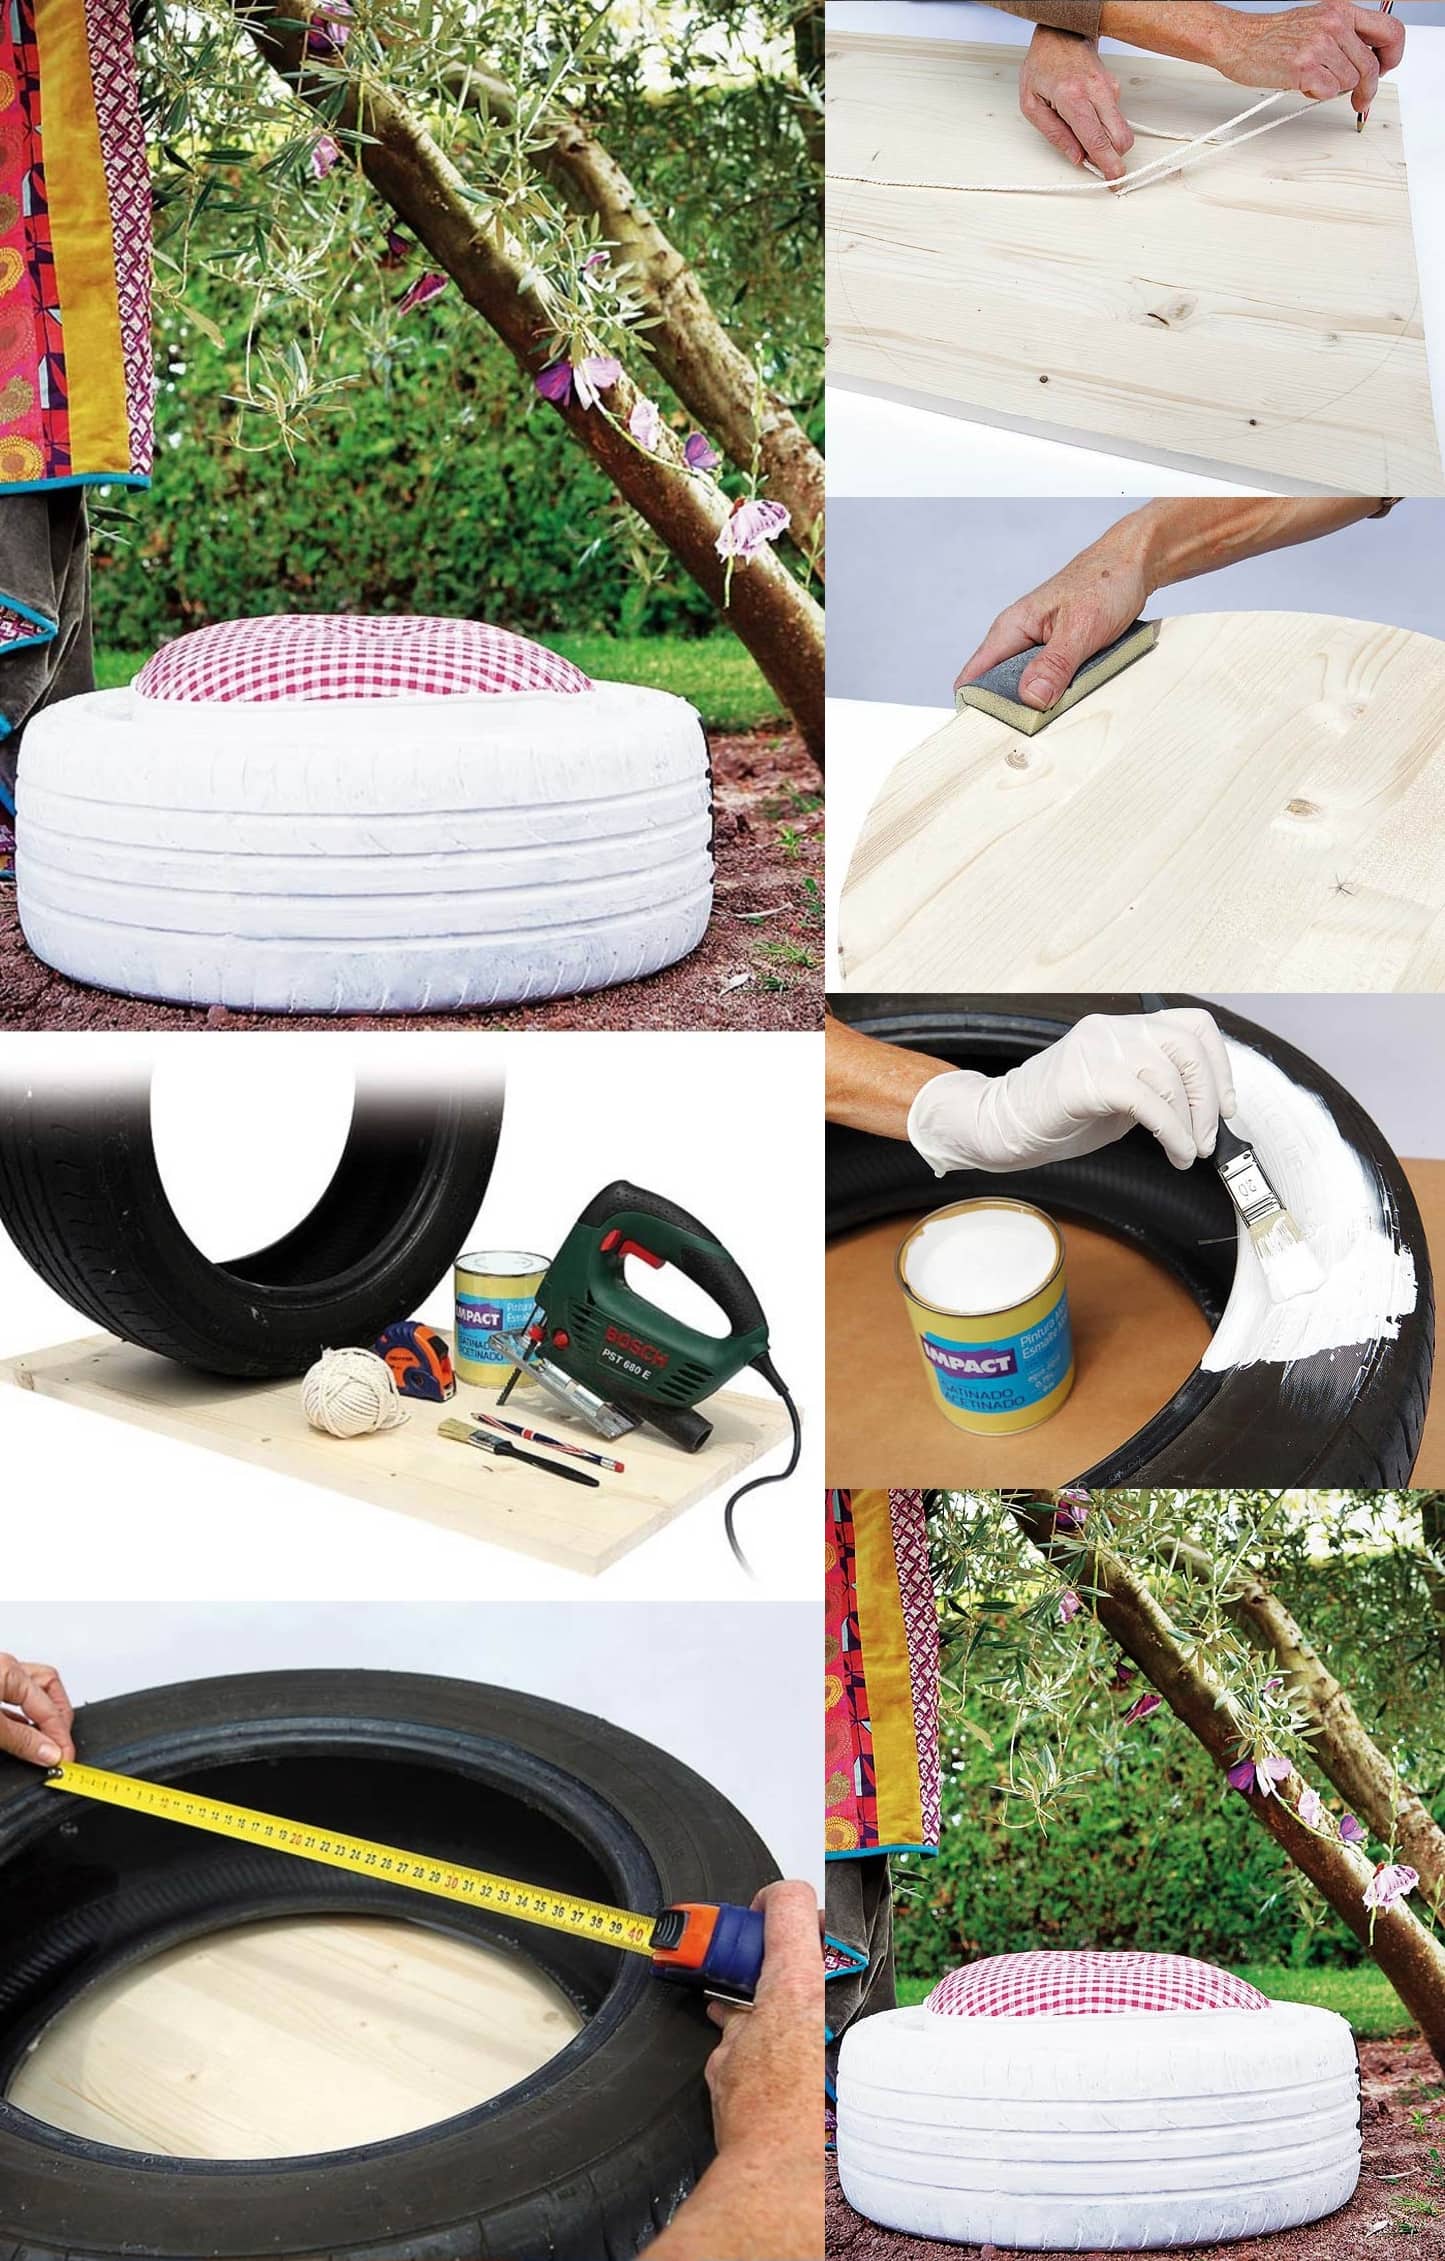
From an ordinary stick in the form of a slingshot, you can make a snail. The round stone will be the snail's house, and the stick will be its body. Any craft made from improvised materials can be used not only as a decoration, but also as an independent element. For example, you can make a swan out of an old tire, and flowers inside.
The design can be varied and you can create extraordinary things from simple objects. Below is the technology for making a swan from an old tire and a palm tree from plastic bottles.
What you need to work
Taking into account what kind of decor you plan to create, you need to prepare the appropriate tools. For a palm tree from bottles, you need a lot of plastic two-liter bottles of green and brown. The size of the palm tree and its splendor depend on the number of bottles. You should also prepare a clerical knife, adhesive tape, scissors, a rope and a metal base with rods.
To create a swan, you will need the following materials and tools:
- old tire
- Electric jigsaw
- Electric drill
- pliers
- metal rod
- Dye
From tires, you can take an old, worn tire. The material should be worn, as it is easier to work with. It is recommended to choose tires with a nylon cord, as they can be easily cut with a knife, unlike imported rubber.
Tire swan: step by step manufacturing instructions
It is not difficult to make a swan out of an old tire, the main thing is to follow the sequence of work. The tire should be pre-cleaned, washed and dried.
Swan markup. First, divide the tire in half with chalk and outline the beak, neck and head. The length of the beak should be about 9 cm, and the head about 10 cm. The width of these parts is 4 cm and 8 cm, respectively. The length of the neck of a swan with a wheel circumference of 180 cm is 95 cm.
Cutting. This is the most time-consuming job that requires not only skills to work with, but also patience. Cutting should be done from the base of the neck to the head. You can use a sharp knife, a jigsaw or, if necessary, a grinder. The tire must be cut on both sides at the same time. The edges of the workpiece must be processed.
Swan collection. Put the workpiece with the cut side down and press down with your foot. Next, turn the side parts up, and press the central part to the ground. To strengthen the neck and head of the swan, make paired holes from top to bottom at a distance of 15 cm. Then thread staples into them and lay a metal rod, which will subsequently be connected by them. To give the desired shape to the tail and neck, the rod should be bent.
Finished product painting. At the end of the main work, the swan should be checked for sharp edges and protruding wires. You can paint the swan white or black. Make the swan's beak red, and make the eyes out of wide bolts. It is important to choose the right paint so that it is weather resistant. Such a swan can become a decoration for a small pond.
How to make a palm tree from plastic bottles: stages of work
An exotic palm tree will become a truly original decoration of the homestead territory. Making a palm tree from bottles is very simple. Before work, clean the bottles from the labels.
Main stages of work:
- Barrel assembly
- Making leaves
- Barrel assembly
Making leaves. Cut the bottle into 2 parts. The lower part will not be needed, and the upper will be foliage. Next, cut longitudinal small strips to the neck. Repeat this process with each bottle. After that, the foliage is strung on top of each other, fastened with a rope. Then screw the cork to the first and last bottle and thread the tourniquet through it for a tight fit.
Stem assembly. It must be strong and durable so that the palm tree does not fall under a gust of wind. You can use a metal platform as a base or immerse the future 50 cm into the ground. Cut off the lower part from brown bottles and make wide cuts along the neck. Each bottle should have 6 cuts. They are fastened together with a rope.
Palm formation. Put the barrel of plastic bottles vertically on a metal stick. Next, fix the foliage in the upper part and evenly distribute it in all directions. Fastening to the trunk is carried out using adhesive tape and a tourniquet.
Palm tree from plastic bottles is ready. it evergreen tree will give the personal plot an original and unique appearance.
Video about creating beautiful and useful crafts with your own hands:
Well-groomed flower beds, a velvety lawn speak about the owner of the site more than words. But there is not enough zest, details that emphasize the individuality of this particular garden. And here they are: garden furniture from forest snags or a well with an old wheel. Or maybe it will be a weathervane?
A chandelier is assembled with the help of two knitting needles, with which a small pumpkin is pierced crosswise. Then she descends into a large pumpkin and hangs on the needles.
You can hang such a chandelier with a strong thin twine, for which holes are made in the upper part of a large pumpkin.
The gazebo or seating area in the garden is decorated with cozy lamps. It is good to sit in such a corner after an eventful day and listen to the birds singing or the murmur of a man-made stream.
Wood furniture
Details for exclusive furniture in the Berendey style can be found in any forest. Branches and roots of any tree species are collected fresh with a diameter of at least 2.5 cm and a length of about one and a half meters. In this state, the bark is easier to remove from them, and the wood does not lose its natural luster.
Within two months, the details of the future interior dry up. Then they are polished and varnished. A double layer of varnish will give the product durability.
Further, all these details are assembled into a chair or table. For a chair, the back and seat are first made. It can be boards or saw cuts of large logs. They are fastened to each other, and then legs and armrests are attached to them. Fastening takes place with self-tapping screws. The heads of the screws are sunk into the wood and further masked with wood putty of the appropriate color.
While watching the video, you will learn about DIY crafts.
Everyone can decorate the garden with their own hands! In such a garden, the soul and body rejoice that the work of the gardener is not in vain!
Noticed an error? Select it and click Ctrl+Enter to let us know.
The article contains new interesting ideas for those who like to make crafts for a summer residence. Find out how much you can make from old dishes, buckets, cans.
Crafts from cans
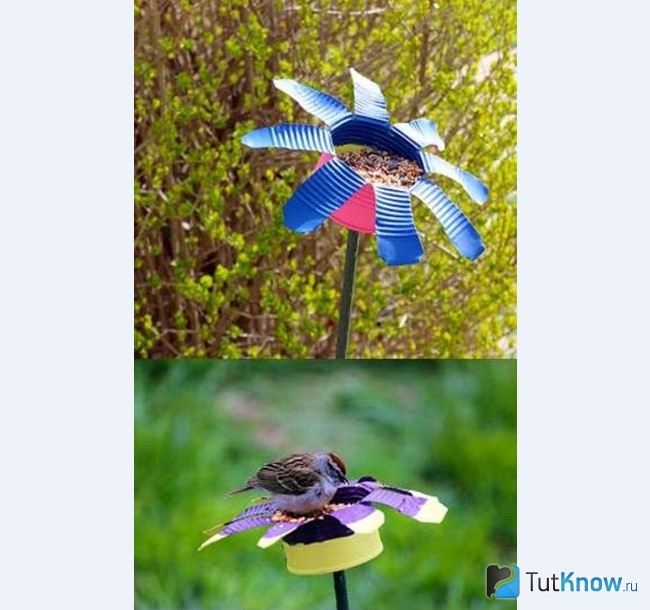
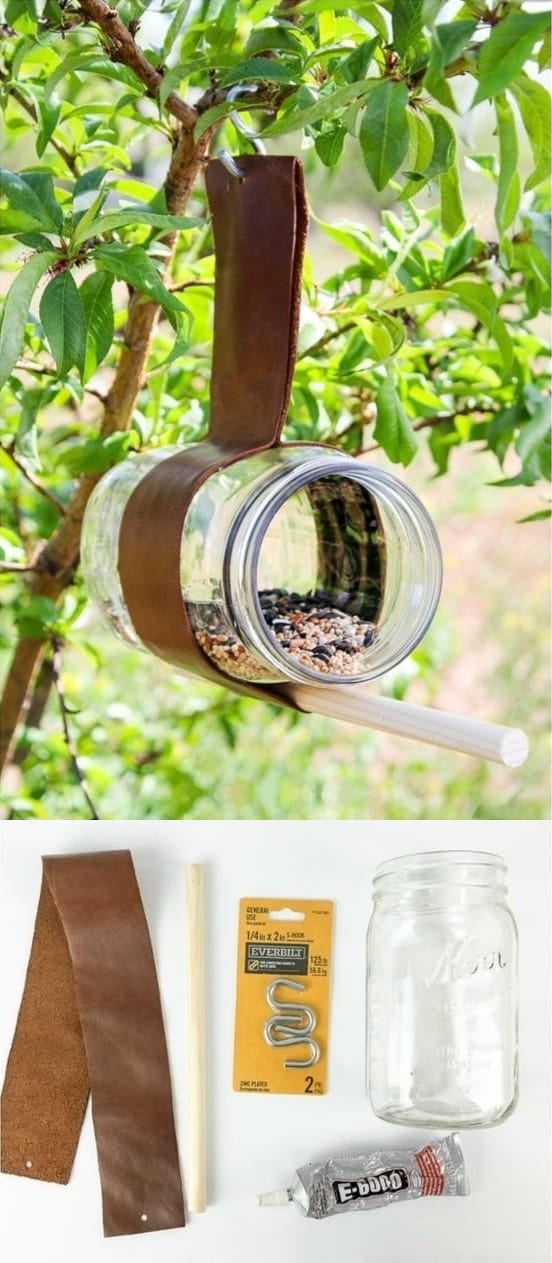
If you have free time and empty canned food containers, you can make a lot of useful things out of it. See how to make a bird feeder that doubles as decorative ornament dachas.
Here is what a bird feeder is made of, and what tools are needed for this:
- tin;
- dye;
- awl;
- Super glue;
- metal scissors;
- metal rod;
- felt-tip pen.
When you open a jar, use a can opener that removes the lid completely without leaving any sharp jagged edges on it.
Now you need to make a hole in the center of the second cover with an awl. Next, we mark the container with a felt-tip pen. Before it, we will cut the jar into fragments, which then need to be turned into petals, rounding them with the same tool.
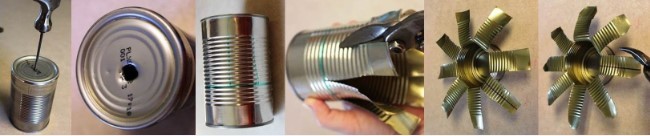
Decorate the container. For this craft from a can, a metal rod is also needed, which can be a small-section reinforcement. We insert it into the hole, fix it with super glue. At the same time, tilt the jar slightly so that rain water does not accumulate in it.

It remains to stick the second end of the rod into the ground, pour grains and wait for feathered friends to visit.
In the country, empty containers sometimes accumulate, which can be easily turned into flower pots.
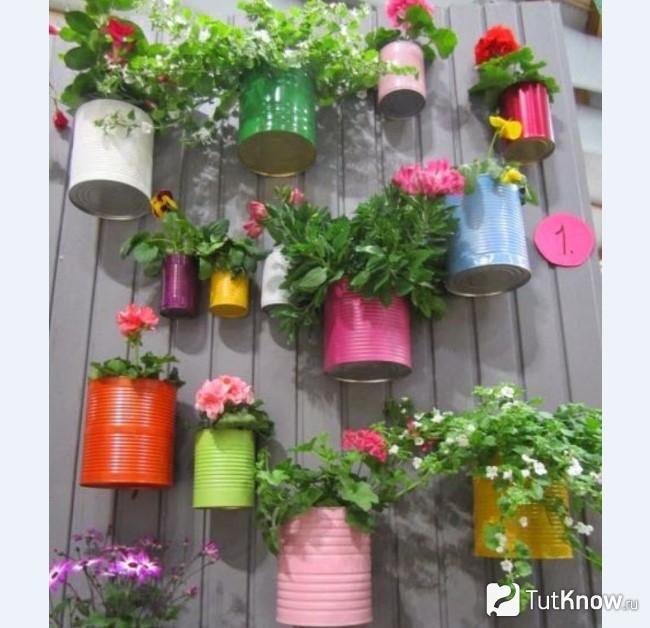
Such crafts from cans are very simple to create. Also open the cover, removing it completely. Wash, dry, paint the container. Now, using self-tapping screws, attach the cans to the fence. Then it remains to fill the soil and plant flowers. In the same way, you can turn an unsightly wall outbuildings into a beautiful, effective
Do not make holes at the bottom of the container for water to drain, then it will flow out along with the soil and stain the wall, and in the heat the plants may wither due to the fact that the soil will quickly dry out.
Where and how beautiful to plant flowers in the country?
This question is faced by many gardeners who want to give their site originality. But not everyone knows that the old things that have accumulated in the country can be turned into interesting planters.
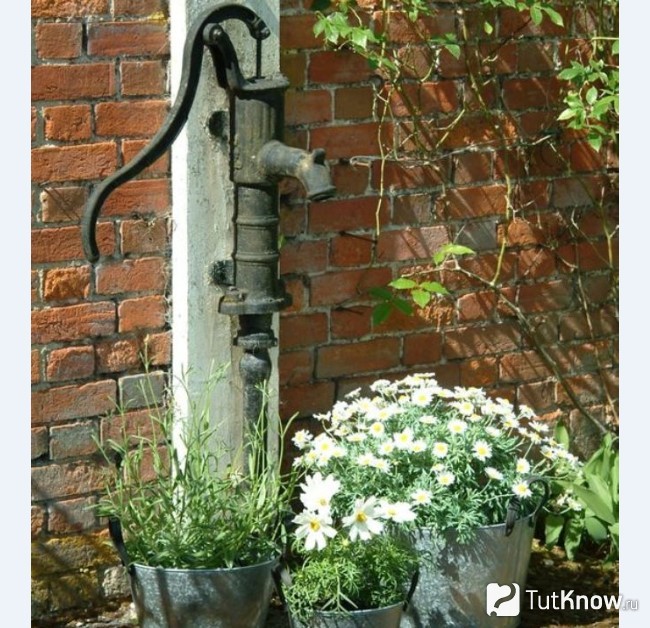
Before you plant beautiful flowers, see if you have leaky buckets. You can first walk on them with paint from the outside or immediately pour the soil right away and place the plants in it.
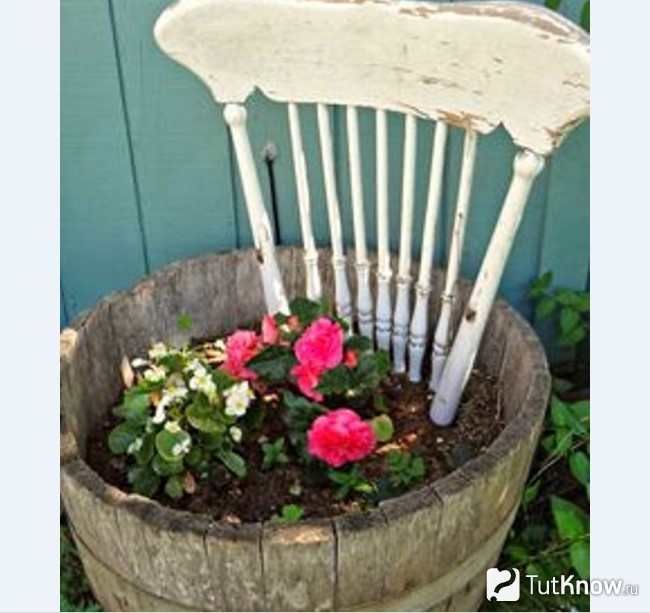
Make an interesting duet using an old chair and a waste bucket. At the first, remove the seat to put a tub of plants between the legs. Use a leaky bucket as it.

By the way, the back of an old chair can also be turned into an original element of summer cottage decor if you put it in a tub, in which flowers are then planted.
And here is another example of using an old chair, a stool. Lay a film on them, dig the grass straight from the turf, put it on the seat. If you bought a natural rolled lawn and you still have such rectangles, you can decorate old wooden chairs in the same way. To do this, they cut out the soft upholstery of the seat, put grass with soil at its base.

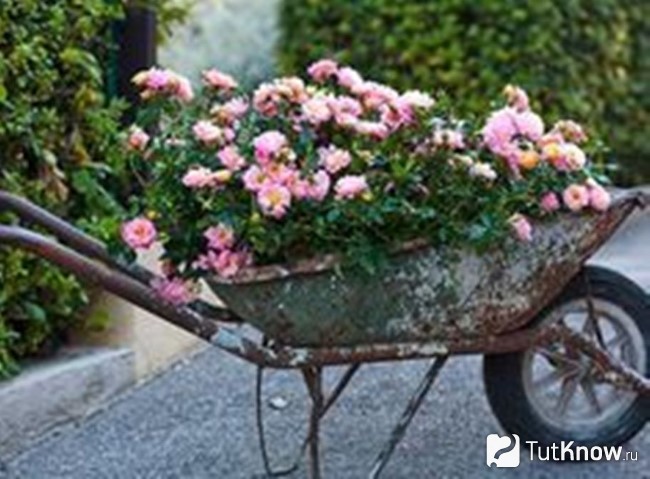
You can beautifully plant flowers even in an old wheelbarrow. Charming plants will turn it into a rare thing that will add mystery to this summer cottage.
Old coffee pots, teapots can be turned into beautiful planters in 10 minutes. Such crafts for giving with your own hands from improvised materials created will betray the site of originality.
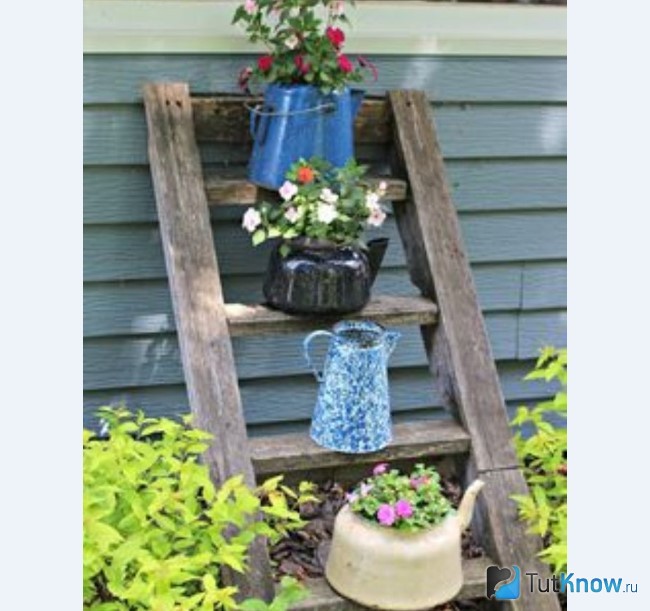
So that each plant has a place in the sun, place these items on a low staircase. Here you can plant not only flowers, but in some containers and spices, which are very useful in the kitchen.
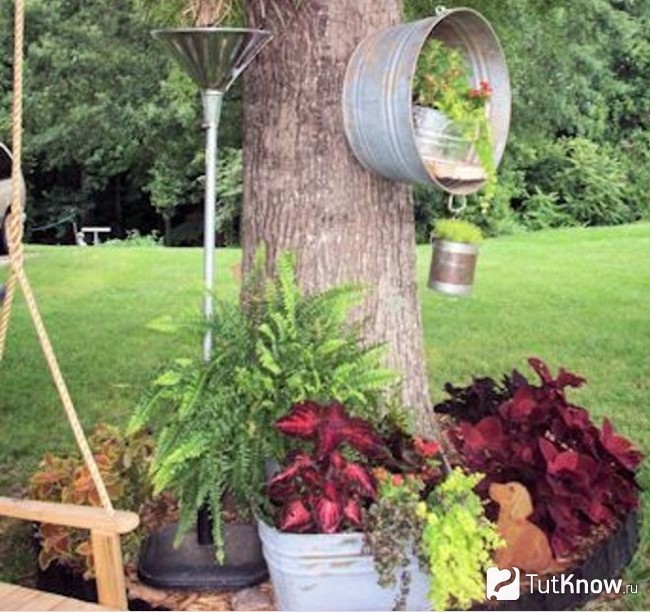
A metal bowl will also act as a decoration for a summer residence, if you attach it vertically to a tree or to a support, and put a flowering plant inside.
Other country crafts
Wooden crafts created with their own hands can be made by both men and artisan women. Such a bedside table will solve the problem of storing garden tools and at the same time act as a decoration for the dacha, as there will be bright plants in its upper part.

For a nightstand use:
- beam with a section of 50x50 mm;
- lining;
- self-tapping screws;
- boards;
- antiseptic;
- screwdriver;
- dark film or black plastic bag;
- stapler;
- door hinges;
- flowers.
From the boards we knock together the side walls of the box without a bottom. Using a stapler, we attach a dense plastic bag or film to it in 2 layers. Everything, you can fill the soil, plant beautiful flowers, and put garden accessories inside the bedside table.
This shelf is also made of wood. How such crafts are made for giving photos clearly show.

This is a very comfortable shelf, made by hand, functional. When needed, it will act as a hanging table. You can put a glass, a plate on it, and then put them inside, covering them with a board on chains.
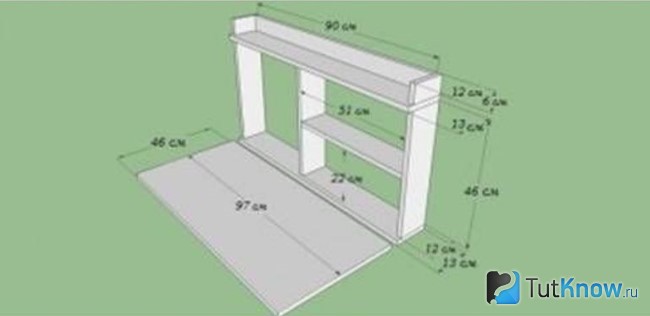
The diagram shows the dimensions of the shelf. Focusing on them, it will be easier for you to do it.
The selected list of necessary will also simplify the task. Here it is:
- boards;
- door hinges;
- dye;
- brush;
- self-tapping screws;
- 2 chains with hooks and loops for them;
- 2 loops to hang a shelf;
- screws;
- wood glue.
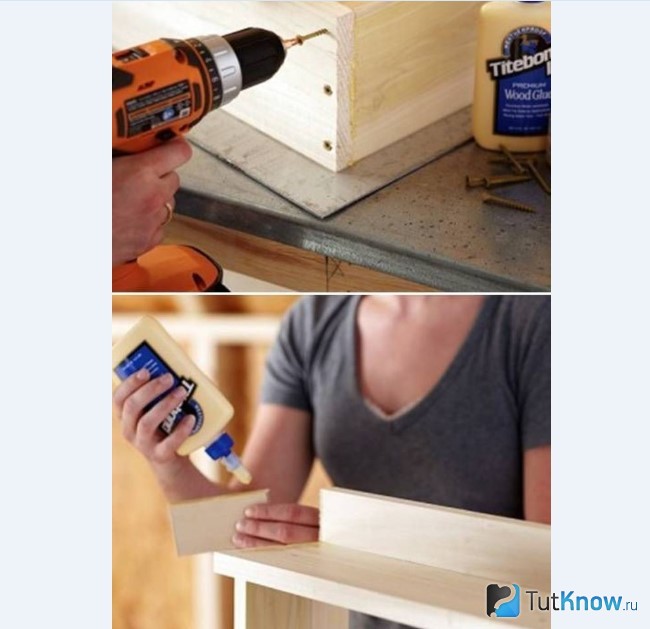
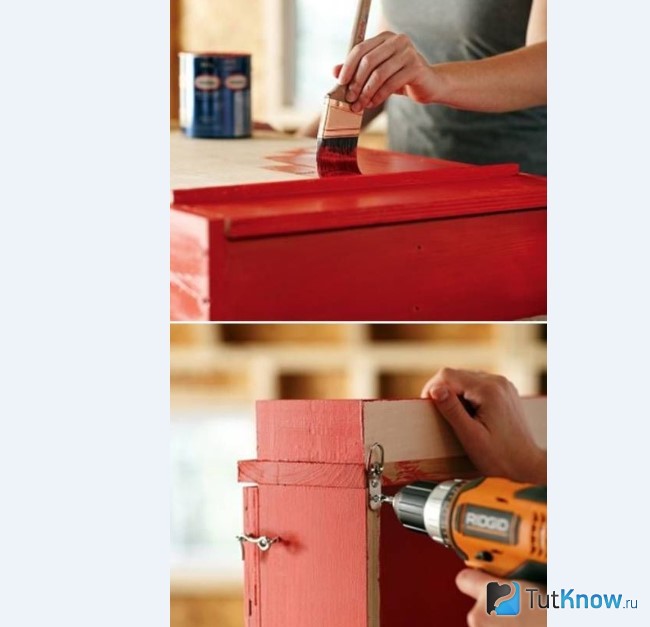
Further, such a craft for giving is made as follows. Attach the long door hinge with small wood screws. Attach the door chain and hinge to it.

The last touch remains - to put hinges on the screws to hang the shelf on the wall, paint it. When the paint dries, the functional craft for giving is ready.
It can also be placed on the balcony in a city apartment. If you brought potted geraniums to your dacha, as well as seedlings in wooden boxes, make interesting flower arrangements. For them you will need:
- wooden boxes;
- baskets;
- geraniums in pots;
- brackets;
- self-tapping screws.
What can be made from old things?
Items that have already served their time can be given a second life by turning them into useful country crafts. If you bought a new whisk, turn the old one into a dragonfly using a thin-handled teaspoon as well.
![]()
Bend two turns of the corolla to the right, and 2 others to the left. These are insect wings. To make the dragonfly further, put the handle of the spoon into the hole of the whisk, secure it with other turns, after removing one. From it you will make eyes, dragonfly antennae, by bending this wire.
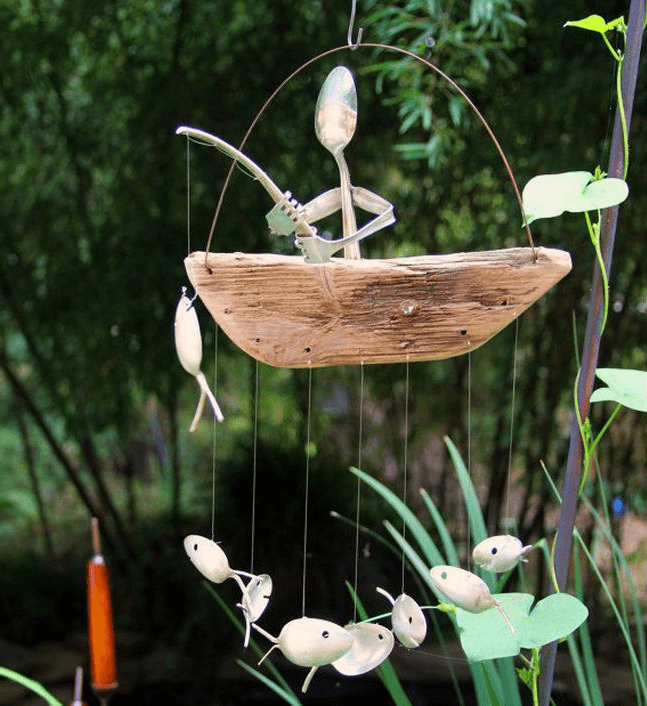
And here's another one interesting idea country crafts using kitchen utensils.
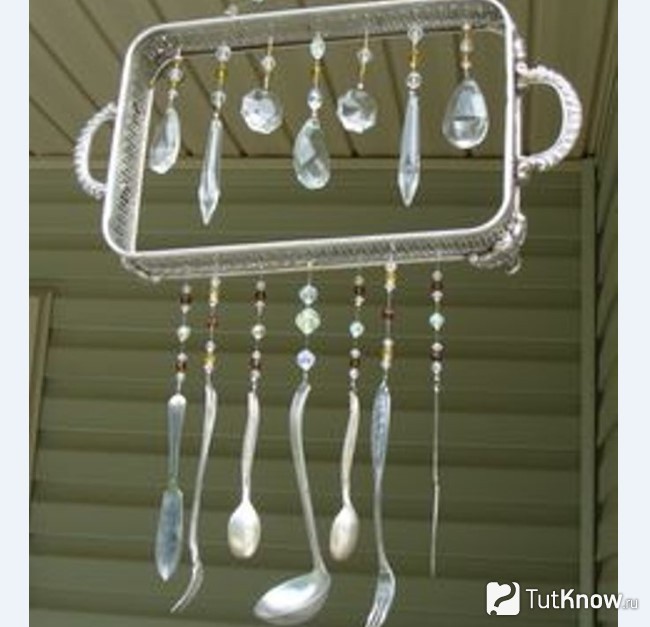
An old tray without a bottom also came in handy for her. If you have a crystal chandelier that was fashionable in the second half of the last century, take elements from it. They are fixed on a tray, and spoons and forks are tied to the bottom. Such an interesting design will make sounds with gusts of wind, and you can enjoy natural music.
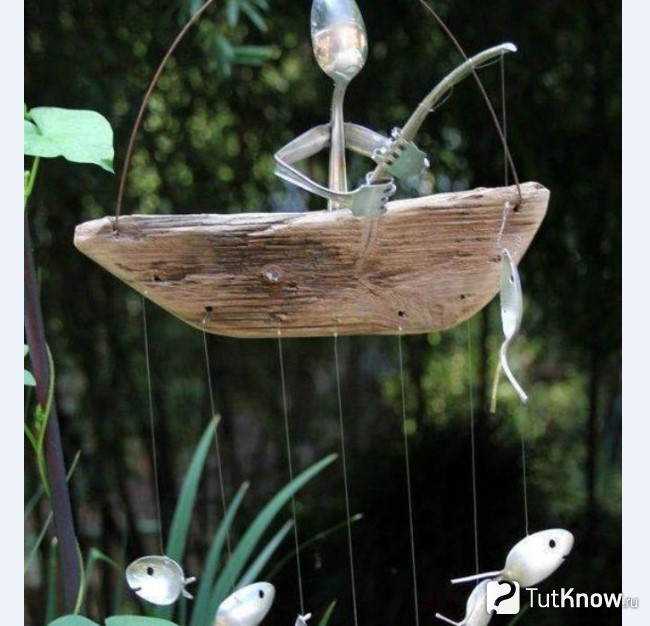
Do you want crafts for a summer residence to turn a small area into a corner of Venice? It is also within your power. From old spoons, “bite off” their handles with pliers, leaving small “tails”. With the same tool, make cuts on the spoons, as if the fish were smiling.
Drill holes with a drill in the place of the eyes of the fish, through them you will need to pass the lower ends of the wire segments, fix them. And the upper edges are attached to a boat made of chaga or wood. A gondolier will sit in it, whose head and body are made of a spoon, and whose hands are made of two forks. If this is a fisherman, then put a fishing rod from the whisk handle into his hands, and if this is a gondolier in Venice, turn this kitchen item into a guitar.
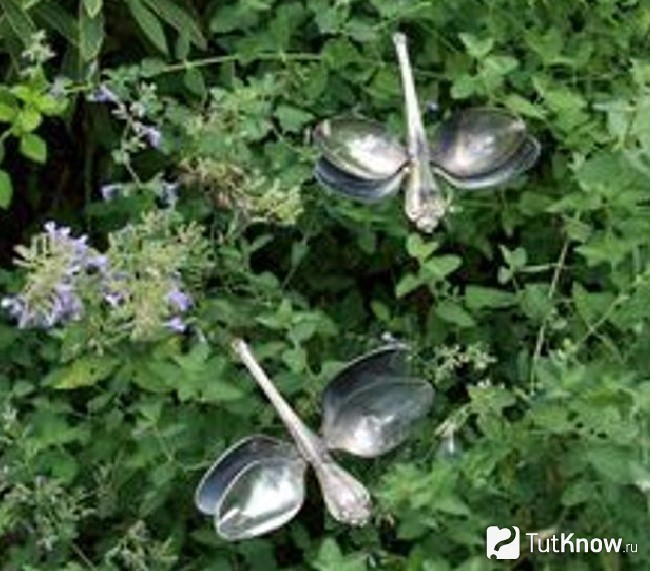
If you weld 4 parts from them to the spoon handle, then dragonflies will flutter in the country and reflect the bright rays of the sun with their shiny wings.
Here's another interesting option concerning how to plant flowers beautifully. Paint an old teapot, place the plants in it by hanging it by the handle. Make several holes in the kettle with a drill, fix the wire. Attach knives, spoons, forks to the second end of these segments, in which also make small round notches with a drill bit.
Instead of wire, you can use a fishing line, then you will achieve an interesting effect - kitchen utensils will seem to soar in the air, causing amazement of others.
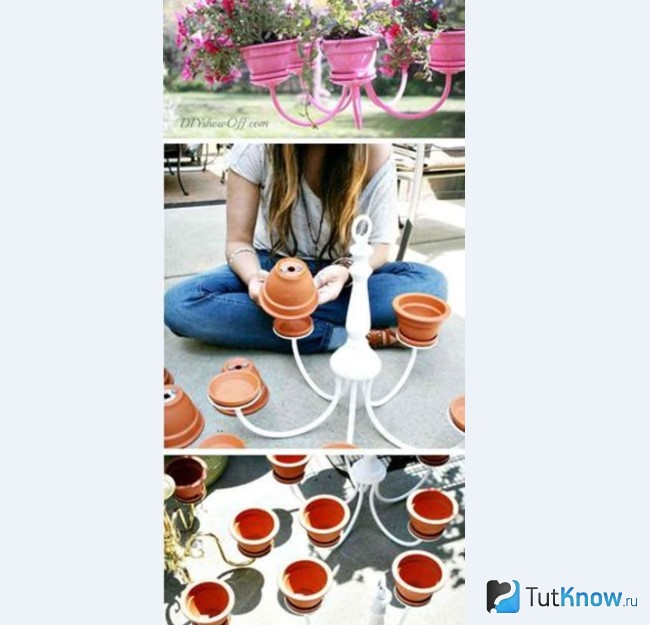
Speaking about how you can use an old chandelier, let's suggest the following idea. If her horns are broken, replace them with plastic pots. These remain with those who buy flowers in a store and then transplant them.
Paint these planters, fill them with soil and plant flowers. Isn't it true that this country craft also looks amazing?
An old wooden frame from a window, a box can be turned into an interesting exposition, beautiful flowers can be planted there, just like in bedside tables. Make a bird feeder out of a broken street lamp, and also find a place for a mini-garden on the windowsill.
![]()
From old tires and willow for a summer residence
It is also a fertile material for country crafts. Many gardeners decorate their beds beautifully. If you have a willow growing nearby, pick up its branches, peel them of leaves and weave a basket that will simultaneously become a vertical bed.

For this you need to have:
- willow twigs;
- wooden stakes;
- axe;
- rope.
A bed, a flower bed can also be made from old tires. Cut each in half, paint in different colors and lay out in the form of flower petals. Its core will be a solid tire.
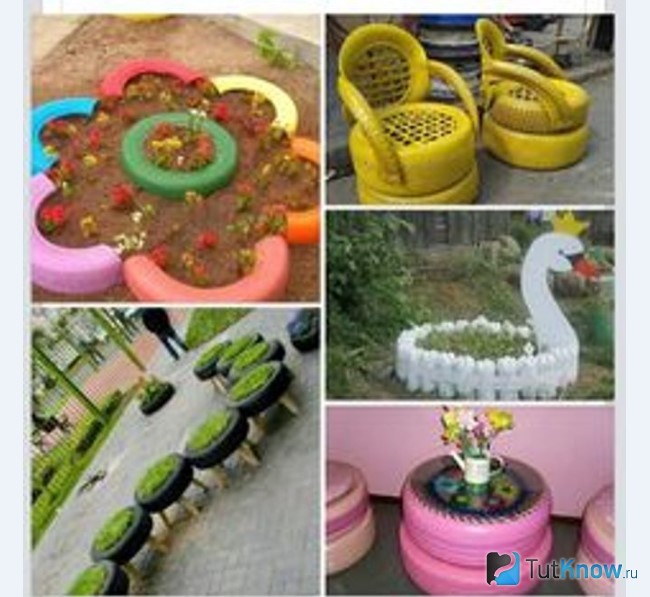
The second photo shows how to make a chair out of tires. Two of them will become its foundation. For the seat, use a metal mesh cut to fit the wheel. It must be attached to the tire with wire. Its back is made in almost the same way, but not the entire tire is taken for it, but its thin outer part is cut off.
Take the tire, cut off 2 halves from it on one side and the other. Attach these handles to your chair. It remains to paint it and put the country furniture, made with your own hands from old tires, in place. She is not afraid of wind, precipitation. These chairs made of tires are practical and durable.
If you put the wheels on wooden or metal tripods, and close the holes with a mesh in which to fix the cellophane, then you can pour earth into it and plant beautiful flowers.
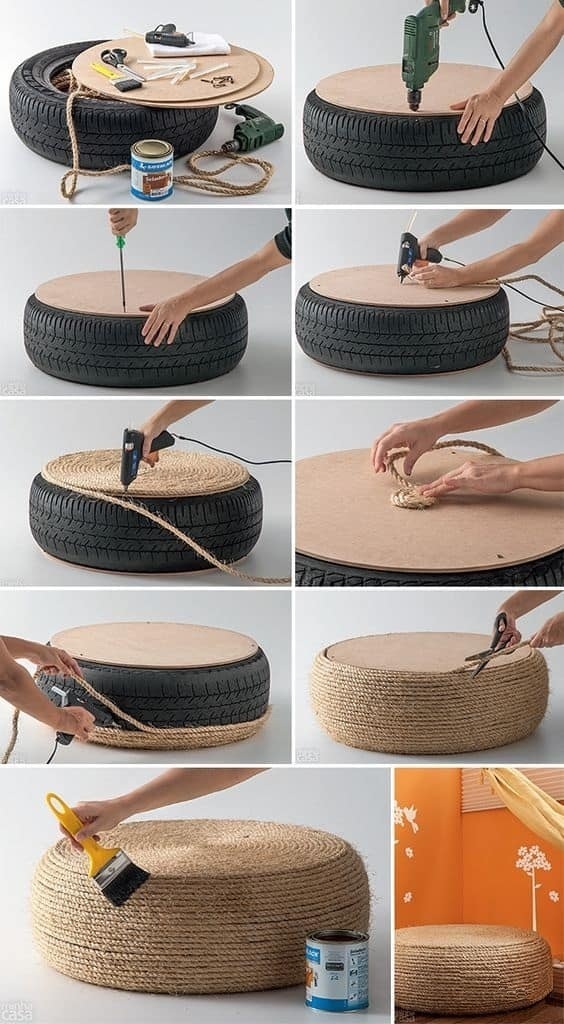
From old tires, you can quickly make a coffee table. It is enough to put one on the second, attach round plywood and plexiglass on top. Cover the tires with your favorite color and, voila, a wonderful table made from old tires is ready.
If the theme of such creativity is close to you, you like to make country crafts, using waste material, then it will be useful for you to watch these videos:
A country house with a plot for most people is not only a place where you can have a good rest, relax and relieve accumulated fatigue, but also room for creative inspiration. Each owner wants to transform and decorate his personal plot in any way possible for this. Some plant beautiful ones, others try to come up with an original one, others begin to make crafts or, fourth ones make crafts for the garden with their own hands. We will focus on the latter in detail in this article. We learn the latest news, novelties and the main trends of the summer season.
To create an original art object for your garden, it is not necessary to run to the store to buy material. You can make your new creations without them. Take a look around. After all, for sure in your household there is something that you have not used for a long time for one reason or another.
It can be a broken bike, an old, leaky bucket, worn out tires and tires accumulated, leftovers, basins, barrels of unnecessary shoes and much more. Give new life all these used things are very simple, the main thing is not to be afraid of experiments.

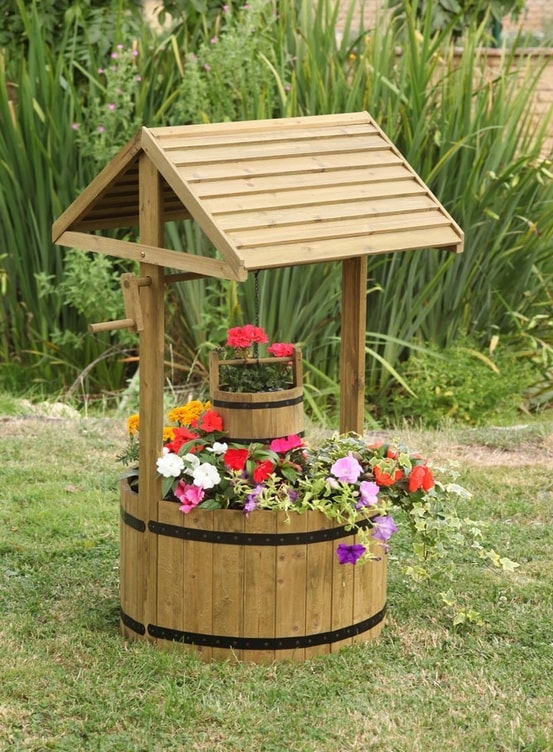
A visual diagram of how to make a decorative well for a summer residence with your own hands


![]()
First you need to decide for yourself in what style you want to see the design of your garden. In Provence style, or Art Nouveau, or whatever you prefer. Taking into account the characteristic features of each direction, as well as your own preferences, you should proceed to its design and decoration.
DIY garden crafts can be not only an aesthetic addition to your garden, but also carry a functional component that can be useful in the household.


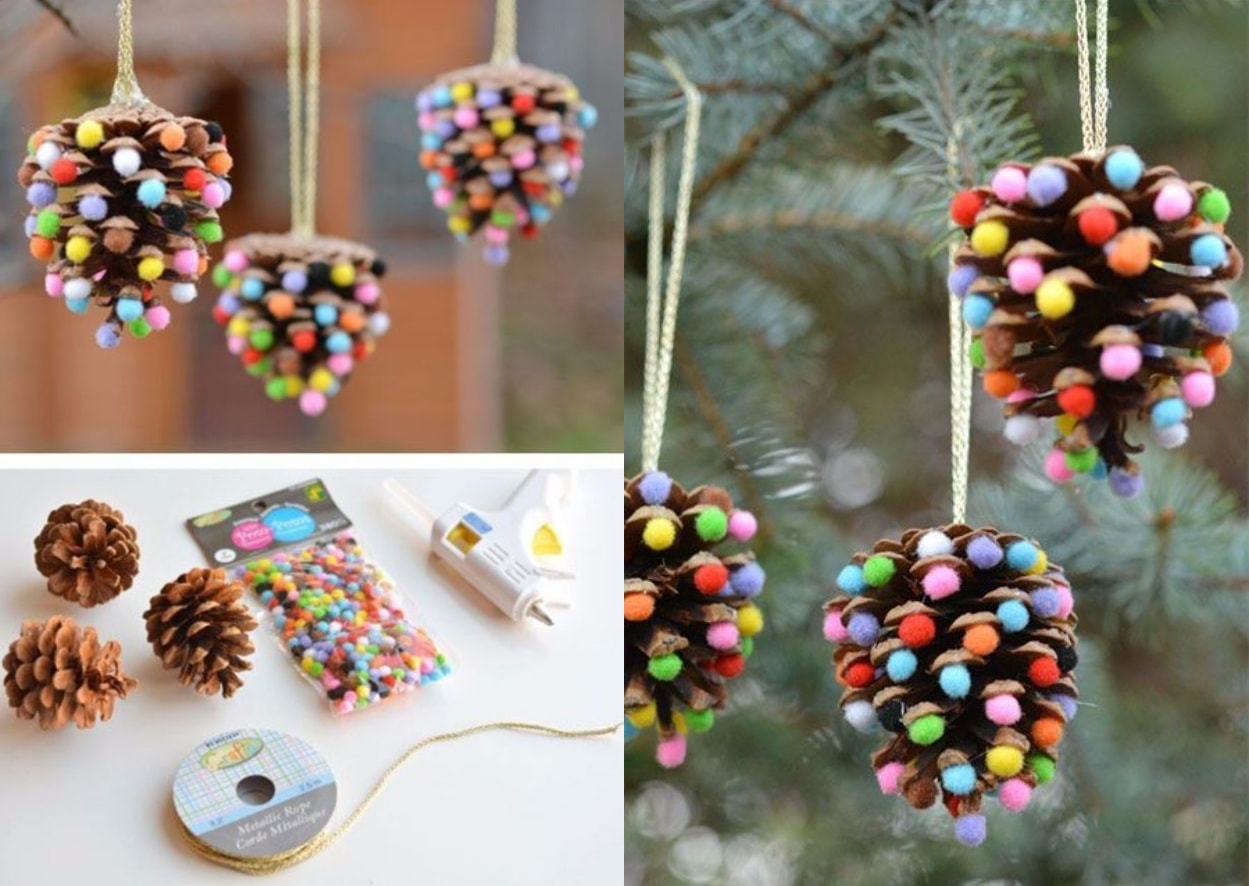
Natural materials will also help decorate your garden. Field boulders, river stones, tree trunks and their stumps, clay, glass, etc. All this will bring beauty and improve the habitat on your site.
The most important thing is the pursuit of perfection, it will help create a unique and beautiful decor for your site.
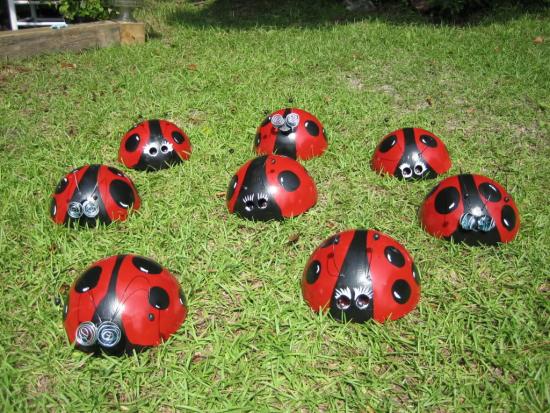
Stones for garden decor
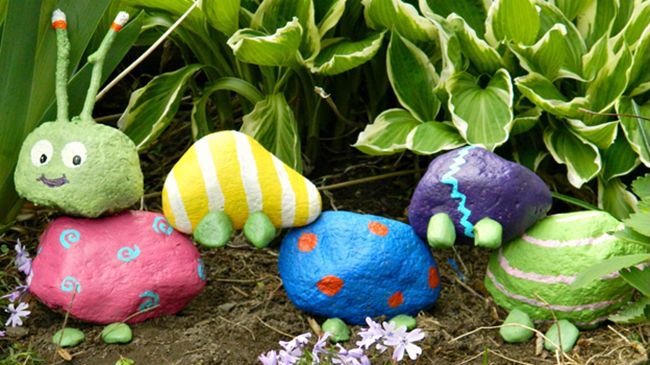
flat stones- a real find, especially if they are large. You can draw anything on them. And most importantly, making crafts for the garden with your own hands from stones is exciting and fun, especially with children.
Large stones may just decorate the garden, and medium-sized stones will serve as excellent helpers in the garden. It is necessary to take pebbles in the shape of a certain fruit or vegetable, draw it on it and put it in the garden in accordance with the drawn one. The garden and garden will immediately be filled with bright colors.
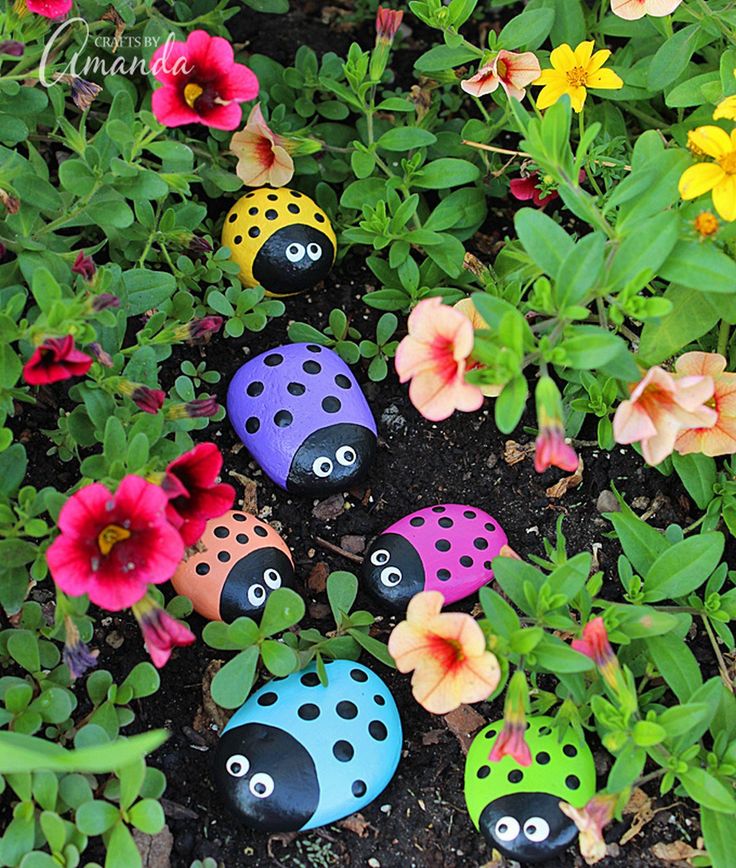
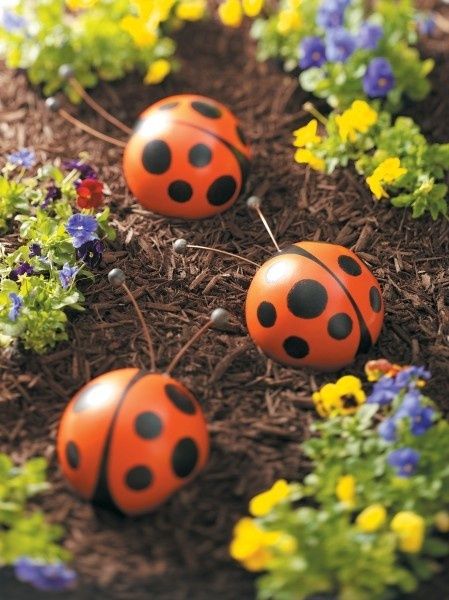
Stone Ladybugs - Design Crafts by Amanda


Do-it-yourself figurines for the garden (photo)
If you decide to decorate your garden yourself, remember that here you need to feel the fine line between the stylistic direction of the garden and a sense of proportion. Since when decorating a garden, going too far with the number of figurines or choosing the wrong image of decorative figurines can easily spoil the aesthetic appearance of your site.
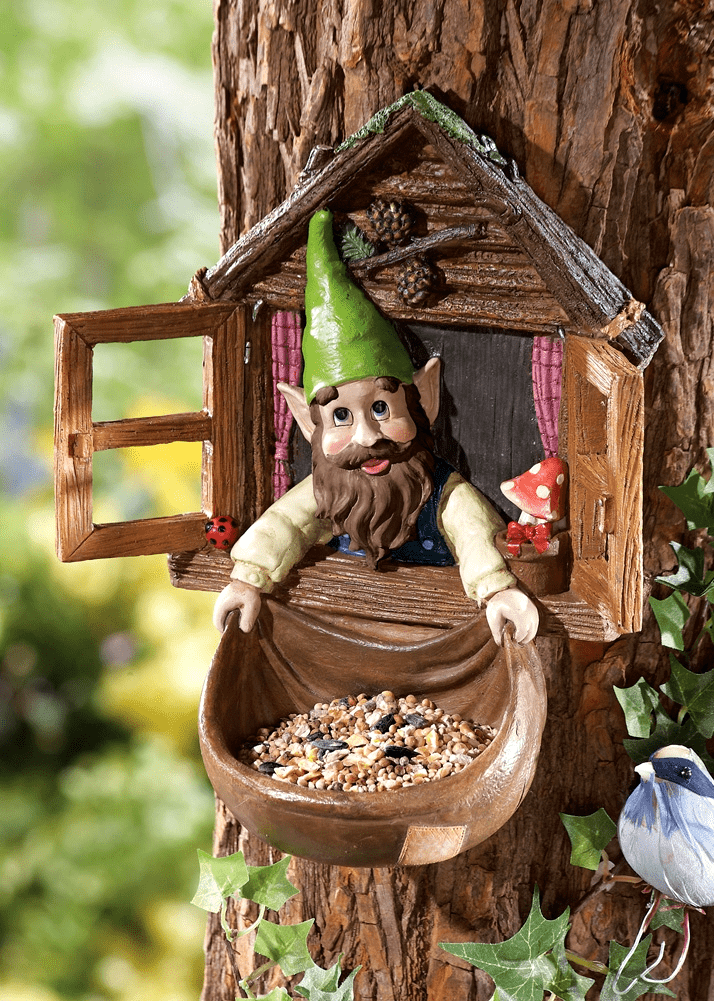
After all, you must admit that the figures of a red riding hood, a baba-yaga, a kolobok or other fairy-tale character in a Japanese garden will not look entirely appropriate. A green lawn decorated with a large number of artificial palm trees will look even more strange, under each of which there will be a gnome figurine.
Based on the requirements of landscape design, try to choose images of figurines in unison with the main direction of the style of your site.


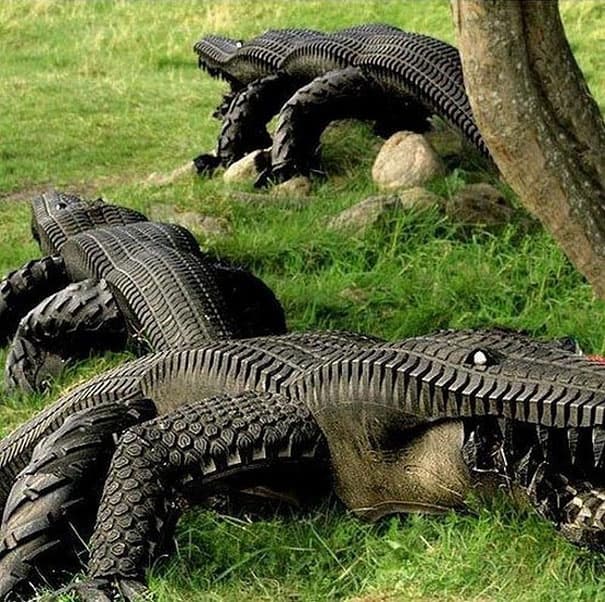
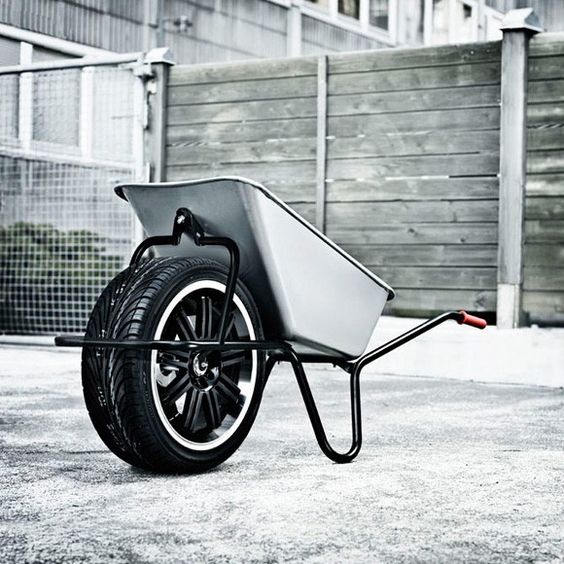
Crafts for the garden from tires and tires (photo)
Using old car tires as a material for making garden decor has long been a common practice for many people. For this, absolutely all tires of any diameter are suitable.
Having a number of fresh and practical ideas in your head, as well as certain skills in stabbing and cutting tools and devices, you can turn a boring piece of rubber into a beautiful art object, thereby decorating your garden in an unusual way.
There is nothing complicated in this work, and as practice shows, to make crafts for the garden with your own hands from car tires, even for a novice master, less than one hour comes out.
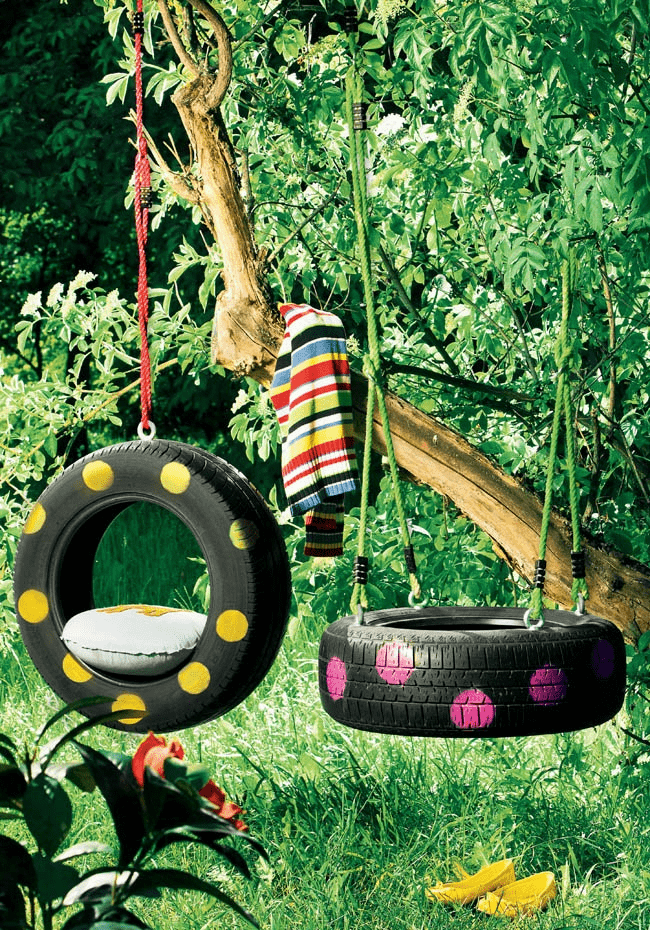

A little imagination and old tire found a new life in the form of a children's swing "overweight"


Tire products are just the case when you don’t need to spend too much time on do-it-yourself garden crafts and invest a lot of money to purchase expensive materials.
The scope of old car tires, where they can be used as a material for making crafts, is huge. Starting from the design of ordinary flower beds and flower beds, ending with full-fledged playgrounds for your children. Garden Tire Crafts- these are simple, cheap, well-proven products, the constructive forms of which know no boundaries.

Crafts for the garden from improvised materials (photo)
In order for the garden crafts you created with your own hands to retain their original appearance for as long as possible, try to choose the right source material for them. Also important is the thorough application of paints and varnishes.
Modern synthetic acrylic paints are ideal for open air, which are distinguished by reliable resistance to constant changes in air temperature and ultraviolet radiation.


In such a responsible matter as decorating a garden with your own hands, absolutely any little thing that has been gathering dust on your site for more than one year can come in handy. As experienced gardeners say, in the country there is nothing unnecessary and nothing superfluous!
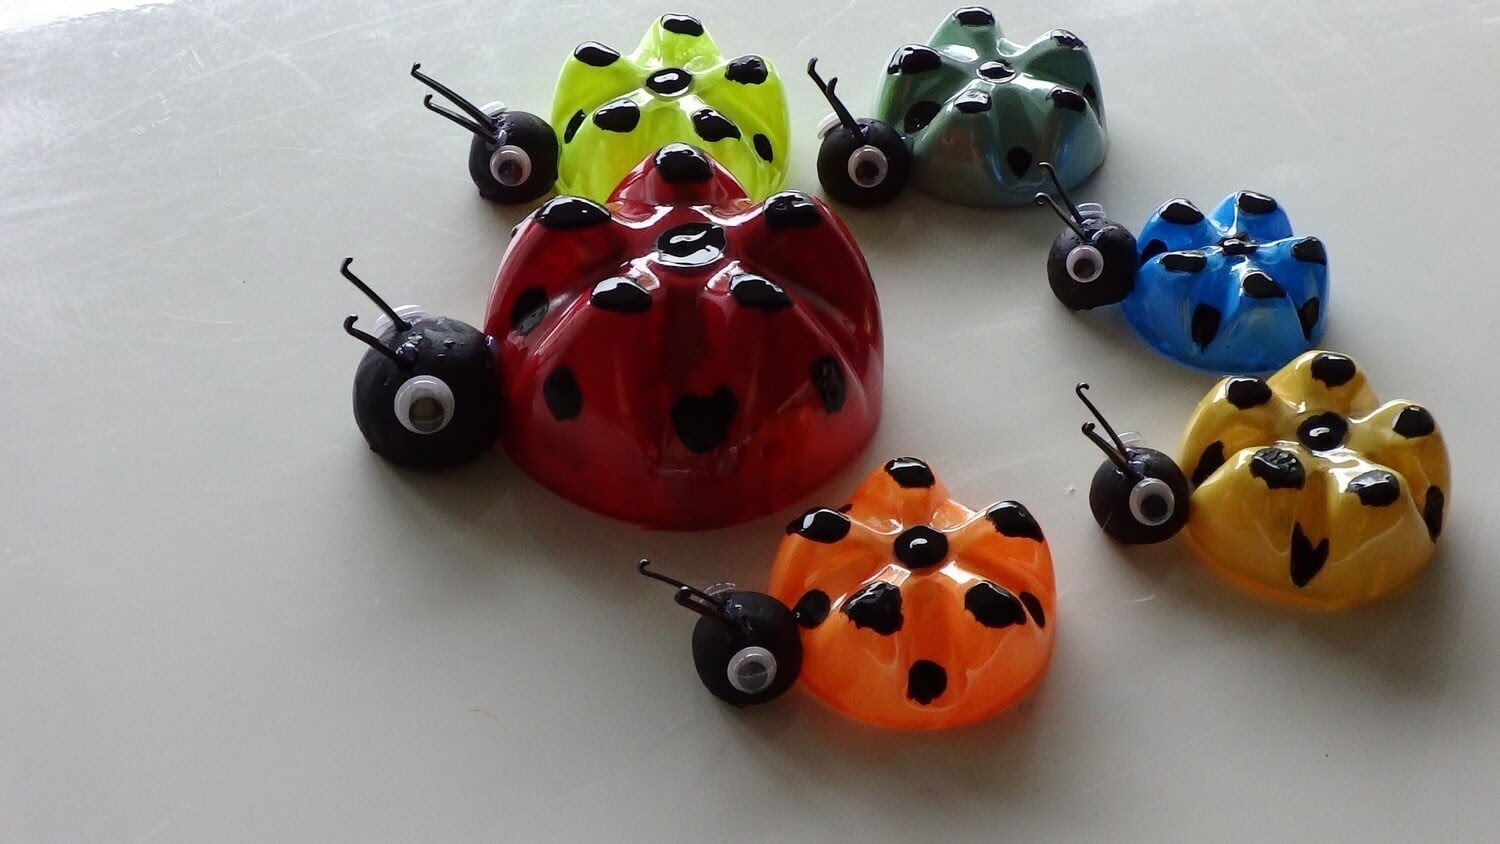
To give a special chic to your creations, experienced designers recommend using various sequins, beads, beads, colored glass, etc. as a decor. With their help, you can create an original image of fairy-tale characters, gnomes, small figures of animals or insects. Well, if you add a little magic to the surface of the products, in the form of fluorescent paint, you can enjoy the beauty of your garden not only during the day, but also at night.


New ideas for the garden that will inspire you (photo)
Everyone wants their yard to look nice and cozy. It's so nice to admire this beauty during warm summer evenings. To do this, you need to spend a lot of time and money, because often purchased decor items are quite expensive and, unfortunately, not everyone can afford it. And yet, even from this situation, there is an excellent budget way out - to make crafts for the garden with your own hands.
First of all, of course, it is worth taking care of the improvement of the site:
- Pay due attention to paths, paths, trees, flower beds and flower beds;
- Also, do not forget about the recreation areas (, ), where you often like to relax on warm summer evenings. They must look perfect.
If we talk about more interesting projects, then we can aim at creating decorative mini-garden or other decoration. Best of all, the miniature will look surrounded by small figurines and various figurines.


A pond decorated with artificial lilies or swans will look no less beautiful. If doing waterproof DIY garden crafts difficult for you, then you can easily buy them in specialized stores. There you will surely be able to find suitable products that will harmoniously fit into landscape design your garden.
It is important to remember that some products (especially those made of cheap plastic) are afraid of strong temperature changes. Therefore, if necessary, in the winter, everything can be moved from the street to a more secluded place where it will not be threatened by the cold.


DIY master class - everything for the garden (photo)
Many decorate their garden using classic techniques for this - beautiful figurines of little gnomes, unusual birds, as well as funny and funny little animals. This style of design for the site is very popular, especially for those who have small children. It has been proven that the fabulous atmosphere created in this way in the garden has a beneficial effect on the development of the child.
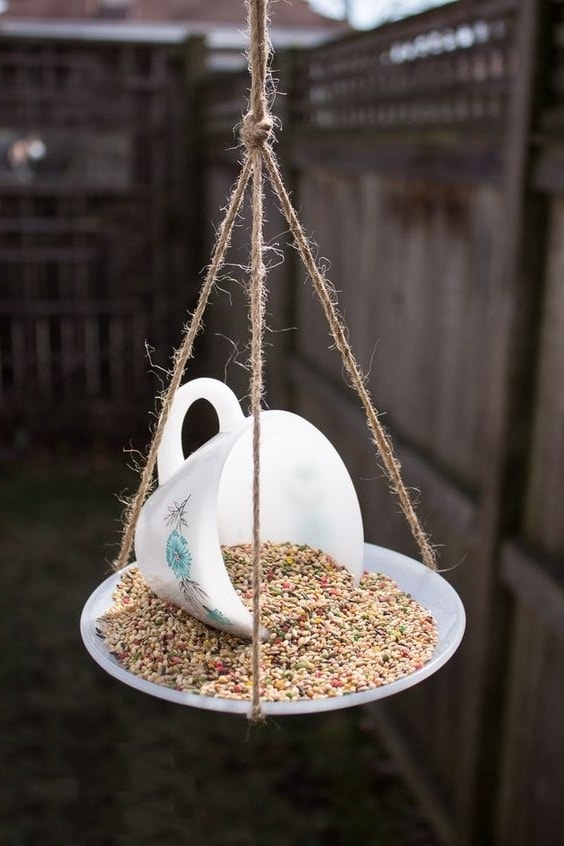
If you supplement the garden with a drinker or bird feeder, then in addition to improving the aesthetic beauty of the site, you will make a significant contribution to saving starving birds in winter. Thus, you will teach your kids to love all life on earth from a very early age.


Garden decor - photos of the best DIY crafts
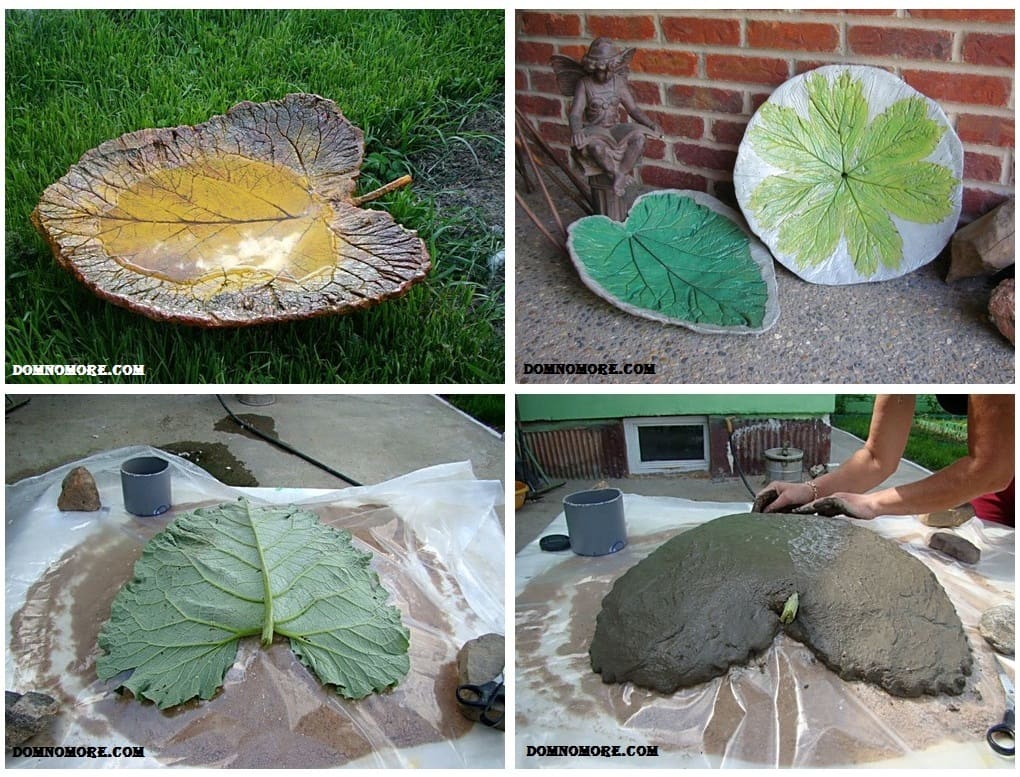
If recently there was a construction or repair on the site, then some building materials, such as cement, probably remained. You can create great DIY garden decor.
- To do this, you need to find the largest leaf, a leaf of burdock or water lily is perfect;
- Then a layer of cement should be applied to this sheet, not very thick, but not thin either. In order for the sheet to stand later, it must be even and smooth on top, otherwise the sheet will have to be dug into the ground;
- After that, you need to wait about 5-6 hours, until the solution is completely dry, turn over, remove the sheet from the cement and now the decor is ready.
To manufactured DIY concrete crafts hands did not look too gloomy, you can glue colored pebbles in the middle or just paint the sheet in any color.


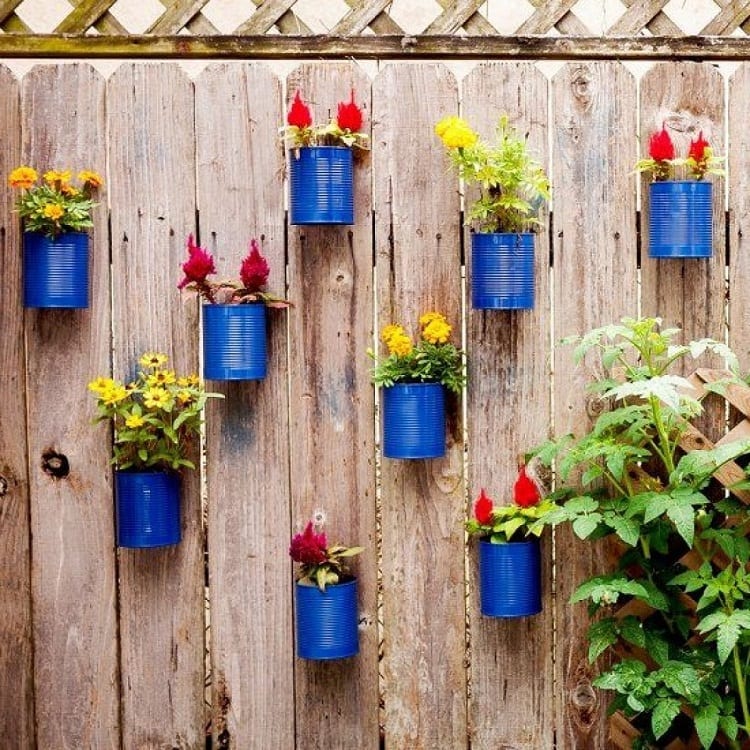
Wall decor with flower pots (photo)
Flowers are beautiful decor idea. If there is an empty boring wall on the site that needs to be decorated with something, then hanging flowers and photo frames will be a great option.
- To do this, you need to find empty tin cans or unnecessary flower pots, preferably the same size;
- Holes are made on the sides through which you need to pass a rope or chain. It will be a latch to hold crafts on a vertical wall;
- If the wall is wooden, then you can simply drive a nail into it, if we are dealing with a brick or block wall, then we cannot do without a puncher and anchor dowels;
- Around the pots, which can be painted as desired, you can hang frames with photos or children's drawings.
Also, clay products will look very beautiful and impressive on the wall, which will give an image reminiscent of a building from old Russian fairy tales.

![]()


Beautiful garden- this is not a dream, because today you can make any dreams come true. By decorating your site with original and beautiful crafts, you will not only transform its appearance, but also make it different from the rest.
In creating decor items, the main thing is fantasy and some skills that come with time. A little perseverance, and everything will definitely work out. Faithful helpers in this exciting process will be your own hand-made crafts for the garden with your own hands.
In contact with