Creative vases with their own hands. Do-it-yourself vase from improvised materials: simple master classes for beginners. How about a vase of pencils
High-quality repairs alone cannot create home comfort and coziness. They are helped to create original accessories, small and large details that organically fit into the design style. Floor vases help to focus on the main elements of decoration. Their height ideally ranges from 40 centimeters to one and a half meters, although in some places you can see similar products up to the ceiling. Finding the right shape is also not easy. To do this, you need to have a special artistic taste. You can buy such products via the Internet, but if there is not enough money, then there is another option - to make them yourself. Let's look at some fresh ideas that will clearly illustrate how to make a floor vase from improvised materials yourself.
Check out the next photo to see how the glass vase should look after it has been painted. After an hour and when the vase or glass vase is completely dry, you will have to turn it over and place it in newspaper. Once you get into this position, you should draw the top of the jar as you did before.
If, in addition, you want the vase to be completely white and with a beautiful finish, then we recommend that you dedicate a few more minutes to this task, as well as paint the inside. Then let it dry for another 1 hour or as long as necessary, it is important to dry completely before decorating.
Black bottle
The first master class will show how to make a fragile vase from an ordinary tall bottle into which you can put dry flowers. This piece of decor is ideal for small rooms with low ceilings.
For its manufacture we need:
- Large shaped bottle.
- Black thick paper.
- Can of PVA glue.
- Acrylic matt varnish.
- Artistic brushes.
First, using a cotton swab and alcohol, the glass surface is degreased. Then a sheet of thick black paper is taken and wrapped around the container in such a way that there is a margin for protection at the top of the neck. Previously, the paper sheet must be thoroughly wrinkled so that whitish kinks form at the junction. Then each side of the bottle is individually coated with PVA glue. Paper is immediately attached to it, and neat folds are formed. This work is not very laborious, and the main thing in it is that everything be done carefully.
Unusual bamboo vase
How to decorate glass vase? There are many options and you can make thousands of different decorations depending on the style you want to have in your vase or the decorative style of the room or space you intend to place it in.
We did this to tie some rope around the top of the vase with a few twists to make it more visible. You can customize the decoration to your liking and fill it with the flowers and plants you like best, and even give it other uses and use it as a pencil, jewelry box, etc.
After pasting, the bottle must be left and the paper should be allowed to dry well. After it hardens, the top of the black vase is covered with acrylic matte varnish.
Note! Matte consistency is not chosen by chance. It will not distract from graphite folds.
If you want to read more articles similar to, we encourage you to enter our category.
If you are just starting out with glass, you will be able to use smooth glass surfaces. So, look at simple clear vases that are full of household items in various shapes. The key step is choosing the right colors. You can choose from two main types: water-thinnable and toluene.
- Do this in an open space or with ventilation.
- In case of opening, do not breathe.
- Allow to dry also in an open or ventilated area.
The elongated black accessory looks great against a monochrome wall. In such a vessel it will be possible to put dried flowers or dry branches of trees.
It is also easy to make your own floor vase for the hallway instead of a magazine rack if you have crochet skills.
For its manufacture we need:

Water soluble can take a long time to dry, but you don't have to worry about breathing in harmful fumes while working with them, and you'll also be able to work with eco-cleaning used brushes and utensils. Before decorating, glass containers must be degreased. Wash them in hot soapy water and, after drying, wipe the surface with pure alcohol. To effectively apply the color, it is recommended to stain the glass before staining. Don't forget to prepare working area so as not to interfere with your furniture and clothes.
Knitted magazine rack
- Quite a bit of acrylic yarn.
- 90 centimeters satin ribbon.
- Double jar.
- Hook.
We collect a chain of air loops from acrylic yarn - its length should be equal to the girth of the can. Next, we knit the pillars according to the scheme - 3 double crochets, 3 air loops. We continue to knit until the height of the jar is completely closed.
Painting refers to simpler versions of glass decorations and can be handled by a beginner. You need glass colors, according to the decorated blanks, choose either burning or air drying. The color without fire will dry for at least 48 hours, but you will need to choose a fragile glass for you.
Cut the neck at home
Also, use different types brushes - you can use flat brushes or smaller wallpaper to paint entire surfaces. Use circular brushes in several sizes to paint motifs. If you want multiple colors to rotate during your painting, you can use a hair dryer to speed up drying.
Note! In the rows, you do not need to make additions or decreases, just knit the entire circumference.
The last row at the neck should be decorative. Look at the photo. The knitting pattern is as follows - 3 double crochets, 3 air loops, 1 single crochet, we put it into the loop of the previous row. And we repeat everything again.
In addition to painting on the surface, you can also try the so-called mosaic, which will require special, oil-free, oil-based colors. Add 2 to 3 different colors to the bottom wide bowl, which you will "blend" with a wooden skewer. A colorful mosaic is created in which you carefully place frosted glass.
A very impressive glass painting technique is the so-called prickling. There is a special brush for creative needs, but you can also get a rich dish with a sponge. Cut it into three pieces and apply soft paint to the glass. This creates a rougher structure on the surface of the glass container.
The last step is attaching the satin ribbon. It will prevent the knitting from slipping and make the vase even more decorative. The tape is pushed between the knitting windows from below at the base of the can in the second row and from above, where the neck is formed.
glass painting
Very often, glass vessels of some bizarre shape are stored on mezzanines or in pantries. Why they were purchased is not clear, but if you bring such an item to mind, it can turn out to be a very beautiful floor vase. It is not difficult to paint it with your own hands if you look into a specialized art store. Let's draw flowers on it with stained glass paints, and an original art object will appear in the house.
The more colors you apply, the more distinctive the relief will be. The second option for creating glass on glass is to apply an opaque color to the entire surface of the container. It is necessary to leave the paint on the glass until completely dry. Then sand the edges, perhaps even part of the surface, using fine sandpaper. The patina is perfect for flowers in antique gold, ivory or copper hues.
When painting on glass, it's best to keep the slogans smaller. Even a simple little motif can emphasize the overall result. If you decide to use larger motifs on the glass surface, try separating the elements. Natural details such as feathers, fish scales, or leaf ribs can help with natural inspiration. The alternative is to divide them into modern mosaics.

We decorate a vase
For its manufacture you need:
- Ready contour Pebeo.
- Any stained glass paints.
It is not difficult to paint a glass vessel beautifully. You do not even need to have special artistic skills to do this. Stencils and stained glass paints are sold in specialized stores. Working with them is a pleasure.
If you have a problem at the beginning of the glass motif, you can help with a template. First, draw the silhouette of the image on paper, cut it out and rinse the motif thoroughly in the glass. Now you can easily build the element. If the vase has a narrow neck, it will be necessary to place the motif on the surface of the container. In this case, remove the glass pattern until the paint dries, otherwise you will sink the pattern.
Contour glass paste, which is available in different color options, is clear and opaque to greatly enhance the color of painted parts. You can also create interesting elements, scraping it with a wet color using a cotton stick or scraping it off in a dry color with a longer sharp needle. On a dry surface, you can also print with stamps, ideally without embossing.
The sequence of actions is as follows:
- First, degrease the surface of the glass.
- Then apply the contour and leave to dry.
- With a thin brush, we gradually paint over each individual element. This work is very exciting and reminds us how we painted coloring pages in childhood.
- When the paints are completely dry, the painted surface must be covered with a protective varnish. And that's it - the floor vase will be ready. It is necessary to choose a decor taking into account the place where the described accessory will stand. It looks great against the background of plain parquet in a room with a restrained interior.
Note! The bright coloring itself is part of the active decor, so nothing needs to be placed in such a floor vase.
And again stained glass paints

stained glass pattern
Buying a finished decorative floor vase is quite problematic. Such products are very expensive. But there is always cheap consumer goods on sale, which, with some effort, can be beautifully decorated with your own hands using the following master class.
Look at the photo - stained glass paints will again help to create the illusion of a real stained glass window. With the help of a golden contour, squares of arbitrary shape are applied. Then they are filled with multi-colored stained glass paints. After complete drying, an imitation of the fact that the flowerpot was assembled from individual pieces of broken glass is obtained. The work is not very laborious, and everyone can do it. And consumables are sold in specialized art stores, so doing all this yourself will be very simple. And do not forget to cover the front side with a special protective varnish in two weeks. Then the floor vase can be washed under running water.
Vase from a large jar
See what can be done from an ordinary tall jar in which marinades were stored in winter. To finish it, you need to take:
- Paper twine.
- Shells, pearls, beads, rhinestones, glass stones, a chain of metal balls.
- Hot glue and second glue.
- Acrylic paints.
- Acrylic varnish matte and glossy.

Decor of a regular jar
Let's get to work. From above and below, along the most convex parts of the jar, we wrap it and immediately glue the paper twine. It is attached with hot glue. The lower part, completely sealed with twine, is closed with shells, pearls, beads, glass pebbles. We lay out and form the seabed, while the decorative elements are fastened with the same hot glue. After that, on the front side of the jar, we draw seaweeds with acrylic paints in free technique. The picture shows that azure colors are chosen for drawing, but the color palette can be arbitrary.
The next step is to cover the glass part of the vase with matte varnish. It will protect the paint and form the desired texture. Glass rhinestones help create the effect of bubbles in the water. They are already attached on top of the varnish on the "second" glue.
The upper part of the twine without additional processing looks rough. Therefore, some decorative cord will be just in place. And one more finishing touch - the upper part of the neck can be wrapped with a chain of metal balls. Then appearance vase will turn out complete.
What else can you make a floor accessory from? From paper modules.
Vase from paper modules

paper vase
Such an unusual art object also looks very impressive. To make it, you only need printer paper and spray enamel. We assemble the modules, as in the photo.
We make a vase out of them with the beginning, like a swan. Then we paint over the paper composition with aerosol enamel. If you choose black, it will look great paired with a black paper bottle, as in the first master class. A golden aerosol will help you get a luxurious accessory for a classic interior.
jute jar
And the last idea, which will allow you to get a beautiful floor accessory by spending little money. If you take a large plastic container, which can be easily found in a hardware store, as a basis, and decorate it with jute, you get an exclusive floor vase.
The presented decor is as follows:

Jute wrapping
- Starting from the bottom, the plastic vessel is carefully wrapped with ordinary gray twine.
- Next, a twine is twisted from two strands of twine and glued with PVA glue in a zigzag pattern to the bottom of the vessel. The tops and hollows of the zigzag are decorated with balls that are twisted from the same twine.
- The medallion is made in almost the same way, with the only difference that the twisted cord is not in a zigzag, but twists into a circle. Each new turn is attached to the previous one with glue.
- The chain is woven using the macrame technique.
- The finished vase is abundantly coated with PVA glue.
- After the glue is completely dry, it remains to treat the front side with an acrylic glossy varnish.
Generalization on the topic

jar used for shape
As you can see, making a floor vase with your own hands is quite simple. If you turn on the fantasy, then a lot of improvised materials can be adapted for this business. The main thing is to remember that any such accessory should take its rightful place. Such items are good for decorating spaces with a minimum amount of furniture. The more unusual the shape and the more complex the drawing, the simpler the background should be for it.
Remember that matte textures with small decorative details look great against the background of glossy parquet. Only a monochrome vessel looks good with a soft pile of a carpet. Experienced decorators recommend putting such items in the corner of the apartment or in the interval between two large items furniture arranged symmetrically.
A vase near the curtains will also look harmonious, but only if they completely cover the wall with a window opening.
Related publications
 Ruslan Vasiliev
Have a desire to experiment and do something with your own hands? Have you been dreaming of a bright accent in a boring interior for a long time? Or maybe you don't know what to do with your child? In this case, we suggest you make a vase with your own hands. Different materials can be used for this, for which there is only enough imagination and desire, and in this article we will consider the most popular and simple ways to make a vase that do not require special skills and costs.
How to make a vase from a waste glass container
One of the most simple ways- make a vase from a jar or bottle. To do this, you just need to paste over the container with small pieces of magazine scraps, corrugated or wrapping paper of different colors. The finishing touch can be jewelry made from small beads, rhinestones or buttons. For gluing the decor, PVA glue will help, which is diluted in a 1: 1 ratio, or you can use special glue for decoupage.
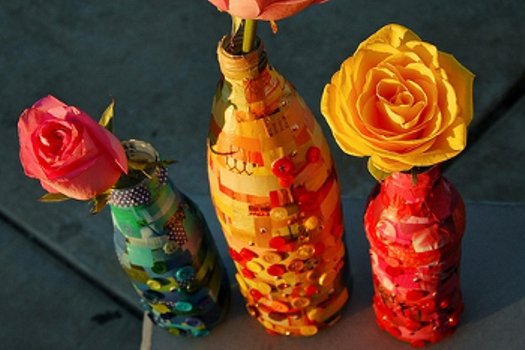
You can also decorate such a vase with a thread or ribbons. In this case, it should be borne in mind that the glue dries quickly, so you need to apply it on small plot working surface. Step by step, we wind the thread so that there are no gaps, and as a result we get an original decor.
Cut the neck at home
To in glass bottle fit more flowers, you will need to cut off the neck. A special cutting tool is not needed, because all the work can be done with the help of improvised parts.
Required tools:
1) Thick woolen thread (1.5 meters);
2) Solvent (alcohol, acetone);
3) Matches or a lighter;
4) A container with water;
5) Sandpaper or a bar for sharpening blades;
6) Goggles and gloves - safety is paramount.
The working process:
1) We outline the line along which we will cut the bottle.
2) We lower the thread into the solvent. Then we wind it on the bottle in the designated place in 3 layers.
3) Quickly set fire to the thread, holding the bottle horizontally.
4) After burning the thread, immediately lower the bottle into a container with cold water. The glass will burst exactly in the place where the heated thread was, due to the temperature difference.
5) We process sharp edges. With a bar for sharpening blades, it is better to perform this action in water.
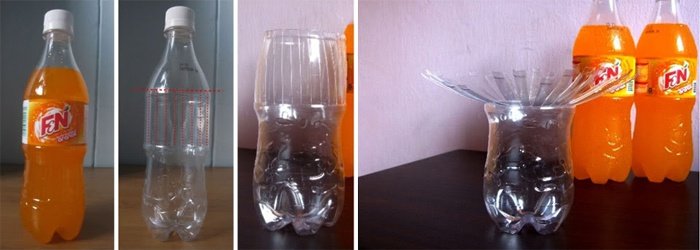
Making a vase from a plastic bottle
In this master class on a vase from plastic bottle it will be shown with your own hands how you can create an exquisite decor for your home from the most affordable and budget materials.
Method one: lace neck
We will need:
1) Plastic bottle;
2) Scissors;
Stages of work:
1) We mark the lines denoting the top of the vase and the boundaries of the beginning of the plastic "laces".
2) Cut along the markings.
3) We bend the resulting strips from the center. We bend each petal in half and turn it so that it crosses two adjacent strips and reaches the third with an edge. We do this with each strip to get a kind of lace neck.
Method two: openwork vase
Necessary materials:
1) Plastic bottle;
2) Nail or soldering iron;
3) Marker;
4) Paint.
Step-by-step instruction:
1) Cut off the neck of the bottle. Use a marker to draw a pattern. You can do it any way you like.
2) Make holes according to the outlined pattern using a heated nail or soldering iron. Do not connect the holes, otherwise you will get big ugly holes.
3) Paint over the resulting vase with paint.

Vase of pasta
Pasta is an excellent material for decorating various surfaces, because with their help you can create original compositions. How to make a vase of pasta, you will learn from the following tips.
Any container can be used for such a vase. It can be plastic bottles, glass jars, and even self-made cardboard bases.
To begin with, we think over a composition of pasta and other decorative elements. You can stick around the future vase with plasticine, in which case glue may not even be needed. Or tie the base with ribbons or twine. Then we glue pasta and decorative elements according to the chosen ornament. For decoration, you can use any adhesive mixture, including self-made paste, as some experienced craftsmen do. Glue residues are removed with plastic stacks.
For coloring we use any paints, including food coloring. There are two coloring methods:
1) Add colors to an already completed composition, for example, by spraying a vase from a spray can.
2) Dip the used pasta into hot colored water before starting work.
We use the gifts of nature to make a vase with our own hands
In addition to pasta vases, vases made from natural materials, such as pumpkins and zucchini, will become an original decor element. The advantage is that the manufacture of such vases will take very little time and will not require special skills from you. However, such decorative elements are only suitable for short-term storage of dried flowers or a beautiful serving of a dish due to a short shelf life.
To make a vase from a zucchini or pumpkin, you need to carefully cut off the top and bottom of the vegetable, then clean out all the pulp. In the resulting curved cylinder, make through cutouts.
The finished product should be put on a small plate so that the dampness from the vegetable does not spoil the surface of the table.

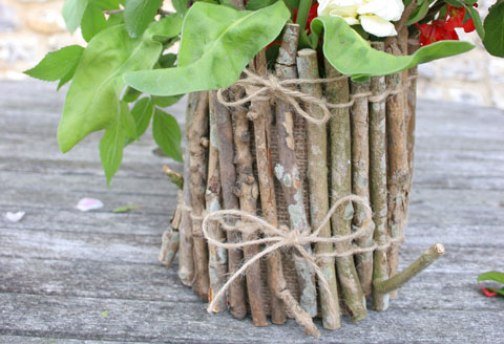
Vase of twigs: step by step instructions
Necessary materials:
1) Glass jar;
2) Bag fabric;
3) Branches;
4) Twine (strong thread);
Manufacturing steps:
1) We collect several branches and break them into equal parts so that they are slightly higher than the container.
2) Cut off about 1.5 meters of thread. After adding each part, we tie a regular knot. We use two threads to connect the branches from above and below.
3) At a certain stage of work, we wrap the resulting “mat” of branches around the can to check the length.
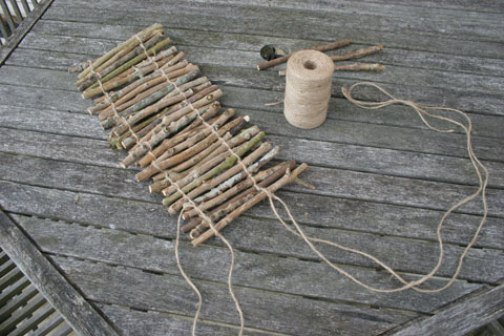
4) We cover the container with bag fabric, bending it at both ends and fixing it with glue.
5) And finally, we wrap the covered container with branches fastened to each other.
This article has shown just a few of the many ways to make and decorate vases with your own hands. Were mainly considered options for making small vases and pots, but most of these tips are applicable to creating tall floor vases. The cost of such interior items is much lower than those bought in a store, however, such decor looks no less impressive.
You can learn how to make a floor vase yourself, as well as additional information on making other decorative elements from the video selection below.
Video on the topic of the article


