Cable for heating a water pipe how to install. Heating and protection of pipes and water pipes from freezing. Choosing the type of cable and calculating its power
The domestic climate is quite severe, and therefore in winter water and heating mains are often subject to sudden temperature changes. This, in turn, can cause freezing of pipes or - and this is even worse - a complete cessation of heat and water supply to a private house. For this reason, any water supply network is desirable in without fail warm or insulate.
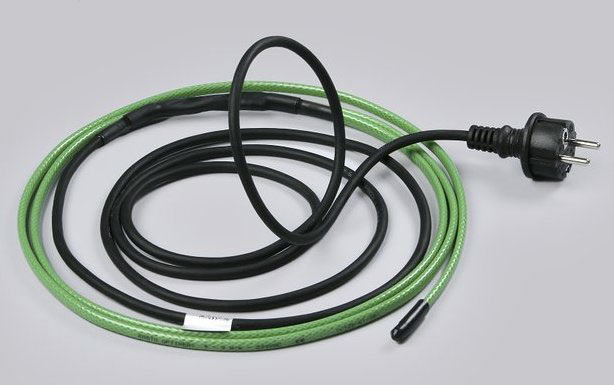
Let's start with the fact that insulation far from in all cases can serve as a 100% guarantee of pipeline performance during prolonged frosts. However, we have great news - a heating cable for plumbing can be an excellent protection for the main line, regardless of specific weather conditions, as well as how low the temperature outside has dropped! This, as well as many other things, will be discussed in today's article.
Design features of the heating cable
Well, you should start with the fact that the device of heating cables can be different, and depending on the principle of their operation, all such devices are conditionally divided into two large groups:
- self-regulating;
- resistive.
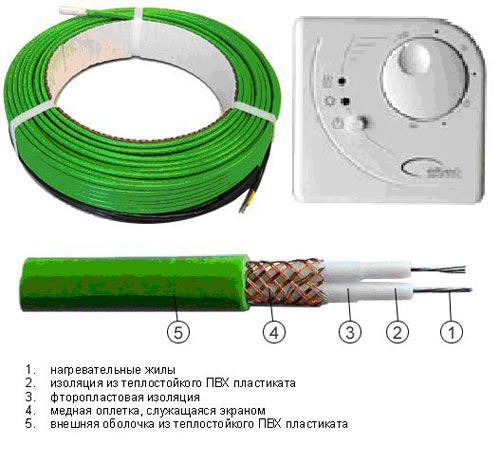
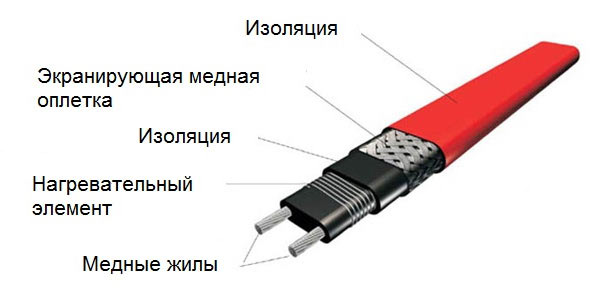
We will talk about the features of the representatives of each of the groups a little later, but now we note that from a constructive point of view, all these cables are one (or, alternatively, several) core, which can be nichrome, copper, or made of another metal that can emit thermal energy during the passage of electricity through it. In addition, each of these cores is clad in heat-resistant insulation, as well as in an additional surface insulating layer consisting of polyethylene foam.
Note! The power of the heating cables described in the article also varies and is indicated, as a rule, by the manufacturer on the packaging.
The main types of heating cables for water supply systems
These seemingly ordinary cables, through which pipes are heated, are also distinguished by their insulating structure mentioned above, which differs depending on which particular type of heating cable we are talking about. First of all, we note that at the present time, such cables can be used not only for heating water pipes with the onset of cold weather, but also for heating drainage systems, melting snow with ice, which tends to accumulate in gutters. Due to this, their destruction is prevented.
Modern industry, as we managed to find out, produces two varieties of this cable at once. Despite the fact that their function is practically the same, the heat release scheme and device are different for them, which means that they should be treated in a special way during installation.
But, characteristically, all resistive cables are further divided into:
- linear and zonal options;
- two- and single-core.
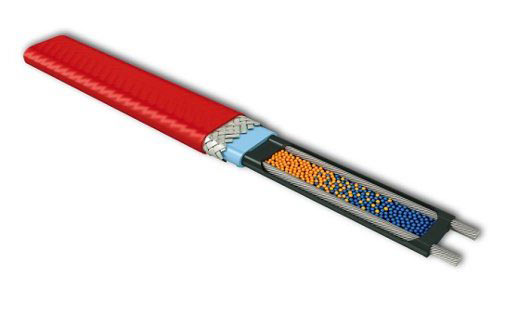
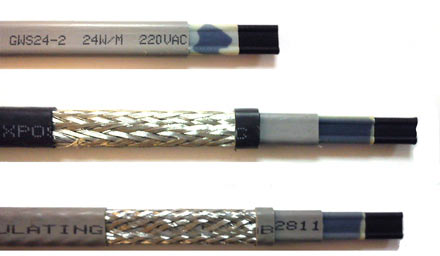
Features of resistive heating cables
They traditionally include one or more cores covered with the following insulating layers:
- copper braid (plays a shielding role);
- fluoroplast;
- heat-resistant PVC compound (it is present in the first / last layers).

What is characteristic, the heating of this cable is carried out evenly along its entire length, and its resistance is permanent. This feature can be considered a minus, because because of this the product can overheat and, as a result, become unusable. To avoid such a nuisance, when installing a heating cable for plumbing, it is imperative to install temperature sensors.
Note! Resistive models cost, by the way, much cheaper than their self-regulating counterparts.
In addition, do not forget that arbitrary cutting of a resistive cable is in no case allowed (that is, cutting in any place). Such a cable can be cut into only certain segments, the length of which is 20 centimeters or more.
As for the advantages of these cables, they include:
- ultimate simplicity of design;
- increased heat transfer;
- easy manufacturing technology;
- preservation of properties and parameters throughout the entire operational period;
- affordable cost.
If we talk about the minuses, then, first of all, they should include the likelihood of overheating of those areas where a lot of garbage can accumulate or where there is a risk of overlap. In addition, the cable cannot be cut arbitrarily, as we just found out, which also often causes certain inconveniences (the dimensions for cutting should be those offered by the manufacturer). If overheating occurs, the entire section will have to be dismantled, while in the case of self-regulating models, any sections must be replaced.
Features of self-regulating models
To begin with, in terms of construction, they are very similar to the resistive cables just described. In both cases, special conductive conductors act as the basis. However, in this case, there is no insulating coating, and heat generation from movement electric current along the wires changes along the entire length of the product.
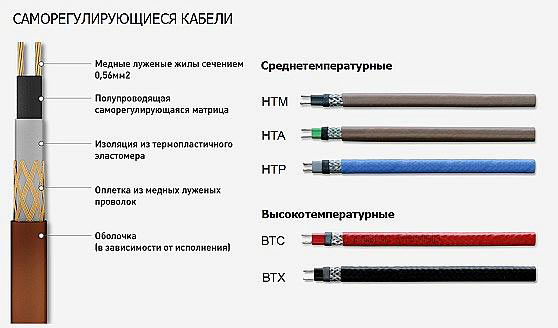
If the temperature regime environment increases, at the same time, the resistance index of the polymer component also increases and, as a result, the release of thermal energy decreases. When the temperature outside drops, you will be able to observe a diametrically opposite process. It is for this reason that the described cable for water pipes is called self-regulating. Due to this property, the probability of liquid burnout or overheating is practically reduced to zero.
Speaking about the advantages of self-regulating models, we should separately highlight:
- moisture resistance;
- the ability to cut segments of any length;
- resistance to UV radiation, flame and chemicals;
- considerable savings in electrical energy;
- extremely high power rating.
As you can see, there are many advantages, but there are also certain disadvantages that cannot be ignored. First of all, you can forget about the rapid heating of the room if the product is used in the arrangement of the "warm floor" system. It should also be added that at low ambient temperatures, after the activation of the heating system, there is a sudden increase in the power of the used current, because of which - for safety reasons - it is necessary to install special protective devices.
Criteria for choosing a heating cable
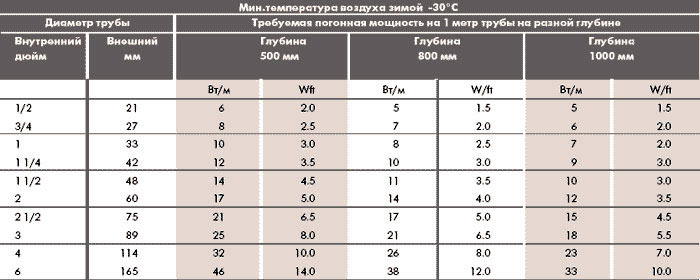
Now it's time to talk about how to buy a heating cable for plumbing and what exactly to look for when choosing a particular model. Let's make a reservation right away that ideally this choice (as well as the installation procedure itself) should be made by a qualified specialist. However, even the average consumer should probably know about some general recommendations. If you are going to purchase such a heating cable, then, first of all, proceed from the diameter of the pipes that need to be heated and the length of the pipeline itself; in addition, be sure to consider where exactly the highway passes, what its functionality is in general (that is, what it is intended for). And it is not surprising, because, for example, the internal installation of the cable (we will talk about this in more detail a little later) is designed for communications of small diameter. Moreover, in such situations, it is a resistive cable that is used.
Note! Be that as it may, in most cases, cables are chosen precisely for power. So, the power of a resistive model for the same internal installation can be approximately 10 kilowatts per linear meter of communication.
If we are talking about an outdoor installation, then the power of the heating cable should already be greater - about 16-20 kilowatts per linear meter.
Popular models, prices for heating cables
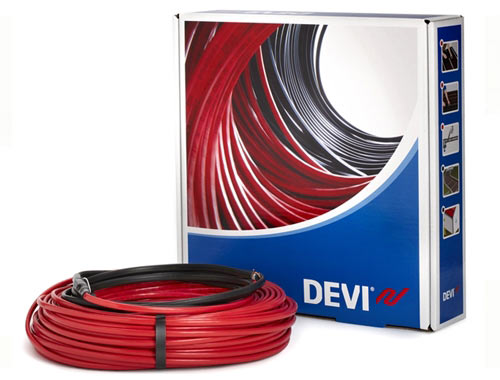
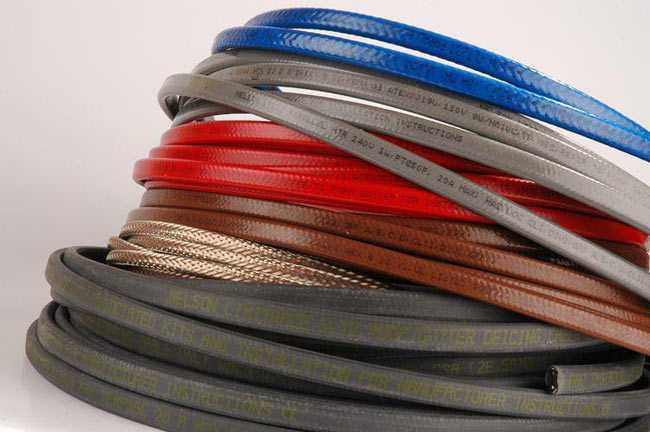
Today, if necessary, you can easily purchase any heating cable. They are sold not only in building supermarkets, but also in numerous online stores. As for the cost, in this case it depends not only on specifications, but also from a specific manufacturer, many other important parameters.
The variety of modern heating cables is simply huge. They are produced not only by foreign manufacturers, but also by Russian ones. In the table below, you can find some popular cable models, as well as average market prices per linear meter.
Table. Popular models of heating cables, description and cost.
| Name, photo | Short description | Average market cost per linear meter, in rubles |
 1. Nelson Limitrace СLT25-JT |
High-quality cable with a power of 16 watts per meter. The maximum length of the product can reach 139 meters. As for the service life, in this case it is 20 years. | About 470 |
 2. Thermopads FPC SR |
Another one good model with a slightly lower power - only 10 watts per meter. The maximum length reaches 100 meters. | About 230 |
 3. Devi-iceguard |
But the power of this cable already reaches 18 meters per meter, while the maximum length is as much as 800 meters. If we talk about the operational period, then it is the same - 20 years. | From 712 |
 4. E&S Tec. Co. |
An excellent product with a power of 16 watts per meter and an indicator of a maximum length of 150 meters. Traditionally, the service life is 20 years. | Around 920 |
 5. Lavita GWS 30-CR |
And the last model, which we will consider today. It is also the most powerful (up to 30 watts per meter). The operational period is the same, but the maximum length is already 300 meters. | From 283 |
Note! This is only a thousandth of everything that the modern market offers. It is for this reason that the choice of a suitable option should be approached with all responsibility and - if possible - entrust this matter to a professional.
As you can see, a heating cable for plumbing can cost in different ways, a lot depends on the technical parameters and, again, the brand's popularity. In any case, there is plenty to choose from, so feel free to move on to the next section.
Video - Features of heating cables for water pipes
A few more words about the features of electric heating
In private homes, often the water in the water pipes freezes. This can happen for a variety of reasons, from excessively cold temperatures and simply improper installation to not laying pipelines below the frost line. And to solve this problem, heating cables are used, and even a beginner in this business can handle their installation. Next, you will learn how to install the heating cable yourself, and familiarize yourself with detailed instructions, installation diagrams, photo and video illustrations.
Note! Most often, it is resistive cables that are used, since, as we have already found out, they are much cheaper. Another important point: water pipes should be heated with two-core products.
Everything is explained by the fact that a cable with one core needs to be looped, which is quite difficult to do in the case of a water supply system. As an option, you can lay a self-regulating product that can function in the absence of a thermostat and heat the line much more economically. The disadvantage of such a cable is its price (it is about twice as high).
How to fix the cable with your own hands?
To begin with, find out how indoor / outdoor installation is performed, and then we will deal with the features of connection and thermal insulation.
Pipe installation
Directly during the laying of the pipeline, it is preferable for him to install the cable through the pipe. There are two ways at once how this can be done - around the highway or along it. Let's get acquainted with the features of each of them in more detail.
Option number 1. Along the highway
It is quite obvious that the cable is easiest to install along the pipes in one line. In this case, the conductor must necessarily be attached exactly under the pipe, due to which the heating element will be reliably protected from above from various kinds of mechanical damage. In addition, the liquid, as you know, freezes from below, and therefore such an arrangement of the cable will allow you to quickly cope with the freezing of the line (if this happens).
But if you intend to lay several lines along one pipeline at once, then do it in strict accordance with the diagrams below.

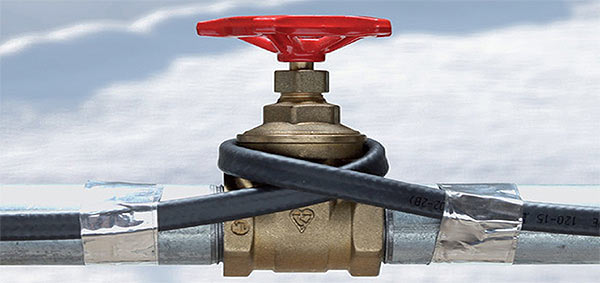
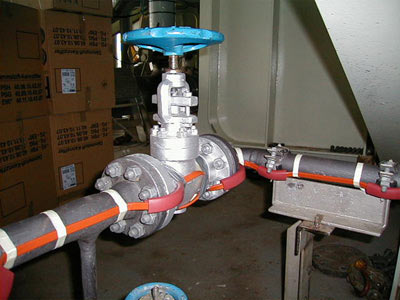
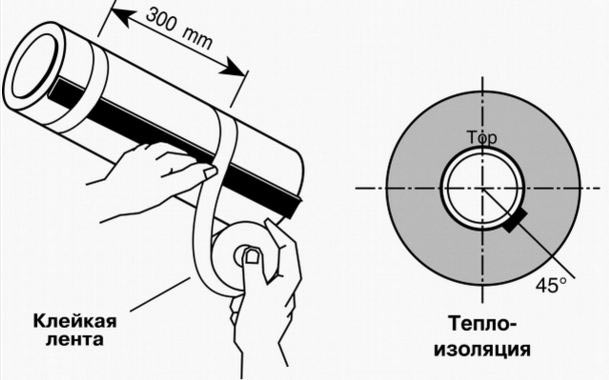
If we talk about how to fix the heating cable for plumbing, then we recommend using aluminum tape for this - it will not only securely fix the product, but also significantly increase its heat transfer. Alternatively, you can use adhesive tape to fix it by wrapping it around the plumbing as shown in the image below.
Particular attention must be paid to the installation of the cable in the corner sections of the trunk! In order for the bend of the product not to be too large, try to place it along the outer radius of the highway. More details of this installation option are shown in the diagram below.

Option number 2. In a spiral
If in your area the temperature during the cold season is quite low, it is advisable to wrap the heating cable completely around the water supply. Thanks to this, the heating efficiency will increase noticeably, since the coil pitch will be approximately 5 centimeters (if you want, you can increase the pitch). Tellingly, the length of the cable with such a winding scheme will be approximately 1.7 times greater than that of the pipeline.
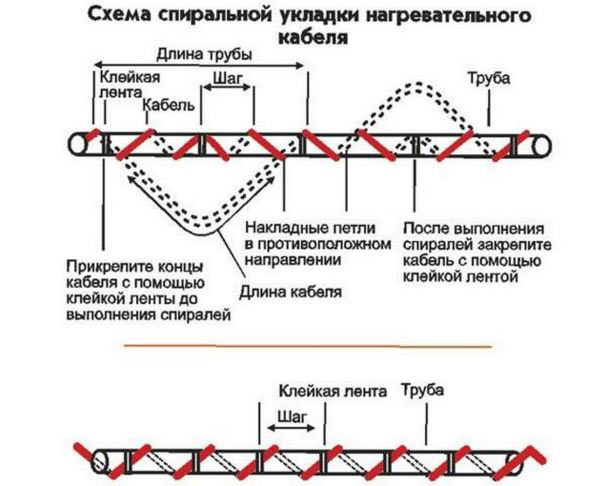
If you have to lay the product in a spiral in a hard-to-reach place, follow the diagram below.
In this case, the cable must first be wrapped with a seam, and then the loops should be turned in the opposite direction. As a result, there are fewer actions when comparing the procedure with step-by-step winding of the pipeline.
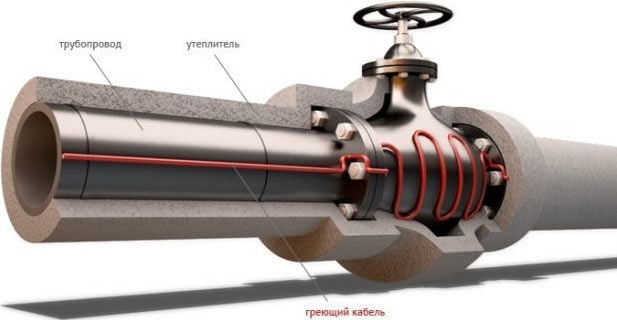
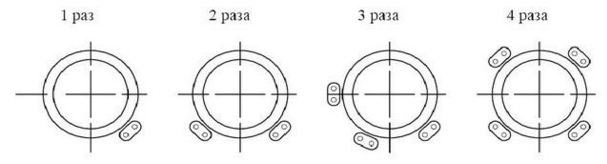
Option number 3. How to wrap individual elements
Such individual elements (and these include various taps, supports, flanges, etc.) must be wrapped with a large amount of heating cable, since the heat sink in such nodes is much larger. You can find all the necessary installation diagrams in the image below.
Video - Features of installing a heating cable for plumbing
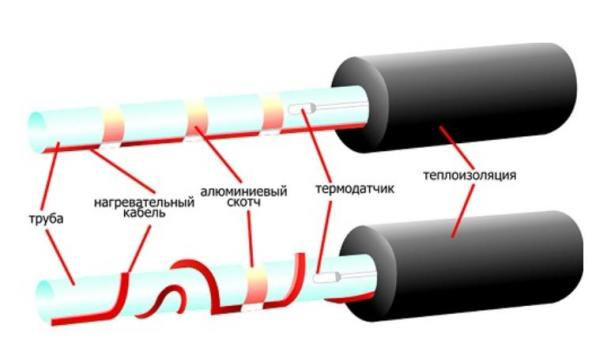
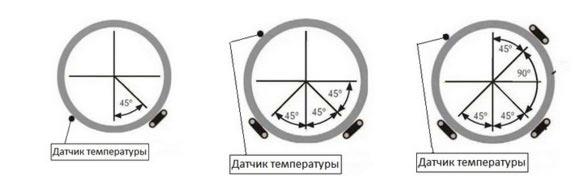
Note! Separately, it is worth talking about the installation of a temperature sensor. For uninterrupted heating of the line and in order to avoid overheating of the cable, it is desirable to locate the temperature sensor at the coldest point of the line at the greatest possible distance from the line itself.
In addition, the place where the sensor will be located must be pre-glued with aluminum tape. We advise you to familiarize yourself with the main options for the location of such a sensor.
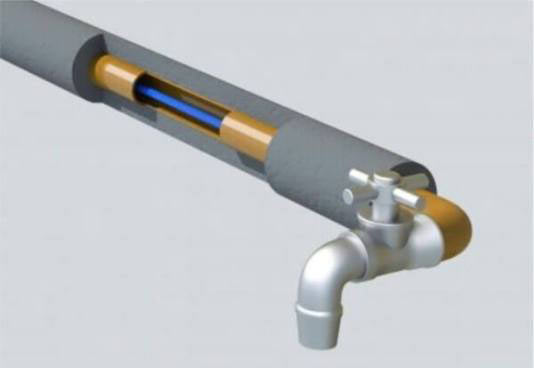
Indoor installation
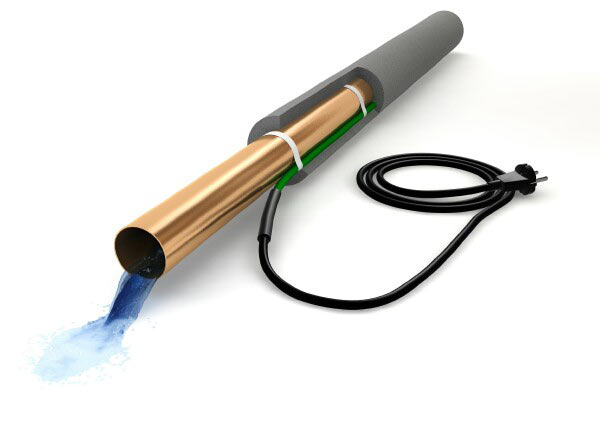
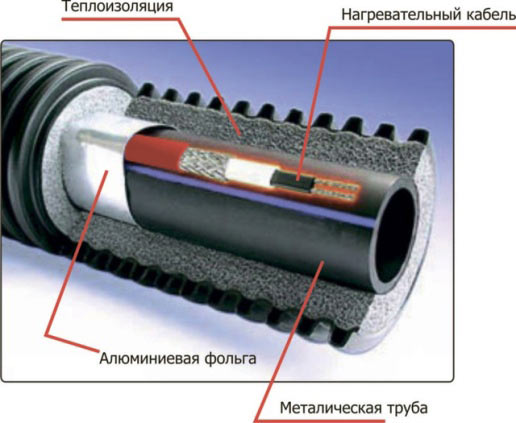
Such an installation (that is, the installation of a heating product directly inside the water supply) is advisable when there is simply no possibility of external heating. As a rule, this method is resorted to if the highway is already equipped above the ground, in some hard-to-reach place, or, alternatively, in concrete structure. This method has significant disadvantages, which you must definitely find out before starting work.
- First of all, due to such heating, the internal lumen of the pipes decreases (that is, the internal diameter).
- In addition, it is possible to install a heating cable in this way only on straight sections of the main line with a minimum number / angle of bends. It is strictly forbidden to install the product through locking elements or tees!
- In the course of operation, the heating element will inevitably “overgrow” with plaque, which, in turn, will soon lead to the formation of blockages.
- In the pipeline itself, a new element will be added - a tee, which reduces the reliability of the line.
At the same time, there are significant advantages - for example, the fact that the heating system consumes little electricity (the product is in direct contact with the transported liquid), as well as a fairly simple repair (you only need to remove the cable from the tee - no excavation and other unpleasant procedures not required here).
So, how is the heating cable for the water supply installed inside the main? There is nothing complicated here - follow our instructions.
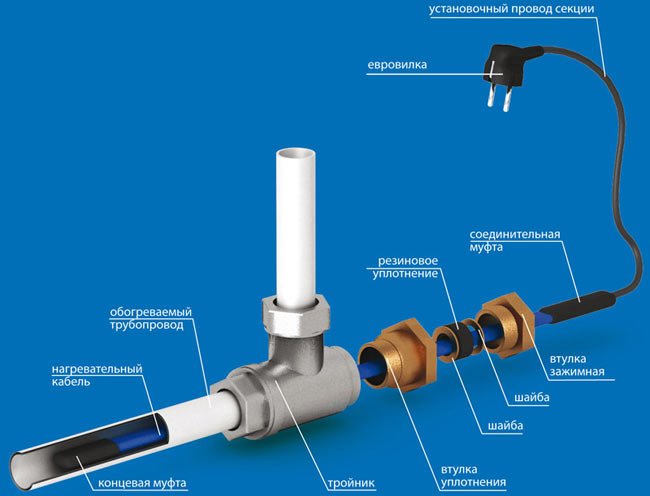
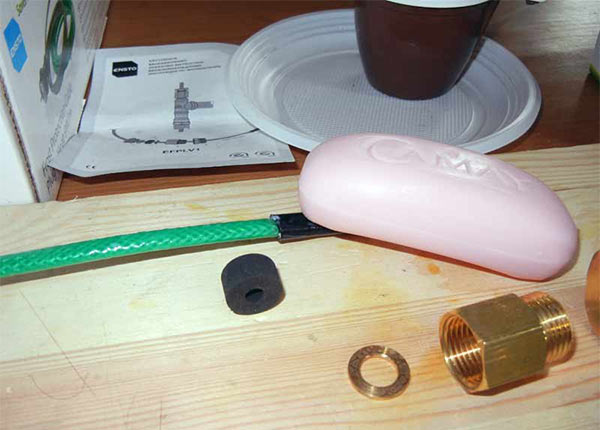
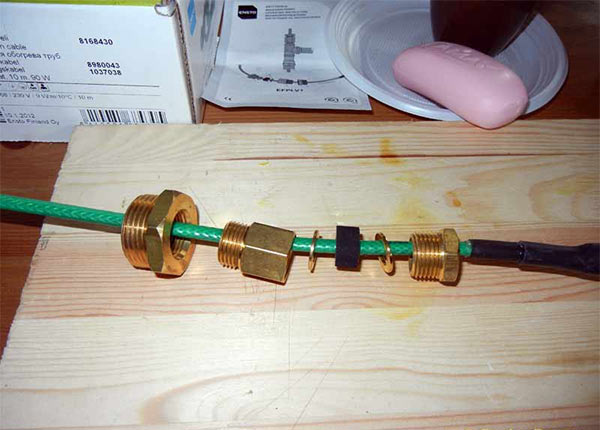
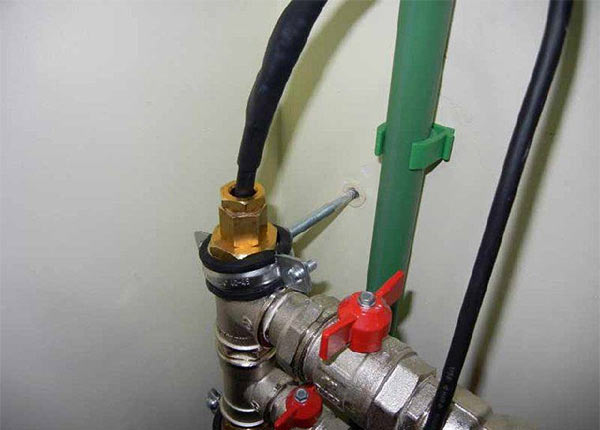
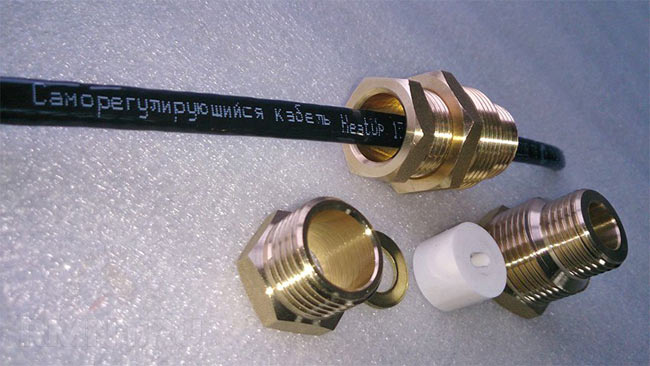
Step one. First, put a gland assembly on the cable, which is intended for installation inside the pipe. Appearance you can see such a node in the picture above.
step two. In the right place of the line, install a tee, through which you will introduce a flexible product into the water supply.
Step Three. Route the cable carefully to the desired area that needs to be heated.
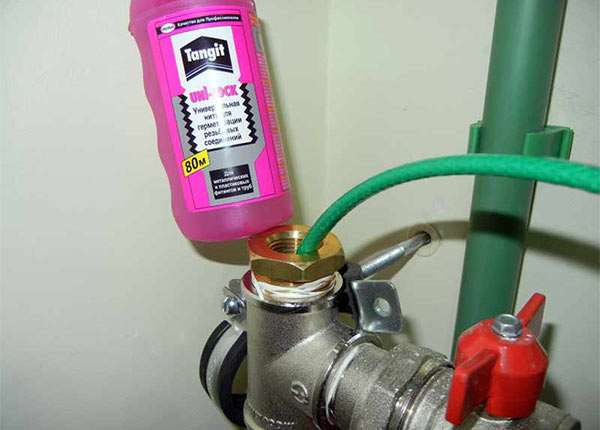
Step Four. Screw the stuffing box, seal and crimp it.
Now you have personally seen that there is really nothing complicated in installing the cable. Now it remains only to consider the final stages of installation - connection and, of course, thermal insulation.
How to connect the product to the network?
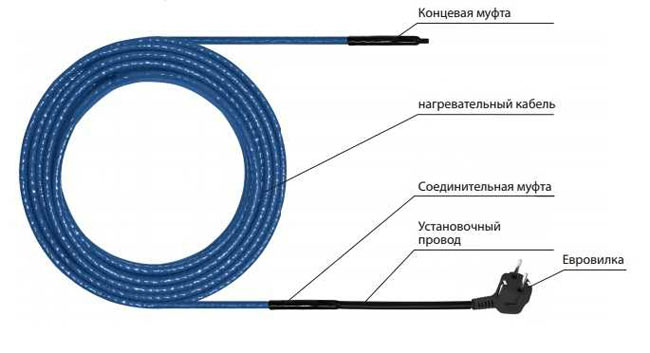
In view of the fact that now you are only studying the use of a heating cable, we have to familiarize ourselves with another important point in the work - insulating the end of the product. For this purpose, a special heat-shrinkable tube is used, which can reliably protect the cores from the harmful effects of moisture. In addition, for the device to work, its heating part must be connected to the “cold”, as it is called. You will learn about all the stages of this procedure from the videos below.
Video - We mount the tip, connect 2 sections
Video - Cutting a self-regulating cable
In order for the heating of the pipeline to be as safe and economical as possible, it is recommended to additionally install a thermostat and an RCD. Thanks to the first device, you will be able to regulate the heating temperature by means of a temperature sensor, and thanks to the second device, you will protect the heating line from electric current leaks. At the same time, when connecting a sensor to the thermostat, it should be remembered that the correct functioning of most models is possible only with a total pipeline length of not more than fifty meters (this point is recommended to be clarified at the time of purchase).
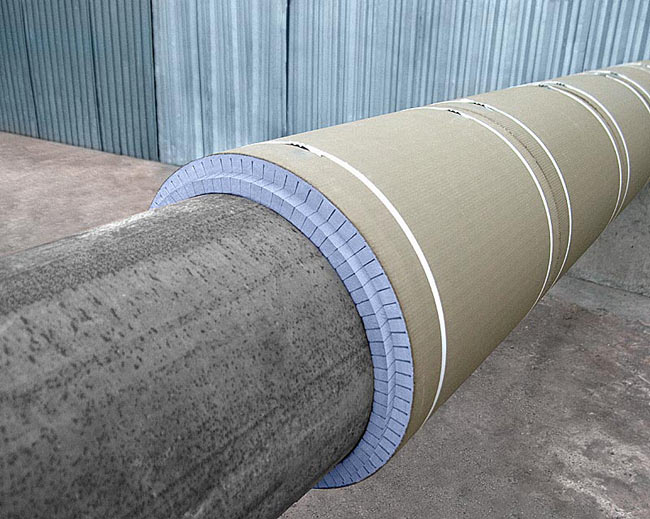
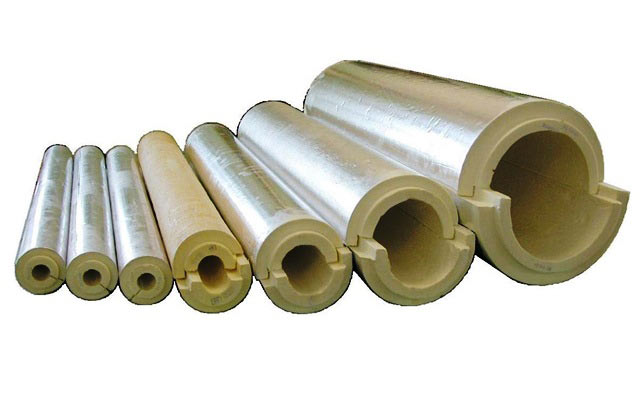
Features of thermal insulation
The final stage of work should be thermal insulation of the pipeline in order to retain heat. Special cylinders, cut on one side, will act as a heat insulator. These cylinders are made from various materials- mineral wool, polystyrene foam or foamed polystyrene. You must choose one or another option depending on your financial capabilities, and then, having bought it, wrap the pipeline with it. Characteristically, the heat-insulating layer is necessary not only to retain heat, but also to additionally protect the cable from mechanical damage (if we are talking about an external installation). As for the thickness of the heat insulator, it should be at least 2 centimeters (for pipes with a diameter? Inches), 3 centimeters (if the diameter is 1 inch), 5 centimeters (if 2 inches) or 6.5 centimeters (for products of all other diameters).
And in conclusion - another useful video. That's all, good luck!
Video - Features of water pipe insulation