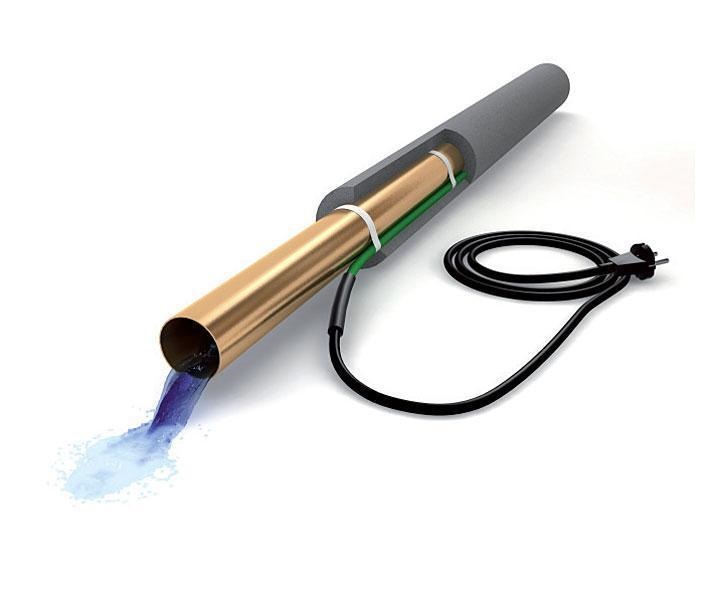
Cable for heating water pipes. The use of a heating device. Advantages of the cable system
In the climatic conditions of the Russian Federation, thermal insulation is not able to protect the pipeline from freezing, a heating cable is required. There are a number of parameters according to which this device is selected.
- First of all, you need to pay attention to the diameter of the pipe, more precisely, the area that needs to be heated. Of particular importance is the thickness of the insulation and the quality of the insulation.
- When installing, you need to calculate to what minimum mark the thermometer falls in your climate zone. Based on these indicators, choose a cable corresponding to the power. The last parameter is measured in watts per meter.
Resistive or self-regulating cable?
You can not ignore the type of product. Most often, a resistive cable is used. The metal core is enclosed in a special insulation, which ensures the reliability of the structure.
The main disadvantage of the system lies in the fact that the owner must constantly monitor the temperature in order to avoid burnout.
Sensors are most often installed on the pipe itself. As soon as the temperature inside the pipe drops below the set level, the system turns on.
 In most houses of Russian residents, resistive heating wires are installed, but the emergence of an alternative in the form of self-regulating wires has radically changed the situation.
They are many times more economical due to sector heating technology. The pipes are not cooled uniformly, but the smart system is able to detect minimal thermal deviations and start heating.
The design uses a polymer shell. Service life can reach 40 years.
Connection and installation methods
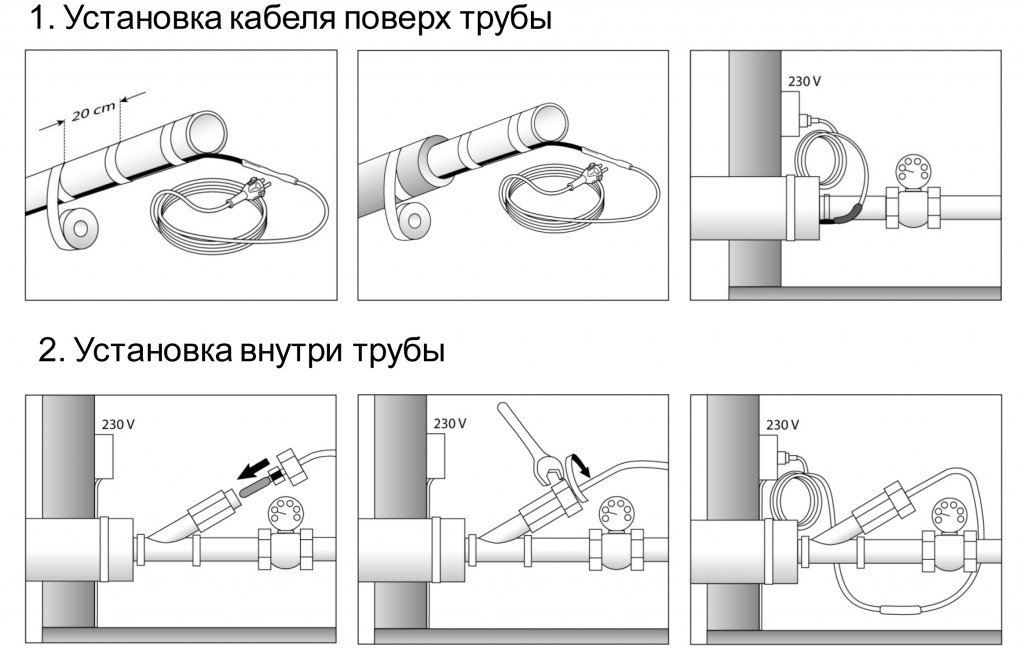 It is very important to lay a self-regulating wire along the entire length of the pipe. There must be no places where, for one reason or another, the product does not come into contact with the surface of the pipeline (external installation).
A relay must be connected to the system. It will be responsible for temperature control. The user will be able to set suitable temperature indicators depending on changes in the external environment.
After the cable is installed, insulation and insulation are mounted. Naturally, the structure must be grounded.
The main thing is that the wire does not have a tensile force exceeding 25 kilograms. The pipe itself must be securely insulated. Leaks and damage are unacceptable.
It is also necessary to avoid contact with sharp objects that can break the integrity of the insulation. Crossing the cable can cause irreversible damage. There are two types of mounting:
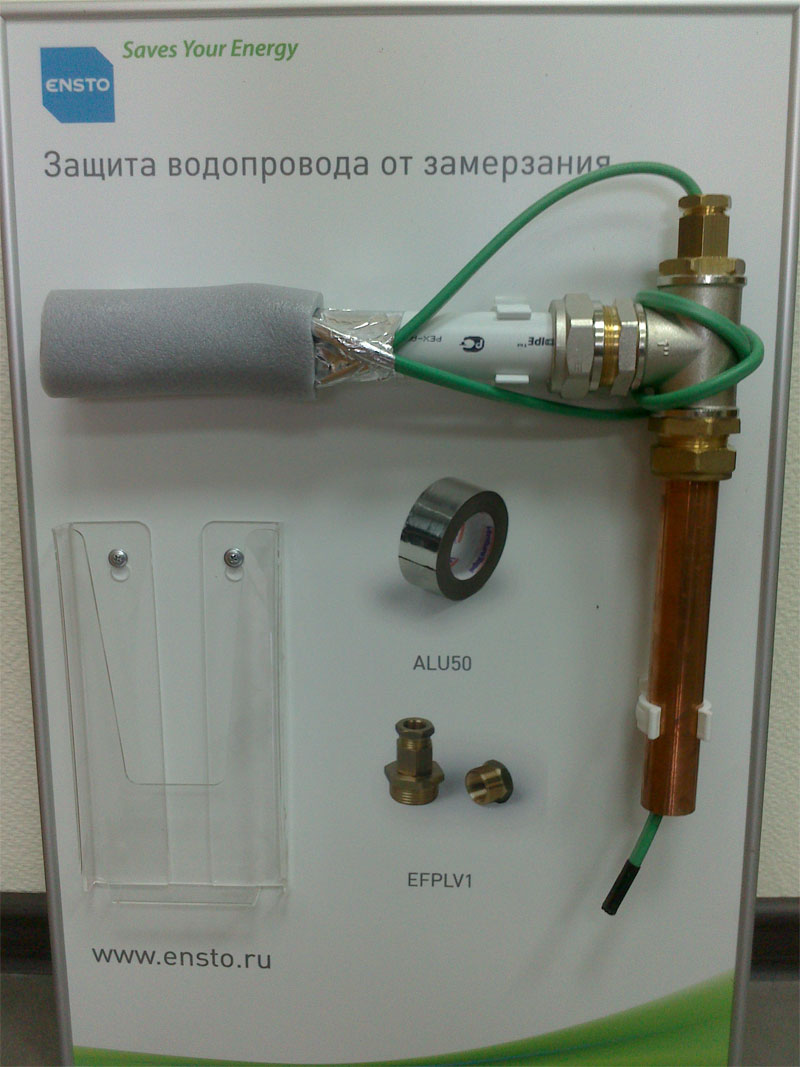
- Internal - the self-heating cable is pushed into the pipeline. The pipe is wrapped with aluminum tape. Entry is via a gland.
- External - the cable is laid linear or spiral method fixed with a special tape.
If the wire for heating the water supply is laid over the pipe, then the calculated power should be in the region of 17 W / m. When mounted inside, this indicator fluctuates at the level of 10 W / m.
Connecting the equipment is pretty easy. In the absence of a braid, it is enough to power the cable from the network. If there is a ground shield, then it is connected to the ground.
Then it remains to insert the plug into the socket. If the wire is securely packed, then you need to remove the outer sheath and twist the shielding braid to get to the matrix.
Then we release the cores, the ends are inserted into the sleeves, the resulting structure is fixed.
What to choose? Best Options:
Cable with built-in sensor and thermostat - Arnold Rak
 Manufacturer country :
Germany.
Manufacturer country :
Germany.
Specifications:
- Power - 16 W/m.
- Plug for Euro socket with grounding.
- Built-in sensor and thermostat.
Description and features: Prefabricated structure is completely ready for operation. The device is equipped with a thermostat, has increased protection against freezing.
Prevents freezing water pipes and key nodes in winter. As soon as thermal insulation is installed over the cable, it is ready for use.
The product is easily fixed on the pipe and is easy to use. The heating system automatically starts at temperatures below +2, as soon as the heating reaches 10 degrees Celsius, the equipment turns off.
Devi pipeheat self-regulating cable
 Country of manufacture: Denmark.
Specifications:
- Power - 10 W/m.
- Rated voltage - 230 V.
- Europlug.
- Braid resistance: 18 Ohm/km.
- Possible temperature range from + 85 to -40 degrees Celsius
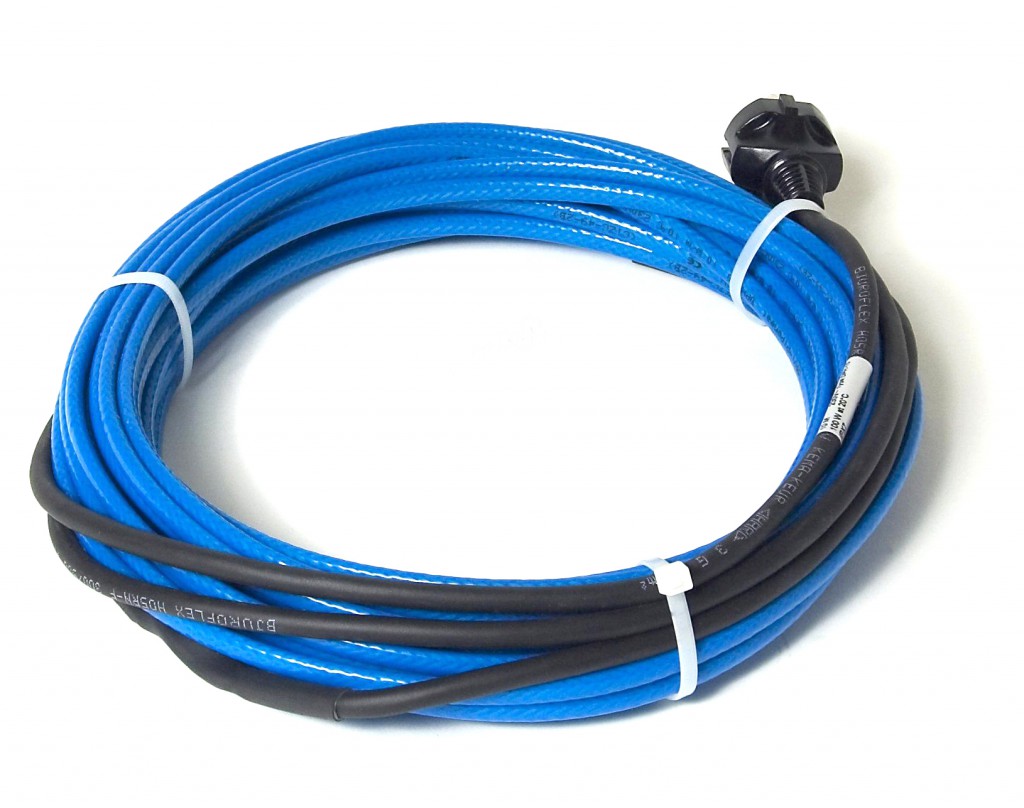
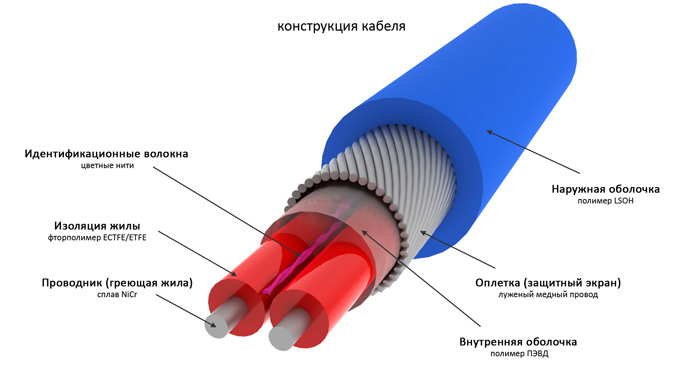
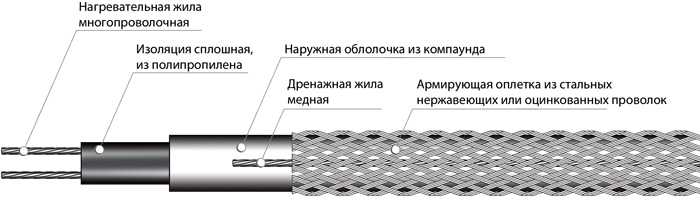
Description and features: This is a two-core shielded wire.
The design has sixteen current-carrying cores. The main feature of the cable is that it can be used both inside the pipe and outside.
 The insulation is made from food grade plastic. The length directly depends on the needs of the client. Range from 1 meter to 300. Included is a regulator with a temperature sensor.
This set allows you to achieve the most rational energy consumption.
Ensto Optiheat 9 (Finland)
Specifications:
- Power - 9 W/m.
- Voltage - 230 V.
- Europlug.
- Green color.
 Description and features: The cable is used both inside the pipe and outside. The features include the fact that the product can be used in pipes intended for drinking water.
The product is bent at an angle of 35 degrees. To enter the cable inside, you will need the EFPLV1 kit. Due to the fact that the sheath is made of polyethylene, the installation of the wire inside the pipe does not affect the quality of the water in any way.
- Length from 2 to 20 meters.
- The euro plug is connected to the cord.
- For installation inside a pipeline, the RLK1 is required.
- Country of manufacture: Finland
Nexans Defrost Water Self-Regulating Heating Cable
 Country of manufacture: Norway.
Specifications:
- The maximum ambient temperature in non-working condition is 65 degrees Celsius.
- Braid resistance - 18.2 Ohm / km.
- Voltage 230 V.
Description and features: Most often, this product is used as heating cable in pipelines with drinking water. Self-regulating cable It is distinguished by reliability, resistance to bending and a long service life.
Another one distinguishing feature As far as installation is concerned, the cable can be overlapped. This will not cause it to burn out. The degree of heating directly depends on the temperature of the pipe.
The design uses tinned copper, a semiconductor matrix.
An aluminum strip acts as a screen. The insulation is made from thermoplastic elastomer. Installation can be carried out at a temperature of at least 10 °C.
Thermo FreezeGuard Ready Kit
 Manufacturer: USA.
Specifications:
- Service life - 20 years.
- Power - 15/25 W (depending on modification).
- Voltage - 230 V.
- The maximum operating temperature is 65 °C.
Description and features: The product is used not only in pipelines, but also in water metering units, drain systems, as well as in other objects that are subject to freezing.
A distinctive feature of the cable is a high-quality LongLife matrix. Thanks to it, the self-heating cable can be used without a thermostat.
Matrix provides different level heating depending on the temperature in a particular section of the pipeline. If we take into account the main pipes, such a solution will result in significant cost savings even in the short term.
The Profi-Cable company offers a range of self-regulating heating cables for water pipes. You can buy products from us at the manufacturer's price, with delivery and installation in Moscow.
Freezing of the pipes of the system threatens with unpleasant consequences for the stable operation of the water supply system. Ice and icicles inside pipelines can reach significant sizes. To eliminate this problem, it is necessary to use large financial and labor resources. If there are severe and long frosts in the region, then traditional thermal insulation is ineffective for heating. The optimal solution is to use a self-regulating heating cable for water pipes.
The heating set of wires for heating the sewerage and water supply systems is a cable product with adjustable electrical resistance. The wire is mounted on top or inside the pipe and connected to a power source. When the temperature drops environment the resistance of the cable increases, which leads to a large generation of heat.
Advantages of cable heating of water pipes:
- versatility of use. The heating cable for water supply can be connected to pipes located underground and on the street. In addition, the wire is mounted both outside and inside the pipeline;
- reliability. Properly carried out calculation and installation of heating wires will protect the pipeline from freezing during the entire period of use of the system;
- economy. The power of the heating device is independently regulated, which allows saving on the installation of an additional set of equipment during the arrangement;
- safety and ease of operation. To use the wire, it is enough to connect it to a power source.
To fix the heating system of water pipes, two technologies are used:
- Installation inside the pipeline. Wires for such laying must have a high degree of electrical protection (not lower than IP68), a non-toxic sheath and a sealed end sleeve.
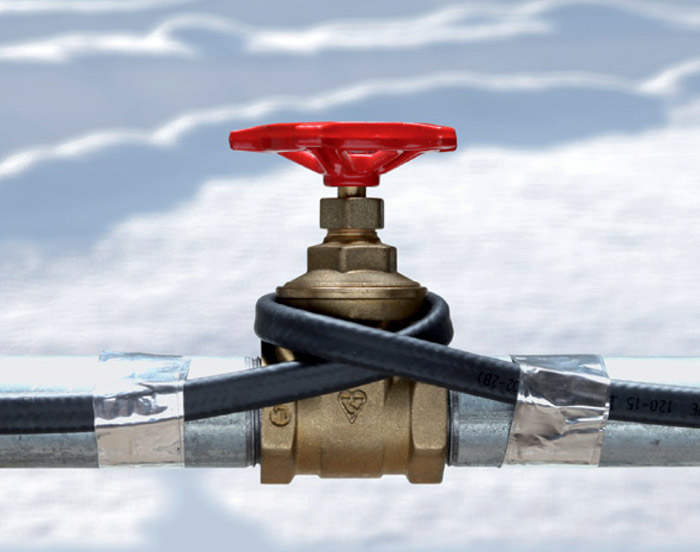
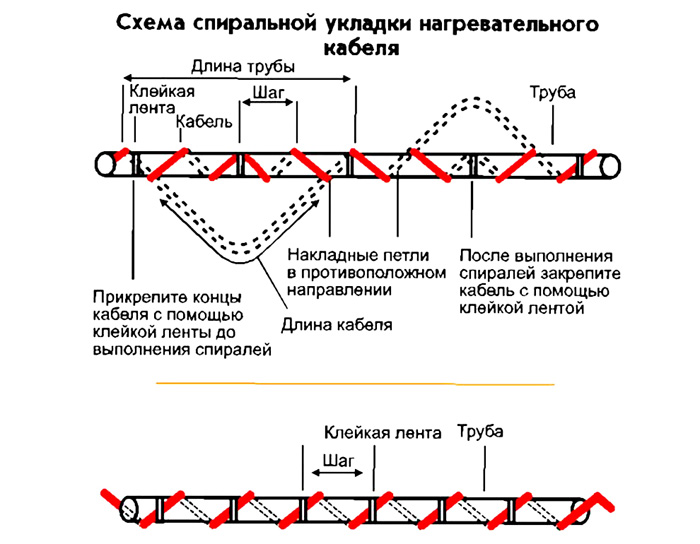
- External installation of the heating cable on the water supply. It is carried out in the following ways: spiral, parallel, wavy. In the first case, the pipe is braided with wire. In the second case, the cable is mounted along the pipe. Wavy mounting is used when it is impossible to apply the previous schemes.
Why choose a self-regulating heating cable for plumbing?
This heating element, unlike cheaper resistive analogues, changes its properties depending on ambient temperature: the stronger the frost, the greater the resistance, and hence the release of thermal energy. During the thaw period, the process is repeated, but in reverse order.
The use of a heating self-regulating cable provides the following advantages:
- reliable protection of the water supply system from freezing in any frost;
- saving energy consumption;
- lower operating costs.
When installed, no additional control equipment is required.

If you plan to purchase a certified heating cable for plumbing at a wholesale price, please contact our company. In addition, we provide design and installation services for heating systems.
IN country house The problem of freezing water pipes is a fairly common problem. This may be due to severe Russian frosts or improper laying of engineering networks. This unpleasant problem can be solved with the help of forced heating of water supply networks. Even a novice home master can install a cable for heating a water pipe.
The heating system will help to avoid an emergency with the water supply
The principle of such heating is quite simple and similar to the operation of underfloor heating. Suitable for water supply self-regulating heating cable or resistive. It is laid in the right place and connected to the mains.
Installation of the heating device is carried out in two ways:
- laid within the network;
- wrapped around the outside.
Resistive heating wire for water pipes costs less than self-regulating, so it is used more often.
Important! A two-wire wire is used for heating engineering networks. It does not need to be looped like a single-core.
A self-regulating conductor is good in that it significantly saves electricity and does not require the installation of a temperature control device. Its only drawback is twice the cost compared to the resistive counterpart.
Related article:
What are the advantages of such a cable? Is its price justified? And how to mount it correctly? Read in a special publication of our portal.
In what situations is it necessary to install a heating conductor:
- when locating labor outside the house;
- engineering networks are located above the level of soil freezing;
- in some places, the pipeline passes from the underground to the ground;
- communications pass inside an unheated space (attic, veranda).
Note! Laying a water pipe below the soil freezing line does not exclude the possibility of an emergency. Water can partially turn into ice and tightly clog the net.

Heating the water pipe prevents freezing and allows you to maintain the required temperature throughout the winter
The cost of resistant wiring starts from three hundred rubles. A self-regulating conductor will cost about seven hundred - a thousand rubles.
How to lay a cable for heating a water pipe
The heating system of engineering networks has several components:
- electrical wires;
- special fasteners that tightly fix the wire on the channel;
- power conductors connecting the heating system with an energy source;
- additional electrical appliances that provide connections and thermoregulation.
Note! A cable for heating a water pipe can heat up to a temperature of one hundred and twenty degrees, but it is worth remembering that such heating can adversely affect plastic materials.
Resistive cable
It has two heating cores, dressed in a heat insulator and a shielding sheath. It works like a normal heating element. The main requirement for this device is not to divide it into parts, in which case too many adapters will be required, which will greatly complicate the installation.
The resistive conductor evenly heats the entire water supply network. If any part of it has ceased to function, you will have to change the entire system. But the main thing in this system is its low price. It is easy to install a heating cable for a water pipe outside the pipe yourself, saving on inviting specialists.
Self-regulating wire
This device has a semiconductor matrix that allows you to adjust the temperature of the system to external conditions. The matrix is placed between the conductors of the wire. This system allows you to save energy while maintaining optimal results. This system can be safely divided into parts.
Cable installation along the pipe
This type of heating is considered the easiest to install. The only important condition is that the electrical cable must pass under the network. This position will protect the wire from accidental mechanical damage. In addition, the water in the pipeline begins to freeze with ice from below, so this type of heating will prevent an emergency. There are several schemes for external cable laying:

To fix the wire, you can use construction metal tape, it will firmly attach the cable to the pipe, and increase its heat transfer. Fixing the cable with ordinary tape is possible, but short-lived. When laying the conductor, special attention must be paid to the angular momentum. To prevent the core from breaking, it is placed on the outside of the pipeline.
In the northern regions, where severe frosts are observed for a long time, experts recommend winding the heating cable around the water supply in a spiral manner. The core consumption will be almost twice as much, but the efficiency of such a device will increase by an order of magnitude. The pitch of one turn is from five centimeters or more.
Advice! To wind the wire in a hard-to-reach place, many turns are first wound, and then they are straightened in the reverse order.

To prevent overheating of the system, a temperature sensor must be installed on the resistance cable. It is recommended to install it in the most frozen place, away from the heating core. The installation site is wrapped with metal tape.
Heating cable for plumbing inside the pipe
Laying the heating wire inside the water supply is a less time-consuming process. In his favor, a choice is made only when the engineering networks have been installed for a long time and are not available for arranging outdoor heating.

Cons in this method:
- the internal volume of the pipeline is significantly reduced;
- after some time, the wire will begin to overgrow with limescale and may completely clog the water supply;
- the reliability of the system circuit is reduced due to the need to use tees;
- it is possible to install an in-line system only on straight sections of the water supply system.

How to install the heater inside the pipeline:
- A gland is put on the wire, a tee is mounted at the wire entry point, through which the cable is fed.
- The wire is pushed to a particularly cold place, which presents an emergency hazard.
- The gland assembly must be sealed, screwed in and crimped securely.
Connecting the cable to the power source
To insulate the end of the cable, heat shrink is used, which will protect the wire from moisture penetration. How to properly connect the water supply heating is shown in detail in the video below.
Helpful information! Most heating systems only work with a cable length of up to fifty meters.
Connecting the heating cable (video)
Thermal insulation pad
To increase the efficiency of the system, it is necessary to cover the water supply with a heat-insulating material.
The thickness of the insulation must be at least two centimeters. The larger the diameter of the pipe, the thicker you need to choose a heat insulator.
- For effective work cable for heating a water pipe, it is important to correctly calculate its power. It is difficult to do it yourself, so it is better to turn to specialists. There are tables and formulas for calculating the heat loss of a pipe.
- The calculation of heat losses should include the average temperatures of the region.
- If supports or reinforcements are installed on the pipe, it is necessary to increase the number of cable turns in these places.
Outcome
An electric cable for heating the plumbing system will help to avoid freezing and rupture of pipes in severe frosts.

It is not difficult to mount such a heater, but the recommendations of calculation specialists should be taken into account. required power heater.
A self-regulating cable is used to heat pipelines so that water does not freeze in them in winter. This article provides detailed instructions on connecting the heating cable to the electrical network and how to install it on the pipe that needs to be heated.
Pipe installation
Self-regulating cable installation can be done in several ways:
- inside the pipe
- outside the pipe
- linear - along the pipe
- coils - winding the cable around the pipe in a spiral
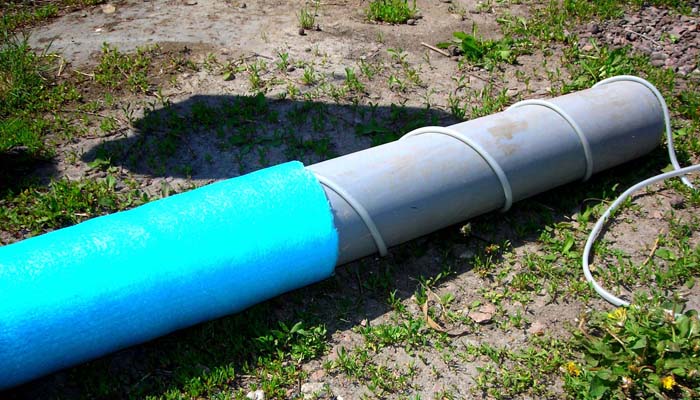
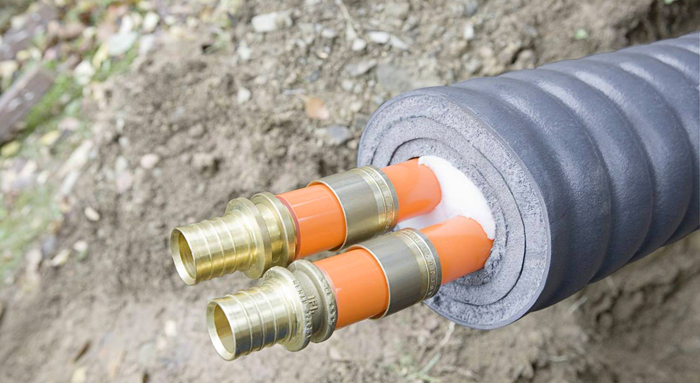
With any installation option, in addition to heating the pipe, it is also necessary to insulate it, otherwise all the heat from the heating cable will go into the surrounding space. The thickness of the insulation usually varies from 20 mm to 50 mm, depending on the conditions for laying the pipe: if underground, then a smaller layer of insulation can be chosen, and for above-ground pipes, a thick layer of insulation is needed. For insulation, you need to use moisture-resistant heaters - foamed polyethylene, expanded polystyrene, it will also not be superfluous to protect the thermal insulation layer from damage by placing the pipeline in a protective sleeve from a pipe of a larger diameter.
The easiest option is to install the cable along the pipe, the cable is pulled along one wall of the pipe and fastened every 30 cm with adhesive fiberglass tape or plastic ties that can withstand the operating temperature of the cable. Fastening the cable with metal clamps is prohibited. The cable consumption is obvious: how long you need to do heating, this length will need a cable. When installing a heating cable on horizontal pipe sections laid in the ground, in the best possible way there will be a placement of the cable not at the very bottom, but a little to the side - at 4 or 8 o'clock.
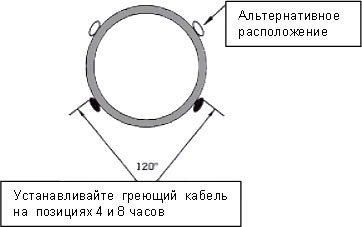
Place of fastening of a cable for heating of a pipe.
With this installation of the cable, it will be protected from the pressure of the pipe and the soil lying on top, and will not be damaged, for example, someone will stand on the pipe or something will fall.
Another installation option is to wind the heating cable onto the pipe in a spiral: this provides more contact with the pipe and therefore better heating, but the cable consumption increases, depending on the spiral pitch.

To calculate how much cable will be needed with this installation method, you need to multiply the length of the heated pipeline by the correction factor. It shows how many meters of cable are consumed per meter of pipe and, depending on the pitch of the spiral and the diameter of the pipe, varies from 1.1 to 1.5. The table below shows the cable helix pitches for different pipe diameters and correction factors.
| Pipe diameter, mm | How many meters of cable per meter of pipe? |
||||
| 1.1 m | 1.2 m | 1.3 m | 1.4 m | 1.5 m |
|
| 60 | 43 | - | - | - | - |
| 76 | 51 | 36 | - | - | - |
| 89 | 61 | 43 | 33 | - | - |
| 102 | 71 | 48 | 38 | 33 | - |
| 114 | 79 | 53 | 43 | 36 | - |
| 125 | 89 | 61 | 48 | 41 | 36 |
| 140 | 99 | 66 | 53 | 46 | 38 |
| 168 | 117 | 79 | 64 | 53 | 46 |
| 219 | 150 | 104 | 84 | 71 | 61 |
For pipes with a diameter of less than 60 mm, the additional cable consumption can be neglected.
Installing the heating cable inside the pipe
Another option for mounting the heating cable - inside the pipe - is only possible for pipes of a sufficiently large diameter of 40 mm or more, otherwise the cable will occupy a significant space inside the pipe and interfere with the flow of water. This installation option provides for heating small area pipes (it is problematic to put the cable ten meters in), but it allows you to simply replace the cable if it is out of order.

Mounting the cable inside the pipe is especially convenient on vertical section pipeline, for example, where it emerges from the ground under the house and rises to enter the room. A tee cuts into the pipeline, so that the cable is lowered through the upper outlet into the pipe, and through the side to continue the pipeline towards consumers. For hermetic cable entry into pipes, there are special couplings with seals, it looks something like this:

To service the cable during this installation, the water supply is turned off, the upper sleeve is removed from the tee, the cable is changed, then everything is assembled back. Perhaps this is the most serious argument in favor of this installation option. If the cable installed outside the pipe breaks, then to replace it, it will be necessary to dig out the pipeline (if it is laid underground), remove the thermal insulation, replace the cable, and then assemble everything back.
Preparing the cable for installation
Before performing the direct installation of the cable, it must be prepared: one end must be stripped and the wires prepared for connection to the mains, and the other must be sealed to protect against moisture and short circuits.
The free end of the cable must be well insulated to protect it from moisture and short circuits. It is impossible to connect current-carrying wires to each other; on the contrary, this must be avoided. For insulation, complete with heating cables there is a plug that is put on the end and is melted and tightly fixed with a hair dryer.
The other end of the cable must be stripped of insulation to connect to the electrical network. Instructions for connecting to the mains:
 Self-regulating heating cables are used to heat plumbing in places where it is laid above the freezing level of the soil - for example, at the point where the pipeline enters the house. A self-regulating cable has the ability to independently change the intensity of heating in different areas depending on the need: the lower the temperature of the heated object, the more the cable heats up.