Mounting the kitchen hood to the wall. Do-it-yourself installation of a hood in the kitchen: follow simple rules. Corrugated pipe fixing
Today we will look at how to properly install the hood. You can buy the device you like, then attach it to the wall, guided by watching YouTube movies, by your own conjectures. The product is completed with the instruction for operation, installation. This document will help you get the job done right. First of all, check the package. Most kitchen hoods do not have a carbon filter, sellers take advantage of the fact, depriving the “extra” model where the product is present. Do-it-yourself installation of the hood in the kitchen is carried out according to the instructions.
Tools for the job
The optimal connection width is about 10 mm. Fugue should be cooked in a clean bucket to prevent blooming. It is best to cook the joint in small portions of about 2 kg. to use it in a short time. The mortar should have the consistency of wet sand, for example from the bottom of a sandbox: after pressing.
Foil in water: waterproof surfaces in the bathroom
They are resistant to water penetration and are less susceptible to dirt and unaesthetic. Their large selection of colors ensures that the color of the grout is exactly matched to each type of lining. The final stage consists of compaction.
Silicon around bath without mold
It even coats new joint fillings, as well as silicone sanitary ware, resistant to moisture thanks to its mushroom content. According to silicone technology advisers, they almost always appear in bathrooms where the welds are not wiped dry after each wash.Installation of a typical kitchen hood
How to install the hood, it is better to read at home in the electronic instructions. Take the trouble to select the device in advance on the counter of an electronic, city store, download the documentation, carefully read it, learn the rules. Practice shows: dealers rarely sell the correct kit, buyers in a hustle are deprived of the opportunity to realize the wrongness of the actions taken. It turns out to return / exchange goods from time to time, not everyone wants to spend resources, hiding a grudge against the store. A person gets unnecessary problems, the need to look for various kinds of adapters, a knee to dock a purchase.
From home to dampness, frost and water
This causes even in a brand new home, the paint dies, the plasters in the bulge bulge and fall, and the walls and ceilings become stained, stained and moldy. Due to the health of the inhabitants and the longevity of the house, it is important to ensure its tightness and effective ventilation.
It should be adhesive, uniform, mature and parallel, free of cracks and cracks. Moreover, it must be removed from dust, as well as any greasy stains and salts that reduce adhesion. The temperature of the air and the substrate should not be below the 5th. The lower part of the balcony and under the walls, greasy paint, and therefore the development of fungus and plaster are falling. Walls or walls under a balcony slab are most often the result of non-insulated wet insulation on the wall of a house or failure to match the board fall.
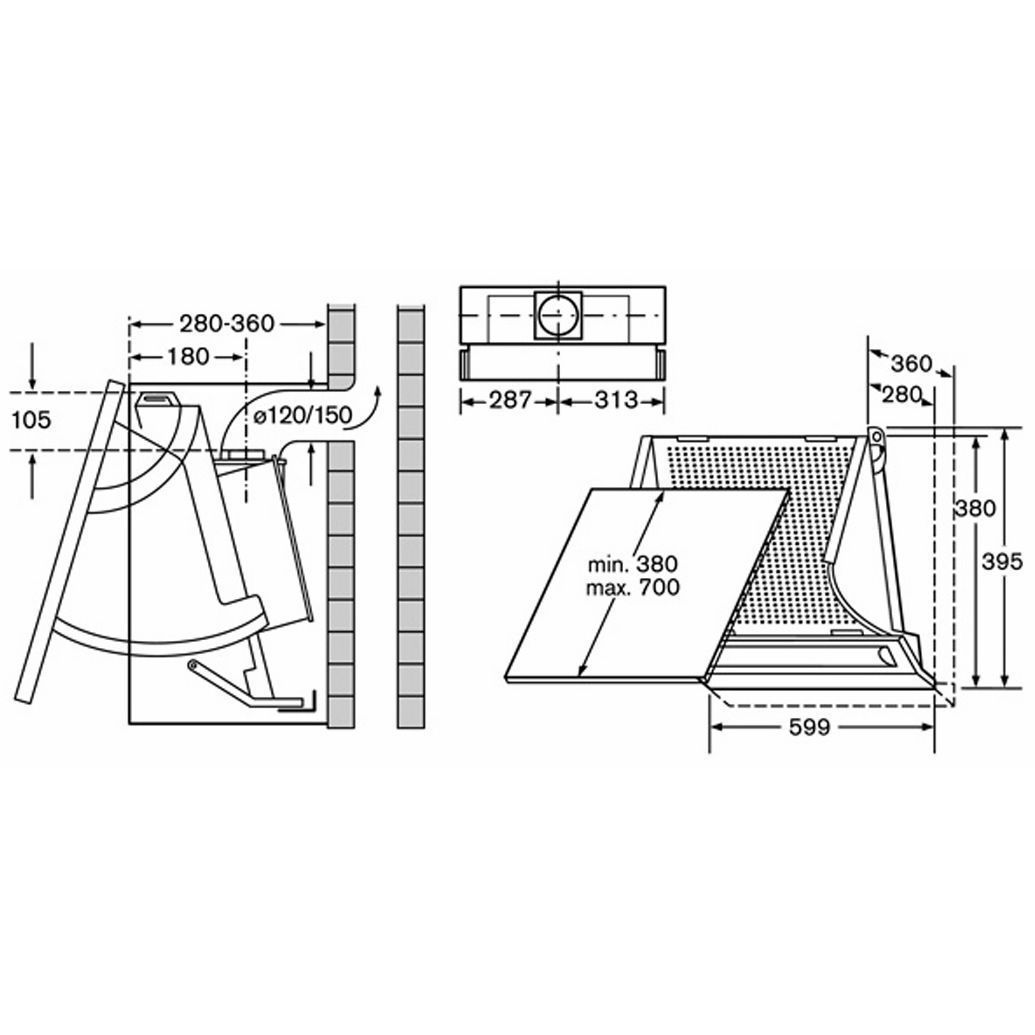
Openings of the kitchen hood for the air duct, length
An adapter is placed at the outlet of the ventilation duct, formed by holes for the air duct and a slotted grille, equipped with adjustable gaps. Sensing the need, the owner takes a stool, closes the valve. Room air exits through the exhaust dome. Increases efficiency during the period of increased activity of the cook.
Clinker brick facades and cladding
Single-family densities are commonly found in single-family homes at the corners of buildings. An expansion joint 1-2 cm thick is usually used to fill the compensator with an elastic sealing compound. Flowering on white White forays, that is true.
A home where beauty comes from the details
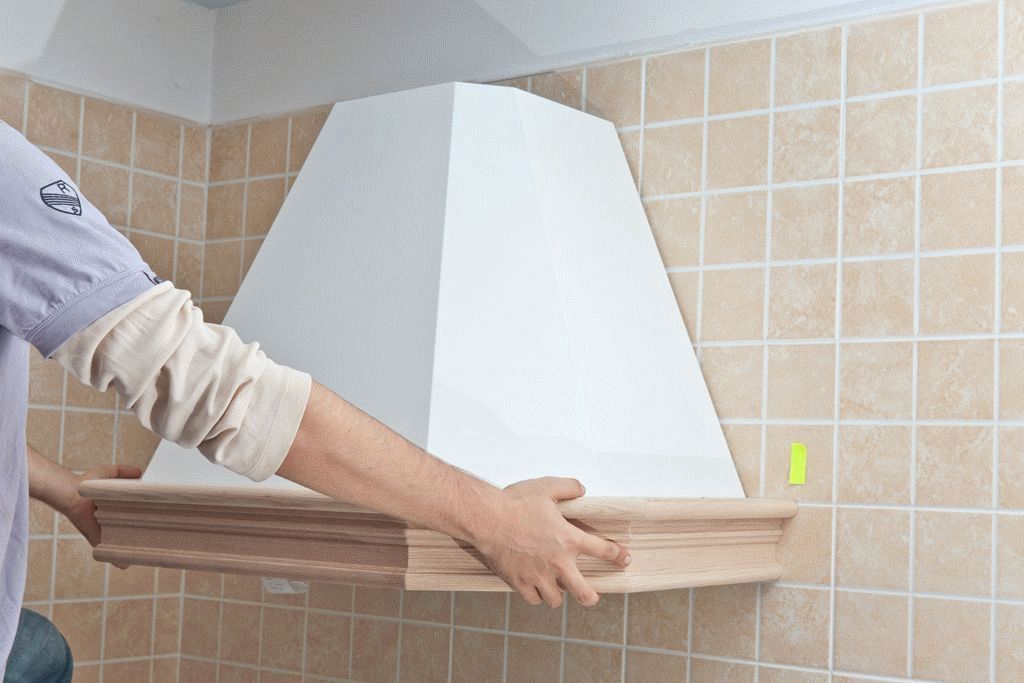
There will be a white non-aesthetic raid. Even better, they won't come out. Therefore, care must be taken to properly connect the lid to the respective products.Standard flat hood
Forms have a favorite clematis clematis. The wood of these types must be impregnated with special salt in a special installation, and then heated with linseed oil at high temperature. On shelves, avoid protected wood - it's easy to spot them on surface stains and salt fading. There are also types in construction markets.
The vast majority of kitchen hoods - if not - are connected to a round duct. Corrugated, plastic, zero difference. The diameter is different. It is useless to give specific values, we recommend that you carefully read the instructions, the little things are certainly indicated, even if the main parameters were absent in the product card. Write down in advance, taking a piece of paper, what you need.
Inside: duplex apartment on Stare Ochota
Heated wall - plaster and paint tips
Minerals or the use of sealed plasters usually result in permanent fading and discoloration that can only be effectively repaired with special paint systems. The recommendations that you should follow with plaster can be drawn as early as possible 7 days after its introduction.Mesh fence - how and how to do it?
Corridors, existing fence can be used to build a clinker fence. When this is done, you need to pay attention to the installation of moisture insulation at the level of the old siding. This will prevent capillary suction of water from the soil and the formation of salt efflorescence on the surface.
Hole for air duct
We recommend looking at the length in place. Let's say that in a store we find an entrance grate to a ventilation duct with a round slot for an air duct. We hope it's clear: the diameter should match the opening of the dome. Violate - you have to fence the garden. Not easy with length. The corrugation is stretched, the length changes up to two times. We do not exclude that you will find more radical models in the general store. Triple lengthening, find out.
Minor Repairs: Repairing a Crack in Concrete
Cleaning. Loose and loose pieces of old concrete or paint should be removed, cleaned and grounded. If necessary, the floor must also be lowered. All cracks and cracks should be enlarged to a width of about 5 mm.
Facade paints: not only color
Mineral products, so you can paint them with any paint. It is important not to do this too quickly - painting mineral plasters that are too fresh often results in permanent fading and discoloration. Paints for thin-layer plaster.Kitchen hood duct gasket
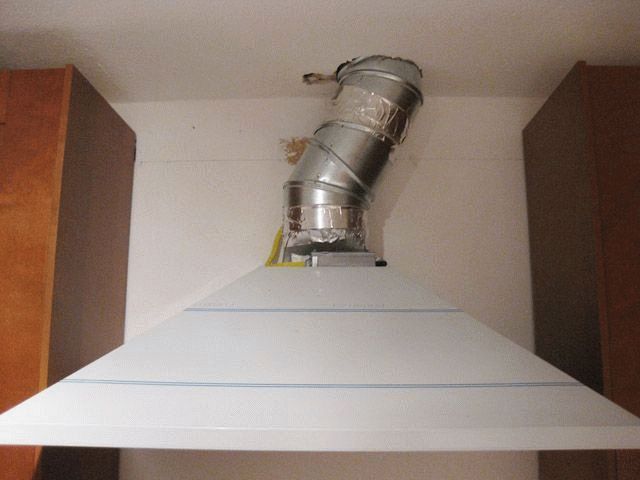
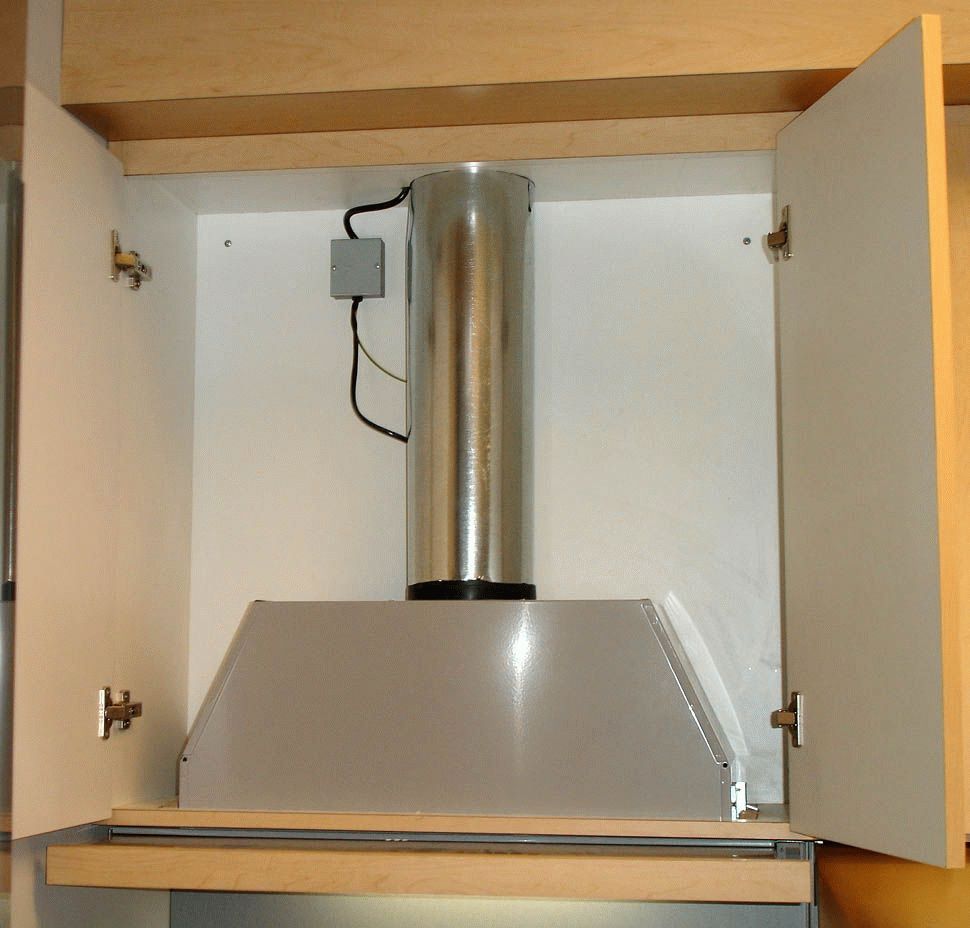
Now a few words about the corrugation laying process. Goes vertically to the ceiling, nature has invented many exceptions. The conditions of the apartments are unique, you can't guess every case. Before installing the hood, it is necessary to carry out rigorous measurements. Then the corrugation is bought with a small margin (considering stretching). Laying is carried out in place. Cabinets are sold to mask the initial section. Some range hoods come with accessories, while others come as an option. Please note that these cabinets have nothing to do with kitchen furniture, they are represented by tin boxes designed to match the style of the hood. We emphasize, recently in the search engines there was no concept of a cabinet kitchen hood.
Winter home insulation is dangerous
First you need to define what. Experts - daytime work at positive temperatures, even if the frost is expected to be dangerous at night. - In addition, the cooling of low-temperature solutions with high humidity leads to an increased risk of salt efflorescence in the mortar.
Basement in a new role: how to grow a house?
However, when the basement gets damp, the costs will skyrocket. In most homes, moisture is caused by a break in the vertical insulation of the foundation wall.
Cubes, pavement and stones on paths and ramps
All you have to do is remember to stretch the cube to make changes to different palettes so that no other shades form on the pavement; - bright spots appear on the surface of the cube, that is, calcareous - they arise as a result of natural.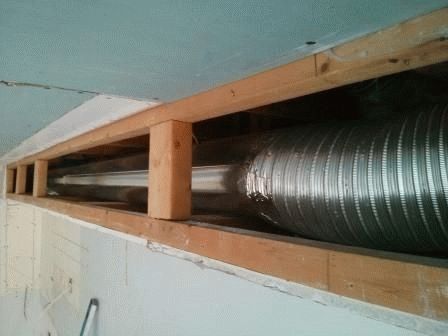
A popular option, a transition elbow is placed near the ceiling, equipped with a 90-degree rotation angle to a rectangular plastic duct. Not the best option in terms of performance, the flow area of the channel is drastically reduced. The rectangular duct runs over the hanging section of the kitchen unit, and the installation of a hood gives a great visual effect. It happens that one section is cut, the hood is built inside. It is not always possible, the portal must completely cover the hob. The wood is not designed to withstand the heat of the stove, even at a distance of half a meter.
Because it rots, it is soft, it crumbles and has changed color. Remove heavy exteriors with a spatula or stiff brush and water and detergent. If you are using water, you should wait at least days for the wood to dry. The next step is grinding the boards.
Decorative walls: everything inside brick
The mineral salts dissolved in it leach onto the surface of the ceramic to create minerals. It's all about the right color, texture, and format. After the winter you must remove the sand, mud and salt white color. This can be done with a brush or water and detergent.
Suspension height of the kitchen hood
Wood unable to withstand the flame of a burner at a height of half a meter. Do not believe it, try to hold your hand, understanding the physics of the process will come much faster. Not without reason, according to the rules for operating heating equipment, it is strictly forbidden to hang clothes over the burners to dry. As for the installation height of the kitchen hood, the figure is clearly spelled out in the instructions, it depends on the type of energy carrier:
Forms that can lead to the destruction of plaster and masonry. After a long time, it can be dangerous even for building construction. To dry the walls, it is necessary to prevent the water from draining. One of two solutions is usually used for this purpose: foundation walls.
We buy cement roofing - parameters
Required Maintenance which does not allow dirt or dust to enter. Any contamination from the front wall is simply washed away by rain, or we can do it ourselves using a facade with clean water. Visible cutting edge and scratches on the roof surface. Tiles coated with acrylic lacquer have not only more shine and intense color. They do not fade when exposed to the sun and are more resistant to dirt and white limestone does not appear on them.
- Gas is more dangerous, the distance increases by 10 centimeters, rarely drops below 65 cm.
- Electric burners are less aggressive. The minimum installation height of the cooker hood is lower.
An exorbitant increase in distance will give a negative effect. Not all products evaporating from cooked food and combustion waste will be captured by the portal. Why do you need an extractor. We use it to protect the ceiling from grease stains, to purify the air from unpleasant odors. Increasing the distance removes the manufacturer's guarantee of the device's performance. The hood fan will spin, zero sense round.
Decide what material to make before taking the floor, as coatings vary in thickness and placement method requirements. White raids on clinker surfaces can. This reduces the risk of white flowers. The clinker pedestal can be made in two ways: - in one step - for full welds, which are also filled with brickwork; This requires the use of one type of colored mortar, available in several colors, and a great deal of masonry practice.
A special compound for clinker that will protect the bricks from moisture penetration and prevent the formation of efflorescence on the surface of the bricks. After grouting, it is necessary to remove excess mortar and clean bricks or clinker tiles from dirt. It is recommended to protect the pedestal from excessive wear.
Hanging a kitchen hood
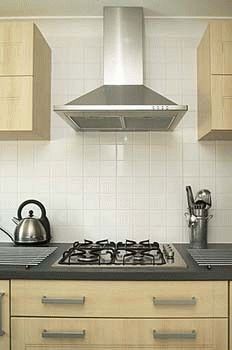
The most interesting question is, cooker manufacturers stubbornly make equipment that refuses to stand close to the wall, hood manufacturers pretend or do not notice the fact. The portal of most designs is in contact with wallpaper. No boundary layer. It may be correct, but the depth is taken in proportion to the plate table. There is a displacement.
Exterior plaster - facade repair
The most important enemy of traditional plasters is water. It penetrates deep into the wall through poor facade paints and cracks in the plaster causing frost damage and drying - saline solution. Water, for example, by rain applied to the wind, which presses the moisture between the welds of the wall. If the outer wall does not have an air gap and the wool insulation sticks directly to the wall, this can lead to the biodegradation of the wool and the formation of fading on the facade.
Floor renovation - new floor of the old
First of all, their proper preparation. The underlay must be stable and provide a strong connection to the floor on floors.
Test preparations for the removal of cement slurries
Rust, lime deposits and other impurities from glazed and unglazed ceramic clinker, clinker, bricks, brickwork, plasters, screeds, facade concrete, natural stone, building mixtures, working tools. Robert Yudvik: dirt on floor tiles was almost created.If there are those who say: the authors are wrong, we will besiege with a simple fact. In most apartments, the riser makes it difficult to hang the kitchen hood on the wall. YouTube has posted a million videos where the ubiquitous block of wood is attached for adaptation purposes, most of them solve problems using old-fashioned methods.
Home renovation - walls before plastering and painting
This makes it impossible to get rid of an already established mold bloom. Ways to obtain a substrate according to its condition Priming is not the only way to prepare a surface for painting or plastering.
Wall sealing in the bathroom - film in liquid
All work related to thorough cleaning or ground clearance must be carried out in advance. The substrate on which the insulation is applied must be strong and stable. They must be free of dust, dust and dirt, as well as any salts.We will be original, suggesting, if necessary, simply move the stove. The furniture will be more compact. We will please readers with a simple fact: when installing gas meters, the obligation of which was canceled not so long ago, there are also some restrictions. Concerns the following points:
- It is not allowed to place a gas meter above the table. Or the distance to the stove is indicated by the instructions, much more than the owners have at their disposal after installing the kitchen hood.
- Take the trouble to leave a considerable indent on the sides.
Before you install the hood, it is beneficial to think about the rearrangement. Gas connections are flexible, steel, of various lengths. Therefore, there are broad prospects for relocation. Please note that it is forbidden to block the riser with furniture, or build niches. In any case, he should stand alone in the middle of the kitchen. When installing hoods that do the opposite, they violate the norms for operating a residential building in an apartment building.
Pots around the house - to the ankle
So don't worry if there are bright spots on the surface of the cube - it's limestone. There is no technical ability to completely eliminate them; are the result. You won't have to wait long for the effects: broken, even broken tiles, cracks, ceilings and walls of the room under the terrace can appear in the first year after the completion of the work. It is necessary to immediately find the cause, but not.
Wall repair - keep it well
Prevent the development of mold, algae or fungi; - improve adhesion and harden the substrate; - improve the adhesion of coatings on the substrate; - Protect against the formation of salts on the surface of the material. Primer and type of substrate The soil must be adapted to the type of substrate and system.
As for the stove, take the trouble to move it so that the counter looks beautiful (open unhindered access from the regulatory authorities). Follow the installation instructions supplied with the meter by the seller. The rules are typical, it makes no sense to sort through the models.
Facade restoration - old house like new
Moisture appears on the surface of bricks, gypsum plaster or limestone deposits. Cracks and cracks as well as mold or algae can also appear on such facades. If there are only a few and they appear shortly after the wall has been erected, they should disappear.
Walls - insulation from moisture from scratch
That is why many old buildings are damp. Soil moisture can reach two meters. Salt appears on the walls outside of wet spots, fungi and mold grow; can come off the plaster, and even.
Joint Cleaning Test
Collection construction works- external plasters. The strength of the gypsum layer should not exceed 1 cm at the height of one floor; - the appearance of the surface of the plaster - blisters, scratches and cracks are unacceptable. Plasters or molds and stubborn stains also cannot be seen on the plaster; - finish the corners and edges - should do so.See, there are many options wooden block not ideal given the above considerations. Before buying, estimate the dimensions of the kitchen hood to fit. There are huge inclined models of the Pyramid brand, you can hardly imagine how they will fit into the environment.
Electrical connection of the kitchen hood
The instructions for electric drills say: it is strictly forbidden to ground. Why, one asks. We think it's about the process. Let's say if you drill a battery, a breakdown to the ground will begin. Obviously: steel gearbox, axle. There will be a significant leakage current. Instructions will write: you can not ground the device. The plug is simply devoid of a side terminal.
Household tools are classified as electrical safety class II. Double, equivalent insulation. In case of violation of the integrity of the cambric, the removal of the potential to the spindle will shake, that the GOSTs will fly out of the head.
Violation of instructions, we believe. In the book of Polonsky P.A. “Installation of line-cable structures of urban telephone networks 1978” is indicated (p. 80): the electric drill must necessarily be grounded. Some equipment manufacturers violate the generally accepted norms. It is authentically known: some people were killed working with an electric drill - they touched the central heating battery. Avoiding repetition with a kitchen hood, housewife, the device must be grounded. If the event is not possible, cancel it!
Even if there are no special tools, make a risk on the case, screw on the lug, lay a good copper core with a cross section of at least the recommended instructions for electrically connecting the device. You will find information in the instructions. The current will be shared between the circuit and the housewife, as a result, life will be saved. Things will not come to contact, in the event of a breakdown, plugs and circuit breakers will instantly be knocked out.
We believe that what has been said is clearly stated. We add that it is not customary to plug kitchen built-in appliances into a socket. Pads are used for switching with the electrical network, it is better to tin before inserting the conductor so that they do not fray and are not covered with an oxide coating. The story about how to install the hood comes to an end. Surely there will be other wishes from readers, you can voice them in the comments.
Where to install a kitchen hood
Installation of the kitchen hood is carried out according to the instructions. Expensive models, products of well-known companies have 3-5 options, others - one. The main factors are the height of the suspension above the stove, the entire surface of the desktop covered by the portal, the number of bends in the duct. The central aspects that determine the performance of the hood. If the portal is hung too low, the grease filter and other structural elements will start to burn, melt. The kitchen hood inlet is too high - some of the combustion products will pass by. Low hanging equipment will interfere with the cook. There are many criteria for choosing a place for a kitchen hood.
TV shows, YouTube videos, reviews give conflicting recommendations regarding the installation height of the cooker hood, we advise you to follow the instruction manual. You will hear different numbers, the manufacturer has studied how much power the burners give, regardless of whether the hob is powered by gas or electricity. Hard work has been done by the service teams of large concerns, why swim against the tide. For example, the instructions say:
- The minimum suspension height above the gas stove is 65 cm.
- The minimum hanging height above the cooker is 55 cm.
We recommend keeping the distances measured from the covers of the burners, not from the stove table. The distances are determined by the number of burners, the size of the portal, the smart transmission cannot replace the instruction manual. There are no instructions - download it by surfing the Internet, today you will find papers.
Finally, for severe cases, the cooker hood is so simple that it is devoid of instructions, it is recommended to choose the maximum distance recommended by the sources found. If possible, the portal overlaps the burners with a margin of 5–10 cm. It is appropriate to cover the burners that work more often with a dome (the hostess can use four diagonally located ones, it will not be possible to cover).
Everyone will assemble the hood with their own hands, having received the appropriate work experience, processing metal. It is impossible to use the device according to the rules, many forges are built by themselves, there is only an extractor fan. Provide the opening of the dome with a bathroom fan. The device must withstand elevated temperatures. It is better to choose a steel fan for a kitchen hood, there are cases - a plastic one worked fine. We discussed the question of how to make a structure with our own hands, we mention: dimensions can be borrowed from a similar design. Please note: modern hoods use tangential fans, you can take it from an old vacuum cleaner, since there is an impeller. The cooker hood operates continuously (without interruption).
Take the trouble to provide the device with safety mechanisms. Other vacuum cleaners are deprived of protection against overheating for a trivial reason: the motor is blown with filtered air taken through a hose. The kitchen hood number will be harmful. The stove air is hot, the kitchen hood motor can heat up additionally, but not cool. The problem is solved simply. Find a thermal fuse at 135 or 145 ºС in old household appliances. Visit the markets. Wrap the acquisition tightly to the turns of the stator winding, supply power through the protection element.
Most vacuum cleaners do not have varistors. The elements eliminate the breakdown of the collector (spark). Readers will inquire in more detail on specialized sites, varistors are soldered parallel to the brushes at one end, and the other is planted on the motor housing. If there is no grounding, the breakdown will go through the motor shell, without going into the circuit, without causing interference, without burning delicate electronic devices.
The height of the installation of the hood is the issue resolved. The vacuum cleaner engine is noisy, there is a chance the neighbors will call for reinforcements, the squad will find out who is howling in the ventilation duct. It is logical to replace the collector motor with an asynchronous one. Housing, impeller to take a vacuum cleaner. A difficult process, if you are bursting with the desire to make a kitchen hood with your own hands ...
Why does the kitchen hood have to cover the cooker table?
The requirement is not obvious, some new hoods work differently. We saw in advertising inclined portals that reach a maximum to the middle. Kitchen hoods are available, high power, the flow of ascending air is drawn inward due to a productive fan. It is worth lowering the speed, opening the burners to the fullest, the new ceiling wallpaper will begin to grow with a layer of fat. It will not be easy to wash, try to avoid dangerous situations.
It is useful to remind you: take a larger portal. Note that some manufacturers prohibit keeping products turned off while the fire is burning. The cooker hood is on fire. The fan should spin, creating movement.
Kitchen hood duct
It is known from the furnace business: the optimal cross-sectional shape of the chimney is round. Square is characterized by acceptable performance. Manufacturers of kitchen hoods make a round hole; an adapter is needed to use a different section. Standard duct diameter is 150 mm. The aluminum corrugation is easy to bend, you can draw a larger size to the required one.
It is worth noting that each 90-degree bend in the combustion products reduces system performance by 10%. Sharp corners, negative slopes are forbidden for stove masters at all, horizontal sections are allowed by catering establishments, it is far from the chimney. The frills just reduce the performance of the cooker hood more. Accordingly, if the path is not laid correctly, the efficiency may become equal to zero.
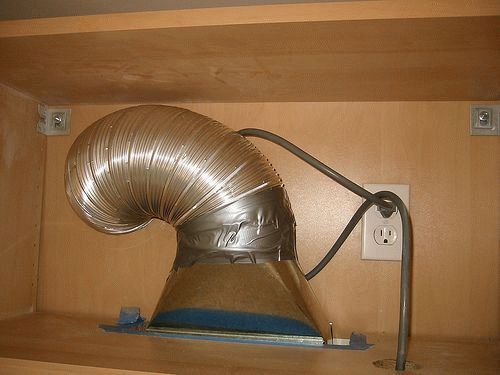
Given the above, it is desirable to independently install a kitchen hood under a round duct. In addition, you should not, as shown in the advertisement, wind unnecessary sections with knots, you should cut them off. Despite its ridiculous dimensions, a typical 150 mm round duct stretches to a length of 3 meters, and this is enough for most cases. Ideally, you need to stretch the product to the full, cut off the excess. In this case, the resistance to moving combustion products will be minimal, and fat deposition will decrease. Otherwise, the air duct will turn into a haven of dust, dirt, which will be difficult to clean.
It is useless for kitchen hoods, the performance of which is low. If the hostess suits, the dust is not a strong hindrance. In the case of powerful units, performance will be greatly reduced by dirt build-up. How to get rid of trouble. Complex issue. Firstly, clean the grease filter regularly, if there is one, and secondly, try to find an air duct in the store with an antistatic coating on the inner walls that prevents dust from settling. Two steps will fix the problems. It was recommended to take a round corrugated duct and straighten it as completely as possible.
How to replace the grease filter. In the case of a homemade hood, cover the portal with a 1 mm mesh steel mesh. Aluminum is used in factory products, fats are better deposited, steel will come off. Due to the presence of filters, the performance of the hood, of course, drops. Is it so important to protect the motor, the air duct from grease, or to focus on the flow force. If the rules for installing the hood are followed, it will work, we tend to believe that sometimes the device should be modified according to needs.
The environment is not always favorable. In apartments, there is a vertical riser behind the hob. For the installation of a kitchen hood, get ready to fill a bar of the required thickness, which serves as the pedestal of the structure, removing the body from the wall so that the gas supply pipe does not interfere. Do not completely block the inlet of the ventilation system with an air duct. Do-it-yourself installation of the hood should leave room for outflow, the subsequent supply of oxygen to the apartment through window slots. The device will not replace ventilation, the installation height of the portal differs from the location of the ventilation hole. We hope that now the installation of a built-in kitchen hood will not present serious difficulties to readers.
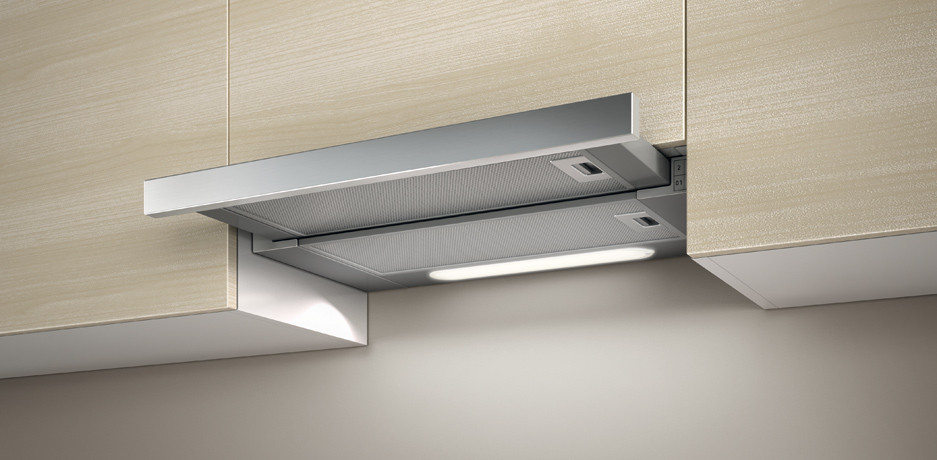
Canopy cooker hood Hansa OSC 511 WH
The VashTechnik portal praised Siemens and Bosch, singing efficient installation instructions posted on the official website, today try to attack Hansa. The hike was comforting. Of the three canopy hoods presented by the site, one differs - in width. They look like complete repetitions of each other. The promised instructions in the corresponding section are round zero, we immediately went to look for paper on the net, after a couple of minutes the necessary electronic document was found by mazuriki ...
The first thing that catches your eye: before you mount the hood in the kitchen, take the trouble to calculate the height above the stove. Dana of an unusual type:
- Min 65/70 cm.
Literally copies the inscription of the instruction figure. There is no division into gas, electric models of cooking surfaces. The authors decided: the installer, according to the compilers of the instructions, should know: the cooker hood is placed above the burner higher than above the induction, spiral stove. The instruction indicates: you can use equipment to remove the products of combustion of blue fuel, the heat of an electric hob. Conclusions from reading:
- The suspension height above the gas stove is at least 70 cm.
- The suspension height above the electric stove is at least 65 cm.
Self-installation of the hood is carried out in three stages:
- Hanging on the wall.
- Connection to the exhaust network.
- Connecting to an electrical outlet.
Installation of the Hansa OSC 511 WH canopy cooker hood
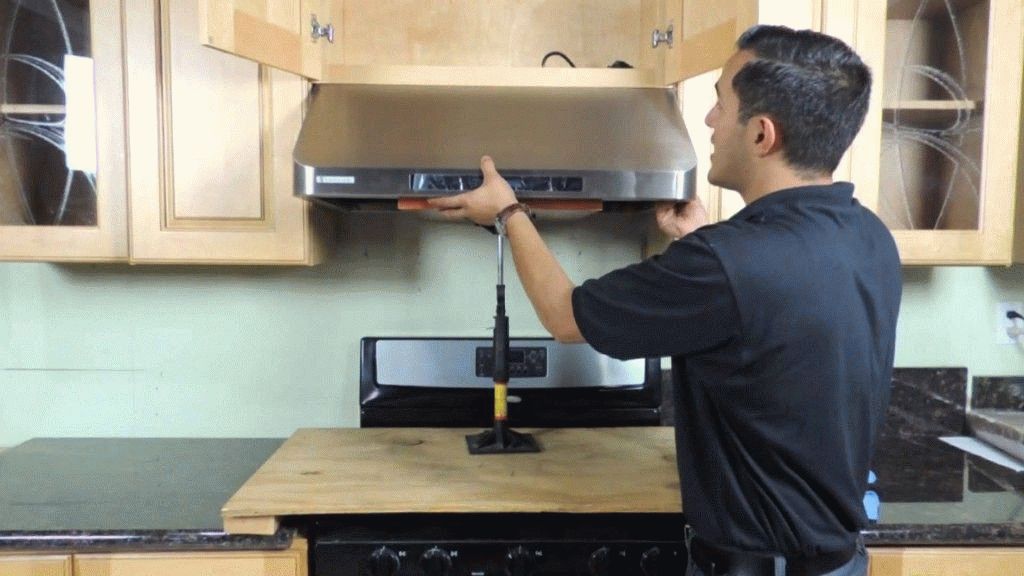
You will need a ruler, a level (a plumb bob on a thread). Then the bottom panel of the case is removed. Under it, there should be a risk that helps to align the center of the hood with respect to the drawn line. We recommend drawing a horizontal line at a height of "Min 65/70 cm" before installing the hood in the kitchen. It will make the next process easier.
You will mark the mounting holes, it is better to do exactly along the top edge of each. The “Min” condition is not violated, the canopy cooker hood will hang straight. Please note that the diameter of the drill bits for concrete is selected according to the pegs included in the set. We'll have to measure with a caliper, then walk to a hardware store. Recall that the device is sold at a price of 1800 rubles with a capacity of 335 cubic meters per hour, an engine power of 135 watts. Considering the amount, the possibilities, the instructions are good. Not the upper price segment, the installation of a canopy kitchen hood, by all indications, will go gloriously without clear instructions.

The device received the second class of electrical protection, grounding is not required, however, we recommend that you immediately lay the outlet with a three-core PVS3 cable. The equipment will be replaced, there will be no need to dismantle the power grid, replace the wiring. Calculate the allowable power based on the cross section, the Internet will provide the initial figures for calculations. For convenience, here is some information:
- PVA3 x 0.75 mm - 6 A.
- PVA3 x 1 mm - 10 A.
- PVA3 x 1.5 mm - 16 A.
- PVA3 x 2.5 mm - 25 A.
- PVA3 x 6 mm - 50 A.
The current is given for a voltage of 380 V, in order to obtain a phase for a home outlet, it must be multiplied by 1.5. Engineering communications are taken with a margin of one and a half to two times, the real current should be less than the specified one. Do not forget: most of the motors used today by technology are of the asynchronous type, at start-up they consume at least twice the nominal power. If in doubt, at the first start, connect a circuit breaker in series with the socket for the number of amperes corresponding to the maximum strength of the conductor.
For a canopy kitchen hood, PVA3 x 0.75 should be more than enough.
Installation options:
- Exhaust. To determine the operating mode, exhaust or recirculation, use a special switch on the side of the plastic motor housing. You will need to climb inside the kitchen hood, make adjustments. As for the air ducts, there are no options left but to buy corrugations with a diameter of 120 mm. Otherwise, you will need special adapters, for example, 125 mm. The clamp is bought together with the air duct, the length of the corrugation is pretended for reasons of placing equipment in the kitchen. If there are horizontal shelves above the hood, it is necessary to break through the duct. It's easier to use a jigsaw. You will need special grinding drills to clean the sidewalls of the hole.
- Embedding. Do-it-yourself installation of the hood in the cabinet is carried out according to a different scheme. You will have to cut a hole in the bottom of the section according to the size of the case. Fastening is carried out on screws, you will have to buy fasteners. Do not cover the recirculation grille of the housing if the specified type of operation is intended. Otherwise, the sequence of actions is the same: the corrugation is taken, the ceiling of the cabinet section is broken, the installation is carried out to the bitter end near the kitchen vent. For docking, a special grate is sold in the store. If necessary, use an adapter for a rectangular duct, which will crown the corrugation near the ceiling above the hood. Take the trouble to buy sealant to seal the gaps, although in our opinion they are additional ventilation in the room, regardless of whether the equipment is working or not.
- In recirculation mode, not only set the engine switch to the appropriate position, you will also have to purchase a carbon filter. The opening of the housing for the air duct is covered with a special plug that comes with the hood kitchen hood.
Operation, care
The instructions say: aluminum grease filter is changed every two months. We dare to assume that the instruction in the source language contains something like renew, which translates to update. Rather, the grease filter should be washed every two months, avoiding buying a new one. Otherwise, the device will become an expensive purchase; for a year, maintenance will eat up three times more money than the cost of the unit. Check with the manufacturer. You can manage on your own after the purchase. Just try to wash the grease filter, if the accessory returns to its previous state, it will become like new, rather continue to use it.
The charcoal filter will need to be changed. The large size is not so much alarming as the renewal period - 2 months. The manufacturer is not so cruel, indicates a period of six months, since the carbon filter costs money. The instructions say: regenerate, wash components is unacceptable. More like the truth. The charcoal filter is located above the grease filter and is used in the recirculation mode, when the air just goes around. Not the best option for a gas stove, for an electric one - nothing more is needed.
Annoying: the name, type of carbon filter is not indicated. A direct search engine query regarding the type of cooker hood in question is powerless to give a positive result. Cunning dealers are straining, writing: there is no Hansa FWU 60 carbon filter, you can order it. The price is hushed up. We find it difficult to calculate the cost of operating the product, we are deprived of the desire to call, making inquiries. The reader will have to take the wheel. We consider in the review the installation of a kitchen hood, not the problem of stubbornness.
Accessories cost 250-800 rubles. Determined by manufacturers. Avoid pecking at a freebie, take a kitchen hood. Expensive carbon filters can serve six months, cheap - two months. A simple calculation shows: we change the awl for soap. A year later, the cost of the product will be covered. Expensive kitchen hood, high-quality, requires similar operating costs.
Installation of the kitchen hood is carried out according to the instructions. The manufacturer's settings are specific, you should not think that kitchen hoods are similar, like twin brothers. It remains to say goodbye.
Installing the hood in the kitchen with your own hands is carried out depending on the type of construction.
The efficiency of the device depends on how correctly the device is selected, and then the rules that ensure installation are already in effect.
Classification of modern exhaust devices
Installing a hood in a kitchen in a private house or apartment involves a few simple fixtures and connection to existing ventilation.
But the process may differ - it all depends on what type of hood is chosen.
According to the place where the installation will be carried out, they are divided into wall, corner, built-in, island and fireplace:
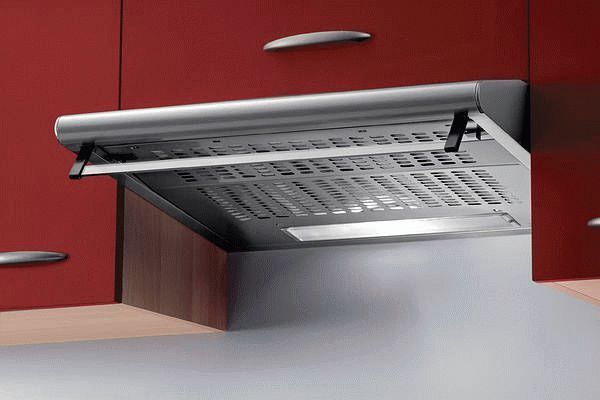
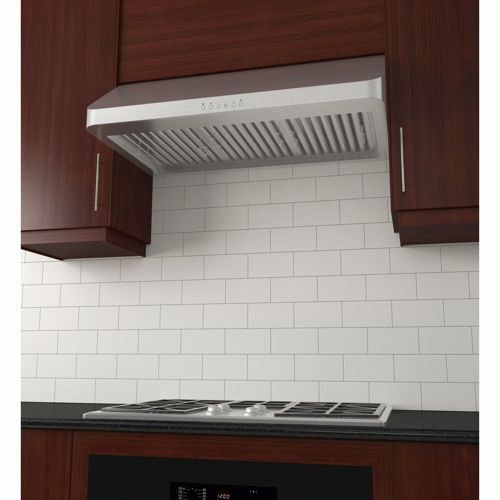
- Standard and easy-to-install do-it-yourself wall-mounted ones are used most often. There are many design and construction options in this segment, from sloped to domed. By the way, the installation of wall hoods can be carried out both on a free wall and in a small closet;
- Corner models in an apartment or a private house are not used so often, and therefore they always look interesting and attractive. In this segment, dome and T-shaped models are suitable for do-it-yourself installation;
- To create a concise and compact interior, you will need to install a built-in hood. Partially embedded from fully embedded differs in the number of "visible" parts - in the latter case, only the suction surface remains visible;
- Do-it-yourself island models are assembled when it comes to a special kitchen layout, with working area placed in the center of the room or by the window. This installation method is more common in a private house. Keep in mind that the number of designs of island models is limited, and their price is high;
- Chimney hoods are considered the most powerful and can work effectively in large areas and with high ceilings.
Exhaust devices are also classified according to:
- The width of the exhaust zone - its standard values are 500, 600, 900 and 1200 mm. The width of the hood and the width of the hob must match;
- Productivity - sanitary standards state that the air in the kitchen should be changed ten times per hour. So multiply your kitchen's air volume by 10 to get the minimum extractor capacity. By the way, the same calculation rules apply both in an apartment and in a private house;
- Installation height: the minimum parameter here is 700 mm. The higher the installation will be, the more productive the device should be;
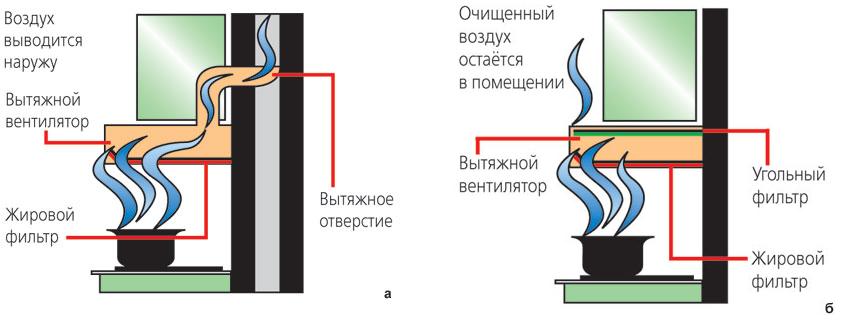
- Air purification method. There are circulating (driving kitchen air through the filter and releasing it back), flowing (using house ventilation to bring air outside the room), combined;
- The type of filters to be installed. The most relevant grease filters coarse and fine filters to absorb odors. The degree of complexity of the do-it-yourself installation does not depend on the type of filter, but different filter models differ in the duration of operation. So, non-woven grease traps need frequent replacements, and metal ones will last a very long time, but they will need to be washed regularly. The charcoal filters that trap odors are also replaceable;
- Control type. The most expensive hoods are electronically controlled. They are equipped with many useful indicators and functions;
- Noise level - devices selected for installation in an apartment or private house must comply with existing sanitary standards by noise.
And do not forget that the installation of the exhaust device with your own hands must be carried out according to certain regulatory documentation.
And these are not only the rules prescribed by the manufacturer of the equipment, but also the corresponding SNiP - SNiP 41-01-2003 "Heating, ventilation and air conditioning".
Rules for choosing air ducts for mounting the hood
Air ducts are needed to take the exhaust air from the kitchen to the ventilation in the house.
The air duct is used only for flow structures, and is not provided for recirculation.
The most popular types of air ducts that ensure the correct installation of do-it-yourself hoods (built-in, inclined and other structures) are:
- plastic, made of durable polyvinyl chloride. They are characterized by compactness, durability, noiselessness and lightness. They are made with a smooth surface, which practically does not create air resistance. Narrow rigid boxes or elastic pipes can be made of PVC - this allows you to install a do-it-yourself hood in the house so that the gap between the equipment and the vent does not attract attention;
- aluminum, in the form of a corrugated pipe. Its independent installation does not cause difficulties, since the pipe easily bends under right size. Among the advantages of aluminum corrugation is the absence of vibration and hum, which distinguishes this design from a rigid box. However, such an air duct cannot be called aesthetic, you will have to figure out how to hide it so that it does not spoil the interior of the kitchen. This method is good if we are talking about a built-in hood or if the room has a plasterboard ceiling.
Progress of work when installing a kitchen hood
Installation to make ventilation in the house is carried out according to the following algorithm:
- For the electrical connection of the hood with a tap, a separate outlet is required;
- On the wall, in the place of the intended attachment, perform preliminary marking. For these purposes, it is better to use the template that comes with the equipment. But if such a template was not provided in the delivery set, then the markup is performed independently, using a tape measure and a pencil;
- If we are talking about installing a suspended hood with a tap, then it is mounted only after the kitchen set is fully assembled and all upper cabinets are fixed;
- Dowels and self-tapping screws are required for mounting the device. A properly selected air duct of the appropriate length will ensure the connection of the device to the general house ventilation shaft;
- It is important to choose not only the length, but also the diameter of the duct, as well as the way it is located;
- Too long an air outlet or having more than three elbows in it will reduce the performance of the hood. It is also forbidden to narrow the ventilation duct. It is preferable to use plastic round boxes with a diameter of more than 12 cm, rather than corrugated metal pipes, because they are less noisy
- During installation, it is important to ensure that the hood is installed strictly horizontally;
- To connect the hood to an existing ventilation shaft, an additional plastic box is laid. In this case, the cross section of the duct must correspond to the diameter of the existing outlet;
- After installing the duct, install the casing for ventilation and adjust it in height;
- It is necessary to connect the device to the electrical network and make a test run - if no malfunction occurs, the installation is completed.
Mounting features of the built-in model
Do-it-yourself installation of a built-in hood provides for the preliminary assembly of the furniture frame, where the device will then be placed.
Keep in mind that in the part where the hood will be located, the bottom is removed, and therefore vertical fasteners in the cabinet will be required only in the upper part.
Before assembling the frame, mark the exit point, then a hole is drilled in the upper partition for the duct outlet.
Most often, a ventilation duct or corrugation is carried out precisely through the top, but it can also be brought out through the back wall.

The bottom of the cabinet is also marked for installation. The dimensions of the hood body are “transferred” to the removed bottom panel.
In addition, the places of the cutout for the corrugation are marked. After the body is fixed on the panel, the fastening of the corrugations begins - first the adapter ring is inserted, and then the box is laid.
The connection with the existing ventilation system by means of corrugations is carried out after fixing the hood in the cabinet.
The electrical connection wire of the device is also hidden in the cabinet - it cannot be hidden directly under the stove, in order to avoid overheating.
So it is better to place the outlet behind the back of the cabinet.
And do not forget that a productive powerful hood requires an appropriate power outlet and cable in order to avoid overloading the system.