Beautiful decoupage bottles. Decoupage from toilet paper. Decoupage bottles: process
Having mastered the fascinating and uncomplicated decoupage of bottles for beginners, ordinary and non-standard bottles of wine, cognac, champagne or bottles that have not yet been drunk can be turned into real works of art that will pleasantly surprise, delight the eye, and as a gift touch the depths of the soul. What could be better than a gift made with your own hands, in which warmth, love and a piece of soul are invested?
The original bottle, which is difficult to find a worthy use, but also a pity to throw it away, with the help of decoupage technique, easily turns into an exclusive decanter for spirits or an unusual flower vase. The best part is that this unique technique is available to absolutely everyone, because it does not require special skills, special material and physical costs. The main thing is a great desire, a little free time and a lot of creativity!
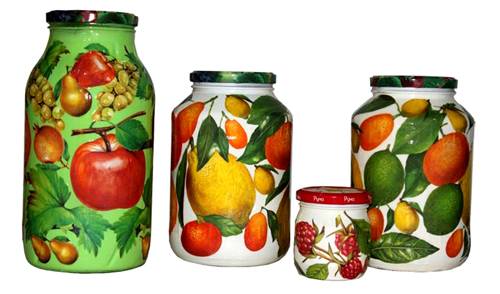
Interior decorations from glass containers
back to contents
What is hidden behind the mysterious word "decoupage"
Decoupage (decoupage) - a word of French origin, which in translation means just "cutting". This is a special decorative technique, close to collage and appliqué, which consists in cutting out images from a wide variety of different materials(paper, wood, fabrics, leather, etc.), which are then attached or glued to furniture, dishes, textiles and other types of surfaces for decoration.
In modern decoupage, printed pictures are most often used, and this is not surprising, because paper applications can be pasted on almost all types of surfaces - flower pots, vases, bottles, wooden kitchen boards, mugs, books, candles. So, an ordinary white plate can be turned into an amazing wall panel, a chic flower vase can be made from a nondescript bottle, and why not decorate your favorite ... toilet bowl with cute daisies or forget-me-nots?! 🙂
The scope for imagination in decoupage is truly limitless! Of course, not all paper is suitable for decoupage. Most often, table three-layer paper napkins of original colors are used, which can be purchased at almost any store. This decoupage technique is called tissue paper. It is actually very convenient: the drawing you like is carefully cut out along the contour, glued and covered with a protective layer of varnish.

What you need to decoupage bottles
- A clean glass bottle, convenient for decoupage - smooth, without unnecessary bulges.
- Three-layer napkins with a selected pattern (for beginners, it is advisable to stock up on several napkins in case of damage), special decoupage cards, clippings of pictures you like from magazines, printouts, etc.
- Means for degreasing the glass surface of the bottle (alcohol, acetone, thinner, nail polish remover).
- To prime the surface of the bottle, you will need ordinary acrylic paint, which can be bought at any hardware store.
- Special decoupage glue or the most common PVA glue.
- Brushes for work of different thicknesses - it is better to take flat ones and always synthetic ones, since hairs can remain on the treated surface from natural ones.
- Colored acrylic paints.
- Acrylic lacquer - it looks milky white color but becomes transparent when dry.
- Additional decorative elements - sequins, beads, rhinestones, bows, ribbons.
- One-step or two-step craquelure polish - if you want to create an antique effect.
- Manicure scissors for cutting out selected motif fragments.
- Masking tape for gluing places not intended for painting.
- Foam roller or piece of foam.
- Disposable plates or special trays for paints and varnishes.
- Sandpaper.
- Rags
Master classes for creative individuals
back to contentsStep by step guide to decoupage with napkins
- We prepare the surface
First of all, we clean the bottle from the labels - soak it in a soapy solution and use sandpaper to wipe off the remnants of paper and glue. Now the surface must be degreased with alcohol, vodka, thinner, acetone, nail polish remover or a quality glass cleaner.
- Prime the surface of the bottle
It is not necessary to prime the surface at all, but it is the background that will give the composition integrity and completeness, and fragments of the drawings will look brighter and clearer. The background can be made either over the entire surface of the bottle, or only in those places where you are going to place the motif. To prime the bottle, pour a little acrylic paint of a suitable color into a wide jar or bowl, if necessary, dilute it with water to a consistency resembling liquid sour cream. The background color should be chosen taking into account the color of the selected image. The bottle should be slightly lighter than the main color of the napkin. With a foam roller or sponge, apply primer to the surface of the bottle. For greater saturation, two or three coats of paint may be needed. Before applying the second layer, the first must be allowed to dry. You can use a hair dryer to speed up the process.
- Cut out motifs for gluing
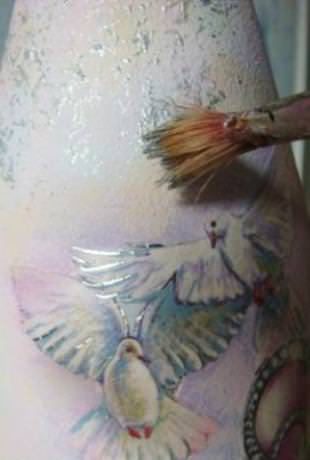
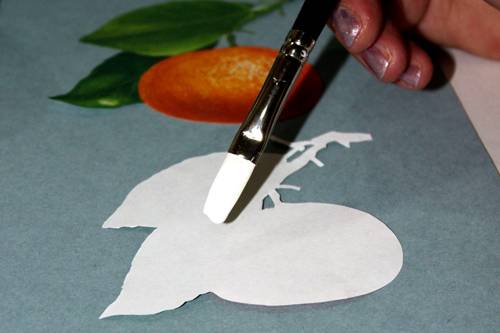
We take a three-layer paper napkin and carefully cut out the vending motifs with nail scissors. You can not cut out the picture, but carefully tear it out, then the clear boundaries of the picture will not be visible on the bottle and it will better “enter” the background. Separate the top layer of the napkin. It is he who we need for gluing. For decoupage, you can use not only napkins, but also magazine clippings, reproductions, any other pictures you like, and even printouts made on a printer. If the paper is too thick, first apply several layers of acrylic varnish to the picture, give each layer time to dry completely, soak everything in water for 20 minutes so that the paper is thoroughly soaked. Then the paper is very carefully separated from the wrong side of the picture. Now a thin picture can be safely glued to the base. If everything is done properly, the picture will look like it was painted!

- Glue motifs on the bottle
Pictures can be glued with special decoupage glue, as well as PVA glue undiluted or diluted with water (in a ratio of 1x1). We put the napkins dry on a dry surface, and then “we coat” with a brush with glue from the middle to the edges, removing all bubbles and wrinkles. For a sample, you can practice on an unnecessary bottle and napkin. Before use, decoupage cards must be soaked briefly in warm water, pulled out and dried on a towel. All these actions should be performed with extreme caution so as not to accidentally tear the picture. If you are using a decoupage card, grease it on the reverse side with PVA glue, attach the middle to the bottle and, starting from the center, gradually straighten the front side with a brush with glue, avoiding the formation of bubbles and wrinkles. You can glue several motifs on the widest part of the bottle, or distribute large and small elements over the entire surface.
Now, most needlewomen are fond of decoupage, namely, they decorate various items with paper appliqué. And, to be more precise, the decorations are made from special decoupage napkins, which are sold in a wide range on the shelves of specialized stores designed for needlework. Decoupage technique is done on many things made of wood, metal and plastic. But, the most popular is decoupage on glass, or rather decoupage of bottles.
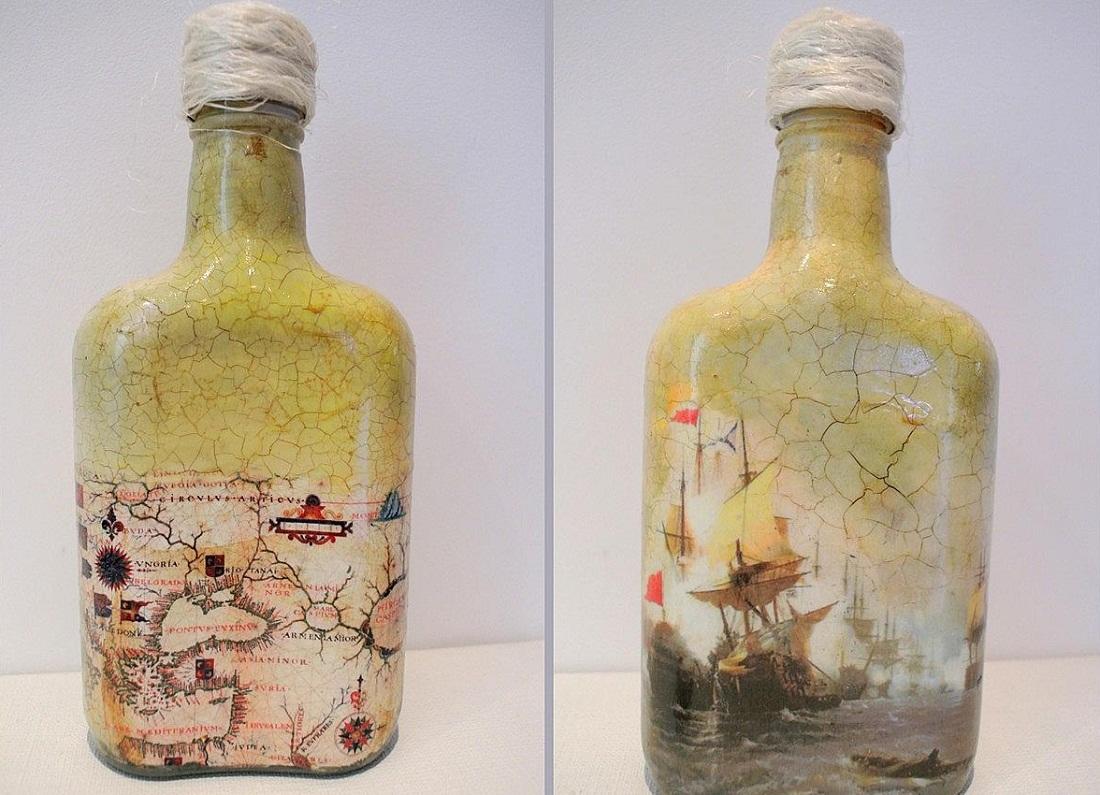
Every housewife will always have an empty glass container, for example, jars for bulk products, intended for throwing into the trash, from the prescription of use. Do not rush to do it yourself. You can try to remake a completely unnecessary little thing into an interesting vase, which, in the future, will decorate your interior, for example, in nautical style. Especially when author's ideas are much more valued than factory decoupage on glass.
Not only used alcohol bottles are subject to decoration, but also other glass objects that have lost their appearance. Decoupage of a vase will be very relevant.
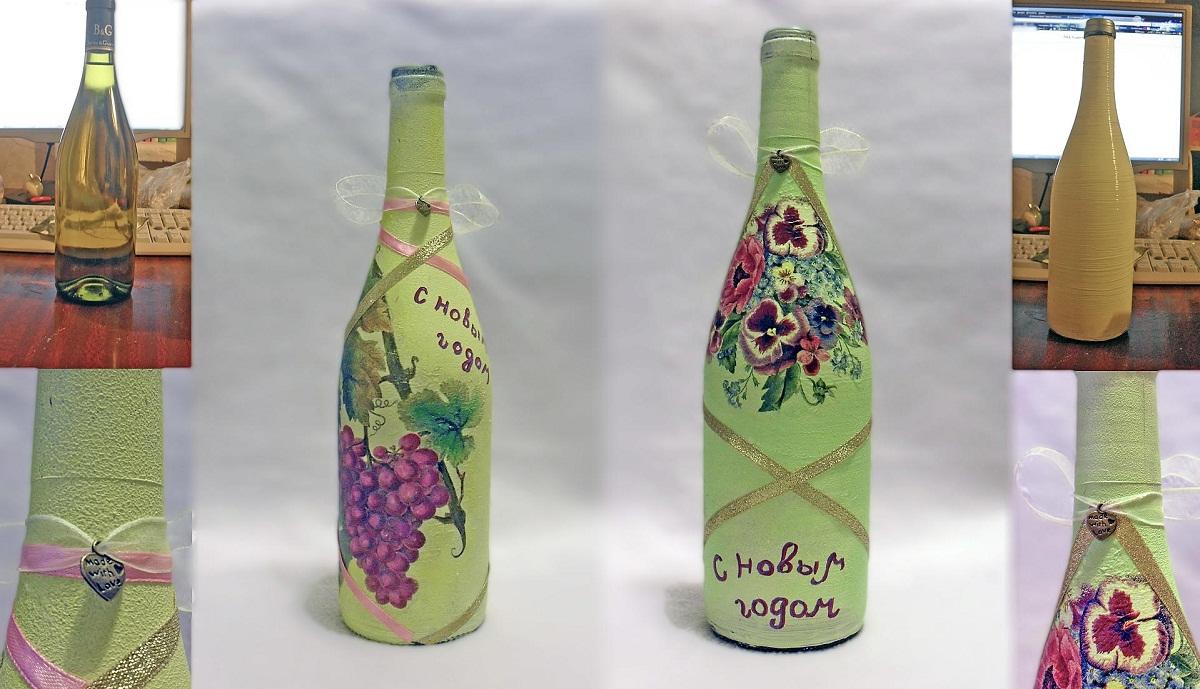
Bottle for Women's Day
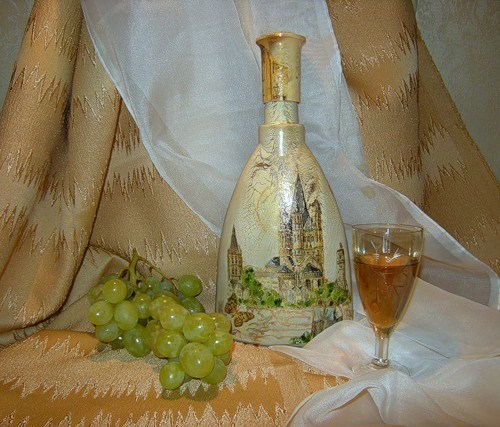
If you don’t know how to make decoupage on glass on a champagne bottle for the 8th of March holiday, then the presented master class and instructions tell you how to decorate and create decoupage bottles with your own hands.
Prepare a bottle of champagne by washing off all the labels. Then, degrease it with alcohol or window cleaner. Now, you should paint the bottle with acrylic light paint, in several layers, as shown in the photo.


Choose a decoupage napkin from which you can make a figure eight for the holiday of March 8th. Cut out the circles and make them in pairs.

Take acrylic-based paints, mix them to get a delicate shade of salad color. Thus, we will make a non-traditional bottle background. Apply this paint with a washcloth to the entire surface of the product. The bottle will turn out a beautiful spring shade, as shown in the photo.
Now we do the usual decoupage for beginners. Attach the cut out circles from the napkin to the bottle and anoint them with decoupage glue. After the glue dries, we can assume that the master class is over, but that's not all. It is necessary to decorate the ornament with an acrylic outline or glitter, circling them around the picture, as shown in the photo.
In the center of the bottle, make an inscription by the eighth of March, it will come in handy. When the green glitter dries, it will shimmer beautifully. Cover all the work done with acrylic varnish, which will give an incredible shine. Now, a festive bottle of champagne is ready to decorate the table on the eighth of March. On the video you can see how the vase is decoupage.

Video: Decoupage glass vase
Decorate the bottle with egg shells
The technique of decoupage of bottles trimmed with eggshells can be safely presented to your friends or relatives. Since, such work looks original and beautiful, acquiring a three-dimensional look. For work you need the following accessories:
- wine container;
- alcohol;
- eggshell;
- napkin, decoupage glue and brush;
- priming.
Rinse the bottle well under running warm water so that the labels can be easily removed by hand. Then, the entire surface is degreased with alcohol or washing liquid.

For primer, acrylic paint is perfect. Apply it to the bottle using a dish sponge. Leave the product for a short amount of time to dry, as shown in the photo.
To make the layer look more even, apply another tier of paint, as shown in the photo. Using a sponge will help get rid of streaks. This time, it will take about 30 minutes to dry.


And at this time, it is necessary to continue the eggshell master class and start cutting out pictures from napkins in the decoupage style. Put the pictures on a stationery file and blot them with water. With meticulous movements, place it on the main part of the bottle. The following manipulations take place in the same way as for beginners, using glue and brushes. The blank remains to dry for one day.
Decoupage with eggshells begins with the manufacture of the base material. Rinse the shell under water and dry. Lubricate the entire plane of the bottle with glue and lay out the shell in the form of a mosaic with tweezers. The eggshell ornament will be made on two sides, and in fact, the upper and lower parts of the bottle. After a break of 20 minutes, apply the background paint. This decoupage takes on a voluminous look.
The last step is to paint the resulting eggshell areas with a darker shade and open with varnish. Now, decoupage on glass, completely handmade. How to make reverse decoupage on glass, in an interesting style, you can see on the video.
Video: Making a reverse decoupage bottle
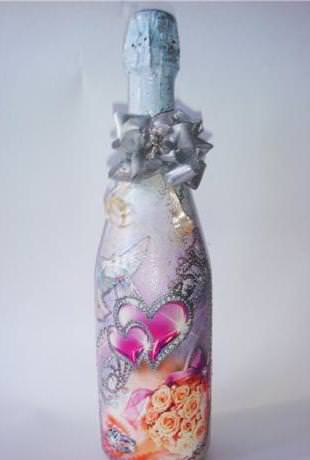
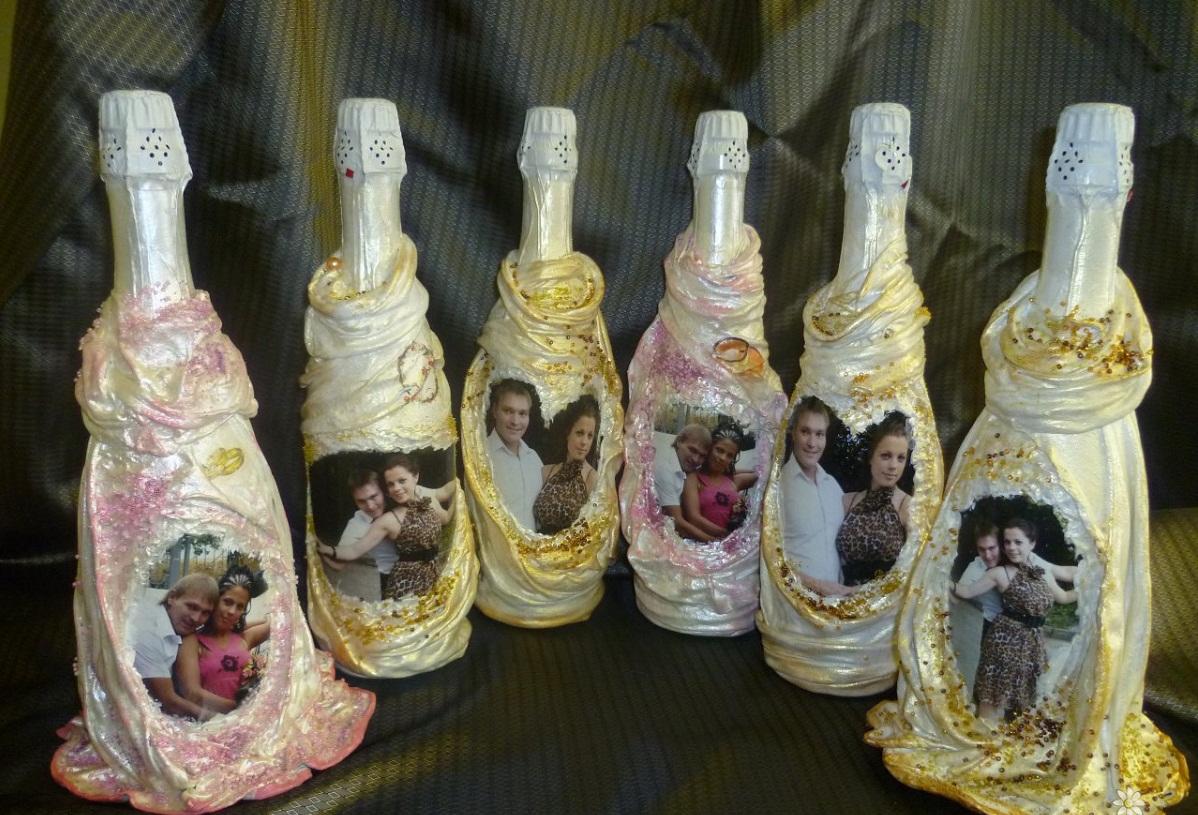
wedding bottle of champagne
Wedding attributes are always given special attention. This applies even to wedding glasses and champagne. Decoupage bottles of champagne for a wedding, you can do it yourself. An example that presented a master class with step by step photos, great for beginners, using a postcard or picture. Prepare the following materials:
- champagne;
- pictures or postcards;
- acrylic based varnish;
- acrylic paint;
- washcloth.
Remove all labels from glass bottle by soaking it in water. Then, degrease the surface with alcohol. Paint the product with primer. The master class involves the use of postcards. Cover it with acrylic varnish and dry. Now, peel off the top tier of paper and cut out a suitable motif.
The bottle is smeared with glue, and the selected pictures are applied on top. Gently smooth the drawing to avoid bubbles and wrinkles.
It is necessary to dilute the paint, which, in your opinion, matches the color of the bottle. Draw a darker outline with the brush. Dip the foam washcloth into a light tone of paint and create a haze by smoothing the edges of the image.
Now, it remains only to paint the veins in silver using an old brush and draw the details. The final touch is varnishing the entire surface of the champagne. Decoupage of a bottle of champagne for a wedding, successfully done. This craft will perfectly decorate wedding tables. A master class on how to decoupage bottles with a cloth, watch the video below.
Video: Cloth bottle decor
Bottle decoration with tights
In order to implement such an interesting and voluminous master class, and create glass decoupage with pantyhose, you will need the following list of materials: a bottle, craquelure, alcohol, pantyhose, PVA glue, acrylic varnish and napkins, as well as decoupage cards, washcloth and acrylic-based paint.
Take the bottle and degrease it using alcohol. Take nylon tights and dip them completely in the glue solution. Then, stretch them over the item to be decorated and form folds. Napkins are also impregnated with glue, you need to make flowers out of them. Drying time is one or two days.
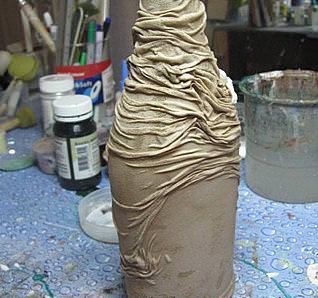

After that, the product is covered with black paint based on acrylic. Let dry for a while. Choose the picture motif you like and apply it to the bottle, covering it with several layers of glue. Don't forget to take breaks between layers.
 Wait for it to dry, and boldly apply golden acrylic paint with a washcloth, painting over black. Next, the craquelure is applied with a synthetic brush, and after four hours, the second layer is being adjusted. When another two hours pass, and you will see how the craquelure turns into cracks. Using a bituminous patina, we make the effect of aging crafts by overwriting cracks. The final touch that appears after using the craquelure is the application of acrylic varnish to secure the creative work.
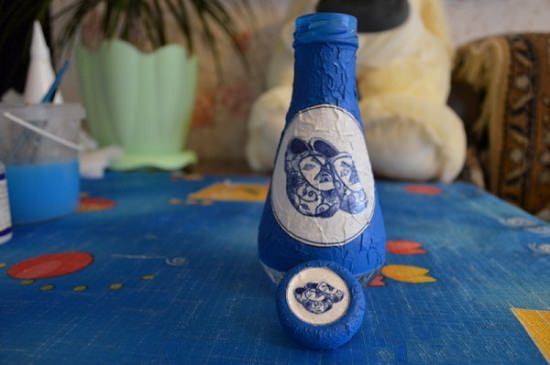
Toilet paper decoupage
Decoupage on glass with toilet paper begins with the preparation of accessories:
- bottle or jar for bulk products;
- toilet paper;
- acrylic based paints;
- napkins;
- glossy varnish;
- scissors;
- brush, PVA glue and washcloth.
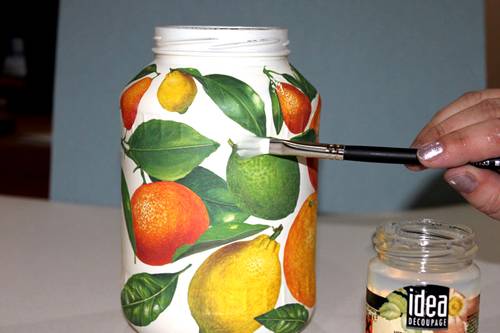
Prepare a bottle, and if you want, you can use several cans, after wiping it with alcohol. Cut out suitable miniatures from the napkin. Small squares are cut out of toilet paper. To apply glue to paper, you need a thin brush. Now, evenly attach the cutouts to the bottle, as shown in the photo. We leave it to dry.
Toilet paper is very thin, so we paint it with white acrylic paint. Large pictures are glued in the central part of the bottle, and small ones on the cap.

After everything is dry, cover the entire light part of the bottle with acrylic paint. of blue color. The next step is painting with a golden color, applying it to a washcloth.
Using the techniques discussed in this article, high-quality images are applied to, decorative ornaments interior and functional things. The main advantage here is not so much cost savings as the ability to create unique products with your own hands. It will be easier to show talents if you carefully study decoupage for beginners step by step, with a photo of the bottle, descriptions of tools and materials. This article provides detailed instructions, which will help reproduce technology at home without errors.
Not every person has the skills of an artist. But you can use ready-made pictures on paper. If they are transferred to a suitable basis and protected from adverse external influences, the desired result will be obtained.
Similar techniques have been used in practice for hundreds of years. But these days, tools and consumables are more accessible. It will not be more difficult to find a suitable illustration in a magazine, or create a unique picture using a printer. But the most convenient thing is napkins, or other finished printed products with repeating patterns. They decorate, for example, a set of a table and several chairs.
There are the following types of decoupage:
- Classic - this is cutting out the contour of the pictures, fixing them on the surface and applying a layer of transparent varnish on top.
- The "reverse" technique improves the protective performance. Here, the pattern is fixed with its front side on the glass, which prevents damage.
- 3D images form real ones. To do this, glue small shells, other objects, create a relief with paste modeling.
The techniques listed are optional. After mastering the skills, they are used together, in different combinations.
Below is a standard decoupage technique from a napkin:
- The surface is cleaned of dirt, degreased.
- It is painted evenly in one color, waiting for the layer to dry.
- At this time, they are preparing. The pattern from the napkin is cut out neatly along the contour.
- Dipped in water, separate the layer with the picture. They dry him up.
- An adhesive composition is applied to the base. From above apply and align the workpiece. Remove bubbles and bumps. Top with glue.
- After the next break, several layers of varnish are created.
Important! If an air bubble is too large, it is pierced in the center. Irregularities are removed by movements from the edges to the middle.
Training
Before learning decoupage for beginners step by step with a photo of a bottle, you need to clarify the following points:
- This technology is suitable for the application of different materials. But when working with a specific project, the masters take into account the features of the foundation. From a tree, for example, “zero” sandpaper removes the smallest villi.
- To simplify the task, you can purchase a special kit. In the distribution network you can find special cards in different styles, sets for plates and other products.
- The appearance of new specks in the process of work should be excluded. High-quality brushes are used for applying paints and other technological compositions. Experienced professionals prefer natural hair.
- According to the complex of consumer characteristics, adhesive and coloring compositions, varnishes and acrylic-based primers are better suited.
Important! It is easier for a beginner to understand the nuances of technology if you purchase decoupage cards on thicker paper.
assistive technology
The following professional techniques are used to obtain special aesthetic parameters:

Related article:
The correct application of this technology, described in the article, will be useful for creating products with unique aesthetic and functional characteristics with your own hands.
Project implementation
It is easier to understand the important details if you study a few practical examples.
This option is good for beginners. The base is durable and smooth glass. Such a surface is not difficult to clean from contamination.
To create such products, the following decoupage technique for beginners is used step by step, with a photograph of the bottle:
- It's easier to experiment with empty containers. Remove labels and decorative coatings, traces of glue. To remove fat, wash with soapy water.
- After drying, acrylic paint is applied in two layers with a technological break. The exact time intervals, temperature drying conditions are set in the instructions of the manufacturer of consumables.
- The prepared workpiece with a pattern is attached to a varnished surface. If a gap has formed, the parts of the image are connected into a single whole with a needle. Irregularities are eliminated with a wide dense brush in the direction from the central part to the sides.


Useful advice! It is not difficult to make sure that carefully selected details help to create a quality image. In addition to the main picture, you need to prepare in advance the appropriate accessories.
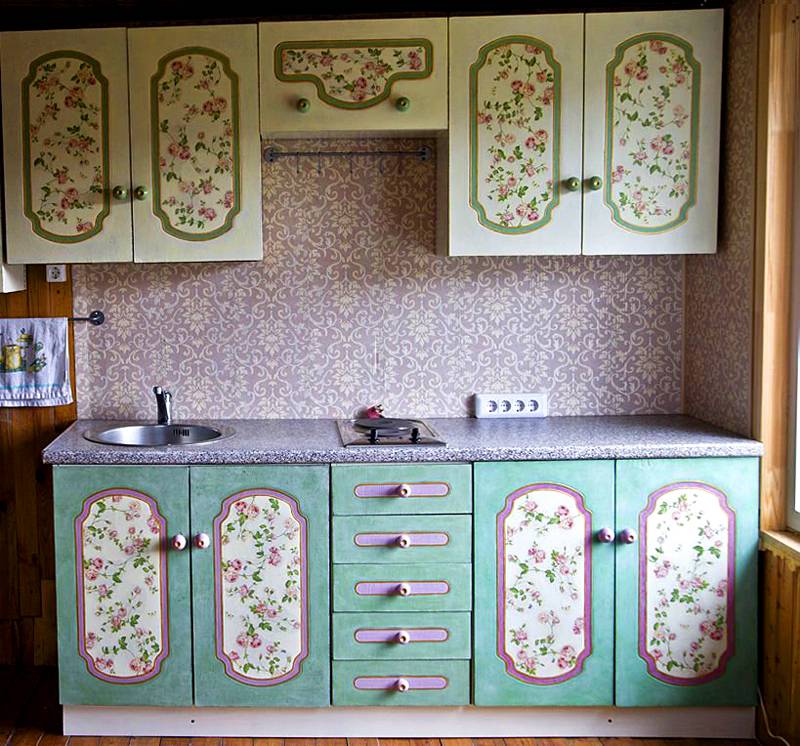
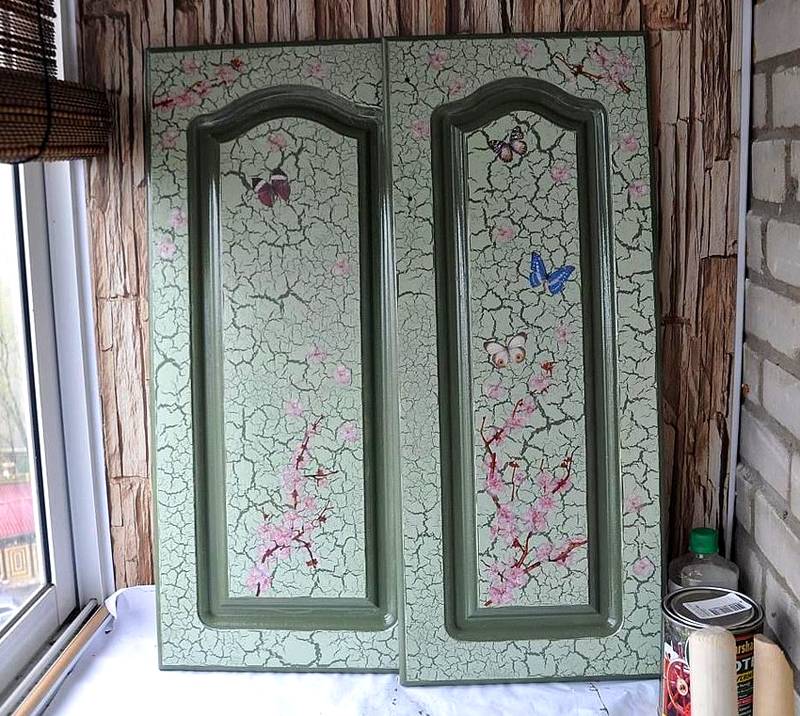
Decoupage furniture in Provence style, master class
Some ultra-modern pieces of furniture are created overly simple. Therefore, it is very difficult to part with old high-quality products.

This style is appropriate for the interiors of different rooms. It is characterized by soothing pastel colors, pleasant motives of the French province, softness. When performing furniture decoupage with do-it-yourself napkins, the following sequence of actions is used:
- First, all functional defects are eliminated. If necessary, dismantle the doors, other parts of the structure.
- Using sandpaper, not only eliminate irregularities. It is useful for creating artificial scuffs that mimic the old look.
- All wooden surfaces are painted. Brown tones are used for the side walls. The facade is made white so that color distortions of the picture do not occur.
- Drawings are cut out of prepared napkins. Attach them to the adhesive composition by analogy with the methods discussed above.
- The surface of the furniture is well protected. Lacquer is applied more than 10 times with drying. After every 3-4 layers, the surface is polished.
Two contrasting paints are used to create "scuffs". First apply a dark color. The necessary places are rubbed with a paraffin candle. Then dyed in a light tone. After drying, the hard side of a household dishwashing sponge is wiped over the surface to develop the first layer. The final coating is created from several layers of varnish.
Related article:
The article details how to create inexpensive and beautiful flowers from corrugated paper with their own hands, which do not fade with time and can be stored for a long time.
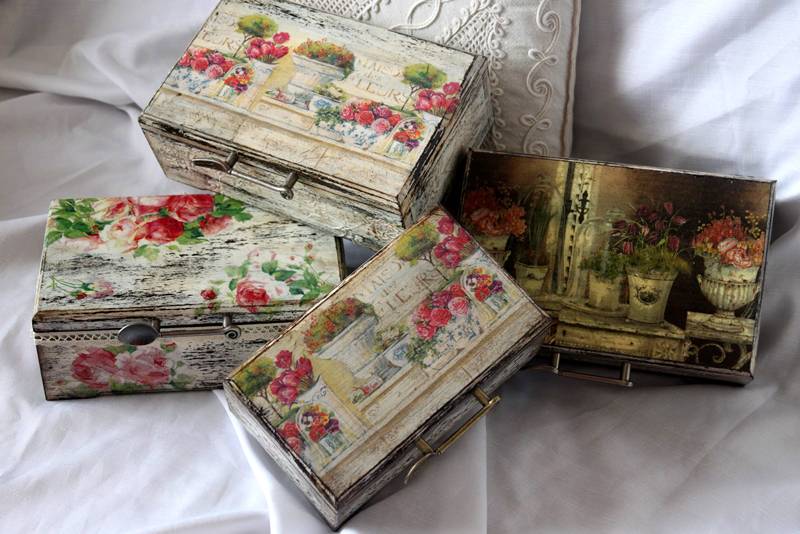
Shoe box decoupage technology, master class
This utilitarian product can be transformed into a beautiful box for cosmetics, sewing supplies, and other household items. It should be remembered about the limited strength of the cardboard, its low resistance to wetting with water. The following tips will prevent mistakes:
- The inner surfaces are painted in light colors. It looks pretty and makes it easier to find small items. The paint is diluted to such a consistency that it is not difficult to apply it with filling all the cracks.
- The outer surface is created in a color that matches the aesthetics of the blanks.
- When transferring a large image, it is cut into small parts. Try to use uneven lines.
- Instead of specialized ones, it is permissible to use other adhesive compositions. You just need to check in advance. Some manufacturers add ingredients to PVA glue that change color after drying.
Application of decoupage from napkins on transparent glass for beginners step by step with a photo
This table describes the methodology in more detail.
| Picture | Explanations |
 | Clean and degrease glass jars. Select napkins. It is necessary to prepare large and nail scissors, several brushes. Primer is not required. Instead, the products are covered with white acrylic paint. |
 | While it dries, cut out drawings from a napkin. It is easier to work with specialized decoupage cards. The reverse surface of the blanks is lubricated with an adhesive composition. |
 | After fixing on the jar and removing irregularities, glue is applied again. |
 | From above, the products are varnished and placed in. There, heat treatment is carried out at a temperature of approximately +160°C. Only after cooling - install the covers. For the main background, different color shades are used. |
Technology Use Cases
Below are projects implemented using decoupage:


Finding more information on the Internet is not difficult. If necessary, you can quickly find the decoupage of bottles with tights with a master class, or other relevant information. But we must understand that it is not easy to repeat the skillful actions of the master with your own hands.
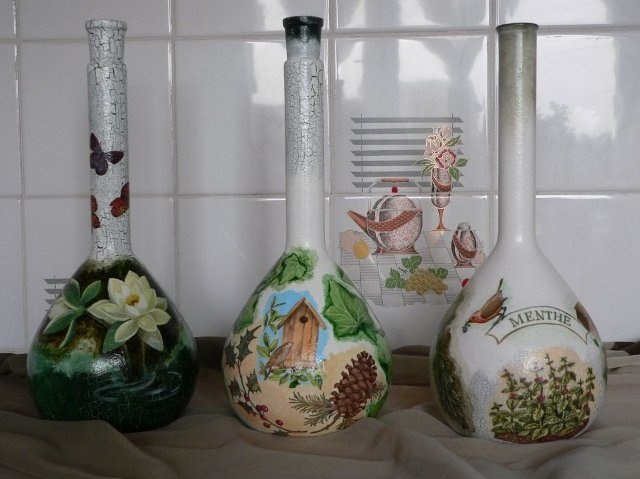
The essence of this creative process is to cut out various figures and decorate them with a variety of objects. Decoupage of bottles for beginners step by step with a photo clearly shows this whole fascinating process. You can decorate not only bottles, this technique is often used to decorate dishes, vases, kitchen utensils, furniture, and in general everything that catches your eye. Decoupage of bottles is often performed for the holidays or as a gift for various celebrations.
Napkin decoupage of bottles: a master class step by step
The most popular decoupage of bottles with napkins.
The paper has good adhesive properties, and it can be glued to almost any surface. Napkins - the material is very thin, and the presence of various colors and patterns on them allows imagination to run wild.
Before starting work, you must prepare all the necessary materials. The most important thing is to find a suitable bottle, it should be flat with smooth curves. Napkins should be three-layer, various magazine clippings will also come in handy. Acetone is suitable as a degreasing agent. It is necessary to glue all decoupage elements on PVA glue.
Decoupage bottles master class step by step:
- First of all, you need to prepare the bottle for decoupage, for this you need to get rid of the glued labels. You can do this by soaking the bottle in soapy water.
- After cleaning from labels and glue, it is necessary to degrease its surface with acetone or an alcohol-containing composition.
- The next step is priming the surface.
- After priming, it is necessary to cover with acrylic paint in an even layer and allow to dry.
- With a foam sponge, darken part of the bottle or its entire surface with acrylic paints.
- Now comes the decoupage process itself. Cut out a pattern from a napkin and separate it by removing the top layer with a pattern.
- On the bottle, in the place of gluing the picture, apply glue, and attach the picture, gently smear the glue on top with a brush.
- The final step will be the application of a layer of acrylic lacquer, and if the application is performed in several layers, then the decorated product can be washed.
In fact, there is nothing complicated in napkin decoupage, it is important to perform all actions carefully. This craft can be used to decorate the interior or present for a celebration.
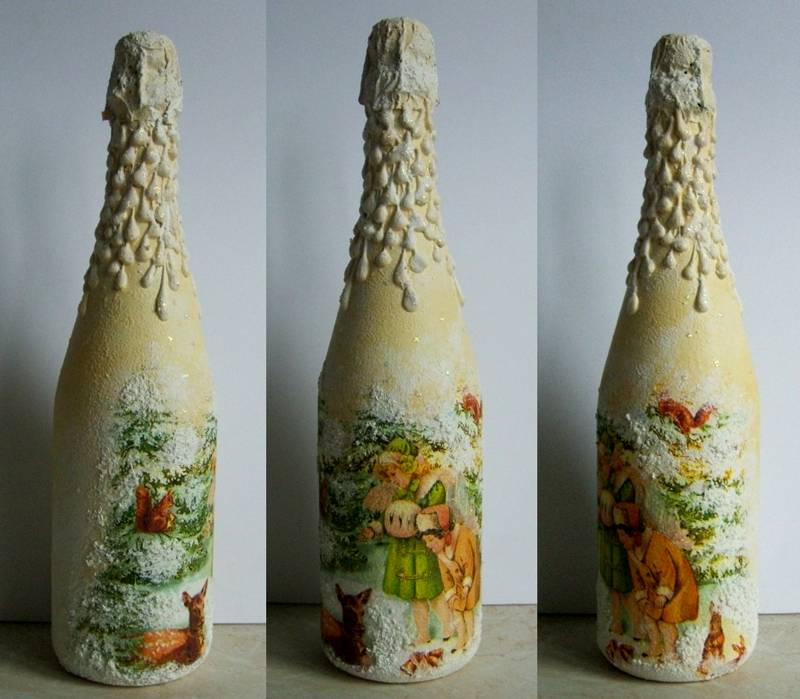
Decoupage bottles for beginners step by step with eggshell
No less popular is the decoupage of a bottle with eggshells. The method practically does not differ from napkin decoupage. The bottles look very original; you can also decorate vases, dishes or other items with eggshells.
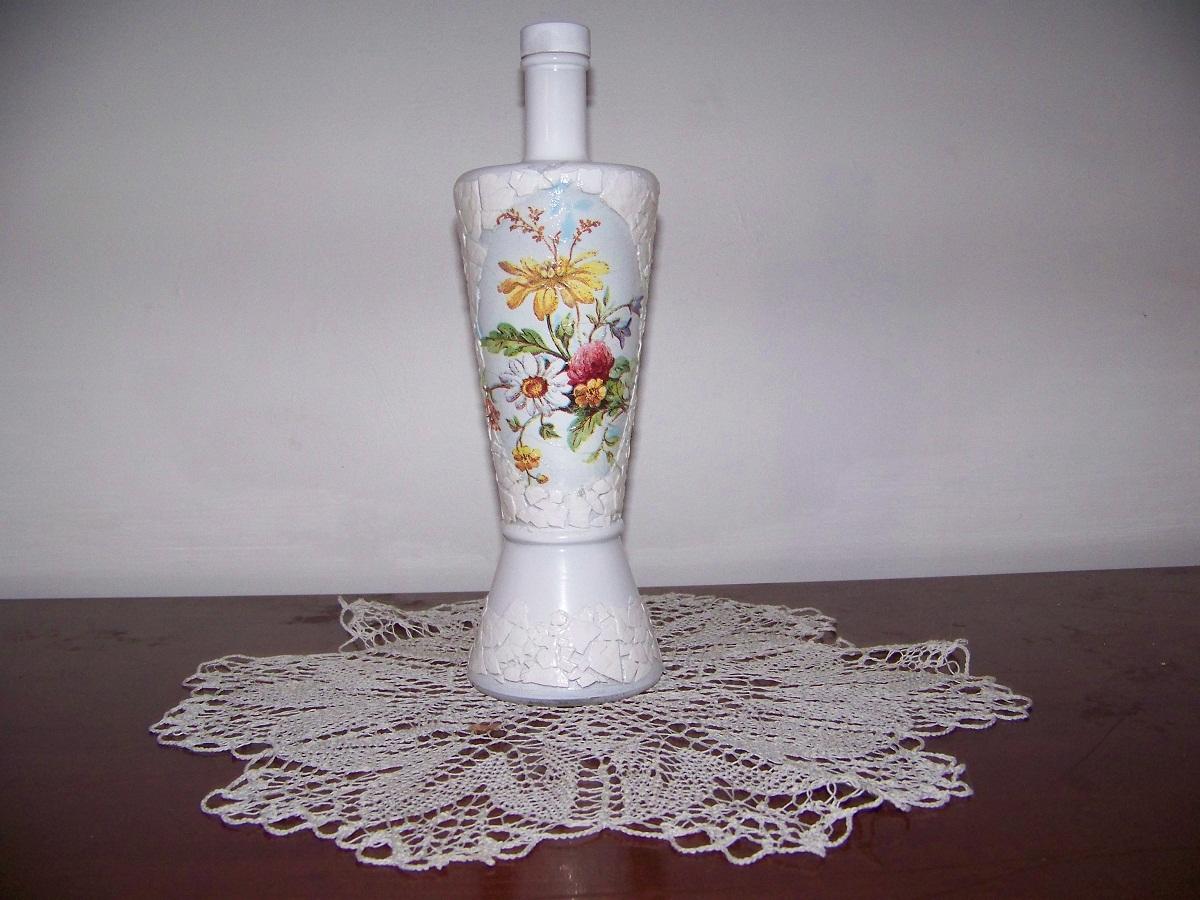
Decoupage for beginners step by step eggshell bottles:
- It is necessary to prepare materials: a bottle, egg shells, PVA glue, napkins, acetone, foam rubber sponges and brushes;
- Degrease the bottle washed from the labels with acetone;
- Apply a primer or acrylic paint in an even layer;
- Apply the base color with a sponge and allow to dry;
- Cut out the drawings you like from the napkin, and separate the top layer;
- Transfer the image to the bottle, and coat with glue;
- The egg shell must be prepared, washed, cleaned and dried thoroughly;
- Grind the shell to the desired pieces;
- Lubricate the surface with glue and lay out the shell mosaic with tweezers;
- After complete drying, the shell must be painted with a piece of foam rubber;
- To complete the decoupage, the bottle should be varnished in several layers.
Lubricate the picture with glue, you should act carefully. The finished product is able to decorate any interior. Also, such a bottle can be presented or put on a festive table.
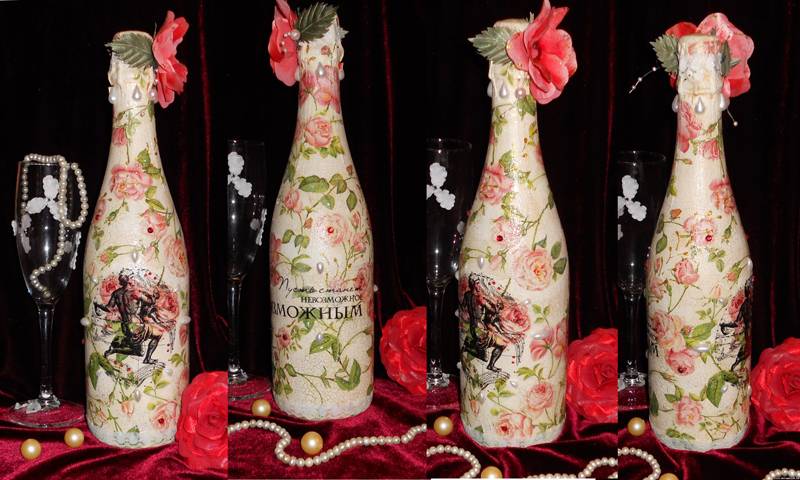
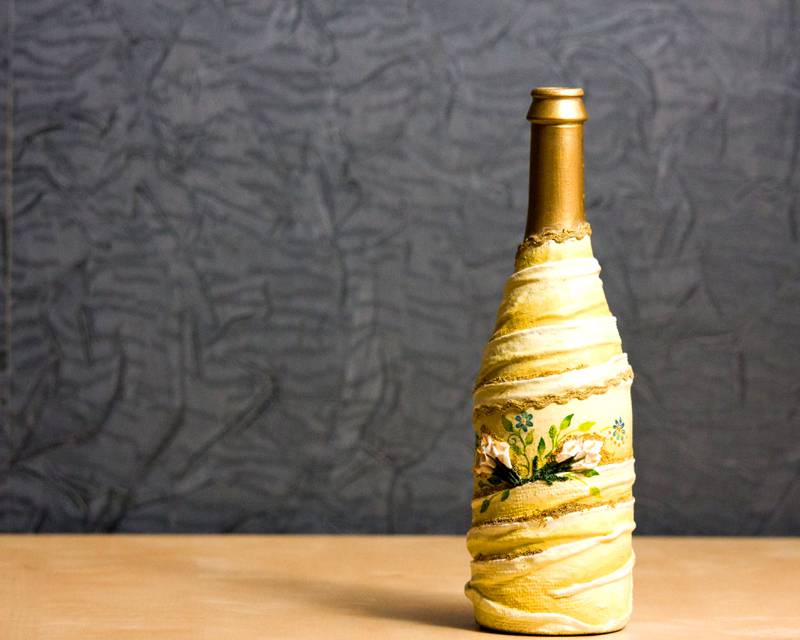
Fabric decoupage of bottles for beginners
You can beautifully decorate the bottle using different fabric shreds, and the thinner the fabric, the more elegant the decoupage folds will be.
Fabric decoupage of bottles for beginners is best done in combination with napkins:
- The first step is to prepare all the necessary materials: a bottle, chintz fabric, scissors, PVA glue, three-layer napkins, brushes and acrylic paints.
- The bottle must be thoroughly cleaned of labels and glue, this can be done by soaking it in soapy water.
- It is important to degrease the surface with acetone or alcohol.
- The next step is to think over the decoupage composition.
- The selected napkin pattern must be carefully cut off from the canvas.
- The drawing of the napkin must be attached to the product, and mark its edges with a marker.
- Chintz must be cut in random order in the form of strips.
- Strips of fabric must be soaked in glue diluted with water in a ratio of 3:1, i.e. the consistency of the glue should not be very thick, but not liquid. If the adhesive is initially quite liquid, then it is not necessary to dilute it with water.
- The fabric soaked with glue should be squeezed out a little and randomly glued onto the bottle, bypassing the area intended for the napkin.
- The bottle, pasted over with a cloth, should be thoroughly dried at room temperature.
- After drying, the fabric part must be painted with acrylic paint.
- After the paint dries, you can start gluing the picture from the napkin, for this the napkin must be divided.
- Spread the bottle with glue, and attach the image, then very carefully smear the surface of the napkin with glue.
The final step will be finishing staining with the desired shade of the fabric area and further application of acrylic varnish.
Lacquer can be covered in several layers to create a more resistant to moisture surface.
You can decorate with fabric in another way. Cut a piece of fabric into small pieces and glue without wrinkling. Further decoupage can be done with any decorative trifles, such as beads, rhinestones or shells.
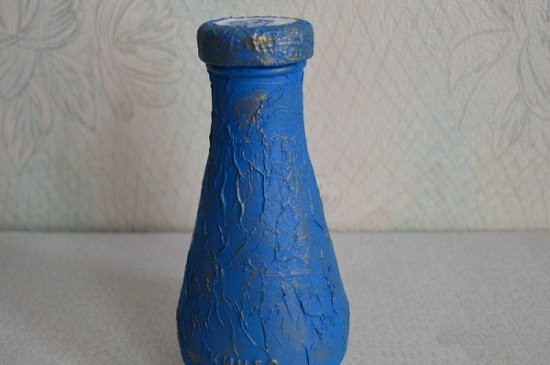
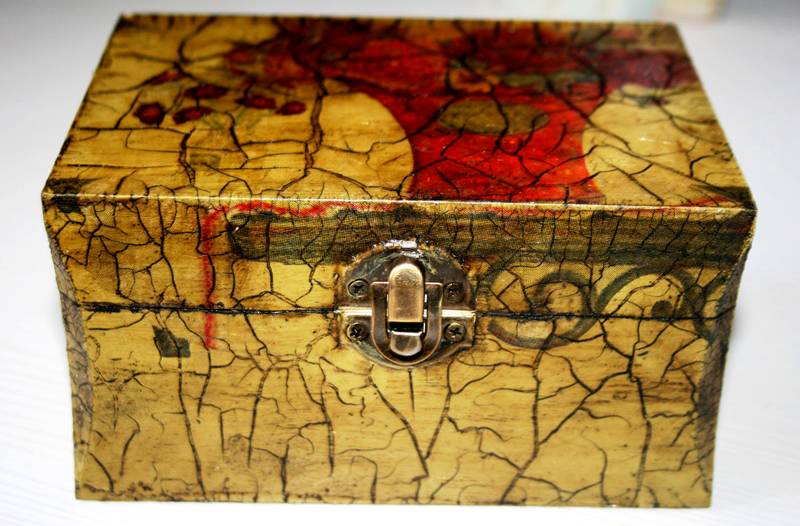
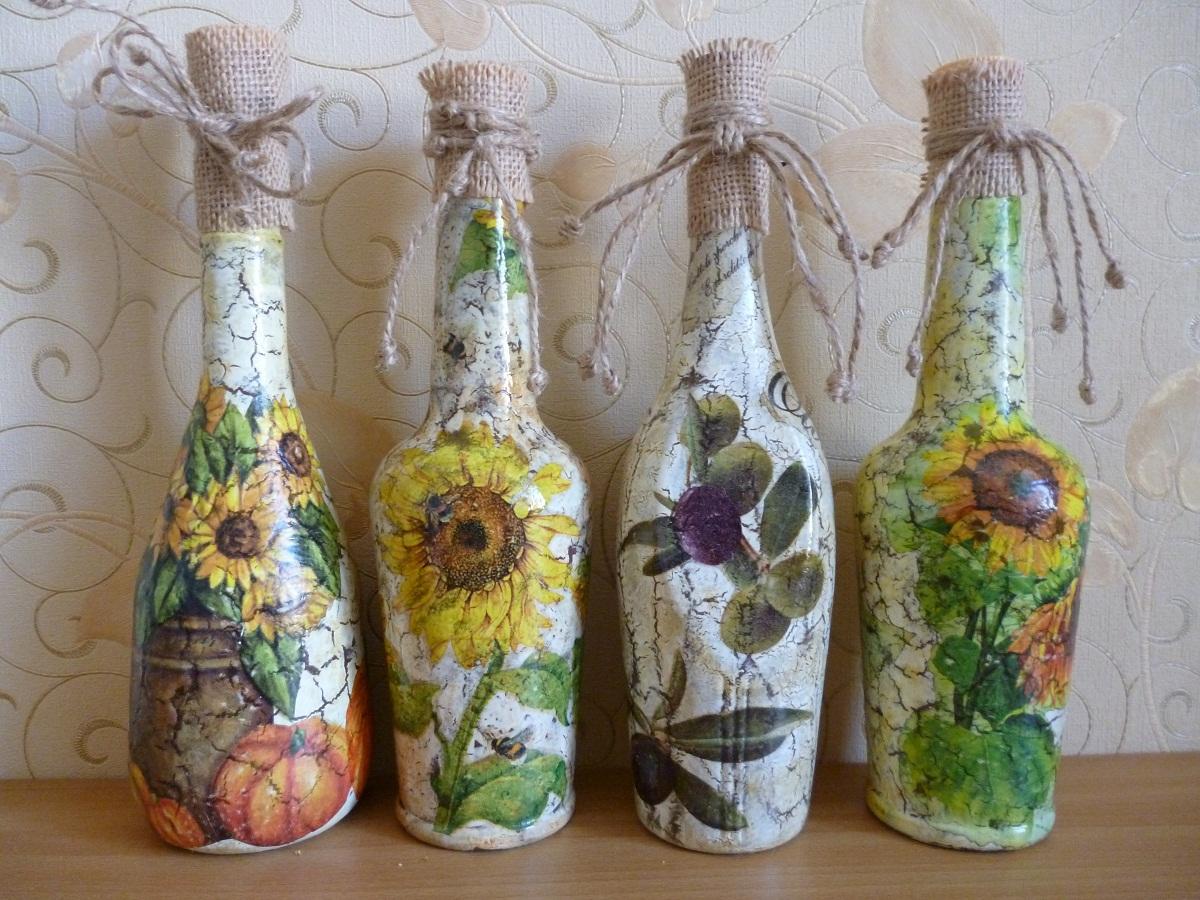
Craquelure: bottle decoupage step by step
There is another very interesting decoupage technique, in which the paint layer cracks, and it is called craquelure. To achieve this effect, a special varnish is used, which cracks after drying. Craquelure decoupage can be one-step or two-step, both of these types are simple and quite doable with your own hands.
Craquelure bottle decoupage - step by step instructions:
- The prepared surface of the bottle must be degreased;
- Paint the container in several layers with paint darker than the main drawing and let dry;
- Then apply craquelure varnish in an even layer, and allow the varnish to dry a little;
- Then another coat of paint follows, which is applied with a sponge, at this stage cracks become visible;
- While the composition dries, it is necessary to prepare a napkin, the pattern must be carefully torn off from the napkin, and the top layer should be separated;
- Glue the napkin to the bottle with PVA glue, and brush the pattern on top with a brush very carefully so as not to tear;
- The last step will be varnishing the surface with acrylic varnish in 3 layers.
A bottle decorated in this way has a decorative, artificially aged look. Craquelure decoupage is relevant for interior decoration, made in various classic styles. Not only bottles can be decorated with craquelure, watches made in this style look very interesting. Often, plates, vases, wooden utensils and many other items are decorated with craquelure.
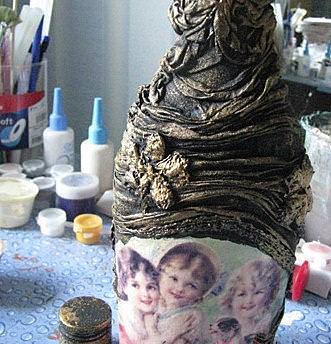
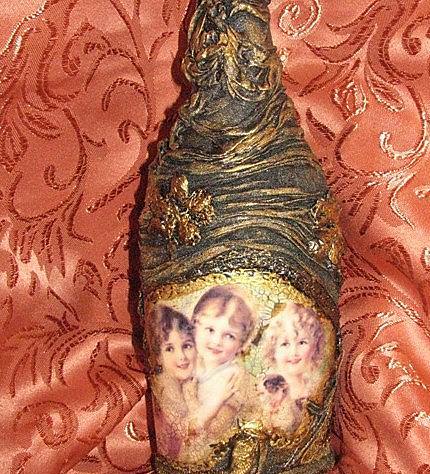
Bottle decoupage lessons for beginners: decorated with toilet paper
You can decorate the bottle with the most unusual materials, one of them is toilet paper. Of course, this material is very specific, however, in the completed work, no one will even guess about its use.
Decoupage lessons for beginners bottles decorated with toilet paper:
- This method requires all the same materials as in napkin decoupage, and some toilet paper;
- It is necessary to clean and degrease the surface of the bottle;
- The surface must be primed and painted;
- Glue the motif of the napkin and smear it with a brush;
- The part of the bottle free from the napkin must also be well smeared with glue;
- Small pieces of toilet paper are draped over the surface of the bottle in random order and left to dry completely;
- Before you paint a layer of toilet paper, you need to varnish the picture;
- Paint toilet paper with acrylic paint;
- Coat the finished composition with varnish.
Decoupage bottles for beginners step by step (video)
Ready decoupage does not give out the materials of its manufacture. The bottle looks very elegant and can decorate a festive table or the interior of an apartment.


