How to make a vase from a three-liter jar. Vases from plastic bottles
Beautiful vases with flowers serve as decoration for the interior of the room, bringing bright colors and zest to it. You can buy a suitable vase in a ready-made form in a store, or you can use all your creativity and make a vase from a glass bottle yourself, guided by the ideas in this article. Crafts that were made by hand are always especially expensive and memorable. They will not only serve as an excellent element of interior decor, but also give warm positive emotions to the whole family every day. we already wrote about, now let's see what can be made from glass.
In order to make beautiful vase, you can use a glass bottle of any shape and color. For example, here is a master class "", with which such bright vases are made, as in the third photo above. A vase can be made with a narrow neck, designed for one small flower, or at the stage of preparing the bottle, pre-cut off the neck. How to do this at home with improvised means will be discussed below.
In order to carefully get rid of the bottleneck, you need to prepare the following materials and items:
Thick woolen thread;
Solvent (you can also use acetone, kerosene, alcohol, gasoline);
Gloves and goggles for safety purposes;
Matches;
Basin with water;
Sandpaper or stone for sharpening knives.
Next, you need to mark a cut line on the bottle. The woolen thread is unwound so long that it is enough to wrap the bottle three times around its axis. Then it is necessary to moisten the thread in the solvent, quickly wrap the bottle around it three times in the place where the cut is planned, set it on fire and wait until it burns out. The bottle should be held so that it is in a position parallel to the ground. Next, the bottle quickly falls into the basin with cold water. From a sharp drop in temperature, the neck itself will break off in the intended place. The last stage is the processing of a sharp edge with sandpaper or a stone for sharpening knives. The second option is better to carry out in the water.
How to make an original silver vase from a glass bottle
First you need to remove the neck from the bottle in the manner described above and prepare everything you need: a can of silver paint, woolen thread, paper napkins, PVA glue, rhinestones and beads, scissors, cotton buds, transparent moment glue, a ribbon for decoration.
Napkins should be cut into 4 parts, apply PVA glue to the future vase and carefully glue all the napkins in turn, while on each napkin it is necessary to create special recesses where beads and rhinestones will be glued later. This is done with a cotton swab. It must be applied to the center of the napkin and scrolled around its axis. When the bottle is completely glued in this way, it must be left to dry for 4 hours. Then you need to stick patterns from pieces of woolen thread with PVA glue. Once dry, the vase is ready to be spray-painted with the appropriate color. Finally, after 45 minutes, you can decorate the vase with rhinestones, beads and a ribbon using Moment's transparent glue.
Vases from glass bottles with a knitted cover
This option will especially appeal to those who know how to knit beautifully. To implement this method, it is necessary to knit a beautiful cover for a future vase that matches the style and interior design of the room. Such vases create a feeling of warmth and comfort in the house.
However, if you do not know how to knit, do not despair. You can create amazing vases using multi-colored knitting threads by winding from the base of the bottle to the neck. To create an even more beautiful effect, you can also put a variety of beads on the threads.
How to make a glass bottle vase using crepe paper
In this case, it is necessary to cut a multi-colored corrugated paper into pieces and stick on a transparent glass bottle, using PVA glue with water in a 1: 1 ratio. Pieces are glued in several layers, the glue will not be noticeable after drying. The finished vase can be decorated with other elements to taste and varnished.

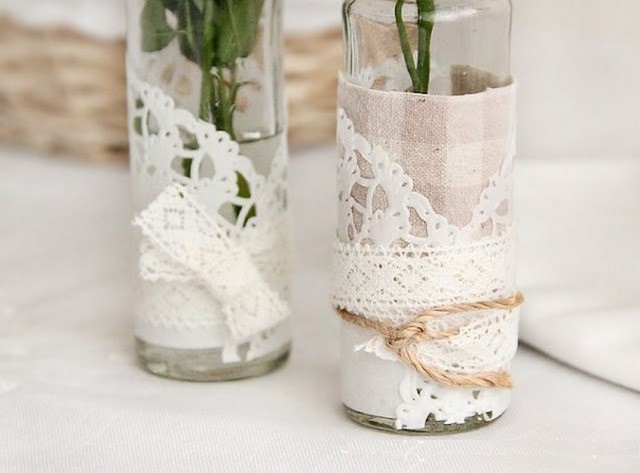
Glass bottle vases decorated with fabric and lace
If you have beautiful pieces of fabric with an unusual ornament, original lace and actual glass bottles, then you should not throw them away. All this can be put to good use in creating truly amazing handmade masterpieces. It will be enough to carefully glue them with PVA glue on the bottle.
Whatever the way to create such a craft, the main thing in this business is desire and creativity. Be sure to think in advance which of the options is the least difficult for you in terms of implementation. It is worth starting your first experiments with it. The main thing is that the result of the work looks beautiful and harmonizes with the interior of your home.
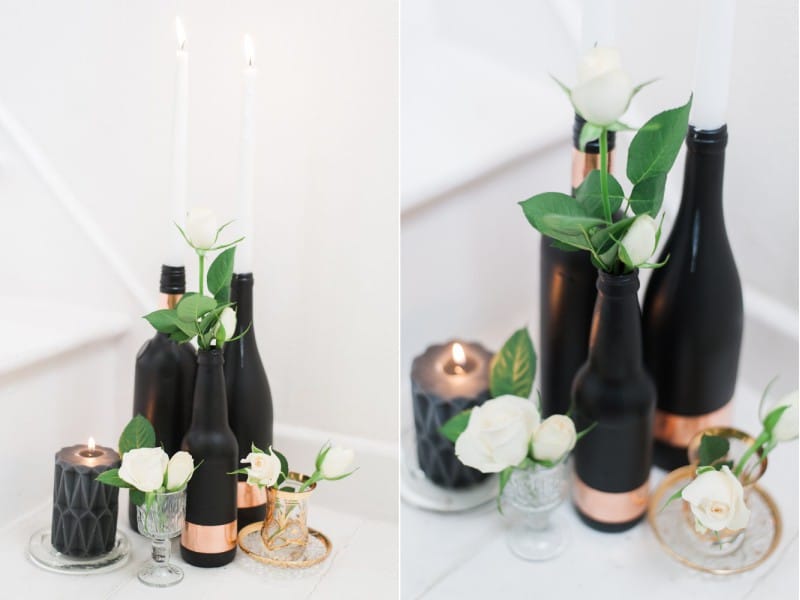
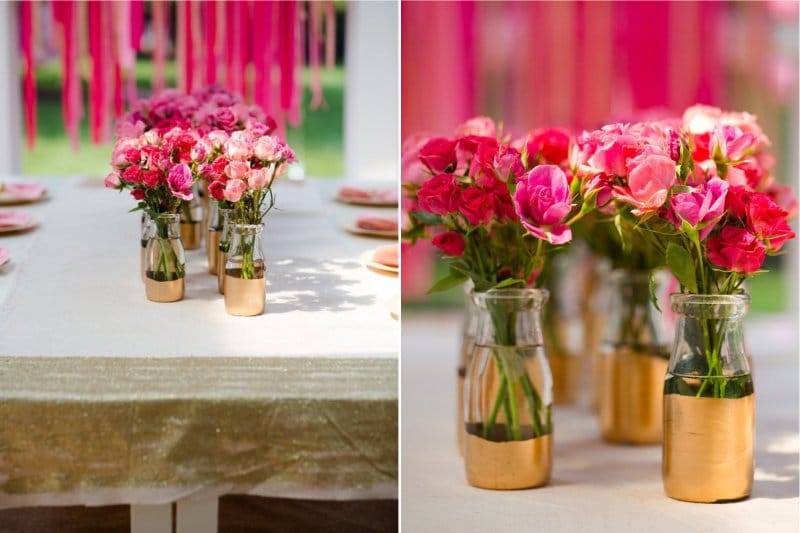
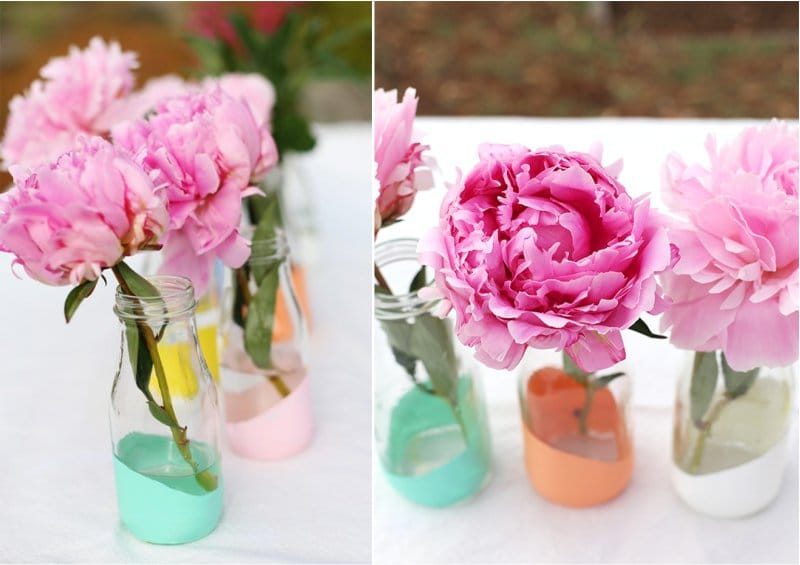
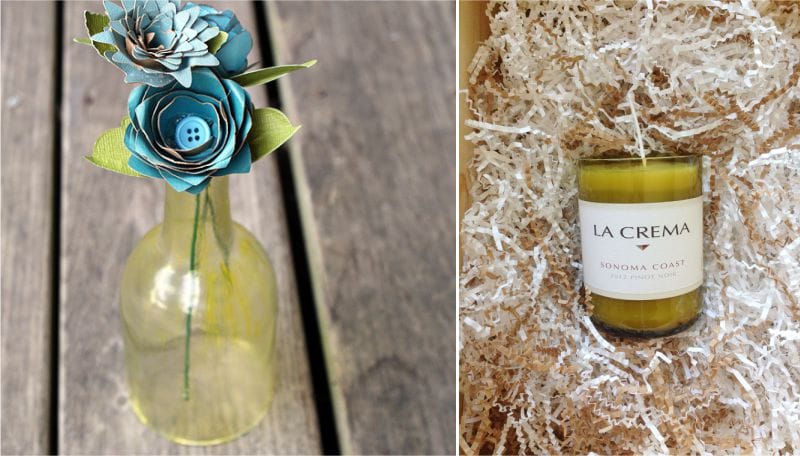
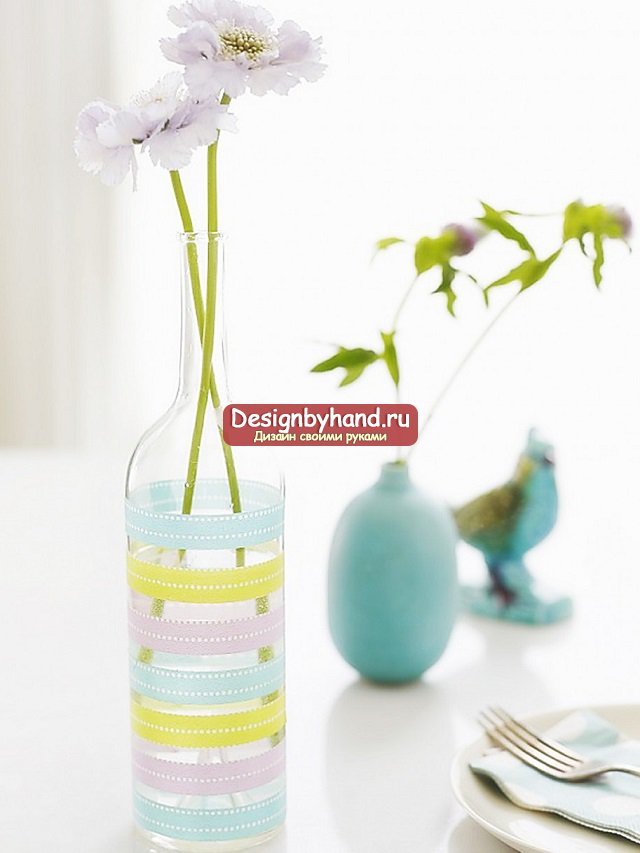
Glass bottles from wine, cognac, champagne, milk, oil and even beer are excellent materials for making DIY flower vases. Painted and decorated vases and vases can decorate not only dinner table and shelves in the house or in the country, but also serving at a wedding or a party, and you can also make a wonderful gift from decorated bottles.
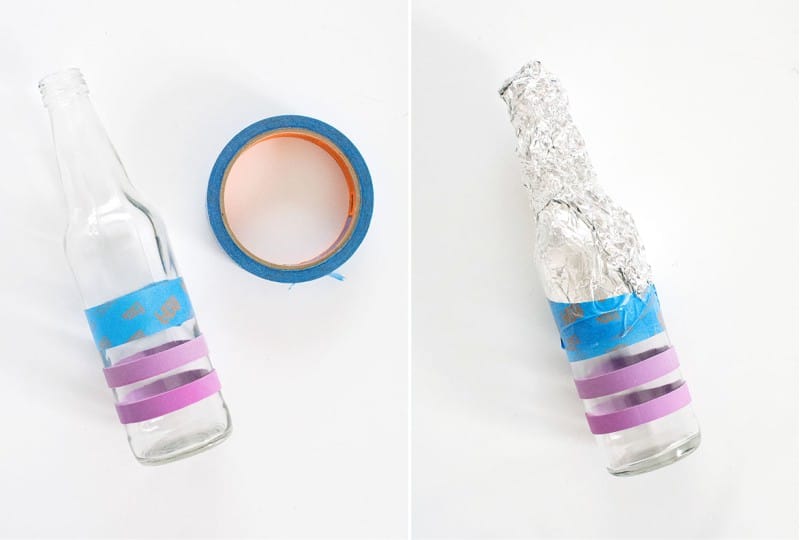
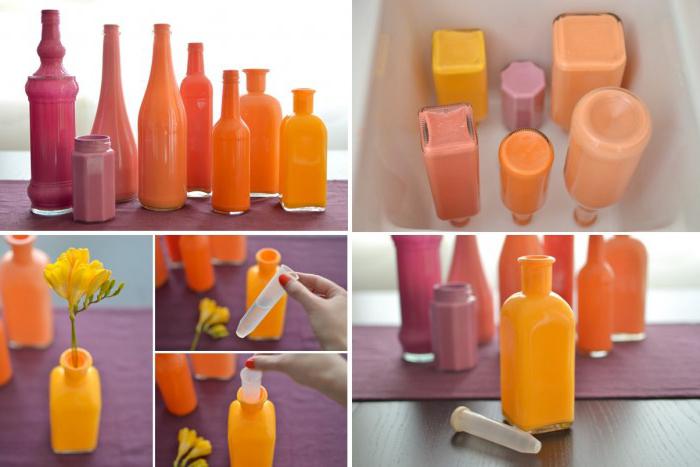
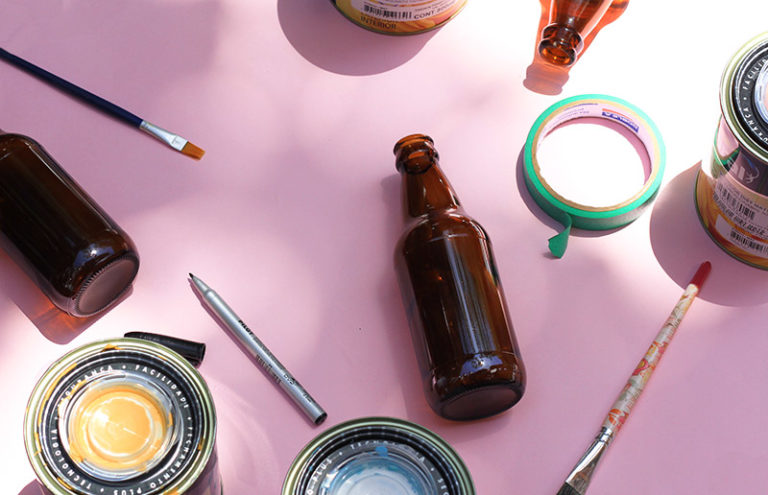
Master class number 1: Stylish and simple
For such a painting of bottles, bottles of any shape and color of glass are suitable, in this master class transparent bottles for milk are used.
Materials: for degreasing - acetone or alcohol, as well as cotton pads, for painting - acrylic paints in jars or spray cans (better for glass and ceramics), a nylon brush, as well as masking or regular tape of the desired width. Rubber rings can be used instead of tape. If you're using spray paint, foil, cling film, or plain paper may come in handy.
Instruction:
- We prepare the glass - we remove the labels, wash the glue, wipe the bottles dry, and then degrease the surface with nail polish remover or ethyl alcohol.
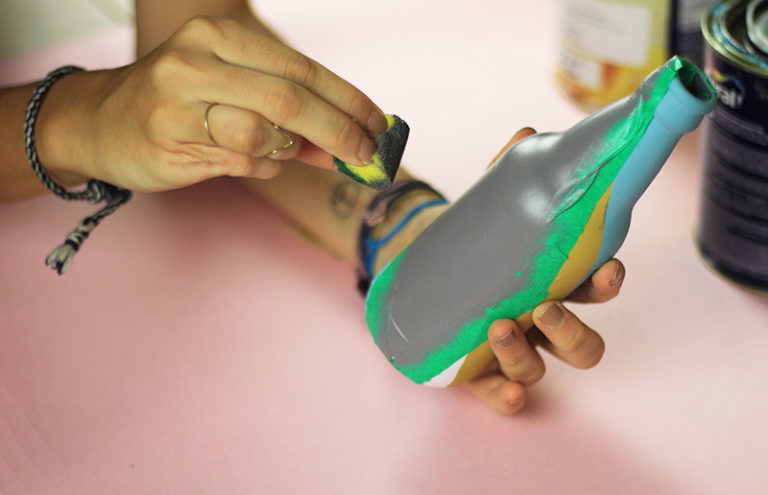
- We glue the future vase with adhesive tape, forming a pattern: stripes of different widths, zigzags or a spiral. Scotch tape plays the role of a stencil here.
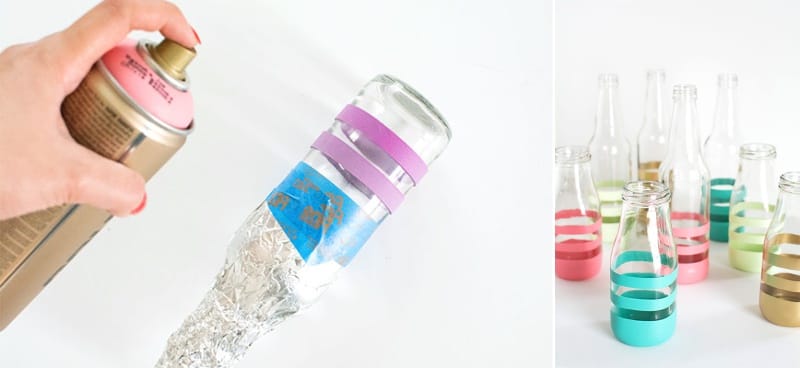
- We start painting the vase in the right places.
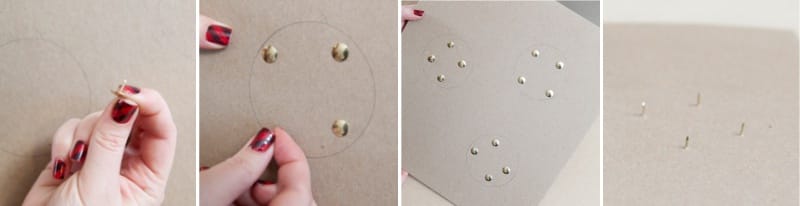
Tip: if the paint requires baking in the oven, then consider in what position the painted bottle will dry. So, if you cover both the bottom and the neck with paint, then it will be problematic to dry the vase, but you can make a design from thick paper and buttons as shown in the photo below.
- The drying method depends on the paint you choose. The manufacturer, as a rule, indicates the required baking temperature (if required) and time. Baked acrylic paints dry for about half an hour in an oven at a temperature of 170 degrees, and then it is advisable to leave the bottles to dry naturally for 1-2 days to make the coating as durable as possible. The spray paints that were used in this master class do not need to be baked, but they dry in 24 hours.
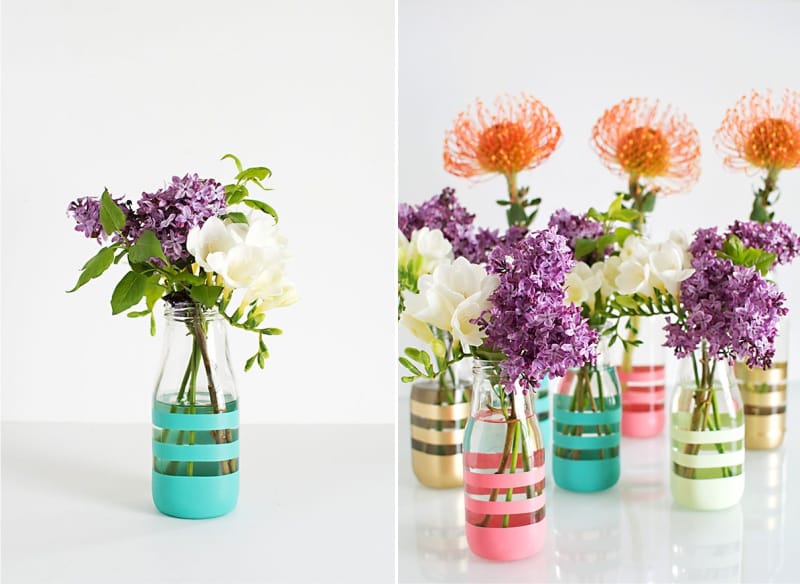
With the help of this master class, you will be able to come up with the most different designs by playing with the color, width, and placement of tape or rubber bands.
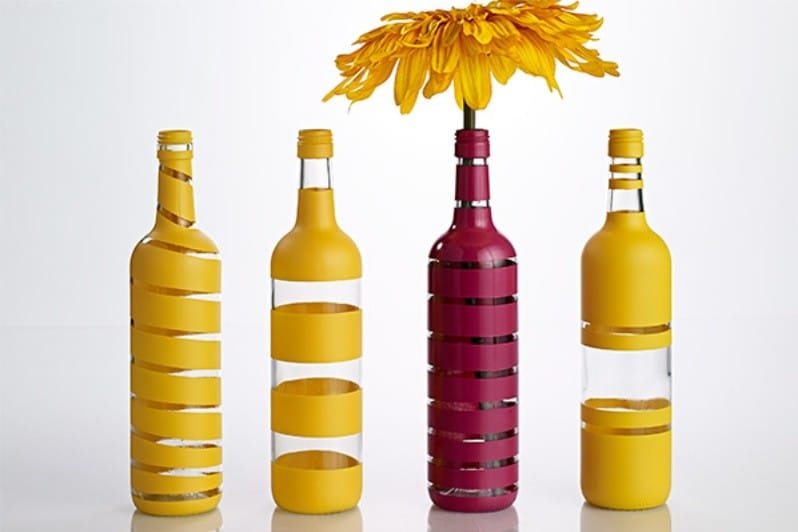
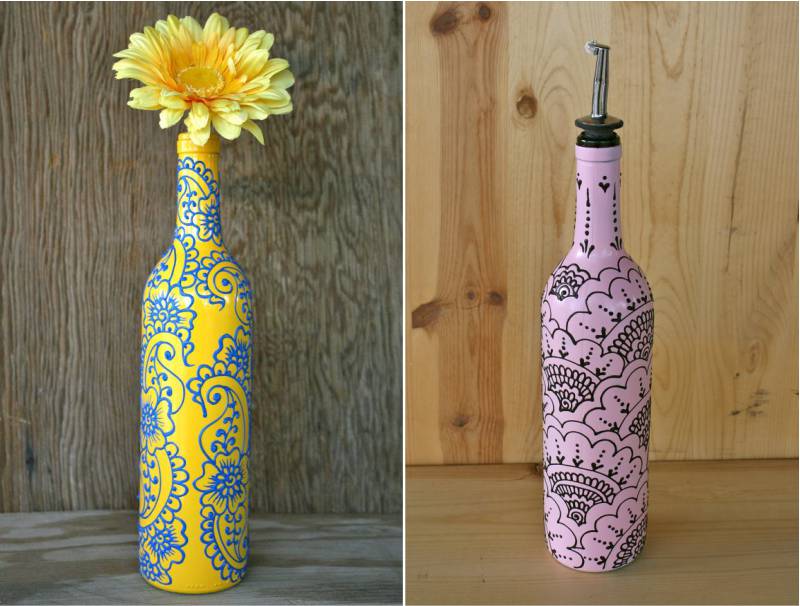
For example, you can use unusual shades - bottles painted in delicate pastel colors or gold or silver paint look very impressive. Take a look at the following selection of photos - these are the colors that are best suited for decor glass bottles for wedding or party decoration.
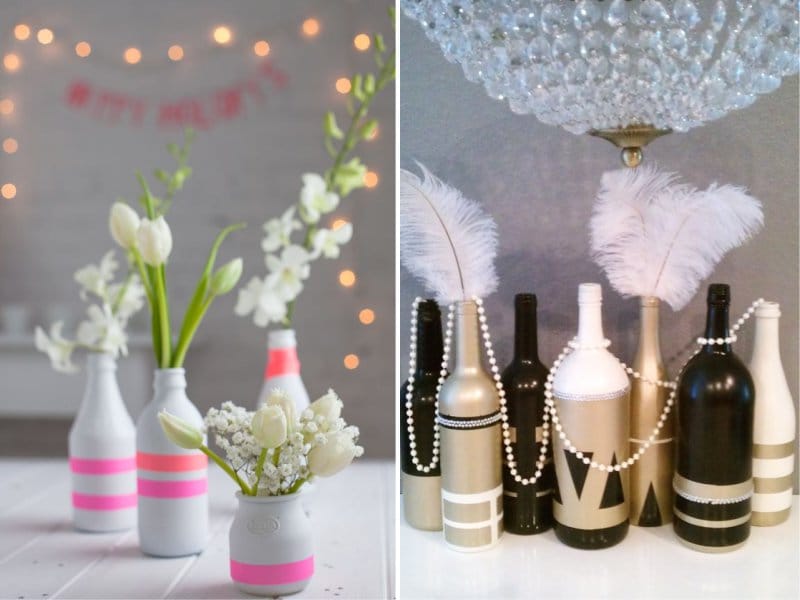
And here's another one original idea- by pulling an elastic band or sticking adhesive tape diagonally, you can only paint over the bottom of the bottle.
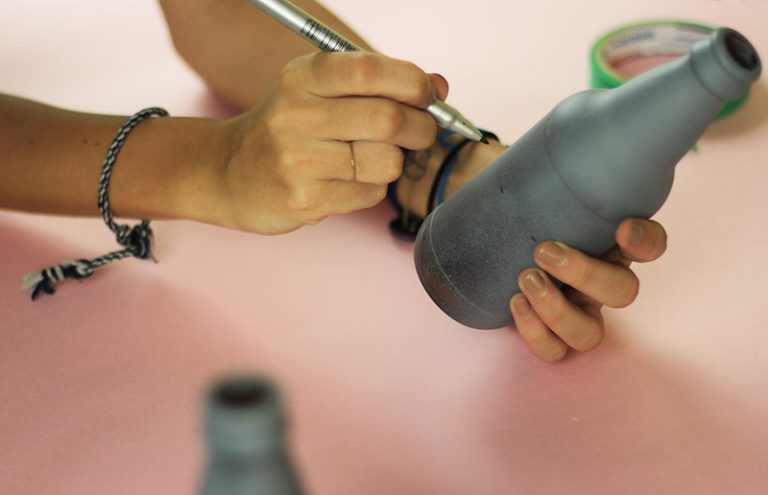
Master class number 2: Painting a bottle with contours
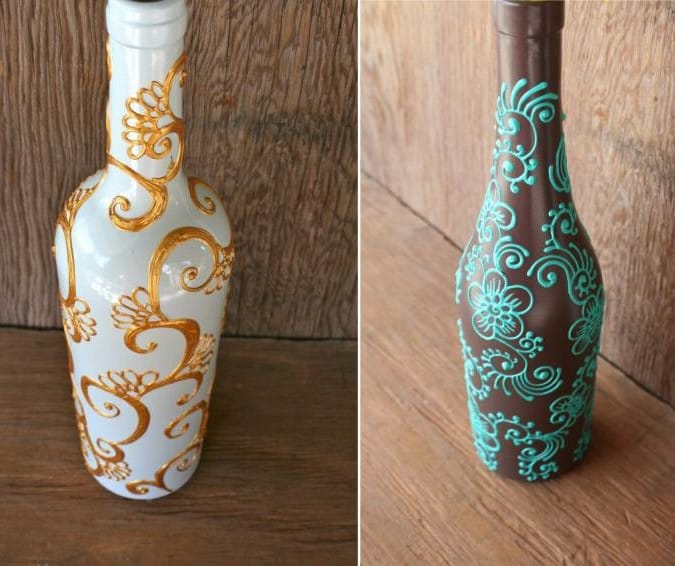
And now let's proceed to a more complex and lengthy, but very beautiful way of decorating bottles with our own hands - painting with volume contour paints. With their help, you can draw patterns and ornaments in ethnic style, apply a complex and simple drawing or write beautiful inscriptions, monograms, initials (photo below).
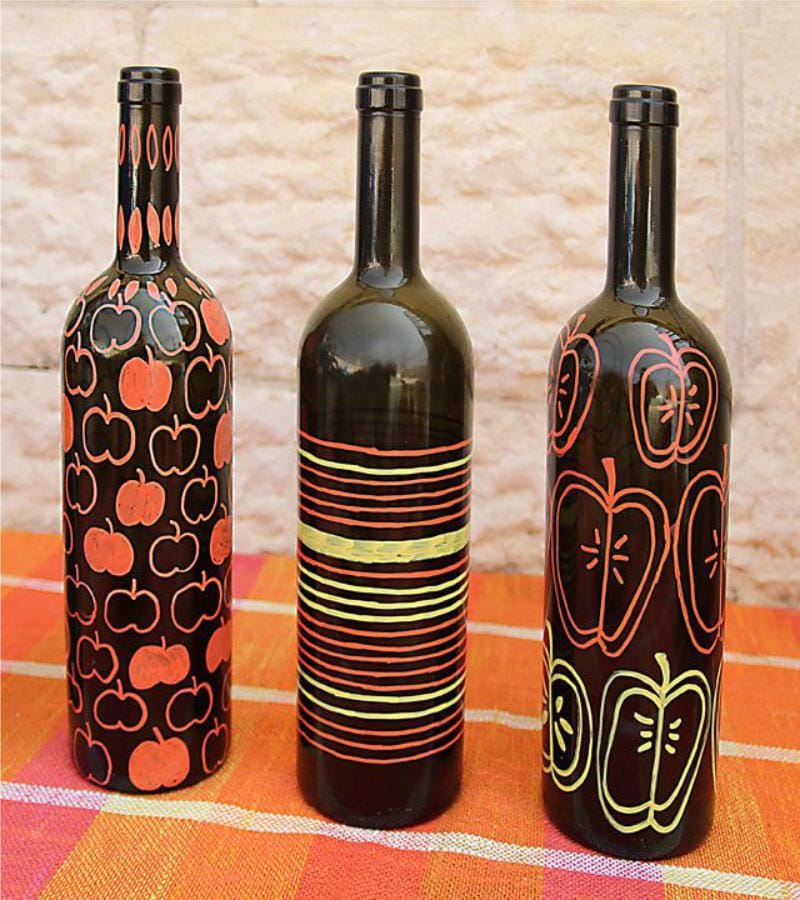
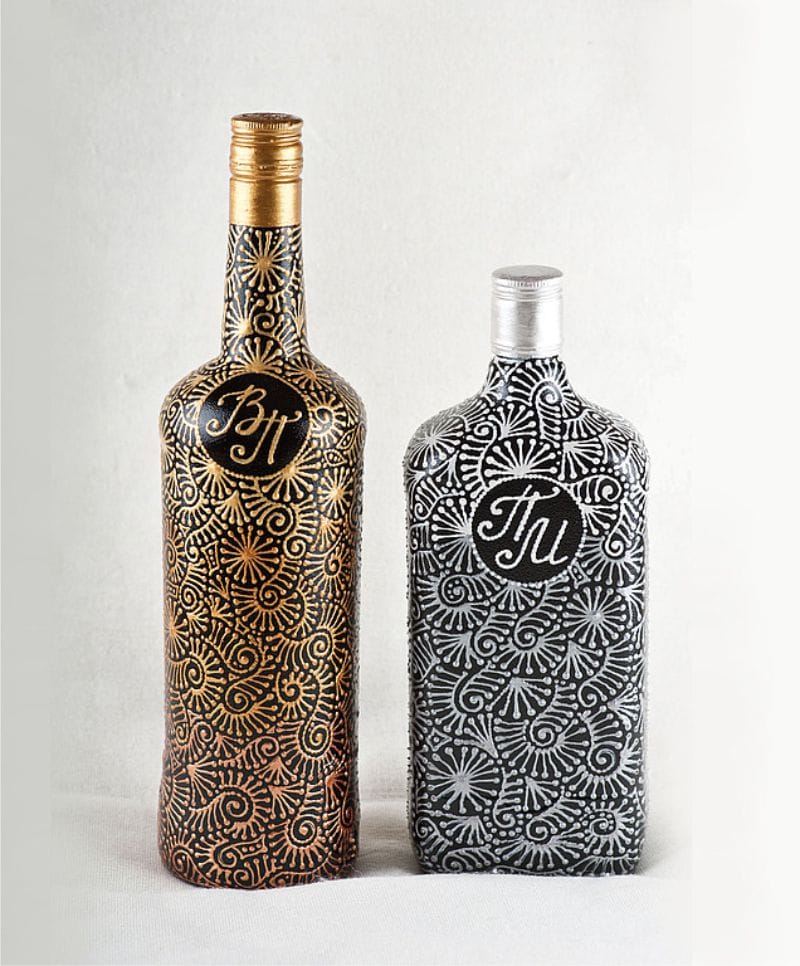
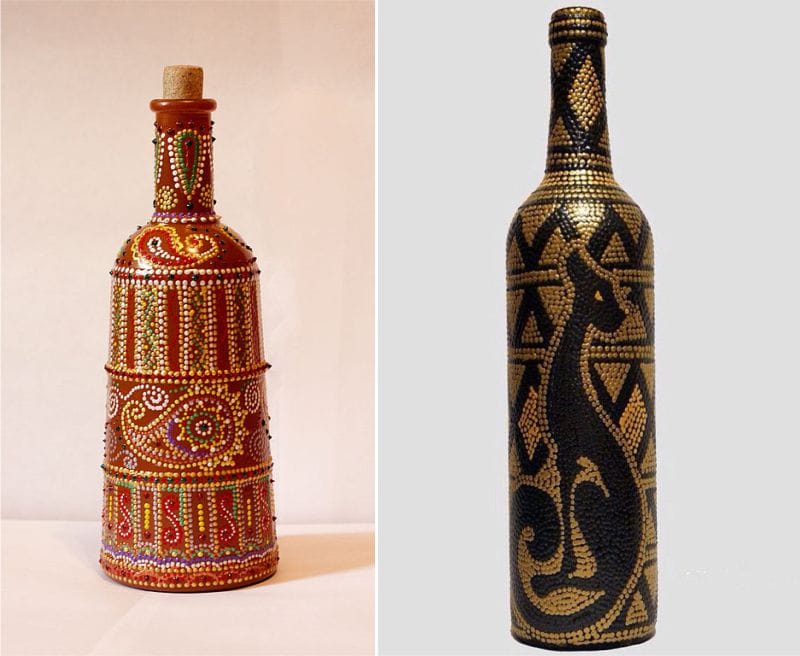
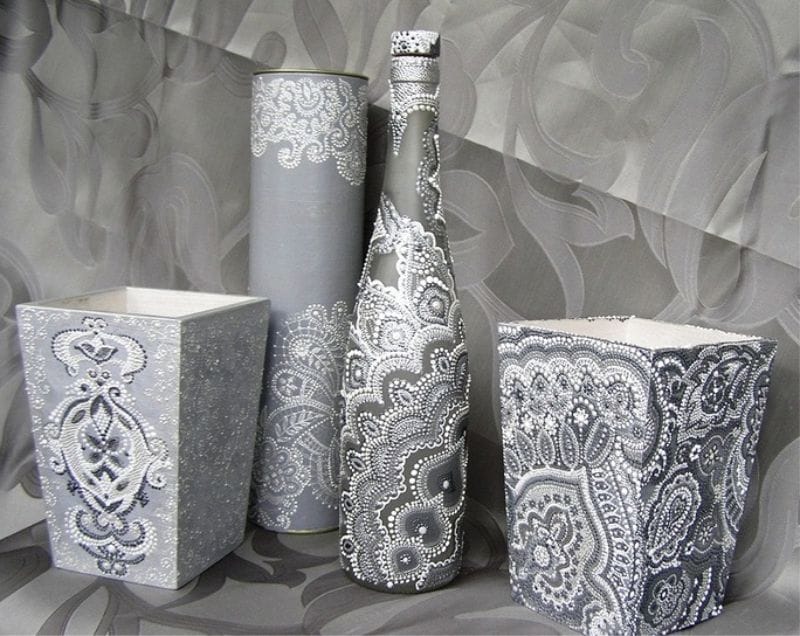
You can also draw with contour paints using the dot painting technique as in the photo below.
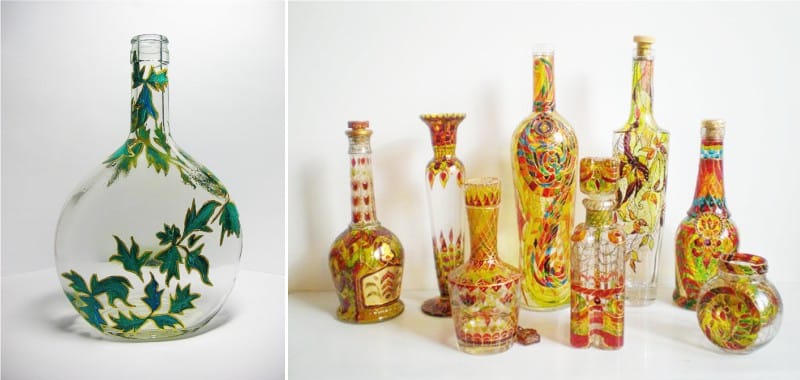
And in combination with stained glass paints, contour painting will turn into stained glass.
Also see our other articles:
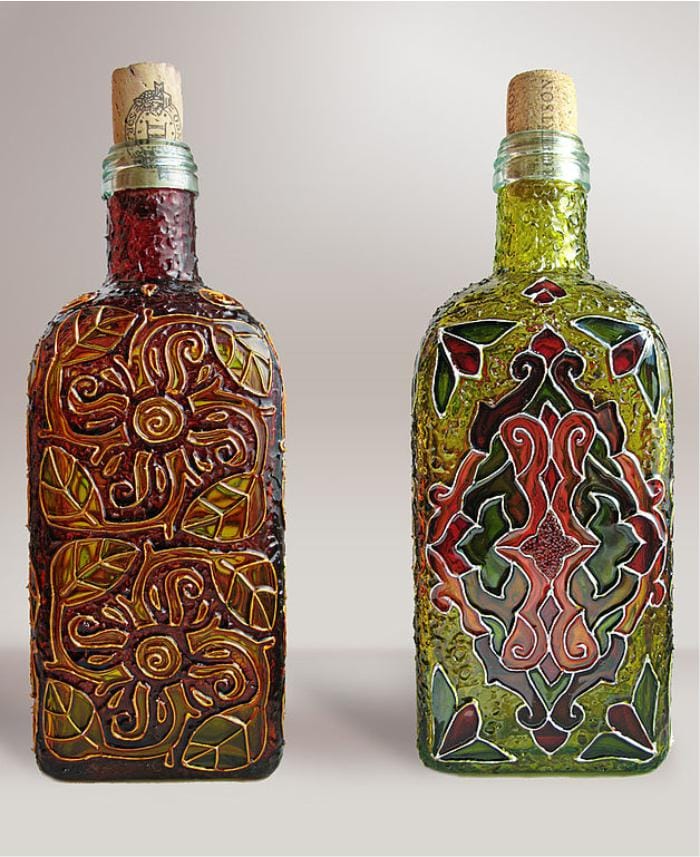
Materials: any alcohol-containing degreaser, cotton pads and sticks, a needle and contour paints. If desired, the painting can be supplemented with sparkles, as well as acrylic and stained glass paints, as in this master class.
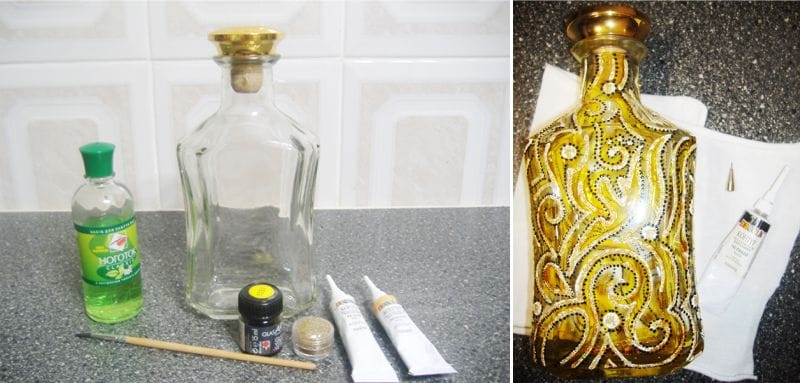
Tip: if you do not have contour paints or drawing with them seems difficult to you, then you can draw with the help of improvised means: toothpicks, needles, cotton swabs or a thin brush.
Technique:
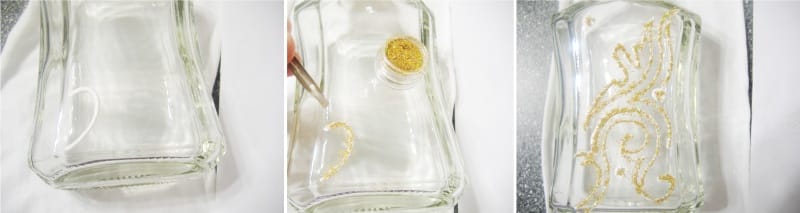
- First we need to come up with an idea and prepare a supporting sketch. It can be found on the Internet and printed in a suitable size or drawn by hand. You can also use a homemade or ready-made template or stencil.
- If you are confident in your sight drawing skills, you can skip this step. If you are a beginner, then it is better to transfer the desired picture onto glass, that is, outline the main details and lines of the drawing / pattern. To do this, you need to: draw or print a picture, cut it out (roughly), then tightly paint over its reverse side with a soft, simple pencil, and then attach the picture with a shaded inside to the glass and circle all or only the main parts of the picture with the same pencil. Barely noticeable, but useful lines should remain on the bottle. If the image is not too complex, then it is enough to outline the main details right on the bottle.
- Now you need to degrease the glass and wait until it dries.
- If desired, you can cover the entire bottle with colored acrylic paint and wait for it to dry completely.
- Let's start painting: we circle all the contours, from time to time cleaning the nose of the tube with a needle and, if necessary, correcting flaws with a cotton swab moistened with water. Drawing is more correct to start with large details.
- If you draw with a contour in stained glass technique, then the contours must be closed, and the stained glass paint must be in contact with them. Also make sure that all parts are completely painted over without paint over, otherwise the coating will be short-lived. Filling the contours with stained glass paints is possible only after 2 hours, but you can speed up their drying with a hair dryer;
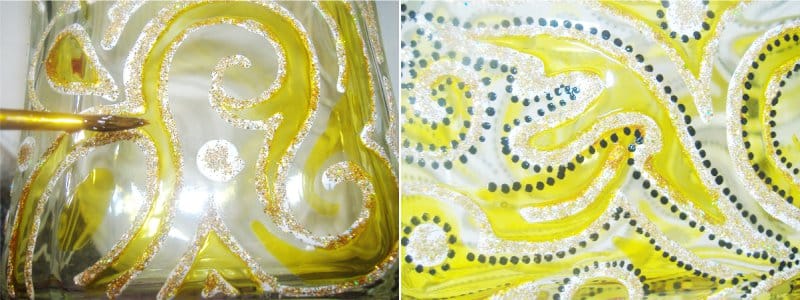
- In the technique of dot painting with a contour, the main thing is to observe the same and minimum interval in one line of the drawing and maintain the same diameter / volume of dots (in one line).
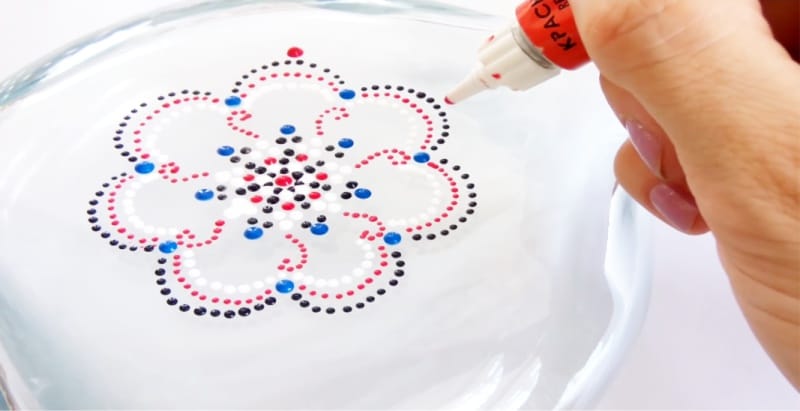
Tip: First, practice drawing with a path or dotting on paper. Remember that you need to press on the tube with the same force.
- When the drawing is ready, you will only have to dry or wait for the paints to dry, following the manufacturer's recommendations. Most often, painted glass is baked in an oven at a temperature of 170 degrees for about 30 minutes or left to dry naturally for a day.
We invite you to familiarize yourself with the following video tutorial, where you can see how to decorate a bottle with your own hands using contours in a chiseled technique.
But others interesting ideas painting bottles with contours for your inspiration.
Master class number 3: how to cut a bottle and make a vase, candlestick and other decor items out of it
So, we figured out the painting and decor. And now let's talk about how to make a vase, a pencil holder, a glass or some kind of interior decoration out of an ordinary bottle, as in the photo below.
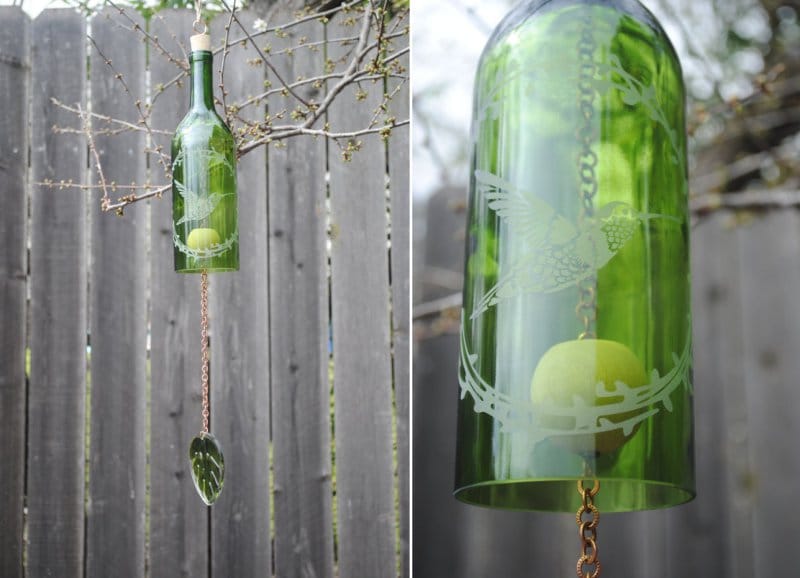
There are many ways to cut a glass bottle with your own hands. In this master class, we use the simplest methods that can be easily repeated at home.
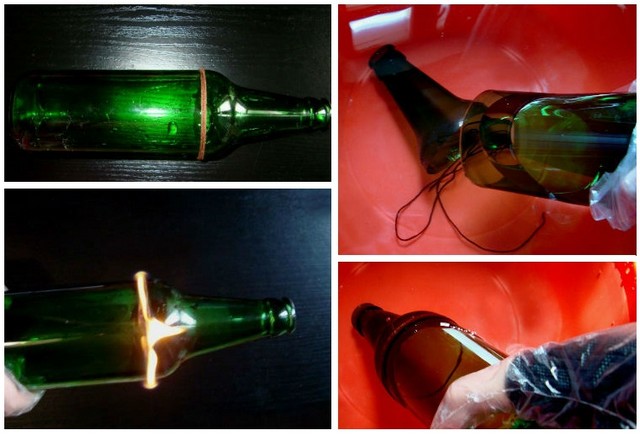
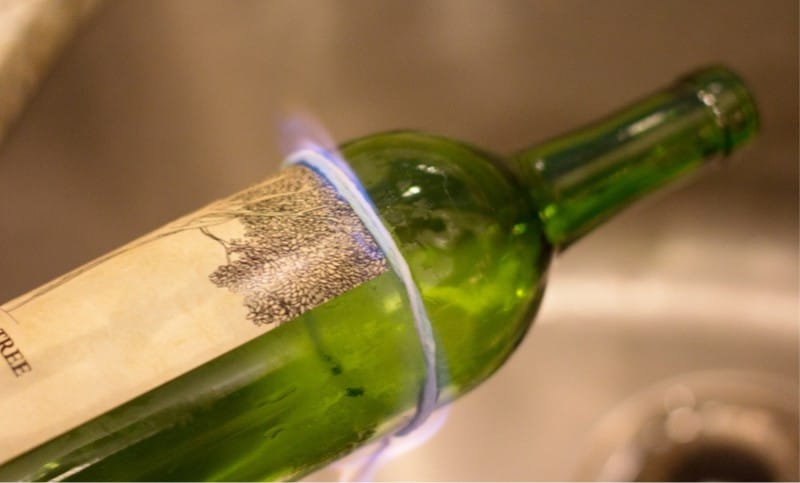
Method 1. How to cut a bottle with alcoholized thread
This method is more suitable for cutting wine bottles and bottles with thin glass.
- First you need to wrap the bottle with thick cotton thread and cut off the excess (upper photo on the left).
- Now this thread needs to be moistened in any alcohol-containing solution - white spirit, ethyl alcohol or nail polish remover, as in this master class. After the thread gets wet well, it must be wrapped around the bottle again in the right place.
- Now you need to carefully set fire to the thread, quickly rotating the bottle until the flame goes out.
- Next, you need to lower the bottle into a previously prepared container with boiling water for 3 minutes, and then quickly lower it into cold water - from a sharp temperature drop, the glass should crack in the right place.
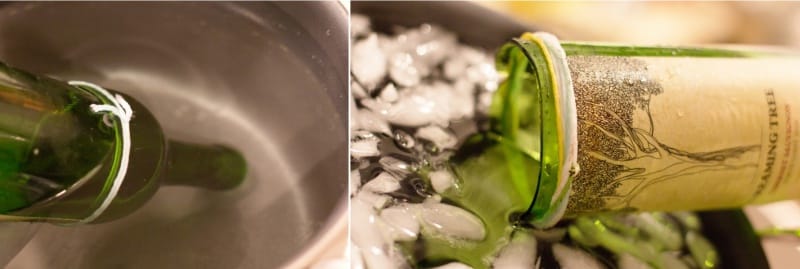
Tip: If you want to make a vase from a bottle of champagne, then steps 2-4 will most likely need to be repeated.
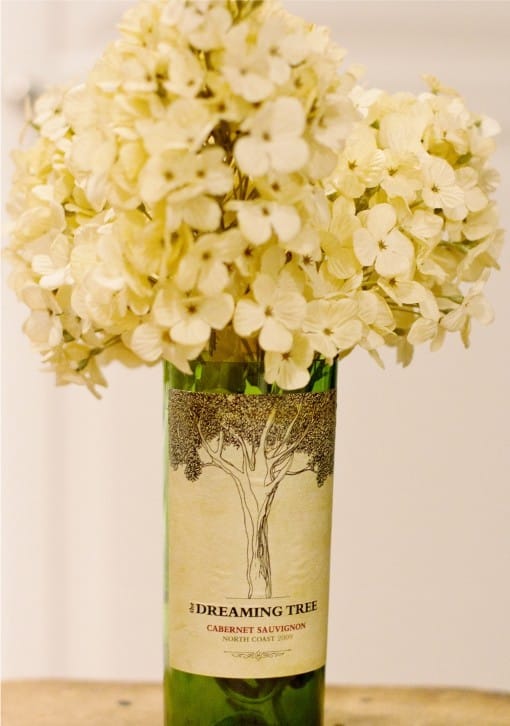
- Carefully break the bottle, and then process the sharp edges with sandpaper - first coarse-grained, and then fine-grained. Voila, the bottle vase is ready!
Method 2. How to cut a bottle with a glass cutter
You can also cut the bottle with a glass cutter. For this you need:
- Make an incision with a glass cutter. To make the edges even, you can sharply wrap the bottle with an elastic band or tape before sharply. Instead of a glass cutter, you can use a glass drill;
Glass bottles fall into our hands quite often. Many of them have a very beautiful shape and texture (flasks in the form of musical instruments, cylinders, etc.). Therefore, after the product is used, many people simply do not raise their hands to throw away such containers. Yes, in general, and you don’t need to do this, because with enough imagination, a little patience and a share of effort, you can very well make something interesting out of them. Let's talk about this, namely, how to make vases from glass bottles. This is a great way to freshen up the interior of your house or apartment, besides, all materials for creativity are quite affordable.
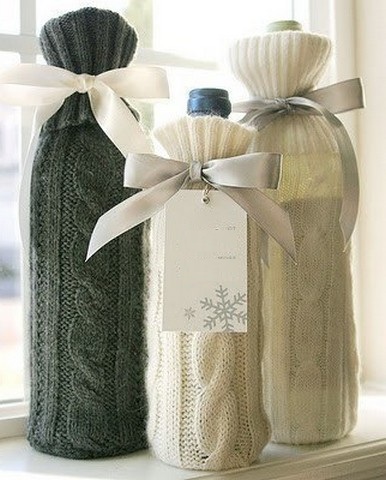
Method number 1: the easiest
The most elementary way to turn a bottle into a flower vase is to make a decorative case for it. Moreover, it will be possible to periodically change such “clothes” on the bottle. Sewing and knitting skills are very useful in this case. After all, the easiest option is to make a case for the bottle (as in the photo). It can be knitted using decorative patterns, or sewn, adding lace to taste and combining fabrics of various textures (leather, suede, velvet, simple burlap, etc.). The second way is to make a beautiful rim on the main part of the bottle. You can use corrugated or plain paper, fabric for this. When using such simple ways you will get an original flower vase in a short time.
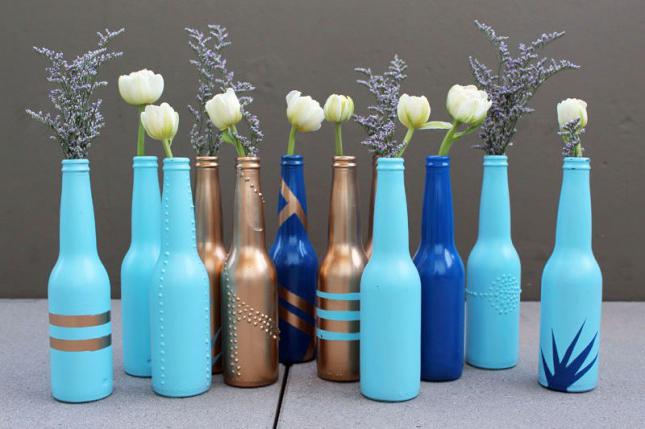
Method number 2: painting the bottle from the inside
Glass bottles of various shapes and sizes and paint - that's all you need. The painting process is not difficult, we advise you to do it from the inside. This results in brighter colors and a smoother surface. You can use absolutely any paint, even the one that is intended for windows and doors will fit. If you are going to paint the container in different shades, then it would be better to buy white paint and a few dyes. Before you make vases from glass bottles, be sure to decide on colors, which should be harmonious and match the interior.
You will also need a large syringe. In a small container, thoroughly mix the white paint with the dye until the color is uniform. Then draw it into a syringe and carefully pour it into a bottle. Start turning it around its axis, evenly distributing the paint inside. Drain excess. Place the bottle upside down and leave to dry completely. In addition to this standard method, several colors can be used. To do this, draw paint in contrasting shades into two syringes and inject it inside. As you mix and distribute, you will get smooth and vibrant color transitions.
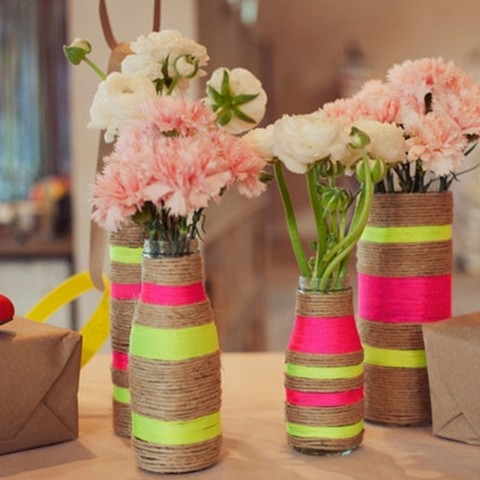
Method number 3: pasting the bottle with a rope
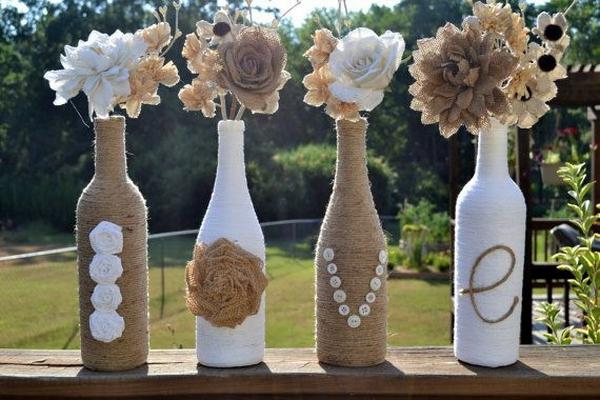
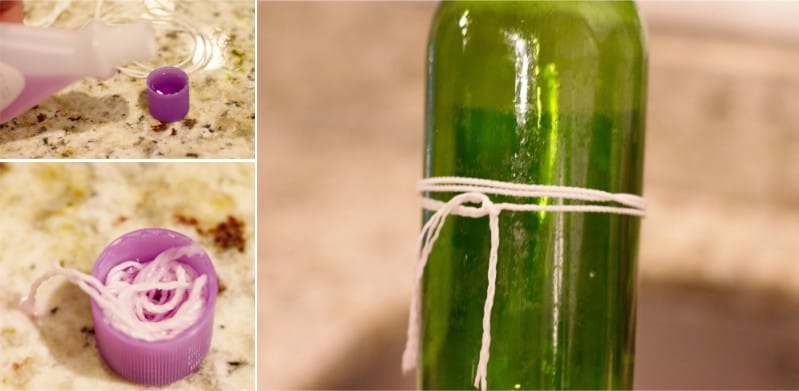
Using ordinary glue, woolen threads, twine or ribbons, you can get a very original bottle vase. A master class on this issue is a completely simple and doable process. The surface of the bottle must first be degreased, then greased with glue or use a special gun. Next, very carefully and slowly, you should twist the thread of the rope, starting from the very bottom. Press it down as tightly as possible. You can paste over the bottle completely (as in the photo) or only partially. After complete drying, the surface can be decorated with additional decorative elements. Remember the main rule - the materials must be combined with each other (natural with natural). So wooden beads, flowers made of leather or simple burlap, sealing wax seals, and so on are well suited to simple twine. Crafts from bottles, including vases, pasted over with multi-colored woolen threads, are cheerful. This activity is perfect for working with children.
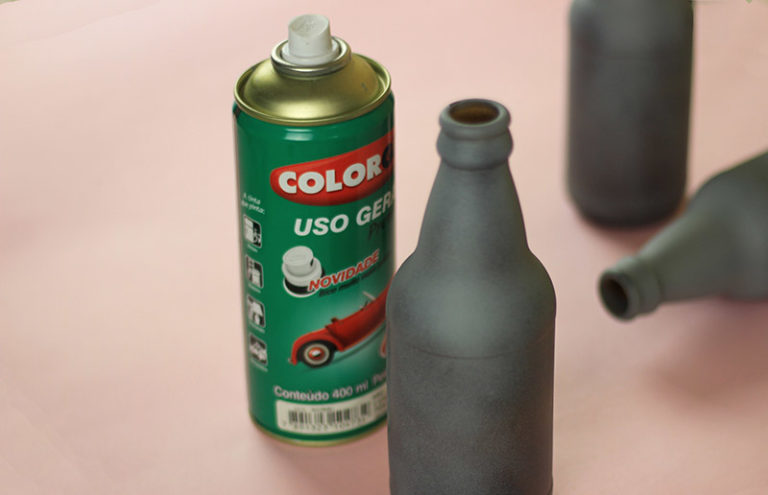
Method number 4: painting the outside
This method also has the right to exist. However, it is used mainly to give the surface the greatest decorative effect, irregularities, and a velvety feeling. We advise you to use matte This is the fastest and most economical option. Before you do it with spray paint, be patient. In this case, the main principle of operation is the gradual application of the coating, layer by layer. Otherwise, the paint will simply flow and be hopelessly damaged.
This method also involves the use of stencils and painting with a thin brush on an already finished surface. In addition, you can use various material, which will add even more decorativeness: sand, glass chips (with caution), etc.
Method number 5: flower vase using decoupage technique
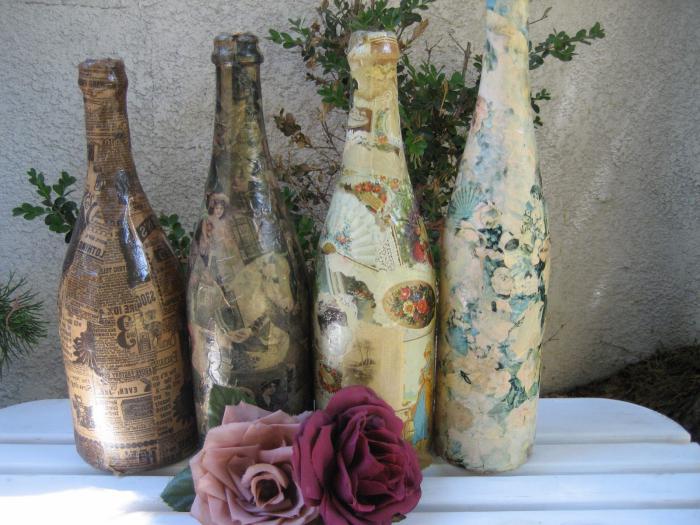
This option requires some skills and patience, as the work is quite painstaking. Decoupage, in fact, is the application of paper application on any surface. In addition to special pictures or taken from magazines, you will need glue, brushes and varnish for the final coat. We will dwell only on the main points, and if you wish, you can take a full master class. Crafts from bottles using the decoupage technique require careful degreasing of the surface, and then priming it. You can do this as usual. Next, the desired picture is applied very carefully and carefully fastened with glue (special or PVA). Surfaces are allowed to dry. The final stage of work is fixing with varnish, you can use a special one that gives the effect of aging.
Method number 6: mosaic
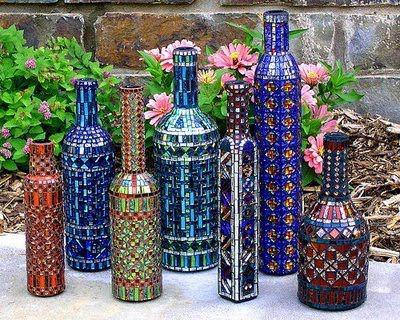
Mosaic is a fairly common way of decorating, and many crafts are decorated with it. Vases from bottles with its use look like small stained-glass windows. There can be two ways: a real mosaic and its imitation. In the first case, the use of many multi-colored pieces of glass is assumed. They must be prepared in advance with a glass cutter, while being careful not to get hurt. What shape the elements will be (squares, rectangles, irregular shapes) depends solely on your imagination. Before you make vases from glass bottles using mosaics, you should choose the right shape. The best way a container with even walls is suitable. For example, large square bottles. On a fat-free surface, small glass pieces are attached with glue, while leaving a small distance between them. After complete drying, fill these joints with normal grout.
Mosaic imitation can be done in two ways. These are fairly simple options for how to make a vase with your own hands from an ordinary glass bottle. In the first case, it is used In an arbitrary, chaotic manner or in accordance with a certain plan, it is wrapped around the bottle. Then each piece is filled with a thin layer of paint. In addition, you can use various decorative elements. The second method is similar, but instead of wire, paint of a certain color (white, gold, silver) is used. After applying the pattern, she is allowed to dry, and then the resulting squares are filled. Finally, the entire surface can be varnished.
Method number 7: pasting with decorative elements
In fact, this method is very much like a mosaic, but other materials and a slightly different technology are used. You can paste over the bottle with everything that you have at hand. If you brought a whole package of shells from a summer vacation at sea, then you can easily create crafts from bottles, including vases, using them. Do not limit yourself to any one material, but create entire compositions. Together with shells, ordinary rope and sand will look good. From the seeds that are in every home, you can also create a beautiful combination. Use sunflower seeds, pumpkin seeds, coffee beans, buckwheat and more.
Method number 8: cutting the bottle
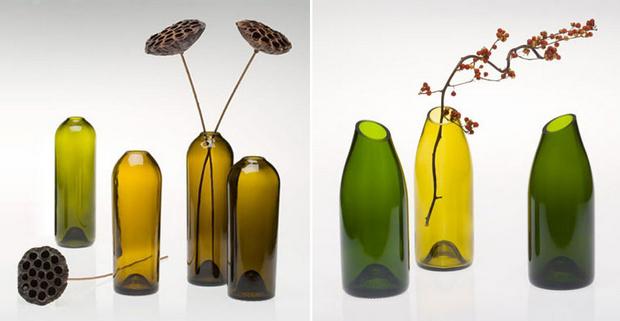
Some bottles themselves have an almost perfect shape and color, so you just need to remove the neck - and you get an extremely concise and stylish vase. You can do this in different ways:
- cut only the neck, for example, as in the photo on the left;
- cut the bottle by 1/3 or half.
In both cases, the cut can be made parallel to the surface or at an angle, which also looks quite impressive. If you have sufficient skills, curly cutting is possible with the help of special equipment. Therefore, before you make vases from glass bottles using additional decor, think maybe this method will be enough.
How to cut a glass bottle?
At home, this can be done quite simply and quickly. You will need: thread, alcohol or regular cologne, matches and cold water. Be careful, wear safety goggles and gloves. The place of the planned cut must be abundantly wrapped with a thread dipped in alcohol, and then set on fire. Rotating the bottle around its axis, hold the fire for a short period of time (2-3 minutes), and then fill it with cold water. The glass will crack exactly where the thread was. Finally, the edges can be sanded to make them look more even and decorative.
Here are presented only the main directions, options for ordering from bottles. Instructions and step-by-step actions may vary depending on your imagination. Is it possible to drive the creative process into any framework? Create and create, use a different combination of materials and methods.
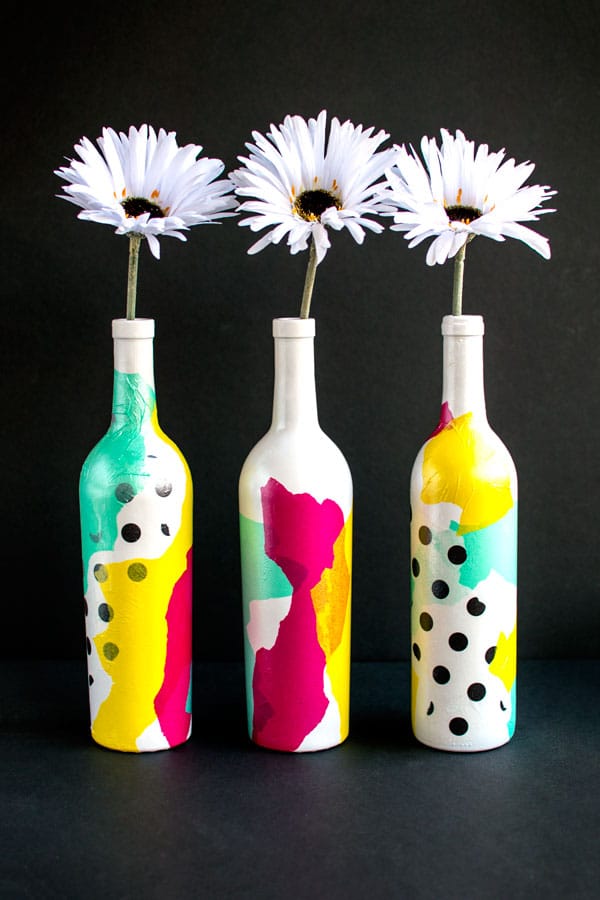
Decorating glass bottles with tissue paper, acrylics, stickers, and just about anything at hand can turn them into very exclusive vases. How to do it yourself - read in this article!
We offer 4 step-by-step master classes on how to make a vase from a glass bottle.
In fact, not only a vase can be made from a bottle, but for example, or others.
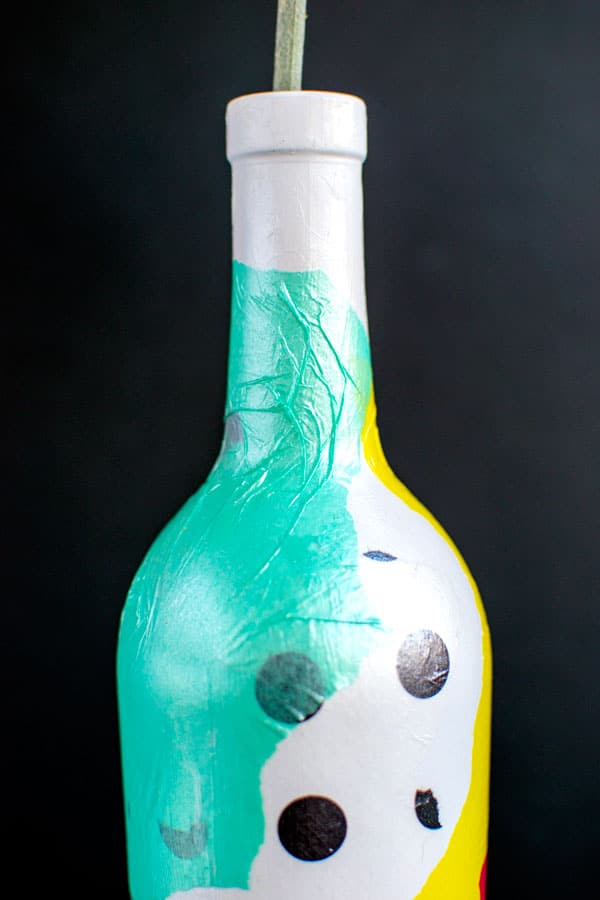
Where to put an old wine bottle? Using paints and tissue paper with a beautiful pattern, you can turn it into an original vase. The process of work itself is quite simple, even a beginner in decoupage can cope with the task.
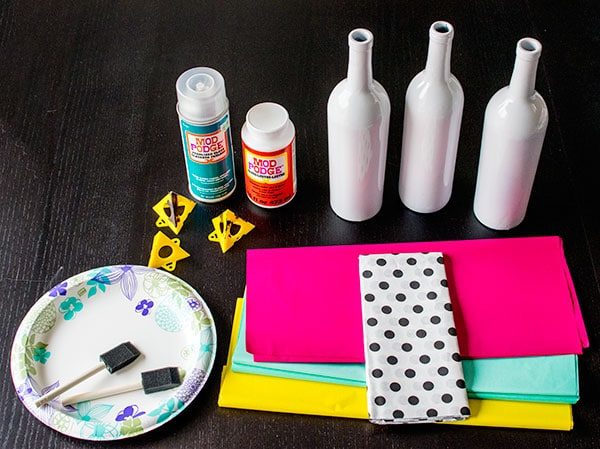
Materials and tools
You will need:
- empty glass bottles;
- bucket hot water;
- a cup of soda;
- alcohol;
- a can of white enamel paint;
- sponge brush;
- glue for decoupage;
- gloves;
- tissue paper in different colors.
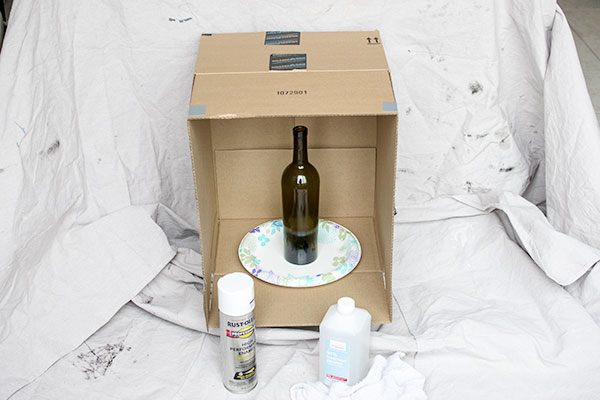
In order not to stain the house, it is also worth making a special device for spray-painting bottles. It has a very simple design and consists of only 2 things: a medium-sized box and disposable plates.
For additional surface protection, you can take an unnecessary rag or newspaper to lay them where you will work with paint.
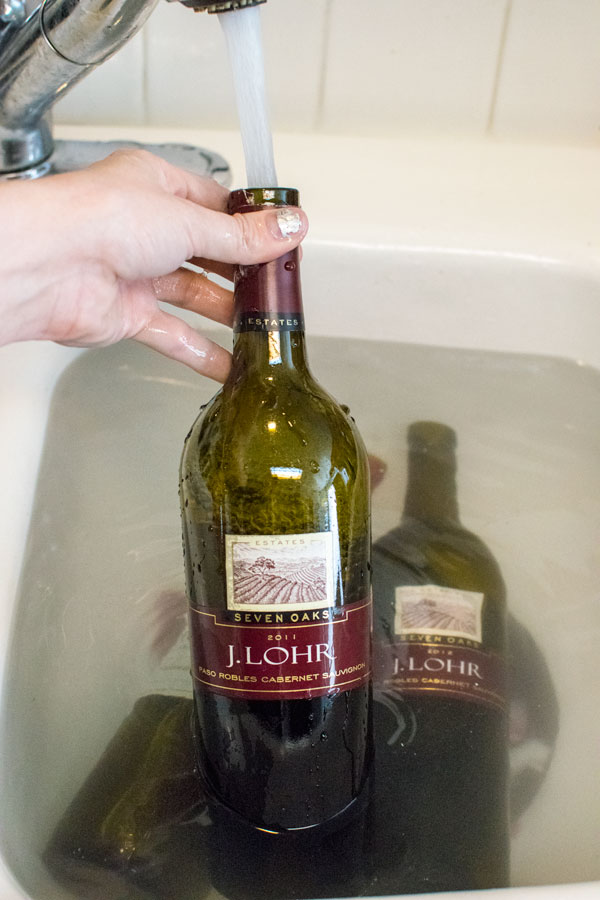
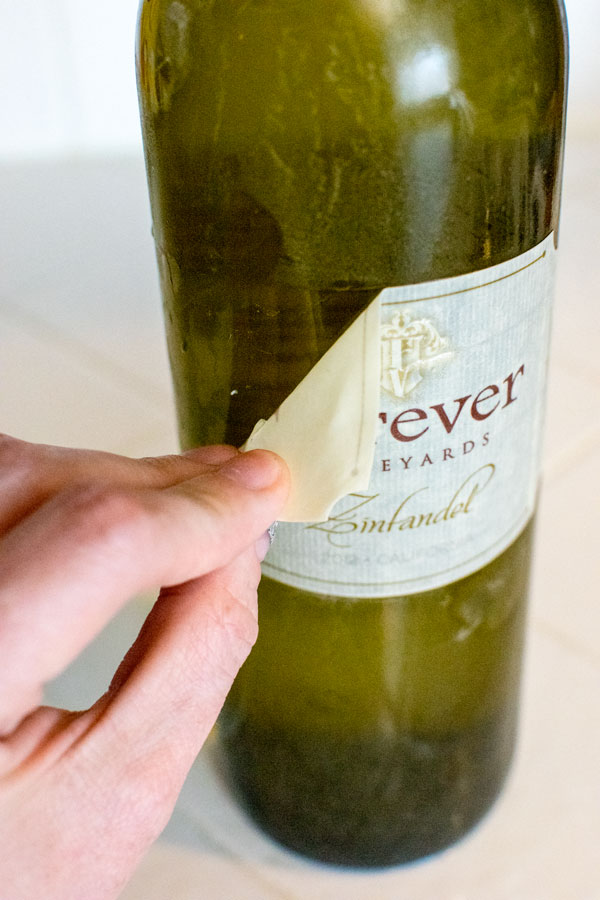
How to remove the label from a bottle
- Dissolve in a bucket of hot water a cup of soda, place the bottles there. Make sure they are filled with water inside. Otherwise, they will float, and the label will not get wet in some places. Leave the dishes for half an hour.
- After this period, remove the bottles and remove the swollen label and traces of glue from the walls. You can use a sharp object to scrape off difficult-to-remove pieces. You may not be able to completely remove the label the first time, then place the bottles back in the water for another half an hour and try again.
- Now you need to dry the cleaned containers well. After moistening the napkin with alcohol and wipe all surfaces of the bottle. This step is necessary so that the paint fits better on the glass. In addition, if small imperceptible particles of paper and glue remain on the surface, they will become visible.

Create a mini-studio for painting
While the bottles are drying, there is time to build a mini dyeing studio - it will take less than a minute.
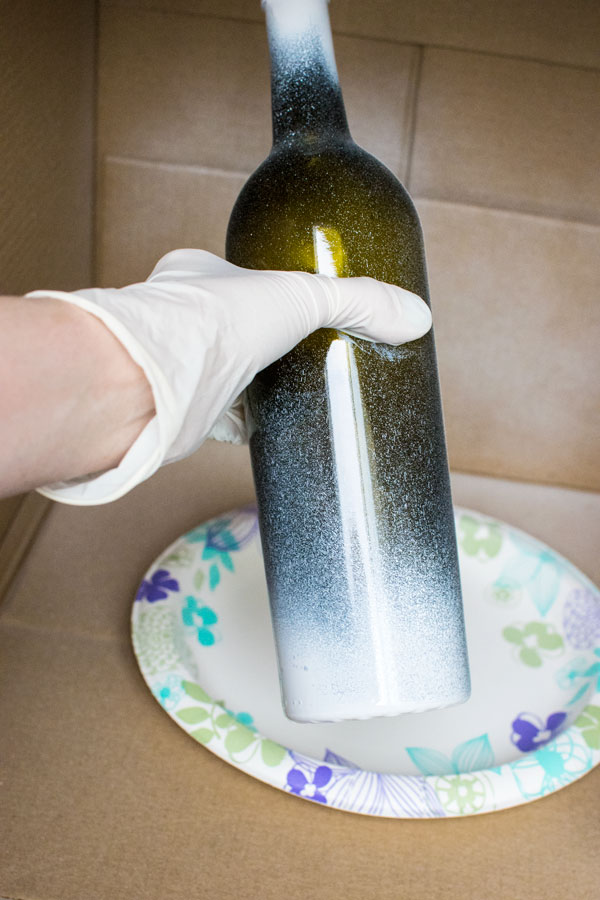
- The box must be opened and put with the short side down, put a disposable plate inside.
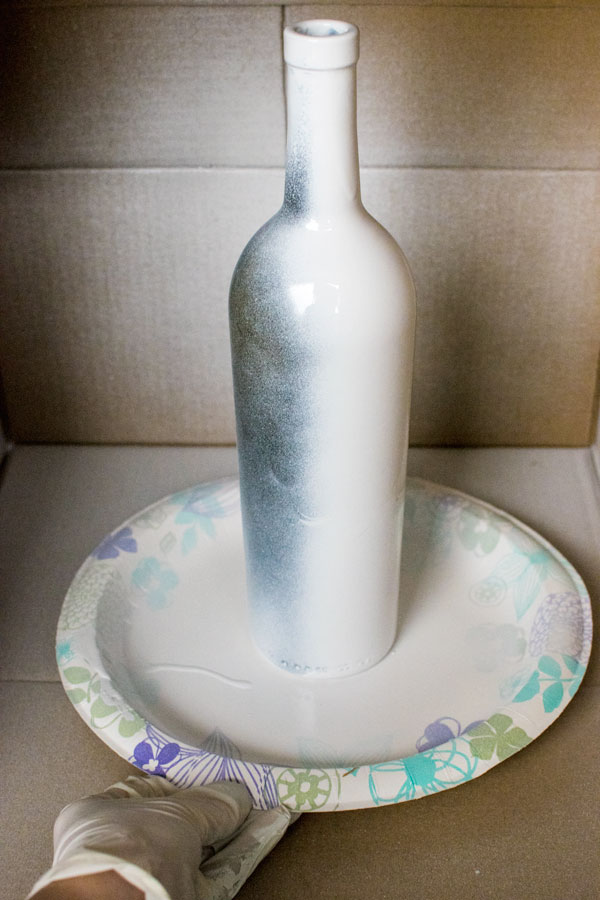
- Place the bottle prepared for painting directly on a plate, put on gloves and, shaking the can, start painting. Rotate the plate to color the other sides of the bottle.
- When work with the first bottle is completed, take a plate with a container standing on it, rearrange it to where it will dry. So each future vase will have its own stand, and the surface of the table will not get dirty.
- Check your paint instructions for how long it takes for it to dry completely. Usually it is about 24 hours. Please note that during rainy and cold seasons, the process may take a little longer.
vase decoration
Everything that happened before was just preparation, and now the real creative process of creating a vase begins.
- Tear the selected sheets of paper into pieces of different sizes and shapes.
- Attach them to the bottle, try them on and see how and in what combination it is better to stick them. By the way, paper can be glued and overlapped, this technique will help to achieve an interesting effect, reminiscent of a watercolor drawing.
- Choose the piece you want to paste first. With a sponge brush, apply a thin layer of decoupage glue to the part of the bottle where you planned to stick this paper.
- Gently place one edge of the paper against the glass and gently stick the entire piece. Try to smooth it out. Check if the edges fit snugly on the surface of the bottle. If they have moved away somewhere, apply a little more glue with a brush and press the paper.
- Now you need to cover the glued leaflet with glue on top. In the process, it will be possible to smooth out all wrinkles, if any.
- Glue all the other pieces of paper in the same way, arranging them the way you want.
- At the final stage, you need to apply another layer of glue, then with a napkin, carefully, so as not to move or damage the paper, remove its excess.
- Let the bottles dry. Drying time depends on the brand of glue, it is indicated on the package.
- If desired, you can use the top pearlescent coating. It must be applied after the glue has dried.
TIP #1: Be very careful with paper - it's very thin and rips easily. Also, you can’t be too slow: if the glue dries, then a piece of paper will stick and may tear when you try to smooth it out.
TIP #2: Until the paper is completely dry, it may appear wrinkled. However, small wrinkles will smooth out after drying, so do not try to achieve a perfectly smooth surface.
TIP #3: If you want to stick the paper around the neck, be prepared for the paper to go unevenly there, and even after it dries, the surface will wrinkle. For the same reason, bottles of complex shapes should not be used for decoration in this technique.
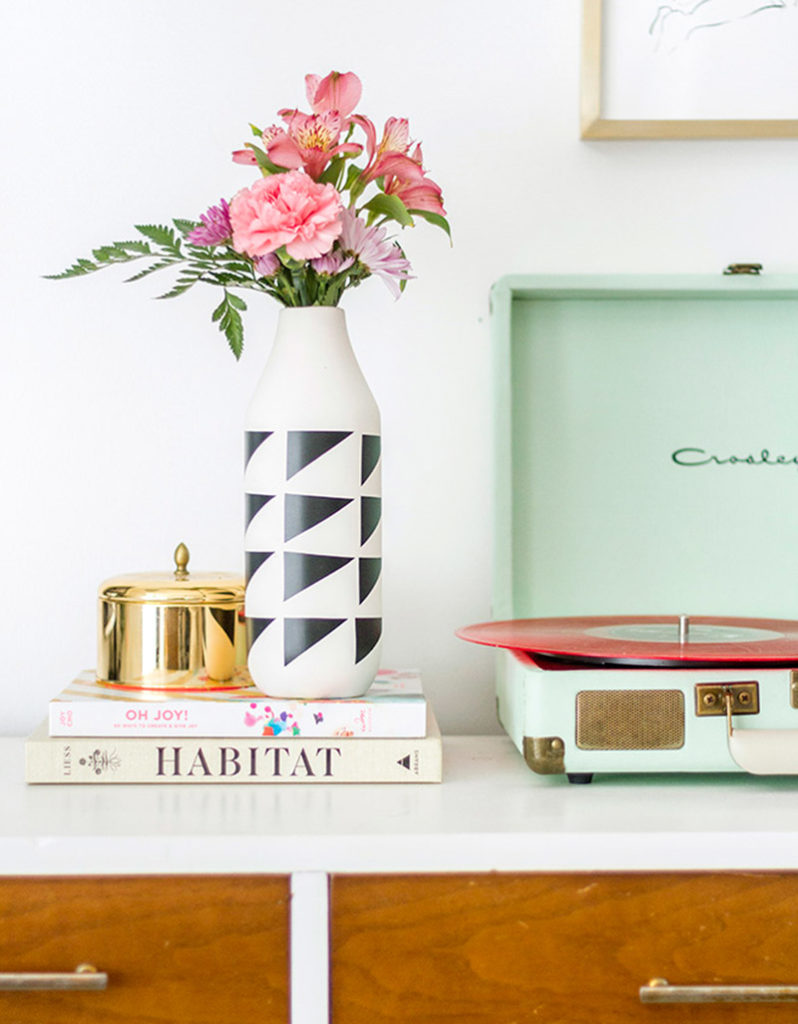
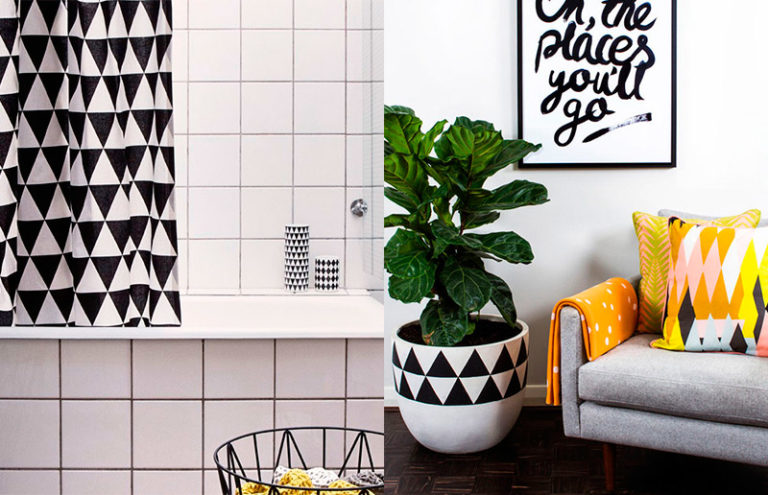
Master class number 2: Vase with stickers
Triangles are quite an old but still relevant topic in decorating. I use them for finishing furniture, dishes and other interior items. Decorating a bottle or other container with triangles is very simple, and the products will look spectacular. Try turning an ordinary bottle into an original vase with geometric patterns.
Materials and tools
Prepare for work:
- glass bottles;
- white paint (aerosol or regular);
- scissors;
- black self-adhesive paper;
- sandpaper or glass primer.
Operating procedure
- First, the bottle needs to be cleaned - wash it inside and out, clean it from the remnants of the label. To make the process easier, you can pre-soak the bottles in a hot soda solution to make the paper soak.
- After that, dry the cleaned containers.
- Before you start painting, treat the glass - this is necessary so that the paint lies flat on the surface and firmly adheres to it.
- To do this, use one of two options: sand the outer walls of the bottle with sandpaper or cover the surface of the bottle from the neck to the bottom with a primer (any primer is suitable - liquid, spray or varnish).
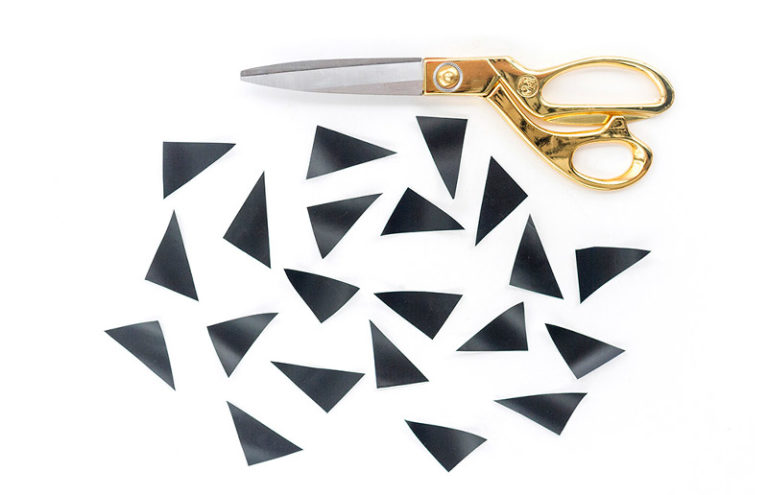
- While the bottles are drying, cut triangles out of black paper. Their size and number will depend on the size of the decorated containers and what kind of pattern you plan to make. However, all triangles must be the same. It is most convenient to cut one first, and then use it as a stencil for all subsequent ones.
- Decide how you want to decorate the bottle. After that, you can start gluing triangles in accordance with your plan. Attach the paper to the glass carefully so that it fits snugly on the surface and does not form wrinkles.
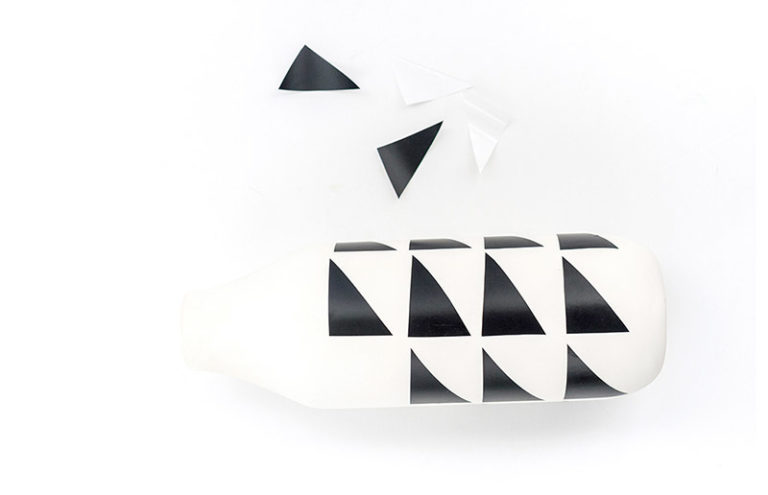
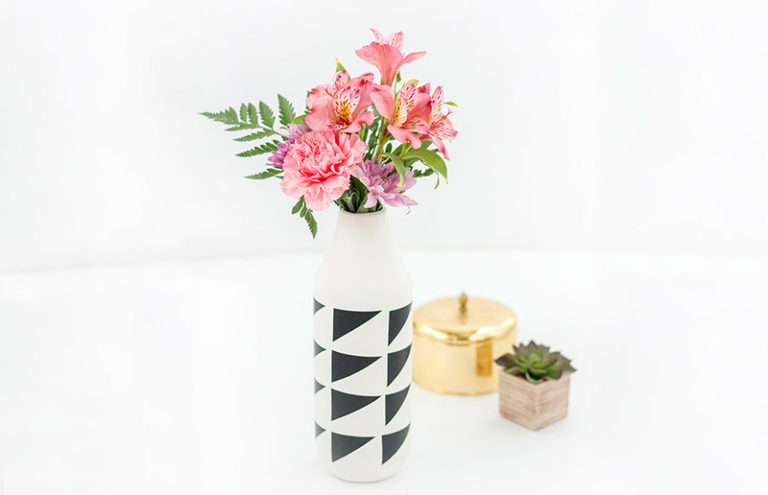
That's all, the product is ready. For the next bottle, if you decide to decorate several containers with triangles, you can come up with a different scheme for gluing decorative elements, or you can make all the vases in the same style.
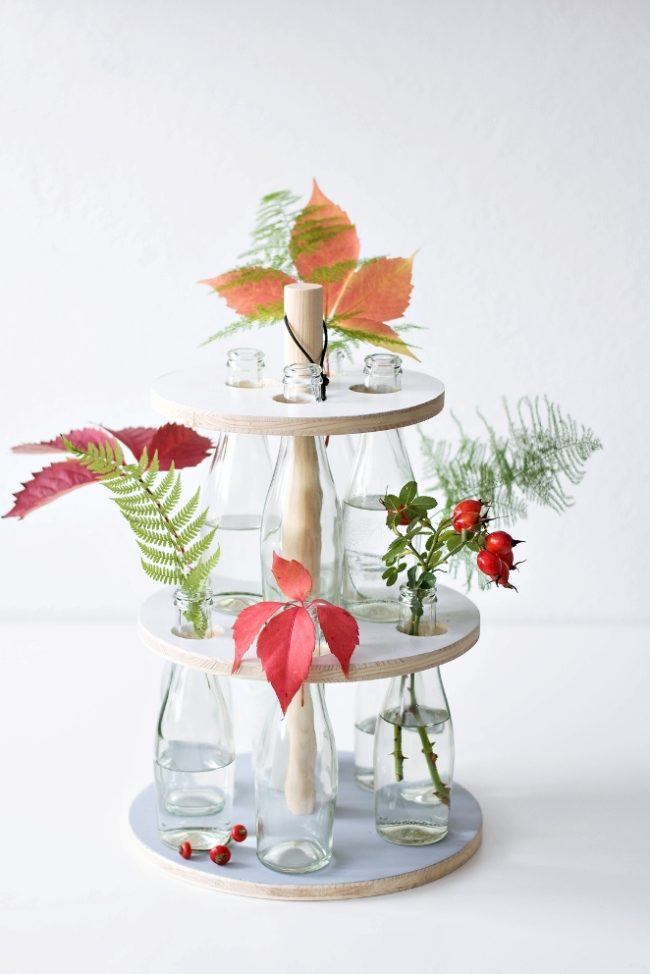
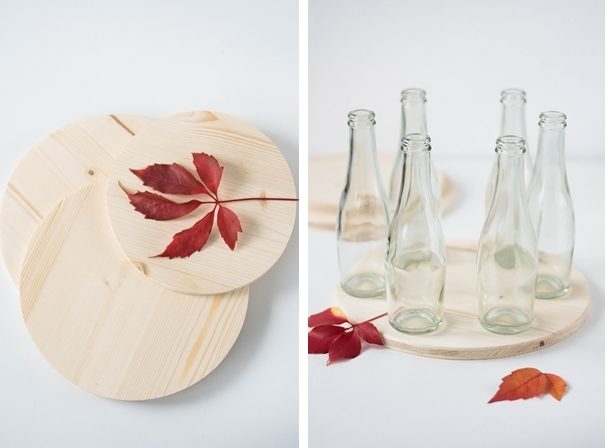
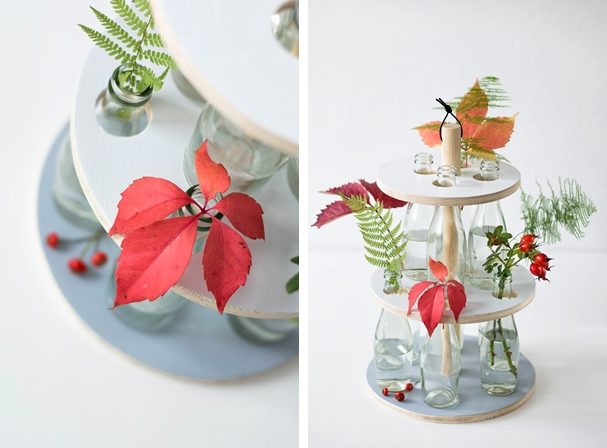
Master class number 3: Bottle rack
You can breathe a second life into used glass bottles or glasses, not only by turning them into a vase. This master class will help you build an unusual design out of wood, bottles and paints - bookcase with vases.
For future vases, it is advisable to find small identical bottles - small bouquets or single flowers will look especially impressive in them.
Materials and tools
You need to prepare:
- 3 round wooden slats 7, 14 and 15 cm long, all 25 mm in diameter;
- 10 small bottles of beautiful shape;
- 3 round wooden boards with a diameter of 20, 23 and 25 cm;
- sandpaper fine-grained paper;
- acrylic paints (the choice of color is up to you);
- hole saw for wood with a diameter of 35 mm;
- glue for wood;
- tape measure and pencil.
Operating procedure
Largest board, diameter which is equal to 25 cm, will serve as the base of the shelf. On it you need to place 6 bottles. Place them at an equal distance from each other, stepping back from the edge of 1.5 cm.

- Place a second board (23 cm in diameter) on this structure. Now, in places where the necks of the bottles are in contact with the underside of the second board, make marks (circle the contours of the neck with a pencil).
- Remove this board, lay it up with the side where the marks are made. Drill holes at the indicated locations with a circular saw.
The diameter of the holes will be slightly larger than that of the necks, this is necessary in order to be able to freely remove the bottles, change the water in them, and wash them.
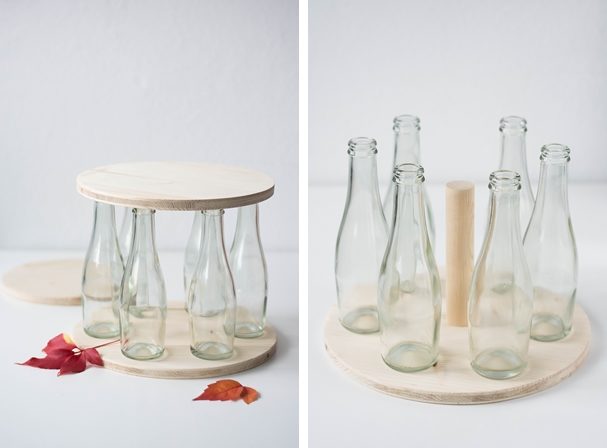
Install this board on the bottles so that their necks fall into the holes made. Now place the remaining 4 bottles on the second board, also keeping an equal distance between them. Place the third plank on top. Circle the contours of the bottles on its lower side, make holes.
- Disassemble the structure, determine the center of all three boards.
- Glue round strips there.
- For the largest board, take rail 15 cm long, for the second - 14 cm, the third - 7 cm.
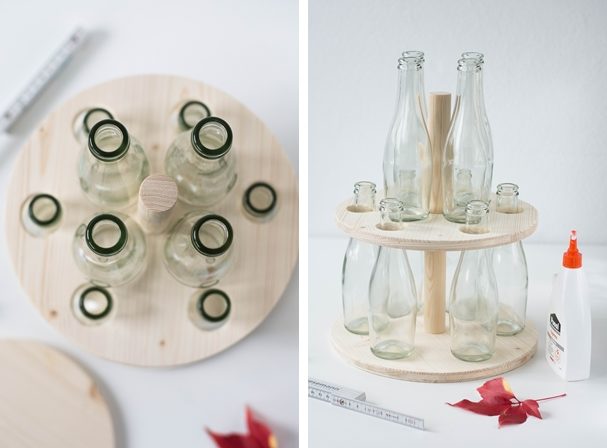
Now the shelf can be painted. For the bookcase shown in the photo, were used three different shades of gray paint. When all the details are dry, insert bottles filled with water into the holes and place flowers in them.
Master class number 4: Hand-painted bottles
If you have accumulated a few bottles that are a pity to throw away, then you can turn them into vases with a unique pattern. For work, you do not need to use strong-smelling spray paints, so you can do it even at home.
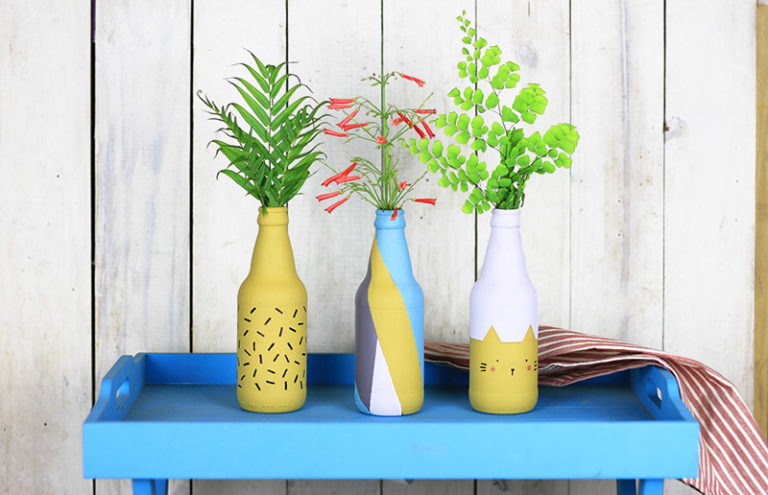
Tools and materials
You will need:
- glass bottles;
- acrylic paints;
- brushes or kitchen sponge;
- adhesive tape;
- pen for painting on glass;
- glass primer or sandpaper.
Operating procedure
- Wash the bottles thoroughly inside and out, remove the label from them, and dry.
- Since glass is a rather slippery material, the surface should be prepared before applying the paint. Coat the walls with a primer or sand them with sandpaper.
- Now you have to come up with a drawing that will decorate the future vase. If you are not very good with the brush, you can draw simple lines or stripes.
How to draw even stripes
ADVICE! Use a little trick to draw even stripes. Use a tape measure to mark a few dots on the side of the bottle, and then connect them by drawing a straight line and stick adhesive tape along it.
Now you can paint: the lines will have a clear outline, and the paint will not go into neighboring areas.
- Remember that after applying the paint, it will take time for it to dry. Only then can you start painting the next section.
- Prepare the paint, delimit the area on which you will work with adhesive tape (if the drawing does not have a background, but consists of various elements).
- It is most convenient to paint with a foam rubber sponge. For small areas, you can cut thin strips or use sponge brush. From a regular brush, traces of strokes may remain on the glass.
- Until the paint dries, it may not look very even, traces of sponge pores remain on the surface, but after drying, all imperfections will disappear.
- The first strokes after dipping a sponge the paint should be applied as far as possible from the border of adjacent areas, since the paint can drain onto them.
- If the first layer is not enough to obtain a bright and even coating, a second one should be applied. When the first section dries, move on to the second, then the third, and so on.
- When the drawing is finished and all the paint is completely dry, you can draw small details with a glass-painting pen.
The first association that occurs to us when we hear about bottle vases- This is a cut plastic container in which, in the absence of a real one, flowers can temporarily stand at work or at home. But those examples that you will see in our today's article prove that objects can be obtained from improvised material to decorate any interior, in which it is not a shame to put the most expensive bouquet.
Vase from a bottle
Use for interior decoration a vase from a bottle is a new fashion trend for all lovers of home design. Moreover, the bottles used are transparent, glass, with a wide neck, which most often contained dairy products before. This trend came to us along with the fashion for environmentally friendly materials and the rejection of plastic packaging in the premium food segment. And then it’s just a pity to just throw away these glass bottles, because they can serve you faithfully for many more years.
A special chic is the design of flower arrangements with the help of containers of various sizes and shapes. So each flower looks individually, not like the others. You can find an example of such a fashionable design in magazines dedicated to fashion design, moreover, which is important for the application of such bottle vase, photo which you can see above, that in this case no refinement is required for glass products, and they, exactly the same as they once left the assembly line, will become an integral part of the modern interior.
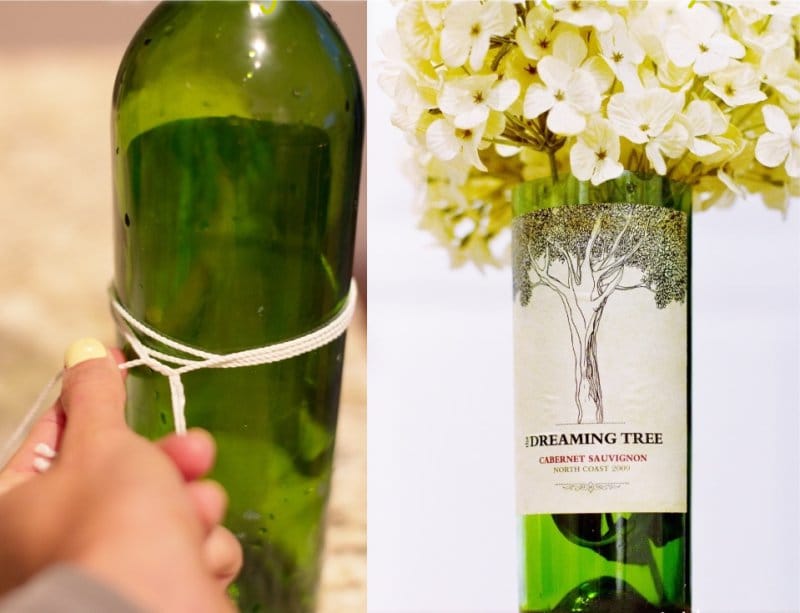
But if we are not talking about a modern style, but, for example, if we are, then it is much better to decorate the glass surface after all, giving it a new texture or color. After all, in those days of domination classic styles, in the interiors of rural houses in Provence, glass was quite a valuable material, unlike ceramics, and was used very rarely. Therefore, any transparent base must be brought to an ideal appearance, decorated. This can be done in various ways, some of which we will talk about. The simplest for beginners can be the application method, moreover, it uses such affordable material as woolen threads or twine.
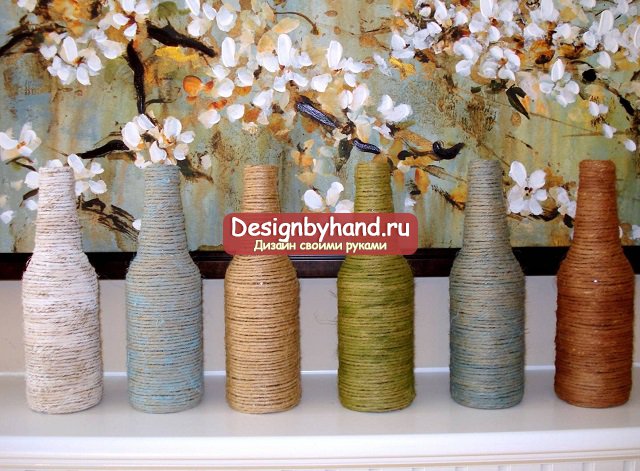
Working with glass, when glue is used as a bonding material, should always include a preparatory degreasing step. This is done in order to improve grip on slippery surfaces and make both the adhesive layer and the paint layer smoother, and the life of such a coating is longer. For degreasing, it is enough to wipe the glass with any liquid that contains alcohol, starting with cologne or nail polish remover and ending with alcoholic beverages. After that, you should immediately start the process of decorating. In this case, for the task how to make a vase from a bottle, twine is used. Its tip is glued at the bottom of the container, then glue is applied over the entire surface a few centimeters in height and a string of twine is wound neatly, in one layer. After that, apply glue again and wrap again decorative material. When you reach the very top, then hide the tip of the last row on inner surface neck. The twine itself is not very attractive, so for additional decoration you can cover it with colored paint, and you can apply it either with a brush or with an ordinary kitchen sponge. With such vases will be especially beautiful.
DIY bottle vases
Always look pretty do-it-yourself bottle vases, which are hand-painted with paints, they are covered with patterns and ornaments. Even non-professional artists can handle such work, especially if you first make a sketch and practice.
Of course, not all paints can be used to solve the problem. Special stained glass dyes are ideal, which can be bought not only in specialized paint and varnish stores, but also in children's hobby centers, because creating stained glass windows on a glass surface is a very exciting type of needlework. Such paints differ in that they do not dry perfectly on a glass surface, but their special variety, the so-called contours, are thicker, help to create boundaries beyond which the paint does not flow, forming an even, beautiful layer. This technique helps in working not only with glass, but also with transparent plastic, creating bright ones.
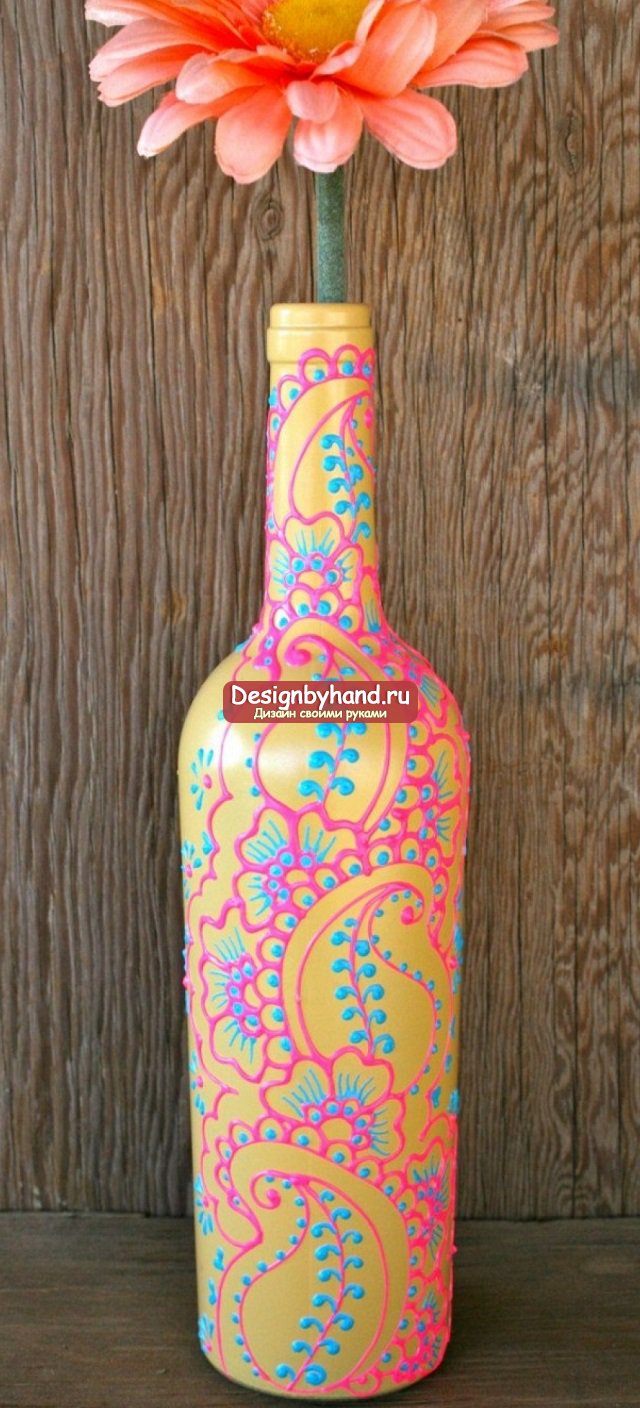
However, you can make it much easier for yourself and preliminarily make one common color as a background, and already depict the simplest patterns on it, all the same, the work will look artful and expensive. You can paint the container both from the inside and outside, the first way is much easier, but in the second case you will get a truly attractive appearance your craft.
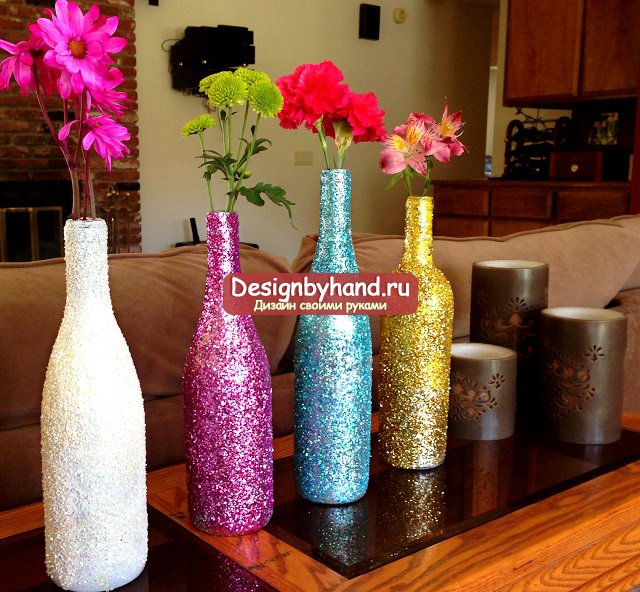
Decorating paint can be not only matte or glossy, you can also use unusual textures, such as sparkles. You can see the visual embodiment of such an idea in the photo above. If you didn’t manage to find the paint with the specified parameters initially, then you can use the sparkles separately, spraying them on the painted surface before it has had time to dry. In this case, you should pour the sequins themselves in a thick enough layer, generous handfuls, so that all the sequins that can stick do it. All the rest, which will remain on pre-layed paper, you can collect and apply on a vase of a different shade. So that later the sparkles do not crumble, you can cover the entire surface of the craft with transparent varnish (often hairspray is even used for this purpose), after which you can safely pick it up and install it in the room. Bright, unusual items will be one of.
In addition to paint, colored stickers will also look great, which cover the transparent bottle in several places, or close completely. If expensive stickers are not affordable for everyone, then you can buy adhesive tape with a pattern and use it as the main material for decorating glass or plastic products.
DIY bottle vase
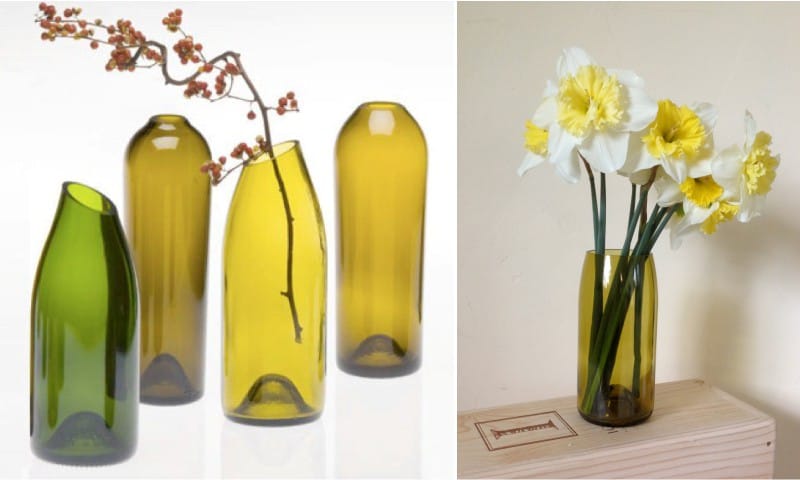
In addition to the fact that the glass surface can be covered with patterns or use the technique of appliqué, decoupage and other things, you can also experiment with the shape, and not just with the shade of the surface. To do this, you will need a glass cutter and the skill to work with such a tool. The main goal that is pursued with such a modification is to make in do-it-yourself azu from a bottle, which at first glance you can’t say that it was made with the help of improvised consumables. On the contrary, such crafts can stand on a par with expensive designer decor elements.
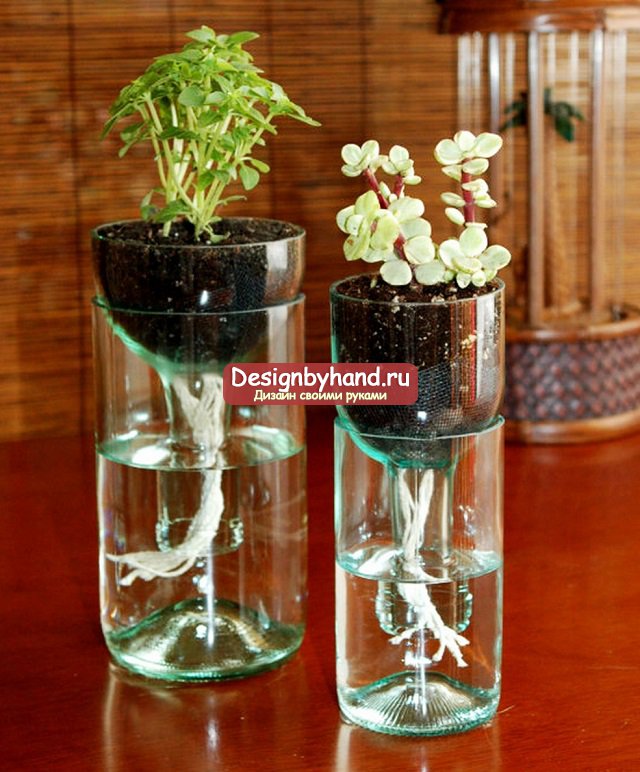
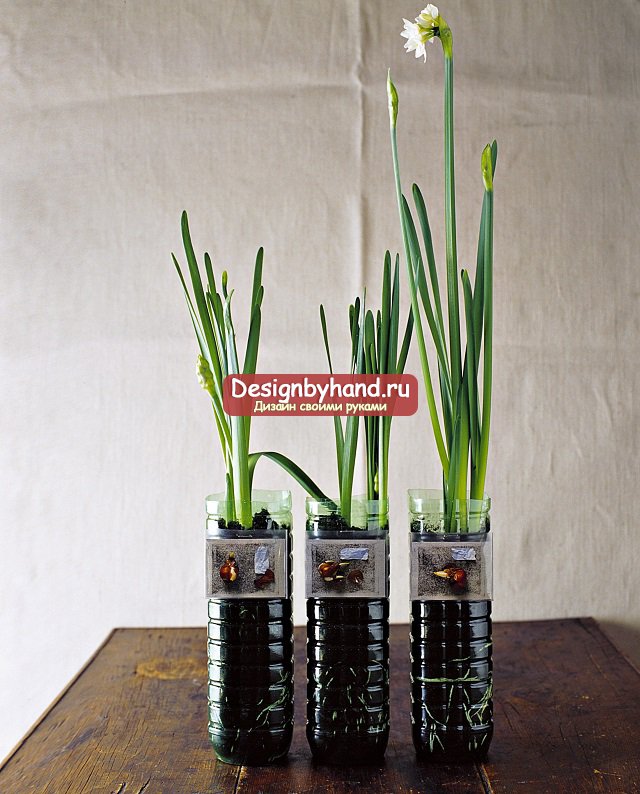
As an example of the work we talked about above, we can cite the following photo. In this case, while maintaining the overall height of the original product, it is reformatted so that small flowers or ampelous plants will look great inside. However, due to the fact that the long neck is immersed in the lower half, you can also place medium-sized flowers inside, the stem diameter of which will be quite thin.
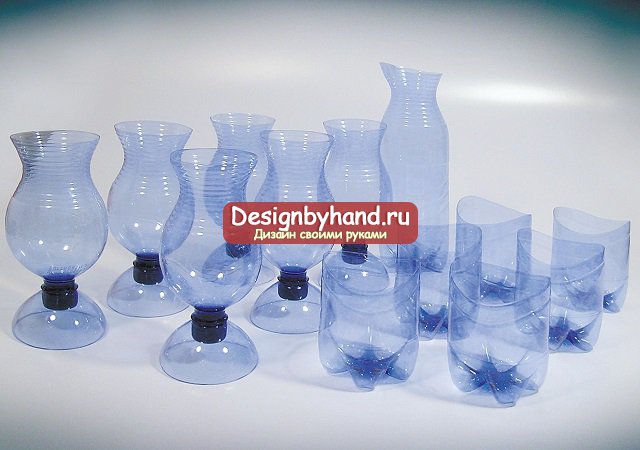
And in the following example, which already considers the manufacture of a vase from plastic bottles, we see how the same original form can be transformed, creating new, interesting combinations, and these ideas are enough for a whole plastic service. Moreover, due to the fact that working with plastic is easier and safer than with glass, such ideas can be easily implemented in that, or organize your own hanging gardens in the country.
Vase from a plastic bottle
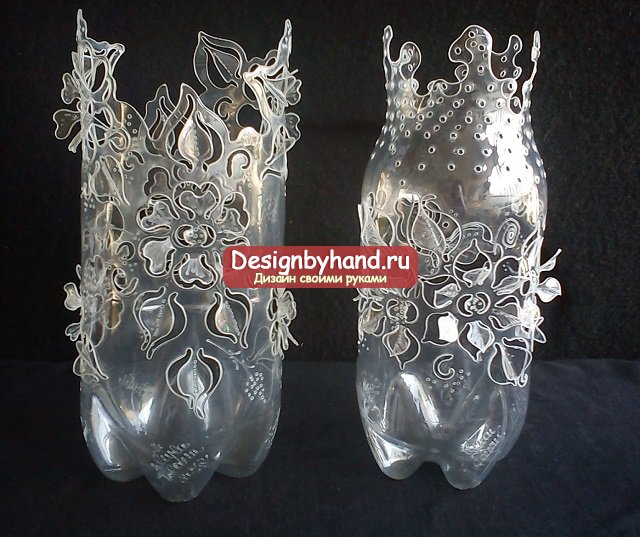
Varieties look very elegant plastic bottle vase, which are made in the technique of cutting. The patterns on their surface are voluminous, openwork, reminiscent of lace fabric rather than banal plastic. The only drawback is that such a technique is not so easy to master, however, like any other, when it comes to creating real artistic value. Therefore, we can only admire examples of such works, or, with a great desire, master carving master classes, starting with those to learn how to repeat such masterpieces ourselves.
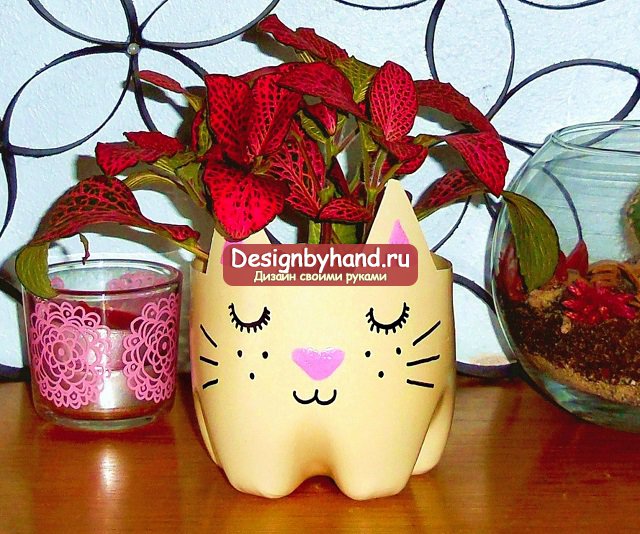
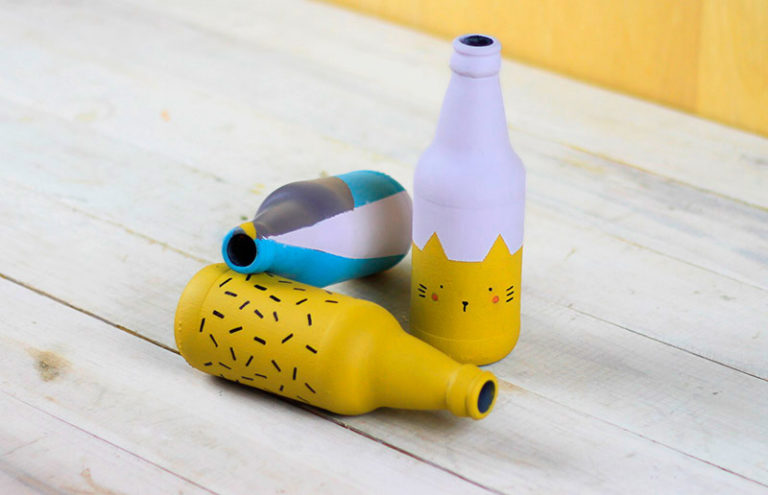
It's good that there are ways to make DIY plastic bottle vase which are much easier to understand even for beginners. For example, like such a cute kitten, which you can repeat by taking a standard container from mineral water. This way of creating crafts is common with the fact that here you also first need to mark the contours of the future figure, cut it out with scissors or a thin knife, and then cover it with a background color and paint it.
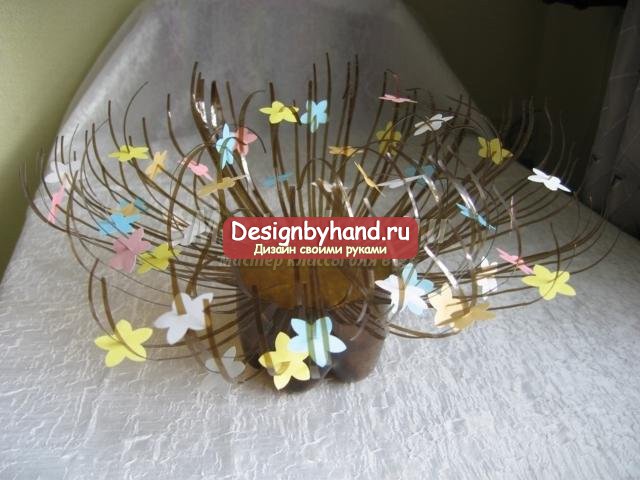
It is similar in technique to the creation and manufacture of such a small vase. It can be used not only for storing flowers, but also, for example, for fruits or sweets. It is quite simple to perform it - a plastic neck is cut off, and the remaining even walls are cut into thin vertical strips, not reaching the end at an evenly defined height. Then, with the help of scissors, each strip is bent and decorated with additional decor, whether it be paper butterflies, as in the example above, pebbles, shells.
DIY plastic bottle vases
Even without changing the shape, without cutting out and without covering with paint over the entire surface, you can make unusual and elegant do-it-yourself vases from plastic bottles. A simple trick works here - even if you have a cheap and nondescript base, you need to add to it interesting decor so that in the end the craft turned out to be attractive.
Thus, in the first example, a container cut off evenly along the upper edge is decorated with an applique of shiny stones. In the same way, you can use flowers made of plastic or clay, lace, rhinestones. And in the second example, after finishing with plastic ribbons, nothing at all reveals the origin of the elegant interior decor.


