How to change a light bulb in a false ceiling correctly.
Practically in any ceiling of a suspended structure, spotlights are used, the shelf life of which, unfortunately, is not eternal. Sooner or later, one or more light bulbs are burned out and need to be replaced. If you have not installed the lighting yourself, then you are also unfamiliar with the replacement technology, but it is not so difficult. You can change a regular spot light bulb with your own hands. Here is a step by step guide below.
Suspended ceiling systems use one of the following types of lighting fixtures:
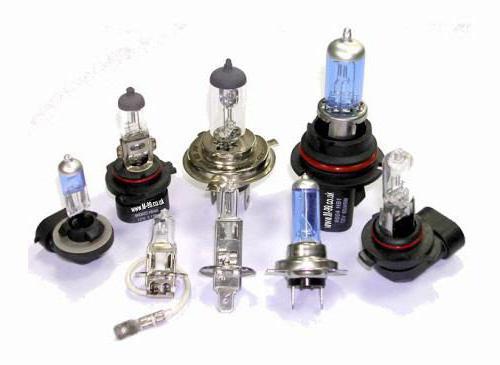
- Halogen light bulbs. They are installed with the smallest gap relative to the base and give a bright diffused light that is comfortable for human eyes to perceive. The service life directly depends on the correct installation (on average, up to 4 years). Can be used in wet areas thanks to the low-voltage models of 12 and 24 V. Since sudden voltage surges are common in our power networks, it is recommended to install special stabilizers on the branch. Replacing a halogen light bulb is more difficult than a traditional one, and the work requires the utmost care.
- Ordinary incandescent lamps. Everyone is familiar with their characteristics and replacement scheme.
- LED light bulbs. Economical (highest efficiency) and durable (up to 100 thousand hours of continuous operation) option for spotlights. They are compact, functional and provide good panoramic lighting in any room.
- LED strips. They are installed behind the canvas in rooms where it is planned to equip a recreation area with pleasant soft lighting. IN false ceiling look very impressive.
- energy saving models. Good because they have low power. However, they cannot be used in rooms with high humidity, the service life is limited by on and off cycles (the more often the light is turned on, the less the light bulb “lives”).
In addition, inside these bulbs contain mercury - a chemical element that is dangerous to human health, so if they break, people need to be evacuated from the premises and a set of disinfecting measures is needed.
Lamp mount
Let's talk about the types of fastening:
- Traditional right hand thread for standard cartridges. Everyone knows how to change the lamp in such a system.
- Light bulbs are also produced, which are attached with two pins. They act as guides and fix when clicked. Here, when replacing, the main thing is not to overdo it in strength. When it hits the groove, snapping is easy, but if you press hard, the lamp can be damaged.
- There are designs in which the light bulb needs to be immersed in the cartridge and rotated exactly 90 °, then the element will snap into place.
 Hanging a light bulb in a suspended ceiling
 Light fixture replacement
- The first important rule is safety. Turn off the power supply on the shield on the required branch, before replacing the lighting fixture.
- Find a stable ladder or stand. Take with you replacement lamp. If the ceilings are plasterboard - put on goggles.
- Unlock the damaged light bulb in the housing, for which find the fixing ring. When performing actions, you should hold the ring, as it is springy and can slip out of your hands. Outwardly, the ring resembles an ordinary spring wire.
- Next, unscrew the burnt out light bulb and check the power, marking and dimensions of the base with the new one. If all parameters match, replace the light bulb.
- Now return the ring to its place and carefully fix it.
- Turn on the electricity and check how the device works.
 Bulb replacement
 - Before replacing a light bulb, inspect it carefully. If you have energy-saving models or incandescent lamps, you do not need to press them, just turn counterclockwise. If the coating is visible, and inside there is another cone - this is the halogen version, which is fixed with pins, then nothing needs to be twisted.
- If there are mirror elements in the false ceiling, work carefully so as not to scratch the surface. The same applies to tension analogues, which are very sensitive to mechanical stress.
- it is better to use one model, otherwise the lighting will not look harmonious. If it’s time to change the lamp, but you can’t find the same one, purchase a complete set of new elements.
- If there were LED lamps that gave poor lighting, to increase the light flux, change them not to models of higher power, but to elements white color. So you get the necessary lighting and save energy.
- To replace a light bulb, use a piece of dry cloth or cotton gloves to avoid leaving marks.
To extend the life of the lighting system in the false ceiling will help the rules:
- The number of spotlights must be correctly calculated, if this is not done, with increased load, the bulbs will quickly fail;
- choose quality products in a specialized store;
- check the wiring and cartridges for the degree of reliability at the stage of purchase;
- do not let the lamps overheat, even if you have ultra-expensive and branded lamps, they also need a rest.
In contact with
Here is the house that Jack built...
Sorry...
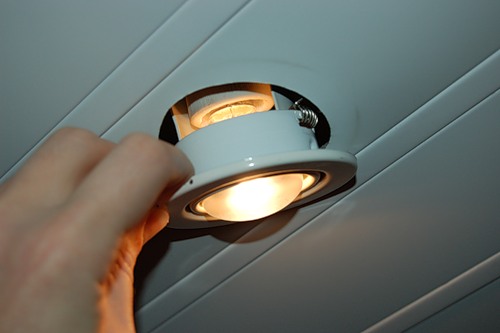
Here is the light bulb that is not lit:
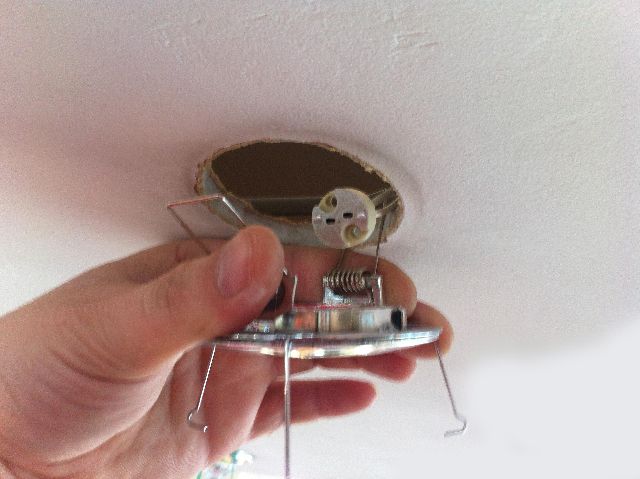
We take the lamp by the rim and carefully pull it out of the hole along with the bulb.
Note: It is recommended to do all light bulb replacement operations with the light turned off (in this room).
Well, first of all, you never know what ... electricity, after all.
And secondly, these bulbs heat up very quickly. You can burn your hand.
I usually illuminate myself with a headlamp, but you can probably just leave the door open and turn on the light in the hallway. Or maybe during the day there will be enough light. 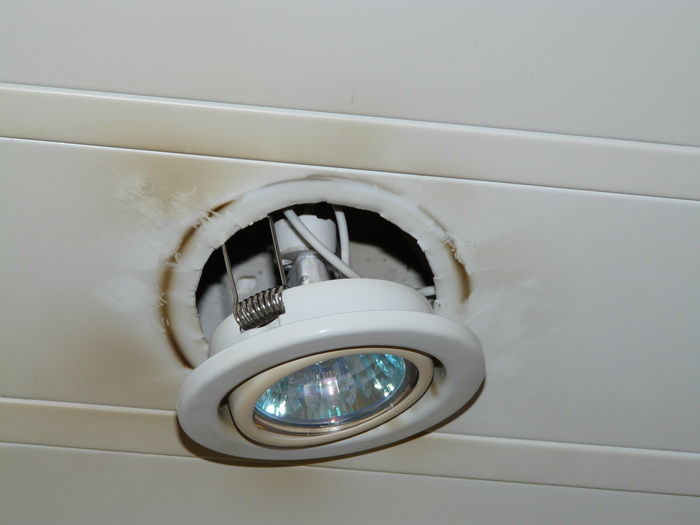
We draw carefully for two reasons:
1. - In order not to break the wires. Who knows how they are sealed up there ...
2. - The lamp rests on two springs (one of them can be seen in the picture) and when the lamp is taken out, the springs, on the way back, can click on the fingers rather painfully. 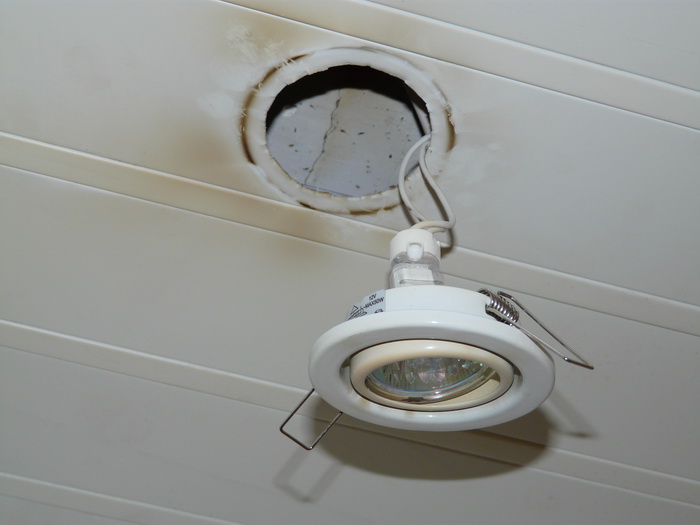
Further, holding on to the cartridge with one hand (in the previous picture, a little white one, on top), and with the other hand on the light bulb and, slightly shaking, take the light bulb out of the cartridge.
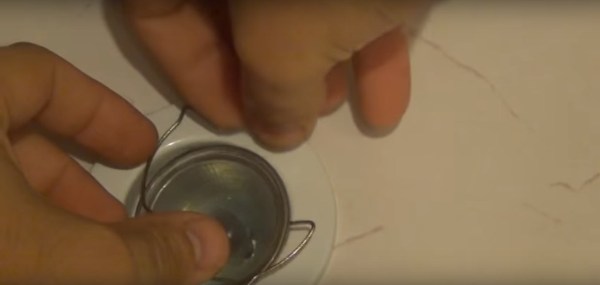
Here is a close-up of a lamp with a light bulb: 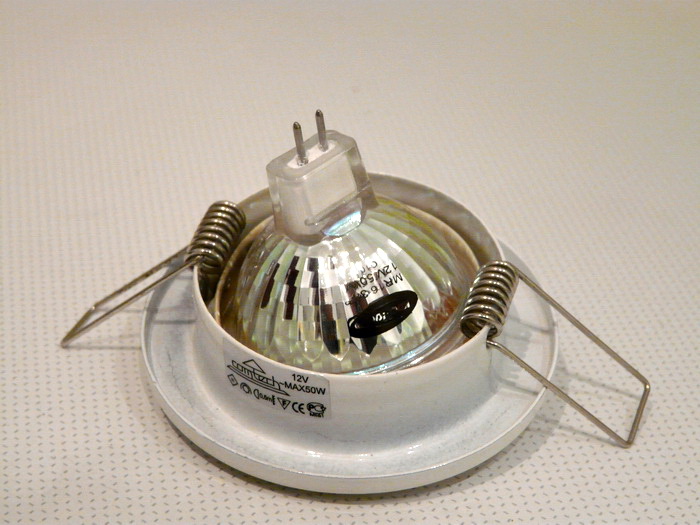
The light bulb is held in the lamp by two springy "antennae". In the picture, top left. We press the light bulb with one edge to the antennae, and take out the other edge. 
Now let's look at the light bulb: 
This bulb says: 12 volts, 50 watts.
Both parameters are very important.
These light bulbs are available for 220 volts and 12 volts. What voltage is connected to your lamps, I do not know. Therefore, we look at the light bulb.
Power is also important. The higher the power, the brighter the bulb will shine, but the faster it will burn out. I'm not talking about power consumption...
Now let's go to the store with this light bulb. It’s better to show the sellers a sample than to explain to them “on the fingers” for a long and tedious ...
Then everything is in the reverse order: we insert the light bulb into the lamp. Again, pressing one edge of the bulb on the springy tendrils and lowering the other edge of the bulb inside the rim of the lamp. 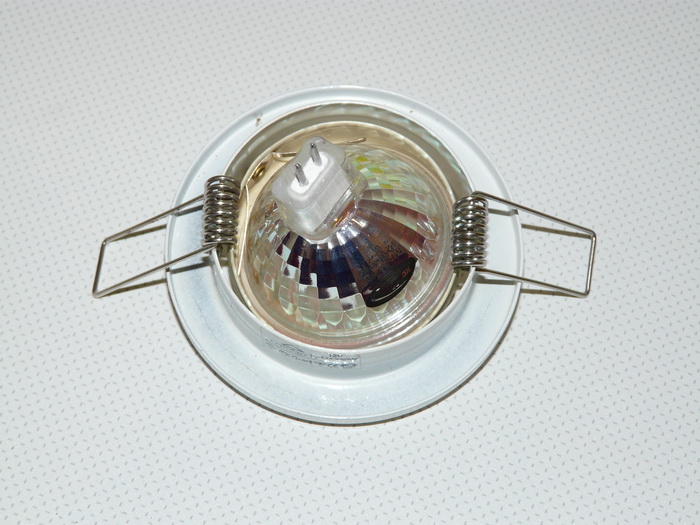
We insert the horns of the light bulb all the way into the holes of the cartridge: 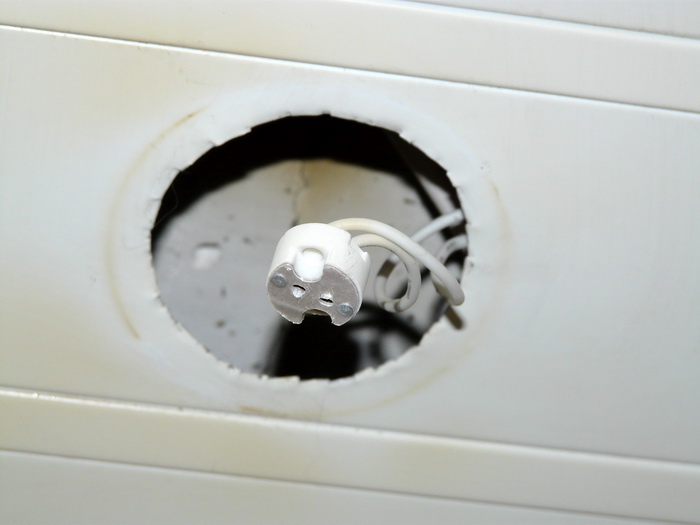
Press firmly:
Now we compress the lamp springs: 
In the picture, I'm compressing the springs before inserting the light bulb into the cartridge, because it was difficult to do all this at once and still take pictures.
And put the lamp in place:
All. You can turn on the light. 
P.S. According to my wife, I also washed the ceiling around the lamp ...
Doing overhaul in a house or apartment, more and more often consumers stop at false ceilings. This design allows you to radically change the interior of any room, hide numerous defects. Any type of suspended ceilings, including Armstrong, is most often illuminated by built-in lamps, and, unfortunately, sooner or later the lamp in the lamps has to be changed. If the owner of the property assembled the suspended structure, then it will not be difficult to replace the element that has become unusable. And if this work was performed by a special construction company, then you will have to solve such a problem yourself. In this article, we will show you how to change a light bulb in a false ceiling quickly and safely.
Types of lamps for suspended ceilings
Before proceeding with the replacement of an unusable element, you should familiarize yourself with the types of lamps that are used in the suspended ceiling structure:
- standard incandescent lamps. This option is probably known to everyone, so the replacement process will not cause difficulties;
- energy-saving lamps. Even judging by the name, you can understand that this option consumes the least electricity. However, their service life is very limited. The more often such a lamp turns on and off, the less it will serve its owner. In addition, in a room with high humidity, for example, in a bathroom or shower, experts do not recommend installing an energy-saving light source;
- setting led lamp, you can give the suspension structure a kind of chic and originality, create beautiful panoramic lighting. In addition, this option is the most durable and reliable;
- The halogen lamp is best perceived by the human eye, moreover, it can be used in any room, including those rooms in which high humidity is constantly observed. However, having decided to use a halogen lamp in a suspended structure, you should be aware that this option quickly fails if there are sudden power surges in the network. A voltage stabilizer, which experts recommend installing additionally, will help solve this problem.
Component structures
 Before replacing a lamp that has become unusable, you need to familiarize yourself with the design of this element.
The main components, regardless of the type of lamp, are the following:
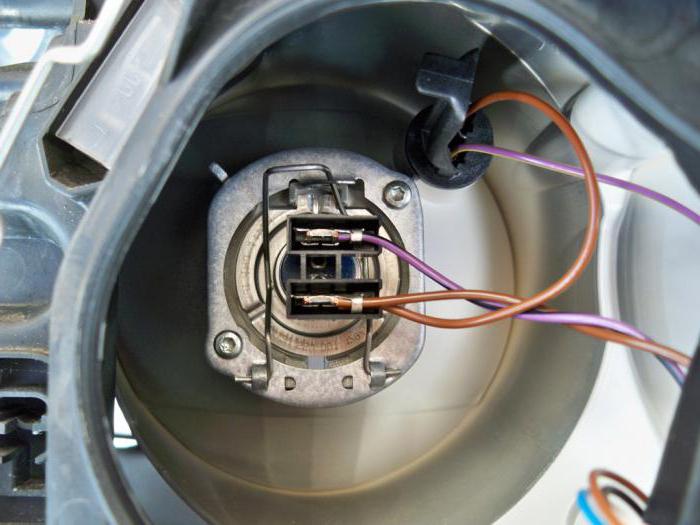
- housing, which includes a lamp holder and wires;
- a clamp with which the device is fixed to a suspended structure;
- a protective cover, the basis of which can be both plastic and glass;
- fixation rings.
Knowing what components the design of shelf lamps consists of, it will be much easier to replace an element that has become unusable.
The most popular element for modern stretch ceilings is a spotlight. They differ from other types of lighting fixtures in a wide variety of design designs, and they can work with any type of light bulbs. With the help of such lamps, you can perfectly complement the interior and emphasize its features. Over time, it becomes necessary to completely remove the lamp from the ceiling. And the most common reason for this is the replacement of a light bulb. Now we will learn how to change a light bulb in spotlight on one's own. You need to seriously prepare for this, because working with electrical appliances is very dangerous and can lead to disastrous consequences.
How to replace a light bulb in a stretch ceiling?
If your light bulb suddenly fails, you need to replace it immediately so as not to disrupt the operation of the general lighting system. But not everything here is so simple, because first you need to remove the lamp itself from the socket and only then the light bulb. Depending on the type of lamps, you need to perform different actions to replace them.
So, first we learn how to remove the lamp from the stretch ceiling to replace the lamp:
- First of all, turn off the light in the room, unscrew the part that holds the parts of the lamp together, and take it out of the socket piece by piece.
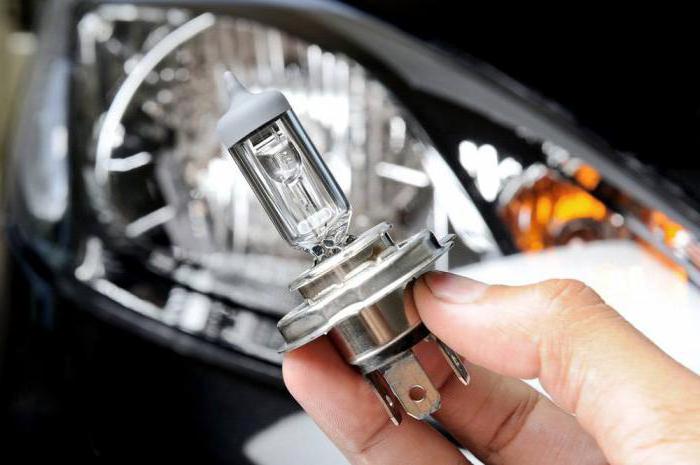
- If you are using ordinary incandescent bulbs, then you need to unscrew old lamp and put a new one in its place.
If you need to replace a halogen light bulb, you will have to spend a lot of effort. First, we do everything the same as in the first case, turn off the power supply, remove the cover from the lamp and remove the fixing ring.
Important! Remember that halogen lamps should only be removed with napkins or gloves. The fact is that the fat that impregnates the fingers can reduce the life of these products.
There are situations when lamps represent a single mechanism with light bulbs, and then you have to completely change the entire lamp.
How to change the LED lamp in the stretch ceiling?
Because it LED lights in our time are the most convenient and profitable, they are used everywhere. In addition, they consume a minimum of electricity, work properly for several years and shine very brightly. Nevertheless, even such light bulbs can fail. Therefore, it is imperative to figure out how to insert an LED lamp into ceiling lamp if suddenly the old model burns out.
The replacement of such devices occurs in several stages:
- You need to take a new lamp, check its serviceability with a tester.
- The electricity must be turned off in the room.
- Take care of autonomous lighting, because you can’t do anything blindly.
- Remove the mount from the burnt out light bulb.
- Remove the insulation from the wiring.
- Then disconnect the wires.
- Read the instructions that came with your new light bulb.
- Install the device according to the instructions.
- Return all the wires to their places and restore the insulation of the electrical wires.
- Remove the wires, attach the lamp cover.
- Attach the cover to the box with screws.
How to remove a chandelier from a stretch ceiling?
In fact, even an inexperienced person will be able to figure out how to remove a ceiling lamp or chandelier on their own. If you are very afraid of an electric shock, then you can turn off the entire apartment, as this will completely protect you, and you will perform the procedure calmly, quickly, without unnecessary worries.
The chandelier is removed from the stretch ceiling in the following sequence:
- Hanging chandeliers are easy to remove. First you need to remove the protective cap, stick your hand into the hole, then feel for the hook on which the chandelier hangs. You should grab it as tightly as possible in this place and remove it along with the wiring. But we still work carefully with the wires, even though they are de-energized. Carefully remove the insulation, and disconnect all wires from each other. All is ready!
- To dismantle a luminaire fixed with a cross-shaped bar, you need to perform a few more steps. It is necessary to remove all elements from the lamp: shades, lamps, decorative details. Then unscrew the cap, under which the mounting system is hidden. Detach the hangers by unscrewing the screws and pull out the chandelier straight with the fastener. Now remove the insulation and unwind the wires. The chandelier is free!
Important! If your chandelier is too massive, then do not try to remove it yourself, it is better to invite an assistant to insure you during dismantling.
How to remove a spotlight from the ceiling yourself?
During the removal of a spotlight, both minor and rather serious problems often arise, because not everyone knows how to remove a spotlight from a stretch ceiling correctly. If you first study the scheme for carrying out these works, then all this can be avoided. In addition, you need to be extremely careful so that you do not accidentally get electrocuted.
When removing such lamps, the following problems arise:
- The springs that secure the lamp to the ceiling hit hard on the fingers when it is pulled out.
- There is a possibility of getting an electric shock.
- When pulling out the lamp, too strong springs can damage the strobe.
So, to prevent all the problems listed above, you need to remember the basic safety rules:
- always turn off the electricity before dismantling lighting fixtures;
- be sure to hold the springs as tight as possible to protect the ceiling and fingers from damage.
Now you know how to disassemble a spotlight and change a light bulb in it. Therefore, from now on, you can not be afraid of difficulties in working with lighting fixtures, because it is better to replace a failed element than to leave it in the ceiling inoperative. Agree that there is no point in the original and beautiful stretch ceiling with fashionable lamps, if they do not shine and perform their functions. Faulty products will only spoil the mood with their presence.
Each light bulb in a car has a specific function. All lighting fixtures should work properly, as this ensures safety while driving on the road. But light bulbs tend to burn out, one earlier and the other later, but it happens. You cannot drive without low beam, high beam, direction indicators and brake lights. Therefore, it is necessary to install a new lamp. Let's talk about how to change a light bulb and what difficulties you may encounter during such work.
General provisions
Average lamp life depends on lamp life and conditions of use. Chinese products usually do not last long, on average 150-200 hours, but there are exceptions. But the original lamps can work for many years and still shine as brightly as on the first day. The average service life is about 1.5-2 years. It is after such a period that it is worth buying spare ones, although there should always be such ones. For example, if a lamp burns out on the highway at night, then driving is no longer so comfortable, and it is not safe at all. In this case, it is desirable to know how to change the light bulb on your car, often there is absolutely nothing complicated about this.
It is worth paying your attention that halogen lamps are installed on most cars. It is strongly not recommended to touch their flasks with your hands. This is due to the fact that during operation they heat up to high temperature. The remaining grease stains from the hands lead to the fact that the lamp simply burns out. The flask should also not be scratched. Otherwise, the replacement process is simple, now we will consider it.

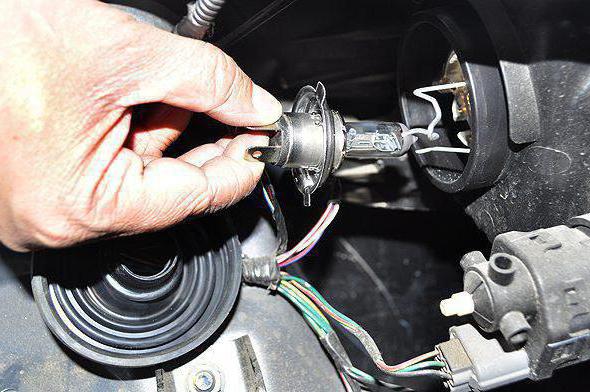
How to change a headlight bulb
The replacement process often comes down to the fact that first you need to understand whether it is worth removing the headlight or not. The design of most modern cars is such that the headlight does not need to be removed to replace it. The base is simply unscrewed from the seat, the lamp is removed from the socket and a new one is installed.
But in some cases, the headlight still needs to be removed. Sometimes this is done, rather, for greater convenience of work, and not as a necessity. To do this, unscrew the studs that go through the headlight housing and hold it firmly in place. But sometimes even a tool is not needed. For example, on the Volvo XC90, the hairpin has L-shape and does not twist, but simply inserted. If it is necessary to replace the dipped or main beam lamp, the headlight is very quickly removed and put back, no tool is needed in this case. But this design is not common, so it is better to keep a set of keys at hand.
How to change the license plate light bulb
Often, two lamps of the W5W type are installed to illuminate the number plate. This is the most common option without a base. The replacement procedure is usually similar on almost all vehicles. It consists in the fact that it is necessary to remove the mount from the latches. On modern cars, latches are often used, on the classic VAZ, screws were used for fixing.
Using a flat screwdriver, we snap off the fasteners and remove the lamp from the protective casing. After that we put a new one. Before placing it back into the case, it is recommended to check for operability. The assembly process is carried out in reverse order. It is worth noting that sometimes one lamp burns out, because of this, the license plate is not fully visible, so the traffic police may have questions. If one lamp burned out, then it is better to change both, so that in a month you do not climb there again. In general, everything is extremely simple, and problems should not arise. In some cases, when screws are used for fastening, they turn sour. You can douse them with WD-40 and wait a bit, after that everything should unscrew.
Did the dash light burn out? No problem!
Here a lot depends on the model of the car. But the essence, nevertheless, remains. Of the tools, we need a flat and curly screwdriver or a set of bits. Often the dashboard is attached with several self-tapping screws. We find and unscrew them. Then gently pull the tidy towards you. There is a block in the center, it must be disconnected, since without this it will be difficult to replace the required lamp.
With the panel removed, remove the back cover. It is held on by simple plastic clips. In the process, we try not to break them. Next we see lamp bases, each of which is responsible for highlighting a particular icon. Scroll the lamp base to the left side and take it out. Now you need to pull the light bulb out of the base. If you cannot remove it, you can try to fix the base with pliers, but only carefully so as not to damage it. Then we put a new lamp and collect everything in the reverse order. Since it is not difficult to change the bulbs on the instrument panel, this must be done, because you may not find out about some malfunctions just because the lamp does not work.
Replacing a lamp in a brake light
Here the procedure is somewhat similar to the one that needs to be done to replace the headlight bulbs. On the classics, it is necessary to dismantle the lantern; on foreign cars, this is often not necessary. First you need to open the trunk and remove the trim that blocks access to the lamp. After that, disconnect the wiring harness and unscrew the nuts securing the lamp to the body with the appropriate key. Now there is free access to the burnt out stop lamp. We unscrew it and put a new one, there is nothing complicated here.
To replace, you will need to remove the rear panel of the lamp. It is held on by plastic latches, carefully remove and try not to damage anything. It is advisable to inspect the condition of the remaining bulbs in the process of work and, if necessary, change them too, they cost a penny. So you know how to change the brake light bulb. In some cases, the lamp does not need to be removed, since the lamp cover is visible from the trunk. Turning it counterclockwise, pull it out, take out the burned-out lamp and put a new one. Assembly in reverse order.
Important information
Often it is worth installing in the headlights what stood from the factory. It is these lamps that last the longest. Also, do not increase the power if you feel that the light is not bright enough. This can lead to the fact that not only the contacts on the ceiling will melt, but also at the steering column switch. In the end, the latter will have to be completely replaced or money paid for an expensive repair. For example, if you increase the power by 40%, then the headlights may soon crack and become cloudy due to the high temperature, the quality of light in this case will become even worse.
Summing up
Since it is not difficult to change a marker light bulb or any other on a car, it is better to do such work yourself. True, there are some exceptions here. For example, on modern BVM or Mercedes cars, even a lamp cannot always be replaced on its own, since for this you need to remove a lot of things. But for budget cars it is quite possible.