Dimensions of spotlights for suspended ceilings. Recessed LED ceiling lights. Shape, color, structure of spotlights
Light fixtures need to be installed. What lamps can be used? To illuminate the room, you can use LED or fluorescent lamps. You can also use LED lighting to illuminate the room. Before installing lighting fixtures on a gypsum ceiling, gaps of the required dimensions must be made in the canvases.
Don't fall into the placement trap!
Important for placement: Is there only a hand shower or is there a larger shower head above? Then you shouldn't install the spotlight in the middle, even if it looks geometrically good. But that would divert too much light, and it would be too dark under a downpour.
Protective lights also available
Therefore, we will rather put a spotlight, shifted to the side in the ceiling, in order to obscure as little as possible. Naturally, the choice becomes easier if the spotlight is lit outside the protection area of the installation and does not need to be feared. Then, for example, the degree of protection, less, turn.
Ceiling with plasterboard with backlight: characteristic features
Illuminated plasterboard ceiling allows you to realize unusual creative ideas. To illuminate the room, you can use point light sources or lamps. If you like extraordinary solutions, you can mount a chandelier or make hidden lighting.
Installing recessed spotted gaskets in false ceilings - whether residential, office or industrial - often presents the user with the following problem. Recessed spotlights are surrounded by insulating material and other flammable materials used in ceilings and should therefore always be protected from overheating - no matter how efficient they are in terms of energy efficiency.
How to install a spotlight in the ceiling?
We offer three different solutions to prevent damage to the insulating material due to overheating of the recessed luminaire.
- Press the retaining pins into the drywall to prevent displacement.
- The recessed spotlight can now be securely and securely installed.
When installing the backlight, observe the following rules:
- Observe polarity.
- Cut the tape only in special places.
- If you need to connect more than 3 strips, please choose parallel connection.
- Before sticking the tape, check its performance.
During installation work, make sure that light sources do not fall into the place where the profiles are located. If necessary, change the marking of the profile or move the luminaire slightly to the side.
They translated the language of the organic form of the tower's silhouette into a stream of spatial continuum. With their classic shape and shiny chrome surfaces, recessed and surface spotlights blend in harmoniously with interior design. Lavishly equipped kitchens with attractive dining areas have been created for each brand. When illuminating the different kitchen areas, the aim was to replicate the different lighting requirements with a single pendulum profile.
Device of recessed LED ceiling lights
The ceiling light picks up the building's amorphous form and wraps around its inner core. Photo: Robert Sprang, Munich. The client's goal was to create an open and welcoming home that reflected the service and value corporate culture of the tax consulting firm.
Spotlights For plasterboard ceilings"data-essbishovercontainer="">
Spotlights for plasterboard ceilings come in various types and designs. They look neat on the plane of the ceiling and give maximum amount white or colored light that can be directed to a specific area of the room. Thus, with the help of them, you can divide the room into zones not only by the intensity of lighting, but also by the color scheme.
Types of LED lamps
Interior design: Swiss concept, Stuttgart. Photo: arg-lola, Stuttgart. During the purchase of a house, we present some doubts that must be considered. Not only is it about the perfect combination of style and color, other characteristics should be considered to increase efficiency.
Where to place a ceiling fan?
Typically, placing a ceiling fan is in the center of the room so that the air is distributed evenly, but this is functional for smaller rooms, in the case of large rooms, two fans are ideal. We must also pay special attention to the height of the roof in relation to the measures of the fan and its weight.
Spotlights are installed in suspended ceiling systems made not only of plasterboard, but also in mineral fiber slabs, for example, structures such as the Armstrong system.
The wiring for spotlights is hidden behind the suspended ceiling structure, so it does not have to do the laborious work of installing a strobe to drown the cable in them. In addition, the technical part of the device will also be hidden in the interceiling space or in the ceiling, and only the decorative part of the lamp will remain visible, so they will look aesthetically pleasing and neat.
When installing into a hollow ceiling or stucco, it is important to see the weight of the fan and it must be secured with a steel oscillating block and a screw. Important note. Due to the low resistance of false gypsum ceilings compared to the strength of a fake ceiling, the placement of fans on this type of surface should be more careful, taking into account a number of tips. If we place the fan on the plaster ceiling directly, it may crack or break the plaster due to the slight vibration they create when rotated.
In order to choose one of the types of spot lighting devices for different residential premises, to correctly draw up a project for their installation, it is necessary to understand their characteristics and classification.
Point devices are divided according to several criteria - these are the types of lamps, supply voltage, design, installation method and purpose for a particular room.
How to buy a ceiling fan?
Before carrying out the installation, make sure it is possible with a professional and well secured to the roof for your safety. When in doubt, give up trying. We always recommend fixing it on the stove. If you go this is an important choice due to its price and long life, it's better that they are not cheap fans as it can give you problems with noise, buzzing or engine failure in a short time. Always look for quality material in your materials, this is a guarantee of enjoying it for many years.
It is important to know these differences, since some of them will help save energy, others will help to comply with certain safety requirements when operating appliances, and still others will help harmonize the design of the room.
Luminaire design
If the design of spotlights is considered from different points of view, then they can be divided:
Types of ceiling fans
Our fans are guaranteed for 15 years for motor damage and 2 years for other parts of the device.
Advantages between ceiling fans with light or ceiling fans without light
When buying a fan, it is interesting to know how to choose whether you want it to be one or one, since depending on what we have, it is possible to come better than the other. For those who have light, we have the dual function of being a lamp and a fan, not having a pendant lamp, but if you already have Various types lamps to light a room, such as floor lamps, table lamps and wall lamps, you can do without a ceiling lamp and use a ceiling fan without light.- for built-in and overhead;
- on rotary (cardan) and non-rotary;
- for single and cardan (block);
In addition, there is a division according to the type of lighting elements (lamps) used, by voltage, as well as by the level of moisture and dust protection.
- Embedded and overhead models
The design of such lighting devices, first of all, differs in the way they are installed. They are divided according to this criterion into overhead and built-in.
Advantages of ceiling fans
When the heat comes in, fans are a great option, before air conditioners, they provide a pleasant feeling of freshness with much less energy consumption. Another great advantage ceiling fans is that they are easy to install and require very little maintenance. Something rare is that they suffer some kind of failure and in case of vibration it will be necessary to tighten the pieces.
Steps to choose a ceiling fan
Ceiling fans have blades that move air around and create freshness, if it comes with air conditioning, it helps distribute air quickly and save energy. Most fans have a reverse function, for use in both summer and winter for heating, distributing heat faster and with less energy. Based on the space the fan will renew, we need to have the diameter and size of the blades for adequate air circulation. You should report materials and features when making a purchase as some have more maintenance than others but are generally designed to be minimal. In the range of fans we can find different materials, for a room we recommend that their blades be made of wood and for a metal kitchen. We find a wide variety, from classic to modern, looking for the one that best complements the decor of the room. There are fan models of all prices, but here it depends on your budget, taste and need.
Ceiling Fan Installation Guidelines
- We must clearly understand the real needs when purchasing a fan.
- Measurements How many meters are in the room?
- Materials and their operational characteristics.
- What price?
- Embedded options are distinguished by the fact that their entire technical part is located in the inter-ceiling space, and the decorative frame and the entrance to the cartridge for screwing in or installing a light bulb are on the outside of the suspension system.
- Overhead lights are fixed directly to the plasterboard surface, and their installation is significantly different from the built-in version. The installation of such models sometimes has more similarities with the installation of a conventional chandelier, since the lamp holder is located in the ceiling, fixed on the outside of the false ceiling structure.
Installation of fixtures in the ceiling
If semi-concealed profiling is acceptable, panels with a red "Vector" detail in mineral, wood or metal are good decision. Q: What is the maximum length of hangers for hanging systems? . The length does not affect its tensile strength or load capacity. If the rope suspension system is to be connected longitudinally, the breaking strength of the mechanical connection system should not be less than permissible load any of the profiling connecting fittings; it provides relevant information.
A fixed lamp is “tied” to its lighting area
- Rotary (they are also called cardan) models are distinguished by the fact that the cartridge in their design is built into a special additional articulated device, for example, two rings on the axle shafts. It can be rotated and installed at different angles with a lamp screwed into it. It is these models that allow you to direct the light in the right direction to illuminate a separate area of \u200b\u200bthe room.
Q: What type of cords should be used for a metal roof? . Therefore, suspensions must be stiff enough to withstand upward pulling forces and, as such, cable hangers or the like are not recommended. In all cases, the tensile strength of the top fastening must not be less than the load capacity of the hanger as indicated on it. Q: Do the hangers have to be absolutely vertical in the main grading profiles? Q: What suspension systems should be used with non-aggressive profiling? . If you are in doubt with the internal sales team, they can advise you on products that suit your needs.
Rotary blocks can be equipped with both built-in and overhead types of spotlights.
The same type includes lamps fixed on a rod, the so-called spots. The lamp holder is located in a special housing, which has a hinged swivel mechanism. The case is mounted on a leg, with which it is fixed on a bar or decorative panel.
Q: What is the minimum camera depth for installation suspended ceilings? . Answer: The answer to this question depends on two factors: the plate used and the profiling system used, as well as the practical aspect of the installer, who can put his hands into the plenum to join the hangers to the main profiles.
Video - Which fixtures are best for a stretch ceiling
In open mesh systems, in which the panel is positioned upward through the mesh before resting it in place, and vice versa to disassemble it, about 150mm is needed between the slab and the top of the main profile lamp. Naturally, the services that exist in the plenum, such as canals, pipes or electrical cables, can change these limits.
A: Our general catalog contains detailed slope and elevation plans, but if these plans do not meet your needs, please contact your in-house sales team for more information.
- Should the main profiles be in the direction of slope or travel?
- Q: How do I create a sloped level change on a roof?
- Single and block lamps
Spotlights can be single or assembled in blocks of several units.
- Single lamps are equipped with one cartridge, respectively, have one lighting lamp.
- Block lighting devices are a structure consisting of several lamps that are built into one housing, which is either a box of any shape, or a special rod.
With profiles of 200mm and 50mm or 150mm and 100mm vertical together you can get the required height. However, the ends of the profiling must be at the appropriate height for the plate being used.
A: This is a practical detail, but you should check if your requirements allow or conflict with your proposal.
- Q: At what interval should the corner of the perimeter edge be fixed?
- Is it correct?
Wiring diagram for spot ceiling lights
This part can be used when it is necessary to prevent unauthorized access to the indoor chamber or when in sports venues the impact of the balls can bring out the panels. However, if the roof is resistant to fire, it must prevent the expansion of the profile. For example, in food preparation and manufacturing establishments, as well as in dining halls, it may be advisable to seal to prevent fibers from escaping into the atmosphere.
Depending on the design of block lamps, they can also be rotary and non-rotary, built-in or overhead.
Any design of such models is more massive, but it is also much more convenient to use, since by installing one unit with several rotary lamps, their light can be directed to different areas of the room.
Types of luminaires by lighting elements
In spotlights, they can be designed for the use of various lighting elements - this must be indicated in the instructions for the lighting fixture. So, in such lamps can be installed:
- incandescent lamps
- LED bulbs;
- halogen lamps;
- mercury (fluorescent) energy-saving lamps.
Lighting devices equipped with certain elements consume different amounts of electricity and can vary significantly in price.
- Conventional incandescent lamps are now quite rarely used in spotlights, as they are uneconomical in operation.
Luminaires equipped with incandescent lamps are considered "classic" devices, since they do not require special equipment - it will be enough to stretch high-quality wiring.
In addition to the wastefulness of incandescent lamps themselves, lamps designed to work with them have several more significant drawbacks:
Firstly, this is their height, which varies from 86 to 110 mm. This parameter must be taken into account, since the ceiling will become much lower, because the suspended structure will have to be lowered to the height of the cartridge, adding about 15 ÷ 20 mm of margin.
Secondly, a pronounced "minus" of such a lamp can be called its strong heating, especially if a lamp is installed in the cartridge high power. Plastic elements lighting device can't stand high temperatures and begin to gradually melt under their influence.
The only advantage of incandescent lamps is their affordable price, however, it must be taken into account that their service life is usually not very long.
- Halogen lamps are used to obtain powerful luminous flux scattered by a special glass shade. However, when installing such lamps in lighting fixtures, it should be borne in mind that they do not contribute to energy saving in any way. Their prices are slightly lower than led light bulbs but they also last a shorter time.
Most often, halogen lamps have a plug base, so if you plan to use them, then you need to choose lamps with the appropriate connector in the cartridge.
The height of halogen lamps is comfortable enough to be built into a plasterboard structure, which will need to be lowered from the ceiling surface by only 50÷70 mm. Since some halogen lamps operate on a voltage of 12 V, you will have to purchase a transformer for the entire installed system. In addition, for any "halogens" a very important condition for their long-term operation is a soft starter - the lamp does not reach full power immediately, but within a few seconds. Often this device is combined with a step-down transformer.
Halogen lamps create a powerful luminous flux that exceeds the illumination from conventional or LED lamps. Lamps of this type allow you to use a special dimmer to adjust the intensity of lighting. Luminous flux from fluorescent lamps has its own shades - warm and cold.
Given all the positive qualities of this type of lamp, they can be called the most popular among all existing lighting elements used in spotlights.
- energy saving mercury lamps, which are most often called luminescent, save electricity quite effectively, but they have several significant drawbacks.
- First of all, it is that they adversely affect vision, can cause rapid eye fatigue.
- Such lamps require special disposal, as they contain harmful human body substances, in particular the highly toxic mercury
- Another disadvantage of this type of lamps is their height, which is almost the same as that of conventional standard incandescent lamps.
The intensity of illumination from these devices will be higher if they are installed in overhead fixtures. Well, if they are screwed into built-in models that are deepened into a plasterboard structure, then there is a significant weakening of the luminous flux, even despite the reflective surface of the ceiling.
In a word, for spotlights they can hardly be called a good option.
- LED lamps are quite expensive, but they justify themselves by the fact that during their operation a minimum of electricity is used, and this helps to significantly save on its payment. In addition, quality LED fixtures last much longer than any other lighting elements.
The most economical option is LED bulbs.
LEDs can have different luminous flux, as well as cold or warm light. Lamps having a cool shade are usually used for installation in office space because they improve performance. Elements that give warm lighting contribute to rest and relaxation, creating coziness, so they are recommended to be used in living rooms.
If it is decided to install spotlights with LED lamps, then you can use a special device that regulates the brightness of the lighting - a dimmer. It will allow you to create the right atmosphere in the room with the help of light intensity, scattering or "compacting" it.
Some types of these lamps are equipped with a special shade that can create various shadow or color patterns on the ceiling. This effect can be used to decorate a certain interior style.
Often, LED lamps are given a "classic" look.
LED lamps are made with different pinouts - for a conventional threaded cartridge (with Edison thread 14 or 27 mm) and with a plug connection characteristic of "halogen lamps". In addition, spotlights can also have specific sockets for GX70 and GX53 LED lamp bases. A sample is shown in the figure below.
Special base types - GX70 and GX53
Based on the foregoing, it can be argued that LED lamps are the best option for installation in spotlights today. The price is still high, however, they are safe, durable and economical, and quickly justify their purchase.
Differences in spotlights by voltage
As a rule, there are two main types of spotlights:
- devices designed for 220 V networks alternating current;
- lamps designed for 12 V;
You can find models with LED lamps that require 3 V DC.
This parameter is indicated on the packaging of both the lighting device itself and the lamps intended for it.
The voltage supplied to the lamp will directly depend on its type, so you need to decide in advance on the lighting elements, since connecting and drawing up a diagram of point devices has its own characteristics.
If you need to lower the voltage, you will need to use a transformer. The operation of certain types of LED lamps will require the installation of an additional device - the so-called driver.
If it is decided to change the types of lamps installed in the lamps to others having a different design, principle of operation and supply voltage, then most likely it will be necessary to make changes to the wiring diagram.
Luminaire protection level
Spotlights can be open and closed - the place of their installation depends on this parameter.
The open design of the fixtures is suitable only for rooms with normal humidity, but they cannot be installed in bathrooms, and even more so in bath rooms. In such devices, the lamp is not covered by a ceiling, so moisture can significantly reduce the life of the prior or even cause a serious accident. Most of the lamps with rotary mechanisms can also be attributed to open - they also try not to use them in rooms with high humidity.
For bathrooms, swimming pools and bath rooms, it is necessary to purchase special moisture-proof lamps.
In order for lighting fixtures to serve for a long time and do not pose any danger, they must be protected not only from moisture, but also from dust. Usually, the degree of protection is indicated on the prior itself and, of course, in its technical documentation. This is the IP index followed by two digits.
The first indicator will tell you about the degree of protection against penetration. solids dust:
- 0× is a complete lack of protection;
- 1× - the device is protected from fragments up to 50 mm in size;
- 2× - indicates protection from 12 mm particles;
- 3× - from particles up to 2.5 mm in size;
— 4× — maximum size- 1.0 mm;
— 5× – partial penetration of fine dust is possible
- 6× - the device has a guaranteed protection against dust.
The second digit of the indicator will characterize the electrical appliance in terms of its protection from moisture:
- ×0 - moisture protection is completely absent;
— ×1 – the luminaire is protected from vertical ingress of water drops;
- ×2 - protection against drops falling at a small angle;
- ×3 - protection against splashes falling on the lamp at a large angle;
- ×4 - the lamp is protected from splashes falling on it at any angle;
- ×5 - there is protection against water jets;
- ×6 - the lamp is not afraid of direct exposure to a strong flow of water;
- ×7 - the device can be briefly immersed in water;
— ×8 – the luminaire can be under water for a long time, for example, when it is installed in swimming pools.
- Insulating corrugated pipe, in which the cable will be protected from various influences. The length also varies depending on the length of the wiring.
- Terminals for connecting wires when connecting fixtures. These can be screw terminals, spring terminals, or. And the most the best option- Vago reusable clamping terminals. Although they are more expensive, but not so much as to save on the convenience of work and on the security of connections.
- Voltage transformer. It will be required if 12 V halogen lamps are selected for installation. This device must comply with required power. Usually it is chosen with the expectation that its output power exceeds the total power of the installed lamps by at least 20 ÷ 25%.
- A current driver will be required when installing some low voltage LED fixtures. This device simultaneously plays the role of both a step-down transformer-rectifier and a current and voltage stabilizer - many LEDs are very sensitive to changes in circuit parameters.
In the case of choosing a series connection of fixtures, the driver must have a current margin for the normal functioning of the entire circuit.
However, it should be noted that serial connection has one important drawback - if one of the lamps fails, the operation of the entire circuit stops. Therefore, it is recommended to carry out parallel installation, but in this case you will have to purchase a separate driver for each lamp. Some models of luminaires are equipped by manufacturers with their own drivers, in which case they can be connected in parallel without any problems. In any case, when purchasing, you should always carefully read the technical documentation of the devices.
- The spotlights themselves. Their number is determined depending on the drawn up scheme and the size of the area of the room. Usually they are mounted at a distance of 500 ÷ 1200 mm from each other.
Tools for installing spotlights
For convenient and high-quality installation of fixtures, you will need the following tools:
- Electric drill or screwdriver for cutting holes in drywall.
- A drill bit for cutting holes of 60÷75 mm or an adjustable version of the drill ("ballerina"), on which you can set the desired hole diameter.
- Roulette and a long ruler.
- Indicator for determining the phase of the voltage.
- Screwdriver Set
- Wire cutters, pliers - if you plan to crimp the connecting sleeves.
- Insulating tape or heat shrink tubing of the correct diameter
- A sharp knife or wire stripper for stripping wires before splicing them, or a protective device.
Installation of spotlights on a plasterboard ceiling
In order not to be mistaken in the amount of material purchased, to determine in advance the location of the fixtures, and also to plan the cable layout for them, you need to draw up your own or find a ready-made scheme.
- The first thing they do before starting the marking and installation of cabling is to mount a frame made of a metal profile or a wooden beam for a plasterboard ceiling.
Here you need to take into account which lamps will be installed - overhead or built-in, since their installation is somewhat different from each other.
For example, for overhead lighting fixtures, it is necessary to fix a rigid base to the ceiling or to the frame, on which the panel of the overhead model will be installed and screwed through the plasterboard.
- The frame crate can be used to attach cable wiring to it, which is best to immediately “put on” in a corrugated plastic pipe.
- The tube is fixed on the crate on special brackets or screwed onto plastic clamps in several places, and the cable segments or loops 200 ÷ 300 mm long, to which the lamps will be connected in the places determined for their installation, are left in a free state.
- For ease of installation of lighting fixtures and for aesthetic reasons, they are placed at the same distance from each other - usually it is 500 ÷ 1200 mm. Later, the cable loops will be passed through the holes cut for them in the drywall and passed to the outside of the ceiling.
- Further, along the crate, drywall sheets are fixed, on which, using a tape measure and a ruler, focusing on the sheet connection line, the places where the lamps will be installed are marked. At the same time, it is very important to prevent a very common mistake by novice electricians when the intended hole suddenly falls on the frame guide.
- You also need to take into account that between the center of the future circle for installing the lamp and the wall there should be a distance equal to no more than 550 ÷ 600 mm
- If the circuit provides for the installation of a transformer, it is installed above the false ceiling, in the interceiling space, fixed on the crate elements or even simply laid on top of the sheet surface.
1 - overlap;
2 - plasterboard false ceiling;
3 - power cable supplied to the lamp;
4 - clips (clamps) holding the cable on the floor;
5 - transformer or driver.
- All wire connections that remain above the ceiling surface must be insulated with high quality. The best option- the use of modern Vago terminals. If twisting is planned, then it is pressed into a copper sleeve, and then it is qualitatively insulated with a heat shrink tube or insulating tape. Bare contacts or connections must not be left.
- It is very important to remember that no matter how the wiring diagram is drawn up, it is not recommended to run the cable diagonally, since if a malfunction occurs, it will be much more difficult to detect it.
- If selected complex scheme wiring, then a junction box is used for it, into which the main supply cable is connected, and the rest of the branches are made from it.
Illustration Brief description of the operation to be performed In the marked places, using a drill-crown for wood or a “ballerina”, as in the illustration, nests are drilled with a diameter several (2÷3) millimeters larger than the installation size of the lamp, but necessarily less than the outer diameter of the decorative flange that will close the hole.
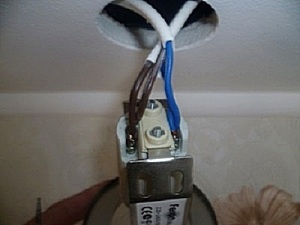
Work should be carried out with great care, carefully, slowly, so as not to damage the cable and not crumble the drywall sheet.It is very important to observe the correct connection of the wires, otherwise, when connected to the power supply, the lamps may burn out, especially when they are switched in series.
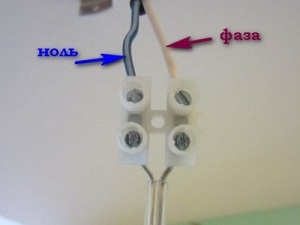
This is easy to do based on color coding conductors.
The blue color is always the “working zero”, yellow, green or yellow-green is the “ground zero”, and the color of the “phase” can be different. White, brown or red phase wires are more common, but this is not a dogma.
If the luminaire itself also has a color code for the wires, this should also be observed.
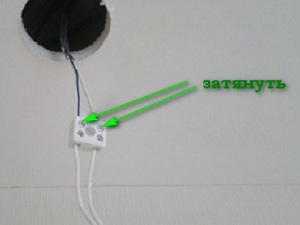
In the circuit breaker, only the phase wire should open.After the cable ends are cleaned, they are inserted from one side of the terminal and clamped with a screwdriver.
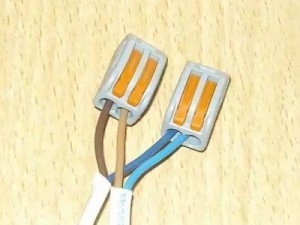
If spring terminals are used (only for single-core wires or when a special tip is installed on the "multi-core"), then the wire is inserted until a secure clamp is provided.Even more convenient - Vago reusable crimp terminals with a locking lever.
They are versatile and reusable.
The wires are inserted with the stripped section into the hole until the insulation, and then the lever snaps down all the way.Similarly, wires coming from the lamp are connected to the terminals.
Often there are devices that are not equipped with wires. In this case, the power wires coming out of the above-ceiling space can be attached directly to the lampholder terminals, as shown in the figure.
However, it is more convenient, nevertheless, probably, at first to connect the wire segments to the lamp, and then - just as described above, through the terminal - if necessary, dismantling will simplify the work.
But twists, even with reliable insulation, should be avoided - in the space above the false ceiling it is difficult to control their "behavior" - and sparking, heating, etc. are not excluded.Included with other models (usually those that are also suitable for stretch ceiling) includes a special ring that frames the cut hole.
This is a fairly sensible solution - drywall along the cut edge will not crumble when installing or removing fixtures, and the device itself will be securely tightly installed in the socket.
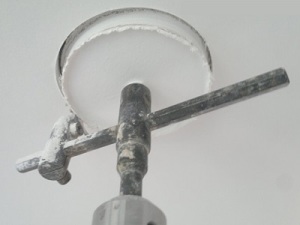
During installation, the "antennae" located behind the facing decorative flange of the luminaire are compressed, the luminaire is carefully inserted into the prepared hole.
After installing the stopper, they open themselves and securely hold the lamp on the surface of the plasterboard ceiling.As a result, the lamp should neatly, tightly, without the slightest sag, stand in the place prepared for it. Installation of an overhead spotlight, after fixing the drywall on the crate, takes place in a similar way, but with some features.
- When installing an overhead luminaire, the hole in the plasterboard false ceiling should not be made large, since the technical part of the luminaire will not be inserted into it. It will serve only to pull the cable loop to the ceiling surface for connection. A hole is also made in a certain place, where a rigid base (a platform or a piece of timber) is installed on top of the suspended ceiling to fix the fixtures.
- Further, the elongated cable is cut, its ends are stripped, and then, switched in the terminal.
- The contact wires of the lamp with stripped ends are also connected in the terminal, according to the wiring diagram, observing the color marking of the wire (phase-zero).
- On each overhead luminaire, the manufacturer provides a special bracket (mounting plate) (pos. 2), which must be fixed from the outside of the false ceiling to a rigid base. It should be noted that in different models of devices, such brackets may have different designs - but it is usually not difficult to deal with this.
- Excess cable (pos. 4) is tucked into the hole so that it does not interfere with the fixing of the bracket.
- Then, the bracket is screwed through the false ceiling to the rigid base.
- Further, the lamp itself is installed and fixed in it. Depending on the model, it can be screwed on both sides to the housing (pos. 1) with a plafond (pos. 3), open or with rubber seals, or even the plafond itself can be screwed into a mounting bracket.
Upon completion of the installation work on cabling and installation of fixtures, the wires are connected to the switch (phase with phase, and zero with zero). this work must be carried out according to the drawn up scheme. And it remains to turn on the power supply to the room in order to check the operation of the installed lighting.
The article should end with an important note: if there is no practical experience in installing electrical appliances with complex wiring, then it is better to entrust this process to a specialist. High voltage does not like dilettantes!
Video: an example of the practical installation of spotlights on a plasterboard ceiling