Installation of a furniture front on a built-in dishwasher. Dishwasher front installation.
For every housewife, the appearance of a dishwasher in the kitchen becomes an incredibly joyful event. After all, this household appliance can greatly facilitate the cleaning of dishes, especially when it comes to a mass feast or dinner for numerous relatives. However, the acquisition of such a unit is only half the battle, its installation remains the most difficult. At the same time, the machine should harmoniously fit into the interior of an existing kitchen.
Having decided to install the door on the dishwasher, it will not be superfluous to learn about all the subtleties, as well as the opportunities that this equipment provides.
Features of embedded technology and its facades
Having made the decision to opt for Bosch built-in dishwashers, you can get a really reliable assistant in solving daily chores. Moreover, it is these models that most harmoniously fit into almost any kitchen design solution, without taking up free space.

To make the equipment even more attractive and practical, you can use the following facade options:
- Installation of the machine in the kitchen cabinet. Thus, the equipment will be completely hidden from prying eyes, but at the same time it will also effectively cope with its main purpose - washing dishes.
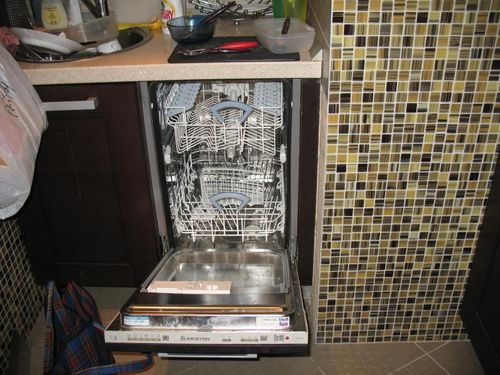
- Partial embedding of the machine. In this case, only the control panel remains visible, and the main part is hidden thanks to the furniture facade. For these purposes, it is best to use material identical to the furniture already available in the kitchen. Thus, the Bosch dishwasher will not stand out, as shown in the photo.
Whatever embedding option dishwasher no matter which one is chosen, it will make the kitchen space more practical, spacious and functional.
What is required to install the facade?
If installing a dishwasher is a rather complicated procedure, then you can put a facade on it with your own efforts.

For these purposes, you will need the following inventory:
- furniture panel (in this case, its appearance will directly depend on the design of the kitchen set);
- suitable countertop;
- yardstick;
- screwdriver;
- necessary fittings.

With all these tools at your disposal, you can easily install the panel on the dishwasher with your own efforts. To perform such a procedure, you will not need to have special skills and experience.
How is the façade installed?
There can be several ways to install dishwashers: this is the installation of equipment in a ready-made kitchen set or separately from it. It will be necessary to hang the door only in the first case, while performing such a manipulation is very simple, since well-known manufacturers have written in detail all the necessary actions in the instructions.

To hang the facade on a Bosch machine, follow the following algorithm:
- To begin with, the equipment is mounted in the place intended for this at the right height using special screws. It should be noted that built-in models are already equipped with ready-made templates, using which you can easily install the furniture front to the door of the dishwasher.
- Fasteners are attached to special grooves located on the machine body. Next, you will need to replace the small "native" screws located on the inside of the door with longer fittings with nuts. Thanks to this, the furniture facade will hold more firmly. In conclusion, it remains only to attach the handle and decorative elements to the door.
- The installation of the facade can be done with one more in a simple way. Before fixing it directly to the bolt, double-sided adhesive tape must be applied. Also, experts recommend that in the process of connecting equipment to the mains, take a cable that has a cross section of 1.5 mm. As for the outlet, it must be grounded. The required parameter is 16 Amperes.
You can see how to install the facade on the dishwasher in the video. All of the above recommendations should be followed exactly. With proper observance of them, the decorative door will be installed without any effort and with minimal time costs. If there is no self-confidence, then you can always entrust this procedure to experienced craftsmen who know all the subtleties and features of its implementation.
Hello dear reader! I will tell you about the nuances of installing a dishwasher under the countertop. There is a lot of information on the network about connecting the machine to communications, but the topic of integration into a kitchen set is not disclosed. Although the topic deserves a separate article.
Thank God, experience in installing a dishwasher in the kitchen is enough to eliminate unnecessary movements and thoughts on your part. You will know exactly what to do. The result is a well-executed installation.
- Dishwasher niche dimensions
- Dishwasher bracket
- The correct location of the dishwasher in the kitchen
- What to do with the plinth under the dishwasher
- Related video
- Conclusion
First I want to warn you that you should not take my recommendations as exclusively correct. I will talk about the mistakes and conclusions that gave me an excellent result. I would be glad if you in the comments, share your solutions.
Dishwasher standard dimensions
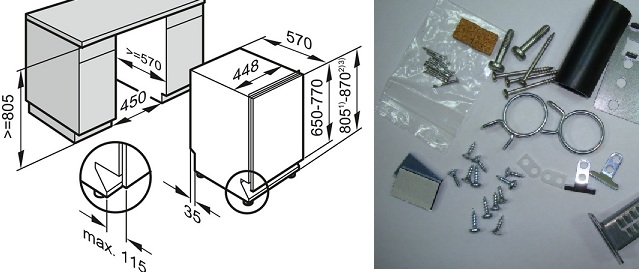
Built-in dishwashers come in 448 mm and 598 mm widths. The standard height for all built-in machines is 818 mm. Depth from 550 to 570 mm, mainly at 550. Standard depth of the lower modules.
When installing the dishwasher under the countertop, I use supports with a height of 100-120 mm on the lower cabinets, with a case height of 720 mm. I used to think that 150 mm legs were needed, but after several installations I saw that 100 mm was enough.
Built-in dishwasher dimensions
I want to draw your attention to for p / m. It shouldn't be in the niche! Otherwise, the car simply won't fit. It is better to place it behind the adjacent module with boxes, pulling out which we will gain access to the outlet.
The niche must be completely hollow. Those. no connecting strips between the cabinets, no sidewalls, bottom and back wall. The dishwasher completely fills the allotted space. See the photo above for the dimensions of the niche.
How to install a dishwasher in the kitchen
Initially, you should definitely level the device in three planes. Adjustable legs are provided for these purposes. Moreover, the rear leg can be adjusted with a screwdriver from the front side. Align flush with headset housings.
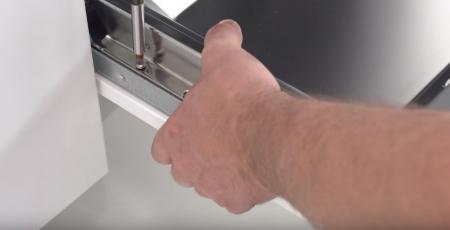
Opening the car door, pay attention to the side plugs. We take them out and attract the dishwasher, through the holes that have appeared, to the neighboring modules. We use self-tapping screws with a length of 35-40 mm. We put the plugs in place and close the door.
Within walking distance from you, located according to the calculation of cabinet furniture.
Dishwasher location in the kitchen
Now all the attention is on the placement of the device in the kitchen. The most convenient, in my opinion, in a pencil case. When the machine is raised to waist level, no need to bend down. Communications must be nearby so that the pumps do not wear out.
Try not to put the car on the edge of the headset. Because in this case, it will be necessary to calculate the additional sidewall. Moreover, the facade of the dishwasher will be internal relative to this sidewall. Otherwise, it will be blocked.
To place the machine under the hob, the worktop must be no thinner than the body of the hob. The supports on the headset must be h150 mm, for the ventilation gap between the hob and the dishwasher. Reliable electrical insulation.
How to install the facade on the dishwasher
To be honest, I never use printed templates for marking bindings. After several unsuccessful attempts, I abandoned this case. I feel sick from the sight of these charts and tables. Developers still have work to do.
The first step is to screw the handle onto the facade. How to fix handles in the kitchen, I told. Get an asterisk bit or 35 mm self-tapping screws. Once I "beamed" the facade, in the absence of a bit and 35 self-tapping screws. He pierced the facade with magpies.
After installing the machine in a level, I measure with a square from neighboring pedestals, taking into account the gaps, the exact distances to the mounting holes. I transfer them to the facade, core and fix them with the car door open. I adjust the gaps with my feet.
Within walking distance from you, located according to the calculation of cabinet furniture.
Plinth under the dishwasher
And finally, let's figure out what to do with the base. When opening the facade, the lower edge touches the plinth. I tried to drown my legs by 50-60 mm, no result. The shuffling is still there. Drowning by 70 mm is ugly and unsafe for the structure.
Therefore, the only the right decision do drank at the top of the plinth 20-30 mm. At the location of the dishwasher.
Conclusion
Now you can install a dishwasher in your kitchen with the ease of a professional. It is enough to study the article in detail and apply the knowledge gained. Good luck to you!
If you need detailing cabinet or built-in furniture,. We will certainly discuss the terms of cooperation and come to a consensus. For a moderate percentage for my work, I will prepare a detailed project for you on time.
What would you like to add to this article?
Tell me about your experience in the comments.
I would love to hear your stories!
With good thoughts about you, always in sawdust 🙂
Rekun Dmitry.
When buying a built-in dishwasher, all necessary accessories are included for installation.- Dishwasher door dimensions:
That is, in terms of height, the machine just passes under the kitchen worktop, set to a standard height of 822 mm, with a facade of 720 mm and a plinth height of 100 mm.
The level of the working surface of the tabletop will turn out to be 850 - 860 mm, depending on the thickness of the tabletop itself.
For a width of 600 or 450 mm, each manufacturer of kitchen fronts has a standard door.
- Front dimensions:
Mounted directly on the dishwasher door, no additional opening mechanisms, except for a furniture handle, are required.
First, the facade is hung, and only then the dishwasher body is leveled and fixed in the kitchen niche!
- Facade installation:
The hanging procedure takes an experienced craftsman 15-20 minutes.

You will need a screwdriver with a Phillips sting or an asterisk, an awl, a drill for holes under the handle.

After mounting the handle, we put the drawing on the back side. We mark the location of the holes with an awl, adjusting them according to the height of the mount relative to the door.
We fix the necessary hooks, according to the scheme. Having unscrewed the screws from the door, we apply and shift it relative to the door. The hooks must enter and secure the facade from the bottom or top side (depending on the manufacturer).
Having opened the door towards ourselves, we screw in long screws, instead of the old short ones.
- Door spring tension adjustment:

In addition, you can adjust the tension of the door spring yourself. Turn the screws to tighten or loosen the steel cable.
The tension of the door spring is correct if the door remains in a horizontal position when fully open, while being lifted to close with a slight push of a finger.
Complementary articles.
Home > Installation >
How to install the facade on the dishwasher
Installing the facade, unlike connecting the dishwasher, is quite easy, you just have to follow the instructions and do everything in stages. To install the facade, you will need the following tools and items:
- screwdriver,
- furniture panels,
- roulette,
- countertop,
- appropriate fittings.
How is the installation
The facade canopy is made only if the dishwasher needs to be installed in an already finished kitchen. Due to the fact that many of these devices come with installation instructions, this should not be a problem.
To install the facade, a handle is first fixed on it, for which the dishwasher will open. Bosch machine, Electrolux, Kandy, Ariston or Indesit. After that, it is necessary to install fasteners adapted to engage with the door of the device. There is a special paper overlay on the installed facade element, which indicates exactly where the holes need to be drilled in order to apply fasteners. You can drill directly according to the drawing to eliminate the possibility of error.
After all the holes are made, you need to install special fasteners. After that, the front is simply attached to the dishwasher. This happens by inserting fasteners into special grooves on the dishwasher door.

But on this, the installation of the facade has not yet been completed, since this hinged element needs to be fixed. To do this, first open the car door, and then unscrew a few bolts from the inside of the door. They are replaced with longer ones that will allow you to attach the facade. At the same stage, you can adjust the degree of tension of the machine door springs by turning the screws. By looking, you can get a more accurate picture of the process.
Advantages of the facade
Facade installation has several advantages:
- the device fits well into the interior,
- the control panel becomes visible only when the device is opened,
- facade reduces noise and vibration.
What is the difference between built-in dishwashers
Built-in appliances are different in that they are designed to be installed in a finished kitchen, and therefore their body is somewhat modified. The control panel on such models becomes visible only after opening the door and, as a rule, is located at its end. There are also partially hidden devices. The difference is that they do not need to be opened to manage.

When choosing such a technique, you can not pay attention to the appearance. When purchasing such a dishwasher, it is worth remembering that the distance from the walls to other furniture should be at least 3 cm. Appearance built-in appliances are not aesthetically pleasing, and their price is about 20% higher.
What characteristics should you pay attention to when buying
First you need to decide which model you want to purchase. There are two types:
- fully built-in dishwashers, the control panel of which is completely hidden;
- partially embedded.

Among the latter, there are devices that are not installed in the finished kitchen, but are designed to be placed next to other furniture. One of the most important characteristics becomes the width of the dishwasher. If he lives in the house a large number of people, you should purchase a device whose capacity is equal to 12 sets of dishes. In the case where the capacity is not great importance, models designed for 9 sets are purchased. There are also machines for 6 sets of dishes.

How to choose an integrated dishwasher
In order for the purchased device to please its owners, its choice should be approached more carefully. To do this, it is enough to evaluate several parameters. One of them is the availability of programs. Mandatory modes include:
The choice of programs depends on the degree of soiling of the dishes and their type. There is also the option of choosing a delicate wash designed for fragile items.
![]()
http://posudomoiki.vyborkuhni.ru
The most popular dishwasher installation consists of the following steps:
- Cold water connection.
- Outlet of the drain hose to the sewer.
- Connecting the power cord to the mains.
- Hanging the facade on the front door of the dishwasher.
When designing the installation diagram, it is necessary to take into account where the outlets for draining, filling and power supply will be located. It is not recommended to do this behind the machine, because. she can't be moved. On the side, outside the sink space, it will not be convenient to have access to them (for built-in appliances). Therefore, only the space under the sink remains.
First, consider the first 3 points that relate to connecting both built-in and freestanding dishwashers.
We connect the feed cold water.
one . You have a cold water outlet with a ball valve (¾ fitting). In this case, the connection will not be difficult, because. sealing gum is included and no fum tapes or other windings are required.
2. There is nowhere to connect the water supply hose. We will analyze this situation in more detail.
a) . Look under the sink to see how the cold water connection for the faucet is made. They are usually connected with hoses with a ½ threaded connection.
In this case, a ½ x ½ x ¾ ball tee, fum tape, or the like is best. Or assemble a similar configuration on your own, from a tee, ball valve, fitting (s).
The tee must be screwed onto the thread, instead of the cold water hose of the mixer, and on the opposite side, the mixer hose itself. It is desirable that the thread for connecting the inlet hose to the dishwasher is directed downwards (Fig. 1), therefore it is necessary (when buying) to pay attention to which side this tee is connected to.
Do not forget to make all threaded connections with the help of "winding" (or the like), with the exception of inlet hoses, which are provided with sealing rubber bands.
b) . The connection of the mixer is made by collet connections. In this case, the installation of the tee occurs in the same way as above. A slight inconvenience will be an additional shutdown of cold water in the kitchen (if possible) or in the entire apartment.
The only difference is that the tee will need to be installed in front of the faucet with a push-in connection.
in) . You have the old way of supplying water to the sink faucet, using metal pipes and couplings. This option is increasingly becoming a thing of the past, but for the sake of completeness, we will consider it.
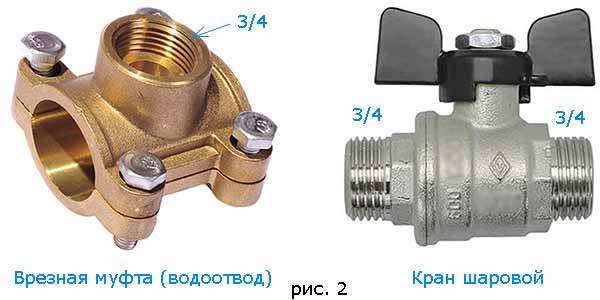
You will need to purchase a "mortise coupling" (drainage) (Fig. 2), a ball valve (fitting ¾ on both sides) and winding.
Install the mortise coupling on the pipe, drill a hole and screw on the tap, then connect the inlet hose.

3 . The hoses must be laid correctly, not tight, and it is better so that the dishwasher can be pulled out without disconnecting them. Therefore, most likely they (the inlet and drain hose) will have to be lengthened.
We organize a drain into the sewer.
There are several drain connection options.
a) . Directly into the drain pipe, using a tee and sealing gum for the drain hose. At the same time, the connection configuration must be made so that the height of the drain hose bend is maintained and water does not enter it (Fig. 3), flowing from the sink or other drain sources (otherwise, water may be drawn into the dishwasher and then flow out onto the floor). ).

b) . In the siphon of the sink with a tap for connecting the drain hose. In this case, you don’t have to invent anything, because. the design of the siphon provides for everything, and that the water from the sink does not flow into the drain hose, and the height of its level, and the absence of "self-draining".
Electrical connection.
It is better to place the electrical outlet on the side of the dishwasher, because its installation at the back can interfere with pushing the machine into place.
The best way to supply power to the dishwasher is a separate outlet from the machine panel in the apartment or on landing, with a separate 16A machine. In the event that this was not provided, if possible, run it from the shield, using a wire with a cross section of 3x1.5 (minimum) and a grounded socket. If this is not possible, then try to run the wire from the nearest grounded outlet or, in extreme cases, use a quality extension cord.
Installation of the facade on the front door.
The following steps apply only to embedded technology.
Before installing the facade, it must be taken into account that most of them are not adjustable in height relative to the door. All adjustments are made by twisting the legs.
Therefore, it is better, before installing the facade, to push the dishwasher in and adjust its position. Measure the distance from the upper mounting holes of the door (which will later include facade fasteners or screws) to the edge of the countertop (distance A) and the distance from the upper edge of the adjacent facade to the edge of the countertop (distance B) (Fig. 4), then calculate using formula A – B = C (distance from the edge of the facade to the upper mounting holes on the front door).

Then you take the paper template supplied with the dishwasher and attach it to the inside of the facade with adhesive tape, taking into account the calculations obtained. We advise you to check everything.
Next, mark the holes (strictly in the center) with an awl or something similar and drill (at an angle of 90) with a drill to a depth not exceeding the thickness of the facade. Choose the diameter of the drill half the diameter of the screw (usually from 1.5 to 2 mm) and insert it into the drill so that it does not protrude more than ¾ of the facade. Such holes, in the end, will be more reliable than screwed screws without pre-drilling.
Holes for the door opening handle, it would be better to drill from the front side. Otherwise, the coating may be damaged (chipped) around the hole when the drill exits. On the inside of the facade, it may be necessary to drown the handle mounting bolts, because. they may not allow the facade to lie tightly against the dishwasher body.
Screw the fasteners and fix the facade according to the instructions. For some machines (for example, BOSCH, SIEMENS), do not forget to replace the short screws with long ones (4 pcs), which tighten the facade through the door (two at the top, two in the middle), along the edges.
If there are things you can't do, call a specialist.


