Peacock tail metal decoration for the garden. Peacock from plastic bottles - a fantastic decoration for the garden
In order to be beautiful and entertaining in a garden or courtyard, it is not necessary to spend money on expensive accessories. Using the usual improvised materials, you can create animals that will become an unusual decoration and fun for children. Today, crafts from plastic bottles, the peacock is one of them.
Necessary materials for the master class
To create an original composition, you will need a lot of plastic containers of different sizes. You can accumulate it in advance or go to work, over time supplementing the craft with new bottles. In general, you will need:
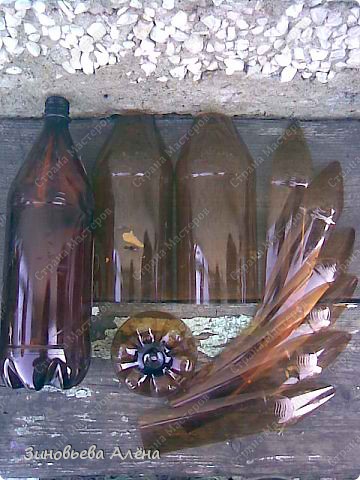
- 3 plastic bottles, preferably transparent, with a displacement of 5, 2 and 1.5 liters;
- about 10 pcs. green plastic containers, with a volume of 1.5 and 2 liters;
- about 4 plastic trash bags (blue);
- foil or candy labels;
- wrapping oilcloth of blue color, or wrappers of the same shade.
- Materials for fastening crafts are also required:
- transparent tape, but its blue or green shades are also suitable;
- about 1 m of tight rope;
- paper clips with a stapler;
- sharp scissors.
After the right materials collected, all plastic containers must be thoroughly rinsed and dried.
Read also:
How to make a peacock from plastic bottles: step by step instructions
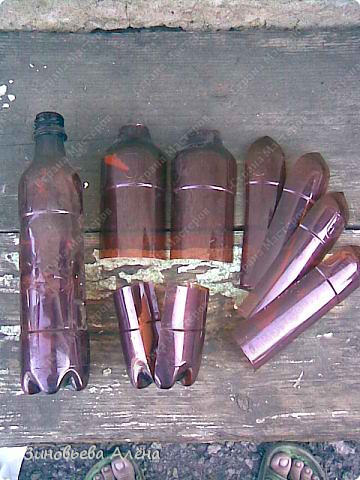
- First, the body of the “bird” is made from two-liter and five-liter bottles. An asymmetric cut is formed in them: the neck is cut off in a larger bottle, and the bottom is cut off in a smaller one. Then a two-liter bottle must be fixed in the hole of a five-liter one, and then everything should be fixed with tape. This will be a sketch of a peacock stretching its neck.
- The head of the "bird" must be made from the bottom and top of the bottle. The beak will imitate a pair of plastic strips, which are fastened with tape to the head. Two finished elements must be securely connected with adhesive tape.
- In the bottom of a five-liter bottle, several punctures need to be made, in different places, necessary to fasten the body to the tail.
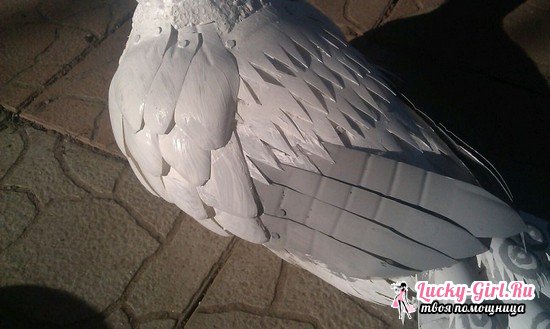
- Next to create crafts feathers should be formed from garbage bags. They must be cut into strips about 15 cm wide, and make a fringe at the edges. The strips need to be folded lengthwise so that a couple of layers of feathers remain, and then attached to the body of the “bird” with adhesive tape. At the bottom of the torso, you need to leave a little space in which there will then be a hole. The head is also wrapped in blue plastic bags, but without fringe. It is necessary to attach several plastic strips to it, which will serve as a tuft.
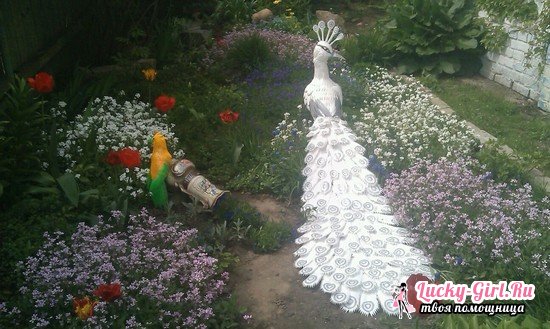
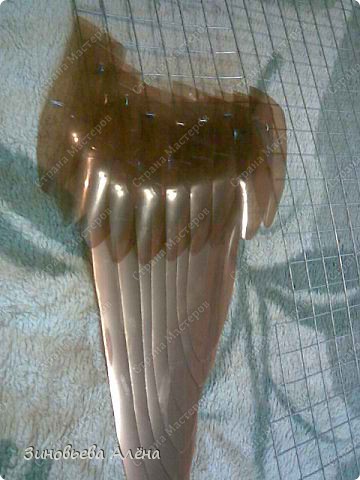
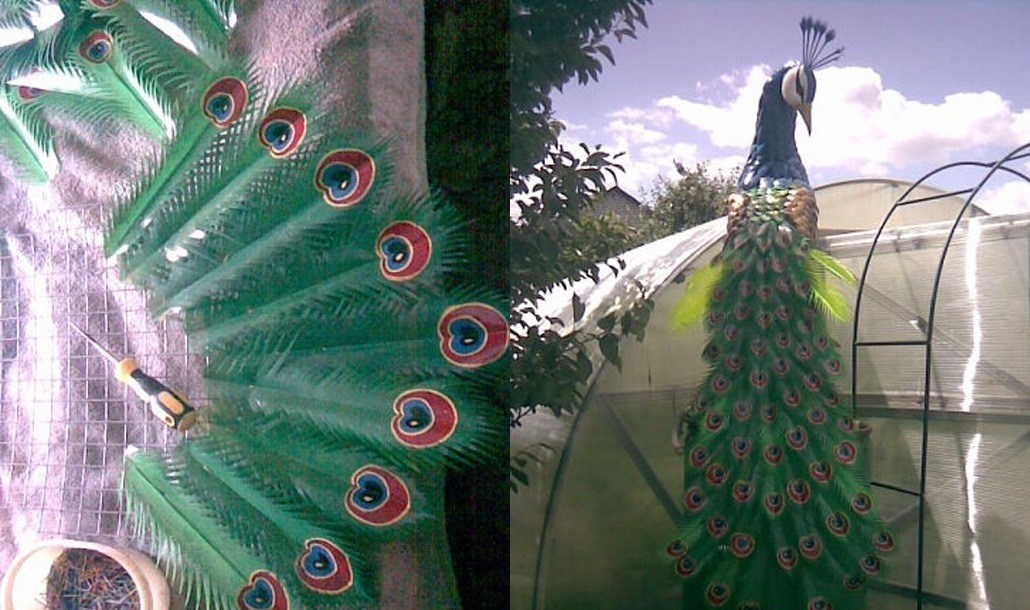
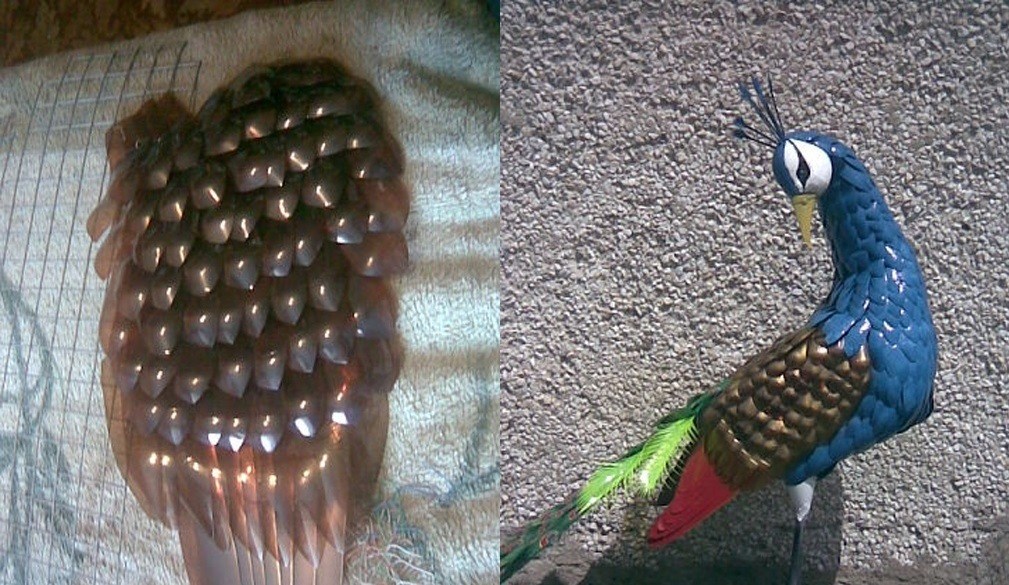
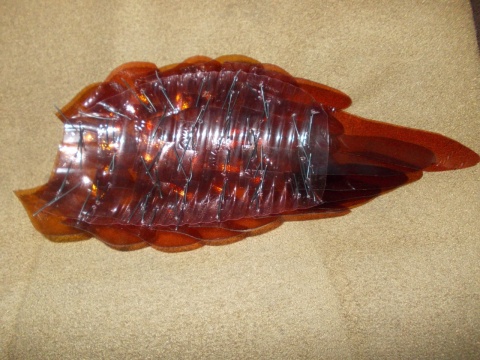
- A green plastic container is required for the tail. In each, you need to remove the bottom and top, cut along and round a little. The rest of the plastic needs to be cut into circles, and wrap each with foil. A fringe is made on the feather plates, and a circle in foil is attached to the top of the formed feather. You should get 27 feathers, which are connected to the body using a semicircle cut from a plastic container. Its radius should be approximately 20 cm, the first 12 feathers are attached to it. Already 9 feathers are attached to the next semicircle, then 6. At the end, you should get a beautiful fan, the layers of which are connected with paper clips.
- The decisive moment in the manufacture of a peacock is the connection of the tail and body structure. A rope is pulled into the lower part of the “bird’s” body, where holes are cut in advance, which should sew the tail and body together. To make the work go faster and easier, the stitching points must be outlined in advance.
- After that, the final touches come: the formation of a peacock crown with foil circles, as well as painting the beak with moisture-resistant paint. If the craft will stand on the street, it must be weighted so that the wind does not blow it away. To do this, sand must be poured through the formed holes, after which nothing will be scary for such a peacock.
In order to be beautiful and entertaining in a garden or courtyard, it is not necessary to spend money on expensive accessories. Using the usual improvised materials, you can create animals that will become an unusual decoration and fun for children. Today, crafts made from plastic bottles are very popular, a peacock is one of them.
Peacock from plastic bottles: materials for the master class
To create an original composition, you will need a lot of plastic containers of different sizes. You can accumulate it in advance or go to work, over time supplementing the craft with new bottles. In general, you will need:
- 3 plastic bottles, preferably transparent, with a displacement of 5, 2 and 1.5 liters;
- about 10 pcs. green plastic containers, with a volume of 1.5 and 2 liters;
- about 4 plastic trash bags (blue);
- foil or candy labels;
- blue wrapping oilcloth, or wrappers of the same shade.
- Materials for fastening crafts are also required:
- transparent tape, but its blue or green shades are also suitable;
- about 1 m of tight rope;
- paper clips with a stapler;
- sharp scissors.
After the necessary materials have been collected, all plastic containers must be thoroughly rinsed and dried.
How to make a peacock from plastic bottles: step by step instructions
- First, the body of the “bird” is made from two-liter and five-liter bottles. An asymmetric cut is formed in them: the neck is cut off in a larger bottle, and the bottom is cut off in a smaller one. Then a two-liter bottle must be fixed in the hole of a five-liter one, and then everything should be fixed with tape. This will be a sketch of a peacock stretching its neck.
- The head of the "bird" must be made from the bottom and top of the bottle. The beak will imitate a pair of plastic strips, which are fastened with tape to the head. Two finished elements must be securely connected with adhesive tape.
- In the bottom of a five-liter bottle, several punctures need to be made, in different places, necessary to fasten the body to the tail.
- Next to create crafts feathers should be formed from garbage bags. They must be cut into strips about 15 cm wide, and make a fringe at the edges. The strips need to be folded lengthwise so that a couple of layers of feathers remain, and then attached to the body of the “bird” with adhesive tape. At the bottom of the torso, you need to leave a little space in which there will then be a hole. The head is also wrapped in blue plastic bags, but without fringe. It is necessary to attach several plastic strips to it, which will serve as a tuft.
- A green plastic container is required for the tail. In each, you need to remove the bottom and top, cut along and round a little. The rest of the plastic needs to be cut into circles, and wrap each with foil. A fringe is made on the feather plates, and a circle in foil is attached to the top of the formed feather. You should get 27 feathers, which are connected to the body using a semicircle cut from a plastic container. Its radius should be approximately 20 cm, the first 12 feathers are attached to it. Already 9 feathers are attached to the next semicircle, then 6. At the end, you should get a beautiful fan, the layers of which are connected with paper clips.
- The decisive moment in the manufacture of a peacock is the connection of the design of the tail and torso. A rope is pulled into the lower part of the “bird’s” body, where holes are cut in advance, which should sew the tail and body together. To make the work go faster and easier, the stitching points must be outlined in advance.
- After that, the final touches come: the formation of a peacock crown with foil circles, as well as painting the beak with moisture-resistant paint. If the craft will stand on the street, it must be weighted so that the wind does not blow it away. To do this, sand must be poured through the formed holes, after which nothing will be scary for such a peacock.


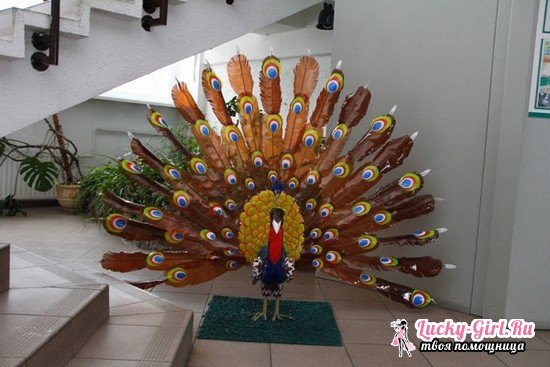
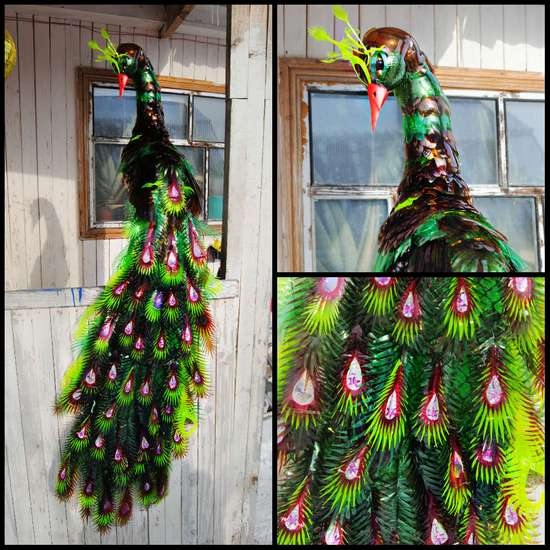
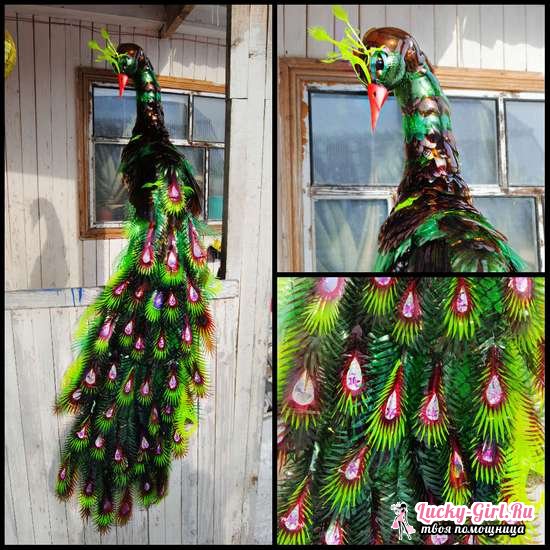
Making a peacock from plastic bottles is very simple. You will be surprised that a beautiful and original decoration turned out so quickly from a mountain of garbage. This craft can decorate a playground or put it in the garden. A motley and bright peacock will not only please the children, but also cheer up adults.
1. People often ask how to do it bird peacock for garden from plastic bottles I have tried to explain to you in detail. I filmed the entire process of making it. But try not to copy it to the smallest detail, try to make your own unusual bird peacock. I will give just the principle of work, and how you will do everything depends only on your skill and yourself.
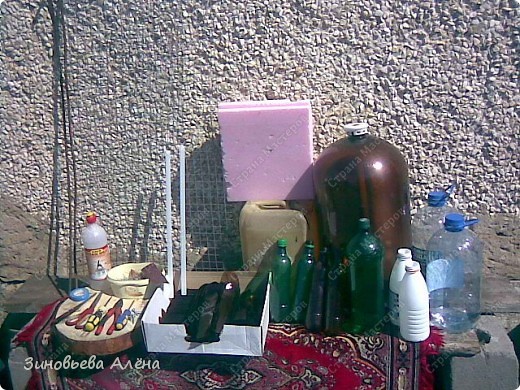
2. For the PEACOCK you will need:
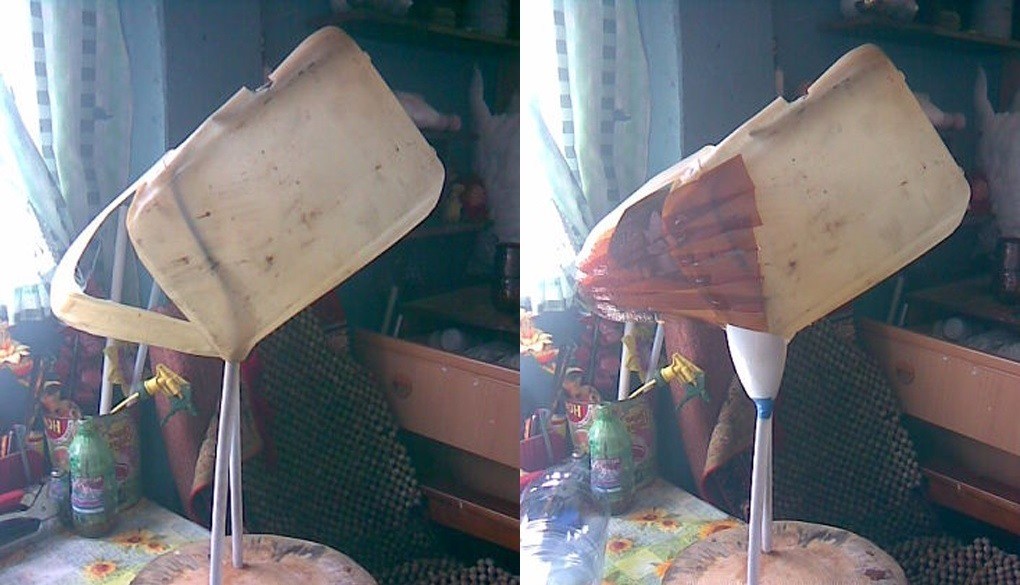
10L canister for the torso, strong wire and plastic tubes for the legs, welded metal mesh 45 x 150 cm, dense foam for the head, plastic bottles different forms and sizes.
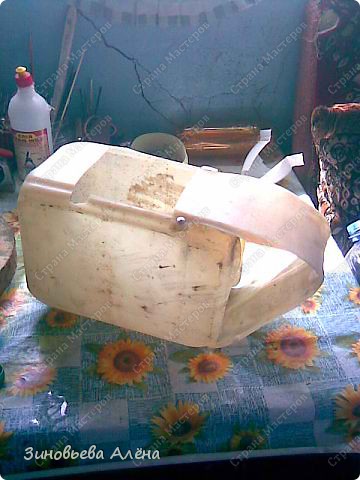
3. At the canister, I cut off a strip from above and from the side and, moving it back, I fix it with self-tapping screws or wire.
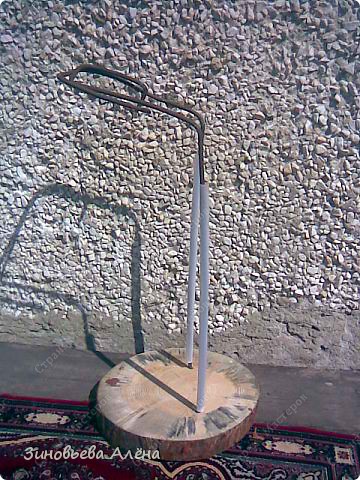
4. I bend the wire for the frame, put on the tubes and install on the stand. The wire must be bent so that the back of the bird is on the fold; this will be the top of the canister.
5. I attach the canister to the base with a wire, pulling it through the punctures with an awl to the legs, thereby we form the torso. We connect the legs and torso, give the necessary position for the future bird. Legs need to be fixed in several places with wire.
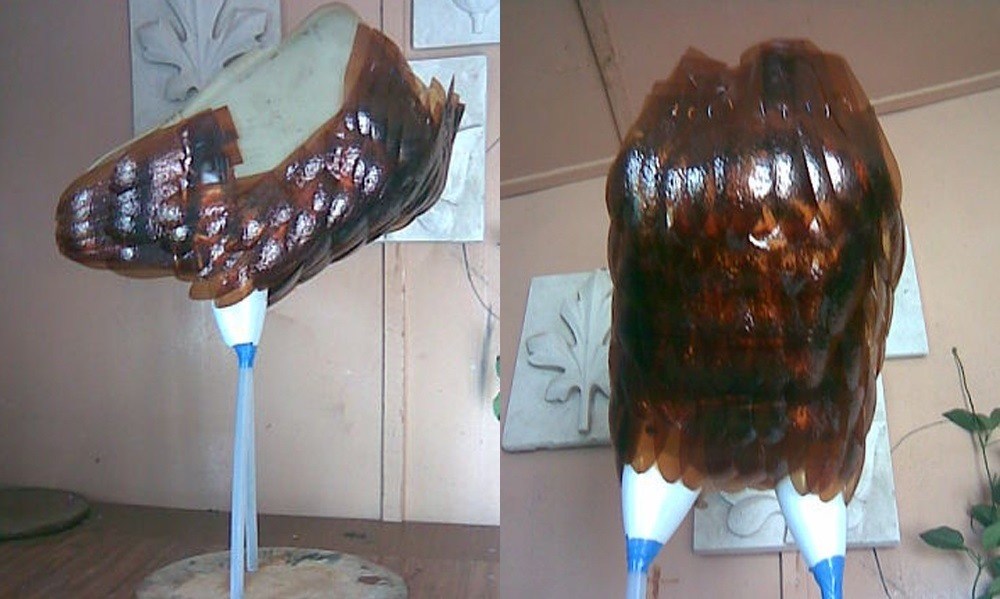
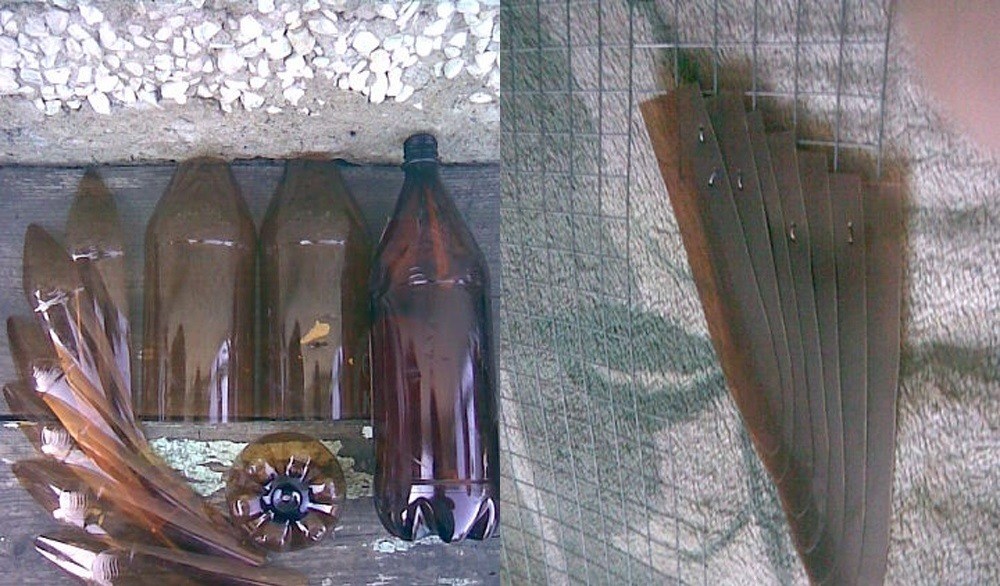
6. A dark two-liter bottle is cut into eight long feathers, from the bottom - another 6 short feathers. In total, we need about 60 plastic bottles .
7. We begin to fasten the feathers, row by row. At milk bottles, we cut off the smooth part that will be used for the top of the legs, fold them into a bag and begin to fasten them to the body.

8. With feathers I close the bottom of the body and a little on the sides.
9. Front view
10. I bend the mesh along the canister, "round" in front and give the shape of a wing. I also cut the tail with a triangle with the top at the body. Tail length optional.
11. This is what it looks like
12. I cut flight feathers from a 30l bottle. Width 5-7 cm. Can be replaced with 2L bottles
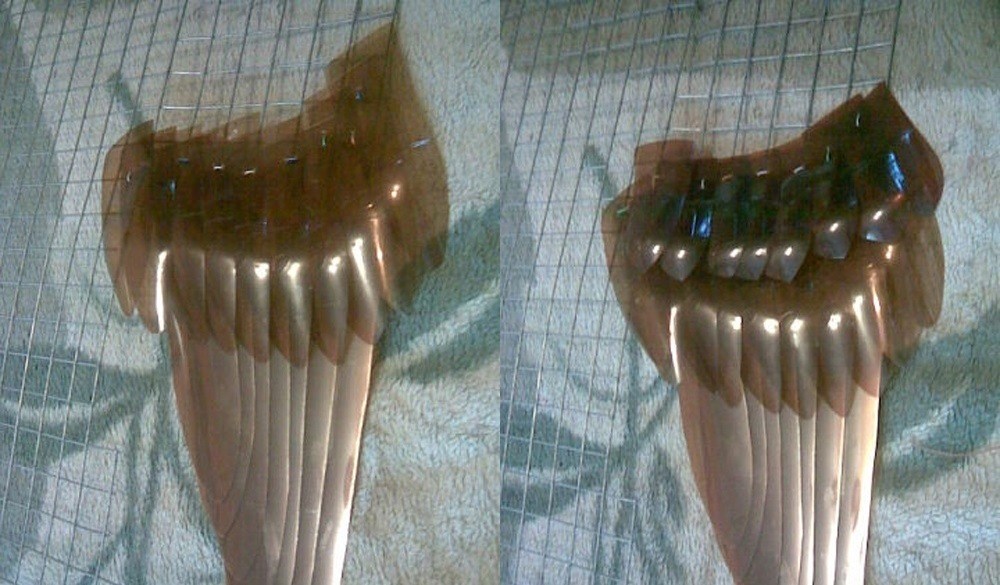
13. I fasten the feathers to the edge of the wing, shifting each feather relative to the previous one, trimming as necessary.
14. For the second row, you will need 1.5l bottles, which we cut into 6 feathers. You need 3-4 bottles.
15. I screw in a semicircle
16. I make the next rows from 0.5l bottles (4 feathers from 1 bottle). We will need about 30 bottles.
17. Also in a semicircle, overlapping the previous row by half.
Funny figurines, sculptures, flowerpots of an unusual shape, original fences and other bright details help to focus on the most beautiful corners of the garden. Some of these elements of garden decor can be made independently using various improvised materials.
If it has already appeared on your site, it's time to supplement the composition with other equally interesting crafts. Today we will talk about how to make a peacock from plastic bottles with your own hands.
To make a fabulous bird, you will need patience and various materials:
- Plastic bottles. The larger the peacock, the more they will need.
- Styrofoam for the manufacture of the body and head.
- A piece of linoleum for the base of the tail.
- stapler, awl and copper wire, adhesive tape, nails or glue to connect parts.
- Foil and acrylic paints for decoration.
If you plan to house your peacock outdoors, choose weather-resistant materials.
All elements ( , , , , and ) are made separately, and then assembled into one common design.
Torso.
The body is the main part on which the rest of the details are fixed. It can be made from various materials:
- Styrofoam.
- Plastic canister.
- Or the same bottles.
Video master class, peacock made of plastic bottles.
Four parts are cut out of the foam plastic (head, neck and two halves of the body) and glued together with liquid nails or any special glue.
With the right skills and enough physical strength, you can make a torso out of a plastic canister. Although it is rather difficult to fix other parts on such a basis, in the end the structure will turn out to be more stable and durable.
The third way is to make a base from two plastic bottles with a volume of 5 and 1.5 liters. The neck of a large bottle is cut at an acute angle, in the lower part of a small one they make the same cut, but in a mirror image. The sections are combined so that the design resembles the body and neck of a peacock, and fastened with adhesive tape. The head can be made from scraps (the bottom of a bottle and a cone) or from foam.
Paws.
You can make peacock legs from strong wire, metal-plastic pipes, or bottles. The latter are the easiest to make: cut off the top of two bottles and attach them to the body with their necks down. Insert metal tubes inside, with which you can easily install the peacock anywhere.
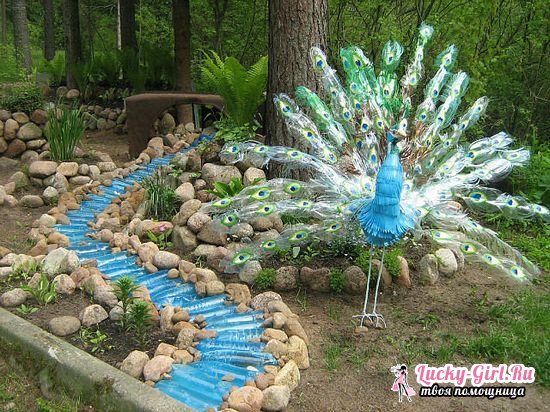
Tail.
Having prepared the basis of the future bird, proceed to the manufacture of the tail. The more time and bottles you spend on this work, the more magnificent the tail will be. It can be made in two versions.
1 option. Cut a base 100 to 170 cm long from a piece of linoleum. Attach the prepared feathers to it. Place the first row at the lower end of the tail, the next row on top of it so that the feathers of the next row cover the attachment points of the feathers from the previous one. Attach the finished tail with a narrow end to the upper back with nails (liquid or regular).
Option 2. Cut out a semi-circular piece from a large plastic bottle. Having fixed several rows of feathers on it, glue it to the back of the body. At the same time, make sure that the peacock looks good from all sides.
Wings.
The wings are in two parts. Lower, with long feathers, do this: cut middle part bottles, divide the resulting cylinder in half. Cut the resulting rectangles from the bottom so as to give them the shape of wings. Attach the pieces to the body. Collect the upper part of the wing from small feathers cut from the bottoms (they also cover the surface of the neck).
Plumage.
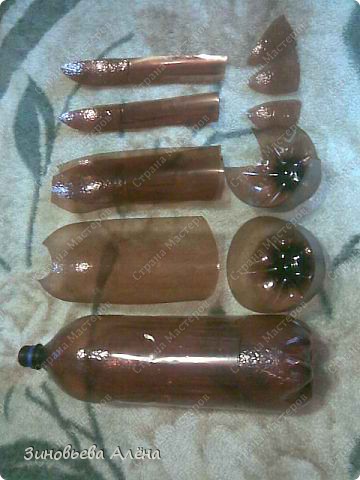
Making feathers is the most time-consuming process that will require perseverance, patience and a large number plastic bottles, one or more colors. Transparent plastic can be painted in any color with acrylic paints for facade work. Moreover, some craftsmen paint the blanks, others paint the finished bird.
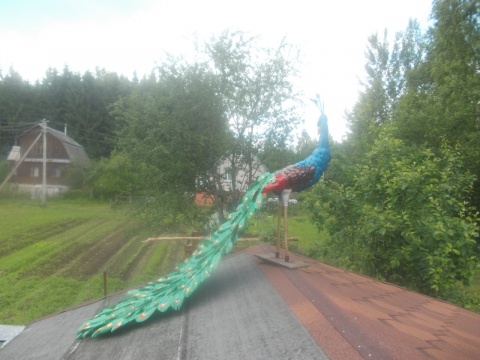
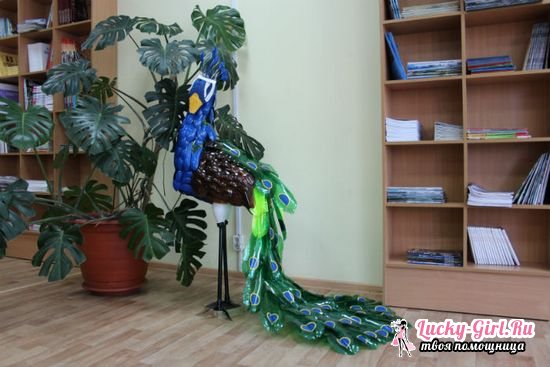
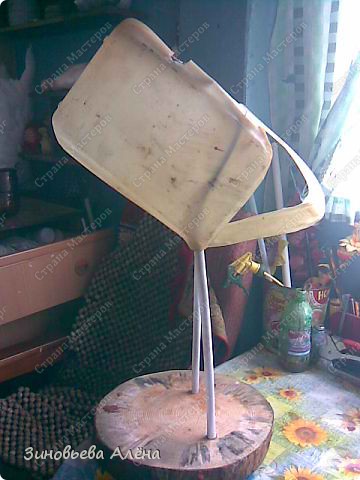
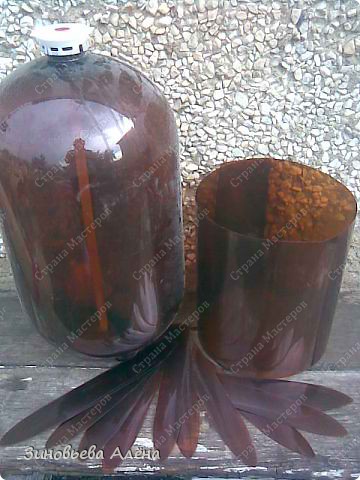
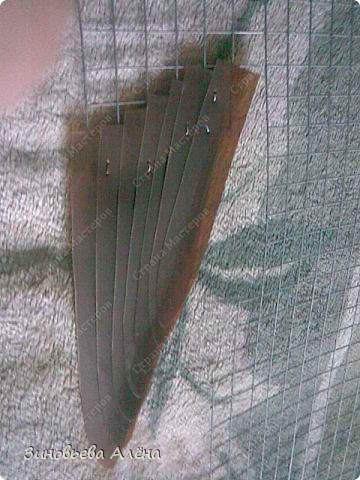
It is not difficult to make a peacock from plastic bottles, I will show a simpler option than on other sites. The body is from a 5l bottle. feather, bottoms 1-2 cm above the girdle - also for feathers, it turns out 5 pieces. The middle flat part is for feathers for the tail. Tail feathers will still have to be painted, so do not waste time on green bottles, you can cut them out of any including white and brown ones. On the tail, cut the ring of the middle part of the bottle in half, then cut one large feather and several small ones, from 1l-get 1-large, 1-small, from 2l-more small ones. Cut out the tail feathers-just cut a rectangle, then we fold it in half (in the opposite direction of the rounding of the bottle), cut it in a semicircle from above, narrowing down, in the form of a petal, then cut it around the entire circumference to the middle, like a Christmas tree. I first painted the tail feathers with acrylic white paint, it dried out in half an hour, then green, and you can’t distinguish by color where the green bottle was, where it was brown. ![]() We cut out the bottom in the bottle for the body, we don’t need it, because it will still be covered by the tail, through it we will fasten all the details. shins) - the upper parts from 1l. bottles, I grabbed 4 punctures. But I didn’t think right away, it would be better if I didn’t paint, but left brown.
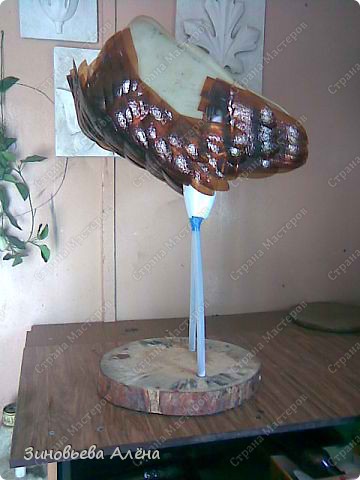
We cut out the bottom in the bottle for the body, we don’t need it, because it will still be covered by the tail, through it we will fasten all the details. shins) - the upper parts from 1l. bottles, I grabbed 4 punctures. But I didn’t think right away, it would be better if I didn’t paint, but left brown. 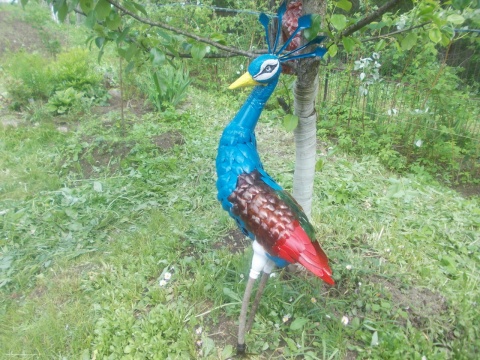 then we draw the approximate contours of the wings with a marker or you can scratch with an awl. We fasten the feathers almost to the very top, not reaching 2-3 cm. I cut out the wings from another 5l bottle, attached the feathers, something like this.
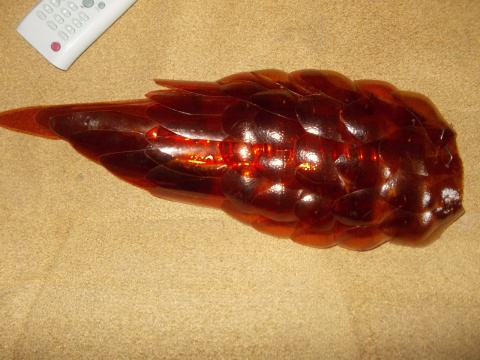
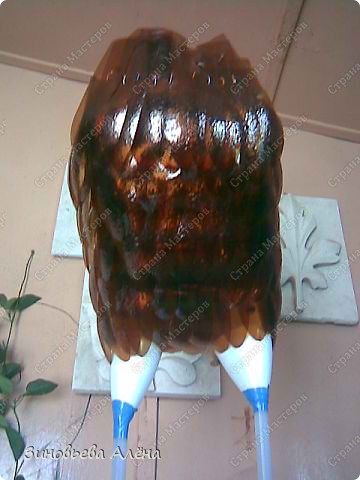
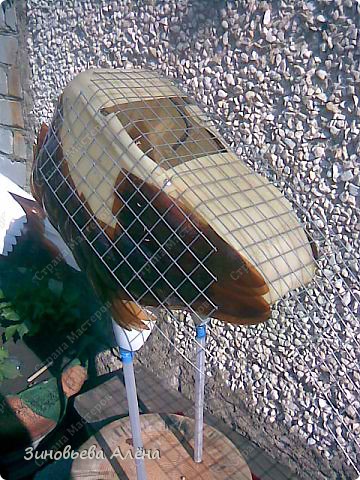
 I didn’t have soft wire to fasten the feathers, so I bent the wire for welding. Then you can attach the wings to the body after 4-6 punctures. I made the neck out of 5l and 2l.
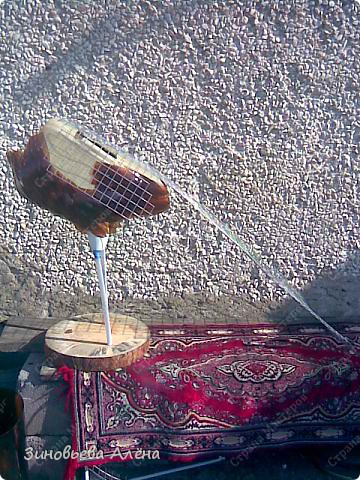
 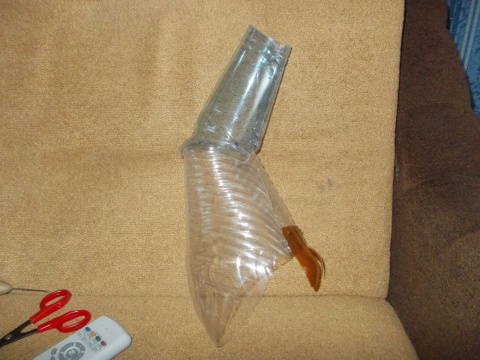 Then you need to fasten the feathers on the neck until the hand climbs. And then we fasten the neck to the body. I cut out the head from foam, then painted it, even if you are an unimportant sculptor, the paint will hide all the flaws. I inserted wooden sticks into my legs , having previously sharpened it on both sides so that it could hardly enter the neck, and screwed it with screws to the board from below, fastened the tail to an iron mesh and connected it to the body on the roof. erratic strokes. You don’t need to draw any circles, in the middle of the tail, I spent 30 minutes painting the tail, until I reached the last wing, the first ones were already drying out, and you can apply another one, it looks beautiful and it’s not necessary to bother. I painted the whole peacock first with white acrylic, then with colored paint, so it turns out brighter. I put the tail on an iron strip so that it does not sag.
  Wings left unpainted, legs probably should have been left that way too.