Lay large paving slabs. Lay on the ground without sand. Tools and materials needed for laying paving slabs.
Finally, before laying paving slabs we got to you! And today I will present you with step-by-step instructions for laying paving slabs, and of course I will support this whole action. interesting video material on which the entire technological process will be shown.
And within the framework of this material, you will learn:
- Why is it better to choose paving slabs for the improvement of garden paths, roads and sidewalks;
- What tools and materials are needed for laying tiles on the sidewalk;
- Consider the entire technological process of laying paving slabs:
a) site planning;
b) the marking procedure;
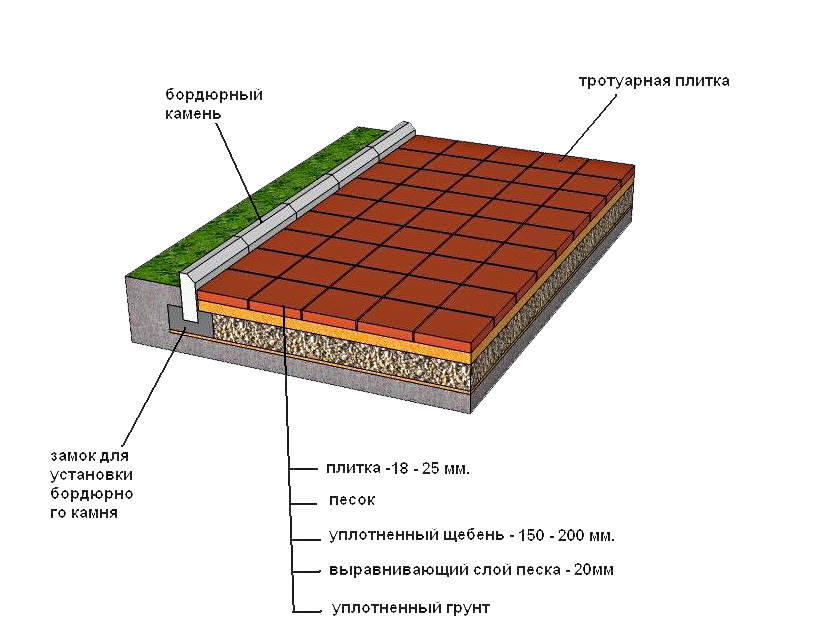
c) Preparation of the base for laying paving slabs;
d) Well, the process of laying paving slabs.
** At the end of the material, as always, a small and pleasant bonus from the author: - I'll show you how negroes lay paving slabs!
Introduction:
When equipping the territory near the house, summer cottage, many of the homeowners ask themselves the question: what is the best way to pave the paths, the yard, what material to use for this? (see *)
To solve these problems, paving slabs or * are perfect, which is a reliable and high-quality material, and also has a huge advantage when compared, for example, with asphalt, wild stone or dice.
Why is it better to choose paving slabs?
This is due to the huge model range how in color scheme, and in form, plus all kinds of options and ways of laying it are added to everything, which will make it possible to decorate your site in accordance with your desires and give it a unique look. It depends on how professionally and efficiently the laying of tiles will be carried out. general form area, as well as the durability and reliability of the coating.
Paving slabs, used as an ennobling material, are distinguished by easy installation, dismantling, and, most importantly, low price. The technical process of laying is not complicated, you just need to master the methodology for performing work, select and prepare all the materials, grab the necessary tools, and you can start laying.
In order for the paths lined with paving slabs to serve not only as a design addition, but also to be used for many years, several important points must be taken into account during the preparation and implementation of work:
Quote: Don't miss it!
The service life of paving slabs fully depends on its strength characteristics. The service life of roads with paving slabs depends mainly on the paving technology used, and, of course, on the quality and professional performance of the work. It does not matter what the tile is laid on, as a rule, crushed stone or sand serves as the main base for it.
But first things first!!!
Tools and materials needed for laying paving slabs.
First of all, we buy crushed stone and sand. We need crushed stone to build a stronger foundation, the so-called primary cushion (but you can do without it if you compact the ground well), and sand, it is on it that we will lay paving slabs. But sand can also be replaced with screenings of various types: a fine fraction of crushed stone, pellet dust - fractionation No. 5, etc. The quantity will depend on the area of the surface being improved, the purchase of which is carried out in tons, but the primary calculation is carried out in m², where the length is multiplied by the width, and then by the average thickness of one or another bedding.
The thickness of the primary slag bedding must be at least 10 cm.
The thickness of the sand filling for laying paving slabs is up to 10 cm. The sand should be slightly damp!!!
The calculation of the required amount of paving slabs is carried out relative to the surface to be improved, where, to obtain the m we need, we multiply the length by the width.
Also, to perform the work, you need to prepare some kind of tool:
• Master OK;
• Pegs (metal, wood);
• Thread twine or capron;
• Hammer normal and rubber;
• Level (long and short), rule;
• Bulgarian;
• Shovel (for leveling the base);
• Hose with a nozzle (we will use it to pour tiles at the end of laying);
Let's move on to the consideration of the technological process of laying paving slabs.
Further, as you understand, the same instructions for laying paving slabs will go, the weight of the technological process will be revealed, so you can easily learn how to lay paving slabs with your own hands. Who suddenly some of the nuances in the preparation and laying of paving slabs will remain incomprehensible, even after watching the video, I ask you to ask your questions in the form of comments under the article!
Site planning - the choice of the laying of paving slabs.
First, it is worth inspecting the proposed site for work and drawing up a drawing diagram, from the elements available in the assortment. We determine the course of the track, its color, choose the option of laying paving slabs.
There are plenty of options for laying paving slabs, its course. But mainly 13 classic ones are used - which are distinguished by the shape of the selected paving slabs. From which 20 traditional and 20 new types of installation follow:
- honeycombs;
- Rhombus;
- Double T;
- grate parking;
- Square standard;
- Old city;
- brick pattern;
- Brick standard;
- Square large, small;
- Creative;
- The brick is large;
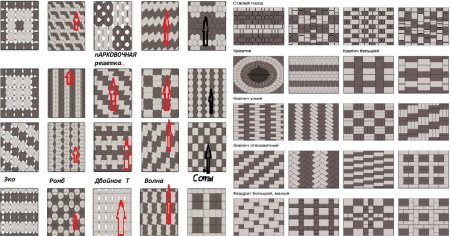
Referring to the plan, we re-calculate the amount of material needed for work and proceed to the procedure for marking the territory.
territory marking procedure.
First, the initial version of the marking of the entire territory and paths for laying is performed, which includes setting pegs, with which we mark the width of the path on one side and the other (beginning and end), we do the same at the turning points.
A large number of pegs with which you will mark the course of your path will make it easier for you to create the height of the bedding!
Then you need to walk and carefully examine everything in order to decide for yourself whether such an arrangement of paths will be convenient, whether the marking of the territory is done correctly. If necessary, you need to make adjustments. To do this, on the selected section of the future road, it is enough to walk, alone, together, turn around, rearrange objects. By such manipulations, the optimal width of the garden and walking path is selected.
Parameters of tracks on the site:
The path (let's say the approach to the greenhouse) is 45 cm. Taking into account the framing of paving slabs on both sides with a parebrik.
Path (for example, from the main house to the kitchen) - from 80 cm to 1.5 meters.
The sidewalk (for example, at the entrance to the yard) - from 2 meters, as it should be designed for the arrival of cars.

Preparation of the base for laying paving slabs.
Only a properly prepared base can serve as a guarantee of high-quality laying of paving slabs! Therefore, this stage requires special attention.
A well-made base will ensure the durability of the tile coating and will not allow it to sag over time, in general, to lose the quality of the road surface.
First of all, the old coating is dismantled, if it is present, of course, and the vegetation is cleaned to a depth of 20 cm, while carefully removing the roots of the plants (pick out the weed, cut off the roots of nearby trees).

The land is planned, where there are hillocks, depressions are visually visible, all this is combed or sprinkled, the base is made as even as possible. Then the earth is rammed. Then it spreads *, which additionally compacts the earth, does not allow vegetation to grow again, and during deformations will not allow gravel and sand to move. A water runoff is planned.
In the case of clay soil, drainage should be done in the deepest part of the dug trench.
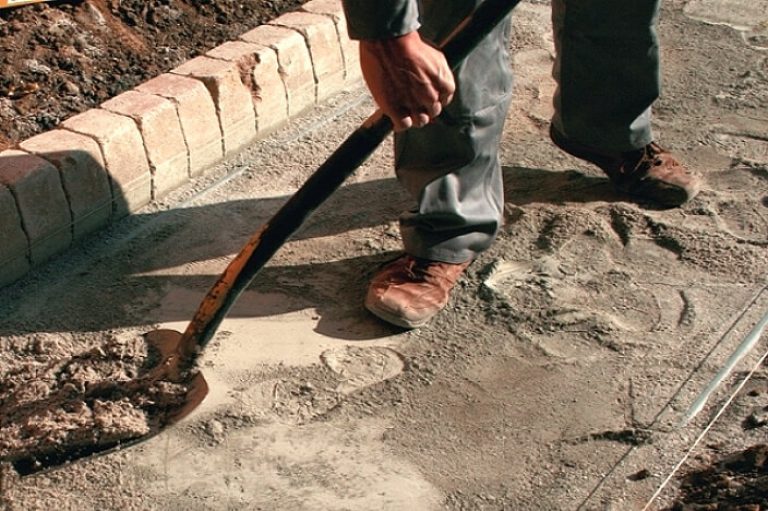
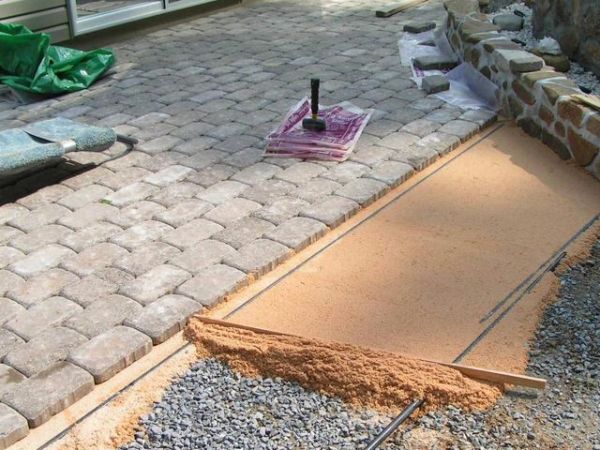
At the beginning of work, crushed stone is laid at the same height (gravel can also be used). Beacons-pipes are exposed! as a rule, these are one and a half meter pipes. Then, an intermediate sand layer is poured over the lighthouses (3-5 cm is enough).
It should be checked that the tile protrudes from the coating by about 1-2 cm. We carry out, so to speak, a preliminary shooting - how the paving slabs will lie.
For the top layer of styling, you can use a purchased mixture, or you can also make it yourself.
Durable, beautiful and aesthetic paths made of paving slabs - paving stones are very popular. This is due to the fact that currently on the market offers building materials There are paving slabs of different colors and shapes. A wide range of these products allows you to fit any design into environment, focusing on the architectural forms of buildings and the purpose of the constructed paths and sidewalks. Against this favorable background, the question of how to lay paving slabs with your own hands sounds particularly relevant.
Knowing how to properly lay paving stones is certainly important. But it is practically impossible to lay paving slabs without considering the purpose of the track being constructed. When choosing the type of paving stones used, one should take into account not only its decorative qualities and role in landscape design, but also the expected load conditions and the potential for contamination.
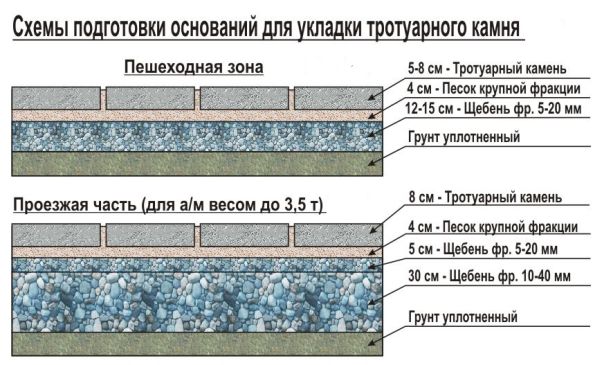
Paths intended exclusively for pedestrians, or for light vehicles that rarely pass, require paving slabs 5-6 cm thick, while for more intense loads we use concrete slabs 8 cm or even 10 cm thick.
2. Rules for laying paving slabs
Paving slabs can be beautifully laid on any surface (of course, following the laying technology). And although the technology itself assumes the water permeability of the bearing layer of the path from paving slabs, it is necessary to ensure the ability to quickly drain water from the surface of the path. The easiest way to achieve this effect is to allow the water to naturally escape from the surface by sloping the surface of the track away from a clear horizontal plane.
Note that the recommended paving technique does not include the use of concrete to increase the strength. A concrete base, subject to all stages and their technology, is not required, this is an additional consumption of materials and extra work, which is especially important when working with your own hands. All layers of the foundation are laid directly on the ground, that is, on the ground. Paving can only be effective if the technology prescribed by the manufacturer of the product is observed. Of course, if you have to lay paving stones on concrete base or after asphalt, this can be done, but there is no need to specially strengthen the base in this way.
3. Stages of laying paving slabs step by step
To lay the tiles securely, you yourself need to break all the work into several technological steps:
- arranging a path bed, or making depressions in natural soil;
- leveling layer device;
- laying the carrier layer;
- curbstone installation;
- the device of the second leveling layer;
- laying paving slabs;
- tamping tiles;
- backfilling of tile joints with sand.
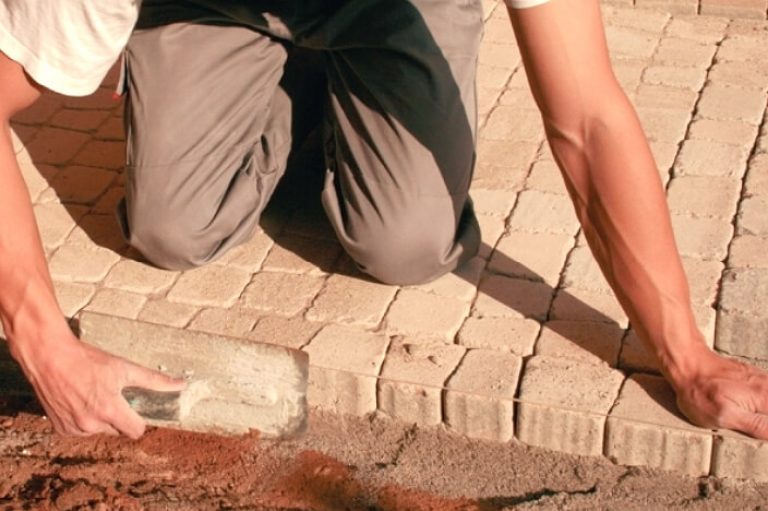
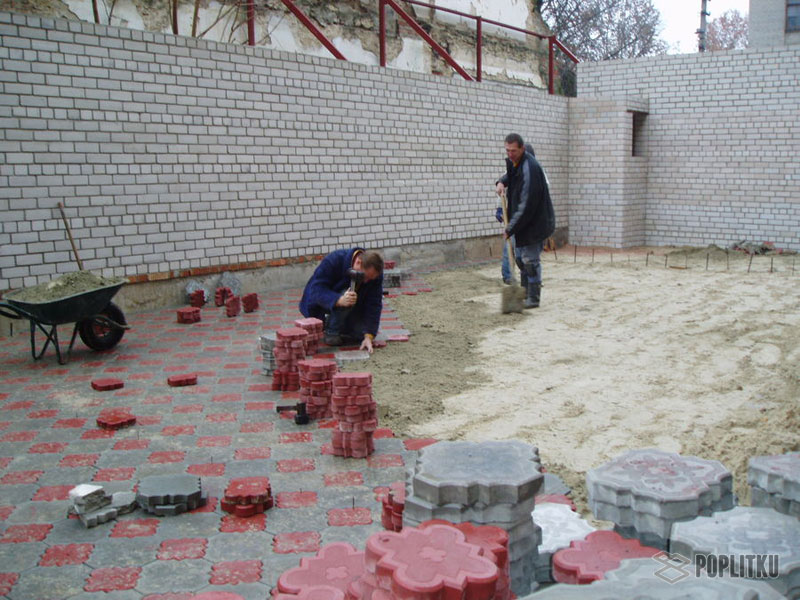
The next photo shows step by step the whole process of laying tiles in the courtyard of a residential building. You can choose your pattern for styling, but when calculating the need for material, do it scrupulously and with a mandatory margin of 5% of the total volume.
The construction of the bed begins with excavation of excess soil to a depth of 20-50 cm, depending on the type of soil and expected loading conditions. On rocky or sandy soils, it is removed to a depth of about 20 cm. On swampy, clay soils, or when planning the movement of trucks (for example, to drive to a septic tank or a fuel tank), the depth of the bed must be at least 50 cm. For digging the bed two shovels are used - a bayonet and a shovel. The bottom of the bed should correspond to the level of the future surface, and, therefore, should be directed to a certain plane - have a slope angle.
A layer of sand after backfilling the bed of the track with the level set
The carrier layer, also known as the stabilizing layer, is a sand-gravel mixture or crushed stone of a fraction of 20 by 40. In the case of laying intended for heavy loads, as well as on lands where there is more clay, it is recommended to use geotextiles before laying the carrier and layer to prevent mixing of gravel, sand or rubble with earth.

Compaction of the sand layer using a vibrator with a rubber protective coating of the working element
Depending on how the land around is planned, curbs can protrude above the paving stone plane or be at the same height. However, the entire surface should be slightly raised above the level of the surrounding soil, which prevents soil contamination from heavy rainfall on the soil surface.
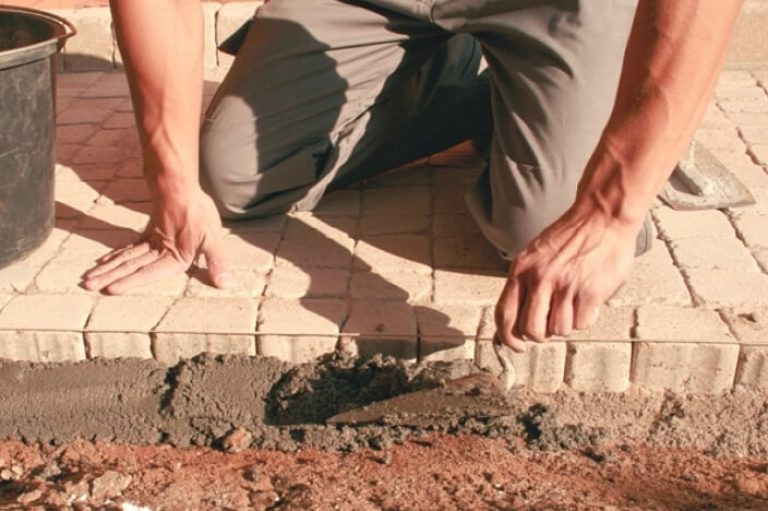
Mixing sand and cement in a doge on a compacted sand bed
Installation drainage channel may be necessary if a very large area is covered with paving stones, which makes it impossible to create a drop in the desired direction, or when leaving the garage.
The possibility of draining water depends mainly on ground water- groundwater level, as well as soil permeability. This may be an external storm sewer or a storage drainage well. In the event that the garage is located below ground level, it is possible to install it in a tank with an automatic start pump.
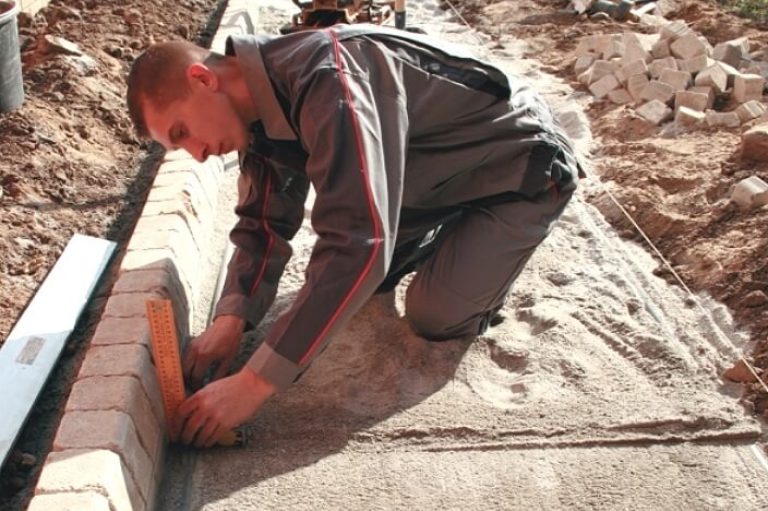
When giving the desired surface level, it is necessary to focus on the previously exposed curb fireplaces

Leveling the surface of the last laying layer is carried out using a rail
All layers require compaction with manual or mobile vibrators. In extreme cases, you can use a homemade device, but at the same time they need to work for a long time and carefully.
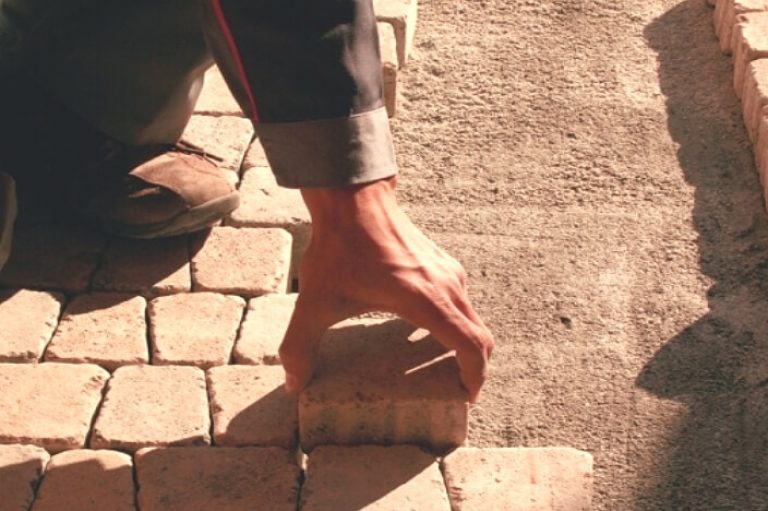
Pavement paving stone
At the end of laying, if you put the curb on only one side, you need to prepare the free edge for concreting
After preparing the free edge of the track (pressing and removing excess material), it must be concreted

A good solution would be to use a vibrator to compact the tiles.
When the entire surface is completely paved with paving slabs, use a vibrator with a rubber protective coating on the working element. This process will compact the tile and correct minor irregularities.
Grouting sand into the tile joints will make the surface uniform and monolithic
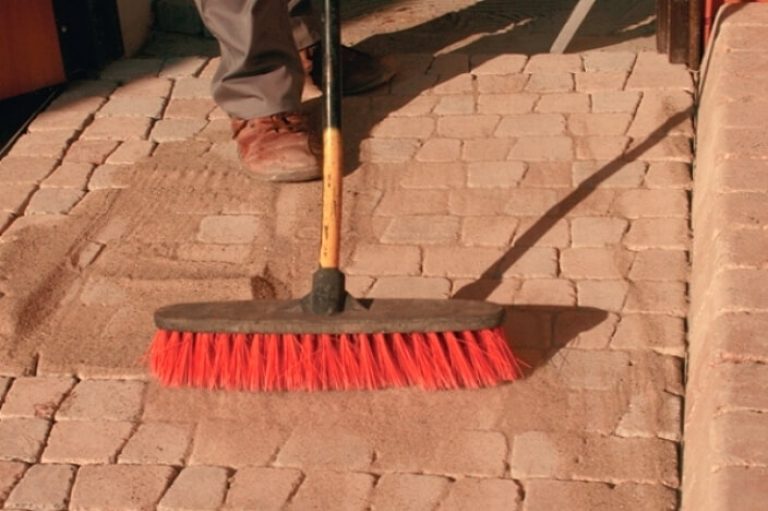
The last step in laying tiles is to rub fine sand into the tile joints, which penetrates into the joints, compacts the tiles and binds the entire surface together.
After that (after some time) sweep away excess sand from the surface of the tile. At this point, your track is completely ready for use. You can also additionally apply a special impregnation for tiles, which will help keep the surface clean and preserve the original color. Beautifully and technologically laid tiles in the yard will serve you for a long time, and you yourself will be pleased to use such a coating.
4. How to properly lay paving slabs video plot
Dirt in the yard of the house or in the country, sooner or later, is sure to bother and then the right decision comes - to use paving stones. This material is valued not only for its strength and reliability, but also for the possibility of using it in landscape design. For information on how to properly build a path or platform with your own hands, see video.
The technology of laying decorative paving slabs on sand with your own hands has a number of nuances, knowing which you can do all the work lightly and without serious mistakes. Thanks to this material, you can create a unique coating on the parking lot, sidewalk or in the garden. Let's see what this technology is.
Most often, paving slabs are laid on a dry cement-sand mixture.
Types of paving slabs
Before considering the technology of laying tiles with your own hands, you need to find out what types of material are used to finish sidewalks and playgrounds. Today, a huge number of product variations are available, first of all, they differ in shape, the most popular are:
- paving stones;
- clover;
- scales;
- fleece;
- wave;
- honeycombs;
- flower;
- gzhelka.
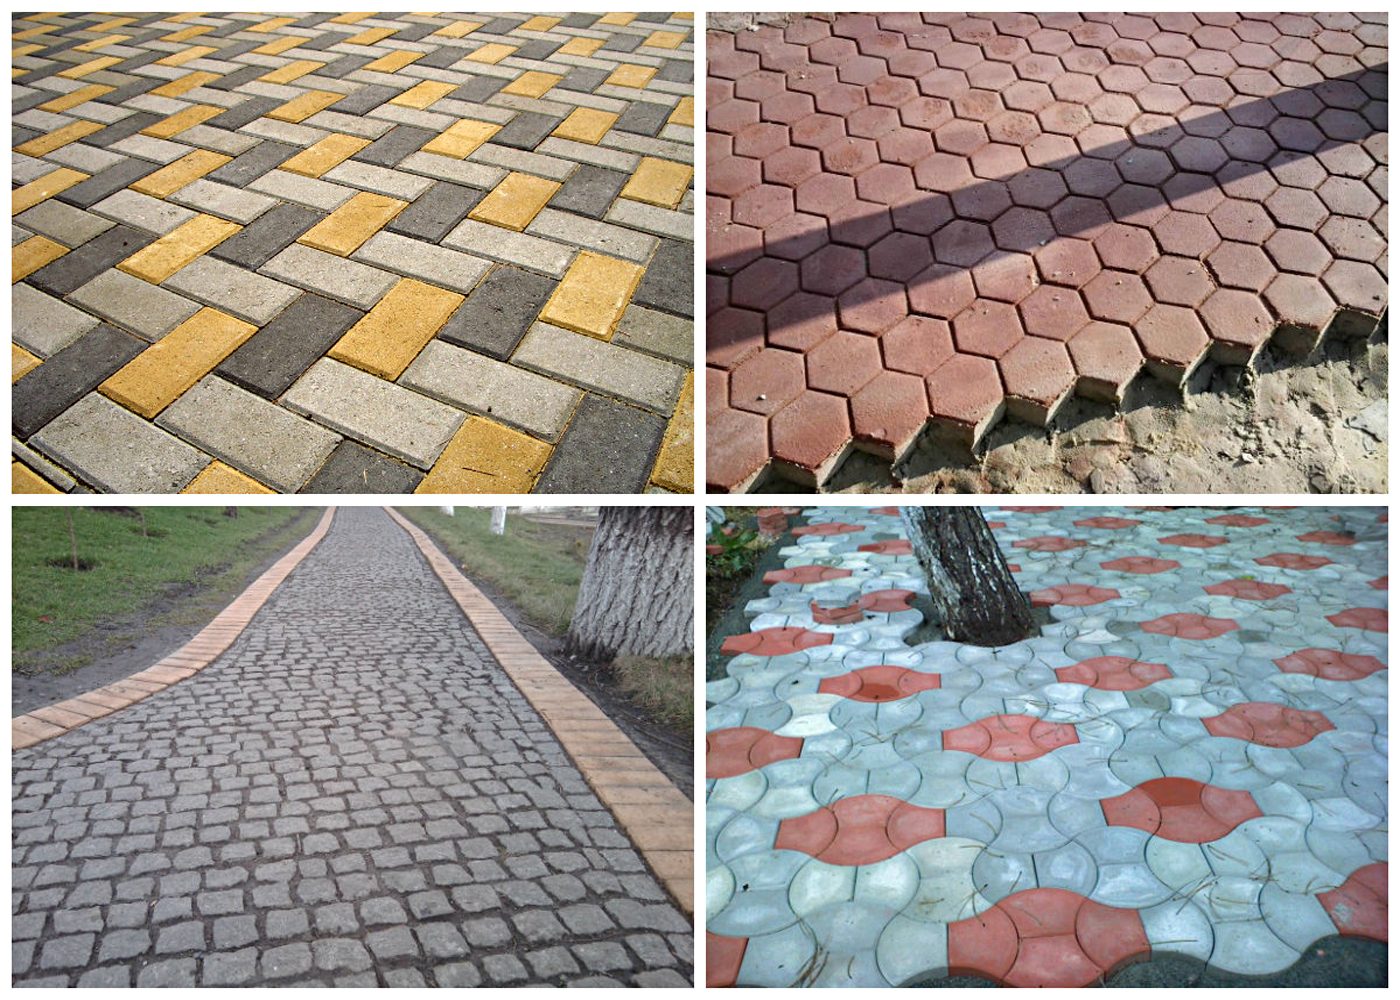
The main types of paving slabs
The production technology also affects the final result. According to the manufacturing method, tiles can be divided into two types:
- Vibropressed. The machine feeds the mass into the mold, then compresses it and vibrates under pressure, after which the matrix is removed and the tile is left to dry.
- Vibrocast. The liquid solution is poured into the mold, vibrated for a certain time and dried.
Both approaches can be used independently. At the same time, if you make a solution with your own hands, it is important to observe the proportions and use suitable raw materials.
Homemade tiles will only be of good quality if good components and a vibrating machine are used to compact the liquid mass.
Soil preparation
Before laying paving slabs, it is necessary to prepare working area. The surface must meet certain requirements. If you do the work yourself, you need to consider the following nuances:
- Deepening. The tile is laid in a recess, but at the same time it should protrude 3-4 cm above the ground.
- Dense soil. To do this, the soil is carefully compacted.
- Smooth surface. It is necessary to perfectly level the area for laying.
- Providing drainage. This condition is met in two ways. Firstly, a sand and gravel substrate is arranged, and secondly, it is necessary to provide a slight slope of about 5 degrees per meter.
Before you start laying paving slabs on the sand, you need to carry out a series of work to prepare the soil. Consider how to do it yourself. First you need to remove the top layer of soil, thanks to this you can even out all the bumps, compact the soil and prepare a sand and gravel cushion. The depth of the site depends on its purpose, for sidewalks an average of 20 cm will be enough, and for car entrances and parking lots, you need to add another 7-10 cm.
After you dig a recess, you need to tamp the earth. To do this, soak it from a hose with a sprinkler and walk with a rammer. This procedure will prevent subsidence of the site over time.

The base for laying tiles must be leveled and tamped
Installation of curbs and drains
Also, before you start laying paving slabs on the sand, you need to take care of the installation of limiters, that is, curbs. They are placed along the entire perimeter of the sidewalk. If you do not install them, most likely, over time, your tiles will shift and the sidewalk will simply “spread” to the sides. To perform their installation with your own hands, you need to dig a trench along the site. Its depth should be slightly greater. Crushed stone is laid at the bottom for emphasis and covered with sand to seal the voids. Then you need to set the curbs, observing the level.
To fix the elements, a concrete solution is prepared based on cement, sand and screenings. With its help, a trench with curbs is poured. After drying, the spacers and clamps are removed, and the trench is covered with earth to the desired level.

Before laying tiles, curbs are installed around the entire perimeter of the site.
Additionally, it is necessary to provide for the installation of a drain for water. It is laid on the inside of the sidewalk along the curb. It is in his direction that the slope of the site should go.
sand cushion
In order to lay the tile itself, this technology involves the use of gravel and sand as a substrate. First of all, you need to fill the soil with sand. The bottom layer does not matter in terms of the quality of raw materials. Crushed stone is poured over the sand with a layer of about 15-20 cm, it allows you to evenly distribute the load over the area of \u200b\u200bthe sidewalk and ensures the outflow of water. To fill the voids, sand is additionally poured.
The top layer will act as a fixative, so it is important to know what kind of sand is needed for paving slabs. The best option is a material with fine particles, it will fill all the gaps, but it is important to clean it from impurities. The site must be sprinkled with water and wait for the materials to dry.
After leveling the surface, fill in the working "cushion". It is a mixture of sand and dry cement. It also needs to be perfectly aligned, keeping the slope. After that, you can start laying.
Schematic representation of a gravel-sand cushion
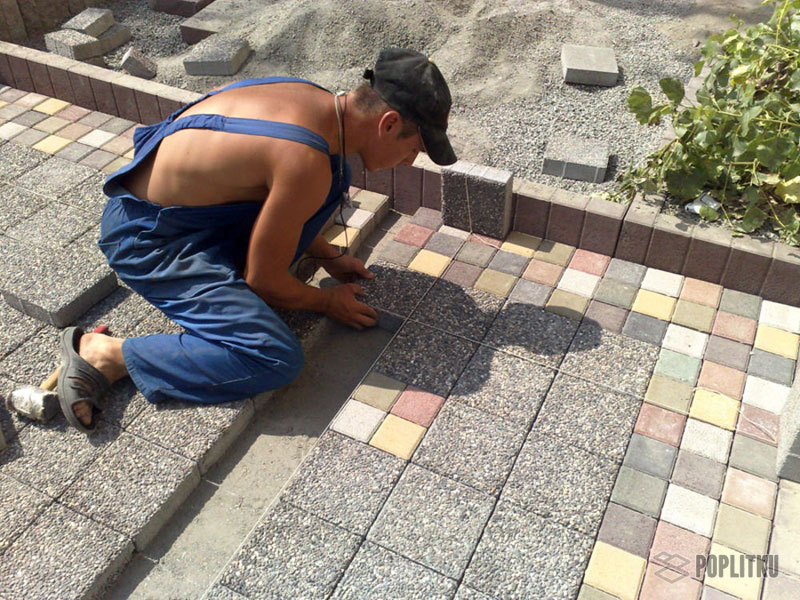
Laying tiles
Laying paving slabs on the sand with your own hands is done in a certain direction, you need to lay it “away from you”, so you do not disturb the evenness of the sand. It is necessary to lay the elements in such a way that small gaps of about 1-2 mm remain between them. For fixing use wooden or plastic wedges.
The technology involves deepening the tiles into the sandy mass by about half, so you need to make sure that the sand layer is sufficient. In this case, the thickness of the substrate must correspond to the dimensions of the recess in the ground.
Each row must be checked with a level and all defects must be eliminated in place. For this, a rule is used, which is an even wooden block, and mallet. It is necessary to move along the sidewalk carefully so as not to displace the elements until they are completely fixed.

Irregularities on the surface are eliminated with a wooden rule and a rubber mallet
Seam sealing
The last step is sealing the seams. In order for paving slabs laid on sand to maintain their position and not move over time, they need to be fixed, it is very easy to do it yourself. To do this, use the same mixture of sand with cement powder, it is poured over the tile, and then evenly distributed over the surface with a brush so that the seams of the site are completely filled with it.

To fix the tiles by sealing the seams, a cement-sand mixture is used.
After you have treated the entire sidewalk, you need to sweep away the excess and sprinkle the surface with water. As soon as the water is absorbed, check the quality of the seams. The cement will swell and bind the individual tiles together. The spacers can be removed. In the future, it may be necessary to refill the joints, especially after heavy rainfall.
Filling with water is necessary so that the dry mixture is compacted and compacted, so this procedure must be carried out 2-3 times to completely fill the seams between the tiles.
Now you know how to lay paving slabs on a sand cushion with your own hands in compliance with the technology. If the work is done with high quality, you will get a smooth and durable surface for many years.
Pavement tiles are made of durable material. In order for the product to last longer, it is necessary to correctly perform its installation. It is not necessary to invite specialists. Laying paving slabs on the sand can be done independently. Let's take a closer look at the workflow and technology features.
Styling technologies
In the independent manufacture of tiled material, two types of technology are used:
- vibrocompression. The molds are filled with mass, then compressed, vibrated under pressure. The finished product after removing the matrix is left to dry;
- vibration casting. The form with the solution is subjected to vibration, then dried.
A quality product is obtained if the proportions are observed and step by step instructions. The finished tiled material will last more than one service life, if it is correctly laid.
What kind of sand is best?
The work on facing the tracks begins with the choice of the work surface. Before starting work, many faced the question of what kind of sand is needed for laying paving slabs. To choose the right one, follow these steps:
- pick up a handful of sand in your hand, then squeeze it;
- if the material is compressed into a lump, then it contains a lot of clay compounds and is not suitable for work;
- quality composition crumbly. After compression, it should easily pass through the fingers.
What kind of sand is needed for paving slabs is determined by eye. Just look at the bulk product. Its structure should be homogeneous, without lumps and clay compounds.
If you use a sand mixture in which clay is present, then during the operation of the tile material, small cracks will go along it. There should be no doubt which sand for paving slabs to choose - only high-quality and crumbly.
Which is the best sand to use for paving slabs depends on your skillful choice.
Laying on sand without cement
The most optimal technology for laying paving slabs on sand is without the use of cement mortar. Prepare the following tools:
- carpentry rubber or wooden hammer (mallet);
- rake;
- level;
- slats;
- brush with hard bristles.
Prepare your work surface. This stage of work should be treated with particular care. To properly lay paving slabs on the sand, you will need markings. To do this, drive in earthen pegs, then pull a cord between them.

To prevent weeds from growing between the joints of the tiled elements, the trench is pre-covered with geotextiles. Depending on the purpose of the laid path, the width of the protective layer is different. For pedestrian 15 cm, for parking much wider twice (30 cm).
The next step in the rules for laying paving slabs on sand:
- fill gravel, tamp;
- now it is the turn of the sandy structure (it is better to take a coarse-grained one);
- sand layer thickness 5 cm (minimum);
- the laid layer is leveled with a rail. Use level;
- tamp well, fill with water and leave to dry;
- the base is ready, now level the surface again.
So that tiled products do not go in different directions during operation, you need to protect them with borders. The level of the borders must match the tile level.
Tiled elements are laid out in the direction away from themselves or diagonally. To avoid deformation and destruction of tiles in cold weather, adhere to a slope of 2 degrees (for rainwater runoff). Below is a video on how to lay paving slabs on sand.

Facing work is not very difficult and you can do it yourself. The main thing in laying paving slabs is to fill your hand a little and follow simple rules at work:
- the first element is laid, pressed and carefully knocked out with a hammer;
- make sure that the parts do not move when laying (if necessary, add under the sand mixture);
- lay the next element, focusing on the level of the previous one. And so the whole workflow;
- gaps can be no more than 5 mm;
- if empty spaces remain, fill them with tiled particles (use a grinder to cut).
When laying paving slabs on the sand with your own hands is completed, fill the entire lined surface with a sand structure. With a brush, try to rub the sand particles into the gaps between the tile elements. You can use the lined track in the next day.
Lay on the ground without sand
In this part, we lay paving slabs with our own hands without using sand.
The ground surface will serve as the base. The method is considered to be very simple. This method is used on summer cottages, if the tiled elements themselves are large in size with imitation of natural stone.
Laying paving slabs on the ground without sand and preparing for work is practically the same as facing a sandy surface:
- a trench is being prepared;
- tile elements are compacted with a rubber mallet.
The only difference in laying paving slabs on the ground from the sand method is that the gaps after work must be covered with earth.
Ramming
How to put paving slabs on sand so that the lined surface lasts longer? Proper ramming is important. There are three methods:
These methods are suitable if you lay paving slabs on the sand yourself. The difference between rammers is in price and the area of the treated surface.
Techniques
There are several options for laying tiles in the country on sand and other surfaces:
- no need to prepare the base of several layers;
- if it is planned to update the overall design of the backyard territory.
Plan ahead
Before the main work on the lining of pedestrian or car paths, it is advisable to draw up a plan. The technology of laying tiles on sand in the drawings will look clearer. The diagram will clearly show how and where it is more profitable to place walking paths, whether elements for decoration will be needed.
The drawing is a plan for a dacha or a country cottage. Given the dimensions, you can calculate how much facing material is needed and what the base will be at the surface.
Check how well the drawing is made by walking around the site.
Basic Rules
How to put paving slabs on the sand so that there are no flaws? It is important to observe the following rules:
- the face of the tiled product must be level with the surface;
- be sure to use the level;
- if it is impossible to level the element with a hammer, lift it and level the base;
- you can not lay paving slabs on the sand in the rain;
- with uneven terrain, a concrete base is first constructed;
- sand must be free of impurities, roots and plant residues;
- the sandy base is suitable only for hiking trails;
- work is performed in the direction away from you;
- you can not use the tracks immediately after the completion of work.
The rules regarding how to lay paving slabs on sand are simple, but their implementation is mandatory. So the tracks will last a long time and do not need constant adjustment of the coating.
You can lay out paving slabs in the country on your own, guided by the rules and observing the technology. It is important to choose high-quality materials for work, to be attentive and patient.
If the tile material is also made independently, then a small expense will be obtained. Do not forget that in the question of whether it is possible to lay paving slabs on sand, the main thing is to patiently complete all stages of work.
To avoid unnecessary waste, plan in advance and calculate the required amount of material. Regardless of the base, paved paths can be used in a couple of days.
Keep track of the condition of the tiled coating during operation - it's easy. Can only be washed with water or detergents. Special, chemical agents are used in case of mold or rust stains.
In winter, be careful when cleaning tiles. Do not use pointed tools to avoid damaging the coating. Do not use saline solutions to reduce slip. Take only sand for these purposes.
When facing, try to make the slope of the tracks. So moisture will quickly leave the tiled surface. If the tile is laid for a platform for cars, then it is desirable to make the base for the cladding from concrete. The sand base is used on footpaths where heavy loads are excluded.
is not difficult, then the paving of the yard needs to be approached more responsibly. The area is large, the loads in the form of cars are considerable, and the coating should look beautiful and neat. The most reasonable choice in this case is paving slabs. Unlike concrete, the work can be carried out in stages, the tile itself is quite durable and can be easily repaired if necessary.
Materials and tools
The thickness of the tile can vary from 2 to 6 cm. For a yard that cars can drive on, it is worth choosing a 4 cm thick tile, as thinner ones can crack. Tiles with a thickness of 2-3 cm are suitable only for paving sites that will not have increased loads. Vibrocast tiles are slightly more expensive than stamped tiles, but stronger and more beautiful.
The color, shape and pattern on the tile are selected based on exterior finish at home. Gray is the cheapest. Laying with your own hands is the easiest shaped tile, more difficult - small diamond-shaped and rectangular. Required amount tiles are calculated depending on the area of the yard, the calculation method may differ from manufacturer to manufacturer.
In addition to the tiles you need:
- sand without clay impurities (2-3 tons per average yard),
- cement,
- border for fencing off the site,
- fishing line or strong thread and pegs for marking,
- for cutting concrete
- rubber mallet or mallet
- shovel,
- press for compacting soil and sand,
- rule length 150-200 cm,
- tape measure and level,
- trowel or trowel,
- old hard broom or brush
- protective gloves.
Preparatory stage: marking and ramming the site
From the site on which the tiles will be laid, the turf and the top layer of soil are removed. A layer of sand or fine gravel 5-7 cm thick is laid in the resulting pit.
Before starting work, it is necessary to determine whether the site has a slope due to which water will not collect. The best option- a slope of several degrees towards the street. If the yard has a slope towards the house, then you will have to take care of drainage.
The lowest point of the site is taken as the zero mark, and the line to which the plane is inclined is taken as the zero line. Two pegs are driven in at its ends, and a thread is pulled between them, which must be strictly horizontal (this is checked by a level). Another thread is tied to one of the already hammered pegs and pulled perpendicular to the first. Its other end is attached to the peg so that the entire thread has a slope of several degrees to the zero line.
The thread is again tied to the third peg and fixed parallel to the zero line strictly horizontally. The fourth and first pegs are interconnected, forming the contour of the site, inside which the tiles will be laid. If the site has a shape other than a quadrilateral, then it can be visually divided into parts, and a contour can be drawn for each of them.
For the convenience of work, the entire site is divided into strips 10-20 centimeters wide, already the rules. They do this by setting equal distances on threads perpendicular to the zero line and driving in pegs. The pegs are connected by a thread, which is located horizontally and at the same level with the threads that form the sides of the rectangle.
Marking is a painstaking and tedious step, but only if it is applied correctly, the tiles will be laid with professional quality.
After marking, the sand is leveled on the site. They take off where it reaches the thread, and add it where it is far from it. As a result, there should be a distance of 8-9 cm between the thread and the surface along the entire length. The sand is well leveled and crushed.
Laying tiles
Before laying the tiles, you need to inspect, weed out defective or broken ones. Suitable tiles are laid out in piles around the perimeter of the site, taking into account the color and pattern, so that when laying, you do not have to go after it every time.
Immediately before laying, prepare in a ratio of 6:1. Sand is better to take wet. So that it does not dry out, prepare a little bit for each strip.
The cement-sand mixture is laid out on the first strip, leveled and well rammed. At the beginning of the strip, more mixtures are added, rammed with hands and leveled with a rule. Lay the tile, making sure that its sides coincide with the marking threads. They press on it, sinking it into the mixture, tap it with a mallet. Adjacent tiles are also laid, and then rows. The distance between the tiles is about 5 mm. In those places where the tile will experience increased loads - at the curbs, gates, it is worth laying it not on the mixture, but on the cement-sand mortar.
Rows of tiles are laid out from themselves in order to move along the already laid one. Obstacles in the form of hatches, covers, pillars cost whole tiles. All work on fine-tuning and trimming pieces is best done at the end. The tile is cut with a grinder with a diamond disc, and then broken off.
The seams between the laid tiles must be filled with a cement-sand mixture. It crumbles over the tile, and then swept into the cracks with a hard broom or brush. If the work is delayed for several days, then this operation is repeated at the end of each day. This backfill additionally fixes the tiles.
The edges of the platform on which the tiles were laid are bordered with a border. A narrow trench of the appropriate depth is dug under it, a little solution is poured into it and a curb is installed. Empty spaces along the curb are filled with cut tiles or special "halves" that each manufacturer has.
Finishing touches
After laying all the tiles and borders, the seams must be covered again with a mixture of sand and cement. If possible, it is worth walking on the laid tile with a vibropress, this will imprint it even more strongly into the base. The finished site is abundantly watered with water - it washes off the sand and, penetrating under the tile, helps it adhere more firmly to the sand cushion.


