Pour the floor slab with concrete. Buildings and conditions in which monolithic floor slabs are used. Design calculations of the supporting structure.
Costs the least monolithic floor slab when building a building do it yourself if it is poured into the formwork in place. It is slightly inferior in quality to industrial PC boards, however, it has a greater thickness, which is due to non-stressed reinforcement.
Monolithic overlap technology step by step
Consists of floor slab from reinforced concrete, which must be poured into a formwork that will not sag, deform under load. For construction do it yourself you will need lumber, tools for cutting, fitting, assembling shields. After demoulding, it can be used in the truss system.
Reinforcement is a consumable material, communications also remain concreted. The most difficult is the floor slab of the basement floor due to the numerous input nodes of engineering systems. The technology consists of several operations, each of which is discussed in detail below.
Formwork installation
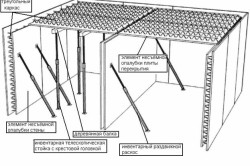
To floor slab had a stable geometry, ideal flatness of both surfaces, it is necessary to mount do it yourself reliable formwork with a margin of safety at least twice. The cheapest lumber is:
- board 20 x 5 cm - racks, girders, beams
- board "inch" - thickness 25 mm, any width
For the manufacture of beams, runs, a board of 20 x 5 cm is dissolved in half, for racks - into three parts (65 x 50 mm each). To strengthen the structure, you need an inch. Wood of II grade is needed, which, when strengthened, can withstand 700 kg per square.
Poured floor slab into the formwork, the lower shield of which serves as the level of the ceiling. Racks are cut shorter by the thickness of beams + girders + shield boards (10 + 10 + 2.5 cm) than the height of the floor. The structure looks like:
Hexagonal anchors are used at the junction of girders and beams to the walls of the lower level. Ordinary dowel-nails with a slot for a curly screwdriver cannot be dismantled during stripping.
To prevent displacement of the lower ends of the racks, bending of these elements in the middle, a two-level strapping is used do it yourself inch board in two directions. The lower belt is attached at a height of 10 cm from the floor, the upper one in the middle of the uprights. 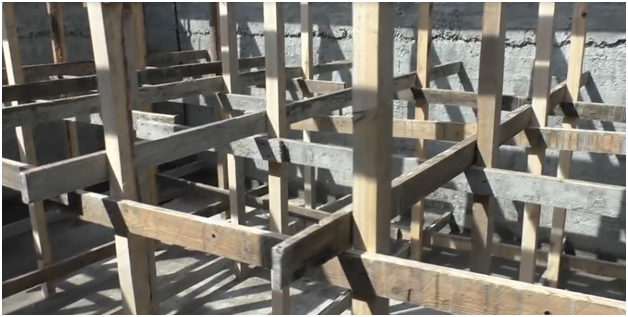
With a specified run step of 1 m floor slab will push through the formwork panels. Therefore, each span is reinforced with a 10 x 5 cm beam obtained by dissolving the board. Wide 25 mm boards are best used near the walls, narrow ones can fill the middle space.
Large gaps foam up with your own hands, small ones can be ignored, since the surface is covered with a plastic film, which will retain moisture in the concrete and will not allow it to flow through small gaps. 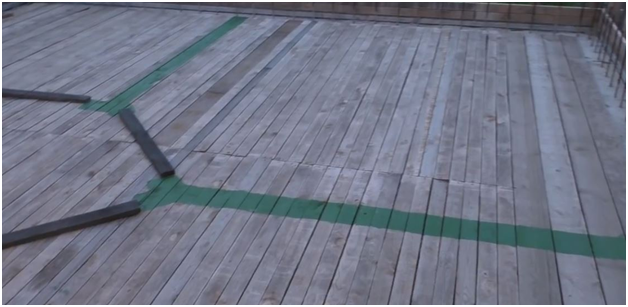
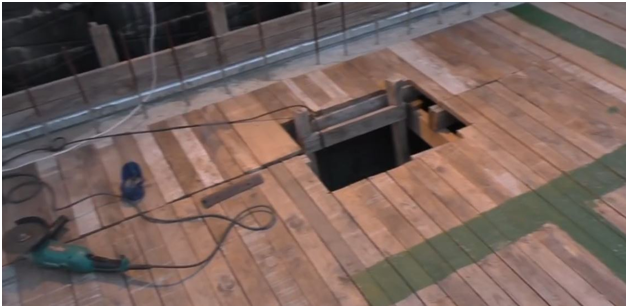
An opening remains for flights of stairs of internal communications. It can be partially filled with a board for comfortable walking when pouring, leaving a small hatch with a temporary ladder. When using multilayer plywood, installation time is reduced, but the estimate is doubled.
At the last stage, the contours of partitions and walls are placed with paint. This will improve the accuracy of the passage of electricians, other engineering systems.
Flanging of the overlap is carried out do it yourself from a board with a minimum thickness of 4 cm, you can use a 5 cm board purchased at the initial stage. To avoid deformations on the outer planes of the walls, pieces of timber are mounted, which are stops for the side panels of the formwork.
The maximum bonding strength of plates/walls is obtained in the following way:
This reinforcement is later bent, connected with the bars of the lower, upper grid of the slab. For bending at a right angle with the required radius, a device in the form of a tubular hammer is used.
Inside each ceiling there are communications that are easier to install before pouring than to hammer the slab with a puncher afterwards. Traditionally, the maximum concentration of engineering systems is observed in the basement/basement floor:
- hoods in every room
- electrical in all areas
- sewerage for output to the external network
- cold water risers
- boiler room chimney
- technological openings for low-voltage systems, gas lines
To install them do it yourself it is best to use socket fittings for internal sewerage with plugs. They are mounted in accordance with the marking of the walls, the plugs are fixed with self-tapping screws from the bottom of the formwork (through), side panels (for ventilation outlets). 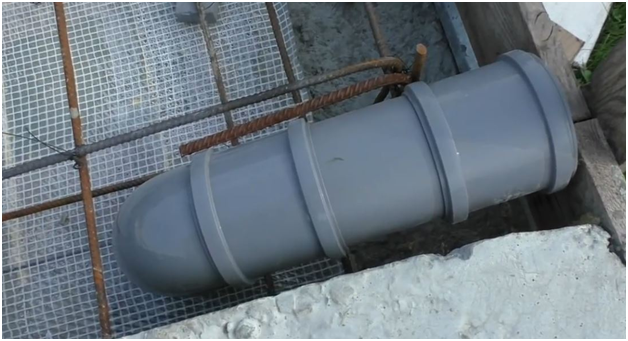
Electrical cables are marked with electrical tape, tags, and other convenient methods. It is forbidden to lay the cable corrugation along the lower layer of the armored belt under it. This will reduce the protective layer, weaken the plate in this area. Therefore, after reinforcement, the electrical wiring must be checked. 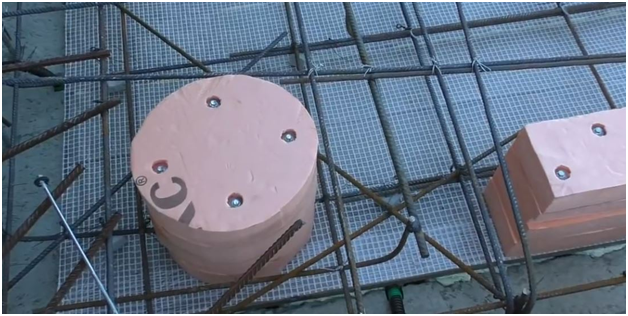
Structural reinforcement
In 90% of cases floor slab reinforced with two continuous reinforcing meshes, which causes an overrun of the material. middle part plate for compression practically does not work, so a sparse grid with large cells can be used here. However, this requires an accurate calculation of the scheme of bars in each grid. Mounting technology do it yourself given below.
The cells are formed during laying, the rods are tied with wire directly at the place of operation. This allows for the same protective layer (usually 4 cm) on all sides. The main requirements are:
It is forbidden to put crushed stone, pieces of pipes, fittings, wooden blocks under the grid.
Self-made clamps are cheaper, take into account the dimensions of the plate, specific operating conditions. They are bent with the same device that was used to bend the bars in the walls. 
The upper mesh is knitted from rods laid on tables. In the middle part, an increase in the cell is allowed according to the calculations. The corners of technological openings for internal stairs are reinforced diagonally. The lower grid rods are released into the formwork of the openings.
Filling at one time is extremely inconvenient in the absence of external scaffolding around the entire perimeter of the building. Therefore, more often the overlap is made in stages. Vertical jumpers are mounted in the following way:
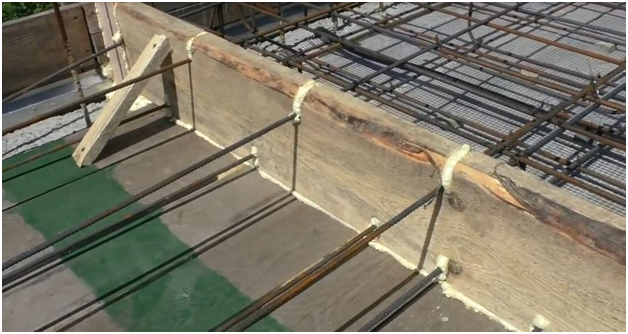
To ensure the connection of two floor slabs poured in stages, it is possible to make a recess in the first slab. To do this, it is enough to fix a longitudinal board inside the jumper in its middle part between the reinforcement belts, without resting on the lower bars. 
Concrete is ordered from the manufacturer or made in the building spot. It must be fed, laid, compacted with a deep vibrator with interruptions not exceeding 2 hours. After this period, hydration begins in the concrete, it loses mobility, does not form a monolith with the previously laid layer. 
Stripping of the partition of the technological seam is possible on the 4th - 7th day after pouring. The shield can be transferred to the next section to continue work on the same day.
Middle plate
Filling subsequent sections of the overlap is similar to the specified method. When vibrocompacting, one should focus on the cessation of bubbles, the appearance of cement laitance, and the concealment of large gravel with a liquid solution. All these factors indicate normal compaction, it is possible to move the tip of the vibrator to an adjacent location. 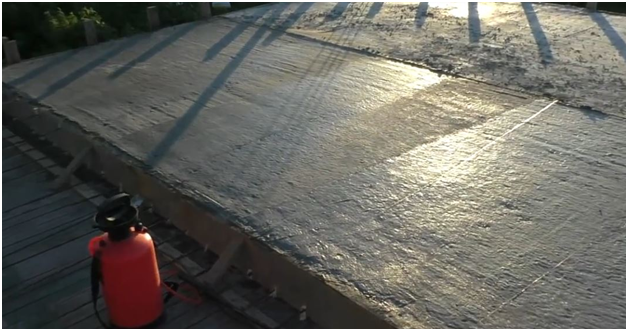
A plot with a staircase is usually poured into last turn when you can walk on the rest of the surface with buckets, a leveling tool. Seams are processed after 70% of curing (in the summer on the fourth day). To level the plane, grind off possible sags, an angle grinder with a disk-type diamond tool is used. Demoulding is possible in a week or two, depending on the weather. For the first three days, concrete needs water treatment without pressure.
Reduced step-by-step instruction guarantees the maximum possible operational resource. The quality of the floors is almost identical to the factory slabs. The increase in thickness is due to the impossibility of prestressing the armored belt at home. On the other hand, communications are laid in reinforced concrete at operational sites, which drastically reduces labor costs and the budget for finishing work.
Often country houses are built with a basement floor, in which an underground garage, a basement with storage rooms and other utility rooms are located. In this case, as a rule, the buried part of the building is erected from concrete. Accordingly, the ceiling between the first and basement floors should also be concrete, since the load on it is significant, and additional thermal insulation of the main house from the basement will also not be superfluous. So a story about how to do concrete floor between floors can be useful for many.
There are two ways to create a concrete floor over the basement. One option is simple, but costly. And the second, at a lower cost, is more reliable.
The first method, in essence, is not much different from the device of an ordinary wooden floor. First, at the level of the floor along the load-bearing walls, they fix metal beams, which will serve as a base for concrete slabs.
The plates themselves should be compact and light in weight. Since it is not possible to use a crane or other lifting equipment when working inside the house, all operations will have to be done manually.
So it is better to choose products from lightweight concrete grades, the mass of which does not exceed 100 kg. Try to lay the plates tightly, without large gaps. At the final stage, a finishing floor is created, leveling the surface with a concrete screed.
The described technology seems quite simple, but in practice one may encounter a number of unsolvable problems. As a rule, the difficulty arises from the standard dimensions of the plates that can be found on sale.
Most often they do not coincide with the dimensions of the future overlap. Naturally, sawing, cutting, etc. such products are not possible. So part of the spans between the beams may remain uncovered, and the gaps sometimes turn out to be very significant.
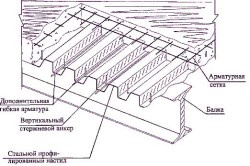
And so it turns out that in order to build concrete floors with your own hands between floors, you need to use the second option. It is more complex in terms of technology. The first stage is the flooring of metal beams. On top of them, a rough flooring of the floorboard is arranged. In this case, such a wooden floor acts as a formwork along which the cement mortar will be poured.
Thus, the resulting overlap will be completely monolithic, which increases its strength and reliability, and also has a positive effect on the thermal insulation of the house.
In order to avoid leakage of the mortar when pouring the floor, the boards must be laid as tightly as possible. On the other hand, if funds allow, it is possible to arrange a substrate of roll-type thermal and waterproofing materials on a wooden base.
Further, in order to give the future overlap more rigidity, you need to create a reinforcing base. To do this, use a metal bar or rod of a small section. It is laid on the floor in both directions - along the length and width, fastened with a wire twist at the intersections. It is very important that the rods intersect at right angles, thereby forming a mesh.

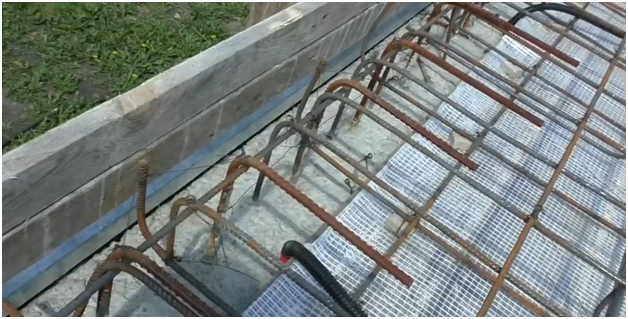
Where the created concrete floor mates with conventional non-load-bearing walls, the reinforcement bars are left straight, cutting them as close as possible to the vertical structure. At the same time, the reinforcement should go on the load-bearing walls by about 5-10 centimeters, for which its ends are bent perpendicular to the floor. This is necessary so that the monolithic slab has additional support, which will reduce the load on wooden base and metal beams underneath.
The minimum thickness of such a concrete floor is 10-12 cm. Moreover, over the entire area of \u200b\u200bthe slab, the difference should not be more than 1-2 mm. Therefore, when pouring the solution, you need to use special fixing devices, like plastic benchmarks.
But it is even more convenient to use special dry building mixes belonging to the group of bulk self-leveling floors.
Firstly, it is very simple - working with such compositions does not require special skills, all that is needed is to knead the solution correctly with your own hands, accurately observing the ratio of water and dry component.
Secondly, such products are characterized by a much faster solidification - if you can start walking on a concrete pavement only 21 days after it is poured, then from a self-leveling floor it takes from 1 to 3 days to completely harden.
And thirdly, the self-leveling floor does not require additional processing, since in itself it is a ready-made coating for laying floor materials of any category - from tiles to carpet or linoleum.
Concrete flooring is a durable and reliable element, which is indispensable during the construction multi-storey buildings and structures. Installation monolithic floor does not require lifting mechanisms, which provides savings on equipment and additional labor costs. The use of interfloor partitions in the construction reduces the time for work and allows you to build structures with your own hands. Making concrete floors is an easy process, but to make the material High Quality with its main advantages, you should follow the sequence of work and calculate the main parameters of the building element.
Concrete floors are one of the main building elements in the construction of buildings. They are designed to connect:
- basement with rooms;
- the first floor with the second;
- roofs with a house.
They are also used for horizontal screeding of buildings and structures.
Cover requirements
The following requirements are put forward for concrete floors:
- the presence of the necessary strength;
- must not contain deformations and must have rigidity and a long service life;
- an important property in a concrete floor is its maximum fire resistance, water resistance and the inability to penetrate air;
- the concrete structure between the floors must have sound and heat insulation.
Kinds
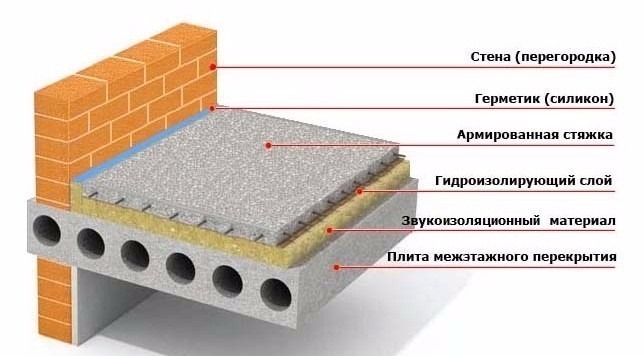 The scheme of interfloor overlapping of concrete.
 There are the following types of concrete floors:
- attic;
- basement;
- interfloor.
Concrete flooring also happens:
- hollow, which is often used in construction, where interfloor overlap is required for houses made of concrete, blocks and bricks;
- ribbed, used in the manufacture of the roof of industrial buildings, where there is no heating of the premises;
- monolithic, which is a reinforced concrete element and is characterized by increased strength, is used in the construction of buildings and structures with a large number of storeys.
Materials and tools for manufacturing
When working with concrete floors with their own hands, prepare the following tools and materials:
- concrete pump;
- capacity;
- buckets;
- jack;
- building level;
- plywood with moisture resistance property;
- boards;
- steel fittings;
- wire;
- concrete mortar or components for its preparation by one's own hands: sand, water, cement and various additives to increase the strength of the mortar.
How to calculate parameters?
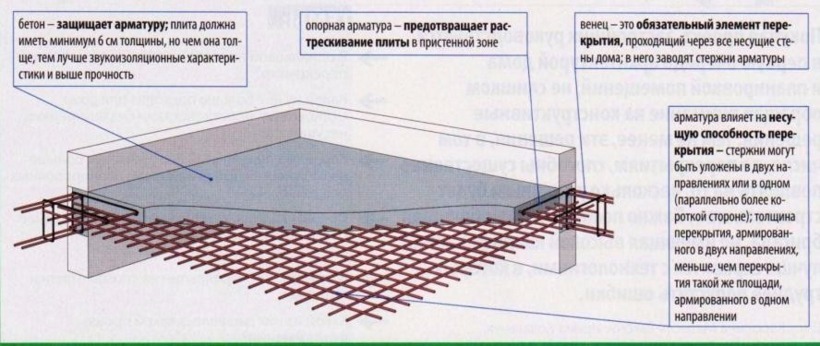 Scheme of a monolithic reinforced floor.
 When working with concrete floors, it is important to purchase high quality materials. When preparing a building mixture, which will be used to fill the structure, concrete grades 250 and 400 are used, which include heavy fillers. To make partitions with your own hands, it is important to thoroughly calculate the main parameters of the material. The calculation is based on a comparison of two main properties:
- strength of the reinforcing structure;
Plate calculations are based on the following indicators:
- intensity of constant loads;
- efforts in sections with a large load;
- axle stiffness.
The calculation of monolithic floors consists of determining their individual components. First you need to make a formwork from plywood of great thickness, then install it from steel rods tied with wire. The calculation of partitions is carried out by special computer programs and designers.
The definition of strength is obtained from factors such as: load and strength.
To find out the maximum bending of the slab, use the following data:
- design resistance of reinforcement and concrete;
- fittings A400 C class.
The definition of parameters includes the following calculations:
- working reinforcement area;
- required moment of resistance;
- the maximum moment in the section of the beams.
Formulas and constants are in the collection of building codes and regulations.
Formwork device for overlapping
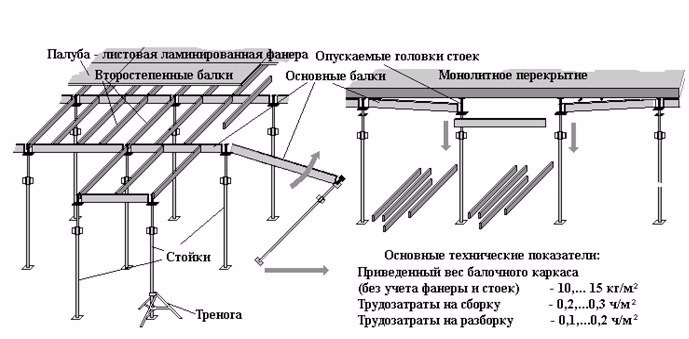
Formwork construction technology includes the installation of plywood on horizontal supports. To pick up correct amount materials, you need to find out the area and volume of the planned floor. The thickness of the structure depends on the possible loads and the dimensions of the span. Thus, the formwork is made of increased strength without allowing deformations, so that it can bear the weight of reinforced concrete for a long time.
When choosing boards for formwork, you should pay attention to their strength and thickness. Before installing the structure, the height of the span and the bottom of the floor are measured with a building laser level. In the process of installing home-made racks, they are adjusted in length to the height of the structure on which the first layer of the beam will be built.
It is important to observe the distance, which should be more than one cubic meter. Put the racks on the floor with a flat surface and high strength. After that, the transverse beam is laid in increments of about half a meter and then the formwork is installed. After the formwork is installed, the top of the structure is checked for horizontality using the building level.
When using boards instead of a plywood sheet, they are laid to each other without gaps and a moisture-proof material is laid on top. On all edges of the formwork, boards are installed, which are fixed at the corners of the structure so that they do not deform from the solution.
When installing the formwork yourself, it is important to remember a few rules:
- exclude the formation of holes, cracks through which the mortar can flow out of the concrete during the pouring process;
- check the strength of the jacks installed under the formwork;
- moisture-resistant plywood is used for the construction of formwork;
- formwork should be as strong as possible, because the quality of the structure being built depends on it;
- formwork should be installed both over the area and around the perimeter of the room, which will protect against leakage of the concrete mixture.
Reinforcement
Partitions between floors need reinforcement, which can be started after the formwork has been installed. Reinforcement of structures is carried out with reinforcement in one or two layers per formwork. A reinforcing mesh measuring twenty by twenty centimeters is installed, while the first row is laid on a protective layer, which ensures a uniform distribution of the concrete mixture under the reinforcement.
If necessary, connect the reinforcing elements, an overlap of at least seventy centimeters should be made. To maintain the proportion, it is necessary to install a second layer on top of the first row of the reinforcing mesh with the same step (twenty centimeters), only ensuring perpendicularity. At the intersection of the reinforcing bars, they are fixed with steel wire and a special hook designed to connect the reinforcement. In the manufacture of a two-layer frame based on segments of reinforcing bars, a similar sequence is carried out for the first layer and the second is laid, while maintaining a distance between layers of at least three centimeters.
Floor pouring
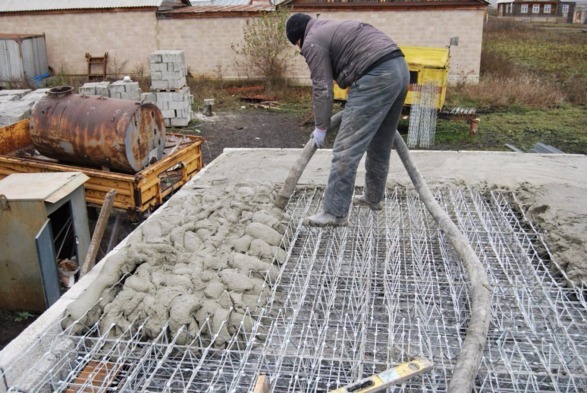 Filling a monolithic floor.
 After the installation of the formwork and reinforcement, the slab structures are poured with concrete. In the process of concreting, it is important to act quickly, since the mortar has the property of quickly hardening. Concrete is made from cement, sand, gravel and water by combining the dry ingredients in a concrete mixer and gradually bringing the mixture to the desired consistency with water. The concreting process includes continuous pouring of the mixture and its compaction with internal vibrators.
Concrete can be laid by hand or using a concrete pump. In the process of concreting, it is important to monitor the evenness of the laid mixture, for which a laser level is used. Concrete hardening should be carried out in a place with optimal temperature and moisture conditions, while it is important to protect the solution from direct sunlight and precipitation. The hardening of concrete should take place naturally; overheating of the laid mixture will lead to cracking of the solution.
Mechanical impacts on the laid slabs are allowed only after the concrete mortar reaches its maximum strength characteristics. The laid concrete mortar should be periodically sprayed with water, and in order to protect the mixture from the penetration of excess moisture, cover the filled surface with a waterproofing material. Dismantling of the formwork is carried out after the final drying of the solution.
In order for the floor to have high strength, high-quality materials are used for its manufacture, concrete grade 250 or 400 with heavy fillers and calculations are made that save cash and labor force.
Conclusion
Overlappings in buildings and structures play an important role for structures, but the desired result can only be achieved through proper manufacture building material and its installation. The manufacture of concrete floors is possible with your own hands and thus allows you to independently lay the necessary communications under the structure. To increase the thermal insulation properties of the material, wooden boards are used. Before proceeding with the installation of the slab, it should be leveled with self-leveling compounds.
Compliance with all the rules and the technological process for the manufacture and installation of concrete floors, you will get a solid, reliable structure for many years.
There is not a single person who, during construction, would not encounter ceilings for the first floor.
Scheme of monolithic overlap.
At the moment there are 3 types of them - these are wooden, slab and monoliths. Each of these options is subdivided into deeper levels, which gives a significant choice in approaches.
The most perfect is considered a monolithic overlap, which you can do with your own hands. Here you will need to invest a considerable amount of financial resources, effort and time, but then even grandchildren will be able to see the result, because. it will last almost forever. But for everything to be exactly like this, both of its options should be considered - it is a complete monolith or half on metal beams.
Tools and materials
We will need:
- sheet A3;
- pencil with eraser;
- roulette.
At this stage, there is a complete calculation of all means and materials that will be used in the future. If you wish, you can correctly calculate everything to the smallest detail.

Scheme of the formwork of a monolithic slab.
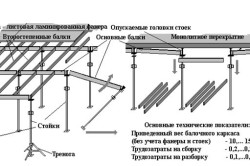
- Initially, you should make a plan for the surface of the first floor, on which the floor will be poured. With an open surface of 10 * 10 m, you can do without additional load-bearing walls, but if the area is larger, then it is desirable to have at least one load-bearing partition available, because. the mass of the plate will be very large. The outer wall of the building is taken as the perimeter, because The entire wall should be the carrier, not part of it.
- The calculation is made of plywood, which will be used in order to make the formwork. To do this, you need to know a simple formula: area + perimeter * formwork height. For a full monolith, it is 0.3 m, while for a half one it is 0.12-0.2 m. So for a house with a perimeter of 10 * 10 m, 100 m² of solid and 12 m² of sawn 0.3 m sheet will be required.
- The next step is to calculate how much cement mortar needs to be put. Here the formula will be a simple area * height-5% (which will go to reinforcement). Thus, for the same house, 28.5 m³ of solution will be required. And taking into account the fact that the average automixer contains 8-9 m³ of solution, you will need to order 4 machines.
- Reinforcement should also be calculated in advance. Given the standard step of 0.5 m, the formula will look like this: length * width * 4 is the size of one layer. With a maximum slab without I-beams, there will be two such layers. Those. for the same house, 800 m of reinforcing rod + 2% for staples will be required.
- Beams (I-beams) are calculated using the simplest formula: width / 2. This is their number. As a rule, their length is enough for one overlap.
It is not worth initially calculating nails, polyethylene, roofing felt and other materials, because. the number of nails may vary, and roofing felt and polyethylene are equal to the perimeter + 5%.
Preparation for construction
Structural scheme of prefabricated-monolithic overlap.
- hammer with nails;
- wooden beams (100 * 100) or metal spacers (2.5 and thicker);
- only;
- polyethylene;
- reinforced rod А500С;
- soft wire.
- Do-it-yourself formwork installation between floors. The formwork is installed immediately on the floor where the work will be carried out. It is important here that the entire area is done in good faith and all joints correctly match one to one. The walls should be nailed vertically to the bottom, because. if they are nailed to the edge, then there will be a chance that the nails may not withstand the pressure of concrete (exceptional cases, but there are).
- Do-it-yourself support system is mounted under the formwork, consisting of wooden beams and metal spacers. Beams are installed on every m², while spacers can be installed in a ratio of 1 to 2, i.e. 2 times less. Absolutely each must be perfectly installed, and then checked three times for stability. The pressure from the concrete on them will be 500 kg, and at the same time they should not even move. Otherwise, all the work may come to naught.
- Once the system has been correctly installed and checked from below, you should climb up and double-check everything again. Just walking on top with a heavy step will be enough. If everything is solid under your feet and there are no more doubts, it will be right to lay the waterproofing floor with your own hands with roofing paper or polyethylene, after which the material is pressed with something heavy and you can proceed to the next stage of work.
- Reinforcement is carried out as follows: rods are laid out along the entire length in increments of 0.5 m, after which a similar layer is laid out on them with a cross. All ligaments at the joints occur through soft wire. As soon as the lower crate is ready, you should start making the upper one. It is done in a similar way, but in no case should they be connected with each other.
- Staples are made by hand using the same reinforcing rod. They are bent with the letter U (of course, inverted) and installed at a frequency of 1 piece per 4 m². The upper level is fixed at a height of 25 mm from the pouring ceiling, and the lower level is mirrored from the formwork. Everything is tied with soft wire and tested for strength. If the armature does not have free play, then this is a well-done job, but if there is free play, then the cause should be found and redone. During the pouring of concrete, nothing should be damaged due to such shortcomings.
Main body of work
- bayonet shovel;
- shovel;
- polyethylene;
- solution 500 brand.
Cover arrangement scheme.
- When ordering an automixer, it is important to consider that it must have a special hose for supplying concrete to floor height. It is not advisable to make a solution with your own hands, because. even with the help of a concrete mixer, it will be simply impossible to make the right amount in a short time. And if you do not meet the compressed time frame, then the solidification will be uneven, which is fraught with fragility. It would be correct to fill the entire overlap between floors in one daylight hours.
- During pouring, you should use the help of at least one more person, otherwise everything can be significantly stretched out in time. During the filling process, in no case should you stand in one place. It is always necessary to move so that the pressure on the supporting formwork system is uniform. By itself, the pressure of the solution has 500 kg, but when dropped, the weight can increase quite seriously. The ideal option is a uniform filling of the layers, which will allow everyone to clearly do their job, and then affect the strength.
- While one person holds the mortar hose, the assistant(s) use shovels to stir the mortar to release air from it. The only thing to take into account in this case is that there is a waterproofing layer on the bottom, which in no case can be damaged.
- When the filling is completed, the resulting result should be covered with plastic wrap for a period of 28-30 days. From time to time, at the same time, it is necessary to moisten the top layer with water so that the concrete gains the desired strength. In a month, everything will harden, then it will be possible to continue construction further.
- A month later, you should dismantle the entire supporting system with your own hands, remove the polyethylene from the concrete and remove the plywood with a crowbar.
As a result, a wonderful overlap is obtained for the first and second floors, which is not so easy to make, but when you see the result, it will become clear that the game was worth the candle.
Erection of a monolith between floors on beams

Scheme of prefabricated-monolithic overlap.
- steel beams (I-beams);
- laminated plywood 20 mm and thicker;
- hammer with nails;
- or metal spacers (2.5 and thicker);
- only;
- polyethylene;
- reinforced rod А500С;
- soft wire;
- solution 500 brand;
- bayonet shovel;
- shovel;
The main part of the work here is no different, but the thickness of the future slab differs (1.5-2 times already), the amount of cement, as well as the supporting system. Putting such a concrete floor will be even easier in time.
- Beams should be laid before formwork installation. It is ideal to lay them along the width of a narrow wall, but if everyone is equal, then it is desirable to parallel the wall at the front door.
- The formwork and all its components are mounted on top. It is important to consider that the reinforcement here is not made in 2 layers, but only in 1 (in the middle). All formulas remain the same, only the coefficients change.
- As a supporting system, it is better to use metal spacers, which will not be needed at all, because. beams provide an additional margin of safety. One spacer is enough for 2.5-3 m² in length.
- After completion of work, everything is dismantled in the same way.
There are additional aspects that exalt this concrete floor in relation to the usual monolith.
- A monolithic floor laid between floors on beams has an increased margin of safety, because. It is held in place by a steel frame underneath.
- Concrete goes 1.5-2 times less, respectively, and the price is lower.
- It is convenient to conduct wiring through the beams, because. it will not affect the condition of the ceiling at all. And the installation of a suspended ceiling will be a joy to the worker, because. almost the entire structure is ready from the start.
Summarizing
A do-it-yourself monolithic ceiling can last more than one century if everything is done according to the technology described above. There is nothing complicated or unusual here, but patience and diligence are needed, only in this case you can be completely sure that the work done will also bring joy to the grandchildren.
Before the pouring of the concrete floor begins, it will be correct to familiarize yourself with the weather forecast for 1-2 weeks in advance, because if there is precipitation, it will simply be impossible to lay the material.
Comments:
- Formwork reinforcement
Before you make a concrete floor with your own hands, you need to prepare the following list of materials and tools.
- plywood or board at least 40 mm thick;
- board or timber;
- racks or supports made of pipes or channel;
- reinforcing bars;
- knitting wire;
- supports protective under fittings;
- level, level;
- Bulgarian;
- cement;
- crushed stone;
- sand;
- concrete mixer;
- pump or crane for pouring concrete.
It is the concrete floor that is considered the most reliable, as it is a monolithic reinforced concrete slab, with mandatory reinforcement.
Do-it-yourself formwork device for overlapping
For a monolithic concrete slab, the formwork is made by laying a horizontal surface with moisture-resistant plywood. Plywood or boards of similar diameter are installed along the beams supporting them, laid horizontally on supports. These supports or racks for beams and formwork can be found ready-made under the name telescopic or assembled by yourself from a beam, angle, pipes.
In order for the proportion of materials taken to be correct, it is necessary to calculate the area of \u200b\u200bthe future floor and its volume. The volume or thickness depends on the area of the span and the load experienced in the process. To withstand the weight of reinforced concrete for a long time, the formwork must be strong and not deform. Therefore, plywood or boards for manufacturing are taken strong and thick enough.
To determine at what height from the floor the formwork will be installed, it is necessary to measure the perimeter of the span horizontally with a level to the height that corresponds to the bottom of the planned self-leveling floor. The most convenient way to do this is using a building laser level or level.
If telescopic racks are used, then you should first install them along the edges, and subsequently longitudinal beams are already placed on top of them, the gap between which should be 2 m. Only then are all the racks in the middle of the room installed, both with tripods and without . The distance between these racks will depend on their power and the planned thickness of the floors. Averaged calculations lead to calculations that one stud must support every m³ of floor to be poured.
If homemade racks are used, it is necessary to adjust them along the length to the height at which the bottom of the first layer of beams will be installed. The distance between such racks should be at least 1 m³, install them on a flat solid floor. Further, a transverse one is laid along the longitudinal beam, the step during laying is approximately equal to 0.5 m, and the formwork sheets are already laid on them. The upper plane of the resulting structure is checked with a level, since it must be strictly horizontal.
If boards are used instead of plywood for formwork, they are adjusted one to the other, and a moisture-proof material is laid on top. Along the perimeter, the formwork must be protected with a side of the same height, which corresponds to the thickness of the concrete layer. It must be connected securely at the corners so that it does not collapse from the solution.
Back to index
Formwork reinforcement

Floor reinforcement scheme: 1 - main mesh; 2 - additional reinforcement of the main grid; 3 - U-shaped reinforcement of the edges of the plate; 4 - L-shaped reinforcement of the corners of the slab; 5 - load-bearing walls.
When the formwork is ready, it is necessary to prepare a reinforcing cage, consisting of reinforcement in 1 or 2 layers per formwork. For a single-layer frame, reinforcement is used with a larger diameter. Reinforcing cages are laid with cells of 20x20 cm, the initial row is laid out on special protection, which is needed for uniform penetration of concrete under the reinforcement. The height to the side should be 20-25 mm. If two pieces of reinforcement need to be spliced, the overlap should be at least 70-80 cm.
In order to maintain the proportion, a second row is placed on top of the first row of reinforcement with the same step of 20 cm, only perpendicularly. The reinforcement at the intersection is tied with soft steel wire with a special hook for knitting reinforcement. If the frame is made two-layer, then special supports-chairs made of pieces of reinforcement are laid out and then tied to the first row, and the second layer is laid out on them, similarly to the first. The distance between the layers should be at least 2.5-3 cm.
Back to index
Do-it-yourself filling of ceilings
Before you make a concrete floor, you need to prepare the concrete. It can be taken ready-made or made by hand. For its manufacture, a concrete mixer is used and the correct ratio of ingredients is required. Concrete can be poured with buckets or using a concrete pump, as well as a special crane. The method depends on the height of the floor and the volume of concrete to be laid on the formwork. It is recommended to treat the formwork boards with a special formwork oil immediately before the concrete is placed, so that the formwork can be removed later on. If polyethylene is already spread on the formwork, this is enough and no additional preparation is required.
Concrete is poured all in one go, total time work should not exceed 3 hours. Be sure to level the concrete at the end of the work with a special mop-squeegee so that the concrete is evenly distributed over the top and bottom. Density is also very important. To compact it, special vibration machines are often used, but if there is none, you can pierce the concrete with a shovel handle or a piece of timber.
The formwork is not removed until the concrete has completely solidified, that is, 20-30 days, and at the same time it is covered with a film on top so that it does not dry out unevenly.
Thanks for the feedback