Laying veneer laminate on wooden floors. Laying laminate on a wooden floor - the old base will shine with new colors. Dry screed
Among the fairly wide variety of decorative floor coverings, there are not so many options that can be laid on a wood base. Although, with strict adherence necessary rules, almost any material can be laid. But the laminated coating, created according to the floating principle, is ideal solution for a wooden base. In this article, we will talk about how laminate is laid on a wooden floor, as well as what options are available for laying laminate.
How to lay laminate on a wooden floor?
Laminated panels are fastened only to each other, there is no need to fix them on static building frames, on the floor or on the wall. The floor, created by the floating method, feels calm on the draft base, and gives it the opportunity to expand and contract. The base is also not a hindrance to the laminate when it changes its geometry due to changes in temperature and humidity levels. Design features laminated panels allow you to do without the adhesive composition. The glueless method is the most popular. It pleases both the wooden base and the owners of country houses with excellent spontaneous aeration, which is necessary for the ventilation of parts of a wooden structure.
Despite the artificial composition, the laminate does not differ much from timber during operation. Because its main part consists of MDF panels, chipboard, HDF and the same boards made by pressing wood processing waste. The basis of laminated panels is important indicator, which defines the scope.
When implementing the installation of any high-quality laminate on a wooden base, it is worth considering certain features of this material:
- a material that is made of wood will lose its qualities after some time, for this reason, before installing the laminate, carefully inspect the floor, as well as the condition of the support bars and lags
- the timber is not highly stable and stable, therefore, even a slight displacement of the panels will cause an increased load on the interlocks
- old wood flooring often has an uneven surface, bumps or depressions. Before installing the laminate, it is necessary to get rid of all the flaws so that the panels do not disperse or crack.
Before laying laminate on a wooden floor, you need to level the surface. There are several ways to level a wooden surface:
- using sheets of plywood or chipboard (chipboard). To do this, you need to take a thick sheet of plywood, treat it with an antiseptic solution to prevent the growth of microorganisms. Next, adjust its size with a special saw, after which you can lay them on the base. Underlay rails will help level the level of the base slope, and self-tapping screws will secure the sheets
- cycling. This method is suitable for an old floor that has minor flaws. Provided that the imperfections of the base are from 4 to 6 mm per square meter. meter, you need to conditionally divide the coverage into several parts. Each of the received parts must be processed with an electric planer
- installation of support bars or log. When the base has a significant slope or strongly creaks, then you need to fit and attach to concrete base special slats made of timber, which are called lags.
 In addition, if a rotten board is found, it must be replaced. Secure loose boards with self-tapping screws. When the logs stagger, they must be strengthened at the base. For this purpose, drill a hole and fix the logs with the help of an anchor. When the base subsides, special support wedges must be placed under the logs. Any cracks and crevices, even the smallest, should be repaired with putty.
At the end of all repair work, it is necessary to thoroughly clean the base from dirt and debris, then you can implement the second stage of installing the laminate.
Laying laminate with your own hands on a wooden floor
On a leveled and repaired base, first lay a 3 mm polypropylene foam or cork underlay. The sheets of the substrate are placed end to end and connected to each other using a wide adhesive tape or construction adhesive tape.
Laminate panels are laid from the window towards the door. Thus, the joints between the laminate plates will be the least noticeable. The first row is placed at a distance of 1 cm from the wall. To maintain this distance, a wedge must be inserted between the panel and the wall. This gap is called temperature, it is needed to compensate for linear expansions of the coating.
The second panel is mounted in the end lock at an angle of 25 degrees. It is rare not to cut the last panel in a row. Most often the rooms are of such a size that it needs to be cut off. The second row starts with this piece.
At the end of the installation of the second row, it is worth carrying out the operation of minimizing the joints. To do this, tap the panels with a hammer through a wooden stand. This is done until the joint is reduced in size. Then you can move on to the third row.
When the entire laminate is laid, you can proceed with the installation of skirting boards, which serve as an additional fixator for the panels and give the finished appearance decorative coating.
There are certain types of laminate flooring. Having decided on the choice, you need to make calculations in order to go to the store for a certain number of panels. To choose the direction of laying, you need to make sure that the pattern and texture of the panels are compatible with the lighting of the rooms and their shape. Today, modern materials allow laying decorative coating along the line of sunlight, across it, as well as laying herringbone. However, the latter option is not applicable to all laminate models.
Conventional panels are not suitable for herringbone mounting. The panel should contain special locks that allow you to lay the laminate in herringbone or squares. For example, the collection of Quick Step Noblesse panels contains materials of small dimensions, with a specific locking connection, which makes it possible to link the panels at an angle of 90 degrees. The flooring of the panels of the Quick Step collection is carried out along the line of natural light, as well as against it. When mounting panels against the flow of light, you can visually enlarge a small room, but the joints will be visible.
 When the window openings are located on one wall of the room, experts advise using the direct option of laying the panels in the direction of the sun's rays, because when installed across, the panel joints will be conspicuous and spoil the whole appearance. Laying across the light is carried out when the room is narrow. Under the condition of such an arrangement of laminated panels, the room visually expands, more volume is given. This option is very suitable for corridors, or other long rooms. The essence of direct mounting is that the panels are placed parallel to the wall, starting from the doorway. Cutting costs are minimal - only 5-7%, which significantly saves the amount of raw materials.
Diagonal mounting is the most difficult and costly. Cutting costs are about 17%. This option is implemented at an angle of 45 degrees. There are two types of installation, from the corner of the room and from the middle. The second option is the lowest waste, and simpler. Due to the unusual and neat styling, the room visually expands. Diagonal laying is used with an open view of the floor, when there are no carpets and the room is not cluttered with furniture.
Today, laminate with a chamfer is gaining popularity. This option belongs to a special series of laminated materials. The chamfered panels lying on the floor look like a plank floor made from a single piece of board. This laminate is released at an angle, creating a beveled plane of the board throughout its thickness. The structural element is created along the entire perimeter or on two opposite edges.
There are two types of bevels:
- V-shaped
- U-shaped.
In the process of connecting two panels, an almost imperceptible groove is formed, which resembles a laid elite parquet, or solid wood. These recesses are not felt to the touch, so dust will not accumulate in them. And the ends of the material are most often impregnated with wax, so no liquid will penetrate inside. Recesses make it possible to hide minor flaws. According to experts, these recesses do not allow the material to "walk", which gives a huge advantage in comparison with standard series. Now you know how to lay a laminate with your own hands.

When renovating an apartment, a situation often arises when old plank floors need to be covered with new flooring, for example, laminate. In this case, specialists from repair organizations assure that before laying the laminate, it is necessary to completely dismantle the old coating and make a new concrete screed, leveling the floors. However, the dismantling and screeding work often turns out to be much more expensive than a new coating, so the question arises: how to lay a laminate on a wooden floor without dismantling it?
Let's try to understand the requirements for the surface for laying the laminate. The surface must be flat, the height difference must not exceed 2 mm per 1 meter of floor length in any direction. The floor must not sag. If these requirements are not met, there is a risk of breaking the laminate lock under load, as a result of which the integrity of the floor will be violated, cracks will appear. Also, the base for laying the laminate must be strong, dry, and free of debris. Based on these requirements, it is necessary to inspect the wooden floor and, if necessary, prepare it.
Checking and leveling the floor
First you need to carefully inspect the floors. Old wooden floors that have been painted many times often have a convex surface of the boards - this is due to the many layers of paint in the center of the board and the partial destruction of its edges. Also, they can have gaps of various widths. If the board is relatively new, tongue-and-groove, tightly fitted, the floor surface is usually flat, without drops.
Check if the floorboards bend, if there is a creak when walking, you should also make sure that the boards are tight at the point of attachment to the logs, and the logs themselves have not failed or sagged. In addition to irregularities, the floor may have a significant slope towards the corners or the center of the room , it is checked using a laser or bubble level. This defect also needs to be corrected before laying the laminate.
An old board with a lot of drops can be leveled in two ways:
- To cut it off, I use an electric planer or a parquet leveling machine;
- Upholstered with plywood, plywood thickness from 8 mm.
If the floor has a significant slope, it will be necessary to level it with additional guides and sheathe it with plywood.
- If the floor boards sag, it is necessary to check the condition of the lag. To do this, determine the place of passage of the log, in the area of \u200b\u200bwhich there is a deflection, and cut out part of the board. This can be done with an electric jigsaw, and it is better to place its blade at an angle so that the cut out part forms a narrowing towards the bottom. The part of the board cut out in this way will not be difficult to put back without additional fastening. Through the resulting hole, the logs are examined, and if they subside, a wooden wedge is hammered under them until they are completely leveled.
- Grooming the floor makes sense only if the boards are tightly fixed and do not have a significant slope in any direction. Before leveling the floor with an electric planer, it is necessary to eliminate squeaks by fixing the boards on the logs using long self-tapping screws. Self-tapping screws can be screwed both into the holes from the previously removed nails, and next to them. The heads of self-tapping screws and nails must be sunk to a depth of about 2 mm. The leveled floor is carefully swept, impregnated with an antiseptic for interior work or drying oil and dried. After that, laminate flooring can be laid on the floor. In this case, the laying direction must be chosen so that the joints of the laminate are perpendicular to the floor boards - this will reduce the possible deflection.

Electric planer floor leveling technology
- If the boards have small numerous drops, but the overall slope of the floor is satisfactory, the floor is sheathed with 12 mm plywood, fixing it directly to the boards. To eliminate squeaks, it is necessary to fix the plywood with long screws through the boards to the logs - in this way, all layers of the floor will be pulled together with high quality.

Plywood floor technology
- Small humps, dips, and irregularities can be corrected by lining pieces of plywood or timber under the plywood sheets. If the irregularities are significant and reach 5 cm, you will have to level the floor with the help of bar guides. Need to calculate in advance required amount bar different thickness to make it easier to adjust the height. Pre-cut plywood, laying it on the old wooden floor. The joints of plywood sheets are drawn on the floor with a marker - this will facilitate the laying of the bar. The bar is fixed to the floor with self-tapping screws with a minimum step of 50-60 cm, while always putting support bars at the joints of plywood sheets. For additional noise and heat insulation, the space between the wooden floor and plywood can be filled with insulation, such as mineral wool. Plywood is attached to self-tapping screws with a cone-shaped cap, deepening them flush with the surface. The gap between plywood and walls should be 3-5 mm. It should be remembered that leveling the floor in this way will raise it relative to the level of the rest of the floor in the apartment, and may require replacing the doors.

Video - how to lay laminate on a wooden floor
Laminate step by step
- A plywood or leveled floor is ready for laminate flooring. Under the laminate, a polyethylene foam substrate is required. The substrate is necessary in order to avoid the knock of the laminate on the base. The thickness of the substrate is from 1 to 3 mm, but during operation it tends to cake, so there is not much point in buying a thick substrate. The substrate is placed end-to-end on the floor, the joints are glued with construction tape to fix it on the floor. Additionally, you can fix the substrate with adhesive tape around the edges.

The technology of laying laminate on a polyethylene foam substrate
- Before laying the laminate, it is necessary to keep it in the room for 2 days so that it acquires the temperature and humidity of this room. Before laying, it is necessary to decide on the installation method: parallel to the light, perpendicular to the light or diagonally. Diagonal laying requires a more careful fit, and is recommended for narrow spaces in order to visually expand them. Usually the laminate is laid perpendicular to the window - so the joints are less noticeable.

- Once the installation direction is chosen, measure the distance between the walls and calculate the number of laminate boards, as well as the width of the last board. If the width of the last board is less than 1/3, it is advisable to start laying the first row of boards sawn in half. The sawn-off parts of the laminate will come in handy for the last row.
- Laminate is of three types: with locks such as "Click", "Lock", as well as adhesive laminate. The “Click” lock is fastened when the board is set at an angle of 45 ° to the previous one and the lock snaps into place. This system is collapsible. Lock "Lock" is fixed by lightly tapping on the opposite end of the board until it clicks, while the laminate spike is inserted into the groove. It is necessary to tap the laminate through the bar so as not to damage the groove. Adhesive laminate is more often used in wet rooms; special glue is used to fasten it.

The technology of the correct joining of the laminate
- Laying laminate with a "Click" lock is carried out in rows. First, the ends of the boards of the first row are fastened, the row is aligned in place and the laminate is wedged between the walls using thin rails. This is necessary to create a gap that regulates the thermal expansion of the coating. They assemble the second row in the same way and, placing it at an angle to the first, lead it into the lock, then lower it, and the lock snaps into place. So continue laying to the end of the room.

Laminate laying technology with "Click" lock
- Laminate with a "Lock" lock is laid apart - this will help to fasten the boards into a single surface. To do this, measure the length of the board, the length of the room, calculate the number of boards in one row. If, as a result, about half of the last board remains, then it is used at the beginning of the next row. If an even number of boards is laid in the length of the room without a trace, then in every second row one board is cut in half, starting from half the board. A gap of 3-5 mm is also left between the wall and the coating, installing a wedge from the rail there.

Lock Laminate Laying Technology
- The adhesive laminate is laid using the same technology, but the groove-thorn junction is coated with glue, and after laying, the boards are temporarily fastened with adhesive tape. After laying, the wedges are removed and the skirting boards are installed.

Laminate is a coating that requires the preparation of a perfectly even base. But what if there is no way to dismantle the old floor and arrange a new cement screed? Can laminate flooring be installed on wood floors? These questions are of interest to those who decide to refresh the interior without resorting to capital investments. You can learn about how to lay the material on an existing surface from the recommendations and videos given in the article: how to put a laminate on a wooden floor with your own hands.

Can laminate flooring be installed on wood floors?
The question of the possibility of laying laminate on an old wooden floor often arises due to the fact that the cost of dismantling and installing a new cement base in many respects exceeds the cost of acquiring the floor itself. floor covering. In addition, the feasibility of overhaul is not always justified, as it is associated with the duration of the process, while you can change the interior of the room by resorting to cosmetic repairs.

Is it possible to lay laminate on a wooden floor and not be afraid that the coating will deform, creak when walking, or come apart at the seams? Knowing how the old wooden base behaves, and what measures must be taken to comply with the basic requirements for laying laminated floors, you can safely proceed to work. The technology of laying laminate panels on a wooden floor is similar to the procedure for covering a screed.
Despite the warnings of manufacturers and some installers, it is possible to lay laminate over a wooden floor, taking into account two main differences between a wooden and cement base:

In order for the laminate to be perfectly even, not to diverge in locks and to serve for a long time, it is necessary to prepare the base, taking into account all the requirements for the surface when laying this material. The base must be:
- even - deviation from the horizon should not exceed 2 mm per 1 linear meter of surface;
- absolutely dry;
- clean - it is necessary to remove from the surface all the debris and dust that have arisen during the preparation process;
- stable - there should be no displacement of the elements of the base relative to each other.
How to level a wooden floor under a laminate
There are several options for leveling wooden floors under a laminate:
- cycling of a wooden floor;
- floor covering with plywood or chipboard;
- leveling with plywood using linings and bars.

The choice of one or another option for correcting the surface depends on the degree of unevenness of the wooden base.
Repair of an old wooden base
Work on the preparation of a wooden floor for laying a laminated coating is carried out either immediately before installation, or in advance. It depends on how complex the process will be and how long it will take to fully meet the specifications. First, you should check the condition of the wooden floor for all sorts of defects.
Most often, boards that have been in operation for more than one year have a slightly convex surface as a result of applying several layers of paint to them. The edges of boards or parquet lamellas may be damaged in the form of cracks, holes and gouges. In addition, it is possible that the floorboards do not adhere tightly to the joists at the docking points. Sometimes there is a significant slope of the floor in one or more directions. All these shortcomings need to be addressed.

Before laying a laminate on a wooden floor, all potholes should be repaired, the loose elements should be wedged and fixed with glue and self-tapping screws. If there are cracks in the wood, they are stapled together with a construction stapler. Moldy and rotten boards must be replaced with new ones. To eliminate the creak of a wooden floor, it is necessary to sort out all the floorboards.
You can also get rid of creaking in a wooden floor by driving wedges between poorly fixed boards and joists, as well as between adjacent floorboards. This method will help to neutralize the friction of the boards against each other. If the boarding is heavily worn, this method may not be effective. Nevertheless, the main threat to the integrity of the laminate remains the unevenness of the base.

How to lay laminate flooring on uneven wood floors: sanding the surface
If all the floorboards of the wooden base are well fixed and the surface does not have a significant slope, scraping or electric planing can be used for leveling. This method is appropriate for surfaces whose roughness does not exceed a slope of 5-6 mm per square meter. Local irregularities are eliminated by processing defective areas with sandpaper or using a manual scraper. This treatment is also used in hard-to-reach places.
To facilitate the process, it is recommended to start leveling by dividing the entire surface into several sections. After processing, the plane of each section and the quality of grinding is controlled. Before starting work, it is necessary to deepen the heads of all self-tapping screws by 2 mm into the wood in order to avoid contact with the metal knives of the grinding power tool, which can damage them.
Upon completion of leveling, check the entire surface of the wooden floor with a level, and then carefully sweep or remove sawdust and dust with a vacuum cleaner. If the small rubbish left after leveling is not removed, there is a chance that it will get into the locks of the laminated coating, and this, in turn, will lead to an unwanted creak when moving along the laid laminate.

Before laying the laminate on a wooden floor after leveling, it is necessary to treat the entire surface with an antiseptic composition or proliferate and dry well. To reduce the possible deflection of the laminated coating, it is recommended to lay the material panels perpendicular to the direction of the boards.
Leveling the floor with plywood under the laminate
One of the simple and at the same time low-cost types of surface adjustment to the required level is the method of laying plywood on a wooden floor under a laminate. To perform such work, plywood sheets with a thickness exceeding the thickness of the finished laminated coating should be purchased. It is recommended to choose the thickness of plywood for the floor under the laminate in the range from 12 to 15 mm.
Before starting laying, it will be useful to check the level of humidity in the room. This can be done by placing a sheet of polyethylene approximately 1x1 m in size on the floor. The polyethylene should be pressed tightly to the floor and left for three days. If after this time no condensation forms on the inside of the sheet, plywood sheets can be used in such a room.

Begin the process by cutting plywood sheets. They are cut into squares 60x60 cm in size. Separate extreme sheets are adjusted to fit the outlines of the room, fill in the niches and bypass the protruding sections. When laying between sheets, gaps of 7-10 mm are left, which play the role expansion joints. The distance between the end sheets and the wall should be between 15 and 20 mm. In order not to confuse the cut sheets of plywood during assembly, it is recommended to number them.
You can fix plywood boards to the floor with glue, but you can do without it. Using the laying scheme and numbering, the sheets are laid out on the wooden floor in their place and fixed with self-tapping screws in the corners of the square and along diagonal lines with a step of 15 cm. For fastening, it is important to use self-tapping screws, the length of which is three times the thickness of the plywood. After final assembly, plywood sheets are carefully sanded with coarse sandpaper.
Laying plywood under the laminate on a wooden floor with fastening to the logs
Before laying a laminate on a wooden floor, you can use the leveling of the surface by laying plywood and attaching it to the logs. This method is quite laborious and expensive. The principle of this method is to install the log in such a way that their upper faces are in the same horizontal plane. To achieve this position, wedges or wooden bars are placed under the logs. When laying adjustable logs, their position is fixed by means of adjusting screws.

Plywood boards are cut with a circular saw and laid on logs, while checking the horizontal level of the plane of each sheet. Laying is done in a checkerboard pattern to avoid overlapping seams at one point. Sheets are fastened to a wooden base with self-tapping screws along the perimeter and diagonally in increments of 20 cm. For quick and convenient installation, it is recommended to pre-mark the attachment points.
After complete laying, the sheets are sanded and treated with an antiseptic solution, and then the laminate is laid on plywood. On wooden floors leveled in this way, the flooring will hold firmly and for a long time. The only drawback of laying plywood on logs is that this option is not very suitable for rooms with low ceilings, since their height can decrease to 8-10 cm. In addition, trimming the door leaf may be required.

Is it possible to put laminate on fiberboard
When renovating an apartment, many people wonder if it is possible to put a laminate on a wooden floor covered with fibreboard? Some recommendations state that if fiberboards are laid flat and held firmly, they can be used as a base for laminate flooring. However, some experts do not agree with this statement.
The thing is that fiberboard panels do not have the ability to redistribute the load over a large area, unlike plywood or chipboard sheets. In addition, when bed fiberboard sheets, there is no way to carefully examine the condition of the old wooden floor. How to put a laminate on a base, the elements of which are possibly rotten or worn out? This can lead to the fact that over time, all existing defects will appear on the finished floor covering.
The use of fiberboard, which is based on pressed paper, as a base for a laminated coating, raises serious doubts about the durability of the repair. On old floors, under load, a play of up to 0.5 mm may appear, which will cause the laminate locks to loosen. This can lead to creaking and breakage of locks. And given that the logs of the wooden floor can be cracked, the gap can be much larger.

Considering that not everyone has the opportunity to dismantle the old wooden floor or sort it out (which is also costly in itself), you can lay the laminate on the fiberboard. However, the condition must be met that the fibreboards are sufficiently firmly fixed to the wooden floor. And if the base for the laminate is strong, then there is not much difference what is the base - chipboard, plywood or fiberboard.
Laying laminate on a wooden floor with your own hands
To figure out how to properly lay a laminate on a wooden floor, you need to have an idea about the material itself, its classes, types of substrate used, calculations and installation technologies. This information will help during the work to avoid mistakes that lead to damage, waste of material, and will also contribute to high-quality and durable installation.

Choosing a material: calculation and purchase of laminate
The amount of laminate required is calculated based on the area of the room, the material consumption rate and the installation method. First of all, the area of the covered surface should be determined. Quantity square meters The room is divided by the area of one laminate board. As a result, the required number of coating strips is obtained. Knowing that each pack contains 8 boards, you can easily determine the number of packs.
When buying material, you should also take into account the consumption coefficient, which varies from 5 to 14%. This or that value of the coefficient depends on how the laminate panels are laid. If you decide to lay the laminate flooring diagonally, the coefficient is assumed to be maximum. Consequently, there will be more material waste.
In addition, it should be taken into account that during the laying work, the lock of the plate may be accidentally damaged or an incorrect trimming may be performed. In this case, it would be useful to purchase a few boards in stock.

To work with laminate in residential premises, a coating with certain technical parameters is chosen. Manufacturers present four classes of material, the main indicator of which is wear resistance. The most common plates are 6, 8 and 10 mm thick. The thicker the board, the stronger the coating. For domestic use, grades 31 and 32 of the material are quite suitable.
In addition to strength indicators, laminate plates are distinguished by locks. There are two types of locks - CLICK and LOCK. The CLICK lock is more common, it perfectly holds the seam and allows unevenness up to 3 mm per linear meter of surface. Panels with the second type of lock are difficult to install, require a perfectly even base and are used less frequently.
Preliminary preparation of the base
Before laying a laminate on a wooden floor, the condition of the existing subfloor should be analyzed. It is necessary to identify all existing defects: potholes, cracks, holes. Loose boards should be wedged and fixed with glue and self-tapping screws. Potholes should be sealed with wedges using glue, and if possible, clean the ventilation holes.

A very old floor should be disassembled to the supporting logs. If during the examination it was found that some elements are rotten, they should be replaced. Floor boards that are leaky on one side can be turned over with the unworn side up, and completely rotten ones can be replaced with new ones. Checking the slope of the floor is carried out using the building level and rails.
If a floor surface difference of more than 3 mm is detected, the scraping method should be used. If you don't have a scraping machine, you can always rent one. It will be more reliable to level the floor by laying chipboard or plywood. In addition to the leveling function, such a coating will provide additional insulation and sound insulation of the floor.
Leveling a wooden floor with chipboard boards
Chipboard boards are laid after strengthening all the elements of the wooden floor and impregnating the base with an antifungal compound. The plinth is dismantled, and unnecessary items that may interfere with the process are removed. Laying of plates is carried out from the corner of the room. A gap of about 10 mm is left from the wall. have chipboard sheets so that the joints of the material fall on the lines of the beams.
Chipboard boards are fixed with self-tapping screws, while trying to ensure that the caps of the fasteners do not extend beyond the surface. The pitch of the screws should be about 30 cm. After laying all the chipboard boards, the joining lines must be putty with thin-layer compounds specially designed for working with wood. When the solution dries, the surface of the chipboard boards is polished.

The base of the freshly laid chipboard should be thoroughly dried. Ideally, the plates should be kept for about a week, so that acclimatization takes place and excess moisture evaporates. If during this time it is found that some joints are swollen or displaced, they should be cycled, puttied and cleaned with sandpaper.
Necessary tools for the job
For people who are not professionally involved in repairs, but are going to lay a laminate on their own, a logical question arises about a set of tools for the job. To lay a laminate on a wooden floor, you will need a tool that should be in the arsenal of every owner:
- construction roulette;
- ruler, pencil;
- construction knife;
- hacksaw or jigsaw;
- rubber mallet;
- pliers.

Do not forget about the plinth, for fixing which you will have to slightly expand the range of tools. If you plan to install wooden skirting boards, you will need a miter box. In the case of plastic baseboards, this device is not needed. You will also need a screwdriver or drill to tighten the screws.
A puncher can also be useful for arranging holes for fixing the plinth. Not everyone has this power tool, but it can be rented for the duration of the work.
Choosing a substrate for laminate on a wooden floor
Before laying a laminate on a wooden floor, it is correct to cover the surface with a substrate. This layer allows you to compensate for minor irregularities, provide moisture and sound insulation of the laminate, as well as the space between the coating and the base. There are quite a few types of substrates, and they differ in composition, properties, cost, appearance, and other features.

The material for the manufacture of substrates can be synthetic (polyethylene foam), natural (cellulose, cork, needles, etc.) and combined. The most budget option is polyethylene foam - lightweight, easy to install, but fragile material that is quickly compressed and does not provide proper moisture exchange. A more durable substrate is made of polystyrene in the form of 1x1 m plates, it does not cake and provides high-quality sound insulation. But these types of substrates are more often used when the base is made of concrete.
Before laying the laminate on a wooden floor, it is recommended to arrange an underlay made of natural material. The cork backing has excellent properties; in combination with a laminate, it demonstrates excellent heat and sound insulation. Its cost is quite high, but this is offset by the long-term preservation of the wooden base. The thickness of the substrate is chosen, focusing on the same parameter of the laminate board.
For example, under an 8 mm board, a substrate 3 mm thick is selected. With regard to the laying of the material, it should be noted that the strips of the substrate are placed end-to-end without overlaps and stationary fastening to walls or a wooden base. Docking lines are glued with adhesive tape along the entire length or in periodic places.

How to put laminate on a wooden floor: installation technology
Once all preparatory work is completed, you can proceed directly to laying laminated panels. The process of laying laminate flooring is relatively simple and does not require special knowledge and skills. However, it is still worth familiarizing yourself with some of the nuances of installation. Choose a place where the packages with laminate will be located, remove the doors from the hinges, free the room from unnecessary items.
Before laying the substrate, it is necessary to remove all debris and carefully dedust the surface of the substrate. The underlayment strips are laid parallel to the future arrangement of the laminate boards. If a single piece of the substrate is not enough, it is necessary to connect several parts with adhesive tape, cutting them using the mirror cut method. All docking lines are also glued with tape.
Next, lay the first row of coating. Don't forget that the laminate panels should be placed across the planks of the wooden base. Carefully connect the lamellas of the first row with each other. First, we collect solid panels, and then we measure the length of the last board of the row and outline the cut line. When cutting, it is necessary to turn the board 180 degrees, otherwise the locks will not match. Cut off the excess part according to the mark. As a visual aid, use the video: how to lay a laminate on a wooden floor with your own hands.
Do not forget to leave gaps between the end of the panel and the wall, in which you can put 8-10 mm wide limiters made from laminate scraps. After the formation of the starting strip, the next one is assembled. The distance between adjacent rows should be small so that it is easier to connect them. The formation of the next row begins with a cut lamella.

After assembling the second strip, it must be carefully lifted, holding on to the end joints, and turned slightly so that the lock snaps into place. It is necessary to go along the entire length of the strip, alternately lifting the end joints and snapping the locks. In order for the locks to be tightly fastened, it is necessary to bring them by tapping with the palm of your hand or a mallet.
By this principle, all other rows of coverage are assembled. Laying laminate panels is best done in a chaotic manner, i.e. some of the rows should not be started from the cut board of the previous strip, but from a whole board or from a short cut.
Features of laying the last row of laminate
The closer the laying moves to the last row, the more inconvenient it will be to carry it out. When the room is covered by 80%, it is necessary to lay the panels, turning in the opposite direction and standing on the already laid laminate. Some difficulties are caused by laying the last row, which must be carefully measured and cut along the strip.

When the laying process reaches the last strip, the distance from the edge of the penultimate row to the line of the opposite wall along the entire length may not be the same. In view of this, the marking of the last row is carried out in stages: first, the first board is marked and cut, then the next one is measured and cut off, and so on until the end of the row. We outline the outlines of the first panel with a pencil and cut out the necessary strip according to the markup.
As soon as the laminate flooring is laid, proceed to attach the skirting boards. Docking places between rooms are covered with special thresholds to prevent dust from entering there. At the end of the work, sawdust, debris are removed from the coating and the surface is wiped with a slightly damp cloth.
How to properly lay laminate flooring on hardwood floors
Laying laminate in places where pipes, heating radiators, around doorways and in other hard-to-reach places does not present any particular difficulties. The pipes are bypassed in the following way: make marks on the board with a pencil and cut out the corresponding holes in it, not forgetting to take into account the temperature gap between the coating and the pipe (8-10 mm).

Gaps around pipes and other iron fittings should be filled with a matching acrylic sealant, while expansion joints near walls should be left unfilled. Subsequently, their unaesthetic appearance will be covered with skirting boards. Similarly, the material is laid near the thresholds, steps and other ledges.
As far as avoiding doorways, before laying laminate flooring on a wood floor, it's a good idea to remove the sheet from the hinges and determine if the door will close after the flooring is laid. To do this, it is necessary to sum up the thickness of the laminate, the substrate and the leveling layer (if any). Subtract the resulting value from the distance from the edge of the door to the wooden floor. If less than 3 mm remains, the door leaf will need to be trimmed.
After all the calculations, the laminate is laid around the door frame, leaving an allowance of 8-10 mm, the door is returned to its place and its progress is checked. If necessary, saw the door to the desired size.

Tutorial video: how to lay laminate on a wooden floor with your own hands
According to the principle, it is better to see once than hear a hundred times, home craftsmen are invited to familiarize themselves with the instructional video of laying laminate on a wooden floor. From the videos you can learn everything related to the coating device on a wooden surface.
Video: do-it-yourself laminate flooring on a wooden floor
On the Internet you can find a whole series of courses on how to lay a laminate. Video instructions for installing flooring provide visual information and practical advice both experienced craftsmen and those who for the first time tried to level the wooden base and lay the lamination coating on their own.
In the training videos you can see master classes on leveling the floor with plywood and chipboard, learn about the features of the wooden base, the choice of substrate, as well as step by step instructions for laying laminate flooring. In addition, in the videos you can find recommendations for eliminating possible defects in the wood flooring.
Video: how to lay laminate flooring near a doorway
There are many educational stories about the installation of skirting boards, the features of the interlocking joints of the floor covering and the technology of fastening material panels to each other. Thematic video tutorials contain information on how to lay the coating around radiator pipes, in niches, ledges, near doors and steps, as well as in other hard-to-reach and inconvenient places.
Some video tutorials are devoted to the elimination and repair of defects on an already laid laminate flooring. From them you can learn how to mask scratches formed on the laminate, dents from fallen heavy objects or heels, as well as how to eliminate damage caused during the laying process: chipped corners and edges, divergence of seams, swelling of the coating.
Leveling a wooden floor in any of the existing ways allows you to use it as a base for a laminate. If all work on the preparation of the floor surface is carried out in compliance with technical requirements, the flooring will last a sufficiently long period without requiring repair and while maintaining an aesthetic appearance.
Modern market building materials rich in variety of types of floor coverings: ceramic tile, linoleum, carpet, cork floor, parquet and others. Currently, more and more buyers prefer laminate, because this material is durable, easy to use, has a reasonable price and beautiful appearance. This article describes the secrets of the correct laying of laminate on a wooden floor. It also provides answers to questions that bother many readers. Is it right to lay laminate on an existing wooden uneven floor? How is wood flooring prepared for laminate flooring? How to lay a laminate with your own hands?
So, first things first. You bought laminate flooring. Now it is required to perform its laying, while spending minimal resources of time and effort, and also to ensure high quality the work done so that the repair is preserved for many years.
Step 1. Assessment of the condition of the existing pavement

It's no secret that dismantling an old wooden floor is a time-consuming and dusty process. Often consumers want to avoid dismantling, but doubt the correct laying of the laminate on the existing floor.
To assess the feasibility of laying a laminate on a wooden base, it is necessary to carefully check the entire floor area for the absence of fungus and mold, deflection and creaking of the floorboards, and large deformation changes in the surface.
Requirements for a wooden base
- Dryness. old material should not have traces of decay, fungal formations. This factor is very important, since the process of damage and decay of the tree will continue even after laying the lamellas. After a while, the laminate will also cover the spread of fungus and mold;
- Hardness. The base must remain strong so that new structures do not undergo deformation and retain their original appearance;
- Evenness. The difference in height of the existing pavement is not allowed by more than 2 mm per 2 m of length. An uneven old floor will cause the slats to squeak and the laminate interlocks to deform.
More detailed description requirements for a wooden base can be found by watching the video:
Advice. If the existing flooring in your apartment does not meet the specified standards, you can bring the wooden floor to its proper form by locally replacing sections of the base. Plywood flooring will help level the surface.
Step 2. Preparing the wood flooring
Important! When partially replacing a wooden floor, it is necessary to use only dry and high-quality material. Otherwise, the base structure may be deformed during operation and drying of the wood, which will lead to the destruction of the laminate coating.
Eliminate squeaky floorboards
A common cause of unpleasant sound is poor fixation of the boards to the joists. Old fasteners loosened over time, it needs to be replaced with a new one. In this case, it is not necessary to remove the old nails, you can make holes nearby. In this case, it is better to use self-tapping screws, which are 2–3 cm less than the thickness of the floor. It is necessary to fasten each board to the lags, drown the hats so that they do not stick out. A visual guide is provided in this video:
Leveling an existing wood floor
The first step is to identify height differences using the building level. It is better to use this tool with a length of 1.5–2 m in order to cover the entire surface area as much as possible and make more accurate measurements.
If you have an uneven floor, then do not despair. Align the convex sections of the coating, it is better to cut them down with a grinder or an electric planer. If you lay sheets of plywood, you can easily eliminate height differences, make the base of the floor more durable and even.
Step 3: Laying Plywood on an Uneven Wood Floor

Plywood laying is effective way elimination of defects in the wooden floor.
Advantages:
- Strength, deformation resistance, durable laminate flooring;
- High thermal insulation. The material retains 30% more heat;
- Soundproofing;
- moisture resistance;
- Ease of use. You can lay this material yourself, without involving assistants;
- Large dimensions of the product allow you to quickly level the surface of large and small rooms;
- Low cost.
When choosing plywood, it must be taken into account that the thickness of the sheet must match the floor covering or be greater. Therefore, for laying under a laminate, it is better to use plywood sheets with a thickness of at least 10 mm.
There are several brands of plywood sheets. For the construction of industrial buildings, this material of the FB and FOF brands is used, for work in residential premises - the FSF and FK brands. At the same time, thanks to special adhesive compositions, FSF plywood sheets have an increased level of moisture resistance. However, such products are not recommended for use inside apartments and houses, since they can be harmful to human health due to the content of phenol-formaldehyde adhesive toxins in their composition. It is better to lay an eco-friendly and cheaper brand of FC plywood.
Correctly laying plywood is necessary in a checkerboard pattern. Do not allow 4 corners to converge at one point. Pre-cutting sheets and their numbering will help not to get confused when it comes time to lay the cover. The plywood laying technology provides for the mandatory presence of gaps between the seams of 2–3 mm and an indent along the perimeter of the walls of 10–12 mm. This will allow the wood to expand without warping as the temperature changes.
To level the old wooden floor with plywood, it is necessary to fasten the screws at a distance of no more than 20 cm from each other along the perimeter of the sheet, while retreating 2 cm from the edge.
You can find out the details of cutting sheets, the scheme for attaching canvases and the secrets of checking the quality of the work performed by watching the video:
Advice. You can additionally glue an uneven floor with plywood sheets. This will avoid unwanted loosening of the boards when walking, thereby increasing the durability of the laminate flooring.
After you managed to align and prepare wood flooring, it is necessary to consider laying the substrate under the laminate.
Step 4. Choosing a substrate for the laminate

The substrate is a special rolled material that allows you to prevent contact between the subfloor and the laminate. Compensating and distributing the load, the substrate softens the pressure of gravity, thereby ensuring the strength of the entire structure of the coating. Thanks to this rolled product, the lock joints of the lamellas are not deformed. Also, this material performs the functions of noise absorption and vapor barrier, with the help of it you can even out minor deviations.
The substrate is of the following types: from polyethylene foam, from polystyrene, cork.
What you need to know to choose a substrate for laminate flooring? requirements for this product. The following video will help you answer these questions:
Attention! Properly selected substrate will increase the life of the laminate and its performance properties.
Step 5. Laying the laminate on the prepared wood floor base

Laminate laying is simple. On the prepared floor base, it is required to lay the substrate end-to-end, fastening the edges of the strips roll material tape or masking tape. It is better to start laying the lamellas from the window to the door close to the wall. Having inserted a wedge, which will ensure that the temperature indentation of 10-12 mm from the walls is observed, you can begin to lay laminate boards. The last laminate plate in the row must be cut with an electric jigsaw, carefully measuring the distance remaining to the wall. It is important to lay the second row by shifting the laminate board at a distance of 40 cm relative to the first row. This will give additional strength and integrity to the laminate flooring, as well as improve the appearance of the floor.
The installation of laminate boards involves the ease of snapping locking connections. However, sometimes it is required to perform additional gentle manipulations with a hammer in order to get rid of the gaps and achieve a tight fit of the lamellas.
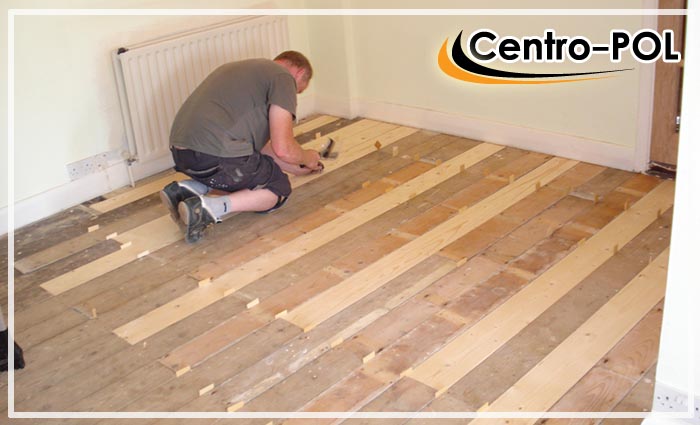
In this article, we will talk about the experience of laying laminate on a wooden floor in a panel house. We are talking about budget repairs that everyone can afford.
This is what it looked like before the renovation...
The first problem that every inhabitant of a panel house faced was the creak of wooden floors. That's why it happens: the floorboard is nailed to the joists, which loosened over time, and the floor began to creak.
The next problem is a very uneven floor with large differences between the boards. To lay a laminate, such a floor must be leveled, while the maximum allowable height differences should not exceed 2 mm by 1.5 m.
To eliminate these problems, we decided to level the wooden floor with plywood. But if you just screw plywood over creaking boards, then, of course, it will not get any better. Therefore, first you need to strengthen the floor with screws.
We dismantle the old plinth. If it is plastic, there will be no problems, but the wooden plinth needs to be torn off with a mount or a nail puller. We pull out all the protruding nails, remove the large protrusions with a planer. Before laying plywood, do not forget to wash and vacuum the floor well.
 Getting the wood floor ready for renovation
 Now it is important to determine at what height the wooden floor is raised above the stove; for this, 1-2 holes are drilled in the boards. Knowing the distance between the base and the boards is necessary to determine the size of the floor screws. Usually it is 8-10 cm, but on the first floor there are all 25 cm.
After raising the floor level, the door may not open: the thickness of the laminate with the underlay is almost 1 cm + the thickness of the plywood (minimum 0.6 cm). If the door is old, then it can be filed with a hacksaw without any problems, simply by removing it from the hinges. And for trimming a door with a laminated coating, thick plywood must be placed under the bottom, otherwise chips will appear at the cut site.
Material calculation

Next, you need to calculate how many screws you need. To do this, we look at how many lags are in the room (they can be found by nails or seen through a gap near the wall). Then we count the number of boards in width and multiply the resulting amount by the number of lags.
Each board is screwed with 1 screw to the log, every 40-60 cm. For example, if there are 11 logs and 28 boards in a room, then 308 screws + 10-20% for the stock will be required.
It is better to fasten plywood every 15 cm, if less often - it will swell and dangle when walking. The length and width of the room are measured and the resulting amount is divided by 15 cm, and then the values \u200b\u200bare multiplied. For example, our room is 3x5.6 m in size. Divide 3 meters by 0.15 = 20 pcs, divide 5.6 m by 0.15 = 38 pcs. Now we multiply 20 by 38 and we get 760 pieces, + 10-20% for the stock. For plywood, wood screws 25-30 mm thick 3-3.5 mm are suitable.
Now we consider how much laminate is needed. To do this, you need to find out the dimensions of the room, and do the calculation already in the store, because the laminate panels have different parameters. Our room is 17 sq. m. In one box, a laminate with an area of approximately 2.6 square meters. m. Divide 17 by 2.6 = 6.53. We round up, which means we need 7 boxes, and half the box will be in stock, in case of marriage.
This should be enough if you lay the laminate in the usual way: pruning costs are approximately 5%. If laying diagonally, the margin should be at least 10%.
When buying a laminate, it is important that the delivery batch on all boxes is the same. In boxes with different batches, the shade of the picture may vary. Also, the pack must be intact, otherwise the locks may be damaged.
Now we count the amount of plywood. We chose plywood with dimensions of 1.43x1.52 m, that is, the area of \u200b\u200b1 sheet will be 2.17 square meters. We divide the area of the room (17 sq. M.) by the area of \u200b\u200bplywood and get 7.8 sheets. So, you need to buy 8 sheets of plywood. The thickness of the plywood must be at least 12 mm.
Strengthening boards with screws
So, all the materials have been purchased, we proceed to strengthen the floor with screws. The site has an article about what to do with the creaking of the floor in the apartment, it partially talks about this work.
Since the screws were difficult to penetrate into the wood, we first drilled holes about 70% of the length of the screw, and then pulled the boards to the joists with screws.
 We strengthen the floor in rows along the logs
 Of course, if you have a powerful screwdriver, you can do this much faster without additional drilling. In our case, the cheapest Chinese screwdriver, which quickly sat down, so all the work dragged on for several days.
The main thing is to tightly fasten the boards to the joists so that they do not hang out when walking.
Since the doors will soon be changed, we file the slopes to install the plinth.

During the work, it turned out that it was blowing too hard from under the floor from the side of the street, so I had to seal the gap with foam. In this case, it is necessary to moisten the surface before treatment with water, and also spray the foam after application, since moisture is necessary for the polymerization process of the mounting foam.
 There was a strong breeze from the street from this crack
  It got so much better
 Plywood leveling
To level the floor with plywood, lay the sheet on the floor and fasten it every 15 cm with screws. Do not forget to leave a small gap between the sheets and near the wall. The even arrangement of plywood sheets is controlled using a level. Sheets that require trimming are sawn with a hacksaw or jigsaw.
Substrate laying
 The cat is scared...
 We chose the cheapest substrate, made of polypropylene. Before laying, vacuum the floor again.
We lay the substrate with a margin on the walls, so that later we can cut off the excess, and glue it together with adhesive tape. The substrate should lie in one layer, butt to butt.
Laying laminate
Having finished preparing the floor, we proceed to laying the laminate. Before that, you need to store the laminate for several days in the room (to adapt the material to the temperature and humidity of the apartment).
Laying starts from the corner of the room, preferably from the most prominent place. However, there is a small nuance here: if the door opens into the room and no one plans to remove it, then they begin to lay the laminate from it, otherwise it will not be possible to lay the last row later.
 We start laying from the door
 It is best to place the wide joints of the laminate along the light from the window, so the gap will be less visible (they will increase over time).
Modern laminate is mounted without glue, using the locking method. This type of flooring installation is called floating, because it is not rigidly fixed to the floor, but rests freely on the substrate. During the change of season, the coating changes its dimensions a little, so it is impossible to screw the laminate hard to the floor with screws. Along the perimeter of the panel there are locks that are connected if one of the panels is inserted at an angle and then lowered.
To see how it works, watch the video tutorial:
The panel is laid in the corner and the next one is joined from the short side. Thus we collect the first row. The last panel, most likely, will have to be filed. This can be done with a jigsaw or saw, but make sure that the teeth are small, otherwise there will be chips on the laminated surface.
 First row done
 The main rule when laying laminate flooring is to leave a gap of about 1 cm near walls, pipes, doors and other obstacles. At the same time, you should not make a gap of more than 2 cm, because the thickness of the plinth will not be able to cover it later.
 The wedge is needed to withstand the same gap near the wall
 For ease of installation, stores sell a special kit for laying laminate. It includes wedges of the same thickness, a mounting foot for installing the last row and a wedge of panels.
For additional sealing of the seams, you can buy a special sealant paste and coat the locks with it before docking. However, in wet rooms it is better to use tiles or porcelain stoneware.
The second row is laid in the same way as the first, and then inserted into the previous one. To simplify the task, we recommend laying the panels as close to the lock as possible, so that later you can simply lift the entire row and snap into place. This is done by simply pressing the row at an angle.
 To connect, insert the panels at an angle
  Then we lower the panel so that the second row lies next to the first
  We join adjacent rows with our hands
  As a result, the joint should not be visible.
 Some types of locks allow you to join the laminate not in a whole row to the previous one, but one at a time. For example, Quick Step laminate has universal locks: they can be inserted horizontally or at an angle. At the same time, there are Click-locks that only hammer horizontally.
It is not necessary to immediately leave a gap between the first row and the wall. It will be more convenient to collect 3-4 rows, and then move them to the wall, and you can put something heavy on top. This is much easier, especially if the wall is not very flat.
Another one important feature- the panels are laid in a checkerboard pattern. If the first row started with a whole laminate panel, then the second row should be started with a half, and the third again with a full panel. So the connections of the locks will be denser, and the cost of trimming will be minimal.
Half of the room is readyThus, in a checkerboard pattern, we lay the remaining rows of laminate. When we reach the heating pipe, cut out a round hole with a jigsaw or drill. Then the trim is simply laid and pressed with a plinth or glued onto liquid nails.
When we reach the last row, we need to file each panel in width, taking into account the gap. Installation takes place in the same way, we snap it with a strong pressure on the panel at an angle.
 The floor is almost ready
 Skirting board installation
Plastic plinth with cable channel consists of two parts. The first is a wall mount, and the second is a decorative nozzle that snaps into place at the top. There is another type of fastening - first, metal brackets are attached, and then a plinth is put on them.
We drill holes for dowels approximately every 30 cm and fasten one part of the baseboard. We fix the main part, hide the wires, then put on a decorative nozzle. For a beautiful docking, we use special accessories for the plinth: adapters, external and internal corners, plugs.
We put on a special stroke around the pipe to hide the gap (it costs about 50 rubles). In our case, the pipe was very close to the wall, so I had to cut the plinth and saw off the stroke, and then glue it on liquid nails.
Buy a skirting board and all accessories at once together with a laminate. Otherwise, if there is a shortage of material, you will have to travel to many stores before you can find the right color.
And the final touch is the fastening of the threshold at the door. It is needed to hide the height difference between the rooms. Laminate laying rules require that different rooms be separated by a gap so that the coatings are independent. However, in practice, if the same coverage is chosen for adjacent rooms, you can not use the threshold, but do everything without seams: it will be prettier, and cleaning will be easier. If some defect appears later, it is more convenient to actually saw off the coatings in the doorway.
floor repair cost
- Birch plywood 6 mm thick, 8 sheets - 2300 rubles.
- Laminate Kronostar Pear White 31 class - 7 boxes. 1 sq. m. cost in Leroy Merlin 235 rubles. Total 4112 rubles.
- Substrate for polypropylene laminate - 1 roll 2 mm thick, 25 m long - 320 rubles.
- Screws and dowels - about 600 rubles.
- Plastic plinth with cable channel 8 pieces, 2.5 m each - 150 rubles.
- Stroke around the pipe, connectors and corners for the plinth - 420 rubles.
- Porozhek - 160 rubles.
As a result, the amount is: 9112 rubles.
 The cat obviously did not like the new slippery floor
 - It is better to take plywood thicker, 6 mm is still not enough, so you should not save on this. Next time we would take at least 12 mm plywood. If the floor is too uneven, then you need to lay plywood in 2 layers, with offset joints.
- We advise you to choose not too thick or long screws, they will be difficult to screw.
- You can not buy a soft substrate thicker than 3 mm, it will strongly spring when walking, and the floor under you will be pressed through. For more information, we recommend reading our article on.
- If the laminate is laid on a concrete floor, then before laying the substrate, a layer of polyethylene must be laid for waterproofing.
- For productive work, you need a good screwdriver with a powerful battery. So you save a lot of time.
Spending a small amount to repair the old wooden floor, we got rid of the squeak, made it smooth and pleasant to walk on. It took three days to prepare the floor for the laminate, and one day was spent on laying alone.


