How to reliably waterproof the foundation. Waterproofing the bathroom: how to protect the floor and walls from water leaks.
Do-it-yourself waterproofing of the walls and floor of the basement
When building a house with a basement, care must be taken to protect the structures from the effects of underground groundwater. This will require you to take action to waterproofing basement walls inside and out and the foundation of the entire structure.
Why you need to waterproof your basement
Due to the fact that there is constantly high humidity in the basement, this leads to the formation of fungus on the walls, and this, in turn, adversely affects both the structures of the building and the health of the person himself. To ensure that the basement is always dry, it is necessary to properly organize waterproofing from the outside of the walls.
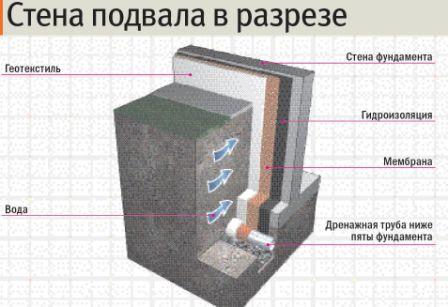
The organization of a drainage system laid underground, as well as a blind area around the entire house, can completely protect the basement construction from groundwater. A well-made waterproofing of the walls inside the basement should protect it from the penetration of seepage groundwater.
If you notice that the basement is damp, then you need to take a series of consistent steps to improve conditions, namely:
- Inspect all walls, floor, and ceiling of the basement for cracks and open seams that allow water to pass through.
- Inspect the blind area around the structure, if there is damage, then be sure to repair it.
- Found cracks and open seams that let water into the basement must be sealed with a waterproofing mixture.
- The ventilation in the basement must work properly.
How to make internal waterproofing of the floor in the basement with your own hands
It is necessary that the blind area around the entire perimeter of the house be complete, without any damage. Under the blind area there should be a layer of clay that prevents the penetration of water. If this is not the case or the integrity of the blind area is broken, then it is necessary to perform the work again.
To lay a new blind area around the house, you need to dismantle the old one. Then dig a trench 1 meter wide, 30 cm deep and lay a layer of clay 10 cm high on the bottom, and tamp it well. On top of the clay we put a layer of sand, 5 cm high and a layer of crushed stone of the same height. At the end, we lay the reinforcing mesh and fill it all with M200 concrete, the layer thickness is about 10 cm.
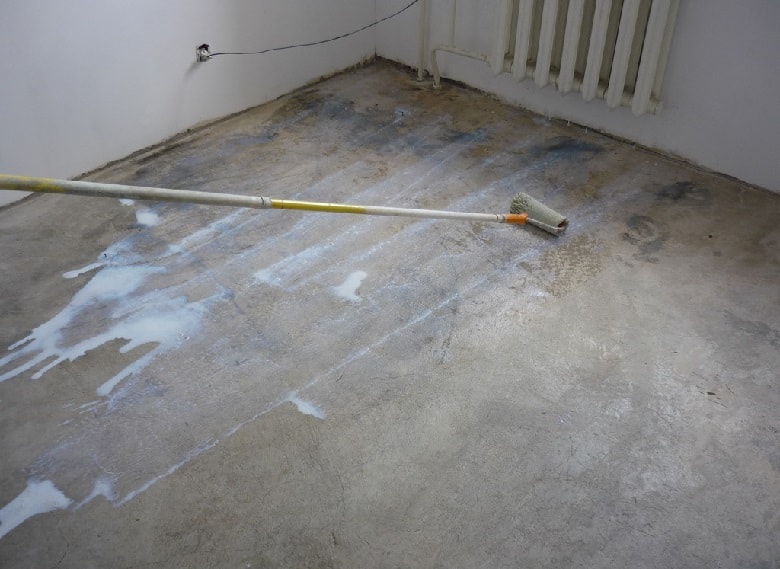
When the blind area is restored, you can start examining the walls and floor in the basement. An unfavorable option that can develop is that water from underground breaks through fountains into the basement. No waterproofing in this case can help, you need to raise the level of the floor. When the floor in the basement is just wet, the first thing to do is to remove the water and dry the floor.
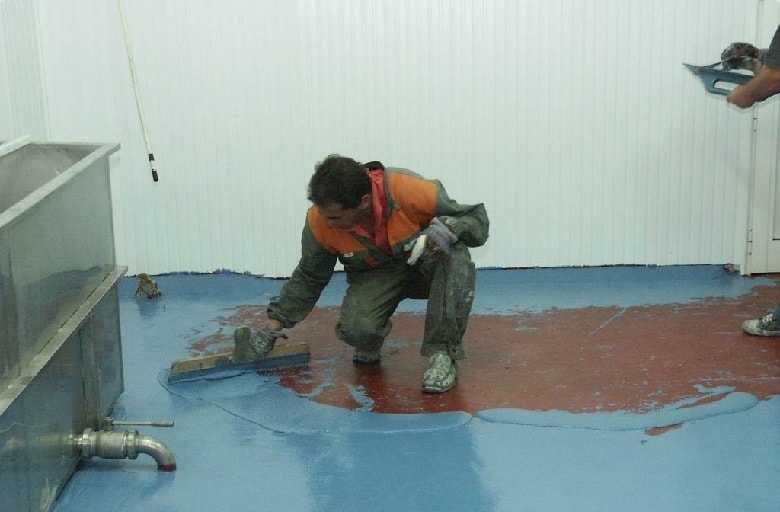
To seal all cracks in the floor, you can use bulk polymer waterproofing, it penetrates well into all cracks and pores in concrete, fills them and prevents water from penetrating. It consists of cement, sand and special connecting additives. After about a day, you can lay the reinforcing mesh on the floor and fill it with a cement-sand mixture or concrete, the required layer is 5 cm. You can walk on the floor in a week, which means that it became possible to do waterproofing walls.
How to make internal waterproofing of walls in the basement with your own hands
When water flows along the walls of the basement, it is impossible to make waterproofing, you need to wait until it stops flowing, most often this happens due to natural phenomena - melting snow or precipitation.
First you need to establish where the water comes from on the walls and make marks. When the water stops seeping, the basement must be dried with a heat gun. In order for the evaporating water to leave the basement without problems during the drying process, the ventilation must be in good order.
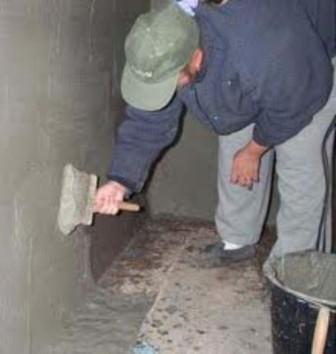
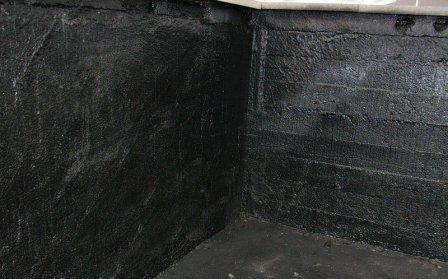
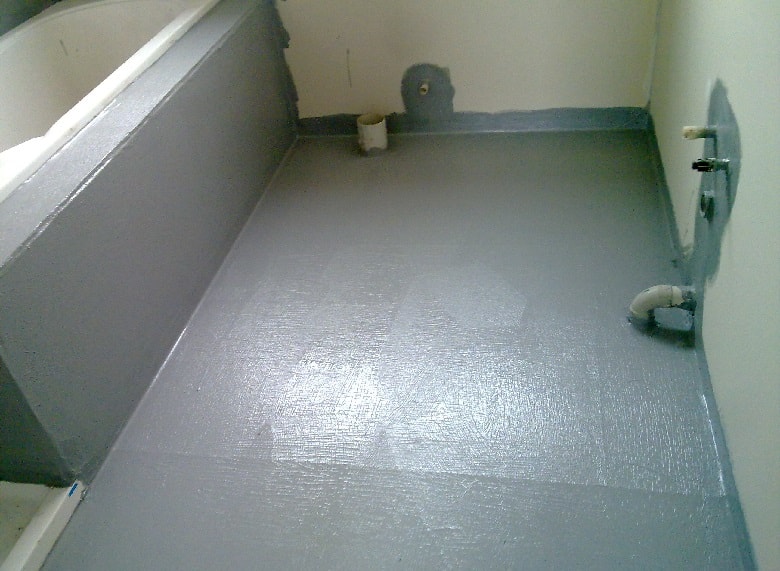
Now we begin to seal the seams in the walls, and for this you need to remove the old mortar from them and treat all the walls with an antiseptic. When they dry, we use Penetron - deep penetration waterproofing for the basement based on a cement-sand mixture with polymers. We fill all the seams and cracks with it.
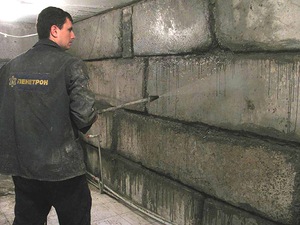
Then, with the same mixture, only of a more liquid consistency, we process all the walls of the basement as a whole. For three days, it is necessary to moisten the walls with plenty of water - this contributes to the fact that the sealant layer applied to them becomes more durable. After 2 weeks, you can apply the finish on the basement walls. The floor will be ready in three weeks and it will be possible to put flooring whichever you want.
Penetrating basement waterproofing from the inside from groundwater- this is good way protect your home from moisture. You can do all the work yourself if you watch the video and read step by step instructions. With your own hands, you can extend the life of any structure in the country.
- Types of materials for insulation
- Coating method of protection
Floor waterproofing is an essential step in home improvement. If a person cannot do without moisture, then the design of the house, and even more so the floor, can and should be without liquid, since for some elements its presence will be fatal. Therefore, the question of how to waterproof the floor is important.
Features of floor waterproofing
If the apartment has a considerable service life, then there is no need to talk about the quality of the floors. The situation is simpler if the base of the floor is reinforced concrete. In this case, the old floors should be dismantled to the base in the form of concrete. If the base is wooden, then here the owner of the house faces many problems. Wood is a fragile material, it can easily become damp and begin to crumble, which raises the question of replacing the entire floor.
As for reinforced concrete pavement, there are several tips for it. The first of them says that special attention should be paid to those places where there is a zone of high humidity. In this case, it is necessary to replace the coating to the base.
Further, it is recommended to level the floor with a self-spreading mixture or a special repair compound. It is worth noting that trying to get rid of bumps with waterproofing is stupid, just like using rolled coatings and self-leveling floors.
If you want to redevelop the rooms, you should remove all interfering partitions. This is due to the fact that during waterproofing it is necessary to maintain tightness, for which it is recommended to apply the entire coating. It will be difficult to carry out this work under partitions.
In addition, it is not recommended to carry out partial isolation, as this will reduce all the funds and efforts spent to a negative result. Water can get into unprotected areas, which will require additional repairs.
For rooms like the bathroom or kitchen, where water can easily get on the floor, there are a number of tricks. To prevent liquid from getting, for example, from a waterproofed kitchen into another room where there is no protection, during construction, the kitchen floor is made slightly lower than the level of other rooms. If this is not possible, then you can get by with a small border between the rooms, which will stop the moisture.
Back to index
Types of materials for insulation
It is important not only to know how to properly waterproof the floor, but also to correctly choose the material suitable for this work. At the moment they exist a large number of so it's worth talking about them. Materials for waterproofing floors are divided into several categories:
- Paste or roll.
- Mastics and other coating compositions.
- Bulk funds.
- Plasters for special purposes.
- Bulk mixtures.
- penetrating compounds.
- sprayed polymers.
If you plan to make waterproofing yourself, then it is recommended to use special plasters or coating agents. For independent work rolled products are also suitable, but they are difficult to mount and lay if you work on your own.
Waterproofing the floor using penetrating agents can also be done by hand, but for this you should follow all the installation and care instructions in the future. In addition, some procedures need to be done. It is worth noting that the use of such products for insulation must be combined with moisture, which can lead to leakage during operation.
Bulk type of insulation is used under the screed. The material is represented by special granules, which have one feature - when moisture gets on them, the material begins to foam, resulting in the formation of a gel. This gel does not allow moisture to pass further.
As for sprayed polymers, it is difficult to make a coating with such insulation on your own. This is due to the fact that a large number of rules and requirements should be followed for laying the material, which, without knowledge and skills, can lead to a negative result. Therefore, it is not recommended to try to carry out such isolation without special knowledge and skills.
There are some misconceptions to be mentioned as well. Surfaces such as floor tiles are not considered insulation. Even if a polyurethane or silicone grout was used during its installation, which is necessary for the seams, then you should not rely on the protection of such a surface. As for the bathroom, even if the floor is waterproofed, moisture can penetrate below, as it tends to collect on the walls and penetrate other surfaces.
Back to index
Waterproofing with roll materials
The following tools are required for work:
- A vacuum cleaner.
- Self leveling compound.
- Needle roller.
- Polymer or bituminous mastic.
- Building hair dryer.
- Primer.
- Roll material.
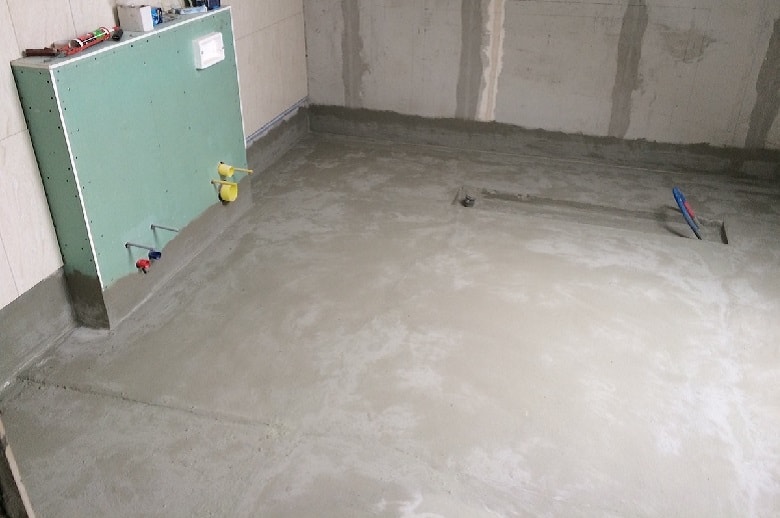
Before using this method, it is necessary to make a complete leveling of the floor. This is due to the fact that there should be no free space between the insulation layer and the floor surface. For leveling, a self-leveling compound should be used, as it is best suited for such work.
After that, you need to clean the floor surface from debris and dust. This work can be done with a vacuum cleaner or just sweep. To ensure better adhesion of the material to the floor, you need to prime the latter. The mixture must be diluted with water or a special compound, depending on the material used. The resulting mixture must be poured onto the floor.
For a better and uniform distribution of the mixture over the entire surface, it is recommended to use a roller with a needle nozzle. In addition, the use of this roller will allow you to get rid of air bubbles that may form during pouring.
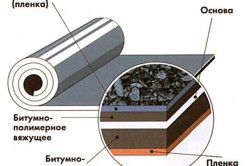
According to the basic rules of the process, insulation using gluing materials is carried out on special-purpose glue or bituminous mastic. In addition, it is advised to use polyisobutylene, PVC film or fiberglass for polymer mastic, while hydrostekloizol, hydroisol and brizol are used for bituminous mastic.
Summarizing all of the above, it must be repeated that the floor is cleaned before waterproofing, after which it is treated with a bituminous emulsion.

The emulsion does not emit harmful solvents during operation, as it is made on the basis of water. The primer is applied in two layers, both should be perpendicular to each other. While the first layer is not yet dry, it is necessary to glue the joints and corners with tape. With the next layer, these places need to be well smeared.
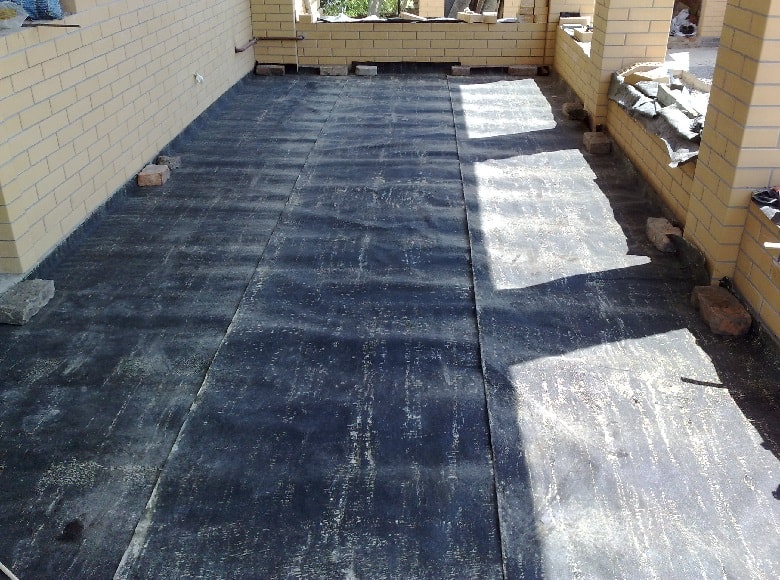
After some time, which is necessary for the drying of the primer layer, you can begin to work. How to make waterproofing in this case? It is necessary to simply stick layers of material on the surface. If self-adhesive carpets are used, they must be pressed to the floor.
As for ordinary carpets, it is recommended to use a building hair dryer or a burner when using them. The lower surface of the outer layer is melted, after which it is pressed against the floor surface. The places where the overlapping strips converge must also be melted and then welded together. The material should be overlapped on the walls by about 20 cm. After the screed is completed, these pieces should be removed. Additional patches need to be glued and the corners, after which it is good to seal.
August 29, 2016
Floor waterproofing is necessary not only in a private house. There are times when you can’t do without it in apartments. If the apartment is located on the first floor above the basement, moisture and mold from the underground space can move up the walls.
In this case, the floor will be constantly damp and cold, and over time it may even begin to crack and collapse. To avoid these troubles and the constant smell of mold in your apartment, waterproofing the floor is a must for the first floors. But there are cases, especially in old houses, when even on the upper floors the floor and walls are saturated with dampness, which penetrates through cracks from the street. In this case, you also need to take care of reliable waterproofing to avoid the appearance of mold in the apartment, which is very dangerous to health.
As for private houses, floor waterproofing is mandatory, even if it happened in accordance with all the rules and in compliance with all technologies.
Types of floor waterproofing
Materials for creating reliable waterproofing are selected taking into account what kind of room it is, how it will be operated. In any case, these measures are aimed at creating a dense and reliable waterproof layer on the floor, which also has water-repellent properties. Thanks to this, the floor will be reliably protected from rotting and destruction.
Waterproofing by area of application is:
- outdoor
- internal
Depending on the main water-repellent substance, it is divided into:
- bituminous
- polymeric
- bitumen-polymer
- based on mineral components
Waterproofing the floor in the house can be done using the following materials:
- film
- rolled
- membrane
- penetrating
- pasting
- painting
- powder
- plastering
- coating
Film waterproofing materials
The most popular and familiar to everyone are roofing material, roofing felt and glass roofing material. In the last century almost all waterproofing works carried out with the help of these building materials. They continue to be used in modern times, using for reliable protection against moisture not only floors, but roofs and foundations. These materials are thick cardboard or fiberglass, which are impregnated during their manufacture with bitumen and basalt chips. The result is a well-known roofing material or roofing felt.
Do-it-yourself waterproofing With the help of such materials it is quite possible, because no special equipment is needed for their installation. It is very important to ensure that there is not a large distance between the joints of the roofing material. Ideally, they need to be soldered with a torch.
There are modern film materials that are used for waterproofing. These are multilayer polymeric membranes, which, among other things, have excellent thermal insulation properties. If waterproofing of a concrete floor is required, polypropylene, polyethylene or PVC film is most often used, all of which are produced in rolls. They are laid before starting work on creating a cement-sand or dry screed.
Mastic for waterproofing
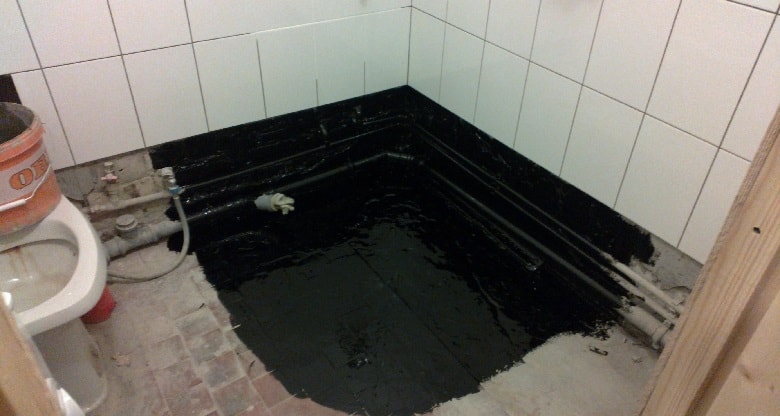
If you are looking for a way to make waterproofing inexpensively and quickly, this building material is right for you. Mastic is a plastic adhesive composition, which is based on liquid rubber, bitumen, resins, plasticizers and polymers. It is often used in residential areas to create a dense waterproof layer on the floor. It is also suitable for processing joints in bathrooms, kitchens, swimming pools, saunas.
When choosing mastic, please note that they are of hot and cold type. This material is good because, in addition to forming an elastic and dense waterproof film, it fills all the cracks and pores in the material from which the floor is made.
Materials for waterproofing liquid water-repellent
These include all kinds of paints, primers, varnishes, impregnations, injection formulations for topical use, which, after curing, create a dense water-repellent film. If "breathing" waterproofing of the floor screed is needed, there are modern impregnations that penetrate deep into the pores of the material. After drying, they form breathable crystals that do not let water through at all.
If you need waterproofing a wooden floor, you need to select liquid materials, which are designed specifically for wood. As a rule, they protect not only from moisture, but also from the development of fungal microorganisms, as well as bark beetles.
Powder waterproofing materials
These are all kinds of dry mixes, which are based on cement, glue, plasticizers and binders. They can be used to make DIY waterproofing, it is only important to carefully read the instructions and follow the application technology. To prepare such a mixture, water must be added to it immediately before starting work. It is only important to observe the indicated proportions, if you try to save money and pour more water to get more mixture, the result may disappoint you. Such waterproof mixtures are suitable for creating concrete screeds not only in residential areas, but also in basement pools, bathrooms.
How to properly waterproof
Whatever material you choose for waterproofing, there is something for everyone general rule. In all junctions of the floor with walls, as well as with other protruding structures, such as columns, the waterproofing layer must necessarily rise 30 cm above the floor level without interruption.
How to apply liquid waterproofing
The application technology depends on which material you have chosen, namely, impregnating or cast. Floor screed waterproofing with the help of cast materials, it may well be done independently. A bitumen or polymer solution is applied to the surface in an even layer, which, after hardening, will turn into an elastic and dense waterproof film. Bituminous mastic must be preheated to + 120-140 degrees. Then it is poured onto the floor thoroughly cleaned of debris and dust. Using a spatula, it must be well leveled so that the layer is uniform.
Cast waterproofing under the floor is used in cases where it is necessary to protect a monolithic base from moisture before a sand-cement screed is laid on it. For reliability, several layers of waterproofing material will be required, if necessary, they can be reinforced with fiberglass or metal mesh. The thickness of the resulting waterproof film should be from 5 to 15 cm. Liquid waterproofing materials can be applied with a brush, but it is very convenient to do this using a sprayer.
Impregnation floor waterproofing consists in applying special impregnations to the floor surface. It is best to use a sprayer in this case to distribute the waterproofing material evenly over the entire floor. But you can also do this with a brush. Depending on the material from which the floor is made, an impregnation with the desired penetration depth is selected. After it hardens, a seamless monolithic waterproof membrane is obtained. This modern method of waterproofing is now very popular, so it is already provided for in many.
Creation of waterproofing with coating and coloring materials
The cast method of waterproofing involves working with heated materials, such as mastic. The painting or coating method differs in that cold rubber-epoxy or polymeric materials are used, as well as varnishes or paints. The composition is applied to the surface using a tool, depending on its viscosity. For this, both ordinary brushes and rollers are suitable.
Whatever material you choose to create a coating or paint waterproofing, remember that it must be applied in a thin layer of about 2-3 mm, but evenly. The result is an excellent waterproof layer, which will also serve as an antifungal and anti-corrosion protection. The only drawback is the fragility of such waterproofing, it will need to be updated every 5 years.
How to make waterproofing with gluing materials
When creating such a waterproofing, selected roll or sheet waterproof building materials are glued to the floor, which is previously well cleaned of dust and treated with a primer.
There are three ways to create waterproofing pasting:
- you can make a simple flooring of materials on the surface, this method is suitable for a dry or cement screed, you can also lay materials under a plywood floor. Waterproofing a wooden floor can also be done in this way.
- Rolled materials can be welded to the surface using a torch. This method requires strict adherence to safety standards so that a fire does not occur. Doing it yourself is not recommended; to perform such it is better to invite specialists.
- Roll waterproofing can be glued to the floor using mastic or special glue.
Modern rolled waterproofing comes with an adhesive layer, so it is very easy to lay it. If you have chosen materials without such an adhesive layer, you need to buy a polymer-bitumen-based mastic for gluing them. When choosing it, be sure to look at technical specifications melting temperature. It is necessary to select such a mastic, in which this indicator is at least 20 degrees higher than the maximum possible temperature in the room.
Remember that all types of liner waterproofing are very sensitive to tensile and shear loads. Therefore, it is most often used for concrete and brick structures.
Waterproofing with plaster
This is an old way to protect the floor from moisture, but it is still used today, as stucco mixtures have improved. Now you can choose a mixture in which there will be a high concentration of water-repellent additives, just this one is ideal for waterproofing. This method is good because with the help of a plastic solution you can quickly and reliably fill absolutely all cracks and crevices in the floor, as well as get rid of bumps. Easy to apply with a spatula or brush.
Waterproofing with plaster is suitable for wood, concrete, stone, tiles, it can even be applied over paint. There is also a filling mixture for waterproofing, which is considered a kind of plaster. It is evenly scattered on the floor, absorbing moisture, it hardens and forms a durable layer.
It takes at least 14 days for the waterproofing layer made with plaster to completely harden. It must be ensured that it does not dry out, otherwise cracks form on it. It is very important during the first days after laying the plaster layer to moisten it with water every 3 hours, it is convenient to do this with a sprayer. After that, you need to moisturize the layer at least twice a week.
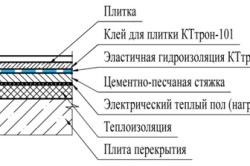
Features of waterproofing underfloor heating
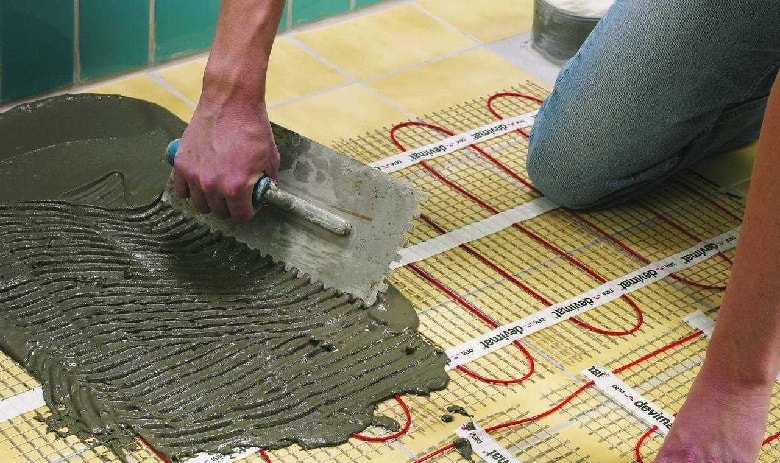
It is very important to follow the technology of creating waterproofing, as it is necessary to provide reliable protection from water to all elements of the underfloor heating. Before pouring the screed, you need to treat the base with mastic. Can also be used for this roll materials, while it is important to seal all the seams with bituminous mastic, and also lay them overlapping the walls at least 30 cm.
There is also an alternative option. You can make coating waterproofing using bitumen-polymer, cement-polymer or traditional bituminous mastic for this. After complete hardening of such a waterproofing layer, it will be necessary to fill in a cement-sand screed, on which you can lay the finishing floor covering. The result is a reliable and durable waterproofing that will perfectly protect all elements of the underfloor heating from corrosion.
08.06.2016 0 commentsA well-made foundation is a reliable foundation for a building. The strength and durability of your dream home will depend on how well it is built. Therefore, it is important that at this stage of construction all work is carried out in accordance with all technical standards. In order for the base structure to be strong, it must be protected from moisture and temperature fluctuations. Will help make it proper waterproofing foundation.
In contact with
Classmates
Building materials for foundation waterproofing
Not so long ago, a material made on the basis of bitumen was used to waterproof the strip foundation. People treated the foundations of the house with bituminous mastic and glued roofing material to it. In principle, this technology helped to protect the foundation of the house, but unfortunately, not for a long time.
Usually, such foundation waterproofing dries out after 5-7 years, and after another 3-4 years, cracks appear on it, which allow moisture to pass to concrete base. Therefore, if you have the opportunity, then purchase durable and modern materials for work.
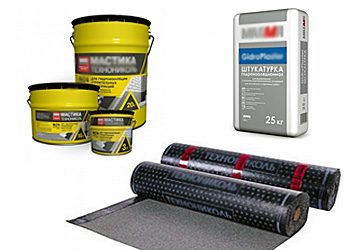
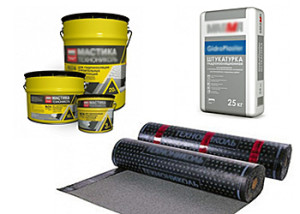
Modern waterproofing materials:
- Coatings. This group can be divided into two more subspecies: mineral and polymeric. These include solutions that contain plasticizers, hardeners and fillers. Most often they are used for anti-capillary waterproofing of the foundation.
- Paste. They are glued to the surface of the base on a certain type of durable mastic. Used as anti-filtration protection at home.
- Plaster. This species is represented by cement-mineral mortars. Most often they are used at the overestimating stage of waterproofing works.
Preparatory work
![]() If you do not understand how to waterproof a strip foundation with your own hands, then seek help from a professional builder. After inspecting the foundation of the house, he will give you recommendations that will help you to carry out all the work correctly. In this case, you will only have to strictly follow their advice and carefully carry out all waterproofing work.
If you do not understand how to waterproof a strip foundation with your own hands, then seek help from a professional builder. After inspecting the foundation of the house, he will give you recommendations that will help you to carry out all the work correctly. In this case, you will only have to strictly follow their advice and carefully carry out all waterproofing work.
But if you still have experience in construction, then you can quite cope with this task yourself. The main thing to remember is that this stage of building a house requires special attention. If the walls of the building have not yet been erected, then you will simply need to patch up all the gaps between the base plates.
But if you have to waterproof the foundation of an already residential building, then first you will have to clean it from the ground and only then proceed to sealing the cracks. After the base is leveled and minor defects are eliminated, it will be possible to begin to carry out subsequent work.
Before you start waterproofing the strip foundation with your own hands, you need to properly plan all the work. First you need a building plan. If you did everything strictly, following the technological conditions, then it will indicate all the parameters and properties of the soil on which the house stands.
Look carefully how deep under the house lie ground water, what quality is the soil under it and whether it is prone to frost heaving. And only after you have studied all the factors, you can decide which type of insulation is more reliable, which will protect the foundation of your home.
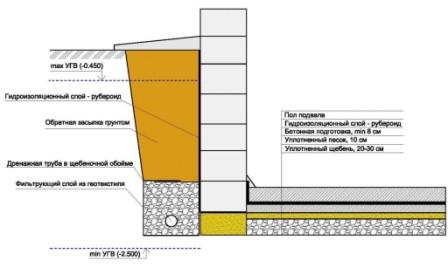
- Groundwater lies below the sole of the base. In this case, it will be enough to carry out vertical coating waterproofing of the foundation and, if desired, reinforce it with roofing felt or any other pasting material.
- Groundwater is at basement level. You will have to lay two layers of waterproofing, and each of them must be smeared with bitumen or some other polymeric material. After the horizontal waterproofing of the strip foundation is completed, also carry out a vertical one. It will be better if you use both pasting and coating material for it at the same time.
- Groundwater lies above the basement. In this case, you will have to spend money on penetrating roll and coating materials. For greater efficiency, they will need to be laid in 2-3 layers. Also, you will definitely have to make a drainage system to permanently drain water from the foundation.
We do waterproofing
 As you already understood, the waterproofing of a strip or slab foundation is a complicated matter. But still, if you prepare for it correctly, carefully study the technological process and buy in advance desired material and a tool, even a novice builder can cope with this task. In this article, as an example, do-it-yourself foundation waterproofing will be described using the cheapest building materials- bitumen and roofing material. But if you wish, you can replace it with more modern and durable ones.
Materials and tools:
- Quality roofing material
- Mastic (bituminous)
- bitumen burner
- Stiff bristle brush
- big roller
- Medium spatula
Stages of waterproofing strip foundation:
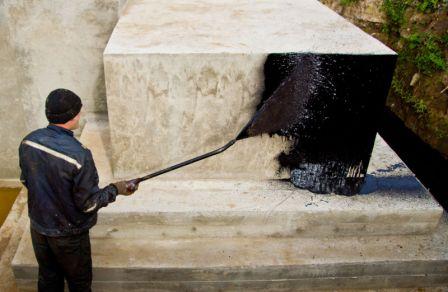
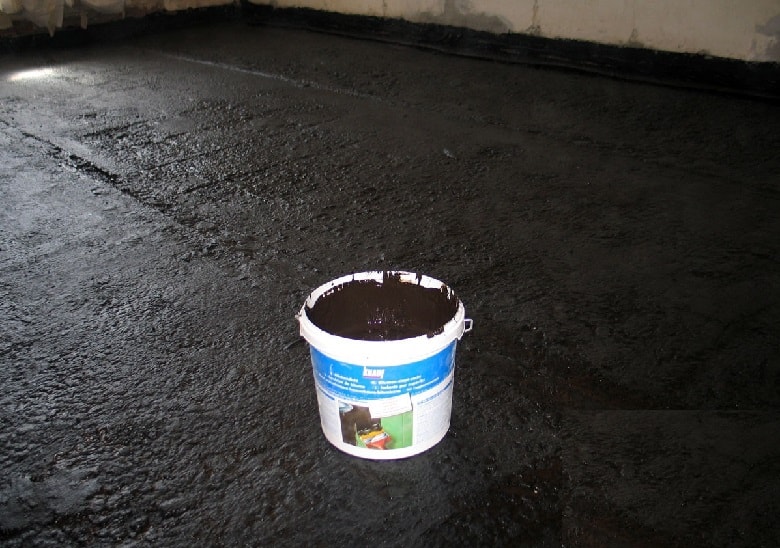
- At the initial stage, it is necessary to clean the base from sand and see what condition the concrete is in, from which it is made. If everything is fine with him, then you can start applying bituminous mastic on him. If you have purchased a solid mastic, then first you need to heat it up with a gas burner. Just make sure that during the work the temperature does not fall below + 15 ° C.
- Before applying to the base of the house, the mastic must be thoroughly mixed. After preparation, you should get an ideal homogeneous mass. It is necessary to apply the material to the base with a brush and roller. It can also be applied by spraying. But in this case, you will have to buy or rent a special device. The thickness of the applied bitumen must be at least 2 ml..
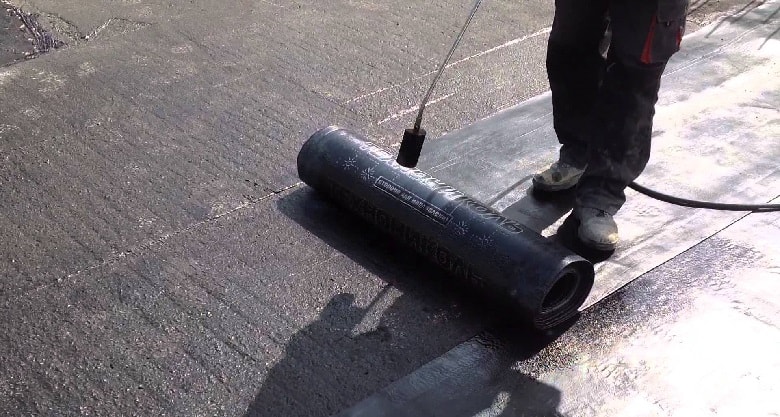
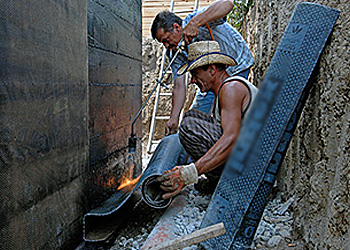
- While one person is applying bitumen to the foundation, another person should heat up the roofing material at this time. This will make it more elastic and maximize the bonding strength of both protective materials. It is necessary to lay the roofing material with an overlap (it must be at least 10 cm). Moreover, it must be additionally smeared with bitumen and heated with a gas burner.
- If you want to maximize the waterproofing layer and extend its life, then you can lay the roofing material in several layers. Just do not forget that each next layer must also be overlapped, additionally heated and smeared with bitumen.
- At the final stage, it is necessary to backfill the base with soil. But for this you definitely need to wait until absolutely all layers of waterproofing are completely dry. By such actions, you will protect the roofing material from damage and from sharp temperature fluctuations.
Installing a drainage system
If the house is built on soil that does not absorb moisture well or groundwater lies above the level of the base, you will definitely have to take care of drainage. This pretty simple system will help to ensure that water does not accumulate at the very base and is diverted as far as possible from the house.
![]() But when installing the drainage system, be very careful. If you make a technological mistake, then in the end you will not only not protect the base, but also contribute to the flow of water directly onto the concrete. You can also take care of an additional security system. You can strengthen the drainage system with special water collector trays. Since you will have to spend a lot of money on materials for drainage, it would be better if you calculate in advance what you may need.
But when installing the drainage system, be very careful. If you make a technological mistake, then in the end you will not only not protect the base, but also contribute to the flow of water directly onto the concrete. You can also take care of an additional security system. You can strengthen the drainage system with special water collector trays. Since you will have to spend a lot of money on materials for drainage, it would be better if you calculate in advance what you may need.
Materials for mounting the drainage system:
- Metal-plastic pipes
- Geotextile (threads and staples for fixing it)
- Shovel
- Sand and gravel
- adjustable wrench
Installation instructions for the drainage system:
- It is necessary to begin the installation of the drainage system by digging a trench. Its depth should be at least 1 meter. But keep in mind that the drainage ditch is made with a certain slope. It should be 1 cm for every 2-2.5 m of trench. At the same time, do not forget that according to the rules, the highest level of the ditch should be located at the lowest point of the base of the house. The width of the trench can be completely different, the main thing is that it should not be less than the diameter of the pipes that will be laid in it.
- At the next stage, you can proceed to the device of a special pillow under the drainage pipes. To begin with, we pour sand into the trench, lightly tamp it down and put geotextile on top of it. Its ends should be brought out to both sides of the trench in such a way that later they can be easily connected to each other.
- We put a 10 cm layer of crushed stone on the geotextile and lay drainage pipes on it. In order for them not to clog, their ends must be wrapped with a protective cloth. Pour the remaining gravel on top of the pipes and carefully cover everything with geotextile. For greater reliability, it must be fixed with special brackets and the trench must be covered with previously selected soil.
- At the last stage, install the water intake (it can be a plastic container). It is dug into the ground at a distance of 4-5 meters from the base of the house. It must be placed in such a way that the drain pipes are above its extreme point. After the pipes are securely connected to the water intake, the drainage system will be ready for operation.
In contact with
The foundation is the basis on which the future house is built. ceilings, walls, interior decoration and communications have put a lot of pressure on him for many years. In order for years to become decades, it is necessary to waterproof the foundation, which reliably protects such structures from the harmful effects of dampness, groundwater and melt water.
Concrete structures are susceptible to such “causative agents” of fungal infections and corrosion. Concrete is not afraid of moisture. In addition, with the prolonged influence of water on concrete, its properties become much stronger, and this is confirmed by the conclusions of many research institutes. But it is worth remembering what components make up concrete structures for the foundation.
Foundation pillows and concrete blocks are the most common material for building foundations for cottages and houses. Basically, new concrete products are an expensive pleasure, therefore, used products are often used after dismantling the foundations of structures and buildings. Their cost is much less (3-4 times).
Pillows and blocks consist of concrete and steel reinforcement exposed to water through pores and microcracks in the concrete. Water strengthens concrete for 30-50 years of the building's operational life, but during this time the reinforcement undergoes significant corrosion.
If you do not block the access of moisture to it, then concrete products finally lose their ability to withstand huge loads (a pillow or block will simply burst in places of less resistance or in a place where the reinforcement has rusted).
This also applies to new reinforced concrete products. They also require processing by special means and in accordance with certain rules.
Types of foundations for residential buildings
There are only a few common types of foundations:
- tape;
- bored and pile;
- columnar;
- monolithic foundation slab;
- fences for the foundations of buildings made of wood.
The type of foundation for each building is chosen individually, depending on several factors:
- soil category (depending on the density of its components - chernozem, sand, clay);
- depth of soil freezing in winter;
- depth of groundwater.
Waterproofing materials
For waterproofing the foundation, materials are presented in a wide range, but you can choose from the most popular and affordable options:
- polymeric and;
- coating waterproofing;
- rolled or pasted waterproofing based on bituminous materials and synthetic or paper bases.
As well as plaster waterproofing based on cement polymer solutions.
Waterproofing Options
There are 2 methods to protect the foundation from water:
- creation of a drainage system around the residential building;
- protection of foundation elements with waterproofing materials.
The foundation must be protected from the harmful effects of moisture.
Consideration should be given to options for foundation waterproofing and the materials used for such purposes. In the process of waterproofing strip or prefabricated foundations for residential buildings, a set of measures is carried out that are associated with the application of waterproofing materials to structural elements.
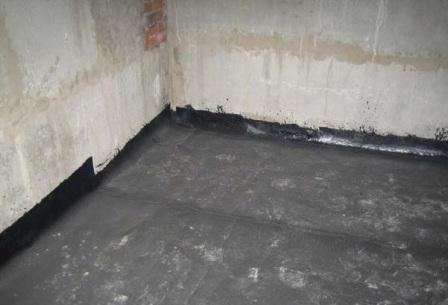
Horizontal waterproofing of foundations and basements is performed in 2 levels. As a rule, this is done on the top or bottom of the basement floor slab. The surface of the floor slabs before waterproofing the foundation is cleaned of dust and debris, and the joints of the walls and slabs are well sealed with cement mortar.
When the solution dries, then roll-up adhesive waterproofing is glued to the entire area of \u200b\u200bthe plates. A gas burner is used to perform waterproofing of the foundation with guided materials. But on sale there are also self-adhesive materials for waterproofing. The protective film is simply removed from them and tightly pressed against the insulated surface.
Important! Such materials are more expensive, but in quality they are no worse than guided roll materials.
The disadvantage of glued and built-up materials in the manufacture of a foundation waterproofing device is that the joints may not provide the necessary sealing.
Vertical waterproofing is done on the walls of the basement. It also prevents moisture and fungus from penetrating the concrete blocks. Basically, it is carried out with coating materials based on polymeric materials and bitumen.
Performance coating waterproofing monolithic and prefabricated foundations are carried out using liquid formulations. Bituminous mastics can be diluted with gasoline and applied with a simple brush to concrete blocks. It is important that the consistency of the liquid allows filling all small cracks and pores.
It is recommended to apply in 2 layers. In this case, the first layer hardens in 4-6 hours, and the final coating should have a thickness of at least 1.5-2 millimeters.
AT winter time waterproofing needs high attention to the use of frost-resistant additives and the quality of applying insulation materials to foundation blocks, especially at their joints.
When performing waterproofing of foundation slabs, special care is required, because it is closer to groundwater. Here, filtration waterproofing is needed, which is performed with a bituminous solution before laying it in the pit.
If the groundwater is not close to the foundation of the house, then you can limit yourself to processing the foundation blocks with the help of primers - this is a liquid solution of gasoline and bitumen.
Plaster waterproofing of foundation walls is based on the use of cement-containing mortars with the inclusion of polymerizing components. After mixing with water, they become a composition that penetrates into the pores and cracks of concrete blocks and after a while increase in size with filling all the voids.
Particular attention is paid to sealing the joints between the pillows and the foundation blocks.
Important! You can not use the usual plaster mixture of cement and sand. It is not intended for waterproofing.
Vertical and horizontal waterproofing of slab foundations must be joined without gaps, because this will break the seal. The drainage system is a network of storm drains and drains that carry wastewater to a distance from which it cannot affect the foundation structures.
From the foundation belt, the distance is 4-5 meters. Drainpipes and trays for joints with the roof, various sidewalk paths with rain trays with a slope of 1.5-2 degrees from the residential building - this is what you need.
Along the perimeter of the cottage or house, the blind area is carried out according to the following rules: A trench 1500-2000 mm wide and 300 mm deep is dug along the perimeter of the house. 100 mm of sand are poured into it, the same amount of gravel of a fraction of 25-30 mm and 100 mm of clay. The last 2 layers are well compacted.
Then, along the perimeter of the trench, a concrete pad of 100 mm is made or laid paving slabs on a sand-cement base.
Important! The slope of the sidewalk paths adjacent to the structure and the blind area with drainage trays should be at least 1.5-2 degrees.
The withdrawal of melted and storm drains is directed to the sewerage system provided for this or to the outer perimeter of the site.
After getting acquainted with the basic technologies and concepts of foundation waterproofing of private houses, it must be remembered that an integrated approach is required to study the characteristics of the soil of construction sites. No need to save on foundation waterproofing
Useful for repairs too.


