DIY woodworking lathe. How to make a milling and lathe for wood with your own hands
Wood is the most practical and natural material from which you can make household items, furniture and even children's toys. In addition, many residential and non-residential buildings are being built from wood. Therefore, many "homemade" are not averse to having woodworking machines for the home workshop. They can be purchased at a specialized store or made independently from improvised materials. Let's talk in more detail about the second method of arranging your own corner for work.
The variety of woodworking machines for the home workshop is wide. Each has its own purpose and ways to assemble a homemade version. Among all the options there are narrowly focused and with a large number of functions, but with a modest size:
- Universal household. These are mini devices for processing wood elements. Used at home or in the backyard. Such a small unit performs several functions at the same time, therefore it is very popular with "homemade" ones.
- Multifunctional for your own carpentry workshop. Can be used in small production.
- Turning machines are used to create wooden products by turning. There are compact options that do not take up much space in the garage.
- For the production of doors and windows, milling models are used.
- To plan the boards you will need a thicknessing machine.
- Copy-milling machines are used to create products of unusual shapes.
- Jointers can plan a blank on one side.

Many other options for do-it-yourself woodworking machines are made according to schemes. Among the popular fixtures that are very useful in the home workshop, there are:
- lathe;
- circular saw;
- milling equipment;
- thicknessing machine;
- grinding and jointing option.

Consider the features of each fixture for carpentry and options for self-assembly of such equipment for your woodworking mini-workshop.
Features of a wood lathe for a home workshop
A lathe is an indispensable thing in the workshop of those who like to work with natural wood. Using it, you can make a corrugated surface or bore holes, as well as cut out real works of art of the most unusual shapes.
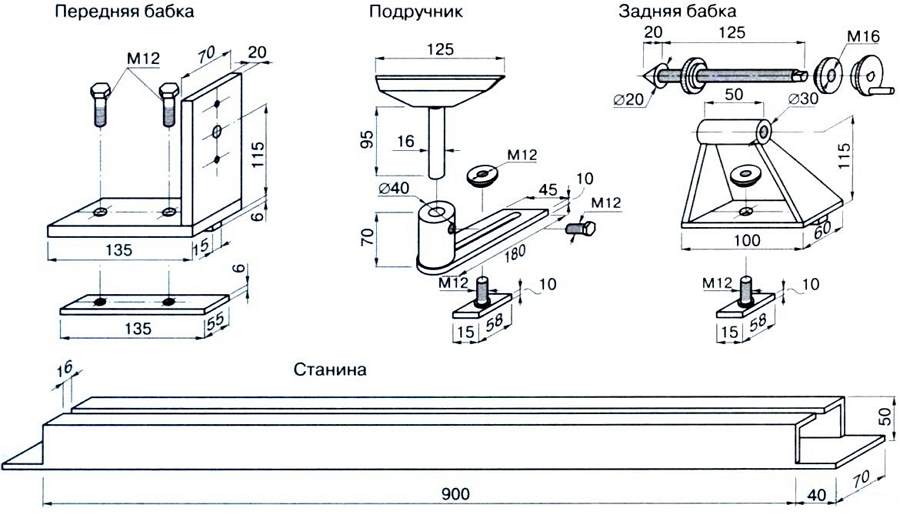
Structurally, the machine for wood differs from the turning version for metal in the absence of a cooling system. In this case, the rotation speed of the main element is less, but there is a power adjustment. Below are a few drawings with the dimensions of a do-it-yourself wood lathe:


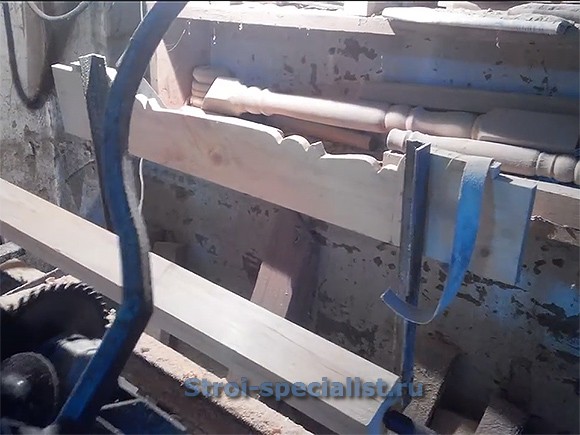
Often, for their workshops, "homemade" make turning and copying machines for wood with their own hands. They are used for the production a large number identical parts, such as fence posts or stair railings. Here are examples of finished machines in workshops:
1 of 4
![]()


Video about homemade machine on wood with your own hands will help you understand the assembly sequence and the selection of the tools necessary for work:
Ways to assemble homemade wood lathes with your own hands with photo examples
They make mini-turning machines for wood with their own hands, which take up little space in the garage or will be placed in a room in a city apartment. Here are some examples of ready-made devices from "homemade" ones:
1 of 4


Thinking about how to make wood lathes yourself, first, select the appropriate drawing. Then, prepare materials and fixtures to create your own unit. During the manufacturing process, the device will come in handy:
- bed;
- front and rear racks;
- electric motor;
- leading and managed centers;
- tool holder.
Important! For a homemade machine, a motor with a power of up to 250 W and a speed of up to 1500 is enough. For larger elements, choose another version of the “engine” with greater performance.
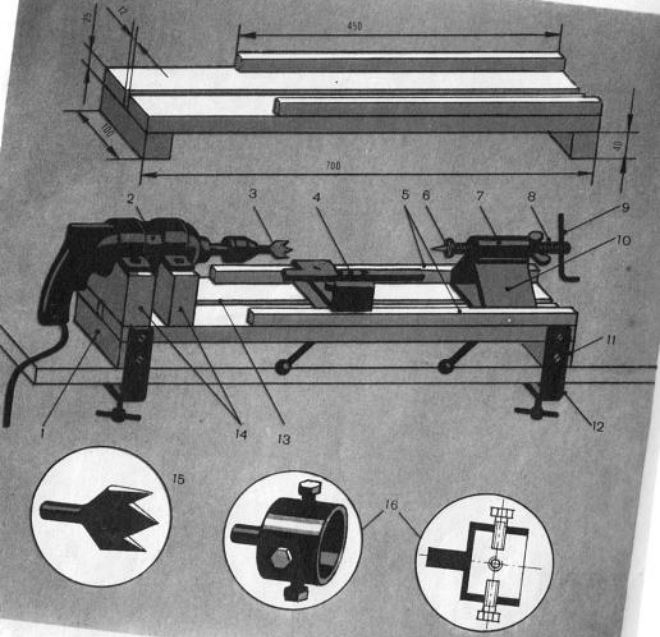
To assemble all the elements into one design, you will need a drill, a file, a small angle grinder and welding machine. Below is the instruction for assembling the mini lathe:
| Illustration | Sequencing |
 |
Choose a sharpener for wood or make it yourself, but so that you don’t have to change it later. Use a high axle position with sealed bearings and a washer to secure the discs. On one side of the axis, you install disks that control the speed of rotation, on the other, a faceplate for working with wood. |
 |
The bed is made of two parallel channels, between which there is a guide. The length of the blanks directly depends on the dimensions of the guide. On one side of it, weld a channel in the form of the letter "P", and close the other end with a metal corner. |
 |
The caliper can be assembled from several pipes inserted into each other so that the height can be adjusted. Fixing the desired position is carried out with the help of bolts. Use a horizontal bar as a stop. Observe all dimensions from the drawings. |
 |
An old drill chuck acts as a pulley. The driven elements are assembled from plywood in two layers. The faceplate is also made from plywood. Install the metal base on the supports. At the location of the headstock, you collect the platform. It can also be made from plywood. On the site, fix the electric motor. |
 |
You fix the motor on a small plate to change the belt tension. When all the elements are assembled according to the scheme, check the operability of the device and proceed to active use. |
There are many ways to assemble homemade equipment. Choose the right one based on the availability of material and the required performance.
The specifics of cutters for a wood lathe
Cutters are one of the main elements of a lathe. The area and depth of the surface to be removed from the part depends on their choice. They consist of a cutting part and a section for fixing on the equipment.
The cutting edge has one or more surfaces. And the main indicator of the incisors is the width of the blade, its shape and the ability to adjust. All models are divided into two subgroups:
- radial, installed perpendicularly and aimed at removing a large surface;
- tangential: for tangent processing and the formation of complex patterns.

When making cutters for a wood lathe on your own, follow a few rules:
- The length of the working surface should be within 20-30 cm. This size provides a secure grip on the tool and enough space to place it on the stop. And also you will provide a reserve for regular sharpening.
- In order for the blade to be firmly attached to the handle, a tail of sufficient length should be left. If you are making a cutter from a file or rasp, then lengthen the tail by 1.5 - 2 p.
- The thickness of the working case must be sufficient to withstand the shocks during the primary processing of parts.
- The length of the handle made of wood or plastic is 25 cm. Otherwise, it is inconvenient to hold such a tool in your hands.

See the video for making a homemade cutter:
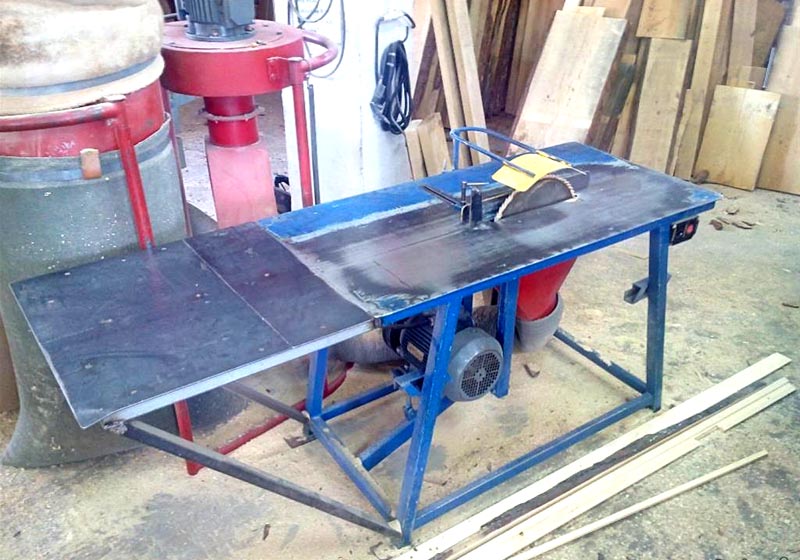
We make a stationary circular saw with our own hands
You can buy a finished stationary circular saw from 9 thousand rubles. It will ensure proper work safety and save time on sawing wood. But, you can not spend money and make your own machine according to drawings and blanks.

Despite the external complexity of the design, it is not so difficult to assemble it yourself at home. Any stationary saw model consists of several elements:
- table;
- disc with teeth;
- engine;
- side stop with the possibility of adjustment;
- shaft.

To assemble all the parts of a circular saw, prepare:
- metal sheet from 8 mm thick;
- metal corner 45 by 45 mm;
- electric motor;
- disk with teeth;
- ball bearing;
- apparatus for welding;
- a block of wood;
- a piece of plastic or the remains of a laminate.
In order to correctly make all the elements, it is worth choosing a drawing, which will indicate the dimensions of the table for a hand-held circular saw with your own hands, as well as all other dimensions and materials for work. Here are some examples of ready-made schemes:


The assembly of the structure itself will follow a certain plan, regardless of the chosen scheme:
| Illustration | Sequence of work |
 |
The tabletop must be made strong and stable. Use a sheet of metal according to your size. If you plan to install other devices on the table, then arrange a place for them with thick plywood. |
 |
When making a guide for a circular saw with your own hands, pay attention to its height. It should protrude 12 cm above the table. So you will be able to process the boards in width and thickness. To make a guide, take two pieces of a corner and a clamp. |
 |
Make the central saw with the possibility of height adjustment. |
 |
For the motor, mount a separate platform on the same axis as the rocker arm. Fix it on a bolt with a diameter of 1.5 cm. Install a metal plate on the side of the saw, after making a hole in it through which a bolt with fixed handles passes. |
More detailed instructions for the manufacture of a stationary circular saw, see the video:
We make a circular saw from a grinder with our own hands: drawings and manufacturing videos
To create a circular with your own hands, you need to prepare an engine from a grinder, a shaped rectangular pipe and steel corners. To get a real comfortable saw, it is worth considering an emphasis, an axial handle and rods for adjustment.
Here are a few do-it-yourself stand drawings for a grinder. On them you can assemble an emphasis that ensures the sliding of the saw.


The order of assembly of the stop will be as follows:
- Several metal corners are needed for the standard stop in the form of the letter "T". They are placed at a distance of 3-4 mm on each side of the disc.
- The bottom edges must be rounded so that there are no scratches on the workpiece during operation.
- Attach the corners with cross braces on the bolts and nuts in front and on the back side. The slots are fixed with washers.
- Put a metal clamp on the body. Fasten the elements at the back so that the stop post and the collar become one.
- Drill 2-4 mounting holes in the gearbox housing. It is more convenient to do this in the disassembled state of the element.
After assembling the stop, make an axial handle and an adjusting rod. Watch a video on how to make a frame for a grinder with your own hands according to the drawings:
After connecting all the elements, your homemade grinder circular will be ready. In addition to it, you can make various parts. Here are some photos of do-it-yourself circular saw fixtures:


We make a wood milling machine for a home workshop
Milling machines are necessary for working with shaped parts made of wood. They are used for flat milling and profile processing. Professional equipment is multifunctional and costs a lot of money, so more and more "homemade" assemble such equipment for workshops and garages on their own.

The package of homemade milling machines for wood includes:
- Driving mechanism. This is an engine whose power ranges from 1-2 kW. With such a motor, you can use various tools for working with wood without fear that a failure will occur.
- Elevator to adjust. It usually includes a body, sliding skids, carriages, a fixing screw and a threaded axle. During operation, the carriage moves up and down, and the screw is needed to fix it at the required level.
- Support. The table is made from solid wood.
Before assembly, be sure to draw up a detailed drawing with all dimensions. For manual milling machines for wood, you need to think through everything in advance to the smallest detail.


The sequence of self-assembly of convenient and practical milling machine woodworking for the home workshop is described in the video instruction:
If you are thinking about buying your own equipment, and not about self-assembly, then to understand how much a manual wood milling machine costs, look at the table with models and prices:
| Model name | Specifications | Cost, rub. | |
| Milling table Kraton MT-20-01
|
site size | 64 by 36 cm | 6 400 |
| possibility of vertical work | there is | ||
| equipment weight | 15.7 kg | ||
| Milling machine Corvette-83 90830
|
engine power | 750 W | 38 000 |
| transmission type | belt | ||
| spindle speed | 11,000 rpm | ||
| vertical stroke | 2.2 cm | ||
| spindle diameter | 12.7mm | ||


Mikhail, Volgograd:“I purchased a table for the Kraton MT-20-01 machine. Inexpensive and convenient. Moreover, it is compatible with different models of equipment.
Dmitry, Moscow:“I bought myself a Corvette 83 90830 for my home. Attracted by the small size and engine power. It has been working well for over a year now.
In online stores and specialized departments, there are many models of wood milling machines, but the cost of a complete set rarely drops below 30 thousand rubles. That is why many "samdelkins" assemble equipment for their workshop on their own.
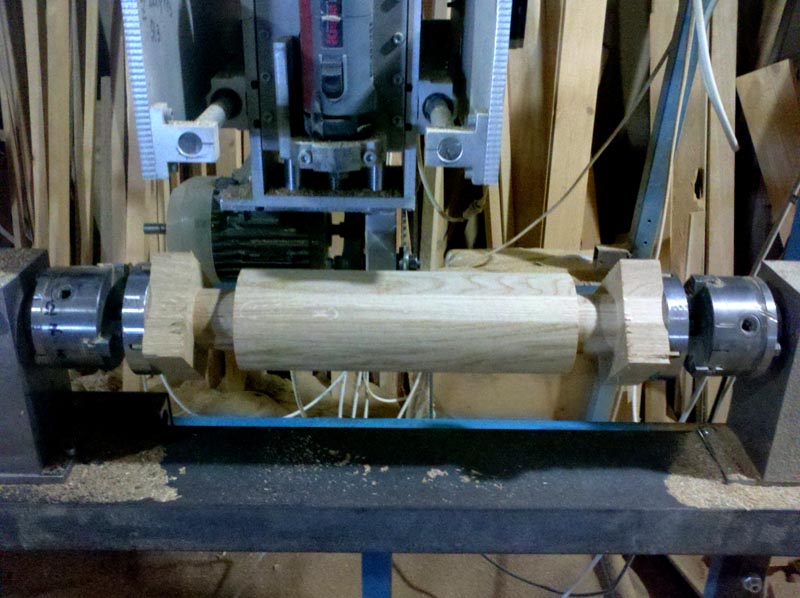
We make a CNC milling machine with our own hands
Make your own hardware with numeric program management you can do it with your own hands. To do this, select the appropriate CNC wood router drawings. With your own hands, you will need to assemble the model strictly according to them.


Simple and neat machine for the garage Professional equipment Variety of working tools 
- Table with a frame for the machine. The tabletop must be perfectly flat and stable to withstand vibrations during operation.
- Knife shaft. The main part of the structure responsible for the processing of wood blanks. The pulley rotation speed should be 4000 - 7000 rpm.
- Adjustment bolts and workpiece feeder.
To properly manufacture equipment, use the thickness gauge drawings. It is necessary to assemble the structure with your own hands strictly according to them.


Video instruction on how to make do-it-yourself thicknessers from an electric planer
To assemble a thickness gauge from a plane with your own hands, prepare:
- electric planer, which is not a pity to remake into another tool;
- detailed drawing for work;
- plywood and bars for the body.
When the preparatory stage is completed, you can proceed to the direct assembly, which will take about an hour for a person who skillfully handles the tool:
Features of a do-it-yourself wood grinder
After sawing a tree, it must be sanded and only then proceed to the construction of buildings or the construction of other objects. In total, there are several varieties of grinding machines:
- Disk. The working surface is made in the form of a circle, on which sandpaper or other grinding device is fixed on top. You can adjust the processing speed without changing the number of revolutions.

- Tape. A continuous strip of sandpaper is stretched between two shafts. It is not difficult to make belt grinders with your own hands, it is enough to prepare a detailed drawing and read the instructions. It is important that the emery in the working surface does not sag under the weight of the workpiece.

- Drum grinders on wood are common among joiners. Used for horizontal alignment of planes according to the jointer method. The principle of operation is to fix the "sandpaper" on one or two drums, and under them there is a table with height adjustment. You can set the required calibration and make workpieces of the same thickness.

- Sanding and calibration machines for wood- universal machines that combine grinding and leveling workpieces. Two types of hardware are used: disk and tape. Such a device can be made independently, with right choice drawings.

To correctly assemble a suitable version of the machine for grinding and processing wood, select the appropriate drawing and all accessories. Below are some examples of available and convenient schemes equipment:


Features of do-it-yourself planers for wood
The planer for working with wood is used at the final stage of working with elements. It is able to make the surface perfectly smooth and even. Most purchased models are equipped with a thickness gauge, which allows you to make the thickness of the entire workpiece the same length.

planer on wood for the house, both home-made and purchased, includes several elements in the design:
- bed;
- planing shaft;
- table regulator;
- motor.
To assemble a jointer with your own hands, you first need to determine the dimensions and prepare a detailed drawing. Here are some examples from "homemade":


To create the simplest jointer, without additional functions, follow the following sequence of actions:
- Prepare all the details and tools for work, as well as a traced drawing.
- Make blanks to exact dimensions. Please note that the place for installing the bearings is prepared from several elements.
- Prepare a place for installation for the selected motor. You can fix the unit on a skid.
- Assemble the rotor with bearings, install in place according to the diagram. At the same time, immediately connect the engine using a belt drive. The rotor must rotate freely.
- Assemble the work surface from two parts: the supply and the receiving. The second is slightly higher (by 2-5 mm). For arrangement, you can use multilayer plywood or metal sheets.

For a complete understanding of the work in progress, watch the video
Wooden products always look interesting, especially chiseled ones, when a beautiful and unique wood structure emerges. Even if the elements turn out to be identical in shape and size during turning, you will not find two identical ones.
It is known that one of the hobbies of Peter I was working on a lathe, possibly like that.

Therefore, no one will call this business “not royal”, but many people can make a lathe for wood with their own hands, and there are a lot of options for simple solutions. We will offer you some successful, in our opinion, completed projects.
What can you make a wood lathe from?
To make such a machine is not so difficult. First, let's look at its concept.
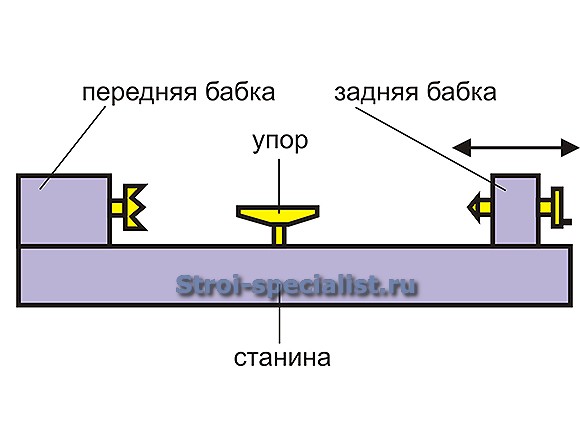
The headstock is rigidly attached to the frame. It can contain either an electric motor or a device with pulleys, to which torque is transmitted from an external motor. This can be a self-centering chuck, a crown washer or a faceplate with a tapered threaded shank. The tailstock can move along the frame and has a device for centering and preloading the workpiece. The emphasis is also movable relative to the frame in 3 planes.
The bed of a homemade wood lathe can be made from metal, or from wood itself or thick plywood. Exclusively from metal, either the whole, or at least the main elements of the headstock and tailstock must be made.

Most often, corners are used for the manufacture of a metal frame - it is easiest to tighten and fasten the moving elements of the machine in them and they have a high degree of dimensional stability. But you can use a channel or a profile pipe.
Sometimes a groove is milled for moving elements in the channel.

The design solutions of the headstock and tailstock may be different, but the main condition - the ideal alignment of their centers, must be strictly observed. If the role of the headstock is performed by the electric motor itself, then the height of the tailstock is adjusted to it.
This is the easiest way to drive a lathe, but the engine parameters should be close to universal:
- rotation speed 1500 rpm;
- power - from 120 watts.
The output shaft of such an engine can be machined under a Morse taper for fastening a three-jaw chuck from an electric drill, in which either a threaded stud or a crown is clamped. Less commonly, a large self-tightening chuck is installed on the motor shaft through a faceplate, which must be machined separately.
Craftsmen make wooden full-size lathes rather not for practical reasons, but out of love for the material itself and to demonstrate its design capabilities, although these can be full-featured devices that are in no way inferior in practical terms to their steel counterparts.
True, it will take 2 times more time to manufacture such a handsome man than to produce a metal one, but this is offset by the difference in the cost of materials.
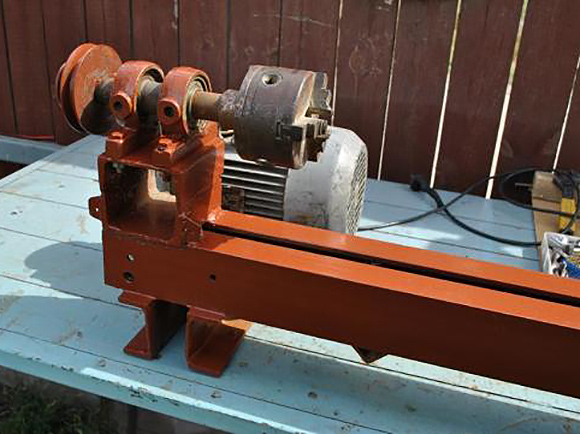
Do-it-yourself metal lathe for wood: drawing
For those who do not want to reinvent the wheel, we offer a drawing of a universal, in terms of the dimensions of the machined parts, a wood lathe, created on the basis of steel corners 50x50.
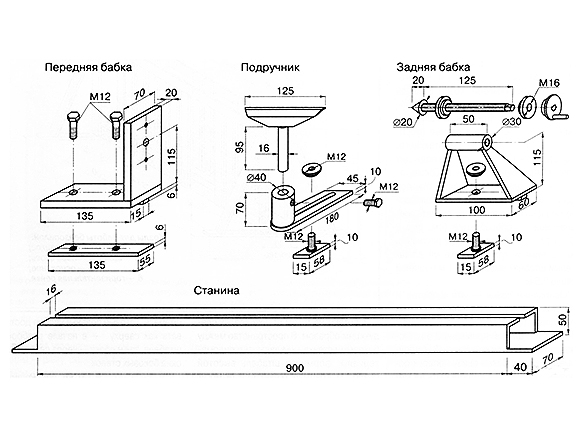
The drawing does not indicate the diameter of the hole for the central shaft of the headstock, because it will depend on the selected type of drive, and only the distance to its center is indicated. Also, if a shaft with pulleys is installed in the headstock, then this particular part will need to be made in duplicate and the second one installed in the back of the headstock. Of course, a tube with bearings can also be installed in it, on which the central shaft rotates with pulleys extended beyond the headstock.
![]()
On such a machine it will be possible to make table legs and even balusters. If you need longer turned products, then the bed will need to be lengthened. Make all other parts of the indicated dimensions, except that also slightly increase the length of the stop.
You can buy a cutting tool for a wood lathe or make it yourself.

The main incisors are: reyer - a passing or peeling cutter (pictured 2 and 3 on the right) and meisel - finishing cutter (pictured - 2 medium cutters). The rest are used to obtain sharp recesses of various shapes (left) and rounded recesses (right).
A small metal lathe can be made as shown in the video, it also shows the dimensions of all parts:
But for turning a large number, especially long, of the same type of parts, you should think about making a machine with a copier.
DIY wood lathe with copier: video
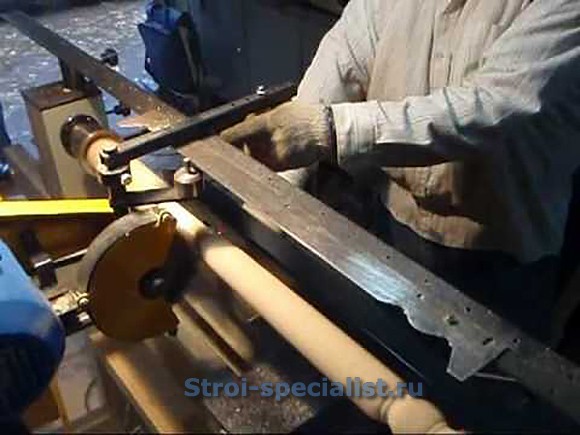
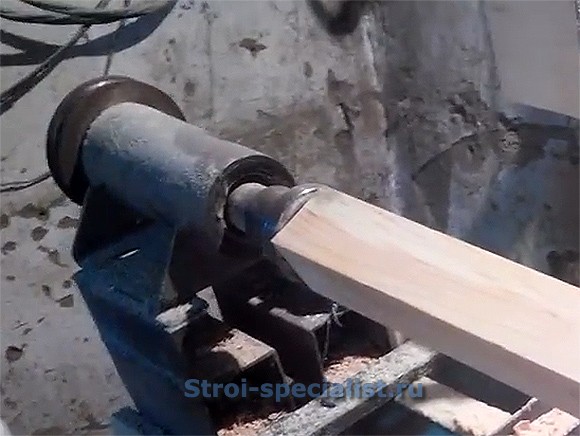
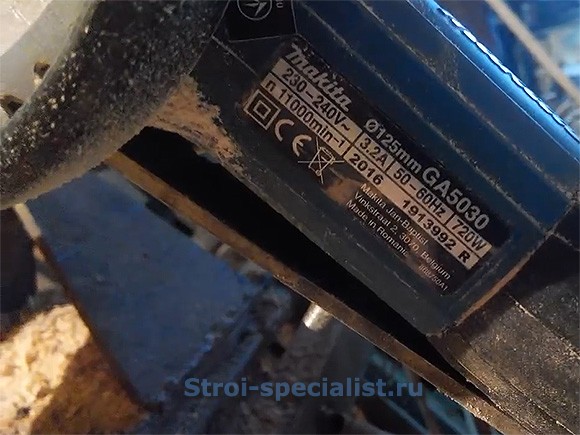
Actually, the machine itself can be the same as proposed above, only its design will need to be finalized, and one of the universal woodworking power tools should be used as a cutting tool - more often it is a grinder.
A template for a product of the correct cylindrical shape, machined with a copier, is a flat rail. If you need to get a complex multi-stage shape, then its profile is cut out on a flat template. It can be metal, plywood, wood, plastic, etc. and be installed in different places, depending on the design features of the machines.
Consider the structure of one of these machines.
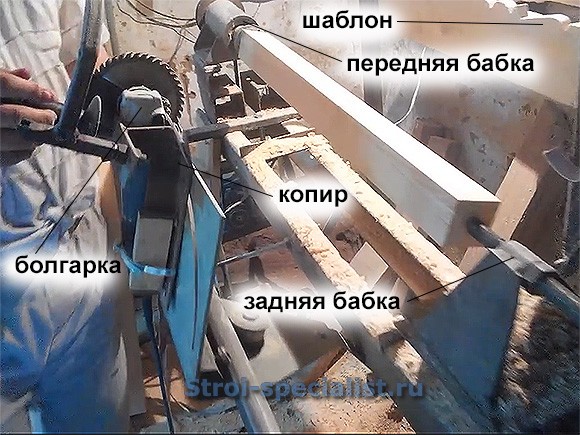
The workpiece in this machine is clamped between the crown of the headstock and the fixed cone of the rear. The tailstock cone is fixed with a lock nut.
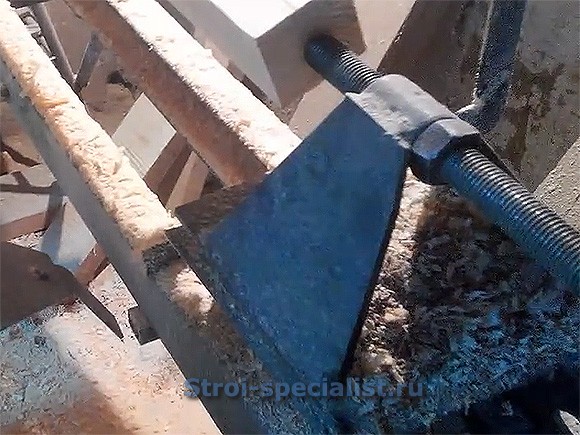
The copier is mounted on a rotary shaft on 2 bearings and a tension roller from an automobile timing drive, allowing it to move freely along the shaft.

The shaft, in turn, is mounted on a base also on bearings, making it easy to rotate around an axis.

A grinder is rigidly fixed on the copier, with paired disks mounted on it with a slight offset, allowing for better and cleaner turning.
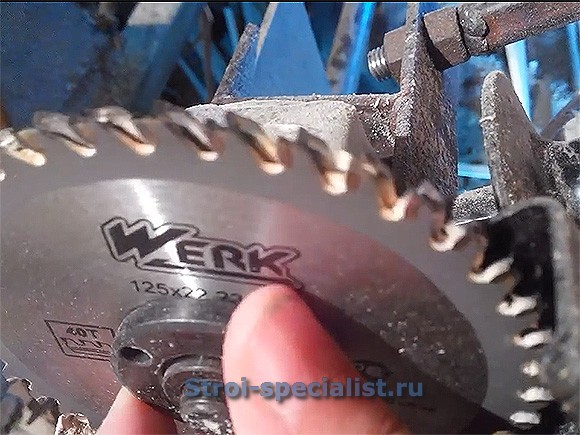
Saws should be taken with victorious soldering and large teeth that contribute to better chip removal.
The template can be mounted in a convenient place that does not interfere with turning. From the template to the copier, the profile drawing is transmitted using a leash, but its shape and length must be consistent with this place. The thinner the tip of the leash is, the more accurately it will transfer the shape from the template to the workpiece, but at the same time it must be quite hard and rigid.

An interesting option is when the role of the template is performed by the reference part. The system proposed by the author of the next video provides just such an opportunity, and adjustments to its fastening allow you to make some adjustments to the thickness of the replicated turned parts.
Using a hand-held circular saw instead of a grinder, with the template placed in front, is also a rather progressive type of wood lathe with a copier. It allows you to make it more compact, but the combination of the control stick with the leash does not allow you to make it thin enough, so a very accurate transfer of shape will not occur with this arrangement.

And two disks should also be put on the saw.
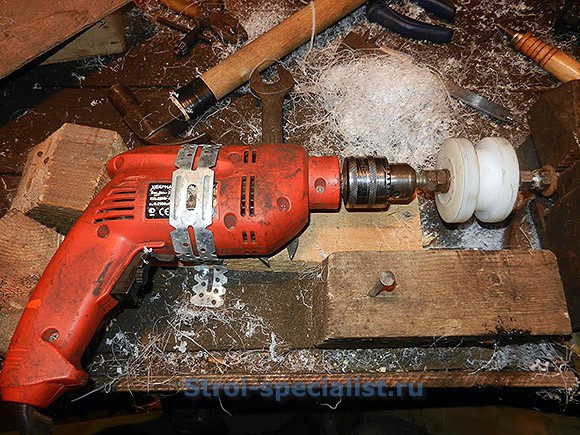
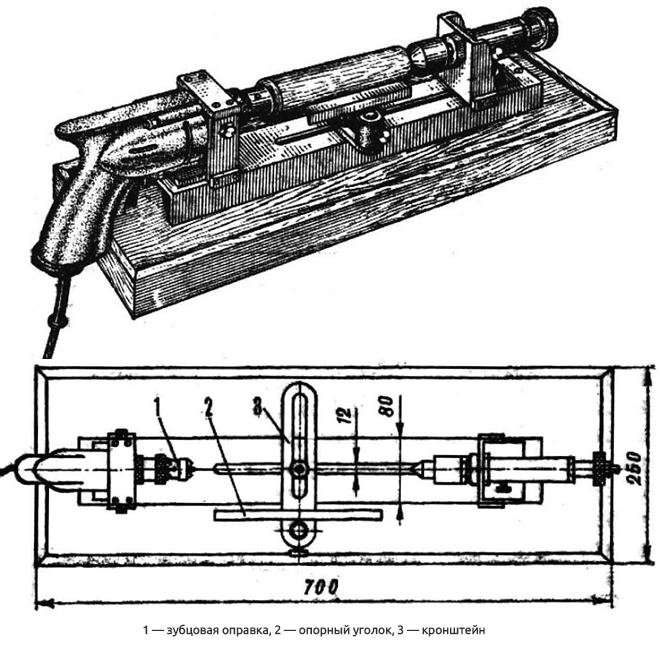
Do-it-yourself wood lathe from a drill
Of course, the easiest will be the manufacture of a wood lathe using a standard power tool, primarily a drill, although there are also factory-made fixtures.


It is desirable that the drill has sufficient power, a lock button in the on position and speed control.
Let's consider several schemes and start with the simplest one, when the use of a tailstock is not required. This is possible in the manufacture of small in diameter and not very long products.

In this case, it is quite convenient to fix the drill itself, install a piece of threaded stud or the threaded part of a powerful self-tapping screw in the drill chuck, and drill a hole of the appropriate diameter for them in the workpiece. As an emphasis, any bar corresponding in height will fit.
And here's the right video:
If you can’t do without the tailstock, then a bench vice can partially perform its function, just the drill will need to be positioned relative to them when fastening.
And yet, the most common home-made lathes based on drills, having a wooden frame and, at a minimum, primitive tailstocks.
By the way, the role of a crown fixed in a self-tightening drill chuck can be successfully performed by a drill bit for wood. So that it does not start to remove chips from the end of the workpiece when the tool is brought in, at this end you need to make a slot under the wings of the drill and drill the center.
The lathe shown in the video from a powerful drill is not much inferior to stationary machines designed for processing parts of the same dimensions, and its ability to obtain higher revolutions than theirs allows for better finishing of products.
To create a home lathe, you can use not only a drill, but also an angle grinder.
True, it is desirable that it has speed control, because 10 or more thousand rpm for such machines is a bit much.
For home craftsmen who know how and prefer to work with metal, we offer such a design of a lathe from an electric drill.
But the self-tightening cartridge as a tailstock can be used in any other design.
And finally a little video. It may seem that this is a toy machine, but with its help it is really possible to make enough big list useful things: from door handles and handles to hand tool to chess pieces.
Dear readers, if you still have questions, ask them using the form below. We will be glad to communicate with you;)
With your own hands you can do a lot of things that are considered impossible. To do this, you need to have free time, clear instructions and a great desire. Coming to the store, we sometimes see a lot of things, from cute wooden souvenirs to necessary wooden details and decorative items that we would like to purchase, but in some cases it is too expensive, in others it is not quite what we need. But with the help of a lathe, this can be done independently and in the best possible way.
How a wood lathe works is easy to find out - you can find hundreds of descriptions on this topic on the Internet. It is worth talking about this in more detail.
The principle of operation of a lathe for wood
In the woodworking area, there are several main areas of turning work, based on technology and purpose.
Machines are:
- press;
- cutting;
- finishing;
- gluing - assembly and drying.
For a manual machine that does not have much power, use special devices- faceplate, which is removed, and cutters.
The faceplate is needed to tightly hold the part and limit it from any movement. The cutter is necessary for turning a certain shape of the product.
The basic principle of operation is that the machine rotates the wooden mold, while the hand of the master adjusts the cutter. In this case, the part can be fastened in two ways - in a horizontal position between the headstocks or only in the headstock, by means of a faceplate.
The device is fixed on the base (frame) and the success and safety of all work depends on how stable it is.
Also, the manual machine has a regulation of rotation - this can be done using the gear lever.
Many are interested in how to work on a wood lathe and what difficulties beginners may have.
Work on the machine
The biggest difficulty arises at the very beginning - it is fear. Fear of hurting your hands, in the future - to spoil the part, do not do the job well, etc. As the student gets to know the car better, these fears go away. It is not necessary to say that, in any case, it is necessary to observe safety precautions and these instructions - this is already clear.
On the machine, turners perform a variety of operations and they have their own names, these are: trimming, cutting off a workpiece, peeling, preparing a dowel, flow.
This business has its own safety precautions and these rules must be observed:
- it is impossible to sharpen a part from a square, not more than 30 mm in diameter;
- you can not press on the part with the center of the headstock (rear);
- do not overheat the center over 60 0 .
Before starting work, each machine is configured individually. Summing up, we can say that the main thing for a beginner is to strictly follow all the instructions of the master, his immediate teacher.
In everyday life, a turning device may be needed at any time, even one missing part can ruin your mood and you have to go to the store for it. Therefore, many people are wondering how to make a wood lathe with their own hands?
More as possible, moreover, we will tell you how to make a mini wood lathe.
- For this you will need:
- tools - a file, a welding machine, a grinder and a drill;
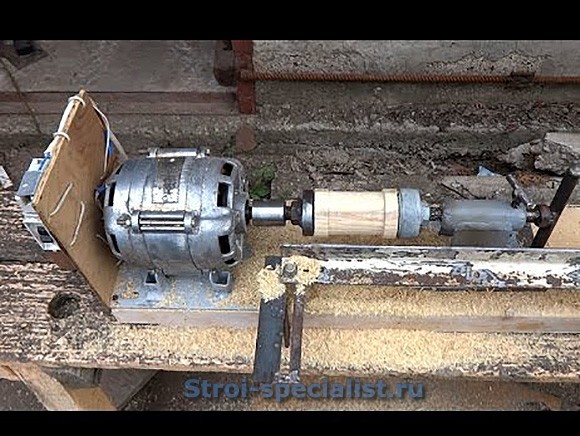
- base - a frame made of metal profiles, an engine from a pump, a front stand - a grindstone high power, rear stand - part of the drill, channels, support - a device for moving the table.
- Also needed: a belt (drive, can be automobile), metal strips (20 mm, 40 mm), fasteners, a 10 mm board, a metal corner, two tubes with matching rotational axes.
And now the most important thing is how to make a wood lathe.
Procedure
- We take the prepared base, weld the channel from one side, close the second with a corner. The sharpener must be used already processed. We place the axis high, on one of its outputs we attach disks to control the speed, on the other - a faceplate.
- To stop the caliper structure, it is necessary to weld the bar horizontally. The entire rack is welded to the bed, by means of corners.
- The pulley (leading) can be made from a drill chuck, the remaining pulleys are cut from double plywood, and the faceplate is also made from wood. Do not forget to make holes in it for attaching blanks.
- We put the metal frame on supports and in front, where the headstock is located, we arrange a platform for the electric motor.
- The engine must be attached to a moving bar - this is done in order to change the belt tension.
What can be done from wood on a lathe? Anything you want.
Products on a lathe
These can be wooden utensils, such as rolling pins, wooden spatulas, candlesticks, caskets, mugs and plates, decorative items for home interiors, blinds, chess pieces, furniture details and much more.
How to make a lathe for wood with your own hands
It turns out that there is nothing easier than assembling a lathe for woodworking with your own hands. You need very few materials and tools, and the functionality of a home-made device will not yield to factory counterparts. First you need to disassemble the device of turning equipment.
Purpose and design of the lathe
On lathes, cylindrical parts are made of wood: furniture legs, chess pieces, souvenirs, balusters for fences and much more, using the turning method. Manual work will take a lot of time, and making exact copies is almost impossible. With the help of mechanisms, you can grind and polish the finished product with your own hands, paint or varnish it.
The main elements of a homemade lathe:
- bed (this is the base on which the rest of the devices and mechanisms are attached);
- electric motor;
- headstock (a motor is attached to it);
- spindle;
- handyman;
- back grandma.
From the electric motor through a belt drive, the movement is fed to the headstock shaft - the spindle. For free rotation, the spindle is mounted in bearings. Do-it-yourself fasteners for blanks are put on the open end of the spindle through the thread. These can be faceplates, tridents or cartridges, depending on the shape of the workpiece:
- small parts made of wood (no more than 15 cm long) are installed in the cartridge: the adjacent part is slightly removed on the cone, fixed in a clamp and driven into the cartridge. There is a hole on the side of the cartridge into which an additional fixing screw is screwed;
- longer parts made of wood are fixed in a trident. At the end of the blank, a hole is made with an awl up to 8 mm deep, about 5 mm in diameter and sawn with a hacksaw to a depth of 5 mm;
- thick short blanks of wood are installed in the faceplate, fixing the connection with screws.
The tailstock supports the second end of the workpiece. It is pulled along the guides to the blank, fixed with a bolt and, using the center, firmly presses the part. The center is a part with a clamp that moves due to the flywheel.
A handpiece is a device for resting the cutter. It is moved along the axis of rotation of the part and perpendicular to it. The armrest is fixed with special handles. The upper plane of the tool rest should be 2.5 mm above the center line of the machine, at a distance of up to 3 mm from the edge of the workpiece.
When choosing a model of a homemade lathe, special attention should be paid to the design of the tailstock and stop under the cutter. Quite inconvenient options are often offered.
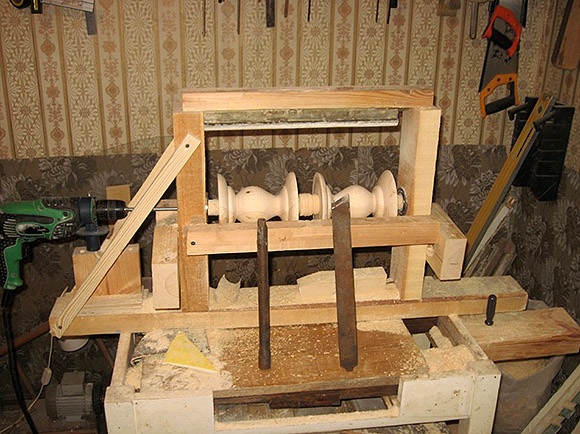
Homemade machine 1
The base and both headstocks are made by hand from thick plywood and bars. Between themselves, wooden parts are fixed with glue or screws.
The headstock is mounted according to the scheme:
- the front part is fixed, a pair of do-it-yourself plain bearings is attached to it with screws. A pair of loops is attached to the bar, to which a piece of the tube is soldered. The tube is sawn into two parts, the parts are ready for installation;
- installed bearings, as a casing, cover with the upper element of the frame;
- a mandrel is mounted in them. The end of the axis is pre-sharpened, spikes are welded;
- on the other side of the axis, the shaft is fixed;
- a transmission belt is pulled between this pulley and the motor shaft.
The tailstock can be placed at the desired point. To move under it, a guide with a wing nut and a mounting plate is made. The cutter stand is attached in the same way.
The engine for the machine should be taken three-phase with a frequency of up to 1.5 thousand revolutions per minute. Depending on the type of motor, it is connected with a "triangle" or "star". It is important to choose the right capacitor.
Do-it-yourself turning will allow you to save on the purchase of several specialized type processing devices. Not all craftsmen need serious equipment, as it often becomes necessary to carry out simple turning work at home. In such cases, a simple home-made machine can be very useful, the manufacturing process of which we will analyze in this article.
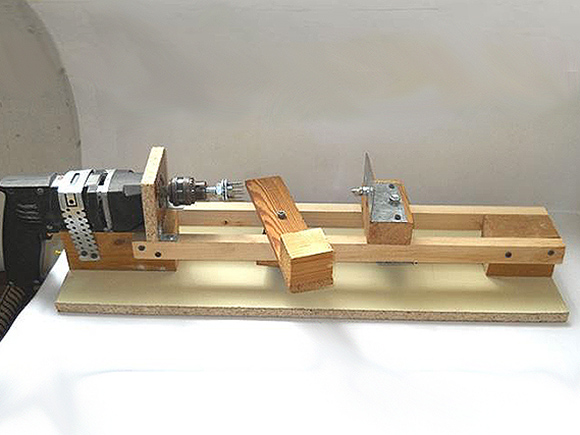
General scheme of a homemade lathe
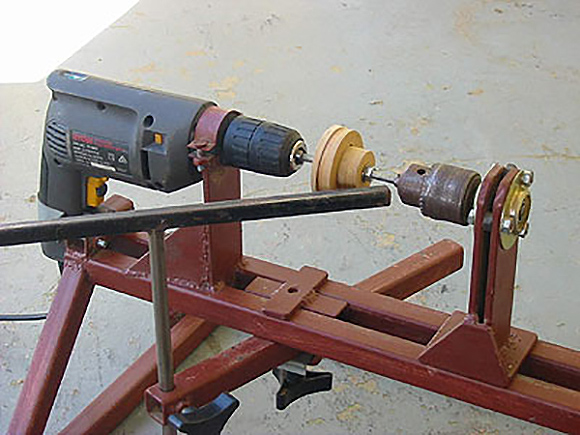
Using a lathe from an electric drill
In which an electric drill is used as a drive, they are also produced in industrial conditions. Such devices are easy to find in today's market. They make a lathe on their own in order to save money, since such serial equipment is not cheap.
After spending quite a bit of time and selecting components for the manufacture of such a device, many of which, most likely, just gather dust in your workshop, you will have at your disposal a machine that allows you to perform turning workpieces made of wood and even metal.
Making a machine from a drill with your own hands, with the apparent complexity of its design, will not be difficult for most home craftsmen. At the same time, the functionality of this device will largely depend on what materials and components you select.
We understand the device of turning equipment
There are several main nodes that will also form the basis of our home-made home equipment.
Drawings of the main components of a homemade lathe from a drill (click to enlarge)
bed
This is the basis of the device, responsible for the reliable fastening of its constituent elements and their exact location relative to each other. This element of turning equipment, in addition, ensures its stability. Stationary units have a massive frame, which is located on special legs. For desktop machines that can be easily carried to any convenient place, the bed is made in a lighter weight.
Headstock
This element of turning equipment is responsible for fixing and rotating the workpiece, which is fixed in a chuck installed in the spindle assembly. On small turning units, including home-made ones, the headstock can move along the bed guides. This is required in order to perform alignment and adjust the relative position of the structural elements of the device. In the process of processing, this machine node is securely fixed. On stationary models of turning units, this unit is fixed, it is made integral with the bed.
tailstock
This is a movable unit of the machine, which is responsible for fixing and pressing the workpiece to the chuck during its processing in the centers. Freely moving along the guides of the bed, the tailstock allows you to install and process parts of various lengths on a lathe. A very important requirement for this structural element is its ideal alignment with respect to the spindle assembly.
caliper
On mini-machines, including on do-it-yourself units based on a drill, the role of this node is played by a handpiece, which must be able to move along the bed rails and be securely fixed in the working position. The handpiece on small devices acts as a stop for the incisors, and the cutting tool itself is pressed against the supporting surface and held on it manually.
Version of the machine with a metal frame made of . When bolting the bed to a solid workbench, you can get a very stable structure that will allow you to work with metal.
General form machine tool Drill mount Tailstock
Mounting the support pad View of the assembly with the workpiece using the stop at an angle
On any lathe, its front and tailstock have one degree of freedom and can only move along the axis of rotation, and the caliper (or handpiece) can move both in the longitudinal and transverse directions. The ability to move the tool rest in the transverse direction is also important in order to minimize the lever arm created by the cutter. If the distance from the end of the support surface of the tool rest to the workpiece being processed is large, it will be very difficult to hold. The tool can simply be pulled out of the operator's hands, resulting in serious injury.
How to make a lathe with your own hands
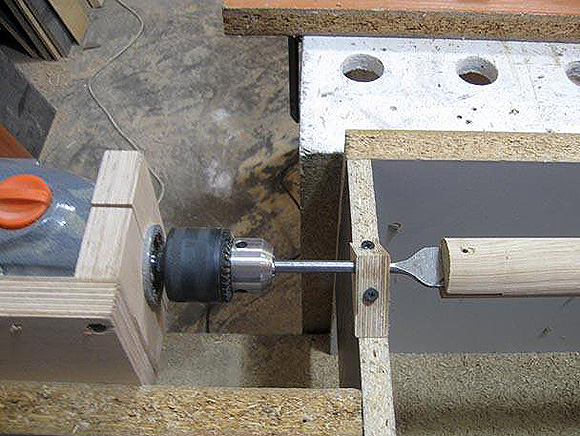
Making a small lathe with your own hands will be much easier if your workshop has a workbench with a flat and solid work surface. In this case, you do not have to spend time and effort searching. An electric drill, which will simultaneously act as a headstock and a rotation drive, is fixed on such a surface with a clamp and a clamp fixed on the neck of the tool.
Now you need to make an emphasis, which will act as a tailstock. Such an emphasis, mounted opposite a fixed tool, can be made from a pair of wooden blocks and an adjusting screw, the end of which is sharpened under a cone. If you plan to process not very massive wood blanks on your home-made machine from a drill, then you can fix such an emphasis on the surface of the desktop using a clamp.
As a handpiece, to the supporting surface of which you will press the cutting tool, you can also use wooden block. It is fixed on the surface of the workbench with a clamp.
Obviously, using affordable and inexpensive materials, you can make a simple lathe with your own hands, on which various woodworking operations are successfully performed. Using such a simple device, made on the basis of a drill, you can carve various details from wood: handles for doors and tools, structural elements of stairs, and decorative items.
Scheme and drawing of the machine on the basis of the channel
The design of such machines based on a drill and their versions can be different. In order not to understand the process from scratch, you can find on the Internet a photo of the most suitable device for you and make it yourself. However, no matter what scheme you make a turning device from a drill, it is very important to ensure the most accurate centering of the axis of rotation of the spindle assembly and the conical adjusting screw located on the tailstock.
If you are going to make a machine on which it will be possible to perform turning operations on metal, and not just on wood, then it is better to make it according to all the rules. First of all, focusing on the design of the existing drill and the dimensions of the workpieces that will be processed on such a device, it is necessary to draw a drawing, select a fastener of a certain shape and type for a complete set. As a basis for the drawing, you can take a photo of similar units that many home craftsmen make for themselves.
A fairly simple version of a lathe with a wooden bed. This kind of design is unlikely to allow working with metal, but it is quite suitable for wood processing.
Complete machine Bed Attaching the drill to the bed
Tailstock design
A home-made lathe for turning, made in accordance with all the rules, is a rigid structure on which the mutual alignment of the front and rear headstocks does not change. All moving elements of such a device, mounted on a reliable frame, move along its guides. If you purchase or make a faceplate with your own hands, which will be fixed in the drill chuck, it will be possible to process workpieces of even large diameters on such a unit.
On a drill, all elements of which are fixed on a rigid frame, you can work on metal, but only on soft (this includes alloys based on aluminum and copper). On such a machine, workpieces are processed using a needle file, a file and sandpaper wrapped around a bar. In this case, the handpiece used to clamp the tool will be quite enough. If you plan to work with turning tools, then you cannot do without a support, the movement of which in the longitudinal and transverse directions is provided by a screw mechanism.

A factory turning device for a drill, like the GRIZZLY H2669 shown in the photo, will cost about 5,000 rubles without delivery
Accessories
The functionality of a homemade turning unit can be significantly expanded by equipping it with additional attachments and fixtures. These opportunities include, in particular:
- applying paint to a rotating part, which allows you to get very interesting patterns;
- execution of spiral notches on the workpiece;
- winding transformers, etc. 5.00 out of 5)


