Spotlights for plasterboard ceilings: selection, proper installation and operation. Installation of fixtures in the ceiling
Recessed luminaires, cut-in diameter which differ, are ideal for decoration and illumination of stretch ceilings. But when choosing them, you must carefully study the characteristics in order to properly carry out the installation. You can find out what the diameter of the hole for the mortise lamp should be below.
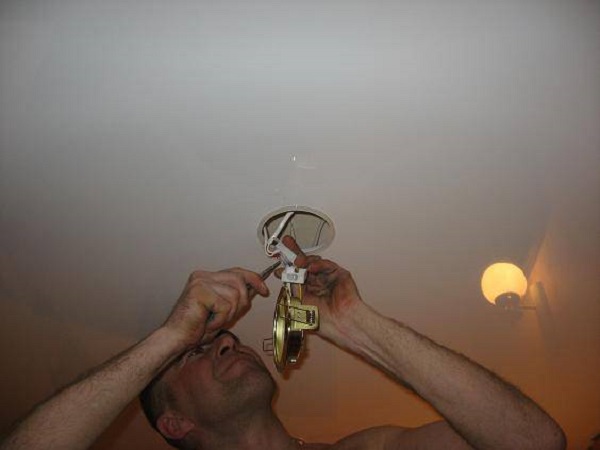
Installing a spotlight
In rooms with false ceilings, it is preferable to install spotlights. This is the best lighting option, because such lamps evenly distribute light even in the largest room. But before installing this type of fixtures, you should understand the technology of their installation.
To install a point light source in a ceiling or furniture, the diameter of the cut-in hole is taken into account. It is indicated in the main characteristics of the product.
When installing such products on a plasterboard ceiling or wall, cutting out a place for a lamp is already at the final design stage (after finishing). If such fixtures are provided in the stretch ceiling, then holes must be made at the development stage.
Hole diameter
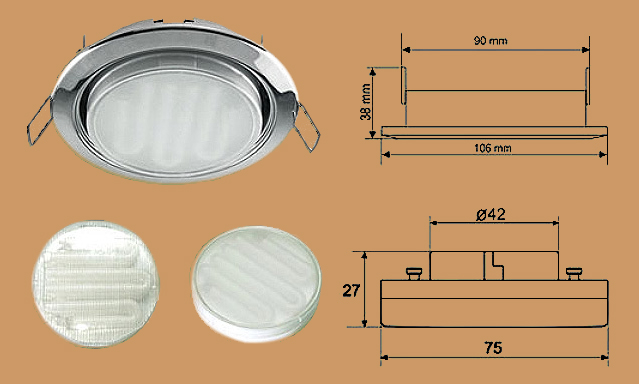
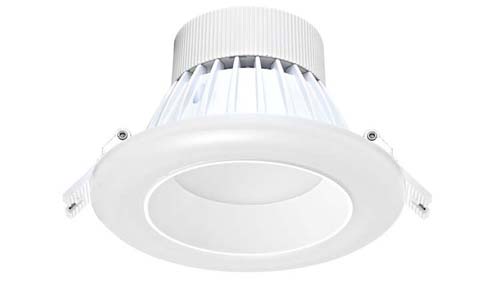
As practice shows, widespread spotlight hole diameter ranges from 60 mm to 75 mm. This size should not be confused with the outer diameter of the product. For example, if the width of the lamp is 90 mm, then the diameter of the insert will be less - 60 mm. Therefore, the hole must be made with a size of 59-60 mm.
The width of 90 mm is the size of the outer lining of the luminaire. This is a decorative detail that hides the resulting gap between the hole made (60 mm) and the lamp.
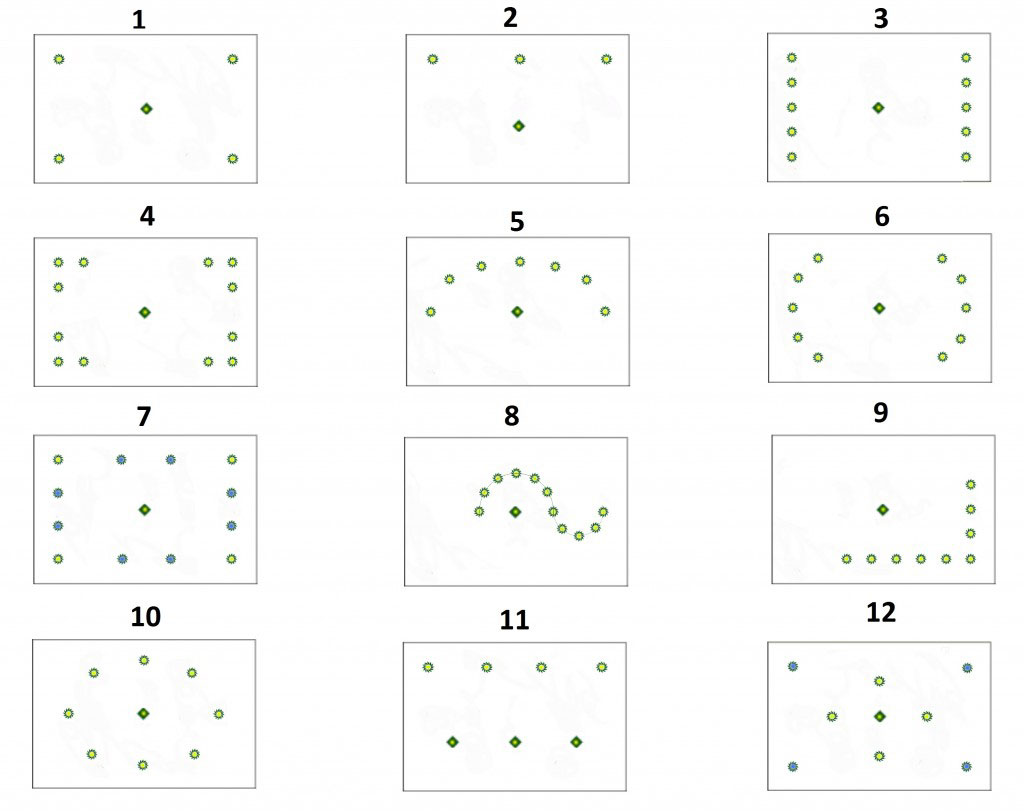
Depending on the style of the room, lamps are produced with various shapes of lining: round, square, rectangular. When choosing spotlights, their number is taken into account. And the number of holes made in drywall and other surfaces depends on this.
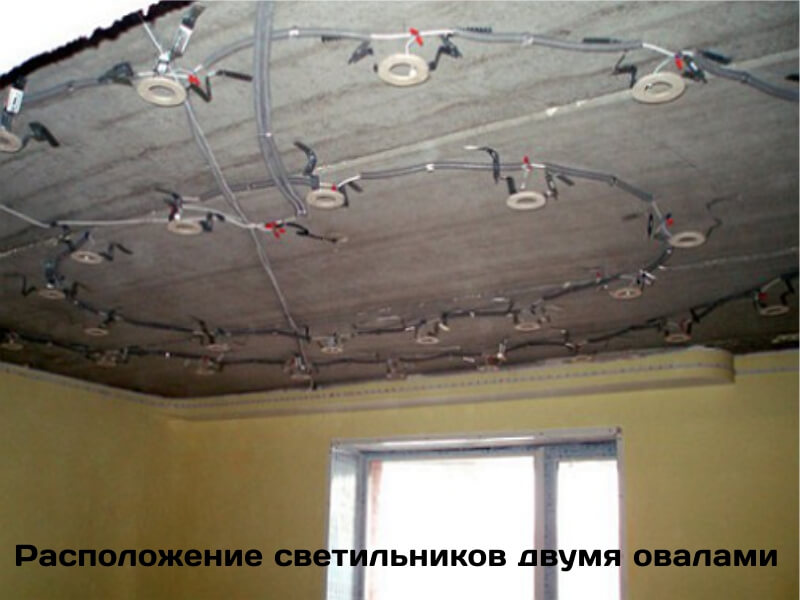
If the luminaires are installed in the ceiling, then the distance between the rows should be approximately 1 m, and between the luminaires in these rows - 1.5 m. At least 0.6 m should be retreated from the wall.
Before inserting the luminaire, it is necessary to make accurate measurements of the hole, regardless of the fact that they are already indicated on the package. In this way, possible errors during installation can be avoided.
Spotlights for plasterboard ceilings"data-essbishovercontainer="">Spotlights for plasterboard ceilings are various types and varied designs. They look neat on the plane of the ceiling and give maximum amount white or colored light that can be directed to a specific area of the room. Thus, with the help of them, you can divide the room into zones not only by the intensity of lighting, but also by the color scheme.
Spotlights are installed in suspended ceiling systems made not only of plasterboard, but also in mineral fiber slabs, for example, structures such as the Armstrong system.
The wiring for spotlights is hidden behind the suspended ceiling structure, so it does not have to do the laborious work of installing a strobe to drown the cable in them. In addition, the technical part of the device will also be hidden in the interceiling space or in the ceiling, and only the decorative part of the lamp will remain visible, so they will look aesthetically pleasing and neat.
In order to choose one of the types of spot lighting devices for different residential premises, to correctly draw up a project for their installation, it is necessary to understand their characteristics and classification.
Point devices are divided according to several criteria - these are the types of lamps, supply voltage, design, installation method and purpose for a particular room.
It is important to know these differences, since some of them will help save energy, others will help to comply with certain safety requirements when operating appliances, and still others will help harmonize the design of the room.
Luminaire design
If the design of spotlights is considered from different points of view, then they can be divided:
- for built-in and overhead;
- on rotary (cardan) and non-rotary;
- for single and cardan (block);
In addition, there is a division according to the type of lighting elements (lamps) used, by voltage, as well as by the level of moisture and dust protection.
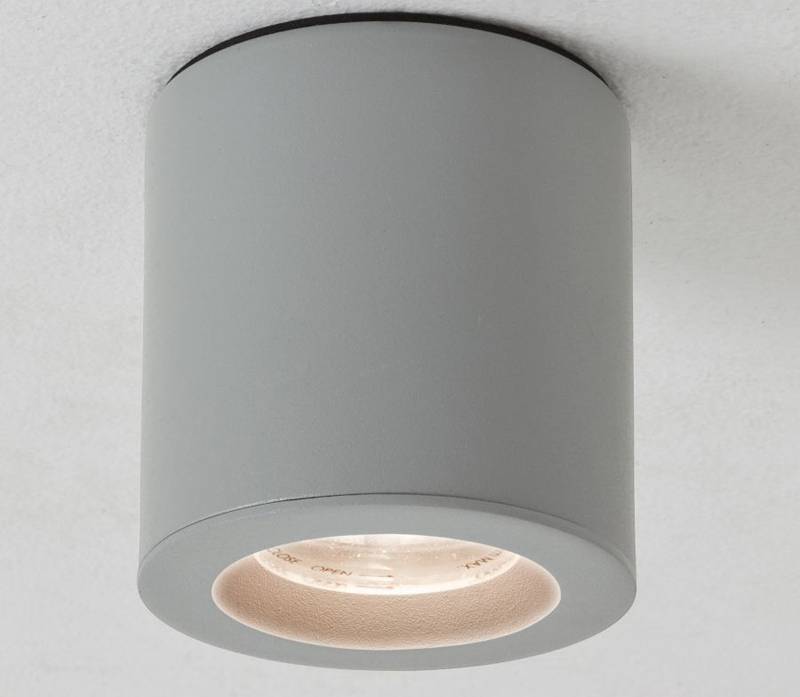
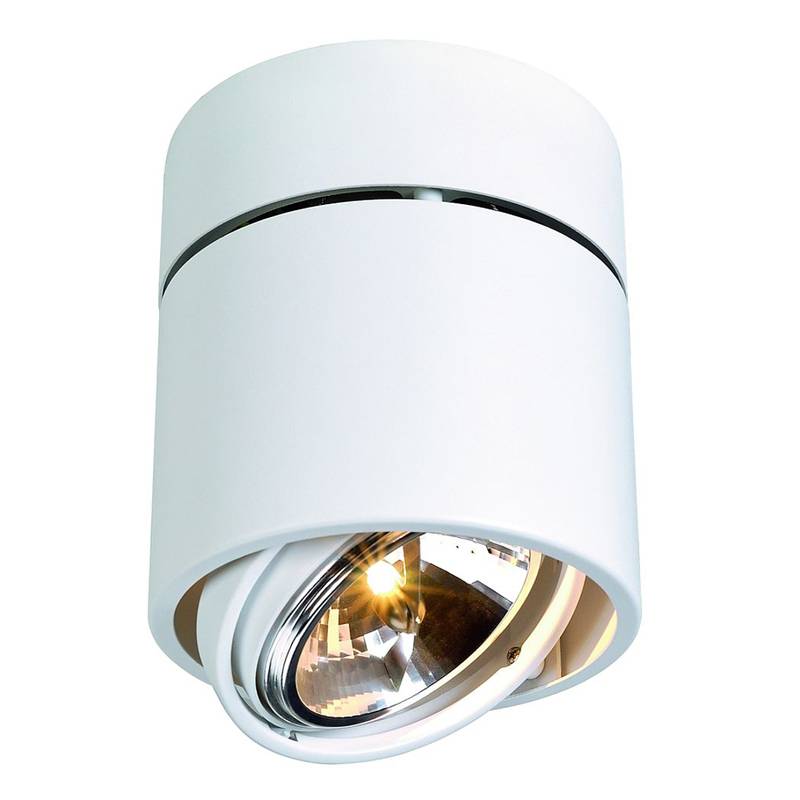
- Embedded and overhead models
The design of such lighting devices, first of all, differs in the way they are installed. They are divided according to this criterion into overhead and built-in.
- Embedded options are distinguished by the fact that their entire technical part is located in the inter-ceiling space, and the decorative frame and the entrance to the cartridge for screwing in or installing a light bulb are on the outside of the suspension system.
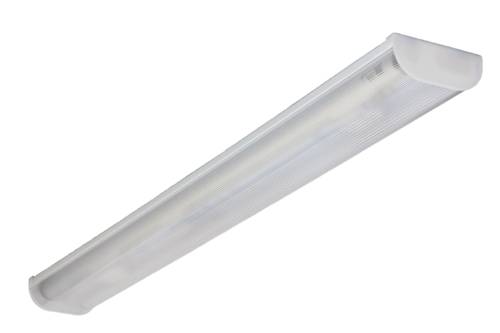
- Overhead lights are fixed directly to the plasterboard surface, and their installation is significantly different from the built-in version. The installation of such models sometimes has more resemblance to the installation of a conventional chandelier, since the lamp holder is located in the ceiling, fixed on the outside of the structure false ceiling.
A fixed lamp is “tied” to its lighting area
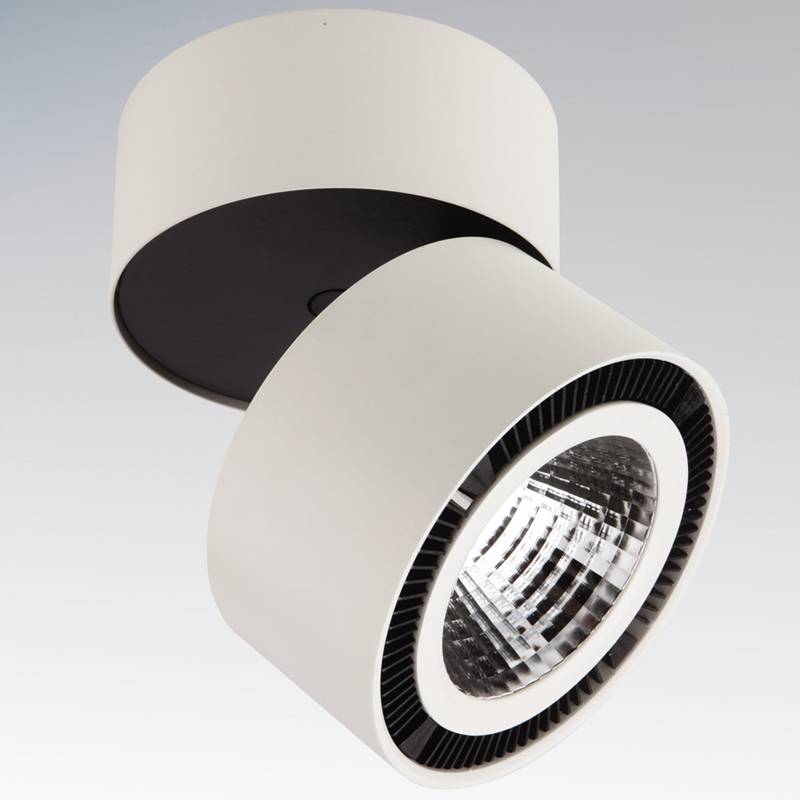
- Rotary (they are also called cardan) models are distinguished by the fact that the cartridge in their design is built into a special additional articulated device, for example, two rings on the axle shafts. It can be rotated and installed at different angles with a lamp screwed into it. It is these models that allow you to direct the light in the right direction to illuminate a separate area of \u200b\u200bthe room.
Rotary blocks can be equipped with both built-in and overhead types of spotlights.
The same type includes lamps fixed on a rod, the so-called spots. The lamp holder is located in a special housing, which has a hinged swivel mechanism. The case is mounted on a leg, with which it is fixed on a bar or decorative panel.
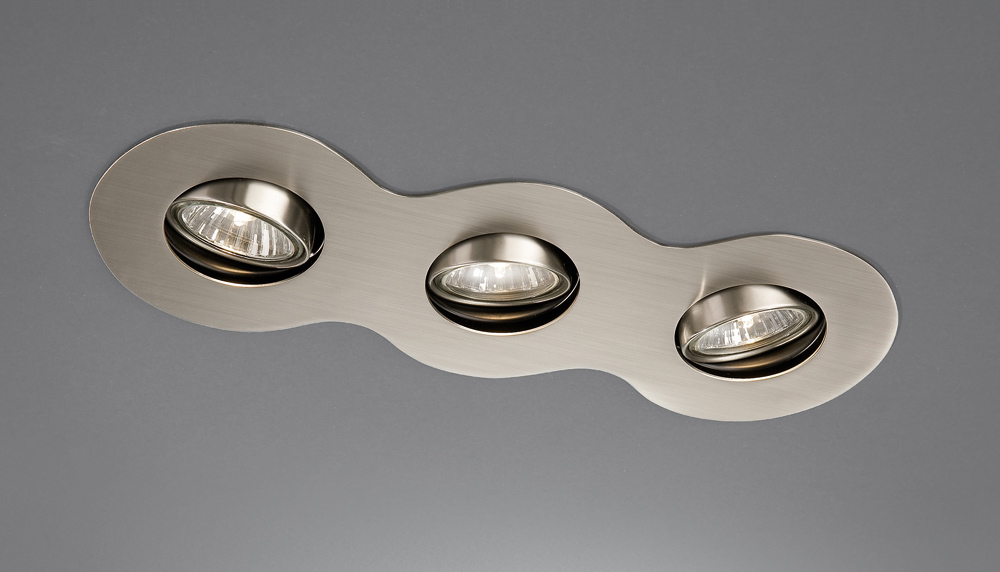
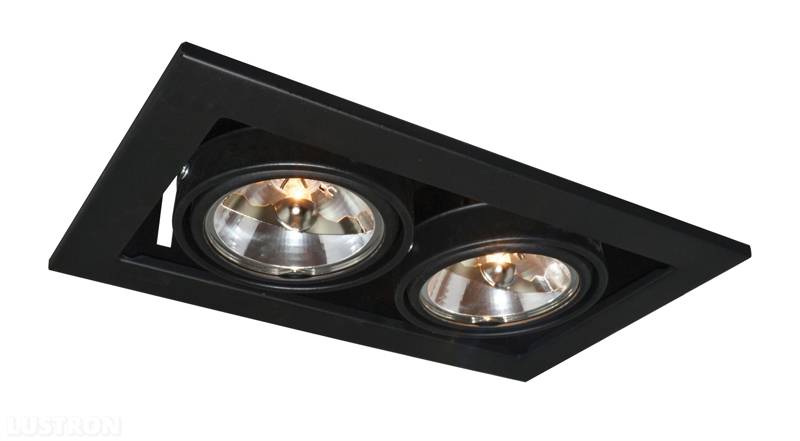
- Single and block lamps
Spotlights can be single or assembled in blocks of several units.
- Single lamps are equipped with one cartridge, respectively, have one lighting lamp.
- Block lighting are a design consisting of several lamps that are built into one housing, which is either a box of any shape, or a special rod.
Depending on the design of block lamps, they can also be rotary and non-rotary, built-in or overhead.
Any design of such models is more massive, but it is also much more convenient to use, since by installing one unit with several rotary lamps, their light can be directed to different areas of the room.
Types of luminaires by lighting elements
In spotlights, they can be designed for the use of various lighting elements - this must be indicated in the instructions for the lighting fixture. So, in such lamps can be installed:
- incandescent lamps
— LED lamp;
- halogen lamps;
- mercury (fluorescent) energy-saving lamps.
Lighting devices equipped with certain elements consume different amounts of electricity and can vary significantly in price.
- Conventional incandescent lamps are now quite rarely used in spotlights, as they are uneconomical in operation.
Luminaires equipped with incandescent lamps are considered "classic" devices, since they do not require special equipment - it will be enough to stretch high-quality wiring.
In addition to the wastefulness of incandescent lamps themselves, lamps designed to work with them have several more significant drawbacks:
Firstly, this is their height, which varies from 86 to 110 mm. This parameter must be taken into account, since the ceiling will become much lower, because the suspended structure will have to be lowered to the height of the cartridge, adding about 15 ÷ 20 mm of margin.
Secondly, a pronounced "minus" of such a lamp can be called its strong heating, especially if a lamp is installed in the cartridge high power. Plastic elements lighting device may not withstand high temperatures and begin to gradually melt under their influence.
The only advantage of incandescent lamps is their affordable price, however, it must be taken into account that their service life is usually not very long.
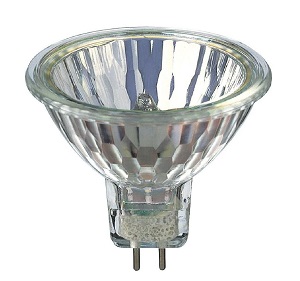
- Halogen lamps are used to obtain powerful luminous flux scattered by a special glass shade. However, when installing such lamps in lighting fixtures, it should be borne in mind that they do not contribute to energy saving in any way. Their prices are slightly lower than led light bulbs but they also last a shorter time.
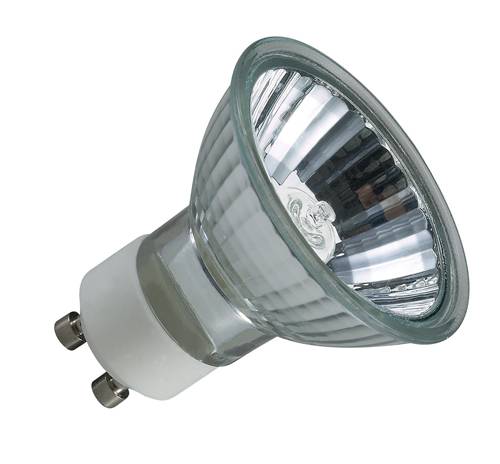
Most often, halogen lamps have a plug base, so if you plan to use them, then you need to choose lamps with the appropriate connector in the cartridge.
The height of halogen lamps is comfortable enough to be built into a plasterboard structure, which will need to be lowered from the ceiling surface by only 50÷70 mm. Since some halogen lamps operate on a voltage of 12 V, you will have to purchase a transformer for the entire installed system. In addition, for any "halogens" a very important condition for their long-term operation is a soft starter - the lamp does not reach full power immediately, but within a few seconds. Often this device is combined with a step-down transformer.
Halogen lamps create a powerful luminous flux that exceeds the illumination from conventional or LED lamps. Lamps of this type allow you to use a special dimmer to adjust the intensity of lighting. Luminous flux from fluorescent lamps has its own shades - warm and cold.
Given all the positive qualities of this type of lamp, they can be called the most popular among all existing lighting elements used in spotlights.
- energy saving mercury lamps, which are most often called luminescent, save electricity quite effectively, but they have several significant drawbacks.
- First of all, it is that they adversely affect vision, can cause rapid eye fatigue.
- Such lamps require special disposal, as they contain harmful human body substances, in particular the highly toxic mercury
- Another disadvantage of this type of lamps is their height, which is almost the same as that of conventional standard incandescent lamps.
The intensity of illumination from these devices will be higher if they are installed in overhead fixtures. Well, if they are screwed into built-in models that are deepened into a plasterboard structure, then there is a significant weakening of the luminous flux, even despite the reflective surface of the ceiling.
In a word, for spotlights they can hardly be called a good option.
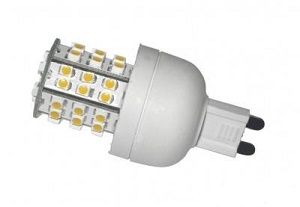
- LED lamps are quite expensive, but they justify themselves by the fact that during their operation a minimum of electricity is used, and this helps to significantly save on its payment. In addition, quality LED fixtures last much longer than any other lighting elements.
The most economical option is LED bulbs.
LEDs can have different luminous flux, as well as cold or warm light. Lamps having a cool shade are usually used for installation in office space because they improve performance. Elements that give warm lighting contribute to rest and relaxation, creating coziness, so they are recommended to be used in living rooms.
If it is decided to install spotlights with LED lamps, then you can use a special device that regulates the brightness of the lighting - a dimmer. It will allow you to create the right atmosphere in the room with the help of light intensity, scattering or "compacting" it.
Some types of these lamps are equipped with a special shade that can create various shadow or color patterns on the ceiling. This effect can be used to decorate a certain interior style.
Often, LED lamps are given a "classic" look.
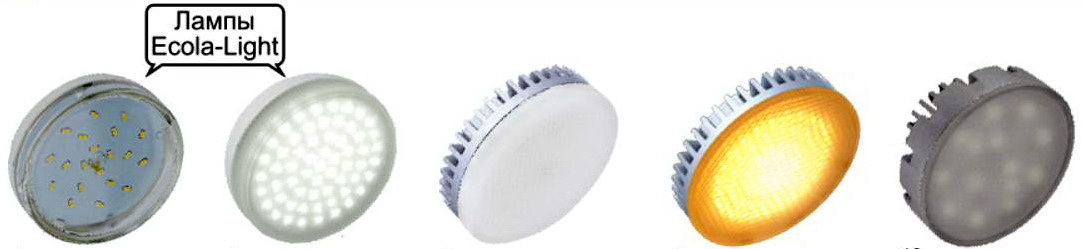
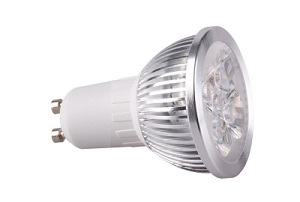
LED lamps are made with different pinouts - for a conventional threaded cartridge (with Edison thread 14 or 27 mm) and with a plug connection characteristic of "halogen lamps". In addition, spotlights can also have specific sockets for GX70 and GX53 LED lamp bases. A sample is shown in the figure below.
Special base types - GX70 and GX53
Based on the foregoing, it can be argued that LED lamps are the best option for installation in spotlights today. The price is still high, however, they are safe, durable and economical, and quickly justify their purchase.
Differences in spotlights by voltage
As a rule, there are two main types of spotlights:
- devices designed for 220 V networks alternating current;
- lamps designed for 12 V;
You can find models with LED lamps that require 3 V DC.
This parameter is indicated on the packaging of both the lighting device itself and the lamps intended for it.
The voltage supplied to the lamp will directly depend on its type, so you need to decide in advance on the lighting elements, since connecting and drawing up a diagram of point devices has its own characteristics.
If you need to lower the voltage, you will need to use a transformer. The operation of certain types of LED lamps will require the installation of an additional device - the so-called driver.
If it is decided to change the types of lamps installed in the lamps to others having a different design, principle of operation and supply voltage, then most likely it will be necessary to make changes to the wiring diagram.
Luminaire protection level
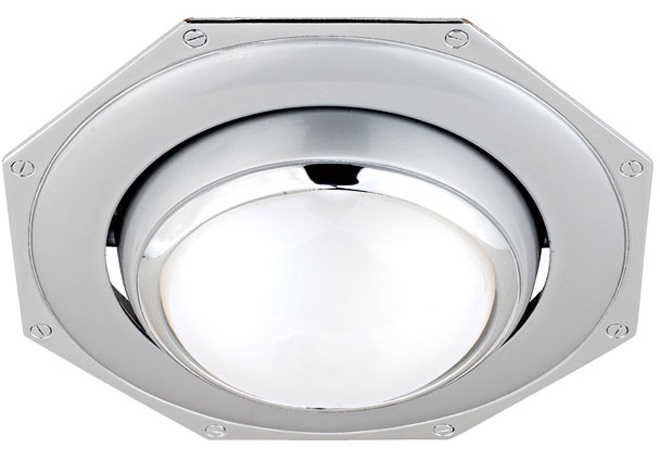
Spotlights can be open and closed - the place of their installation depends on this parameter.
The open design of the fixtures is suitable only for rooms with normal humidity, but they cannot be installed in bathrooms, and even more so in bath rooms. In such devices, the lamp is not covered by a ceiling, so moisture can significantly reduce the life of the prior or even cause a serious accident. Most of the lamps with rotary mechanisms can also be attributed to open - they also try not to use them in rooms with high humidity.
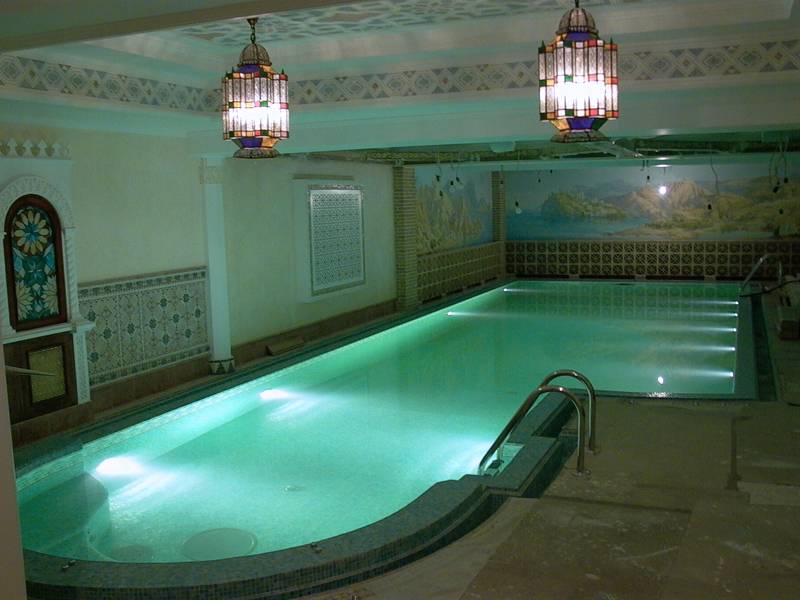
For bathrooms, swimming pools and bath rooms, it is necessary to purchase special moisture-proof lamps.
In order for lighting fixtures to serve for a long time and do not pose any danger, they must be protected not only from moisture, but also from dust. Usually, the degree of protection is indicated on the prior itself and, of course, in its technical documentation. This is the IP index followed by two digits.
The first indicator will tell you about the degree of protection against penetration. solids dust:
- 0× is a complete lack of protection;
- 1× - the device is protected from fragments up to 50 mm in size;
- 2× - indicates protection from 12 mm particles;
- 3× - from particles up to 2.5 mm in size;
— 4× — maximum size- 1.0 mm;
— 5× – partial penetration of fine dust is possible
- 6× - the device has a guaranteed protection against dust.
The second digit of the indicator will characterize the electrical appliance in terms of its protection from moisture:
- ×0 - moisture protection is completely absent;
— ×1 – the luminaire is protected from vertical ingress of water drops;
- ×2 - protection against drops falling at a small angle;
- ×3 - protection against splashes falling on the lamp at a large angle;
- ×4 - the lamp is protected from splashes falling on it at any angle;
- ×5 - there is protection against water jets;
- ×6 - the lamp is not afraid of direct exposure to a strong flow of water;
- ×7 - the device can be briefly immersed in water;
— ×8 – the luminaire can be under water for a long time, for example, when it is installed in swimming pools.
- Insulating corrugated pipe, in which the cable will be protected from various influences. The length also varies depending on the length of the wiring.
- Terminals for connecting wires when connecting fixtures. These can be screw terminals, spring terminals, or. And the most the best option- Vago reusable clamping terminals. Although they are more expensive, but not so much as to save on the convenience of work and on the security of connections.
- Voltage transformer. It will be required if 12 V halogen lamps are selected for installation. This device must comply with required power. Usually it is chosen with the expectation that its output power exceeds the total power of the installed lamps by at least 20 ÷ 25%.
- A current driver will be required when installing some low voltage LED fixtures. This device simultaneously plays the role of both a step-down transformer-rectifier and a current and voltage stabilizer - many LEDs are very sensitive to changes in circuit parameters.
In the case of choosing a series connection of fixtures, the driver must have a current margin for the normal functioning of the entire circuit.
However, it should be noted that serial connection has one important drawback - if one of the lamps fails, the operation of the entire circuit stops. Therefore, it is recommended to carry out parallel installation, but in this case you will have to purchase a separate driver for each lamp. Some models of luminaires are equipped by manufacturers with their own drivers, in which case they can be connected in parallel without any problems. In any case, when purchasing, you should always carefully read the technical documentation of the devices.
- The spotlights themselves. Their number is determined depending on the drawn up scheme and the size of the area of the room. Usually they are mounted at a distance of 500 ÷ 1200 mm from each other.
Tools for installing spotlights
For convenient and high-quality installation of fixtures, you will need the following tools:
- Electric drill or screwdriver for cutting holes in drywall.
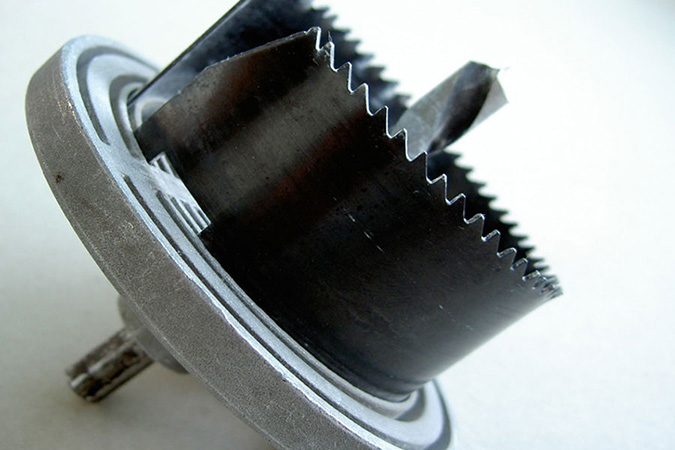
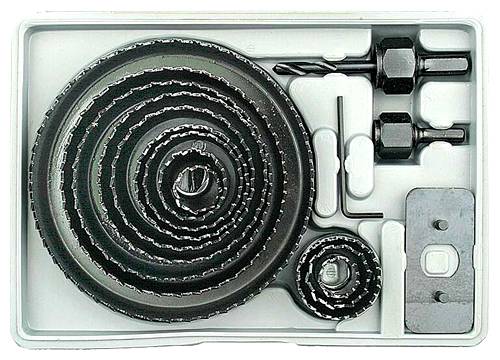
- A drill bit for cutting holes of 60÷75 mm or an adjustable version of the drill ("ballerina"), on which you can set the desired hole diameter.
- Roulette and a long ruler.
- Indicator for determining the phase of the voltage.
- Screwdriver Set
- Wire cutters, pliers - if you plan to crimp the connecting sleeves.
- Insulating tape or heat shrink tubing of the correct diameter
- A sharp knife or wire stripper for stripping wires before splicing them, or a protective device.
Installation of spotlights on a plasterboard ceiling
In order not to be mistaken in the amount of material purchased, to determine in advance the location of the fixtures, and also to plan the cable layout for them, you need to draw up your own or find a ready-made scheme.
- The first thing they do before starting the marking and installation of cabling is to mount a frame made of a metal profile or a wooden beam for a plasterboard ceiling.
Here you need to take into account which lamps will be installed - overhead or built-in, since their installation is somewhat different from each other.
For example, for overhead lighting fixtures, it is necessary to fix a rigid base to the ceiling or to the frame, on which the panel of the overhead model will be installed and screwed through the plasterboard.
- The frame crate can be used to attach cable wiring to it, which is best to immediately “put on” in a corrugated plastic pipe.
- The tube is fixed on the crate on special brackets or screwed onto plastic clamps in several places, and the cable segments or loops 200 ÷ 300 mm long, to which the lamps will be connected in the places determined for their installation, are left in a free state.
- For ease of installation of lighting fixtures and for aesthetic reasons, they are placed at the same distance from each other - usually it is 500 ÷ 1200 mm. Later, the cable loops will be passed through the holes cut for them in the drywall and passed to the outside of the ceiling.
- Further, along the crate, drywall sheets are fixed, on which, using a tape measure and a ruler, focusing on the sheet connection line, the places where the lamps will be installed are marked. At the same time, it is very important to prevent a very common mistake by novice electricians when the intended hole suddenly falls on the frame guide.
- You also need to take into account that between the center of the future circle for installing the lamp and the wall there should be a distance equal to no more than 550 ÷ 600 mm
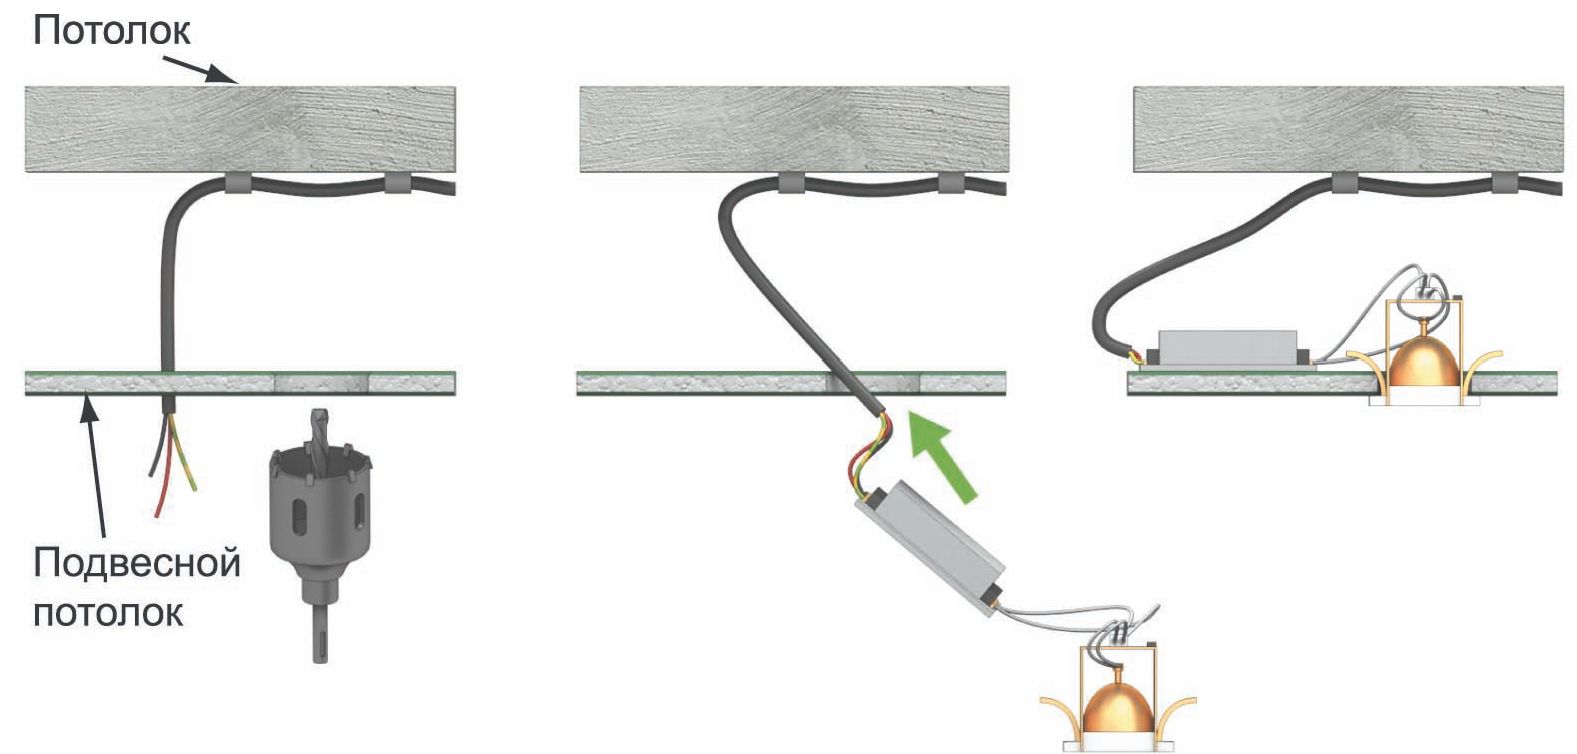
- If the circuit provides for the installation of a transformer, it is installed above the false ceiling, in the interceiling space, fixed on the crate elements or even simply laid on top of the sheet surface.
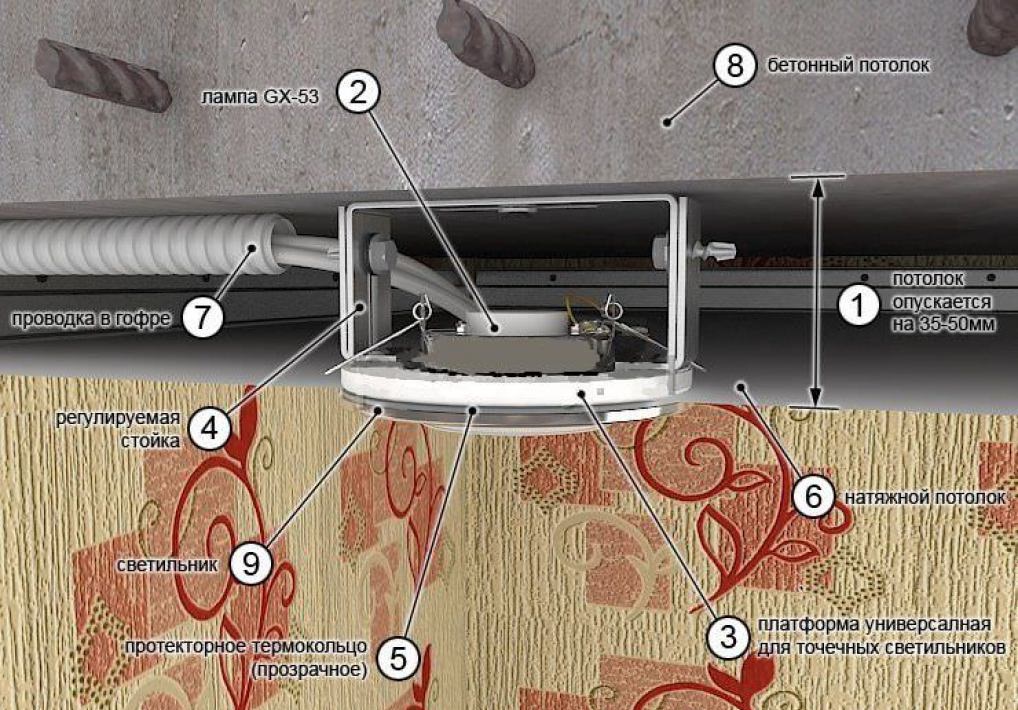
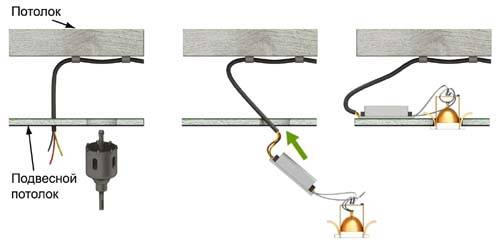
1 - overlap;
2 - plasterboard false ceiling;
3 - power cable supplied to the lamp;
4 - clips (clamps) holding the cable on the floor;
5 - transformer or driver.
- All wire connections that remain above the ceiling surface must be insulated with high quality. The best option- the use of modern Vago terminals. If twisting is planned, then it is pressed into a copper sleeve, and then it is qualitatively insulated with a heat shrink tube or insulating tape. Bare contacts or connections must not be left.
- It is very important to remember that no matter how the wiring diagram is drawn up, it is not recommended to run the cable diagonally, since if a malfunction occurs, it will be much more difficult to detect it.
- If selected complex scheme wiring, then a junction box is used for it, into which the main supply cable is connected, and the rest of the branches are made from it.
Illustration Brief description of the operation to be performed In the marked places, using a drill-crown for wood or a “ballerina”, as in the illustration, nests are drilled with a diameter several (2÷3) millimeters larger than the installation size of the lamp, but necessarily less than the outer diameter of the decorative flange that will close the hole.
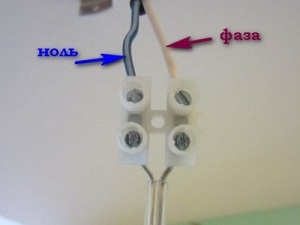
Work should be carried out with great care, carefully, slowly, so as not to damage the cable and not crumble the drywall sheet.It is very important to observe the correct connection of the wires, otherwise, when connected to the power supply, the lamps may burn out, especially when they are switched in series.
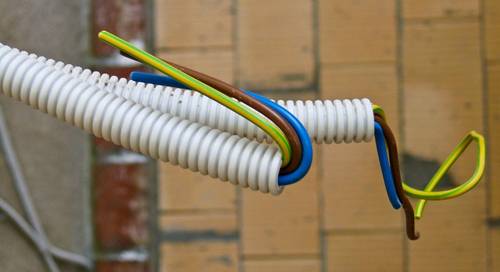
This is easy to do based on color coding conductors.
The blue color is always the “working zero”, yellow, green or yellow-green is the “ground zero”, and the color of the “phase” can be different. White, brown or red phase wires are more common, but this is not a dogma.
If the luminaire itself also has a color code for the wires, this should also be observed.
In the circuit breaker, only the phase wire should open.After the cable ends are cleaned, they are inserted from one side of the terminal and clamped with a screwdriver.
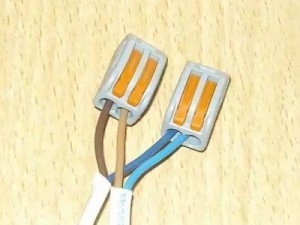
If spring terminals are used (only for single-core wires or when a special tip is installed on the "multi-core"), then the wire is inserted until a secure clamp is provided.Even more convenient - Vago reusable crimp terminals with a locking lever.
They are versatile and reusable.
The wires are inserted with the stripped section into the hole until the insulation, and then the lever snaps down all the way.Similarly, wires coming from the lamp are connected to the terminals.
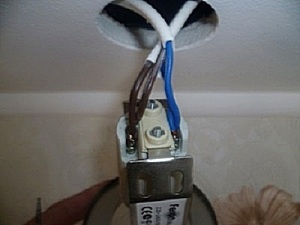
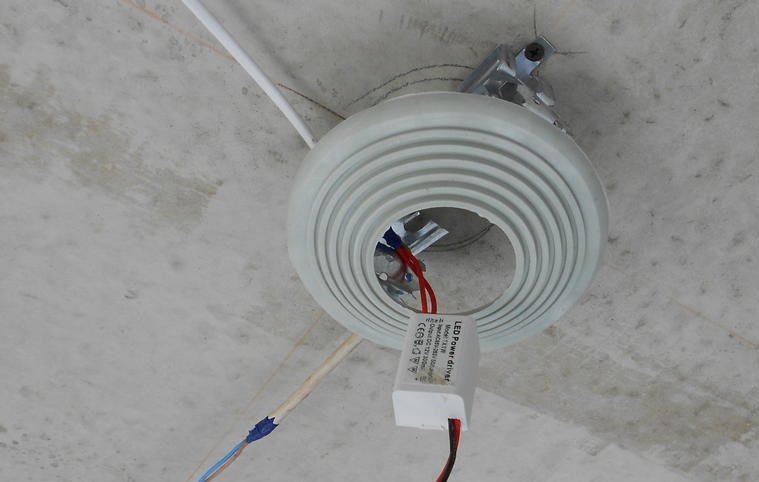
Often there are devices that are not equipped with wires. In this case, the power wires coming out of the above-ceiling space can be attached directly to the lampholder terminals, as shown in the figure.
However, it is more convenient, nevertheless, probably, at first to connect the wire segments to the lamp, and then - just as described above, through the terminal - if necessary, dismantling will simplify the work.
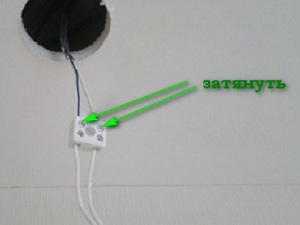
But twists, even with reliable insulation, should be avoided - in the space above the false ceiling it is difficult to control their "behavior" - and sparking, heating, etc. are not excluded.Included with other models (usually those that are also suitable for stretch ceiling) includes a special ring that frames the cut hole.
This is a fairly sensible solution - drywall along the cut edge will not crumble when installing or removing fixtures, and the device itself will be securely tightly installed in the socket.
During installation, the "antennae" located behind the facing decorative flange of the luminaire are compressed, the luminaire is carefully inserted into the prepared hole.
After installing the stopper, they open themselves and securely hold the lamp on the surface of the plasterboard ceiling.As a result, the lamp should neatly, tightly, without the slightest sag, stand in the place prepared for it. Installation of an overhead spotlight, after fixing the drywall on the crate, takes place in a similar way, but with some features.
- When installing an overhead luminaire, the hole in the plasterboard false ceiling should not be made large, since the technical part of the luminaire will not be inserted into it. It will serve only to pull the cable loop to the ceiling surface for connection. A hole is also made in a certain place, where a rigid base (a platform or a piece of timber) is installed on top of the suspended ceiling to fix the fixtures.
- Further, the elongated cable is cut, its ends are stripped, and then, switched in the terminal.
- The contact wires of the lamp with stripped ends are also connected in the terminal, according to the wiring diagram, observing the color marking of the wire (phase-zero).
- On each overhead luminaire, the manufacturer provides a special bracket (mounting plate) (pos. 2), which must be fixed from the outside of the false ceiling to a rigid base. It should be noted that in different models of devices, such brackets may have different designs - but it is usually not difficult to deal with this.
- Excess cable (pos. 4) is tucked into the hole so that it does not interfere with the fixing of the bracket.
- Then, the bracket is screwed through the false ceiling to the rigid base.
- Further, the lamp itself is installed and fixed in it. Depending on the model, it can be screwed on both sides to the housing (pos. 1) with a plafond (pos. 3), open or with rubber seals, or even the plafond itself can be screwed into a mounting bracket.
Upon completion of the installation work on cabling and installation of fixtures, the wires are connected to the switch (phase with phase, and zero with zero). this work must be carried out according to the drawn up scheme. And it remains to turn on the power supply to the room in order to check the operation of the installed lighting.
The article should end with an important note: if there is no practical experience in installing electrical appliances with complex wiring, then it is better to entrust this process to a specialist. High voltage does not like dilettantes!
Video: an example of the practical installation of spotlights on a plasterboard ceiling

Recessed ceiling LED lights used in the installation of any suspended structures and stretch films. With the help of these lighting devices, you can create the desired light atmosphere in the room.
Rules for installing ceilings with recessed LED lights
Spotlights are ideal for additional lighting in large areas (bedrooms, halls, kitchens) and the main one in small rooms (bathrooms and hallways). But the use of recessed lighting devices has one drawback - the need to lower the ceiling level by a distance corresponding to the height of the lamp. For devices with incandescent lamps, the ceiling level must be lowered by 10-12 cm, with halogen lamps - by 8 cm, with LEDs - by 6 cm.
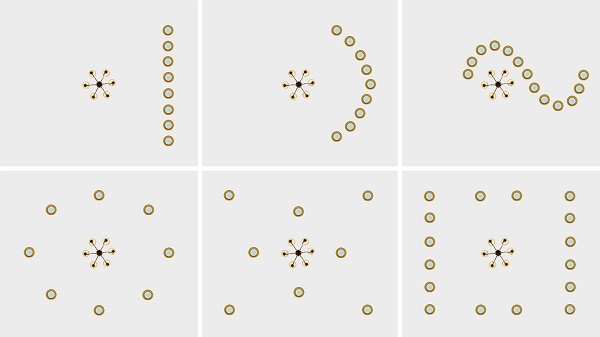
Since the main direction of modern interior design is to strive, it will be an unsuccessful decision to lower the ceiling by 6-12 cm over the entire area of \u200b\u200bthe room. The correct solution is to choose a chandelier located in the central part of the ceiling as the main light source. And recessed fixtures need to be installed around the perimeter of the room, while lowering the ceiling to the distance required for the installation of specific devices.
Using multi-level structures with built-in spotlights, you can create a certain mood and visually change the amount of space. With the simultaneous inclusion of the main and additional devices the atmosphere of a bright sunny day is created. When using only additional light, they get a cozy atmosphere conducive to relaxation and conversation.
In bathrooms, bathrooms and hallways, they traditionally mount or. In this case, the level of the base surface inevitably falls. Therefore, in these rooms it is most convenient to use recessed LED ceiling lights as the main lighting. Using lamps of different brightness, you can focus on some elements of the interior and hide others.

Types of ceiling LED lights
LED lamps occupy one of the first places among devices for indoor and outdoor lighting. Ceiling recessed lamps are produced by many enterprises, domestic and foreign. But for all types of products of these companies there are uniform standards for marking, sizes of flasks and socles.
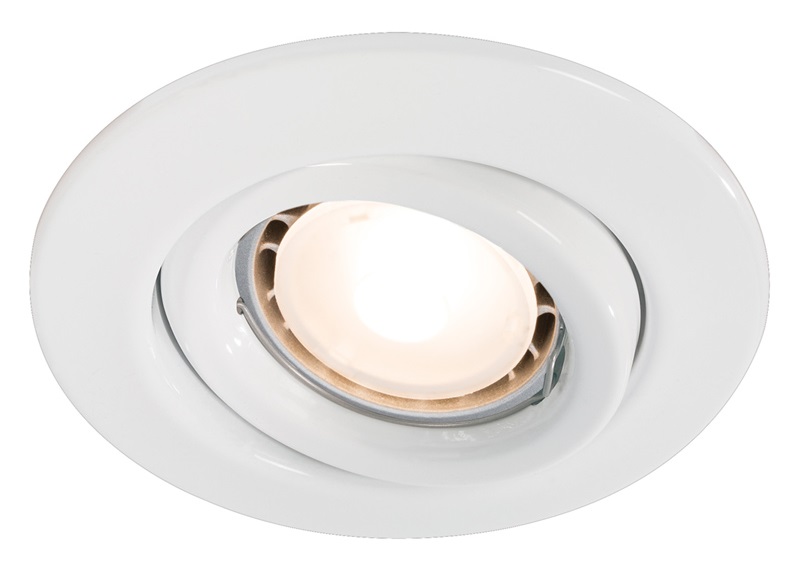
Recessed ceiling lights in the language of professionals have their own name - "spots". Some models are equipped with a bracket that provides the ability to rotate and change the angle of incidence of light rays. Luminaires can be installed not only horizontally, but also vertically.
Thus, all recessed lighting fixtures can be divided into two categories:
- rotary;
- fixed.
The first are equipped with a movable upper part, which is directed in the right direction.
Manufacturers offer spot lighting devices for different type rooms: with normal and high levels of humidity. The outer part of the lamp can be made of plaster, glass, crystal or aluminum. In the design of the device, various crystals, stained glass inserts, wooden or glass linings can be used.
The design of lamps can be very different: from hi-tech to antique. There are models whose task is to minimize the presence of the device on the ceiling. These lamps have a minimalistic design. Due to the variety of styles and colors, you can choose exactly the model that will harmoniously fit into the interior of the room.
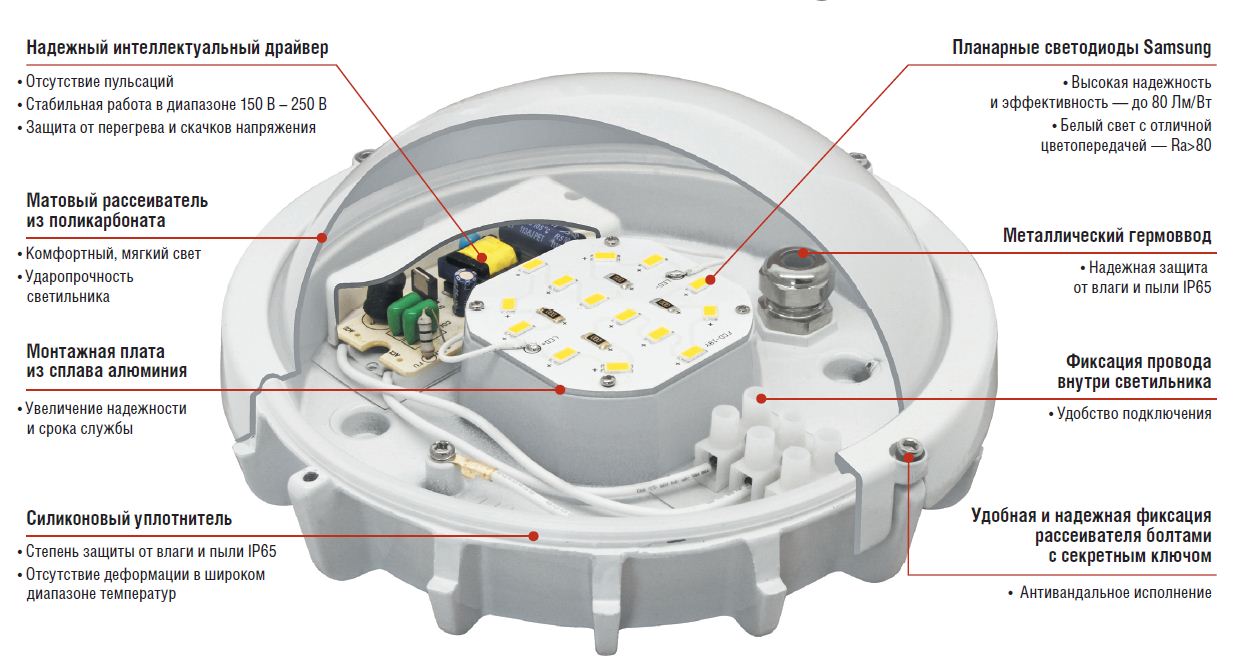
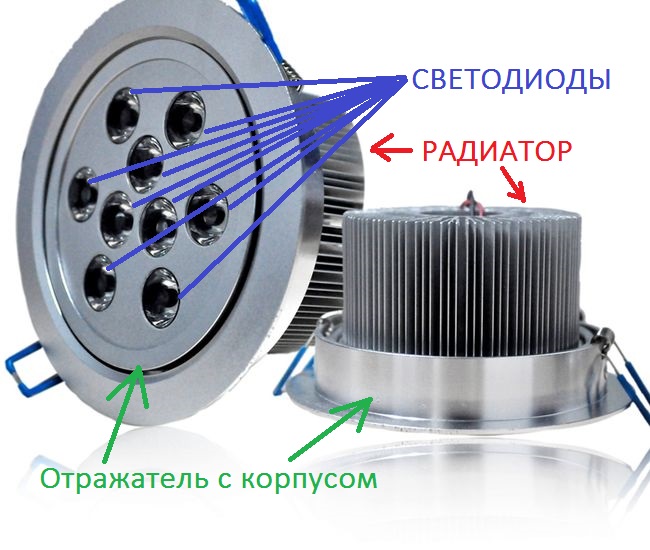
Device of recessed LED ceiling lights
According to the manufacturing method, all spotlights are divided into two groups: stamped and cast. The former are easy to distinguish from the latter: you need to turn the lamp over and examine its seat. For stamped, it is the same around the entire circumference. The width of the seat must be at least 9 mm. In cast fixtures, technical tides are visually noticeable on the surface of the seat - areas of a lighter and darker color.
For the lighting of stretch ceilings, only stamped lamps can be used.
Instrument bases are of two types: threaded and pin. The first are marked E, the second - G. Next to the letter designation of the type of base indicate the dimensions in numbers. For example, E27, GU5. more modern. But in the device of recessed lamps, lamps with both types of socles are used.
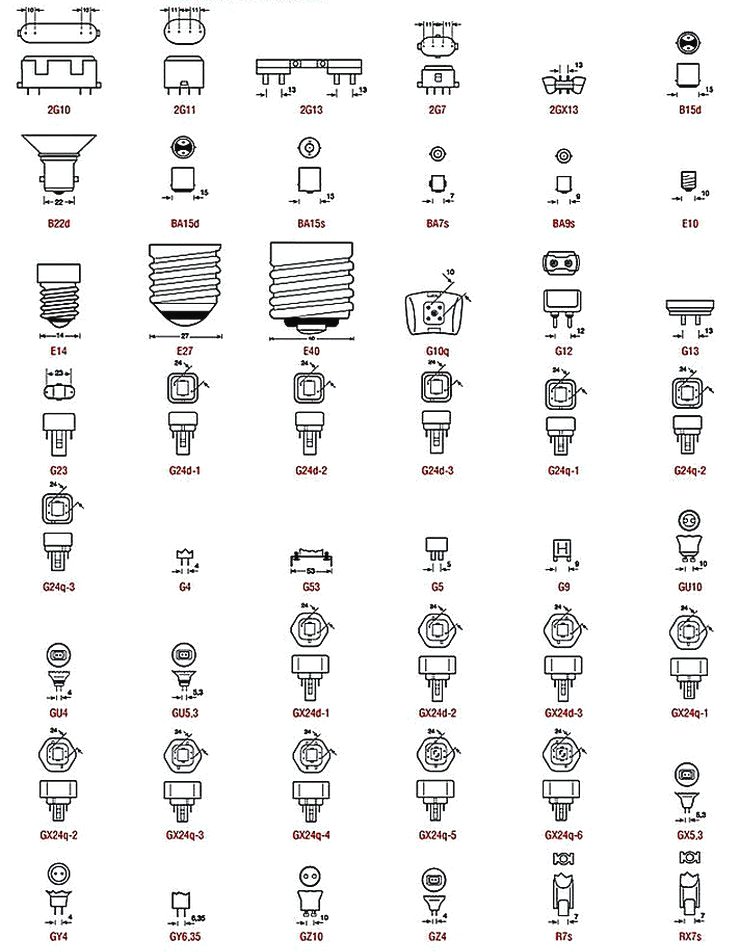
Table. The main types of plinths.
| Plinth marking | Luminaire Features |
|---|---|
| Used for decorative lighting, has a high light output. The base contacts are loop-shaped. Luminaires are designed to operate from the mains without the use of transformers. |
| Two-pin base, the presence of a swivel mount. The pins of the GU base are equipped with small knobs. The numbers next to the marking indicate the distance between the pins. |
| Belongs to the category of two-pin. Does not have thickenings on the tips of the pins. |
| Equipped mainly with LED linear lamps. The numbers indicate the distance between the pins. |
| Plinth "minion". Equip lamps in the form of a candle or a cylinder. |
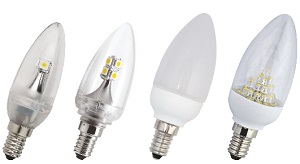
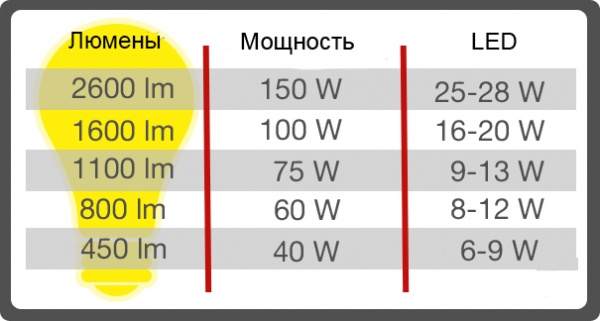
On the body or packaging of LED lamps indicate:
- power in W (the amount of electricity consumed in 1 hour);
- type of flask and base;
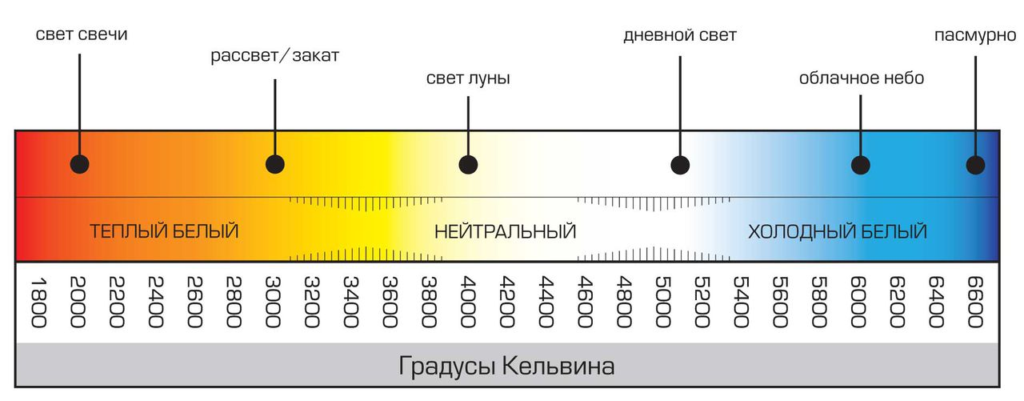
- color temperature (hue of emitted light) in Kelvin (warm tones 4000-5000 K, cold tones from 6000 K);
- intensity of the light beam in lumens (Lm);
- dispersion angle.
All LED lamps are labeled led. Additional characteristics can be indicated: power and estimated number of hours of operation. All this data can be seen on the lamp body, glass or bulb. On some products, the manufacturer is also indicated.
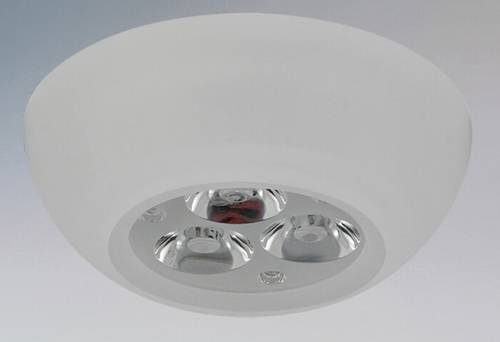
An important characteristic of recessed LED lamps is the number of cartridges. There can be up to 8 of them in one device. Thanks to the movable base, you can change the direction of the cartridges, thereby illuminating several zones at once.
Advantages and overview of models of ceiling LED lamps
The main advantages of lamps of this type include:
- a small amount of electricity consumed;
- environmental Safety;
- weak heating of the body (therefore, recessed luminaires do not require additional cooling and ventilation);
- low cost;
- availability;
- long service life (up to 50 thousand hours);
- high resistance to mechanical stress;
- no disposal requirements.
It should be noted that LED ceiling lights are brighter than halogen ones. A definite plus of these devices and in the absence of annoying flicker.
Table. Popular models of LED recessed fixtures.
| Model brand | Description | Characteristics |
|---|---|---|
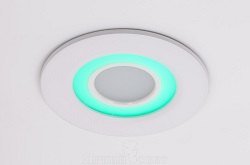
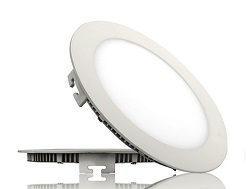
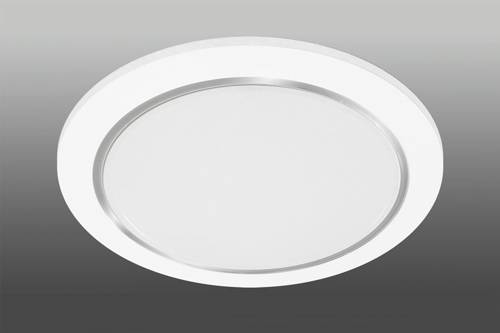
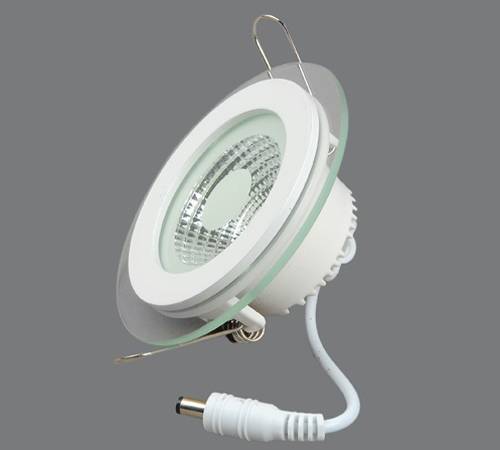
| It has a stylish flat body, ultra-thin, with three-mode backlight. Mainly used in the installation of stretch ceilings. | Outer diameter 107 mm. Recessed diameter 95 mm. Beam angle 120°. Working temperature -30°С – +30°С. |
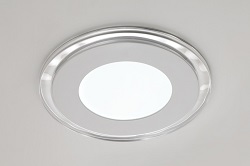
| It has two backlight options - blue and green. The lower surface of the bulb is flat, matte, with mirror reflectors around the circumference. Body is white, diffuser is frosted glass. | External diameter 160 mm. Case height 20 mm. Electricity consumption 15 W per hour. Aluminium case. |
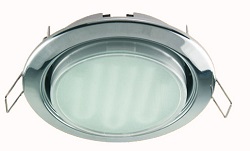
| Wide range of body colors. Plastic and glass diffusers, matte. Energy saving. Stylish design, compact and durable. Convenient lamp replacement, as no removal of the retaining ring is required. | Power 3-20 W. Dimensions from 38x106 to 58x125 mm. Mortise hole(inner diameter) 90-110 mm. |
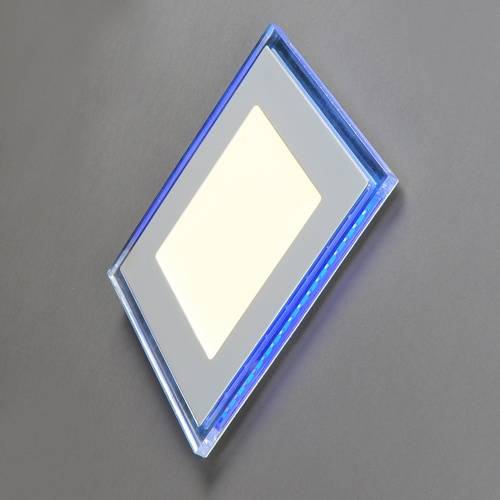
| With white and blue illumination. Glass diffusers, transparent. They produce lamps in the form of a circle and a square. Are equipped with the switch of the modes of color and intensity of illumination. | External diameter 160 mm. Internal 110 mm. Power 12 W and 18 W. Color temperature 4000-6000K. |
Rules for choosing recessed LED ceiling lights
You need to be most careful when choosing spotlights for a stretch ceiling. In this case, it is especially important to know such a characteristic of the lamp as the degree of heating. Mistakes in the choice can lead to deformation of the stretch ceiling, its sagging and damage to the film.
You should know that the stretch ceiling is highly sensitive to high temperatures. When heated, the bar may melt or stain. It is possible to install LED recessed luminaires of any power, but it is necessary to provide high-quality ventilation designs.
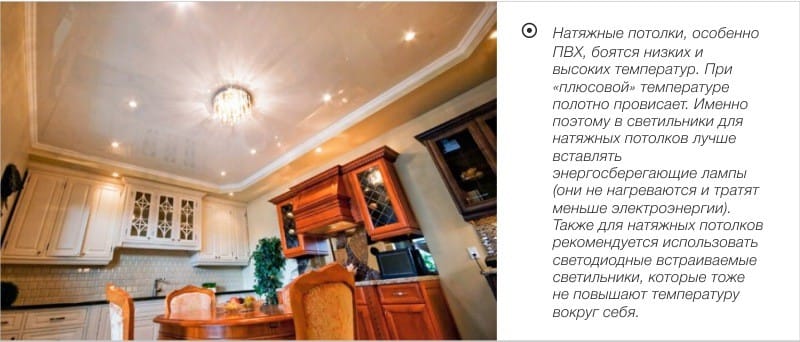
A similar requirement for ceilings made of PVC panels or plastic slats. But for these designs it is recommended to use devices with lamps with a power of not more than 40 watts. It is important to take into account the quality of plastic lining or PVC panels. If they are thin and soft enough, it is recommended to purchase low-power lamps, but increase their number. Thus, the desired degree of illumination of the room will be achieved.
When choosing LED ceiling lights take into account:
- operational purpose of the premises;
- size of the area of the room;
- type of material from which the ceiling will be mounted;
- lamp power.
For stretch ceilings, only LED lamps are used.
Installation of ceiling LED lights
Spot lighting devices are installed simultaneously with the installation of the ceiling structure. The gap between the new and the base ceiling should exceed the height of the luminaire body by 1-1.5 cm. Thus, the ventilation necessary for the operation of these devices will be provided.

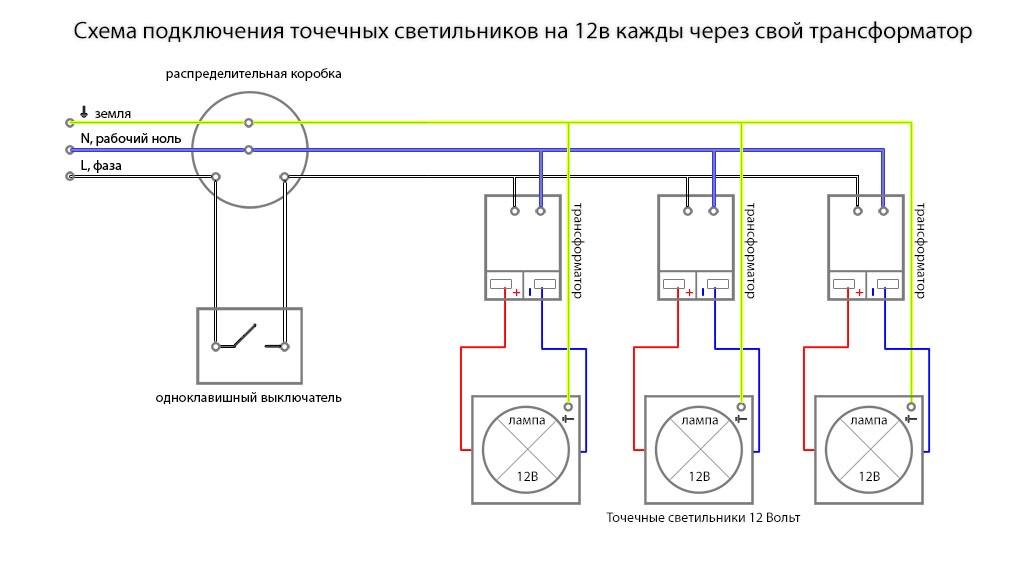
Wiring diagram for 12 V spotlights with individual transformers
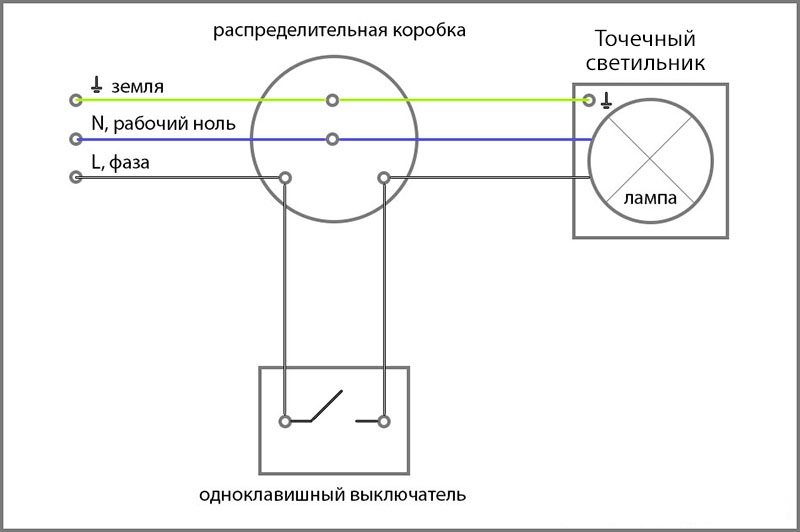
Scheme for connecting spotlights 220 V to a single-gang switch

If a plastic or plasterboard ceiling is being installed, the holes for the lamps are drilled before installation. plastic panels or GKL canvases. To form openings, a crown of a certain diameter is used. Some manufacturers indicate the required hole size on the packaging. Usually it is 60-70 mm.
- connect the wires to the lamp terminals;
- lead the wires into the hole in the ceiling and in some way fix the lamp in suspension;
- then use your fingers to bring together both springs located on the lamp body;
- without releasing the springs, insert the lamp body into the hole in the ceiling;
- release the springs.
When installing a stretch ceiling, the installation of recessed fixtures has its own nuances. Since the holes cut incorrectly on the film can no longer be masked, it is necessary to know the correct sequence of work.
Step 1. Develop a scheme for installing fixtures.
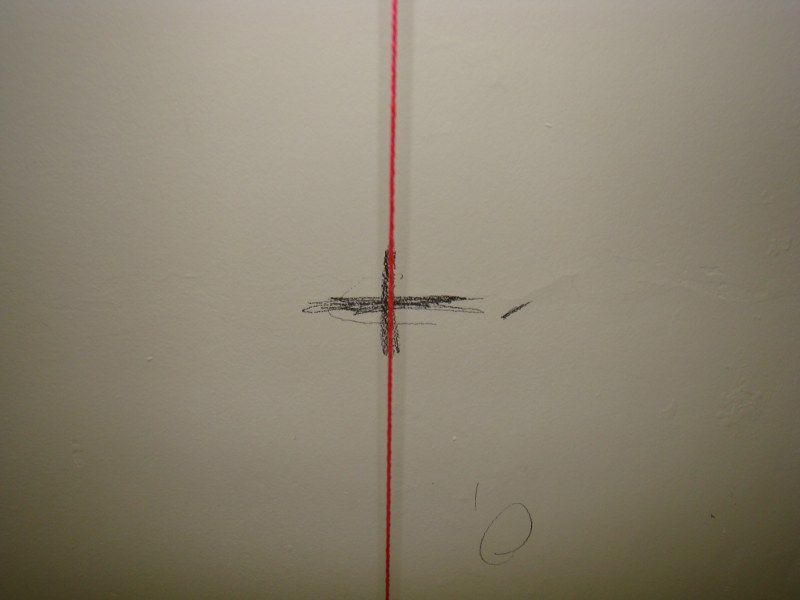
Step 2 On the surface of the base ceiling, the points of attachment of lighting devices are marked.
Step 3 An electric cable is brought to the locations of the devices. Upon completion of the installation, the wiring is checked for operability.
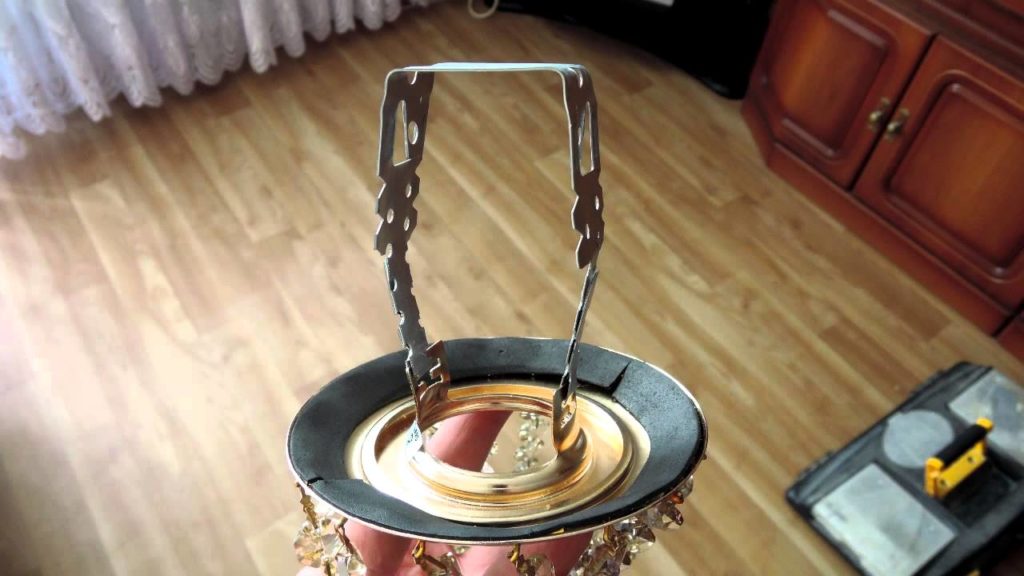
Step 4 Mount fasteners for installation and alignment of fixtures in the same plane. Most often, suspensions are attached to the base ceiling, which are used when installing plasterboard ceilings. With the help of these metal plates, special mortgages for lamps are fixed in the desired position.
Step 5 Install a stretch ceiling.
![]()
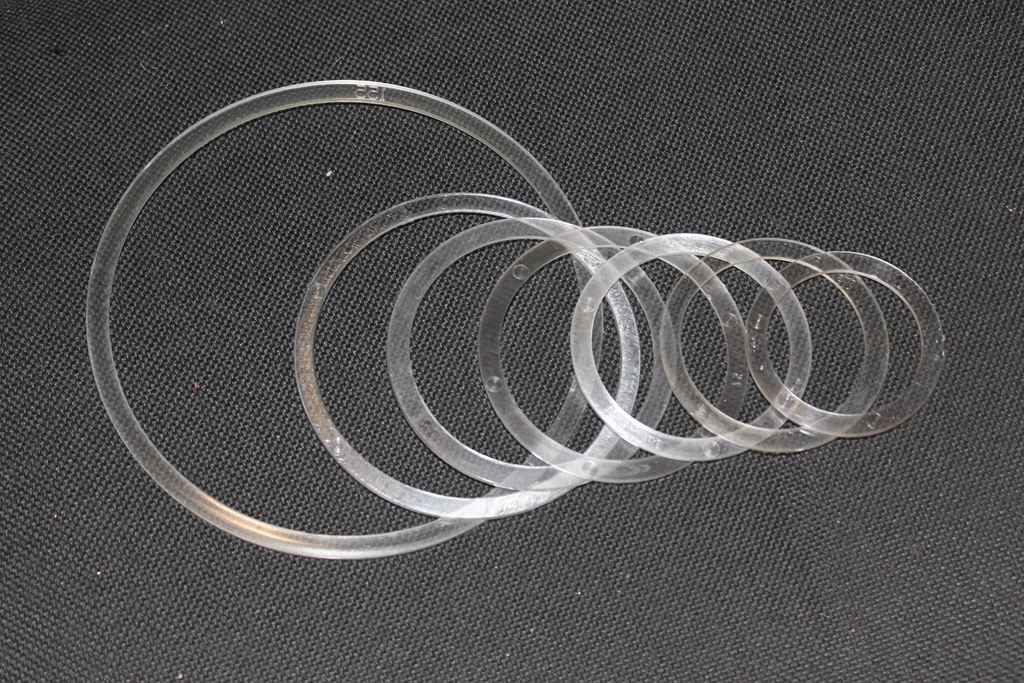
Step 6 In the places where the fixtures are installed, a thermal ring is glued onto the film, corresponding to the diameter of the mortgage. You can use super glue. The thermal ring is necessary to limit the mechanical impact on the material of the stretch ceiling.
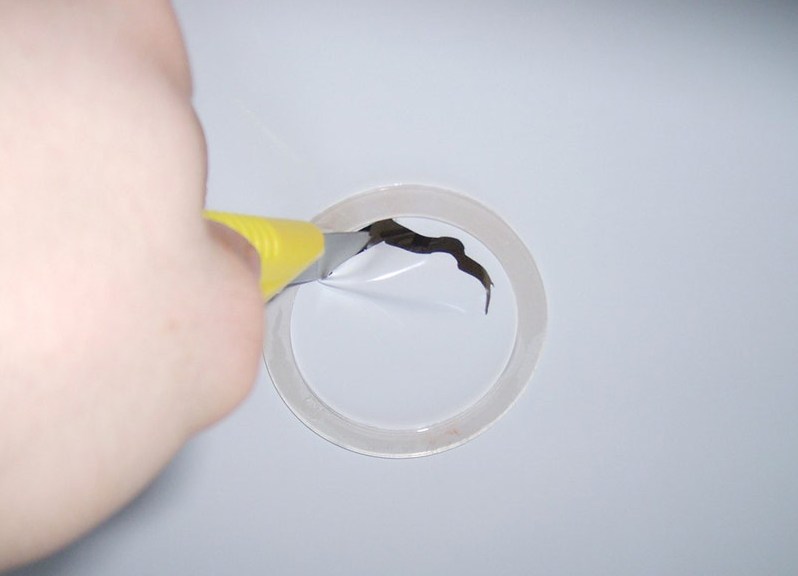
Step 7 With a sharp knife, cut out the film inside the ring.
Step 8 Bring out the electrical wires.
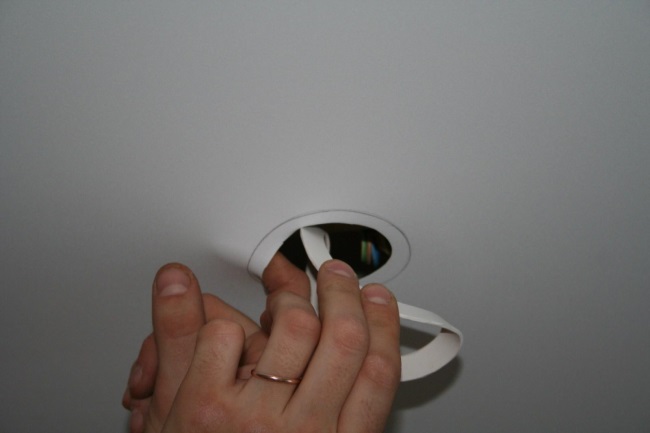
Step 9 Connect the device to the wiring using the terminals.
Step 10 Install the lamp in the ceiling.

Recessed LED ceiling lights can effectively solve the issue of primary and secondary lighting. But for long-term and safe operation, you need to know the rules for choosing and installing these devices.
Video - Which fixtures are best for a stretch ceiling
("config":("idpartner":29","siteId":162))
By using detailed instructions you can independently perform work operations without errors professional level difficulties. But we must remember that when implementing technical projects, it is necessary to accurately use not only installation techniques. The choice of suitable components, especially the operation of the equipment, is essential. This article discusses spotlights for plasterboard ceilings. Following the recommendations below will be useful to save time, Money, rational use of labor and energy resources.
With the help of these devices, experienced designers create regular and multi-colored illumination of design elements. Professional placement of devices provides good visibility in certain functional areas without wasting electrical energy. For proper application, it is necessary to accurately formulate the task, to select suitable spotlights for plasterboard ceilings. A comprehensive analysis of the state of the market, costs during installation work and during subsequent operation will be useful.
Designs of ceiling lights built into a plasterboard structure and other modifications
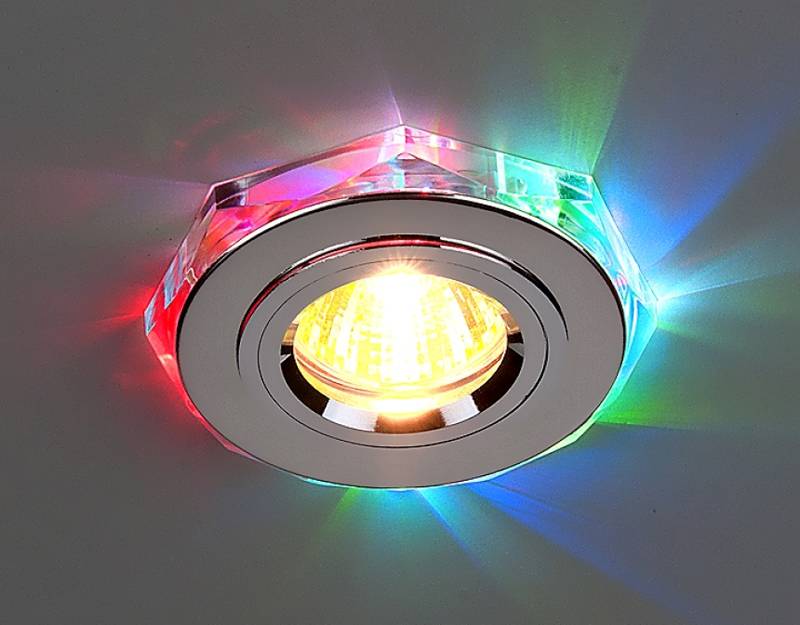
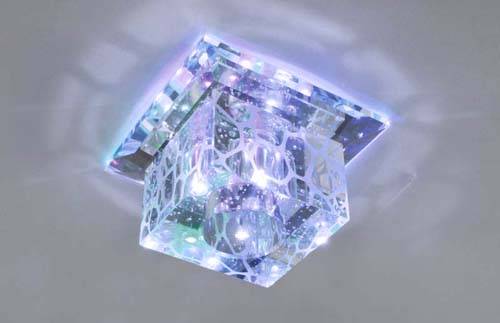
These devices are classified in the appropriate category, since the cartridges and lamps are inside the false ceiling. This design helps to use the available free space to good use. The photo shows an example with decorative crystal pendants. But if necessary, you can leave a minimum protrusion above the plane of the ceiling.
Note! The disadvantage of this solution is the difficulty of replacing failed lamps, repair. To simplify such operations, fasteners are used that do not impede dismantling.
In this option, it is enough to drill small holes in the plate for cable routing.
1 of 6

Features of different light sources
For ease of comparison, the generalized indicators are summarized in one table:
| Light Type/Image | Advantages | Limitations and disadvantages |
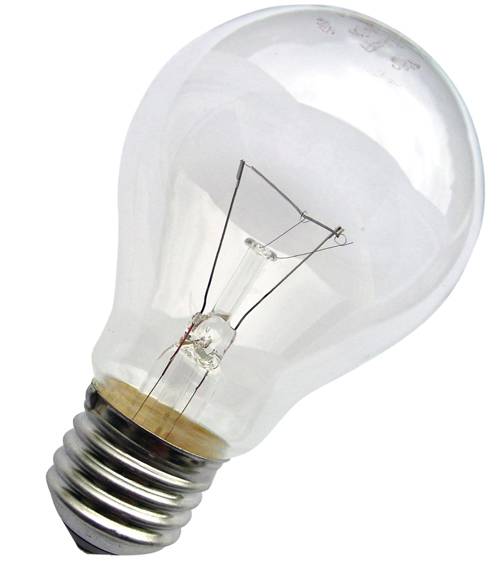 incandescent lamp incandescent lamp | Low cost | When choosing such a device, it is necessary to include in the calculations a large height (from 80 mm or more). Taking into account the dimensions of the cartridge and other parts of the structure, a significant reduction in the height of the ceilings is obtained. Additional disadvantages are: significant heating; high power consumption; significant probability of failure during voltage surges; short service life. |
 Halogen Halogen | Strong luminous flux in a miniature size | These light sources operate on a voltage of 12 V. Therefore, you will need to install an appropriate step-down transformer. In order not to disable them prematurely, it is necessary to use special devices that ensure smooth switching on. "Halogens" waste a lot of power for nothing, for heating the surrounding space. |
 Luminescent Luminescent | Reasonable price, low power consumption | The composition of the phosphors, which are applied to the inside of the flask, there are harmful chemical compounds. These devices must be handled with care. They are disposed of according to special rules. The "minus" is the large size. The disadvantages of experts include low strength. |
 LED LED | Durability, resistance to vibrations and voltage drops, high quality luminous flux | The only significant "minus" of these devices is the high cost. However, this factor should be considered taking into account the long service life and reliability. You should also pay attention to the gradual decline in prices as the popularity of products increases and the volume of production increases. |
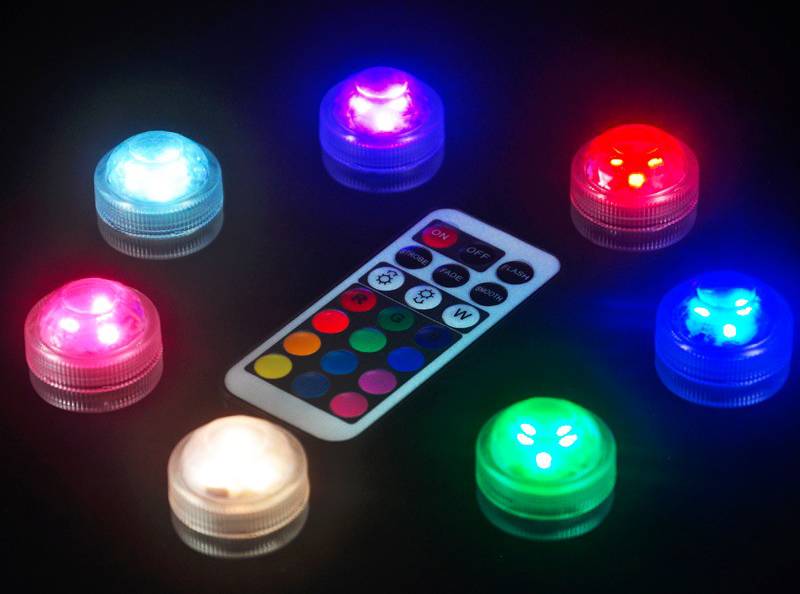
According to the program set by the user, or immediately, the color, brightness changes, the switch is performed. Such devices are connected to systems of the “smart home” category. With the addition of special equipment, their operation can be controlled via the Internet.
Related article:
How to choose the right device, what intensity of lighting is required, where to install the device, an overview of the original models - about this in the next material.
Protection from external influences
The IP standard value is used to check the suitability of the instrument for the operating conditions. The manufacturer provides these data in the technical documentation for a spotlight for plasterboard ceilings. Below are the characteristics of the different groups.
First digit (particulate protection):
- If 0 is specified, no special measures are taken in the product design. Such a lamp is installed in rarely ventilated rooms, where the likelihood of the corresponding pollution is minimized.
- The numbers 1, 2, 3 and 4 indicate the protection against penetration of objects and particles with dimensions in mm of more than 50, 12, 2.5 and 1, respectively. In particular, it can be checked whether accidental electric shock is prevented when touched with fingers.
- Designations 5 (6) confirm the presence of partial (complete) protection against dust particles.
The second digit indicates the protection against water:
- As in the previous list, 0 is the zero power.
- If 1 is given, it means that vertically falling drops will not penetrate inside the case.
- Digits 2 (3) - protected against drops falling at an angle of 15° (60°) with respect to the vertical direction.
- 4/ 5/ 6 - prevents moisture from entering inside in the presence of splashes / streams of water / jets under pressure, regardless of their direction.
- 7/8 - protection is provided when immersed to a depth of 1 meter / moreover, not for a short time / for a long time.
Note! The presence of rotary mechanisms reduces the protection from external influences. Tightness is easier to ensure in stationary structures.
How to buy recessed LED ceiling spotlights: photos, prices, recommendations
| A photo | Brand/Model | Dimensions in mm (length x width x height) | Maximum power of the device, W | price, rub. | Notes |
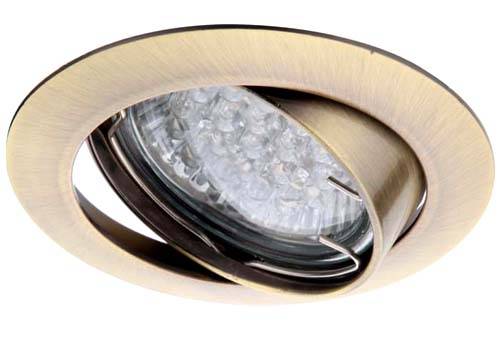
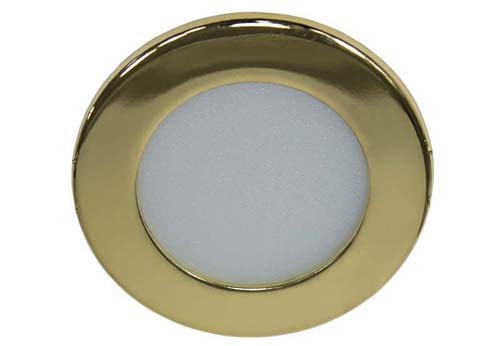 | Feron/929 | 80 x 80 x 11 | 3 | 120-150 | Aluminum case, polymeric decorative bezel with metallized coating. |
 | Lightstar/ Fungo 070214 | 70 x 70 x 65 | 3 | 170-220 | Metal armature. |
 | Arte Lamp/ Praktisch A2100PL-3AB | 80 x 80 x 110 | 1,5 | 190-280 | Swivel mechanism. |
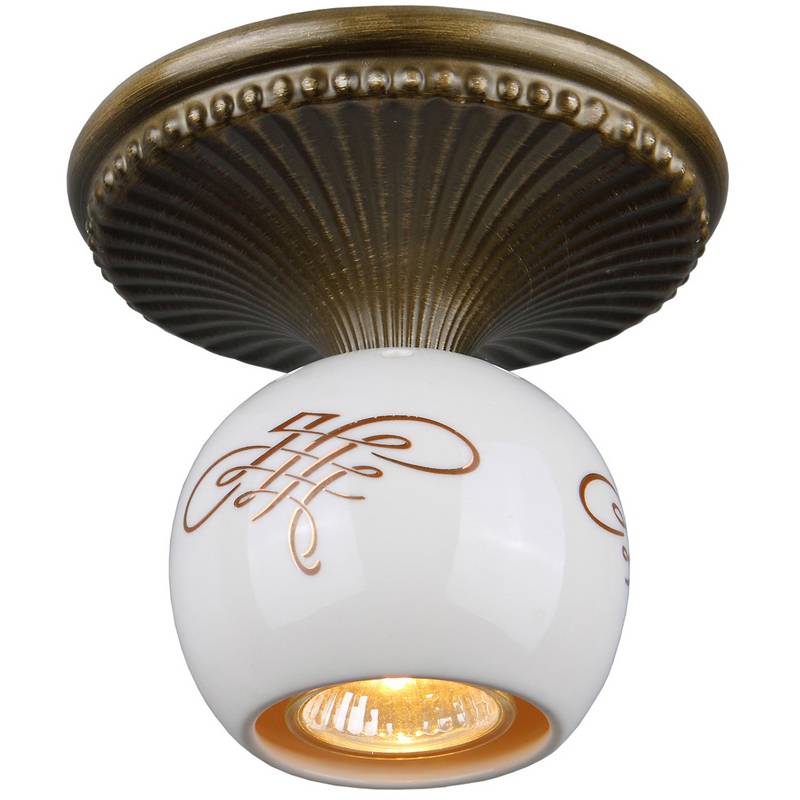
 | Arte Lamp/ Meander A1104PL-1CC | 100 x 100 x 50 | 1 | 290-360 | Crystal ceiling. |
 | ELVAN/VLS-703R-6W-3000K | 100 x 100 x 40 | 6 | 350-460 | IP44 protection. |
 | ELVAN/VLS-701SQ-18W-6000K | 180 x 180 x 25 | 18 | 860-940 | Mains supply 220 V/ |
 | Donolux/ DL18731/15W-White R Dim | 160 x 160 x 98 | 15 | 2800-3200 | The ability to adjust the brightness (dimmer connection). |
Note! It is easier to buy spotlights for plasterboard ceilings if you compare the models you like in one table, which contains the necessary parameters.
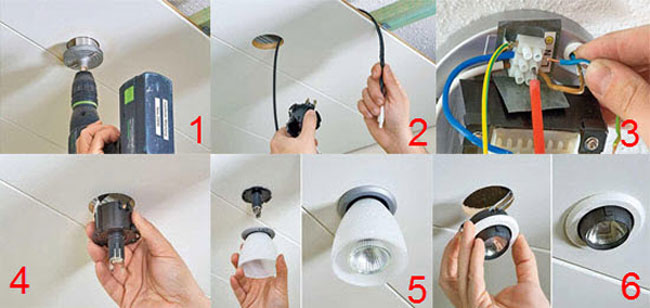
The process of installing spotlights in drywall
| A photo | Description of actions and recommendations |
 | In addition to the fixtures themselves, it is necessary to prepare junction boxes, circuit breakers, and other components of the electrical network. The cable is selected taking into account the total load. It is convenient to use for their styling. Such a shell provides additional protection against moisture, mechanical damage. If there are no built-in power sources in the fixtures, they acquire the appropriate blocks that rectify and reduce the voltage to the required level. |
 | An exact list of the necessary tools can be compiled after a detailed study of the technology. |
 | To drill holes, you will need a crown with a diameter corresponding to the dimensions of the lamp. |
 | According to this scheme, recessed LED spotlights are installed for. In order not to complicate assembly operations, 220V lines are laid in advance to the places determined by the plan. Leave free cable lengths of 60-80 cm. After fixing (with the power off), holes are drilled. The driver is connected to the extracted cable, or the device itself is connected directly. Next, fix the lamp with the help of regular fasteners. |
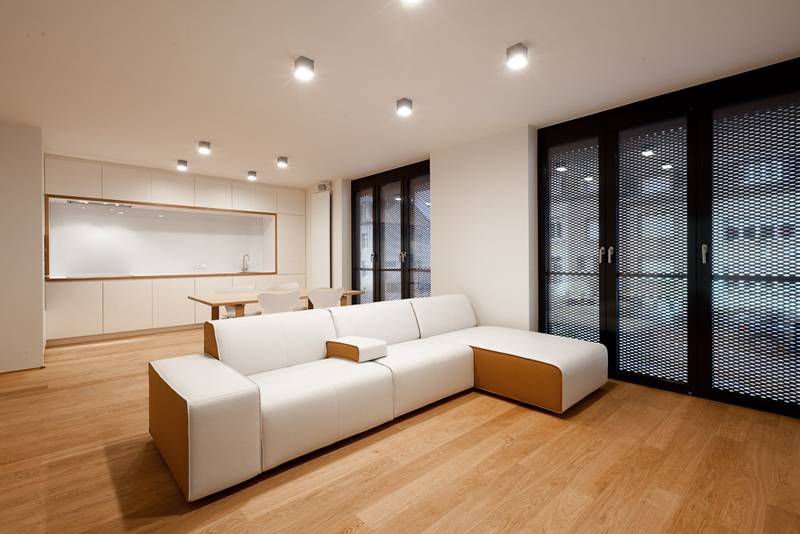
| Overhead spotlights on the ceiling are installed according to the manufacturer's instructions. With a large weight of a certain model, a special rigid base is installed. It is connected to the power frame of the crate. |
After completion of all operations, a trial inclusion is performed.
The following tips will make certain operations easier:
- The diameters of the holes in the drywall for the spotlight create a few millimeters larger than the dimensions of the devices themselves. Appropriate corrections are made if there are fasteners or other parts of the structures protruding beyond the main dimensions.
- If it is difficult to remove the cable hidden in the structure, a suitable piece of wire is used. It shouldn't be too hard. The end part is bent to prevent accidental damage to the insulating shells.
- During installation electrical circuit it is necessary to observe the established connections of zero, phase and ground conductors. Use standard color coding to rule out errors.
- Do not use twists to connect wires. Suitable universal terminals should be purchased in advance with a small margin.
- There are no gaps between the rim of a properly installed lamp and the drywall.
Article