Laminate floors are a fresh solution to old problems. Laminate floor - cheap and beautiful
About twenty years ago, a fundamentally new substitute for parquet appeared - laminated flooring, laminated parquet, or laminate. This material meets all modern requirements for floor coverings.
To lay a laminate floor on a prepared base, use a set of necessary materials and tools:
- laminate panels;
- a roll of foamed film (polyethylene film, sheet cork, corrugated cardboard) to provide waterproofing;
- special glue for connecting panels to each other;
- wooden wedges 8-10 mm thick;
- a hammer and a wooden spacer for rallying the panels;
- hacksaw for fitting panels to the size of the room.
How to properly install laminate flooring
Laminate floors can be laid in almost any room. It is important to choose the right class of laminate. The only exceptions are rooms with high humidity.The main thing to remember when laying laminate panels is that they must not be glued to the floor. When assembling, the so-called “floating” laying method is used: the laminate plates are fastened together according to the “comb-groove” principle, without gluing them to the floor base, so that they form a single surface. If laminate panels are glued to the floor, then under the influence of temperature changes, humidity and uneven load, they will still shrink and expand, due to which the coating will begin to swell or cracks will appear.
The first thing to do is to mark along the length and lay the first row of panels dry against the wall, fixing the gap between the wall and the first panels of at least 8 mm. For this purpose, wedges are inserted into the gap between the wall and the panels. Then you need to fix the nail at the junction of the wall and the floor slab. Do the same on the opposite wall. A thread is pulled along the edge of the fitted panels, which will help keep the first row straight. The first row of panels must always be tongue-and-groove against the wall.
After the fitting is done, remove all panels and spread a layer of film for the first row. Foamed polyethylene, special paper, felt, cork coating can be used as a special substrate. The substrate is necessary for cushioning the coating when walking on it, as well as for sound insulation (so that the floor is not “voiced”).
It is not recommended to cover the entire room with a film at once, since the spread sheets will move during operation, they will need to be constantly corrected.
Then the tube of glue is opened and a portion is squeezed into the end groove of the first panel in such an amount that the glue fills the groove, but no more. The end tongue of the next panel is inserted into the groove filled with glue and so on until the end of the first row.
On a stretched thread, you need to check the evenness of the row, the deviations are corrected with wedges, driving them deeper or raising them. When the panels of the first row are laid, you need to let the glue "grab" for an hour and start laying the second row. The end seams of the second row should be at least 30-50 cm away from the end seams of the first row.
After laying 4-5 rows of panels, you need to lay the next layer of film. Laying is carried out with an overlap of at least 5-10 cm. In the place of overlap, it is desirable to grab the sheets with glue (“spot tack”).
In the process of laying the laminate, it may be necessary to design pipes adjacent to the walls. For this, special cutouts are made in the panels. The gap between the pipe and the cut out section of the panel is eliminated with glue.
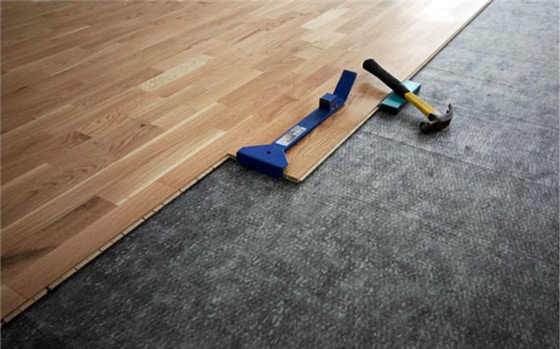
The rallying of panels during laying can be done both with a hammer and with the help of special devices.
To lay the last board, you need to accurately measure the distance between the wall and the penultimate board. To do this, the last board is laid on the penultimate one from above. The top board must be pushed close to the wall with a plug-in spike.
The board is carefully measured and sawn off with a hacksaw.
Laminate flooring can be installed in any living space except the bathroom.
AT recent times a laminate of bright colors appeared, coatings with ornaments and images of various objects, say, fruits. Some firms offer to decorate the laminate floor with various borders and decorative inserts.
The surface quality of the laminate has also changed. Usually it is matte, but recently a glossy laminate with a shiny surface has appeared on sale.
Laminate floor care
Laminate floors are recommended to be swept or vacuumed. Periodically, it can be wiped with a damp, well-wrung out (not wet) cloth.The surface is treated with polish 1-2 times a year to prevent moisture from entering the seams between the panels.
Stubborn stains, such as those from nail polish or felt-tip pen, can be removed with acetone (nail polish thinner) or a gasoline-based cleaner.
Do not use caustic cleaners, mastic or parquet care products.
Trying to paint a laminate floor with any kind of varnish or paint is pointless.
Methods for fixing laminate panels
The method of attaching laminate panels largely determines the durability and quality of this flooring as a whole. Until recently, when laying laminate, the plates were fastened together according to the “comb-groove” principle using a special glue. The result is a durable coating. However, this method also has disadvantages, for example, the adhesive loses its properties over time, and this can lead to the formation of cracks. And in the case when it becomes necessary to replace a separate laminate panel, it is almost impossible to do this: the panels are connected to each other quite firmly, and breaking off one can break the entire structure.A few years ago, one of the leaders in the production of laminate flooring, the Belgian company Unilin Decor, released the QUICK-STEP UNICLIC collection, which eliminates the use of glue when laying. The collection got its name thanks to the original and unparalleled UNICLIC system - a special design of the tongue and groove in the panel. The system allows you to firmly connect the panels to one another with a simple click without the use of glue. The choice in favor of the UNICLIC system, which provides a number of advantages that make the job much easier, is obvious. Now you can lay QUICK-STEP neatly and quickly.
This method has many advantages:
- quick installation: just click the panels into each other;
- neat work: no fussing with glue and no glue stains;
- you can start laying from any corner of the room;
- work in any direction: from left to right or in the opposite direction, which is ideal for left-handers;
- no visible joints: the tongue and groove fit together perfectly;
- exceptional moisture resistance: the laminated coating has no visible joints, and it uses a special additional layer impregnated with a water-repellent composition, which improves the moisture-proof properties of the floor;
- reusable: QUICK-STEP panels are made from materials that can be reused for many years;
- no need to wait for the glue to dry, so the QUICKSTEP floor can be walked on immediately after installation;
- suitability for re-laying: when moving, the floor can be taken with you, the laminate flooring is so durable that it can be re-layed several times;
- the possibility of correcting probable errors in the laying process.
Glueless laminate mounting systems are also called lock or prefabricated. The interlock connection allows to significantly reduce the installation time of the laminated floor and improve the quality of the assembly itself, since it eliminates the possibility of gaps during installation.
Thanks to a special latch profile, the panels are securely fixed during this laying without forming gaps. No glue or special tools needed.
One of the types of interlocks is a connection using an aluminum profile mounted on a laminate and a special profile groove cut into the core of the panel.
At the stage of purchase, “castle” laminates are more expensive than “adhesive” ones. But at the laying stage, the situation changes dramatically. The cost of laying a “castle” laminate is two times cheaper compared to a “glue” one (besides, you don’t have to spend money on glue).
Laminate coating novelties
Manufacturers of laminated coatings pay great attention to its functionality.For example, the Austrian firm Kaindl has created its own adhesive-free laminate installation system, the so-called SNAP system (“snap-snap” literally means “snap-snap”). In this case, neither glue nor special tools are used, just click - and you're done. In addition, for the SNAP series, manufacturers have developed a special HDF AQUASTOP 6 carrier panel with increased resistance to moisture penetration into this coating. If earlier only locks were “water-repellent”, now the whole system is protected from water: both panels and locks.
Other novelties of the Austrian company Kaindl also deserve attention - a new design of the BIG FOOT laminated flooring. Now the panels are produced in a larger width - 331 mm instead of 195 mm, as before (glueless SNAP connection system). In addition, this series has a new herringbone pattern, which was not previously used in laminate (the deck pattern was most often used).
The Norwegian company AllocAS now produces a whole series of advanced laminated coatings: ALLOC COMMERCIAL, ALLOC ORIGINAL, ALLOC UNIVERSAL, ALLOC HOME. One of the main achievements is the ALLOC fastening system (which means "aluminum lock"). This lock is able to withstand a load of 1200 kg / m, and this is considered the best result in the world of laminate.
ALLOC UNIVERSAL laminate from Alloc AS can be called a super novelty. In this creation, the company's specialists have combined all the new achievements: an improved fiber lock (works like aluminum), made from the same material as the base, durable HDP with a wax water-repellent coating. This mount will be able to withstand up to 860 kg/m.
Now many companies working with laminate prefer to use a new, more advanced type of substrate - from a soft elastic material. For example, AllocAS calls this supermaterial SILENT SYSTEM. Its main advantages are that, due to its density, it absorbs noise 5 times better than a conventional substrate, and, in addition, it is a non-combustible material.
Floors are the most important component of an apartment or house. Twenty years ago, many people only heard about parquet or linoleum, but in our time, a completely new type of coating has been developed, which is called laminate flooring. Laminate can be laid in any of the rooms - bedroom, nursery, living room. And the installation of a laminate depends on the class of coating and its physical characteristics.
Replaced natural materials for the floor came modern coatings- laminated parquet. The Swedish company Perstorp is considered the creator of the laminate. The coating was developed by the specialists of this company for the working surface of kitchen furniture. The term "laminate" combines two names - melanin, from which the coating is made, and lamination, that is, a method of processing melamine.
Construction of laminate elements
Laminate floors look just like parquet floors, and their technical properties are much better than other similar materials. A significant advantage is the fact that laying a laminate floor is much easier than, for example, parquet.
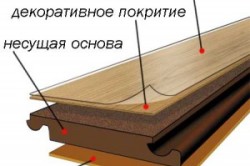
By itself, the laminate is paper that has a strong wrapper, so moisture is terrible for the coating only at the joints - that is, on the sides. The laminated floor consists of several layers. The top layer is represented by a transparent wear-resistant film with a digital index. Classes number 31-33 are designed for a service life of about 20 years. Class 34 is currently under development, and it is planned that it will serve for life.
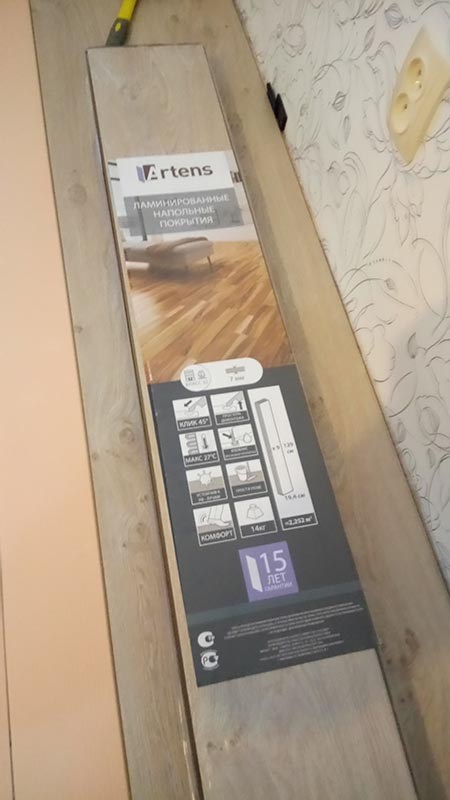
Next are several layers of paper impregnated with resins. Here is a drawing on it, which affects the aesthetic value of this coating and consumer choice. Below is the carrier layer, consisting of fibreboard significant density with moisture resistant impregnation.
In this layer there is a lock, which is intended for attaching laminate plates to each other. Thermal insulation, sound insulation, durability of the future floor depends on the density, thickness and quality of the slab. The lock, in turn, allows you to easily remove and replace the damaged part of the laminate floor if the need arises.
The best locks are able to withstand loads up to 1200 kilograms per meter. An acceptable result is 700-900 kilograms per meter. The fourth layer is a substrate that is highly soundproof and completely absorbs sounds.
Floor preparation
Self-laying of a laminated floor should be started only after electrical and finishing work, pasting wallpaper or painting walls. When performing such work as installing laminate, a video and photo gallery will help you understand the meaning of the procedure. Before laying the laminate with your own hands, you need to carefully examine it. Marriage is all elements with scratches and chips on the surface, with defects in the lock and violation of the varnish layer.
Be sure to check that the substrate for laying the laminate floor is flat and dry. The coating can be laid on PVC flooring, linoleum and parquet, but it is important to prevent cracking and peeling. If you plan to lay the laminate on concrete, then its moisture content should not be higher than 2%.
Laminate floor plank options
It is strictly forbidden to place laminate on carpets. To avoid squeaking of finished floors, it is necessary to put a so-called carpet layer between the laminate and the old coating, which is felt paper or foam padding. If a concrete surface serves as the basis for laying, then an additional polyethylene film or a polyethylene foam substrate should be laid on it for the purpose of waterproofing.
If necessary, additional leveling of the floor should be carried out using a special mixture. The floor must be vacuumed, all irregularities and tubercles cleaned, and only after that the self-leveling mixture should be poured, during which it is recommended to ensure that no sagging is formed. It is necessary to knead the mixture a couple of hours before laying.
How to install laminate floors
Laminate floors are installed in various ways, the choice of which is dictated by the specifics of the locking system, as well as the use of adhesives or the rejection of them.
Installation according to the principle "bar to bar"
Laminate flooring can be laid using the “plank to plank” technology, which consists of the following steps:
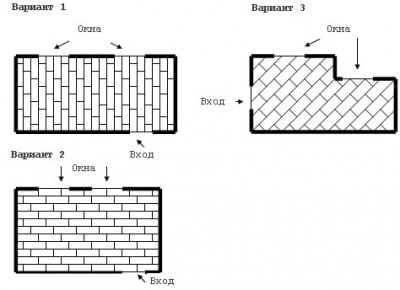
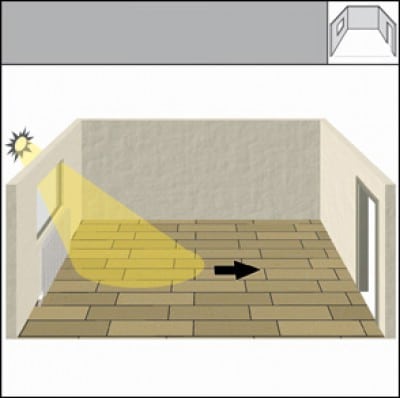
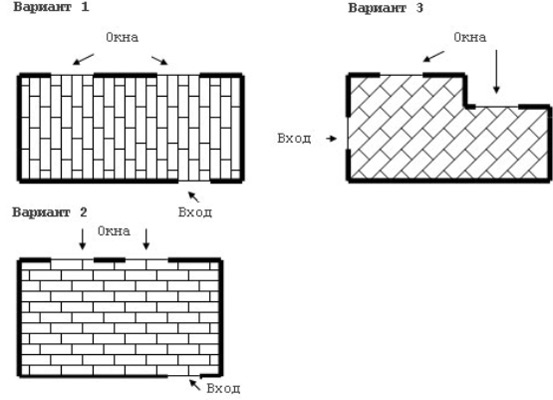
- It is worth laying the laminate, starting from the most distant corner from the entrance to the room. The long sides of the panel should be directed parallel to the light rays falling from the windows. Thus, the sides of the panels will be parallel to the walls of the room. If the room has a round shape, you need to navigate only by the light.
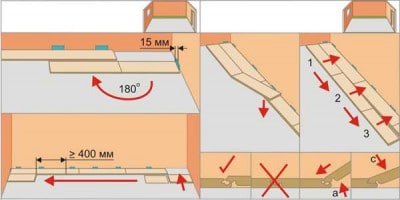
- The gaps between the walls and rows of panels should be based on the following ratio: 1.5 millimeters of gap per 1 meter of the room, which in general should not be less than 10 millimeters.
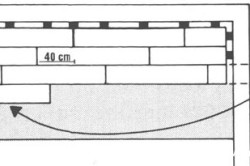
- Next is to determine the width of the last row. To do this, it is worth measuring the length of the room, taking into account the gaps. If the width of the last row in the calculation is less than 5 centimeters, it is necessary to cut the boards so that the first and last rows have the same width.
- Wedges are placed at the walls, which correspond to the size of the gaps.
Laying flooring with "Click" locks
In this case, it is worth throwing aside all the tools. For laying laminate with "Click" locks, it is worth:
- Take the second panel at an angle of 30 degrees, insert the product into the end groove of the previous panel and, pressing the second panel to the floor, snap it into place.
- Move the end seams of the third row by 30-40 centimeters in relation to the seams of the previous row. The rows are laid with a piece of panel that remains from the previous row. If the first piece is less than 4 centimeters long, it is recommended to cut a new piece equal to half the panel. The surface is laid in a checkerboard pattern, which ensures even distribution of pressure on the panel.
- Raise the second row and insert it at an angle of 30 degrees into the groove of the first row. The most important thing is not to stop the process until a familiar click is heard.
Installation of laminate flooring with a click-type lock
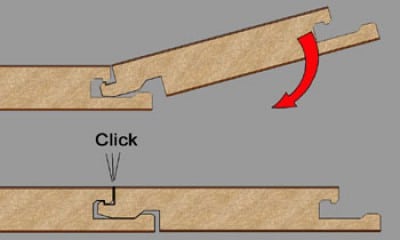
The process of connecting the slats with click locks continues until the sound signal - click
Floor device with "Lock" locks
Do-it-yourself installation of laminate with "Lock" locks is considered the most economical option. The changes relate to the first paragraph of the previous instruction: you need to connect panels that are located horizontally. The grooves also match. The panels are attached to each other by hitting a wooden bar with a hammer, which is attached to the opposite edge of the attached panel. You should hear a "lok" sound.
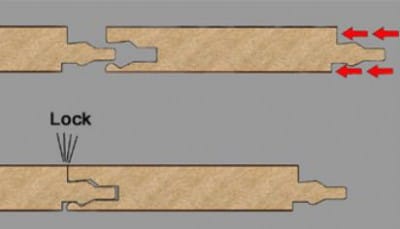
An audible signal should also inform about the completion of the connection of the strips with the “lok” lock
If you decide to install the laminate on glue, then you should purchase a good water-repellent glue. Laminate flooring is laid in a floating way, which means connecting individual elements along a tongue and groove. Coating to subfloor not firmly fixed.
For every 12 square meters, about half a liter of glue is consumed. It is applied in excess, without saving, to the entire length of the groove of each next panel. Next, you should carefully arrive until the sound of "plyam-plam". Using a damp cloth, remove excess glue, which serves to protect the joints from moisture ingress and allows you to disassemble the coating if necessary.

You should not save money by buying cheap glue, the composition must be selected in accordance with the recommendation of the laminate manufacturer
It is better not to use cheap PVA glue, because it will only bring a deplorable result, after which you will have to buy a new laminate. Before starting operation, the coating must be given a break of 10 hours.
Proper and competent installation of a laminate with your own hands implies preliminary preparation: the material should be placed in a room with a temperature of at least 18 degrees and a humidity of about 75%. Before laying the first row, it is worth pulling the rope along the wall and aligning it.
If the room has an uneven wall, then the first row of laminate flooring should be cut along the contour of the wall. If the work is done with a conventional saw, then the material should be laid face up, using a circular saw - face down. When laying a laminate floor, you should focus on the first two rows. And they should be equal.
Laminate is perfectly protected from dust, for cleaning you just need to vacuum the floors. However, the material must always be dry, and if something suddenly spills on it, you should immediately wipe off the liquid. When cleaning a laminate floor, it is highly undesirable to use abrasive cleaners, as they can damage the top decorative layer of the laminate. In addition, heavy furniture should not be moved along the floor, because this negatively affects the decorative layer of the laminate.
Installation of a laminated floor with locking joints requires compliance with the technological sequence of laying the planks, which is shown in the video clip:
So, you managed to install a laminate floor with your own hands. If during this process you followed the above instructions, then you should get a very attractive coating that will serve you faithfully for many years.
- Foundation preparation
- Required Tools
- Choosing laminate flooring
- The process of laying laminate panels
Traditional hardwood floors have been replaced by modern flooring. Laminate is considered the youngest of them. Youth did not prevent him from gaining well-deserved popularity and love of consumers. This material is durable, has many textures and color shades, easy to lay on a flat floor.
Laminate floors are laid on such bases: wood, concrete, linoleum, tile.
A beautiful laminate floor is able to mount every owner of the home.
Thanks to a special locking system, it is very easy and simple to place on a well-prepared base. The work of an amateur master will be no different from a floor laid by a professional.
Foundation preparation
Laminate floors are laid on a base of concrete, wood, linoleum and tiles. The concrete screed should dry out within 25-30 days. A layer of polyethylene and a substrate are subsequently laid on it.
The wooden base should not have mold, fungus, pests. Floorboards additionally need to be screwed to the logs using screws or self-tapping screws. Damaged boards must be replaced. Differences and irregularities are eliminated by scraping.
On top of the base, you can lay thick plywood or chipboard. Polyethylene on such a base can not be laid, but the substrate must be made necessarily. The backing material is polyethylene foam or cork. It is sold in rolls. The roll is rolled out on the floor perpendicular to the direction of laying the coating panels. All joints between the canvases can be glued with tape.
Flat tile and linoleum floors do not need a polyethylene vapor barrier. After laying the substrate, the laying of the laminate begins directly on the floor. Do not lay laminate panels on soft carpet, in rooms with high humidity, on cable line warm floor, glue it to the base.
Back to index
Basic rules for installing laminate
- To ensure a long service life, the laying of the laminate is carried out only on a prepared base, which must be even and smooth. Irregularities and slopes should not be more than 2 mm per m.
- Panels must be kept indoors for 48 hours. This is necessary for their acclimatization. Material with dents and chips should be discarded.
- Laying the laminate should be carried out at a room temperature of 15-30 degrees.
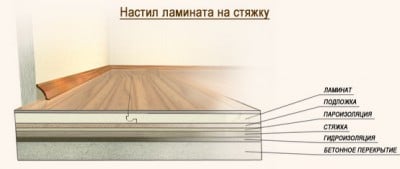
- To protect the flooring from moisture and steam, a polyethylene film and a polyurethane or cork substrate 2-10 mm thick are laid on the floor base. The most commonly used material is 3 mm thick. Sheets of polyethylene film 0.15-0.2 mm thick are overlapped, which is 20 cm, the joints are glued with adhesive tape, an overlap of 10-15 cm is made on the wall.
Back to index
Required Tools

Tools necessary for work: hammer, pencil, ruler, jigsaw, wedges.
When laying a laminate with your own hands, the panels are most often placed in a direction parallel to the rays of light passing through the window. For the implementation of some design solutions, laying perpendicular to the light, as well as diagonally to the room, is possible. With any method, the coating is laid apart. Transverse joints in adjacent rows should be at least 30 cm apart.
Laying usually begins from the far left corner of the room from the door. First spread on the floor substrate. A distance of 10-15 mm is left between the wall and the laminate. For this, special wedges are used, which are removed after laying. This gap is made to compensate for the thermal expansion of the laminate flooring.
First, a row is laid in whole panels along the wall of the room. The last panel is sawn to size. If the cut piece is more than 30 cm long, then it can be laid at the beginning of the next row. This method will provide a gap between the joints. The floor can be used immediately after laying the laminate and installing the skirting boards. Skirting material - wood or plastic.
When fitting the boards of the last row, you can use a fine-toothed hacksaw or an electric jigsaw. If glue applied to the edges was used during installation, then it must be allowed to dry for the time indicated on the package. The adhesive method is used quite rarely. Such a floor does not require special care. It is simply wiped down with a damp cloth. Do not leave puddles of water on the surface of the laminate. This ruins it.
Laminate is a relatively new material. He replaced the expensive parquet. The coating is beautiful, durable, wear-resistant. New technologies have made it possible to obtain a material that does not require special care. Do-it-yourself laminate flooring is not difficult. Even a beginner can lay it down.
Laminate flooring - cheap and beautiful!
Let's consider this situation together - while designing your future home or planning the repair process, you have a difficulty on the way: What kind of floor covering will best correspond to modern concepts of style, beauty, and will be perfectly combined with other interior details? And it won’t hit your pocket too hard, is the money already running out?
If you seek advice from an experienced designer, you will most likely get the answer that such a coating is a laminate. This will be the answer in most cases. But why did the choice of a qualified specialist fall on such floors?
Why laminate flooring?
The most important thing is that the laminate is a very popular material, because the range of different options for colors, shades, textures, textures and design solutions is simply huge. You will not face difficulties and will not encounter any obstacles in choosing the right laminate flooring for your apartment. Is it too a large number of Variations in which it is not difficult to get confused. Absolutely nothing, except your imagination, limits your choice. In addition to the classic and most common types of laminate surface, you can also find laminate with author's textures, funny patterns, stylized as any other, unnatural and unusual material, be it glass or steel sheets with rivets. Laminate is an excellent tool in the hands of the designer and for those who simply want to create a unique, indescribable atmosphere in their home on their own.


Let's talk about the advantages of laminate
What are the advantages besides appearance, possesses this wonderful floor covering?
Among the main advantages I will highlight the following:
- ease of installation;
- affordable price;
- a large selection of colors and textures;
- a huge number of stores where you can order a laminate;
- at correct operation can serve for many years;
- possibility of combination;
- can be used even if there are pets in the house.
I think this is not an exhaustive list, everyone can still determine a number of advantages of a laminate floor for themselves.
What does it consist of?
We will not delve into the process of laminate production, we will leave it to specialists, we will only superficially consider how the laminate is arranged. Each of the layers of the laminate panel, or as it is also called lamellas, performs its role. The top layer is protective, it serves, as you might guess, to eliminate and shield any harmful effects on other layers of the flooring. He is not afraid of humidity, temperature changes and mechanical damage. The next layer is decorative. It performs the most important and noticeable function - it contains a pattern or texture. Other layers are needed to give the floor stability and ease of installation.
The use of laminate flooring justifies its cost many times over. You will not regret such an acquisition, because beautiful and high-quality floors will delight you with their amazing and interesting appearance for many years. 
It is extremely quick and easy to form a floor in a room using a laminate. The shape and configuration of the floor elements (lamellas) has long been well thought out. So even an unprepared person will be able to mount it. The ease of cutting and combining the material allows you to quickly and efficiently lay the flooring in rooms with a complex layout. It just needs to be strictly followed. simple rules, and laying a laminate with your own hands does not take much time and effort.
Operating conditions of the laminate
Before you start laying laminate flooring, you should make sure that it is suitable for your conditions, and that all the necessary conditions for its use.
Laying the laminate should be carried out in heated rooms without sharp fluctuations in temperature, high humidity. For durable operation, the temperature in the room should be maintained within 15-30 degrees, humidity from 40 to 70%. The basis for the laminate can be either a concrete base with maximum height differences not exceeding 2 mm per meter, as well as strong slopes of more than 4 mm for every two meters. If there are significant irregularities, then it is necessary to level the floor under the laminate using the formation of a floor screed, or a self-leveling floor system, thereby eliminating the problem, because laying a laminate on an uneven floor is unacceptable. This will lead to its rapid deterioration.
It is strictly not allowed to install a laminate on top. If they are combined, the laminate elements will dry out and. Moreover, it is unacceptable to heat the laminate from below over 27 degrees. Can be used as underfloor heating hydraulic systems. They allow you to evenly distribute heat and do not overheat the laminate. The distance between the underfloor heating elements and the bottom edge of the laminate must be at least 3 cm.
![]()
So, all the requirements are taken into account, and the base of the floor is prepared, you can start purchasing materials and preparing the necessary tools.
What do you need to install laminate flooring?
The design and technology of laying flooring using laminate is extremely simple. On a prepared even base, a polyethylene foam laminate substrate is spread and flooring elements are laid on top of it. In this variant, laying is carried out on wooden floor. For concrete base you will also need waterproofing, which is placed under the foamed polyethylene. In this capacity, a special membrane or simple polyethylene with a thickness of 200 microns is used.
Considering all aspects of laying the floor, the following materials will be required:
- primer;
- laminate;
- foamed polyethylene;
- polyethylene film;
- wedges to provide technological gaps;
- glue;
- fixings for plinth;
- plinth.
Wedges can be purchased specifically for laying laminate. This is the same affordable and cheap solution as the crosses that are used when laying ceramic tiles. If you don’t want to buy them too, you can use pieces of drywall, wooden pegs, or trimmings of the laminate itself. The size of the wedges should be the same and be about 10-15 mm.
The glue will not be used to secure the laminate to the base, but only to adhere the elements in those places where the provided hooks and edges of the laminate itself are used.
As for the substrate for the laminate, then.
The amount of laminate should be purchased with a small margin. With all the simplicity of its use, no one is immune from errors in which several elements may be damaged. This is especially true for moments when it is required to cut lamellas in places where the wall bends or where communications exit.
Advice: Please note that different manufacturers in the package may differ in the number and size of lamellas. Most often, this is the amount required to fill 2 m², however, there are options for 2.7 m².
From the tool you will need the following:
- tape measure, building corner;
- construction knife;
- pencil;
- hacksaw or jigsaw;
- wooden block;
- a hammer.
When everything is purchased, you should put all the materials in the room where they will be mounted and let them lie down for two days. This is necessary in order to match the temperature and humidity of the materials. Under no circumstances should this process be neglected. Next, we will figure out how to properly lay the laminate on the floor, taking into account all the possible difficulties and important points.
Laminate installation process
The base of the floor is thoroughly cleaned of debris and dust. It is best if it is possible to remove dust with a construction vacuum cleaner. The entire surface is primed. This also applies to wooden floors and concrete screed. Wooden floors are treated with an antiseptic in addition.
For purified concrete surface waterproofing film is laid. In this case, the strips of material are laid with an overlap of 20 cm and the joints are glued with adhesive tape.
Next, lay the foamed polyethylene. Laying the laminate will start from a source of natural light, that is, from a window. You can lay the lining under the laminate only on the area of the floor where the flooring is currently being done, and then report as you go. This will help maintain its integrity and cleanliness during self-laying. The substrate under the laminate should be on the walls, approximately 2-3 cm, thereby forming a depreciation band. Subsequent strips of foamed polyethylene are applied end-to-end to the previous one, and glued with adhesive tape.
Important: There is a laminate, which already has a soundproofing substrate in its composition. Under such a laminate, you can not put a lining made of foamed polyethylene. Only in the case of a concrete base is a waterproofing layer formed.
The installation of the laminate begins with the laying of the first lamella in the corner of the room from the side of the window, and pegs are inserted between it and the wall, including from the end. Next, solid strips are added to the row to the end. It is important to correctly connect the elements.
There are grooves at the ends of the lamellae. Evenly, without distortions, the next lamella is brought in at a slight angle and tightly inserted into the already installed one. You should not make noticeable efforts or use a hammer to clutch. The remaining distance to the wall, if a single piece does not fit, should be filled with a segment.
To do this, turn the lamella over along the short end and place it on top of the laid floor elements so that it rests against the wall. On the reverse side, which is now on top, a cut line is marked. Do not forget about the necessary clearance to the wall of 10-15 mm when marking. Using a jigsaw or a hacksaw, a lamella of the required length is cut. After that, it is inserted into the general row.
The second row begins with a piece that remains from the previous row, but only if it is at least 30 cm. Otherwise, half of the new lamella is cut off.
All elements of the second row are stacked initially without snapping the lock with the first row, but only hitting it over the edge of the end. The entire row is joined, like the first, and only after that, slightly raising the elements of the second row, they are brought all the way into the lock and snapped into place along the entire length. It is not recommended to use a hammer, however, to eliminate stress in case the lock is not fully latched in some places, you can attach a wooden block to the outer end of the laminate strip in this place and tap lightly with a hammer so that the rows fit tightly.
Thus, the entire space of the floor is filled. Particular attention is required only for places with protrusions or bends of the walls and the outlets of communications or heating pipes.
Diagonal laminate flooring
It is quite possible to lay the laminate diagonally. This creates a kind of effect. visual magnification rooms that can be used in the implementation of non-standard design solutions. The main disadvantage is, of course, the increased consumption of material. Approximately can be calculated required amount laminate, adding another 7-8% to the area of the room.
The preparatory steps are the same as for normal installation. To begin with, a corner near the window is selected. From the corner it is necessary to stretch the fishing line strictly at 45 degrees to the walls. On this fishing line, it will subsequently be possible to navigate and align the laying of the laminate.
Cut the edges of the first strip at an angle of 45 degrees. It is laid in a corner with the obligatory installation of wedges for a thermal gap. Next, two strips of laminate are already taken, and they are measured so that the joint between them falls in the middle of the first row, and the edges, cut at 45 degrees, come to the wall with a gap.
So the entire space of the floor is filled. You can focus on the fishing line and the joints of the previous rows, first lay out all the whole pieces, and only after that do cutting and filling in the areas near the walls. This will get rid of unpleasant situation, when the walls “walk” slightly and, if you push off from them, a run begins to appear at the junctions of adjacent rows.
The nuances of laying laminate
Almost nowhere is there a perfectly flat room without all kinds of protrusions or outlets for heating pipes, communications, etc. In such places, it is required to cut curly elements from the elements of the laminated floor. For this, a jigsaw, a construction knife, a construction corner and a pencil are used. Next, we will consider options for how to lay a laminate with your own hands in places with pipes or protrusions on the walls.
Heating pipe bypass
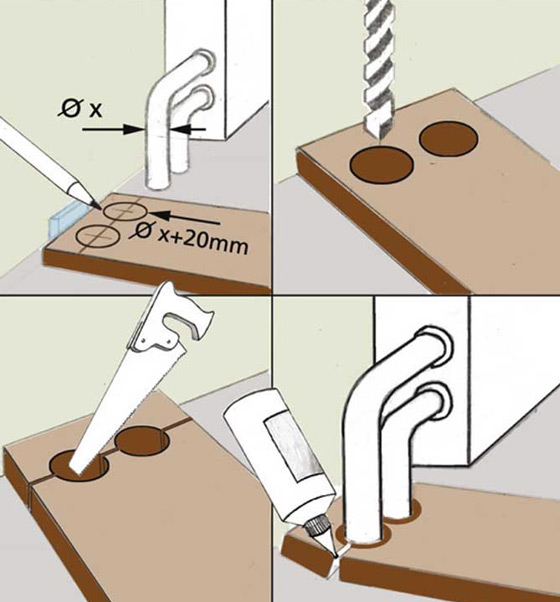 As in the case of trimming the lamellas, we turn it over in length and apply it on top of the already laid ones. With the help of a corner, we mark on the lamella the lines of the pipes in width. Next, we apply the lamella to the side of the pipes and rest through the peg against the wall. In this position, you can mark the second mark with a building level, that is, the distance from the pipes to the wall. As a result, we get places with the intersection of lines that determine the position of the holes for the pipes.
It's best to drill the holes first. For this, special drills called ballerinas are used. The diameter of the holes is larger than the diameter of the pipes, and there can be two options: simply insert a lamella with a gap around the pipes or use special plastic inserts that are sold in hardware stores for laminate. In the second case, the holes are made according to the size of the inserts.
The next step is to cut off a part of the lamella across, focusing on the middle of the hole. It turns out two pieces of lamella. One piece is inserted between the rest of the floor and the pipe, and the second is applied between the wall and the pipe. For reliable fastening of the elements, glue is used, which should be applied only to their ends. Then they hug each other.
You can hide unsympathetic cutouts with decorative pipe lines.
Bypass wall ledges
For laying lamellas, the edge of which rests on the unevenness on the wall or its turn, cut the required shape directly along the lamella. This is easy to do with a jigsaw. Some feature may be a situation where the barrier is a column or ledge sheathed with plasterboard or plastic, as well as places under central heating radiators. In this situation, it is advisable to cut the bottom of the sheathing and bring a laminate board under it up to the base of the wall, observing the gap.
In order to correctly get the end of the lamella under the casing or radiator, you will need to slightly tweak the lock on the adjacent lamella. The protruding edge is carefully cut off at the bottom of the end. Thus, there is no need to lift the entire slat in order to snap the lock into place. However, the strength of the connection suffers. So before joining, the joints of the lamellas are smeared with glue and pressed tightly against each other.
Large area laminate flooring
If the dimensions of the room exceed 8 by 8 meters, then it is necessary to form expansion joints. To do this, special profiles are used, which are mounted on the floor between two sections of the laid laminate that are not connected to each other. At the same time, the upper part of the dividing profile is an overlay, the same as used for thresholds in doorways. This is due to the same thermal expansion of the material and the need to limit the maximum area of a single bonded section of the laminate to reduce the total deformation. The same profile must be installed along the boundary of the separation of excellent loops within the same room.
Completion of laminate flooring
After the entire floor space is filled and installation is completed in all difficult places, you can remove all the wedges around the perimeter of the floor and trim the edges of the substrate that are too protruding. Only 1-2 cm should be left on the wall as a shock-absorbing belt. Then it remains only to hang the baseboard, and the floor in the room will be ready.
Installation of skirting boards
The main feature of installing skirting boards on a laminate is the lack of attachment to the laminate itself and the floor. Along the entire perimeter, the plinth is attached exclusively to the wall. Different versions of skirting boards also require different ways of fastening, so it is worth following the instructions provided by the skirting board manufacturer. It is only worth noting that the plinth completely follows the contours of the walls. So if they are not particularly smooth, then it is better to use the plastic version. Wooden skirting boards are only suitable for perfectly flat walls. As a result, a gap will not form, which will only spoil the appearance.
When laying wires under the baseboard, it should be fixed in special grooves, preventing them from falling into the gap between the wall and the laminate.
In conclusion, it is necessary to provide the legs of all furniture that will be located on the laminate with special soft felt pads. Comply with all rules for keeping the laminate in good condition. Avoid excessive exposure to water and moisture. Then such a floor covering will last a long time.
Video: an example of laying the substrate and laminate with your own hands


