Do-it-yourself LED lamp repair: design, diagram
I would like to share my experience of using automotive LEDs instead of light bulbs.
Over the years, I've probably tried everything I can think of.
For your judgment, I present a small collection of LEDs, unfortunately many photos do not fit here, so I will throw an example of how they shine in a car in the form of links to a record where there are pictures.
The time has come when light bulbs are already a thing of the past, and in stores huge selection LEDs, but you never know what quality they are until you buy it yourself and experience it.
.
Why do diodes die quickly? here are a few options.
1. Poorly selected components, because of this, either diodes or resistors burn out. Indeed, in a car, the voltage of the on-board network with the engine running is 13.5-14.3v, and this is a bit too much for LEDs, the components are selected mainly for 12v of stable voltage, so if you want them to work for a long time, put a voltage stabilizer, you can use our Russian ROLL (roll) , or more expensive and modern.
2. Moisture, if moisture gets into the LED, then that's it, it will die soon. Of course, there is no competition for ordinary light bulbs here.
3. Interruptions in the operation of the generator, then you can notice how a little light flickers in the car (ordinary lamps), then the generator should be repaired immediately.
.
And my collection looks like this, it shows T10 and T5 socle LEDs and other models (I’ll talk about them below), voltage stabilizers.
.
No. 1 - This is an example of good quality Samsung LEDs with a color temperature of 3200k (left) and 4300k (right), when choosing an LED, look at the color, the more yellow it is, the LED will shine with a warm tint, the whiter it is, the more bluish.
№2 - T10 COB LED from China, 6000k. It shines brightly, but only on the sides.
No. 3 - Powerful T10 Cree LED from China, shines very brightly forward, with a lens to enhance the light. As a result, the resistor was not correctly selected in it, and it heats up wildly, which led to the melting of the base.
So the advice, in order to use it, you need to mount a powerful ceramic resistance in the wiring, the size is visible in the photo.
.
.
№4 - T10 From China. Diodes 5630 5000k, 6 pcs, 2 of them in the front lens. it shines perfectly, but after a while the diodes began to blink and then it died. It is heated wildly too. All due to improperly selected resistance.
No. 6 - T10 COB LED 5000k, inside about 10 small crystals, ordered a batch, as a result, part of it shone white, and the other part was bluish. Some got very hot, some didn't. So the model is good, it shines very brightly, but there is a lot of marriage.
No. 7 - T10 LED MAYAK 4300k, I bought recently, the LEDs are of high quality, the light is white, it shines very brightly. An analogue of model No. 4 from China, only without a lens.
In the instrument panel they shine like this, like evenly but bluish. But brighter than regular bulbs.
No. 8 - T10 3 LEDs 5630 5000k, they shine brightly, they work for a long time, they are great for lighting a room where super bright light is not needed, but you want something brighter and whiter than lamps.
No. 9 - COB DRL LED 5500k, I set myself such as DRL, they shine brightly, but one minus, the lens and the body are not sealed, and when water gets in (and there is especially a lot of water in front of the car), they start to burn. It is better to immediately seal the new seam. An example of how they shine
No. 10 - A board with COB LEDs, it shines Very brightly, I put them in my interior lighting on the ceiling, they have been working for many years, everything is fine with them. I am satisfied. Included are many adapters for different plinths.
Installation example here
.
No. 11 - Ordinary light bulbs from the R11-144 tidy. On the left in the cartridge, on the right pulled out of the cartridge. The lamp is soldered into contacts.
No. 12 - A light bulb from an emergency gang button with a light filter.
No. 13 - Bulb for emergency gang buttons, glass heating, as well as A / C and recirculation buttons for dorestyle. Wound on a regular cartridge
No. 14 - T5 LED 4300k, from 3 small LEDs of the 3528 series. It shines well.
No. 15 - T5 LED 4300k, from 5 LEDs of the 2835 series. They shine a little brighter than No. 14
No. 16 - T5 LED 5050 5000k, shines brightly well, I soldered such LEDs into the buttons on the dorestyle.
Example. and further
No. 17 - T5 LED Blue, I have been standing for a long time in the dashboard windows on the GT, and in the climate windows on the P11-144.
No. 18 - T5 COB LED, it shines very brightly for the baby, but for some reason it does not work for a long time, it starts blinking.
No. 19 - LED 2835, such LEDs are used in dashboard backlight boards, a report on Dorestyle, and Like, and repost, maybe someone will find the article useful.
LED lamps are the most expensive lighting. But their quality and durability do not always correspond to the parameters indicated on the packaging. It is annoying to throw away a lamp that has not served its due date, having invested in it tangible funds for the budget.
If you have a multimeter and soldering skills, then a faulty LED lamp can be repaired, saving money on this.
The design of LED lamps
The device of the LED lamp is slightly different from the design of the CFL. The figure shows the nodes that make up the lamp.
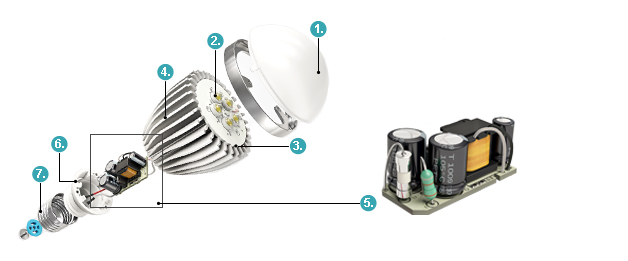
- Diffuser. Designed for even distribution luminous flux in space and eliminate glare when looking at the LEDs.
- LEDs.
- The base of the LEDs with printed conductors for their series connection.
- Cooling radiator. It is necessary for the removal of heat generated during the operation of LEDs.
- Driver. Generates the voltage required to operate the LEDs.
- Driver housing (lamp).
- Plinth.
Only functional purpose needs to be explained. drivers. An LED is a semiconductor device that emits light when current is passed through it. Like a conventional diode, it only conducts it in one direction. When the polarity is reversed, the current through it is zero. As with a conventional diode, the voltage at the terminals of the LED has a value not exceeding a few volts, and does not change with increasing voltage.
Therefore, when serial connection LEDs, the voltage required for operation is calculated by multiplying the number of products by forward voltage drop current through them. It can be found in the reference book or measured. When connecting the required number of LEDs to a 220 V network alternating current need:
- reduce the voltage to the required value;
- convert from variable to constant;
- smooth out pulsations;
- protect the driver and its load from short circuits;
- protect the network from interference generated during operation of the device.
To reduce the voltage are used:
- capacitor circuits;
- step-down transformer circuits;
- inverter circuits.
Circuits with a capacitor used in most drivers LED lamps household use. They are simple and cheap, but this is their only advantage. Functionally, they are similar to a circuit with the inclusion of a quenching resistor in series with the load, on which the excess voltage “falls”. The use of a resistor is impractical, since power is released on it, commensurate or greater than on the LEDs themselves.
The capacitor on alternating current performs the same function - it also dampens the voltage. The elements on the diagram C2, C3 and R1 are designed to lower the voltage to the required value.
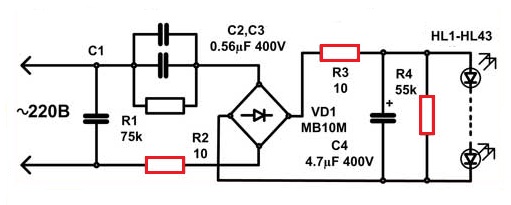
The disadvantage of such a scheme is the dependence of the load voltage on the mains voltage. The current through the LEDs is unstable and sometimes exceeds the allowable values. At this point, the diodes may fail.
The second disadvantage is no galvanic isolation from the network. When repairing lamps do not touch live parts. Although the voltage on them is not dangerous, the “phase” of the mains supply can come directly.
Transformer circuits used in high-power LED lamps, inverter- at in large numbers LEDs or, if necessary, dimming (dimmable lamps).
For straightening AC voltage diode bridge is used VD1, and to smooth out ripples - an electrolytic capacitor C4.
Resistors R2 and R3 necessary to limit the current at the moment the voltage is applied to the circuit. A discharged electrolytic capacitor has low resistance and at the first moment of time the current through it is large. It can destroy the semiconductor diodes of the rectifier. In addition, these resistors play the role of fuses during short circuits. Resistor R4 discharges the capacitor after disconnection from the network for the speedy extinction of the lamp.
Details R2, R3 and R4 some manufacturers do not install. Capacitor C1 needed to prevent the penetration of interference from the operation of the lamp into the mains.
Diagnostics and replacement of LEDs
Before proceeding with the repair, remove the diffuser. Dismantling methods vary depending on the design of the lamp. Most of the diffusers are removed with a screwdriver, for which you need to pry it in several places, finding a weak spot.
LEDs need to be inspected: black dots on some elements indicate their failure. The quality of the soldering is also inspected - a broken contact in a serial chain of LEDs interrupts their power supply circuit. The same happens when any of the diodes fails.
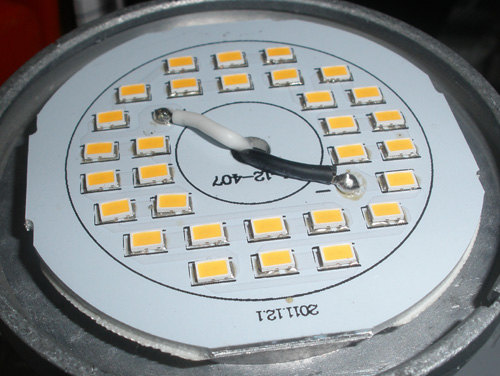
The serviceability of the LEDs is checked with a multimeter. Their resistance is measured in the forward direction. It should be small, the value for comparison is determined on serviceable elements. When tested, working diodes glow dimly. You can believe the LEDs by applying voltage to them from a 9 V battery through a 1 kΩ resistor.
The detected faulty elements are soldered from the board, and a jumper is soldered at the place of their installation. If there is a donor lamp, the LEDs are replaced, or parts from led strip with similar design and features.
Solder the LEDs carefully. To do this, the solder is first heated on one side and removed using suction devices. In their absence, after complete melting of the solder on one of the leads, it is removed by vigorously shaking the board. The remains are removed with a clean sting (you can also shake it beforehand) with a copious amount of rosin. The second conclusion is already easier to unsolder.
After installing a jumper instead of a diode, the entire lamp will glow dimmer. This is due to the fact that the total resistance of the circuit, although slightly, will decrease. The current through the lamp will increase, as a result, more voltage will remain on the capacitor. When removing one or three diodes, this will not affect the operation of the lamp. But when there are few of them left, the increase in current will become so noticeable that the remaining parts will overheat, the failure process will become an avalanche. Therefore, in the event of a massive breakdown of LEDs, leave the lamp as a donor of parts, replacing it with a new one.
Driver repair
Drivers are weak points current limiting resistors. They are checked first. You can replace burned-out elements with the same or the closest resistance value.
Examination semiconductor diodes rectifier and capacitor made with a multimeter in resistance test mode. However, there is a faster way to check the health of this section of the circuit. To do this, the voltage across the filter capacitor is measured. The expected value is calculated by multiplying the nameplate voltage on one diode by their number. If the measured voltage does not correspond to the required one or is equal to zero, the search continues: the capacitor and diodes are checked. If the voltage is normal, look for an open between the LEDs and the driver.
Diodes can be checked with a multimeter without soldering them from the board. A short circuit in the diode or its breakage will be visible. When closed, the device will show zero in both directions, when broken, the resistance in the forward direction will not correspond to the resistance of an open p-n junction. You will recognize it on serviceable elements. A short circuit in the diodes additionally leads to the failure of the limiting resistor.
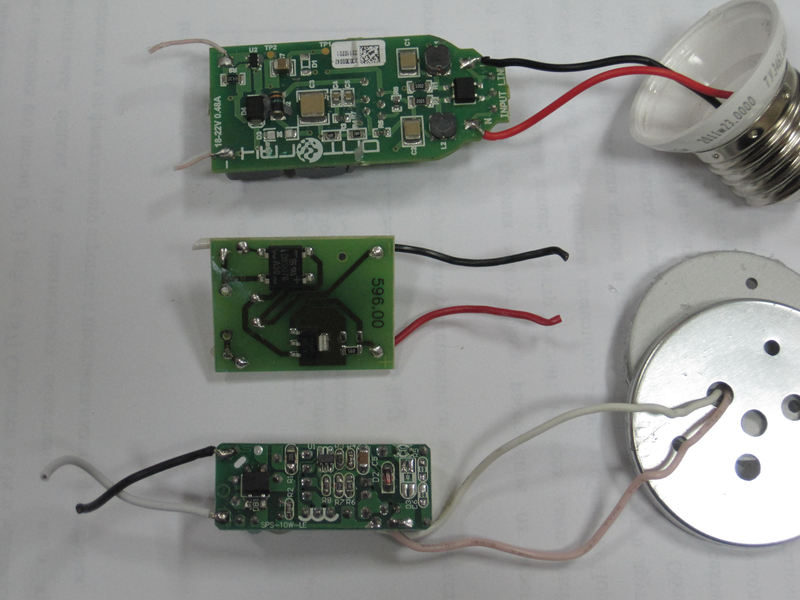
Repairing a transformer driver is a little more complicated than usual. But with the inverter will have to tinker. There are more details in it, and most importantly, it always includes a microcircuit. In order to make a conclusion about its malfunction, you will either need to study in detail the principle of operation of the driver, or make sure that all the parts surrounding it are in good condition.
We will tell you about how to connect an ordinary incandescent lamp through a diode. Such a light bulb can be used, for example, to illuminate corridors, entrances or any other premises that do not require very bright light. In this process, the question arises: what kind of diode you need to buy in order to put 220 volts on a light bulb. It depends on the power of the light bulb, below in the article an example of a diode for a 100-watt lamp is given, formulas are given for calculating the parameters of the diode.
Fascinating electronic gadgets are on sale in this Chinese store.
Let's start with a little theory. It's no secret that in order to transmit voltage over long distances without loss, alternating current is used, which feeds our light bulbs. To understand what alternating current is, it is enough to pay attention to the graph of voltage versus time for alternating current. As you can see, the current changes its direction with some frequency. If one period of oscillation is excluded, then their amplitude can be halved, which in practice will give us a 2-fold decrease in the supply voltage and, in turn, allow the light bulb to work much longer than usual, and also protect the light bulb from power surges and reduce the risk of burnout at the moment of switching on.
Such a lamp will not attract the attention of those who steal energy-saving as well as ordinary light bulbs on landings.
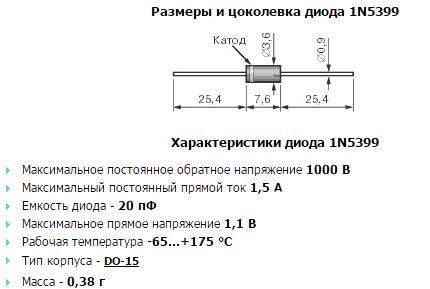
by the most in a simple way The cutoff of the half-cycle of the mains voltage fluctuations is the installation in series with the load of a semiconductor diode, which will pass current in only one direction. In our case, it is necessary to select a diode according to three main parameters: maximum forward current, maximum forward current in a pulse, and maximum reverse voltage.
The maximum forward current can be found by dividing the light bulb wattage by the supply voltage. The maximum forward current in the pulse must be at least 20 times the maximum forward current so that the diode does not knock out when the bulb is turned on. The value of the maximum reverse voltage should be 3 roots of two times the supply voltage.
In our case, since the diode will be placed inside an additional overhead base, do not forget that its length must be less than its length. For example, in this case we use diode 1N5399, which costs about 8 cents. It is ideal in all respects for a 220 volt 100 watt incandescent lamp.
In order to make an eternal light bulb, we need:
An old light bulb or base.
New light bulb up to 100 watts.
Diode.
Soldering iron with a power of at least 20 watts.
Solder.
Side cutters or nippers.
Pliers.
A hammer.
Plastic bag.
Needle or bent paperclip.
How to connect a light bulb through a diode
We need to take a diode, bite off one of its legs, solder it to the contact on the lamp base. For convenience, the lamp can be left in the package for this time so that it stays on the table.
Next, we prepare the second patch base from the old light bulb. If the base is bent, use pliers. Further on, it is necessary to attach it to the main base, soldering the second contact of the diode to the overhead base, more precisely, to its central contact.
By the way, if you decide to make the light bulb eternal and you are not so interested in making a separate light bulb exclusive, the easier way out is not to touch it, but simply screw the diode into the wires inside the switch. This is done much faster and easier.
Automotive LED lamps is an efficient and economical alternative to the traditional incandescent lamp. Installing diode lamps, or as they are also called, LED bulbs, means killing several birds with one stone. LED lights will allow you to significantly save on energy consumption and fuel consumption, and in addition to this, they will make your car even more attractive. appearance. LEDs are superior to conventional light bulbs in almost all respects, and even have some advantages over xenon.
LEDs - best option automotive lighting. In many cars recent years production, LED lights are already being put in series. If in your car LED lamps not yet installed, then we suggest you buy high-quality and inexpensive LED car lamps and see how much better they are than conventional lamps.
LED car lamps not only improve the appearance of the car, but also allow you to save a lot. First, LEDs consume 10 times (!) less electricity than conventional incandescent bulbs, which, of course, reduces the load on the battery and generator of your car.
And secondly, LED lamps for cars last much longer than conventional light bulbs. Thus, the cost of diodes quickly pays off, and their use is much more profitable.
In addition to the above, energy-saving lamps have others important benefits:
- Brightness. LED lighting is incomparably brighter. The flux of light emission increases up to 300% depending on the type of LED!
- Reliability. Even if some LED burns out, the autolamp will still not go out. In addition, LED car lamps have no flickering effect and are not sensitive to changes in the mains.
- No heating . Unlike traditional incandescent lamps, which get very hot, led light bulbs emit little heat. Thanks to this, the plastic parts of the headlight do not melt, and the galvanic coating of the reflectors does not burn out, as is the case with a conventional light bulb.
- Compared to xenon . LED lamps are less whimsical than xenon or halogen lamps. Diode lamps for a car, you can safely take it with your hands, without fear of leaving marks on the flask.
- Adaptation to external conditions . LED headlights are vibration-resistant and tolerate high humidity better than halogen lamps.
 You can install LED lamps on any make and model of the car. Replacing a light bulb does not require professional intervention: the bases of LED car lamps are identical to the bases of incandescent lamps. Sometimes it may only be necessary to connect an additional resistor or replace the standard relay.
In our online store you can buy LED lamps in dimensions, reversing, turn signals or brake lights, as well as LED lightening car salon.
A burned-out light bulb in the entrance is an occasion for battles and the start of a large-scale operation "how to spoil your neighbor." Those who live in apartment buildings, probably more than once faced with swearing about whose turn it is to change a burnt out light bulb. It’s good if the neighbors are civilized and everyone changes the light bulb in turn without swearing and scandals.
Unfortunately, not everyone has such exemplary neighbors, and in order to keep peace and tranquility on your site, there is one interesting way that will prevent the light bulb from burning out quickly. Connecting a light bulb through a diode will increase the service life several times. Based on my experience, I can say that a light bulb with a diode has been burning in my basement for several years and, in my opinion, is not going to burn out at all in the near future.
So, let's look at the reasons why light bulbs burn out.
First of all, these are voltage drops, then a weak contact. With voltage drops, I think everything is clear, but let's talk about weak contact in more detail.
A weak contact may be in the cartridge, in the switch it is also worth looking at the twists in the dose box. There are several reasons for the occurrence of weak contact, poorly tightened screws in the cartridge and switch, oxidation of wires and contacts, and a light bulb loosely screwed into the cartridge. If one of these factors is present in your home, then the bulb will burn out in the shortest possible time.
Also, the main reason for the burnout of light bulbs is their quality and manufacturer. In this age of saving on materials, manufacturers save on literally everything. As a result of such savings, the bulbs burn out in the shortest possible time, without having worked out the declared time. I don’t want to remember about incandescent bulbs of Chinese origin ... ..

Connecting a light bulb through a diode is a fairly simple and quick matter. First of all, you need to know which diode is needed for this business. There is nothing to guess here, a diode with a reverse voltage of at least 350 volts is suitable, we also take into account the current strength, it should be at least 0.5 amperes. Alternatively, use diodes to connect D245, D248, or as a last resort D226B.
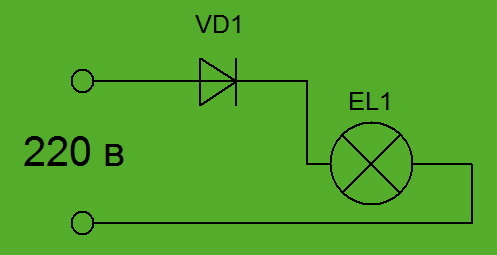
The circuit for connecting a light bulb through a diode is extremely primitive, two wires go to the light bulb,
a diode should be inserted between the light bulb and one of these wires.
The diode can be pushed anywhere, below I posted a photo instruction of a rather original way to connect the diode. But this is a tricky way, there are more quick fixes, which you can read about below.
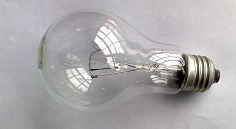 We take an ordinary light bulb for 220 volts. We separate the base from the other burned-out light bulb.
 We solder the diode to the patch on the bulb, make a hole in the base from the burnt bulb and bring the second end of the diode there.
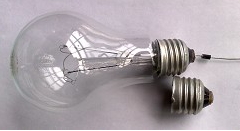
 We solder the output end of the diode in turn to the second base. We solder two socles together and screw them into the cartridge.
As you can see, the connection method shown above takes quite a long time, so here are faster solutions.
Ways to connect a diode to a light bulb
1. We connect the diode with one end to the switch terminal with the other end, to the wire going to the light bulb.
2. In the cartridge, with one end on the contact of the cartridge, the other end is soldered to the incoming wire.
3. We open the dose box and look for the twist that is responsible for turning on the light bulb, solder the diode between the wires (for specialists).
The disadvantage of a light bulb with a diode is a flickering light, but you must admit that for an entrance or basement this is not a very fundamental issue. In order to remove flicker in the circuit, you need to connect a capacitor, but we will talk about this another time.
 Note during a difficult period of life
In general, the Internet is a great thing, in addition to information services, the number of services that can really help out in a difficult period of life is growing exponentially. As it was written above, I started a renovation in my apartment, since I am a rather lazy person, I do all my shopping in online stores. I found a chic chandelier, but it turned out to be the last one, that is, you need to order immediately. As always, there was no money .... I couldn't miss the chandelier, the discount didn't allow it. I used to be wary of all types of online loans. Today I realized that this is salvation.
I went through a lot of online loan services, everything is wrong and everything is wrong. Having lost hope of finding anything worthwhile, purely by chance I found a site that helped me take Qiwi wallet online loan and the beauty of this loan is that they do not charge any interest on the first loan. In general, I dolganul 5,000 rubles at an interest-free rate, and safely ordered the chandelier of my dreams)))). Looking ahead, I’ll say that a couple more times, I made online loans there.
The conditions are quite chic and there are almost no requirements for the solvency of the borrower. A couple of standard items and quick registration, in general, you can deal with them. I did not take large sums, but 10,000 were given without problems, the repayment terms are loyal, who used such a loan, write in the comments, we will discuss ...


