Do-it-yourself fixtures for a locksmith. Reliable homemade tools and fixtures
To maintain a home comfortable and convenient, sophisticated equipment is required. It greatly facilitates household work, but certain skills and knowledge are required to maintain it. Not everyone knows all the possibilities modern instruments and are not fully utilized. If you change them a little, you can get convenient home-made fixtures for the workshop.
If you gradually acquire models of popular brands, they will turn out to be durable and reliable assistants. In addition, devices are needed to position and secure the workpieces during their processing. At the cottage it will be
As the inventory of the home master accumulates, it should be sorted into groups:
- metalwork and carpentry tools;
- appliances;
- electrical equipment.
All accommodation allow fixtures drawers and cabinets. Keeping inventory clean and tidy makes it possible to create a comfortable working environment and ensure the long-term preservation of tools.
Homemade tools for woodworking
Wood processing is most common in the household. Useful homemade tools for the workshop primarily include a workbench. It should be comfortable in height. Its cover is located at the level of bent palms. If you need to raise it, bars of the desired thickness are installed on the dowels from below.
Making a modern workbench
The classic workbench consists of a lid with a front and back vise. This design is more suitable for manual work. It is poorly adapted to work with power tools due to the fact that workpieces can be difficult to fix. You can buy a modern compact workbench MASTER cut 1000 worth 12 thousand rubles, which is folded. On it you can install hand tools: circular saw, jigsaw and router. But then it will have to be redone. good performance has a Festool MFT 3 workbench. However, the price of 30 thousand rubles makes you wonder. The master will be able to make home-made fixtures for the home workshop that work just as well. 
To make a workbench, you need flat plywood without knots. The thickness must be at least 20 mm. By installing an electric jigsaw on it from below, it will be possible to cut boards and small bars along, across, at an angle, as well as complex curved profiles. The tool performs additional functions of circular and band saws.
First, the tabletop is made. An arcuate groove is cut in it to install a guide for blanks, which can be mounted at any angle. A guide with a slot is also made under the jigsaw. Its width is selected according to the size of the sole of the tool.
The sides should be cut out of plywood and glued to the countertop to give it rigidity. The legs of the workbench are made from a bar. Can be crafted metal carcass, and then attach the table top to it with screws. Then the design will be light and durable. The guides from below are attached to the countertop with furniture nuts.
The jigsaw is installed from the bottom of the workbench cover - “upside down”. From above, only the file remains visible. For the convenience of using a jigsaw, an additional switch is installed. The guide should also be easy to remove so that you can easily change the saw blade of the tool. For easy access to the underside, the tabletop can be made folding, on hinges.
The workbench takes up little space and can be installed even at home. To do this, it is made foldable so that it can be easily disassembled and put away in a closet or pantry.
How to make a workbench for a summer residence
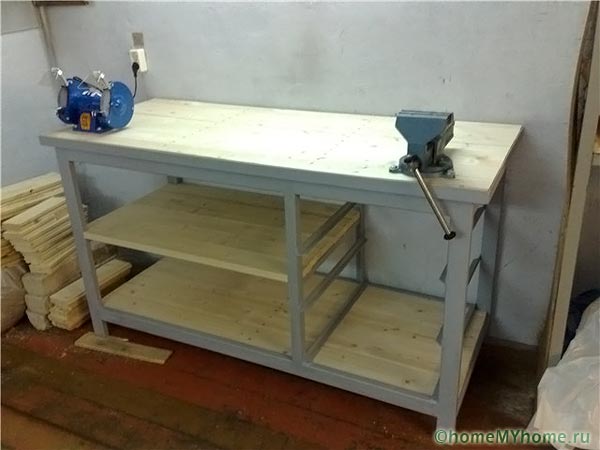
For work in the country or in country house you need a powerful workbench. The tabletop is knocked together from a thick edged board up to 2 m long. It will not be superfluous if it is additionally fixed with self-tapping screws. From below, along the perimeter, the tabletop is sheathed with timber. Table legs are made of square section 120x120 mm. They can be buried in the ground or attached to a reinforced concrete base. The whole structure is treated with an antiseptic and covered with drying oil.
When the workbench is installed, do-it-yourself devices are mounted on it: guides, devices for fastening workpieces and power tools.
How to make a pipe bender with your own hands
IN subsidiary farm it is necessary to have a device for bending metal pipes and profiles. The simplest home-made tool for bending pipes up to 20 mm in diameter is a steel plate with welded pins. By inserting a workpiece between them, it can be bent to the desired curvature. Such simple devices the pipe is crushed at the bend. To avoid this, it is necessary to tightly fill the pipe with sand. It will also help to heat it with a blowtorch, which any master has.
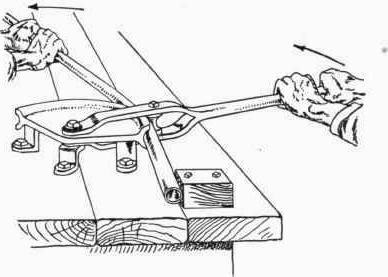 To improve the quality of bending, instead of pins, 2 profiled rollers and a locking element are used. You can also make a special profile from a steel angle and plate and fix it on a workbench that has a solid base. In the picture, the structure is attached directly to the boards. You can make it portable by mounting it on a steel sheet and fixing it to the bottom of the tabletop. Then the pipe bender, which is rarely used, will not interfere with carpentry work. The portable device, like other homemade workshop tools, can be used in the garage. It is convenient to fix it there, and it may be needed not only for pipes.
Homemade circular saw
Branded machines have high prices, and a home-made tool for a home workshop is quite suitable for a private user. It can be made on the basis of manual, cheaper models. 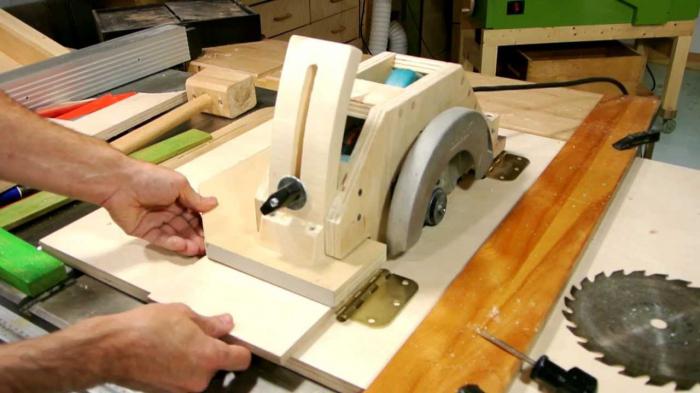
The workbench for the circular must be stable. A frame with a slot for the disk is attached to the tabletop. The best material is a sheet of metal or durable wood that can withstand heavy loads. It has a slight thickness, which makes it possible to use most of the disk and cut products of sufficient thickness. In addition, the tool itself and the fixture for machine tools are attached to the frame. The guide bar is made sliding on a steel or aluminum sled, or fastened with clamps.
Mounted on the bottom of the worktop on the bed. You can also use a grinder or drill, but they are not as effective and do not allow you to use the entire working area of \u200b\u200bthe disk. The mount can be anything, as long as it is reliable.
When working with a circular saw, you should remember that it has high speed and safety rules must be observed.

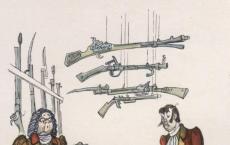
Homemade bow saw
Homemade woodworking tools can be very simple but effective. These include the bow saw. A thin blade makes it possible to quickly saw a large log. It is easy to replace with a new one when the saw becomes dull. A bow saw can be made independently from 3 blocks of durable wood. Two handles with cuts at the ends are connected in the middle by a crossbar using a “thorn-nest” connection. The canvas is inserted into the slots and fixed with two nails. On the other hand, it is stretched with a rope loop thrown over the handles and twisted with a collar.
How to sharpen a knife
Manual sharpening for knives is more effective because a strong cutting edge is obtained. To facilitate the process, a home-made device is widespread. It consists of a bar with a clamp for a bar, a base for fixing a knife and a rack for adjusting the installation angle. 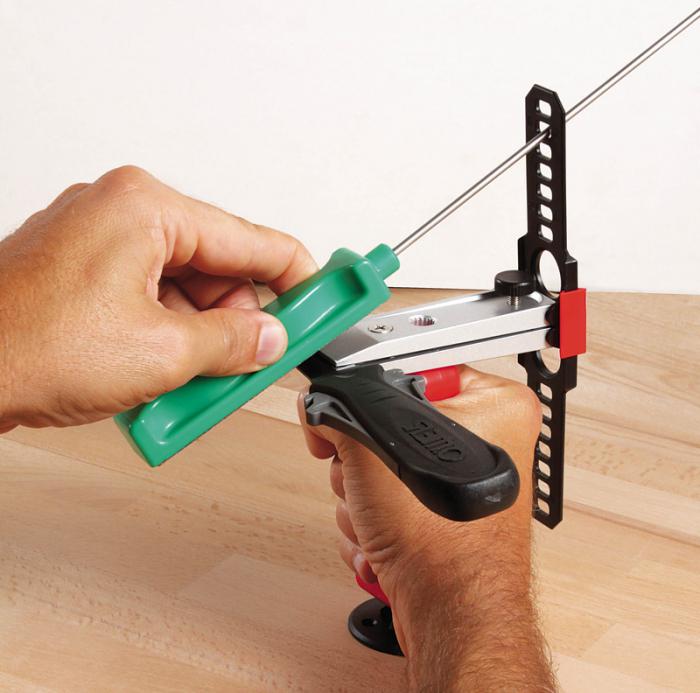 With the reciprocating movement of the bar with the bar fixed on it, the blade is sharpened. The abrasive surface is pressed against the blade only when moving from the heel to the tip. By slightly changing the design of the knife sharpening base, you can also straighten the blades of carpentry tools.
Homemade garage fixtures
The garage is not only a place where to hide the car, but also a workshop where you can store tools and carry out repairs.
Shelves and racks
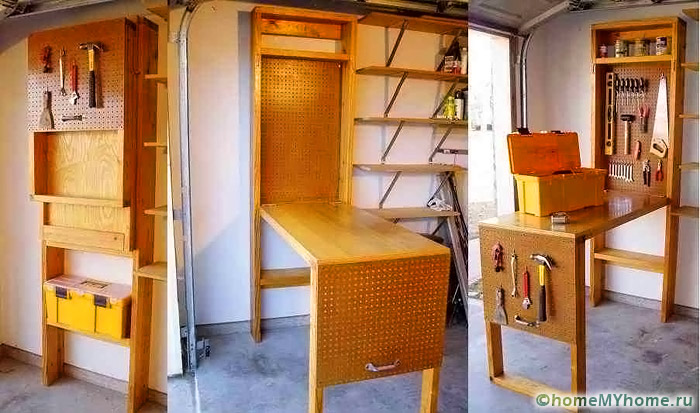
Do-it-yourself devices provide order in the garage. For this, a rack is made, which is usually placed on top. Then it will not interfere with movement inside. A small workbench is installed below for work, in which tools are also stored. It is most convenient to have everything near the back wall of the garage. Then the side passages will be free.
The inspection pit is laid out with bricks or cast concrete, and then covered with a lid so that it does not interfere with the passage.
Making a puller
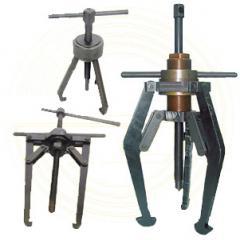
Normal work with the car is carried out using a standard set of tools. Craftsmen make special equipment. A puller is often required to tighten bearings. The most convenient is the three-valve design. A standard device may not be enough. If you make a puller with your own hands, it will last for many years.
Small devices are made of steel sheet 10 mm thick. A pattern is made on it and paws are cut out with a gas cutter. They are processed on an emery machine, adjusting the dimensions. The core is machined from round timber, the foot holders are welded, the thread for the collar is cut and the necessary holes are drilled. The paws are held on bolts with a diameter of 8-10 mm.
The work of making a puller requires skills in working with many tools. Helpers may be needed here. A convenient solution is to manufacture removable legs of the desired configurations, which can be changed on a product purchased in a store.
Conclusion
Homemade accessories for the workshop allow you to solve many problems in the household and subsidiary farms with minimal effort and cost.
- Do-it-yourself sharpening for saws: recommendations
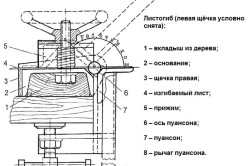
- Homemade sheet metal bender
When carrying out repair, construction or plumbing work, it often becomes necessary to use certain tools. But what if there are none at hand, and there is no opportunity to purchase them? In this case, you can make homemade tools and fixtures. Usually they are mounted from materials accessible to all.
Some items are easily modified, improved, resulting in products of better quality. So, worn out and unnecessary things acquire new characteristics with an extended service life.
Methods for transforming individual items
- A small diameter drill is easily made from a bicycle spoke.
- Pipes of different calibers, tightly connected to each other, are easily transformed into devices for drilling side grooves. Their rods acquire different cross-sectional indicators. The thickness of the outer steel pipe is equal to 0.5 mm, the inner bases are made of iron plates.
- In the manufacture of the cutter, knives from electric razors are used. They are fixed in the drill chuck in the same way as the rollers from the lighter are placed.
- The anvil is made from the remnants of old rails using an autogen. With it, the device takes on the appearance of an iron.
- An unnecessary bottle left after gasoline lighters is easily transformed into an oil can. An old ballpoint pen with a cut off writing part allows you to make a hole in the lid of the container taken, then it is glued to this place. This oiler is designed to supply oil in small portions.
- Needle files and files are made from cans for refilling the siphon. Such devices are attached to this container, tightly wrapping around the neck.
- An empty tube after using toothpaste can be converted into a convenient lubricant storage device. The bottom of the old container is unstuck, washed and dried thoroughly. After that, the cap is unscrewed and the tube is filled with contents. Then the bottom is rolled, the lid is put in place. To ensure maximum convenience, the cap can be drilled.
- A disused ball will become a convenient vessel for stirring any composition. Such a container does not need to be laundered: after work, it is easily turned inside out, the solution leaves the elastic walls.
- An old engine from a washing machine or vacuum cleaner can be modified by welding the mount and fixing the shaft on which the grinding fixture is placed.
- You can make a convenient dust collector by taking it from a regular vacuum cleaner. A mesh filter is inserted into it, which allows you to protect it from damage. When using a magnet in it, the smallest particles will not be inside, but everything will be on the brush. Thus, fallen nuts, washers, screws will not be lost.
- A serviceable motor of an out-of-use fan or mixer can be used to make an important tool in the household. An emery disc with a cross section of 4-6 cm or a circle of wood is taken, on which an ordinary emery cloth is put on. Also, the surface can be covered with felt, this fabric will allow you to grind small-sized parts, polish the cutting edge.
- From unusable plastic bottle easy to level. Water is poured into it, the lid is tightly closed. After calibrating on a horizontal surface, the position of the water bubble is applied with a marker.
Almost every master has a homemade tool. A well-made mechanism affects the result of the work carried out. So, in metal products with a cutting part, the sharpness of the blade becomes an important feature. It is important for saws, axes, chisels. In the process of work, their edges quickly lose their previous indicators, so such products have to be sharpened periodically.
Back to index
The sharpening process will be noticeably facilitated if you use homemade devices for this. They help to improve the quality of the actions taken. An important part of such a device is a clamp, which consists of clamping and support bars. These elements must be the same size.
For this you need to take:
- wood trimmings;
- screws, nails.
Such devices are made from wood of any solid grades. Multilayer plywood is taken as an analogue. In the prepared parts, not far from the end part, cuts are made. The grooves should be the same - 50 × 9 mm. The support rail is connected to the base with card loops.
The length of the main part of this tool will be 10 cm longer, given that the length of the protrusions on each side corresponds to 5 cm. The device is fixed with clamps on the table top using these elements. To provide the mechanism with an inclination convenient for sharpening knives, you need to put a bar at the junction of the clamp and the base. It can be fixed with screws or nails.
One of the closely spaced faces of the bar is cut off, it is given the desired angle. To sharpen a hacksaw, you need to lay it in the space between the support and the slats with the teeth up and clamp it with bolts. The blade should be set in such a way that the saw tip protrudes 20 mm above the clamping part.
So, the main work on the manufacture of a sharpening tool has been completed. Could do some work to improve it appearance after that it is ready for use.
At the beginning of the article, a large number of home-made machines and devices, and then a place to store them. Cool machines in this Chinese shop. Plugin for saving in it: 7% from purchases.
DIY for the workshop
Cool machines and devices for the workshop
You will love these ideas
Roll rag holder
The author of the channel "Inexpensive with your own hands" decided to equip his small workshop and make it exemplary, taking as a basis one of the approaches that are implemented in production, making a series homemade devices. Everything in it is organized according to the Japanese 5S system. The home workshop is located in a small building.
A little about common organization premises. You can see that the walls are made of wood. The building in which everything is placed is cold, half brick. Therefore, it had to be insulated to extend the season of use. Lining was used, foamed polyethylene penoflex, which are laid inside. Ceiling insulation is made in the same way, plus a plastic coating.
The interior is predominantly blue and yellow. Blue color, according to psychologists stimulates creativity. This is the color for creative places. Yellow creates joy good mood. It has a beneficial effect on performance. Everything that the master does by design, he tries to do in such colors.
There is not much space in the workshop, so the question may arise of where to carry out overall work. What kind of work is done on the street, for this there is a specially welded convenient and functional workbench with a vice, holes for fasteners.
Other principles that are laid down in the organization of a home workshop.
Principle 1. Divide items into necessary and unnecessary
This is the principle of separating machines and fixtures according to their purpose. Here we are not talking about the destination for a particular technology of metalwork. What is the essence of the principle? Not all subjects are equally important for work. There are those that are used more often, there are items that are used less often. Therefore, it is necessary to take this into account when placing them. In close proximity to the workplace should be everything that is often needed and should be at hand, involved in almost every job. This is a ruler, knives, level, pliers, screwdrivers, keys, measurer. Everything is within reach. This reduces the access time.
Devices and tools that are rarely needed, or for the implementation of specialized work, have been removed from the workplace. The table must be clean before starting work and ready to perform assigned tasks. Not very urgently needed and things should be located in a place that should not take more than 30 seconds to access. Also, the tool must be quickly put away after use.
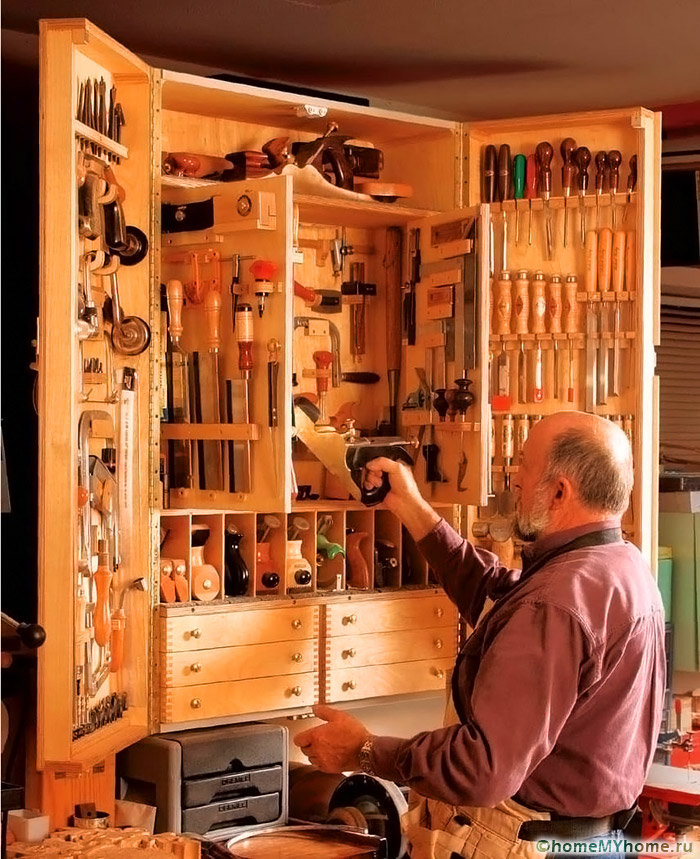
Principle 2. Define a place for each item
This principle says: each item should have its place. When the question arose of choosing how to place the instrument, the first idea was to do everything by hand. But in one of the stores, the author of the video saw a panel for sale for 1150 rubles, he purchased it as a tool holder. M6 bolts are used for fixing. The panel has regular holders, which would take a very long time to do by yourself.
For the subject, not only specific places are defined, but designations are used. For example, a large hammer, . It is convenient that each item has its own specific address. It is better if the address is visualized or signed.
When working in a workshop, it may be necessary to make or receive a phone call. The phone used should also be at hand for accessing the Internet and finding the right information on a current work problem. It is convenient to use a car holder for this.
Each of the keys has a denomination in the corresponding cell. In other cases, it is not always possible, due to the small size of the cells, to put marks.
A hand-held engraver is hung on the wall. For knives, a magnetic kitchen holder is used.
Stationary machines, which may move from their place during work, have their address indicated on the adhesive tape.
The tables that are placed in the workshop are made independently, from profile pipe. The tables themselves should also be located in their place, so the places where they should be are also marked.
Watch the original video of the channel.
For every master who does not have at his disposal lathe, the eternal problem in the manufacture of round, cylindrical parts from wood, even such simple ones as tongues, tool handles. Some masters use a jig for these purposes - a steel plate with a thickness of at least 6 mm with holes of different diameters.
Other professions
 Lovers of crafts are offered interesting options modernization of a conventional electric drill, which was introduced to its readers by the journal Practic (Germany). Thanks to small additions, it turns into a file or a jigsaw.
The principle of operation of these combined tools is the same: a crank mechanism with a connecting rod creates a translational movement of the working body of the tool.
Such devices make it easier to work with sheet material (plywood, plexiglass, etc.) at home, save time and effort, and the result is much better than when working with conventional hand tools.
D For the rational use of space, communications and do-it-yourself garage accessories from improvised materials are used. It is necessary to use the walls, the underground level in the process, place it indoors, organize normal lighting.
Homemade garage fixtures
For comfortable operation of the premises intended for storing cars, you should follow certain recommendations:
Depending on the dimensions of the building, the area occupied by equipment, fixtures, communications should not be more than 10 - 20% of the dimensions of the garage floor.
Storage areas, racks, workbenches
In 80% of cases, do-it-yourself garage fixtures are built to store accessories, tools, and car equipment. It should be noted that the most bulky parts of the car are sets of winter / summer tires, depending on the season.
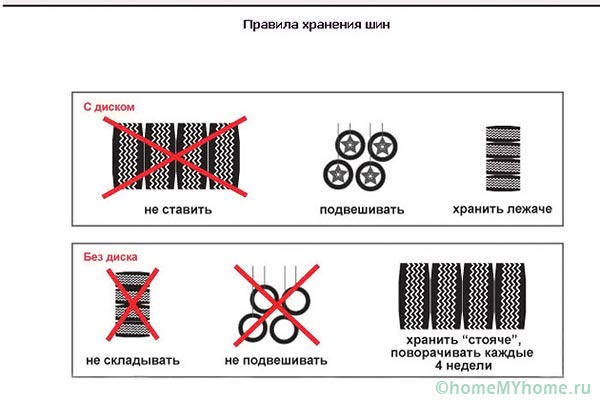
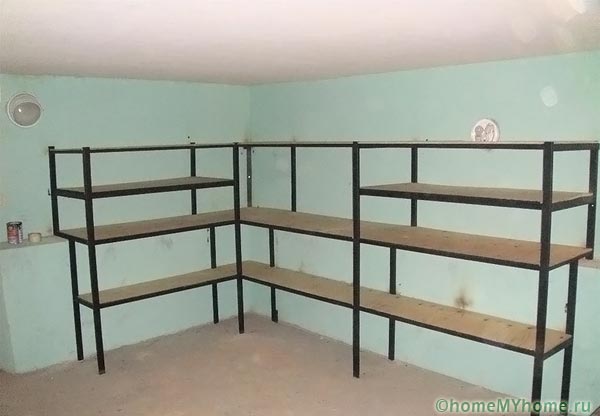
It is more convenient to store wheels on brackets of the following design:
- two triangular frames from a corner, connected by jumpers from any rolled metal;
- triangles are attached to the wall, the wheels are installed perpendicularly load-bearing structure, slightly falling between the jumpers.

This is the most economical option for storing rubber in the off-season. The most demanded by motorists are straight and corner workbenches. The lower space is usually filled with shelves or drawers; grinding machines and a vice are located on the table top.

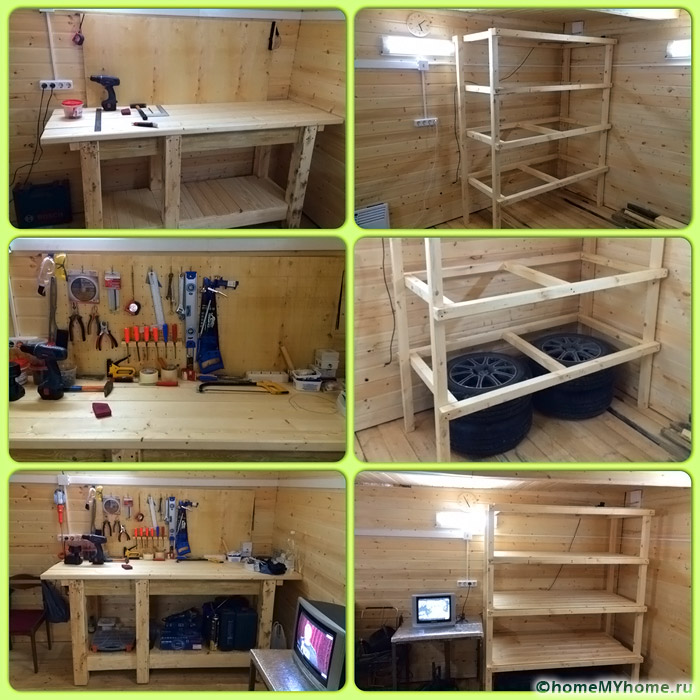
It is easier to build a wooden workbench on your own, but it has a smaller resource than an analogue from rolled metal that needs to be welded. If corners for shelves are not laid in the load-bearing walls during construction, it is easier to make racks from rolled metal or lumber.
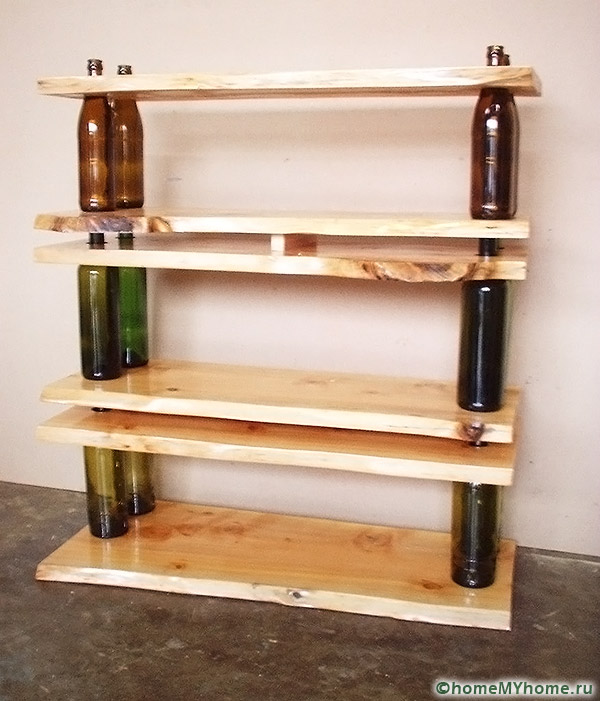
Original hanging shelves are suitable for storing long items
The design and layout of shelving inside each garage is too individual to follow general guidelines.
Observation hole and cellar
An inspection hole becomes a necessary device for a garage with your own hands. Moreover, the owner does not have to do all the repairs himself. Underground communication can be used in the following cases:
- inspection of the running, steering, braking system before a long trip;
- an oil change that saves money and does not take much time;
- minor repairs, which allows the qualification of the owner.

It is more convenient to arrange the entrance to the cellar from the pit, as this will allow you to concrete several steps instead of using an attached one.

The main nuances of these structures are:
- swelling of clay soils is harmful to underground structures;
- therefore, all elements of the pit and cellar are insulated with polystyrene foam from the outside;
- in the underlying layer before concreting, backfilling of the sinuses of the pits, sand or crushed stone is used;
- along the perimeter of underground structures at the level of the sole, drains are laid to collect and drain water.

The width of the pit should allow the driver to drive into it without lighting.
Lighting and ventilation
In garages, parallel circuits are more often used. lighting fixtures. One lamp allows you to use a specific area, several devices are turned on during a major repair, a visit to the cellar. The minimum power consumption is ensured LED lamps. Daylight devices have a large resource.
![]()
Cars use poisonous, harmful fuels and lubricants, so do-it-yourself garage ventilation devices are becoming relevant, allowing you to create air exchange. The inflow is organized from below:
- garage - vents in masonry, protected by bars;
- cellar - a pipe from the garage or from the street.
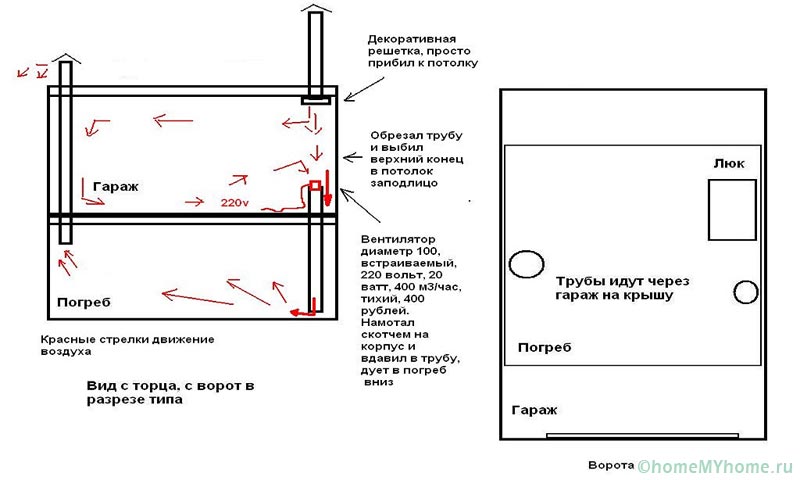
The hood is mounted under the ceiling of the cellar, the roof of the garage or has the form of air vents in the main walls at the highest points.
Related article:
From this publication you will learn why garage ventilation is so important, what air exchange schemes exist, and installation nuances.
Other Helpful Ideas
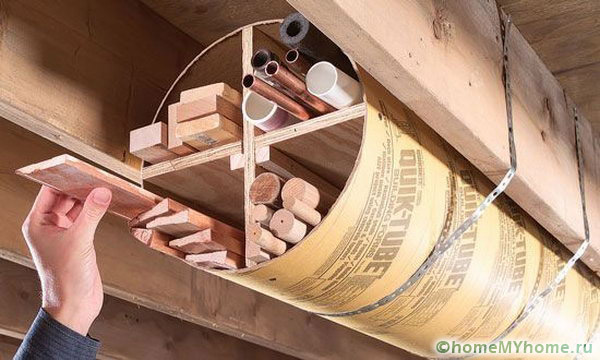
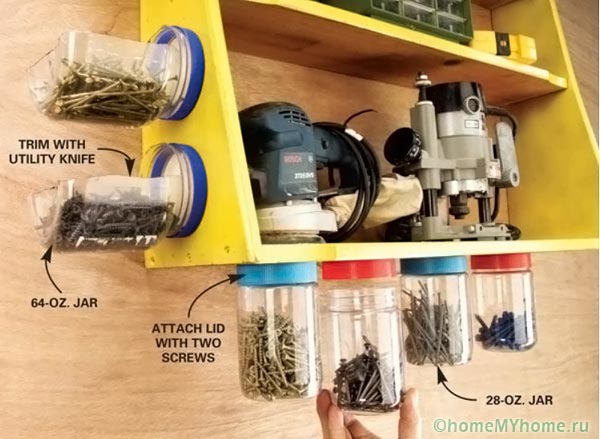
Useful do-it-yourself garage accessories can be made from used utensils, inventory, materials left after construction. For example, by gluing lids plastic cans horizontally / vertically, the owner receives a convenient transparent dish for equipment or hardware, which is always at hand.

Homemade machines
From the power tool, you can also assemble fixtures for the garage:
- drilling - a drill fixed with clamps in a fixture that moves with a gear along a rail;

- cutting - clamped in a similar way with an angle grinder with a tool for metal or wood;