How to lay a laminate with your own hands: practical advice. Reviews and comments.
Laminate is a HDF-plate with a thickness of 6 to 12 millimeters, on which a paper pattern is applied, and there is also a coating with protective layers. There are also security locks located around the perimeter of the slab, which makes it easy and quick to install the floor surface.
The following article describes how to properly lay a laminate surface.
Laying methods
There are several basic ways of laying a laminate in relation to a window:
- Normal laying, taking into account the direction of the sun's rays with offset joints. Such masonry is called brick. This arrangement allows you to make the seams less noticeable, which means that the coating will look like a single sheet.
- Laying with offset joints against sunlight. This installation option is done solely for visual illusions, for example, to reduce the length of the room due to the location of the joint lines along the direction of the wall. Also, this laying pattern highlights each seam. This method is well combined with a coating that has a chamfer. Using the standard installation method, a significant increase in costs will not exceed 5%.
- The diagonal way of laying is specific, but not unique. This method of coating allows you to highlight the laminate flooring. The diagonal allows you to visually increase the area of \u200b\u200bthe room, provided that it is not too heavily furnished. Using this technique, you need to remember that the consumption of materials will increase by almost 15 percent.
Common mistakes
Often, people who are unfamiliar with technology and with installation problems make a lot of mistakes:
- They do not pay attention to the preparation of surfaces, in connection with which irregularities are formed. After laying the laminate, bulges appear, due to which you have to return to the first stage. Or in the worst case, the connecting locks break, the laminate becomes unusable for further use.
- Wrong place to start installation. Many, knowing that the door will open into the room, start laying from the far corner, this is a mistake. As a result of such an oversight, the last row will become problematic in terms of laying. Without removing the door from the hinges, it will be impossible to complete the installation without damaging the laminate surface.
- Temperature effects on the laminate are not taken into account, gaps of 1 centimeter are not left near the doors of walls and pipes. The need for a gap is due to the fact that the laminate has the property that it will expand with a change in humidity.
- In addition to the gap between the wall, it is necessary to make a gap at the door. It is done because there is a high probability of swelling of the laminate in the doorway. The temperature gap can be further covered with a special decorative threshold. An example of an error can be seen in the figure below.
- Do not fulfill the conditions of the joints and the new row. That is, with the correct arrangement, each new row should begin with trimming the previous one. Joint displacement should be at least 1/3.
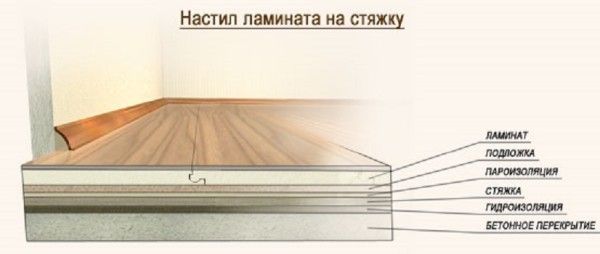
- The use of vapor barrier when laying concrete screed on the floor. Especially insulation must be applied if the concrete screed is new.
Types of castles
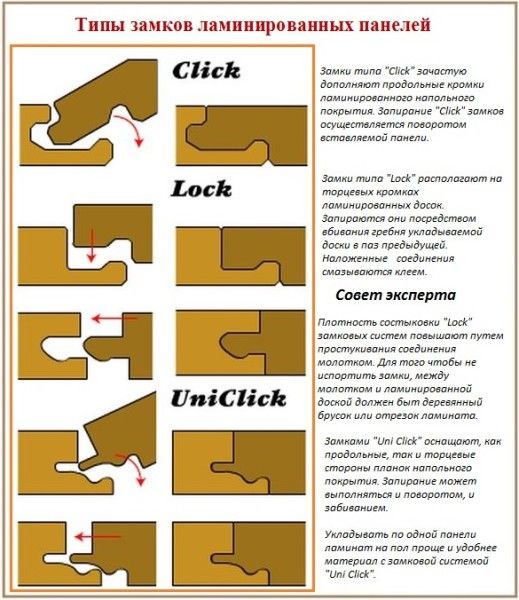
Depending on what types of locks are used, the process of joining panels may differ.:
- Glue locks. This type of lock has not been used for several years. This refusal is due primarily to the fact that the gluing process is very time consuming. You also need to spend a lot of money on the purchase of an adhesive.
- Click lock. Docking occurs at an angle of 45 degrees, then the panel is lowered. Docking such locks using a hammer is strictly prohibited if there is a chance of damaging the lock upon impact.
- Lock - lock. It differs from the previous one in that it is necessary to drive one part of the lock into another with a hammer. Also, there is no need to keep a certain angle when docking.
- Many companies have universal locks. Which can be both hammered and inserted at a certain angle. An example of such a company would be QuickStep. The company produces laminate with latches Uniclic.
Substrate
The underlay is a mandatory element of the coating under the laminate, with the exception of laminate models that have a built-in underlay.
The substrate under the laminate performs many important tasks:
- Soundproofing the floor. The underlay dampens noise from walking or falling objects, as well as noise from below. This becomes especially important when the concrete floor begins to crumble and extra noise is created when walking.
- Creates additional insulation and waterproofing of the laminar floor.
- Due to its thickness, it smooths out small irregularities in concrete or other substrates.
Most often, three main types of substrate are used.:
- Foamed polyethylene. The layer thickness is typically in the range of 2 to 3 millimeters. It is the cheapest, but has a short service life. With the passage of time, volume is lost and the substrate shrinks. Not bad for a cheap laminate.
- Extruded polystyrene foam. It has a higher density than the previous candidate. More durable, as it is not very susceptible to punching and does not lose volume.
- Technical cork backing. It has optimal quality, however, the price of such material is greatly overestimated, which means that for cheap option this pad will not work. In addition, the material is natural and has a high density, as well as high insulating values.
When laying the substrate, it is not recommended that the total thickness be more than 4 millimeters. This is due to the fact that with excessive softness, the warping will strongly sag due to loads, the locks will soon deteriorate. The substrate cannot correct strong irregularities; the base must be leveled.
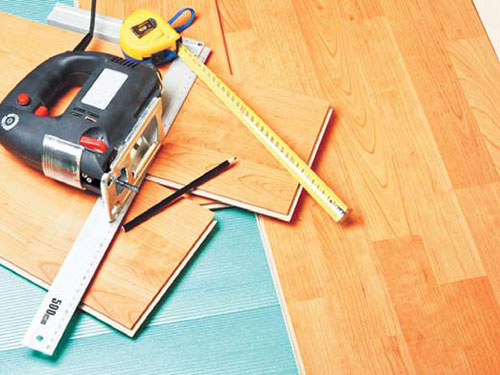
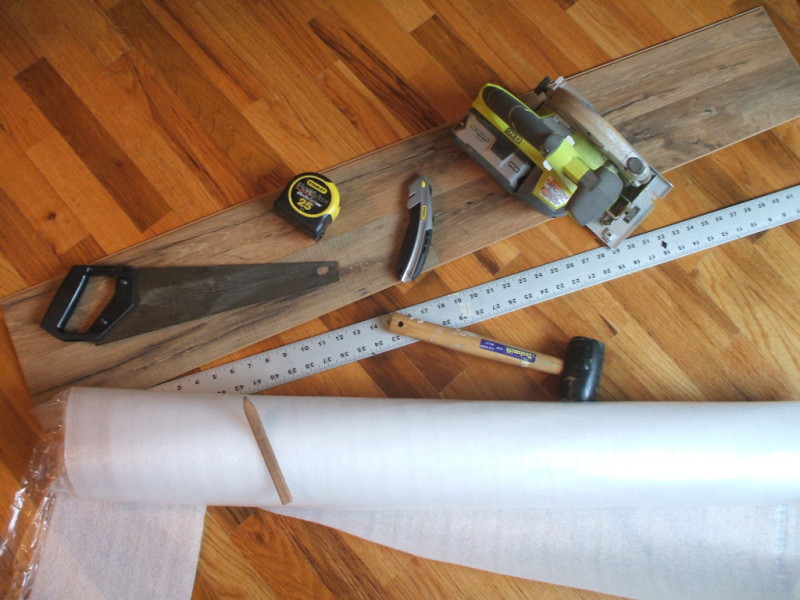
Required Tools
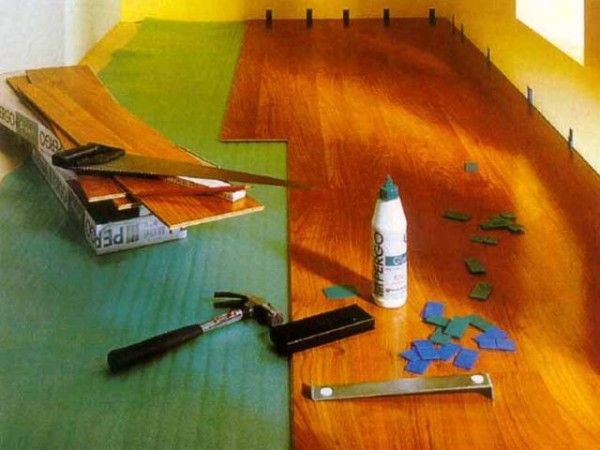
For styling, you need the following list of tools:
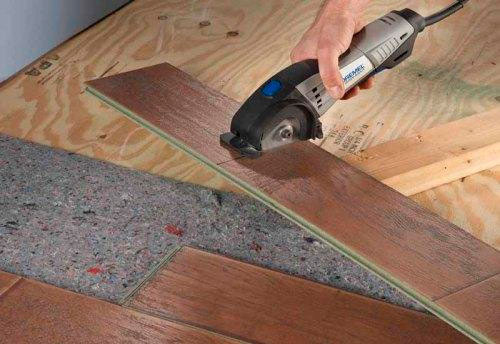
- Electric jigsaw. It also requires a special blade for laminate. This blade prevents chipping.
- Perforator. It will be needed when installing skirting boards.
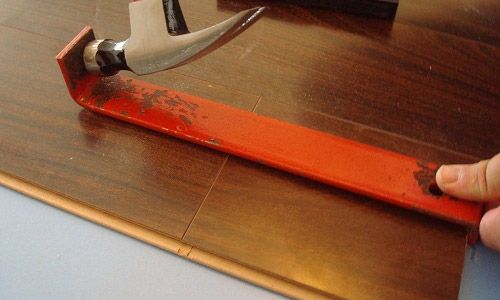
- For tight docking of panels - a hammer.
- Drawing tools: tape measure, pencil, angle.
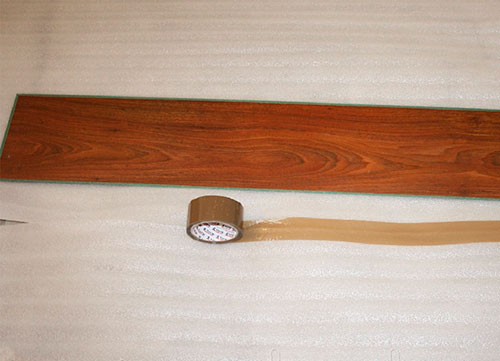
- For gluing and cutting the substrate - adhesive tape and scissors.
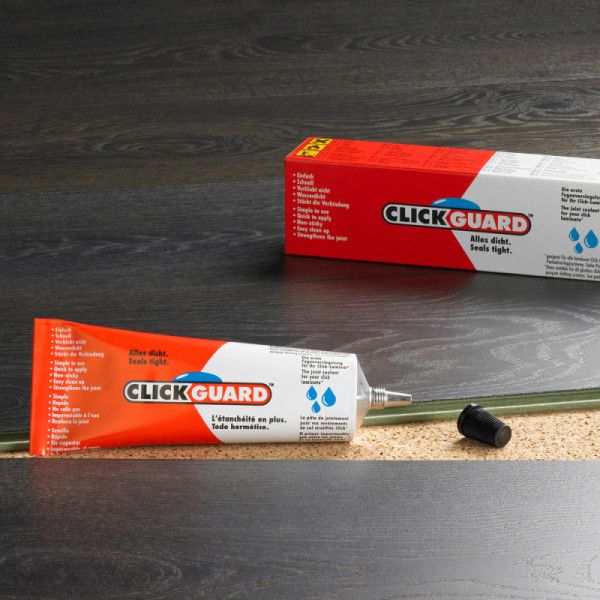
- If the materials were placed in a room with high humidity, then a sealant will come in handy. It must be used at the site of the seams.
- You will also need: pegs, they can be used as limiters between the wall and the panel; bracket, which is useful for mounting the last row.
Laying technology
Consider each stage of installation separately and sequentially. The following instruction will help to carry out the installation of the laminate, even for people without experience, within 1 day.
Preparatory work
- Based on the instructions of the laminate manufacturers, laying should be carried out only on a flat surface - it is necessary to level the floor. Height changes should not exceed 2 millimeters per two meters.
- In order to check the quality of the base, it is necessary to attach a two-meter rail or level in different positions. Under it should not form a space exceeding 2 millimeters. If gaps are found, then leveling with a screed, self-leveling floor or plywood is necessary.
- If a situation arises in which the wooden floor begins to creak or sag, it is necessary to level it using sheet plywood or OSB.
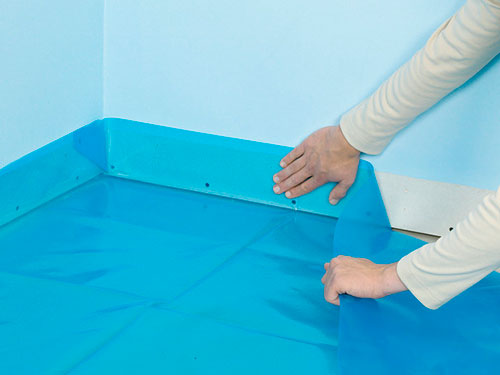
- It is necessary to lay a plastic film on the concrete floor, it is necessary to create a waterproofing layer.
- If before installing a new laminate there is an old coating and you are sure of its evenness and strength, then you can lay the laminate directly on it without resorting to dismantling.
- In order for the material to get used to the conditions of home humidity, it is necessary to leave it in the room for several days.
- You should also take into account the room temperature and humidity, they should be above 18 degrees Celsius and less than 70%, respectively.
- It is also necessary to note the specificity: when laying the floor, it is not necessary to make a primer, since the floor is laid in a floating way.
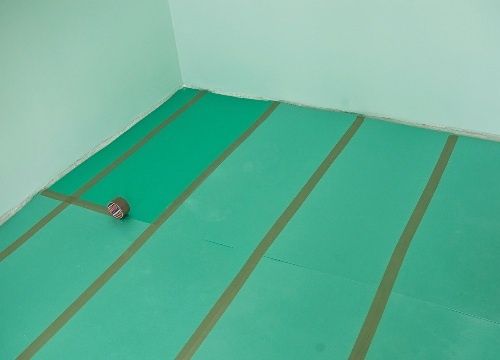
Substrate laying
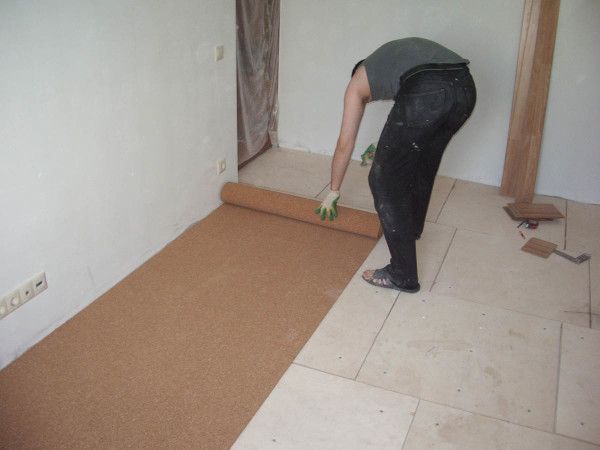
The substrate must be laid on a previously prepared flat surface, leaving a slight overlap on the wall. It is necessary to connect the substrate to each other “butt-to-butt”, for this, construction or ordinary adhesive tape is used.
Useful information! For greater convenience, the substrate under the laminate can be glued to the base. For this, double-sided tape is used.
Often this has to be done when using lightweight polystyrene foam to fix the substrate to the base.
Laminate installation
- Using a tape measure, measure the width of the room. 1 centimeter on each side is subtracted from the obtained value, they are necessary for the gap. Next, the number of panels in width is calculated. This is necessary in order to find out the width of the last panel. If the last part is too narrow, then it will be necessary to make the last and first rows uniform in width.
- As mentioned earlier, the installation of the laminate must be started from the door, and not from the far corner.
- The first row must begin with a solid panel. The panels are joined in one solid row, and the last panel is cut off based on the required length, taking into account the gap.
- The comb of the first row should be directed towards the wall. Also, do not forget that you should not allow gaps exceeding more than 20 millimeters. Since, due to the unevenness of the wall, the plinth may not be enough to cover the entire formed gap.
- The joining of the canvases must be done in such a way that no gaps remain. To seal the joints, it makes sense to tap the joint using a special punch. The doboynik can be made independently from the remnants of the laminate.
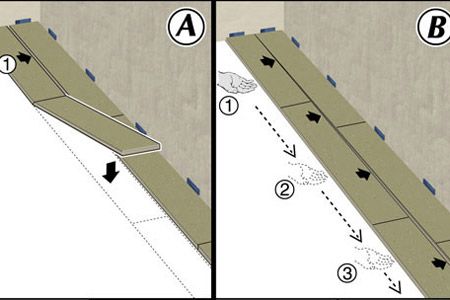
- To trim the board, you need to turn it 180 degrees, setting the limiter for the gap against the wall. Mark the place of the cut on the front side using a pencil and an angle along the top cut of the previous board. Sawing must be done with a jigsaw.
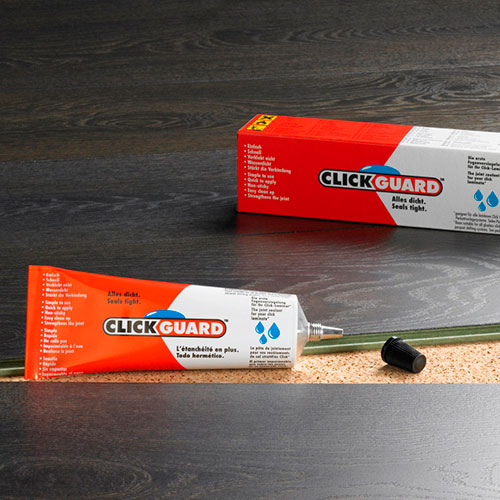
- In order to seal the joints, it makes sense to use a special sealant. Sealant must be applied to end locks and panels. Excess is removed with a clean cloth.
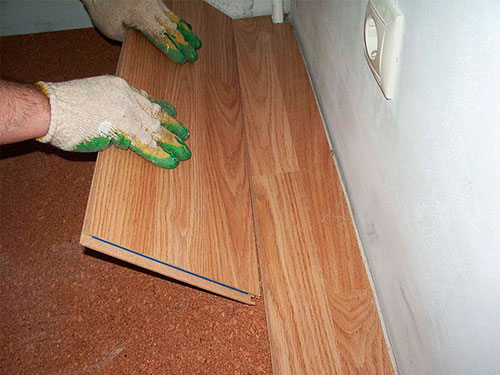
- The panels must be inserted at an angle of 45 degrees and released, then the joint will be attached correctly and further installation will not be difficult. If another type of lock is used, then it is necessary to punch the joint using a special lining.
- It is necessary to lay the laminate based on the segment of the latter. The minimum trim length should be no more than 1/3 of the entire panel. This is necessary in order to displace the joints, thereby increasing the strength of the structure.
- Panels can be joined in two ways: one panel at a time and in whole rows. Most effective method- docking in whole rows. During docking, it is worth remembering that the end lock is joined first, then the longitudinal one.

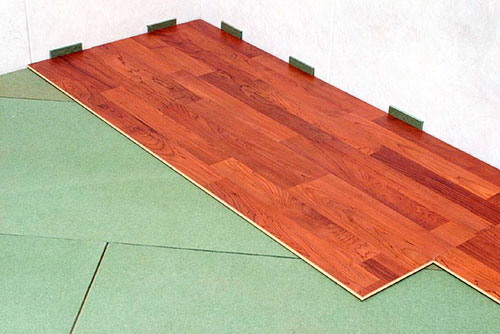
- After the first 3-4 rows are assembled, it is necessary to make gaps around the perimeter of the resulting structure. Wedges must be inserted into the gaps to fix the structure. Wedges can be built independently.
- After the structure reaches the doorway, it is necessary to cut the laminate so that it ends under the doorway.
- Laying the last row requires a lot of effort. This row will most likely be wide, so you need to trim it with a gap of 1 centimeter. You can saw off the excess only from the side of the lock, otherwise the panels will not be able to dock.
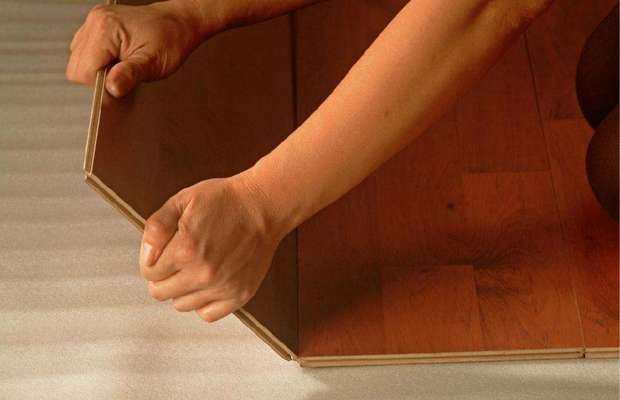
Laying the last row
The last row is inserted at an angle into the lock and snaps into place. This can be done with a strong hand pressure or you can use the styling bracket. With it, you can finish off the last row using a hammer.
This completes the setup. It remains only to apply the threshold on the doorway, as well as fix the plinth.
After installation, the laminate must be processed, over time, the laminate loses its appearance, so careful care is required for the canvases.
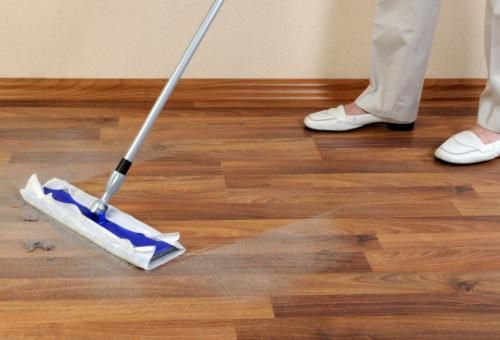
- Do not apply too wet cleaning. If moisture gets on the surface of the laminate, it must be wiped off immediately.
- A mop with a damp microfiber cloth is best for cleaning.
- It is also necessary to use a vacuum cleaner every week to maintain cleanliness, and if necessary, you can use wet cleaning.
- When there are scratches the best option to remove - use water with soda.
Installation cost
The total amount of installation will directly depend on what kind of base for the laminate was used. If the laying took place on a finished surface, then the cost will be the sum of the cost of the laminate, underlay, skirting boards and thresholds.
Conclusion
The quality of the final work depends not only on the experience of the master, but also on the quality of the material. It will be easiest to install an expensive laminate, as it is placed close to each other, leaving no joints, which means that the quality of the final structure will be high.
Laminate is a material that has won a leading position among the many floor coverings on our market, thanks to high quality, relatively low price, ease of installation and a wide range of models, different colors and shades. Also, consumers are attracted by the fact that this material can be laid on almost any rough coating. Therefore, it is not surprising that more and more people are interested in the question of how to lay a laminate with their own hands. Detailed instructions you will find out in our article.
Selection and calculation of the amount of material
Subfloor preparation before laminate flooring
This coating is applied only on a flat, dry and clean surface. Each laminate panel is equipped with locks, so that they are easily fastened together. But when the slope of the floor surface is more than 0.4 cm per 2 sq. m. the ridges may break, and the boards in the future will loosen and begin to creak. Therefore, preparing the base for laminate flooring is just as important as the installation itself.
Installation of this material usually does not require a screed. But the features of this stage of work largely depend on the draft floor covering.
wooden base
If your old floor is wood, careful preparation will be required before laying the laminate. In order for the flooring to last for a long time, the relief of the floor should not exceed 0.2 cm. If the parquet boards creak, you need to fasten them with screws. But, if you want to achieve the perfect result, do not be too lazy to replace rotten wood.
If the floor has obvious defects, it should be disassembled to the lags: perhaps the structure needs to be further strengthened. Another solution to this problem is to lay another layer of new boards or sheet plywood. This is the ideal way to level such a floor if the height of the ceiling allows you to "steal" a few more centimeters.
old wood flooring be sure to treat with antipyrine and antiseptic. Then the boards are cycled with a special machine to get rid of small irregularities.
After the preliminary work is completed, the floor is vacuumed, as even a crumb that has fallen under the laminate may creak unpleasantly in the future.
The wooden base is not waterproofed before laying the laminate flooring, so as not to cause premature decay of the subfloor.
Linoleum and tiles
Laminate flooring can be laid directly on linoleum or tile if the surface is sufficiently flat, without waves. Before installation, the base is thoroughly washed and vacuumed. Lay laminate only on a dry floor!
Concrete flooring
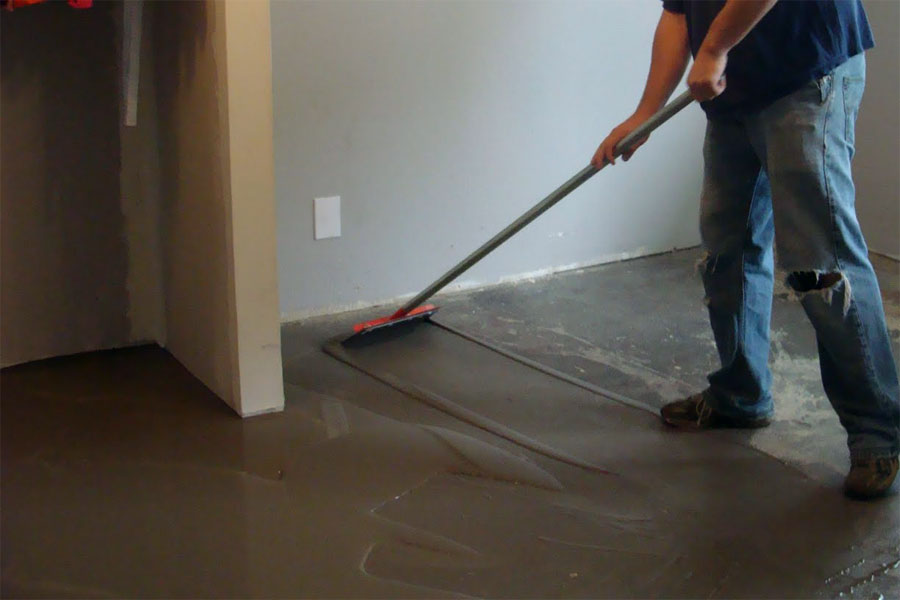
Preparing the concrete base before laying the laminate will take much less effort than wood. If you have a new concrete floor, then it only needs to be cleaned of dust and small particles. In cases where the concrete has begun to crack, it should be repaired. The exfoliated pieces are removed, the recesses and cracks are covered with a solution. Also, if there are small "holes", you can use a self-leveling mixture. In order for the repaired concrete not to dust or crumble in the future, a fresh cement screed is primed with ceresin.
Be sure to clean and vacuum the surface.
Carpets
This type of base is not suitable for laying laminate, so it must be removed, and then the subfloor must be prepared.
vapor barrier
Despite the artificial origin, the laminate has the properties of wood, namely, it can absorb moisture and swell, so a layer of waterproofing must be laid before laying this flooring.
Please note that the only exception is the wooden subfloor, as the film will not allow the natural material to breathe and will speed up the rotting process.
In order to prevent moisture from entering the laminate, roofing material or ordinary polyethylene can be used. The vapor barrier should cover the entire area of the floor, it is overlapped on the walls and fixed with adhesive tape so that the edges of the material extend beyond the laminate.
By itself, the laminate is quite hard and thin material, so it is necessary to lay it on a hard floor surface with a backing that will help to properly distribute the load on the surface.
Cushioning without overlap is laid on a waterproofing or rough wooden floor. Do not immediately cover the entire surface of the floor with material, it will interfere with you when laying the laminate. Cut the backing into suitable pieces. Spread two canvases, fasten them with adhesive tape, lay several rows of flooring on top. Then lay the remaining base under the laminate.
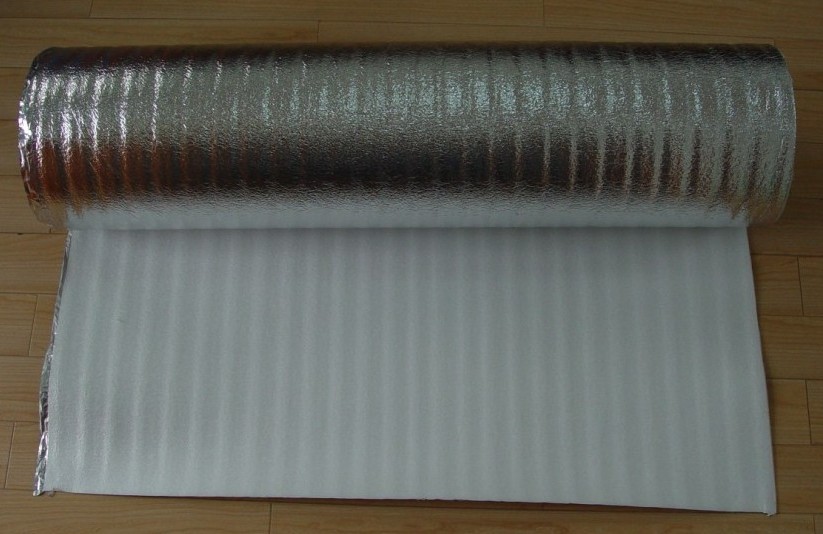
For the purpose of depreciation, you can use any material presented on the construction market: foamed polyethylene, cork backing, etc. Foamed polyethylene film can be used as two in one: for waterproofing and shock absorption.
There are two main types of laminate installation: connection with glue and a system of floating boards, which involves the "clutching" of panels with special locks on the principle of puzzles.
The first method is used mainly for laying in a room with a large area. For flooring in standard apartments, it is rarely used, as it requires a lot of time and additional expenses. The second option is the most common, we will describe it further.
Laminate with click lock
For work you will need: a pencil, a tape measure, a hammer, a saw or an electric jigsaw, a mounting bracket.
Laminate dies are connected to each other, from all four sides: the crest of one board enters the groove of the adjacent one and snaps into place with a hammer. To do this, slightly lift the panel towards you and lightly hit the bar with your palm or a tool. You can not hit the comb itself, it will damage the board.
Laminate panels are laid in strips. You can start from any side, but it is better with the length and the first row of flooring is placed along the wall. If you lay the laminate perpendicular to the window, the gaps between the boards will not be visible. In the case when you decide to lay this material in the corridor, you need to mount the plates in length, otherwise you may not have enough laminate.
There must be a gap between the wall and the flooring so that the laminate has the necessary space for expansion. For this purpose, 0.5–1 cm thick pegs are placed between the board and the wall, every 25–30 cm. Cut pieces of laminate are perfect as spacers.
Laminate laying sequence diagram
- To get started, take two dice. At the first, you need to saw off a comb with an electric jigsaw - this side of the board will be adjacent to the wall. Remember: the groove should never be touched; when laying it, it must always be directed towards the worker.
- The laminate is laid in a checkerboard pattern (panel I - in the 1st row, panel II - in the 2nd), so the boards are more securely fixed to each other. We advise you to shift the adjacent row by at least 30 cm. Shorten the second die by this amount.
- Lay panel I in the first row, and cut board II in the second. Connect them as directed by the manufacturer's instructions.
- Next, hook a solid plate III to panel I, and complete the second row with an uncut board IV. Don't forget to cut the comb on the elements adjacent to the wall.
- We finish the rows in the same way. Before laying the last boards in line, carefully measure the distance, and saw off the boards according to the obtained parameters. A mounting bracket is used to snap these elements into place.
- The remaining rows are also laid, but the ridges no longer need to be cut.
- Having reached the last row, the panels are cut off based on the gap remaining to the wall, taking into account the indentation of 1 cm. We connect them with a clamp-clamp.
Laminate is a modern, high-quality flooring that fits well with any interior. The only conditions for long-term operation of such material: proper installation and a flat rough surface.
Installing a laminate floor is not the easiest task for a beginner, but it is quite doable. So be patient and you will definitely succeed!
Before laying laminate flooring, you need to prepare the surface.
To do this, the old floor covering is removed, and the floor surface is thoroughly cleaned from debris and dust. The floor surface should be even, if you see bumps or differences of more than 1 mm on it, they must be eliminated. Greasy areas of the floor must be degreased.
It is highly desirable that before laying, the laminate lay in the room where it will be laid for at least 2 days. This will avoid its deformation after laying. Laminate can be used in rooms with a temperature of at least 18 degrees Celsius and relative humidity no more than 70%. Laminate boards should be laid perpendicular to the line of the window, so that the light from the window falls along the line of the joints - this will provide a more spectacular view.
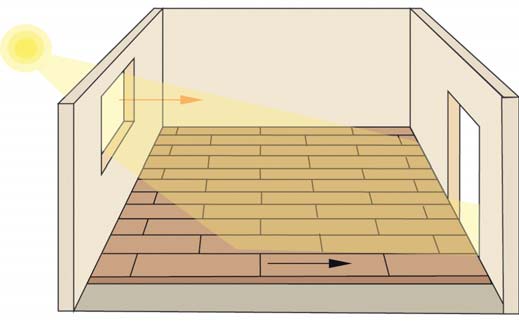
The sun's rays should fall parallel to the joints of the laminate
Do-it-yourself laminate laying methods
There are two ways to lay laminate flooring: glued and glueless.
Let's take a closer look at each of them.
The tool you need to install laminate flooring yourself
Adhesive way:
With this method of installation, a special adhesive composition is applied to the ends of the laminate boards, through which the boards are glued together. Note that due to the special composition of the adhesive, which does not allow the laminate to get wet and dries very quickly, such work can only be done with the appropriate skills. In addition, the boards will need to be pulled together with special straps for 10-15 minutes, which will provide a stronger bond. So, considering that this work is unlikely to be done on your own and you will have to hire a specialist, as well as taking into account the laboriousness of this process, we conclude: the adhesive method of laying laminate is not a very cheap pleasure. However, it has a key advantage: such a floor will serve you for a long time.
Glueless method.
Even a beginner can cope with such installations. But it must be borne in mind that this installation method implies increased requirements for the evenness of the base. Articles about laminate flooring often state that the glue-free method is very practical, as the floor can be taken apart at any time. In theory yes, in practice it is not so at all. When dismantling the laminate, the locks of the laminate boards break and it will be problematic to use such a coating.
![]()
Laminate panels that are mounted in a glueless way
In addition, the glueless method does not ensure tight contact between the boards, small gaps inevitably remain between them, into which moisture gets in over time, the boards in these places swell, the gaps increase and they can already be seen with the naked eye. In a word, such floors are short-lived.
You can install laminate flooring yourself if you familiarize yourself with step by step instructions below:
Video - instructions for laying laminate
Laminate installation steps
1. First, we mark up - we stretch a strong thread or fishing line, fixing it on nails driven in at opposite walls. The thread is pulled at a distance of 10 mm. from the wall. Lay the first row of laminate along the stretched thread.
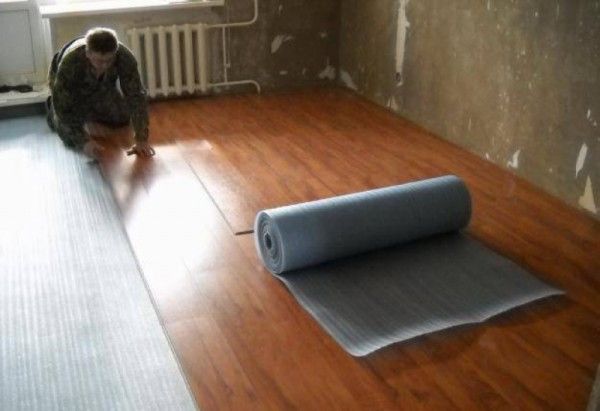
2. After making sure that the first row is laid correctly, we disassemble it and lay waterproofing on this section of the floor (usually it is a simple polyethylene film), and then a shock-absorbing lining, it can be purchased at the same store where you purchase the laminate.
It can be either foamed polyethylene, or - a material that is becoming more and more popular. recent times, thanks to environmental friendliness and its unique properties. The shock-absorbing lining, among other things, serves as excellent sound insulation. You should not lay the lining in the entire room at once. Laying should be done gradually, as the laminate is laid. The lining is laid in an overlap of 5-10 cm. The joints can be fastened with glue or tape.
3. Lubricate the ends of the laminate boards with a sealant and, closing the lock, lay the first row. Laminate boards are attached to each other by means of a so-called lock (grooves and protrusions).
Remember to respect 10 mm. indentation from the wall - this will avoid deformation of the coating in case of expansion / contraction under the influence of changes in temperature or humidity.
Wooden wedges are installed between the wall and the laminate boards, with the help of which this indent is adjusted.
4. The second row should start from half of the board to ensure dressing on the similarity brickwork. This provides greater durability of the coating and a more aesthetic appearance. It is believed that the optimal indent is 40 cm. The board is cut at an angle of 90 degrees.
The boards of the second row are connected to the first as follows: the board is brought at an angle close to the previous row, lowering the raised edge down, we snap the lock. First, the second board is laid, and only then the end board.
The locks of the boards before laying can be lubricated with a special sealant - this will save you from floor squeaks in the future.
5. To level the fixed laminate boards, use a hammer and wooden block, through which we knock the boards in the right direction.
Separately, we note that the laminate board is a floating floor type. This means that in no case is it recommended to fasten it rigidly (with nails, screws, etc.) to the base.
Video: Master class on laying laminate
Liked? Subscribe to the blog and get new articles!
Laminate is considered to be a reliable, beautiful and high-quality material that produces an attractive and durable flooring. Often, homeowners prefer to do the finishing work on their own, but you need to know how to lay the laminate with your own hands. step-by-step instruction all works are shown below. This work can be performed throughout the apartment or in one room. It is allowed to lay the laminate on a concrete floor or other types of base, previously properly prepared for this. It is not difficult to lay a laminate on your own, but it is important to carefully study all the nuances of the process in advance in order to prevent mistakes that are simply impossible to correct.
It is impossible to single out any clear and strict rules for choosing the method of laying the material; it is laid by any method preferred by the owner of the premises. The property owner must take into account his preferences, it is important to assess in advance the features of the premises intended for the work.
Different laying of laminate with your own hands, the step-by-step video instructions of which are presented below, can be performed in the following ways:
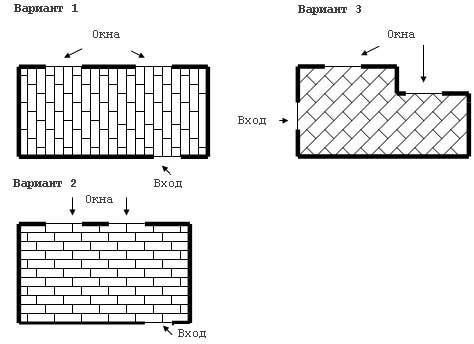
- along the room - in another way, this method is called in the direction of the light coming from the window. This technology of laying laminate is a classic. In the course of work all material is used as much as possible therefore the remains are minimized. This laminate laying scheme assumes the installation of each panel in one direction. Due to the direction of natural light from the window, an interesting type of coating is provided, in which the joints are practically invisible;
- perpendicular to natural light - this laminate laying technology is considered the most popular. Due to its use, a long coating period is guaranteed, as well as the laid laminated material withstands various mechanical influences well. Here, the joints are formed with an offset, however, the coating is laid in this way only in large rooms, since if this laminate laying technology is used in a small room, then the space will visually decrease even more;
- laying laminate diagonally - this work is considered the most difficult, so it is often impossible for a beginner to complete this process. This is due to the need to cut the first and last panel in each row at a specific angle. Therefore, laying the laminate diagonally is certainly accompanied by the appearance a large number leftovers.
Thus, the types of laying laminate have significant differences, so it is important to decide in advance how to properly lay the laminate. To do this, the features of the premises, the preferences of the owners, as well as the need to create a unique design are taken into account. It is possible to lay laminate along or across the room, and in which direction to lay the laminate is up to the worker. If you choose the right way to lay the laminate yourself, then the limited space visually increases or important defects are hidden. Therefore, it is impossible to say exactly how to lay the laminate correctly: along or across, since everything depends on the existing conditions.
Foundation Requirements
Before laying the laminate with your own hands, it is important to assess the condition and parameters of the existing base. At the same time, there may be different types bases, differing in characteristics and material of creation. The most common options are:
- concrete base - most often there is a need to learn how to lay a laminate on a concrete floor. This process is considered quite simple, but the ideal evenness of the screed is considered an important point. Therefore, quite often you first have to pay attention to its alignment. Laying the laminate on the screed is allowed only after its final drying. If the old screed is even, then it is important to make sure that the base does not contain various defects, which include all kinds of cracks or chips. They must be removed before laying the laminate. Minor defects are eliminated by creating a thin coating of special self-leveling mixtures;
- wooden base - it can be represented not only by boards, but also by other coatings. For example, many people wonder if it is possible to lay laminate on parquet. This work can only be carried out if the base is even, of high quality, dry and reliable. It is important to check the quality wooden base, since there should be no rotten boards or other significant problems. It is allowed to lay laminate in the apartment even on plywood or other wood-based panels. It is important to make sure that there are no creaking boards on the wooden base, as they must be replaced, and often the entire flooring has to be redone. Often you need to process the surface with a grinder;
- laying laminate on video on other coatings - the question often arises whether it is possible to lay laminate on linoleum or on tiles and other coatings. It is allowed to perform this work, but the base must be even and reliable. Be sure to install a suitable substrate in advance. The tile should be not only even, but also with a complete absence of breakaway areas.
The most frequently encountered is concrete base that do not have perfect alignment. In this case, laying the laminate with your own hands is only allowed after optimal alignment.
 Concrete
 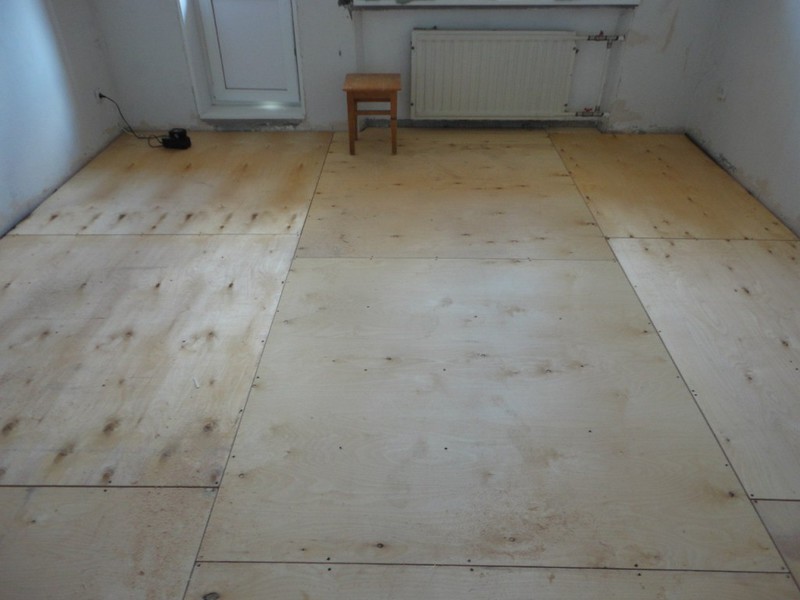 Wooden
 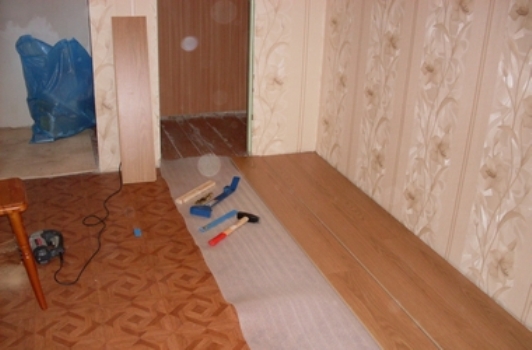 On linoleum
  On the parquet
 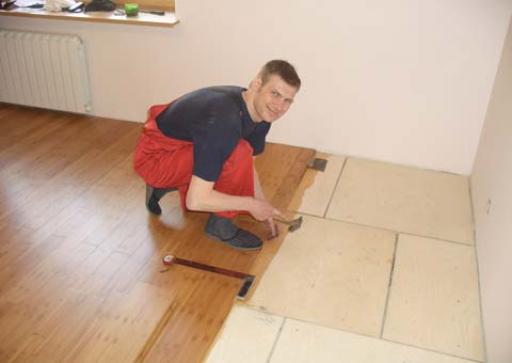 On tiles
 Surface leveling
Laminate can only be laid down qualitatively on a perfectly flat floor. Therefore, it is often necessary to pre-perform certain actions related to leveling the base.
An unevenness of up to 2 mm per 2 sq m is allowed. If you lay the material with your own hands on a concrete floor with numerous irregularities, the coating will warp, so it will not last too long.
The very process of leveling the base in the room is considered not too complicated, and it is implemented taking into account the recommendations:
- if there are cracks and seams, then they need to be expanded, after which they are completely filled with cement mortar or self-leveling mixtures, and after they dry, the floor is polished;
- final leveling involves pouring a full-fledged screed, and the concrete floor will be flat and ideal for the planned work;
- leveling a wooden floor consists in replacing damaged boards, and flooring can also be created over the entire surface of the room using plywood or other plates, and laying laminate on plywood is simple.
A high-quality floor on which the laminate flooring will be laid is considered the main one for obtaining a high-quality result.
 alignment
 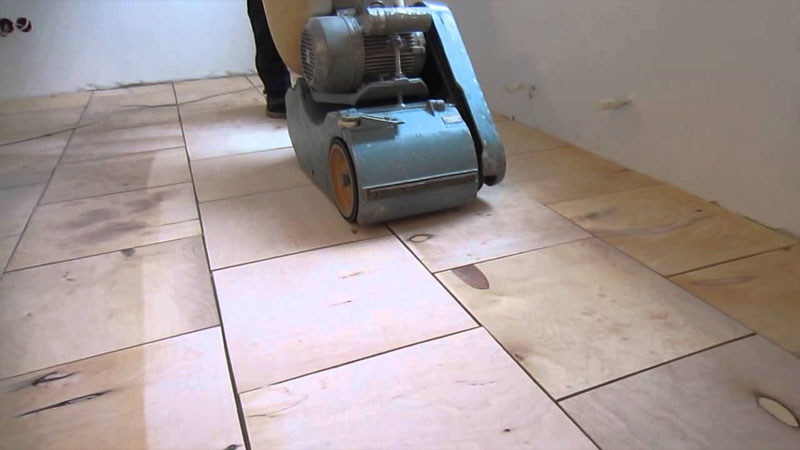 Grinding
 Substrate and insulating layer
Laminate laying rules indicate the need to use special insulation and underlay before creating the floor itself. The explanation for this rule is quite simple. The fact is that the laminate is afraid of constant exposure to moisture, so it is important to prevent it from coming into contact with the concrete base.
A diffusion membrane or standard polyethylene is ideal for the insulating layer, however, its thickness must be greater than 5 mm, otherwise it will be easily damaged. What needs to be done with these films? They are spread over the entire surface of the floor, and all joints are glued with adhesive tape. It is recommended that the film go a little on the walls of the room.
In addition to insulation, you need to put a substrate that performs the most important functions:
- increase the soundproofing parameters of the coating;
- static floor is guaranteed;
- small flaws in the base are leveled;
- the coating is protected from moisture.
Laying laminate on a concrete floor with an underlay is right decision, and products from expanded polystyrene or cork can be selected for the substrate. Plates or rolls are simply laid out on the surface in an even layer with the obligatory gluing of the joints. If you need to lay a laminate on a floor that already has a linoleum coating, then there is no need for a substrate.
Experts assure that the floor material should be laid with the indispensable use of soundproof boards, which increase the comfort of walking on the floor. They are usually represented by thin panels laid out around the entire perimeter of the base.
 Combined
 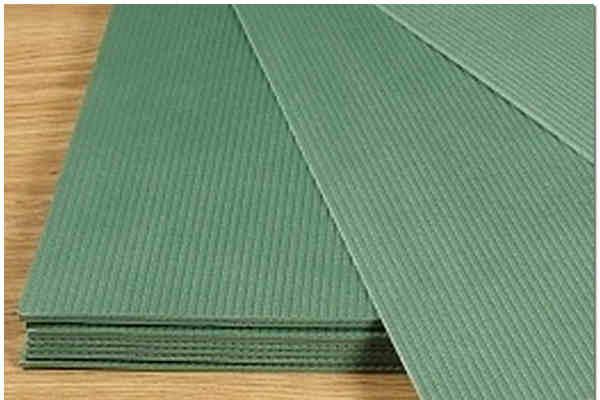 Styrofoam Polyethylene
 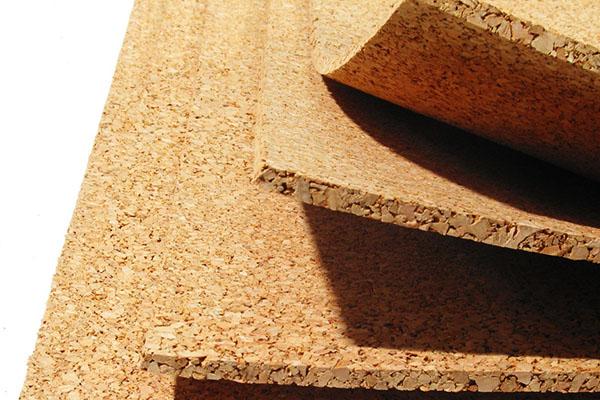 Cork
Cork Do-it-yourself laminate laying process
It is important to know how to properly lay a laminate? This process should be carried out only in a certain sequence of actions, where each action is an important step in obtaining the ideal result. If laying the laminate with your own hands is done for the first time, then it is advisable to watch a detailed video tutorial in advance so as not to miss the most important nuances of the process.
Material calculation
Initially, it is important to decide how much material needs to be prepared so that the finishing of the room with laminate is carried out without stops and problems. During the calculation, the following features are taken into account:
- which method will be used, with all the methods of laying the laminate indicated above, and the lowest consumption is available when using the standard orientation;
- what is the area of the room that needs to be laid with a laminate;
- how much area each panel of the material has.
The calculation itself lies in the fact that the area of \u200b\u200bthe room is divided by the area of one panel.
In order to lay the laminate on the floor without any interruptions, it is recommended to purchase material with a margin of 10 percent. You need to buy tiles from the same batch, because then all the elements will have the same appearance, so there will be no excellent panels on the floor.
 Required measurements
 Tools
How to lay a laminate with your own hands, a step-by-step instruction involves the initial preparation of the necessary tools for this work. These include the following equipment:
- a level or tape measure, as well as a corner, so that each tile of the coating is laid evenly and correctly;
- an electric jigsaw or a sharp construction knife, which ensures even and high-quality cutting of elements;
- a hammer that guarantees reliable fastening of all tiles;
- sealant for laying laminate flooring.
As soon as all the tools are ready, the direct laying of the laminate begins with or without sealant.
 Required Tools
 Material laying
How to lay laminate flooring correctly? This process is carried out in ways that depend on the interlocks that all panels are equipped with during production. It is impossible to say how best to fix the tiles, since each method has its own characteristics:
- Lock locks are represented by special latches. Here, do-it-yourself laminate flooring is laid in such a way that the crest of one panel enters the groove of the previous one. It is important to perform the process strictly in a vertical or horizontal position. To get a good joint, it is recommended to tap the tile, and it is also allowed to process the seams with silicone or glue. The use of sealant for laying laminate will protect the seams from various kinds of harmful effects;
- Click locks are used in such a way that the comb is not only inserted into the groove of the previous panel, but also snapped into place, for which it is important to apply significant force for this. If you figure out how to lay a laminate with your own hands using such locks, you will ensure a high-quality and reliable result that does not require additional fixation with glue or silicone.
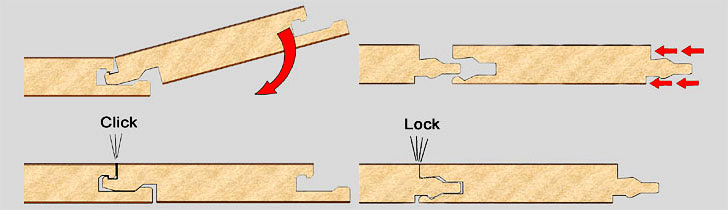 Interlock options
 It is allowed to assemble in separate rows or tiles. It is important to understand carefully how to lay the laminate with your own hands, so that this process is carried out automatically and quickly, so your floor will be laid quickly and correctly.
The installation process itself is divided into stages:
- it is important to lay the first tile with the ridge against the wall, and it is important to leave a small distance between the coating and the walls, for which wedges are laid;
- another laminating element is attached to the first panel, after which this work continues until the end of the row;
- in order to know how to properly lay the material, it is important to prevent a difference in height or the occurrence of gaps;
- if continuous installation is carried out, then the laminate is laid without thresholds.
Thus, correctly laid material will provide a durable and reliable coating that is pleasant and comfortable to walk on. It does not matter whether a transverse or longitudinal laying method was chosen. For additional fixation, it is allowed to treat each seam with a sealant. It is advisable to watch the video of laying the laminate in advance in order to avoid any mistakes.
Panels must fit snugly together.
Step-by-step instructions for working in difficult places
Often you need to figure out how to properly lay a laminate in unusual and difficult areas. In this case, a smooth and beautiful coating is guaranteed.
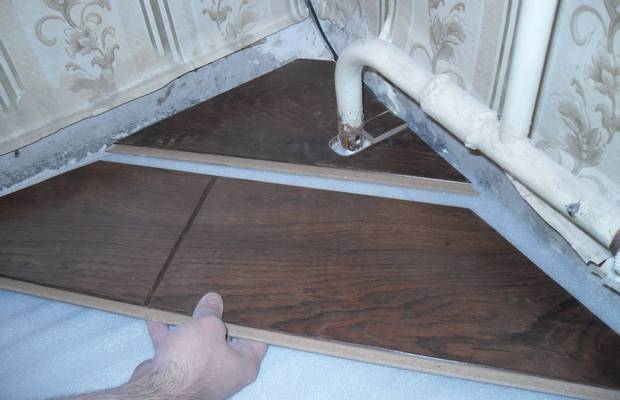
Around the pipes
Properly placed near the pipes, the material will be resistant to impact high temperature, and no ugly effect will be created. The whole process is carried out in stages:
- the distance from the pipe to the wall is determined, after which a mark is placed in the area where the hole will be located;
- the diameter of the pipe is measured, after which it is necessary to take a tile in which the desired hole is created, and it should be slightly larger than the measured diameter;
- standard laying of material is carried out, which ensures that the pipe is bypassed.
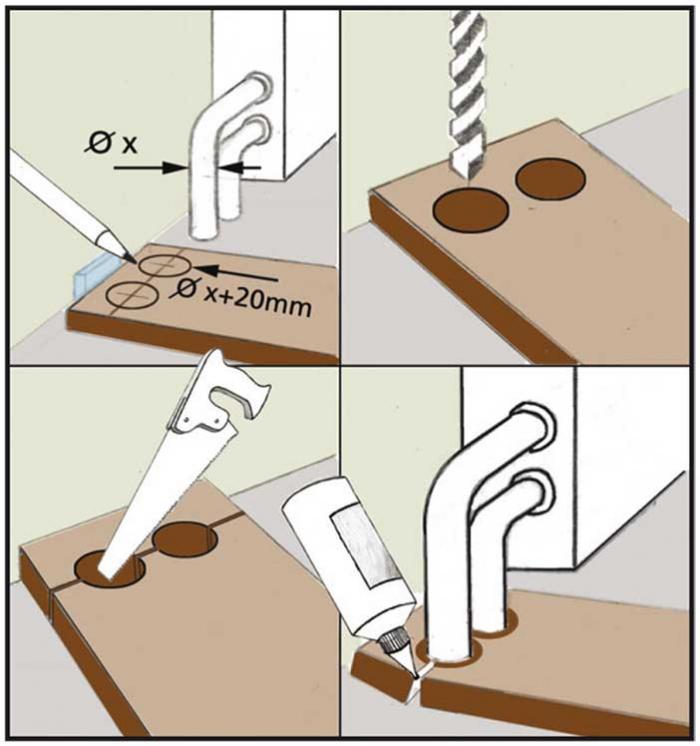 Laying laminate near pipes
 In the doorway
Laying laminate in the doorway with your own hands: step-by-step instructions on the video will easily help you understand the process. It is divided into certain stages:
- first, the width of the room and the size of the last panel of material are measured;
- the tile is cut in the right place;
- even laying is carried out, and between individual coatings or rooms, the joint is formed with a threshold or simply filled with silicone or another solution that matches the color.
Skirting board installation
After the flooring process is completed, the installation of skirting boards begins. They must be selected in accordance with the color and parameters of the laid material. It is best to choose designs with internal fasteners, as they are really attractive, and also they do not have fasteners.
Different types of skirting boards require different types of fastening to the wall, so you should first read the instructions. If the wall is not too smooth, then it is better to opt for plastic skirting boards. Wooden models are suitable only for perfectly flat walls.
When installing skirting boards, it is attached to special grooves, while you need to make sure that they are not on the same level with the gap between the laminate and the wall.
Thus, if you understand well how to lay a laminate, this process will not cause difficulties. Each person who has completed this work will leave only a positive comment about its complexity, since in fact it is simple and efficient. This allows you to save on the wages of employees, and also guarantees an excellent result, which will provide the required material.
How to lay laminate? This question is asked by absolutely everyone who decides to lay this flooring with their own hands in the apartment. We will study the most popular styling methods.
1
In order not to spend extra money, you need to spend literate, for which you will need note paper, a tape measure for measuring a room, a calculator, a ruler and a pencil.
- We calculate the floor area in the room where the repair is planned. If the room has the usual rectangular shape, then to get the area you need to multiply the length by the width of the room.
- On a sheet of paper we draw a plan of the room: we put all the niches, doors and other obstacles in order to take into account difficult areas in the room when calculating.
- The required amount of laminate depends, among other things, on the chosen installation method. With the direct method of laying the material with your own hands, be sure to add about 5% to the calculated area for cutting, with figured laying - about 25-30%, with diagonal - about 15%.
- On packages with a laminate, the coverage area for which the material is designed is indicated. To find out the required number of packages, you need to divide the calculated area by the area indicated on the package. If the result is not an integer, it is rounded up.
Laminate flooring
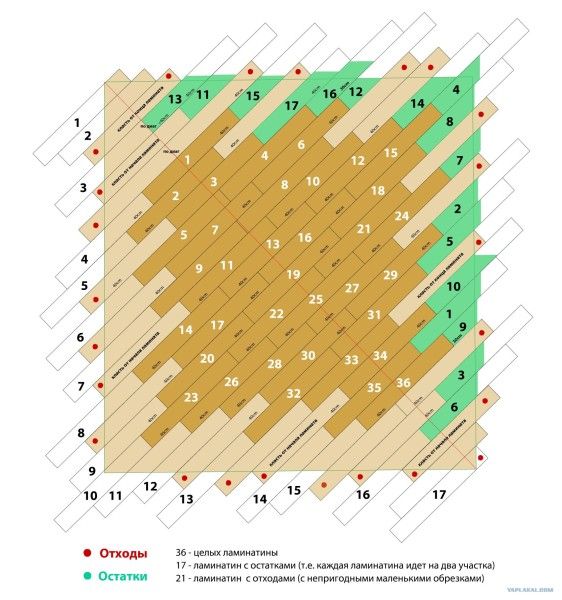
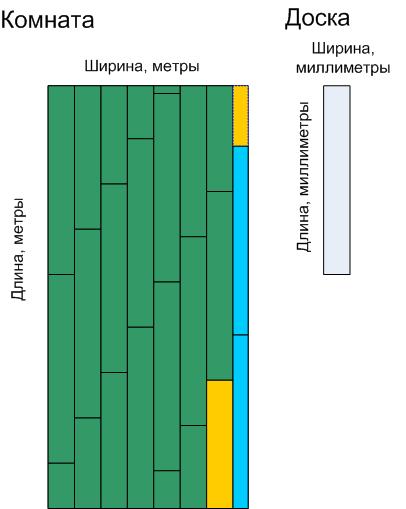
Let's use an example to study in more detail how to correctly carry out calculations with our own hands. Take for calculation a room 3.15 wide and 4.2 meters long. The area in this case will be 13.2 square meters. Add about 5-7% for cutting. To do this, multiply the area by 0.05 - the added expense will be 0.66 square meters.
We add the result (0.66 + 13.2) and get 13.86 square meters. This is the minimum amount of material that you need to purchase. The packing area is about 2,255 square meters. Divide total area to the packaging area (13.2:2.255) and the number of required packages will be 5.8. As we said, the result must be rounded. Thus, the minimum quantity of laminate is 6 packs.
2
There are three options for laying the coating: adhesive; lock type "Click"; castle type "Lock". Adhesive method: apply a layer of glue or sealant to the edges of the boards, and then press adjacent panels tightly against each other. This option is suitable when it is necessary to ensure maximum durability of the coating and protect the laminate from moisture penetration.
Click Laying Laminate
The disadvantage of this method can be called the laboriousness of the process - it will be very difficult to do the laying with your own hands without special knowledge. . The second disadvantage is the inability to further disassemble the structure and the fragility of the coating due to the drying of the glue during long-term operation.
The "Click" system is considered the most popular due to its simplicity of execution: you just need to insert the tenon of one panel into the groove of the other at a certain angle. In order for the grip to be of high quality, you must first press the panel until it clicks, and then hammer it into the previous board with a hammer until the latch mechanism is activated. When laying material with the "Lock" system, the boards are laid horizontally on the floor with a small gap relative to neighboring boards, aligning the "thorn" of the laid panel with the "groove" of the laid board, then carefully drive in the laminate until the lock is activated.
3
The main recommendation when laying the coating is a flat floor without depressions, drops and other irregularities. If you neglect this rule, the laminate will not serve you for a long time, and during operation the coating will creak and diverge. To avoid this, it is necessary to level the floor either with a screed or self-leveling mortar. The wooden floor does not need to be disassembled - just cover all the joints with putty and walk with a grinder. Be sure to check the evenness of the coating using the building level.
Step 1. Preparing for styling
Proper preparation for laying the coating will ensure 50% of a quality installation. We clean the base of the floor from dirt and dust, while the surface must be even. If there are any cavities or cracks on the surface, they must be repaired. If the subfloor is made of wood, first make sure that the surface is even and free of rot. Be sure to replace damaged boards with new ones, do not forget to fix the coating well with self-tapping screws. If there are minor differences or irregularities, use scraping.
Installation of laminate in a diagonal way
The panels themselves must acclimatize, for which they must be left packed in the room where the repair will take place for at least two days. And in order to prevent swelling of the floor covering, it is necessary to carry out laying work at a temperature of +15 to +30 ° C and at a humidity in the region of 40-70%. The covering keeps within on a layer of a polyethylene film 20 microns thick. If desired, you can lay a layer of the substrate, which will increase the level of heat and sound insulation. This will also soften the blows, extending the life of the flooring.
Step 2. Do-it-yourself laminate flooring
It is easier to start laying the first board from the far left corner of the room. Using a square with sides of 45 °, we mark up and cut the ends of the first board with an electric jigsaw. If necessary, cut holes for the radiator pipes. We insert 1.5 cm wedges close to the wall and place the first panel. The next row of coverage will consist of two boards. We carry out marking and cutting so that the panels are fastened together in the middle of the first laid floorboard.
We cut the edges of the planks adjacent to the wall at an angle of 45 °. We connect the first two rows with each other in any of the listed ways. Slowly we move from the far corner of the room towards the right near corner. In the corners of the room, we insert triangular pieces of laminate using a hook and tapping the boards with a mallet for a tight connection. Now you know how to lay a laminate with a diagonal method.
The traditional way of laying laminate with your own hands is much easier. Start laying from the wall located perpendicular to the window. The first row must be assembled close to the wall, taking into account the compensation gap of 1.5 cm. To maintain the gap, use special wedges. Arrange the panels so that the grooves of the floorboards "look" into the wall. Next, we lay the boards in the first row - the second board joins the first board, and so on. Without delay, check the evenness of the laying with a building level.
The last panel can rarely be fitted to the size of the wall - it will need to be cut. Therefore, first measure the distance to the wall on the floor, taking into account a gap of 1.5 cm. Then you need to mark the board and cut it off using a jigsaw.


