Do-it-yourself carport made of metal. Canopies from the pro-thinned-out sheet. Dimensions of a stationary carport
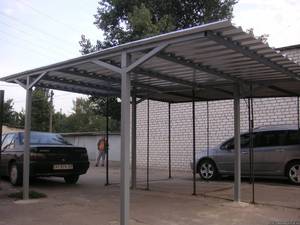
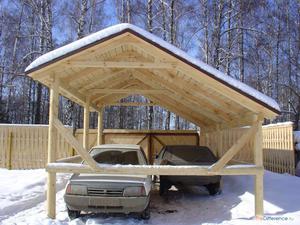
Every person who has a car at his disposal wants to make a cozy place for him to protect his iron horse from various weather conditions. How to build a full-fledged garage in the country or near the house if there is not enough space for this? In this case, the most the best option can be considered a canopy. Many people wonder how to build a carport. In fact, everything is quite simple, and everyone can do it on their own (photo 1).
This design can be easily placed anywhere in the yard or next to the hozblok. You can place not one, but two or three cars at once.
In photo 1 you see an image of a wooden canopy
Design features
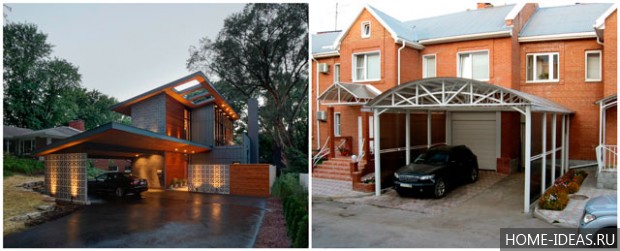
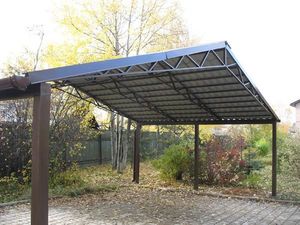
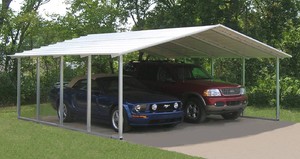
A canopy for two cars or one must be of high quality and withstand possible precipitation. It is desirable that such a design has an aesthetic appearance and only complements the house (photo 2).
There are several options for homemade carports, namely:
- Stationary canopy. Such a canopy can be installed in any convenient place. The construction of such a structure does not require special knowledge or skills. Easy enough to do correct calculations and follow the instructions. In the country, this design is ideal.
- Extension to the house. Such design options take up much less space. Very often you can find a hozblok with a canopy. If you think over everything and choose the right building material, then such an extension will also harmoniously complement the design of the house and garden plot. How to make a canopy as an extension to the house - only professional builders can give an answer to this question, because the construction of this structure should be based on the design of the house or hozblok.
So, the most common option for a canopy is considered to be stationary, since building it yourself is much easier, easier and more economical.
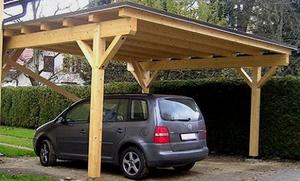 Photo 2 shows a shelter for two cars
 Dimensions of a stationary carport
Before you build a canopy, you need to decide on its dimensions. After all, such structures can accommodate 2 cars, or even three. For one passenger vehicle, it will be enough:
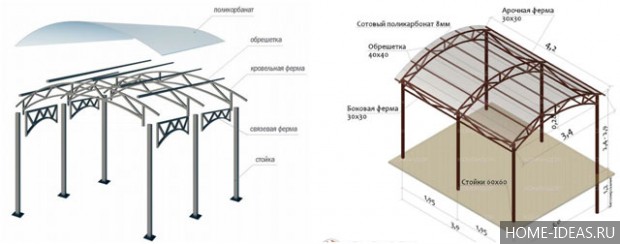
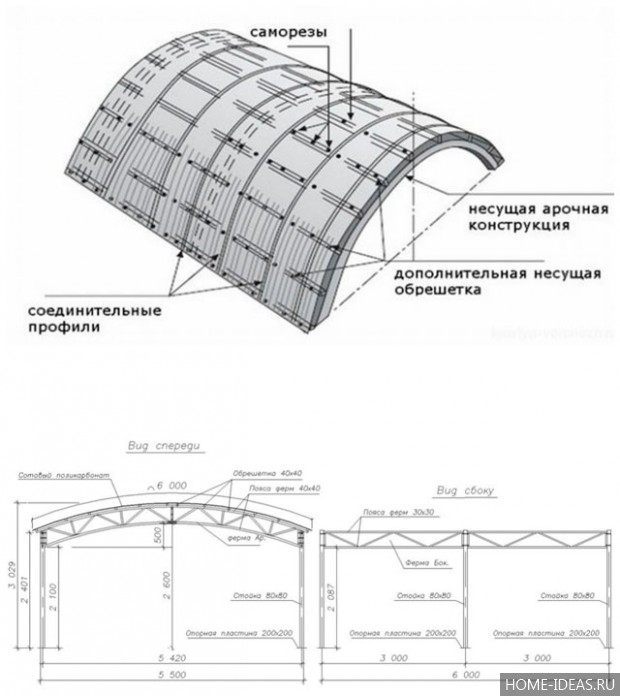
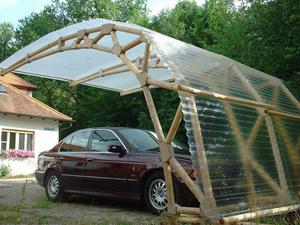
 Photo 3 shows a drawing of the future canopy
 - Carport lengths in 5 m
- Widths in 2.5 m.
This is in the case of a standard small passenger car. And if you need to place a jeep, crossover or minivan, then the dimensions should be larger: the length is about 6.5 m, and the width is about 3.5 m.
How to make a canopy for several cars and how to correctly calculate the dimensions - these questions are best addressed to specialists, because these are unusual and non-standard designs. More specific ratios of the size of the canopy, which will depend on its type, can be seen in photo 3.
Do not forget about the height. The canopy for a passenger car must be high enough so that the car can drive into it even with a load located on the top rack. So, you can find out the height of the future structure by measuring your car and adding another 1 m to its data. Too high a canopy for a passenger car can let in various oblique precipitation that will fall on the car. Experts recommend a height of 2.5 m. Having decided on the dimensions of the future structure, you can proceed with its construction.
Step-by-step construction instructions
The type of material used as a roof does not affect the way the canopy is built. Therefore, the instructions for the construction of this structure for a car with your own hands have the same sequence.
Build reliable canopy for your car, anyone can. It is enough just to know the elementary rules for working with tools such as a saw and a hammer. The construction of canopies consists of several stages.
How to make a carport? Start with the foundation. There are several ways to build it. Most easy option These are prefabricated blocks. The support blocks are attached to them with special brackets using corners.
Another way involves working with your hands. To do this, you need to dig a recess in the ground, the depth of which should be about 1 m. support posts special solution. But the platform under a canopy is usually laid out beautifully paving slabs. It will look harmonious and beautiful.
There are several variations depending on the installed foundation. So, when using ready-made blocks, the frame of the structure must be mounted immediately after fixing the supports.
If the second option was chosen, then you need to wait until the concrete solution completely hardens. This may take about a week. You can learn how to make a quality solution that will harden faster from sellers in specialized stores. If this period fell on dry and hot weather, then you need to pour a little liquid on the foundation. Otherwise, cracks may form in it.
Experts for the frame recommend using a metal profile. Wooden beams can replace it. It is also desirable to take a material with a cross-sectional area somewhat smaller than that of the supporting pillars. This ratio makes it possible to reduce the load on the frame itself.
To assemble it, you need to fix the cross beams on the racks. Only after fixing it is possible to assemble the rafters, and then fill the crate.
So, the do-it-yourself carport is almost ready, it remains only to take care of the most important thing - the roof. There are several options for roofing material that is suitable for this design.
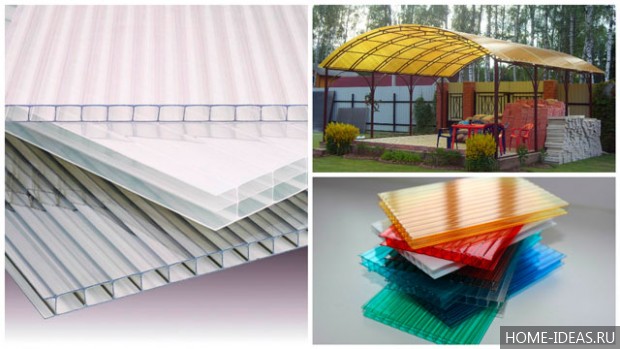
Roof polycarbonate
A carport made of this material is the most popular due to its low cost and simplicity. Polycarbonate in its structure can be cellular or monolithic. The main difference is as follows.
Honeycomb material is much simpler and easier to install, as it has internal voids. But a large weight, for example, of snow, can only withstand monolithic polycarbonate. A honeycomb canopy for your car can be installed on thin supports, but a monolithic one needs a strong and reliable frame. A monolithic canopy for a car will cost more, but it will last much longer than a cellular one.
You can find out more information about the installation of a polycarbonate canopy by watching this video:
Having decided on the characteristics of this type of material, start the installation process. To do this, you need to determine the dimensions of the finished frame of the carport with your own hands. After that, you can use a power tool or a hacksaw to cut off the desired polycarbonate sheet. When installing honeycomb material, it is very important to make sure that the channels of such a sheet are only perpendicular to the ground surface. Otherwise, moisture will accumulate in the sheets and after a short time such a carport will lose its original appearance.
After cutting polycarbonate sheets according to the required parameters, you can start drilling special holes for fasteners. This is important to do immediately before installation. So there will be no damage during fastening, and sheets with previously made mistakes are easy to replace. Then you need to install polycarbonate, and paste over the lower edges of the canvas with perforated tape. Treat its upper edges with a solid tape.
Wooden structures
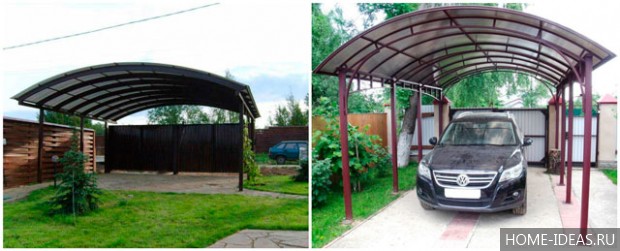
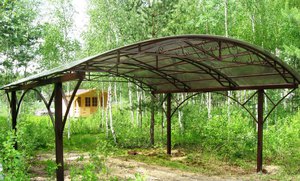
A roof made of wood for a carport will allow moisture to pass through, it is not a reliable protection. Therefore, a wooden canopy implies frame elements, support posts and a crate made of wood. But you can cover the canopy with ordinary slate (photo 4).
 Photo 4 shows a wooden frame for a canopy
 If you still have a desire to make a canopy completely out of wood, select high-quality materials. Lay the boards tightly together and treat them with a waterproof mixture. They are mounted in the same way as polycarbonate panels.
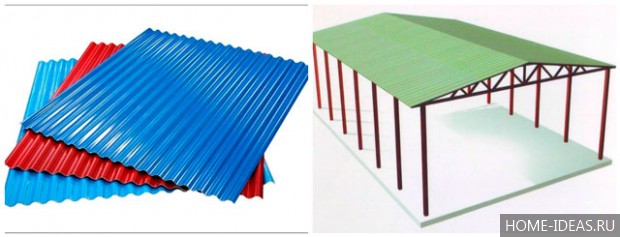
Roofing from corrugated board
This version of the roof is also quite popular. But when installing it, you need to know some rules and follow the recommendations.
It is necessary to lay sheets only with an overlap. Use only galvanized self-tapping screws for fixing. You can fix the corrugated board at the extreme corners, holding it with your hand, and only then over the entire surface.
A canopy with such a roof will look great in any country house. The question of how to make a carport will not be a problem or an impossible task if you follow these recommendations.
If there is a desire to make a beautiful and unique canopy for any car in the country, you can use special projects, view photos or videos on creating such structures. Designers offer their projects where you can find a house with a carport or a hozblok.
It should be noted that when planning it is required to take into account the place for guests. You can make a carport for two cars. To do this, simply increase the dimensions of the foundation and, accordingly, all consumables.
A self-made carport will please the eye and serve for a long time, keeping the car from bad weather conditions.
Every responsible car owner wants to protect their car from both professional car thieves and random hooligans, accidents and just plain bad weather. The best remedy to keep the perfect appearance car - garage. Here the car will be completely safe. But not all owners of private houses have the opportunity to build a separate garage on the site. In addition, driving a car into it every time (even if you popped home for half an hour) is troublesome and unreasonable. Why don't you just leave your car on the street? The most ordinary canopy can save him and you from bad weather. Such a construction will not require special funds and will not take much time. But at the same time, the canopy will serve you for many years, protecting you from snow and rain, hail and falling branches.
So how do you build a strong canopy? What are the techniques and materials?
We create a carport: projects and design features
First you need to decide how many cars should fit under the canopy. If the area of the site allows you to make a large shed, and the family has more than one car, then the choice is obvious. Otherwise, you can limit yourself to a canopy for one car. Necessarily consider machine dimensions. Designs for a small two-seat car and a bulky minivan are significantly different. We recommend that you think about the future, because the canopy can last 10, 20 and even 30 years. What size will your car be? For example, let's take a car with a length of four meters. In this case, the length of the canopy must be at least five meters.
Advice. If the distance to the gate is only a few tens of centimeters longer than required for a canopy, extend the structure. Such a “solid” canopy will allow you to close the gate even in the heaviest rain without getting wet.
Another important indicator, which must be considered when planning a canopy, is vehicle height with possible load on the top rack. It is important to find the right balance here: too low a canopy will make getting into the car uncomfortable and may lead to the fact that the loaded car simply does not fit under the canopy. And in bad weather, removing things from the top trunk is a dubious pleasure.
At the same time, it is worth remembering that too high a height increases the risk of falling slanting precipitation under the canopy. That is why it is recommended not to raise the canopy above 2.5 meters.
Exists two main types of canopies: fixed and attached to the house. In the second case, the walls of the house and special support pillars (at least two) act as supports. This option is considered the fastest, as the amount of work is reduced. But it is worth considering the increasing load on the walls of the house.
Stationary canopy can be placed in any part of the site. It is a simple structure of an even number of supports. The frame can be made of wood, metal profile, etc.
>Selection of materials
Many people make the mistake of first mounting the frame, and then picking up the roof. Features of materials dictate their requirements for the quality and strength of the frame. So, for example, cellular polycarbonate is lightweight. It can also be installed on a frame made of wooden beams with a small cross-sectional area.
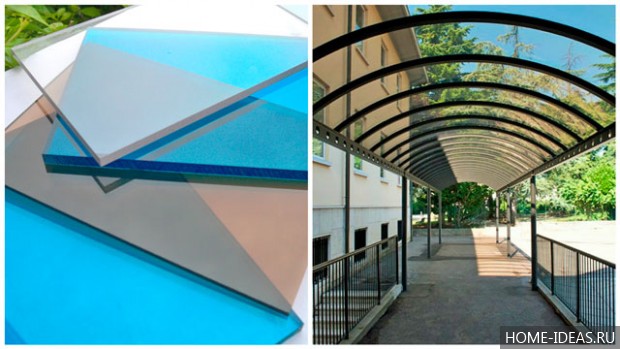
A monolithic polycarbonate needs a more stable support. What are the pros and cons of each type?
Cellular polycarbonate
pros:
- the presence of voids makes it easy;
- easy to install;
- low cost.
Minuses:
- short service life;
- low strength (a large amount of snow mass can simply break your canopy).
Monolithic polycarbonate
pros:
- reliable (capable of withstanding a large amount of precipitation);
- long service life.
Minuses:
- the need for a strong frame;
- complexity of installation;
- relatively high price.
Decking
pros:
- easy to install;
- long service life;
- relatively low cost.
Minuses:
- high consumption of material (lapped);
- high noise level (during rain);
- the need for fixation over the entire area.
How to make a carport with your own hands: step by step instructions
Such work will not take you much time, and the result will be beneficial for many years. To get a really solid design, carefully approach the choice of materials, and also consistently follow all recommendations.
- Laying the foundation. The technology for installing supports is well known to everyone who has ever encountered construction. Dig holes at least 1 meter deep where the supports are to be installed. Remember that the distance between the supports should not exceed 2 meters. Install the racks and fix them with concrete. This budget method has only one drawback - you need to wait until the solution completely hardens. This process usually takes 6-7 days at low humidity.There is another option - to purchase foundation blocks. Support poles are attached to them with brackets. This approach will save you time, but increase costs.
- Create a frame. So, everything is ready for the next step. Now you need to combine all the support posts. Racks made of a metal profile or a wooden beam are attached to them. Then, cross beams are fixed between the racks. Fix each section carefully, as a weak frame can collapse due to snow and rain. If you are interested in arched and other curved shapes, then you will need curved pipes to create a frame. However, you can purchase ready-made elements and assemble them on the site yourself.
- Roof installation. The method of installing the roof depends on what material you have chosen. Remember that materials expand in heat and contract in cold. That is why we recommend that you make mounting holes slightly larger than the diameter of the screws. This way you can avoid cracking the material. Use rubber gaskets to keep moisture out of the holes.
How to make a carport with your own hands: video
Having chosen a suitable place, draw a plan on paper with exact dimensions, make a calculation and prepare a tool.
Required Tool
To build a canopy, a good owner will have almost all the necessary tools. Something missing can always be rented or asked from a neighbor. There is no need for highly specialized tools, but depending on the materials used for the racks, a different set of tools may be needed:
- Trench tools: a shovel, a sledgehammer, a pickaxe and a crowbar - will be required for earthworks: leveling the site and digging holes for the canopy posts.
- Carpentry tools: a hammer, a wood saw, a chisel or a chisel - are used to install wooden racks, logs and shed roof battens.
- Measuring tool: tape measure, spirit level or building level, plumb line, carpenter's corner - are necessary in any case for correct installation and awning installation.
- Power tools: drill, turbo grinder, screwdriver and bits, jigsaw. And in the case of installing reinforced concrete or metal support posts for a car canopy, a welding machine will be required.
Consumable fasteners include nails, self-tapping screws, bolts, metal corners, etc. Their number and dimensions are determined depending on the materials and design of the canopy
Materials and their cost
The calculation of materials is made in accordance with the drawing of the carport. Taking the conditional length of the car at 4 meters, the canopy is planned to be 5x2.5 m. If the car exceeds the usual dimensions, a jeep or minivan, the canopy is built somewhat more spacious, about 6.5x3.5 m. When designing a canopy, start from the dimensions of the roofing sheets. The height of the canopy should allow you to freely open the trunk. It's about 2.5 meters.
The number of support posts, depending on the material, the area of the canopy and the weight of the roof, ranges from 4 to 10 pcs. If one of the sides is adjacent to the building, fewer racks will be required. Materials for support posts and metal canopy frame:
- round pipe with a diameter of at least 1 inch or similar profiled (square or rectangular);
- a metal corner with a shelf of at least 50 mm or a channel, tee or I-beam with a metal thickness of 3 mm or more.
The cost of a metal rolling profile depends on the brand of metal, the most common for steel is 40 GOST 1050-88, and the weight formed by the wall thickness. To date, a profile pipe 50x50x3 costs within 180 rubles per meter. Corner 50x50x5 - approximately 150 rubles per meter.
A frame made of wooden beams will cost less. For support posts, a 100x100 softwood beam costs approximately 60 rubles per linear meter. A bar for a 50x50 frame costs about 17 rubles per meter. m. The price is affected by the type of wood, humidity and wood species.
Any materials used for roofing are suitable for covering the canopy:
1. Decking - with a polymer coating 0.4 mm thick costs from 155 to 175 rubles / m 2, similar galvanized within 130-150 rubles / m 2. A galvanized steel sheet measuring 1000x2000x0.4 mm costs approximately 2660 rubles apiece. A galvanized skate with a size of 2000x100 mm will cost 95-100 rubles per piece, and with a polymer coating - 120 rubles per piece. For the arrangement of a metal roof, additional and drainage elements will be required.
2. Slate gray type SV-40 has 7 or 8 waves with a thickness of 5.8 mm and standard dimensions of 1750x1130 mm, costs 220-230 rubles per sheet. A slate sheet weighs from 19 to 25 kg, depending on the thickness and density of the material. Colored slate will cost a little more - up to 300 rubles a sheet. The disadvantages of slate include the fragility of the material and heavy weight.
3. A metal tile with a thickness of 0.4 mm costs from 180 rubles / m 2. The working width of the metal tile is 1100 mm, the total width is 1180 mm. This is a reliable and lightweight material for a canopy roof. It is easy to transport and install.
4. Plastic roofing is designed for canopies and awnings. As a rule, it is made of polycarbonate or PVC. The standard sheet size is 2000x900 mm or it is produced in rolls of 10-20 meters with a width of 1.5 to 3 m. On average, the price of a sheet is around 300 rubles.
Canopy support legs installation
For the support posts of the canopy, holes 0.7 meters deep are drilled or dug according to the marking. The bottom is covered with rubble and compacted. The concreted end of the support post is treated with an antiseptic and bituminous mastic. The support posts set strictly vertically are poured with concrete. The principle of installation of supports is the same for wooden and metal racks.
After the concrete has dried, the truss structure for the roof is mounted on the racks. Wooden support posts along the perimeter are tied with a board of 50x150 mm, a rafter skeleton is installed on the formed upper crown of the canopy. A beam of 50x100 mm with an installation step of about a meter is suitable for him. The exact size of the pitch of the rafters is dictated by the width of the roofing material. The rafter beam is installed in places where the roofing sheets overlap.
For metal racks, the truss system is welded on the ground. A rectangular frame is welded from a corner of 50x50 mm according to the dimensions of the racks. For corner gable roof rafters are welded from the same corner. For an arched roof, a metal strip is used. Holes are drilled in the rafter system for fixing the roof. Usually the hole pitch for any type of roof is 10-15 cm. The rafter system is installed on the support posts and fastened by welding.
carport roof decking
A crate is sewn onto the rafters perpendicular to them. For this, both edged and unedged boards 20x100 mm are used. The first line of the crate is stuffed along the edge of the slope, the top line at the place where the ridge is attached. The distance between the lines is 50-70 cm. The lines should be located in the places of fastening and overlapping of the roof.
Roofing sheets begin to be laid from the bottom corner to the ridge with an overlap of 10-15 cm. The slate is fastened with special galvanized nails with a large hat. It is nailed with light rhythmic hammer blows on a slate nail mounted on the top of the wave.
For use galvanized self-tapping screws equipped with special plastic gaskets or press washers. Usually, 10-12 self-tapping screws are required per roofing sheet. Often roofing sheets are completed with a set of fasteners of the corresponding color.
Roofing sheets are fastened to the frame of the canopy with the help of bolts with metal and sealing washers or metal screws, under which sealing gaskets are installed. published
Join us at
Sheds for cars in the country are a real salvation from rain and hot sun, if on the territory country house or cottages there is no major garage or closed parking. Therefore, the question often becomes, how to choose the most suitable carport? Let's consider various country canopies.
The choice of material and the stages of construction with your own hands
Carports in the country have long been popular for several reasons:
Naturally, you can make a carport for two cars, or even bring it closer to a real parking place for a car in the country, try your best and build a garage for a car in the country. But this is not always required, especially if the car is rarely in the country or the budget does not include capital construction costs. Either way it's a cover can be built quickly and even make it temporary, since it can be retrofitted at any time or, if necessary, modernized, rebuilt, etc.
In this article, we would like to briefly talk about possible sheds so that any owner of a summer house can choose the most suitable one for his site, and also learn all the stages of construction with his own hands.
- The construction of a car shelter begins with preparatory work, reflections and fantasies, choosing materials, drawing up a drawing, studying various photos of a carport, determining a budget, etc. At the same time, any drawing is a rather important stage, with the help of which the entire further work. But it needs to be done more or less professionally so that it is possible to calculate not only the amount of material needed, its location and cost, but also permissible loads etc. Roughly speaking, you need to take into account even the smallest details and make a complete design for a shelter for a car.
- Upon completion of the design work and at a time when you already clearly know the full estimate and the amount of material, you can safely go shopping. In this case, you need to consider not only the material for the construction of the roof or foundation, but also additional materials and, possibly, the tool that will be needed. Therefore, in order not to have to go to the construction market or to the store several times, you need to check everything initially.
- Preparatory work - this stage of construction should not be neglected either. For starters, this choice of building site, then, freeing it from everything unnecessary and at the end, preparing the base, leveling the site, and so on. All these preparatory measures must certainly take into account the constancy of the wind, sunrise and sunset, the occurrence groundwater, slope of the territory, subsidence, etc. Of course, you don’t have to bother, but it will be much better when the car is under a canopy, and not in the sun, or some side of it starts to rain, puddles will accumulate under the car, etc. .
- Construction of a carport in the country. By and large, this is the last stage of all work, but the most difficult, since this is no longer the preparation of the territory and the purchase of materials, but the direct construction of the frame, construction, covering, etc.
Carports by type of covering
Canopies made of polycarbonate
 Building this shelter is quite simple if you have some experience in construction, for example, you have already covered a place to relax or built a gazebo in a polycarbonate country house. Popular and very high quality material, which has many clear advantages, affordable and easy to do with your own hands. Due to these qualities, the popularity of polycarbonate is constantly increasing and canopies from this building material at the dachas is becoming more and more. With polycarbonate it is possible to cover a canopy from almost any material, for example, made on the basis of metal, timber, prefabricated frame, metal forging, etc.
Polycarbonate is laid on the prepared roof frame and fixed to special fasteners that do not allow the material to crack, provide for narrowing or increase from temperature changes, prevent water leakage, etc. Basically, we want to recommend you one thing - do everything very professionally and correctly, since only in this case the material, on absolutely any frame, can show all its positive aspects.
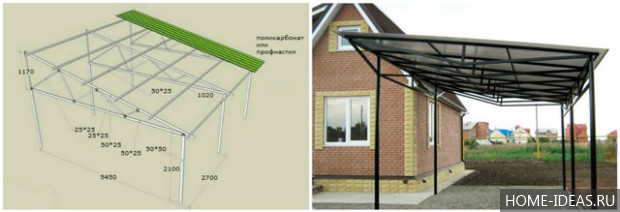
Sheds made of profiled sheet
 By and large, the same popular type of shelter, which is very common today. Average in cost, fairly fast when installing with your own hands, practical in operation - in principle, these qualities are already quite enough. And if we also say that a carport for a passenger car made of profiled sheet can be laid by hand, and even for any type of frame, then in general it has almost no competitors left.
A canopy from a profiled sheet is actually practical, but it is also very good because it is light in weight. It is enough to firmly fix on the frame and not be subject to strong gusts of wind and is just right so as not to create a large load on the base and frame, and therefore the cost of these structural elements can be significantly reduced in material terms.
Canopies from a metal tile
 A metal tile is considered a building material of medium weight, and therefore the frame and base for this shelter must be as close as possible to capital. Most often in this case (if the roof is made of metal tiles), the customers of the structure choose this type of construction - a residential building with an attached carport. Thus, it is a canopy that is attached to the house, repeating its outlines, design, and the roofing with metal tiles smoothly goes from the roof of a residential building to the roof of the canopy. This is quite convenient, especially when the shelter is being built at the same time as a residential building.
As a result, forged or metal carcass, neatly covered with a metal tile, is area completely enclosed on one or more sides for auto. The carport that we got is single-sided, it may well be a capital parking lot in the country, especially when it is additionally fenced and provided with a high-quality foundation made of cement, tiles, and concrete, etc.
Awning
 The simplest option, which very often used before building a more capital and high-quality building. This makes it possible not to waste a large number of money and painlessly dismantle the canopy at any time.
Although, most owners of summer cottages prefer not to consider an awning as an impractical and cheap structure and fundamentally change everything. Imagine a reliable metal frame made of profile pipe, concrete base, wiring for lighting and other required devices and a high-quality awning, firmly fixed on the frame. At the same time, it can be of high density, of any color and size, with a pattern or plain. Perhaps this is very good, especially considering that it can be replaced with a new one every 5 years, completely changing the entire appearance of the carport.
Any shelter for the car will fit perfectly into country cottage area, if you pay attention not only to your requirements, but also to the specifics of the landscape of the site.
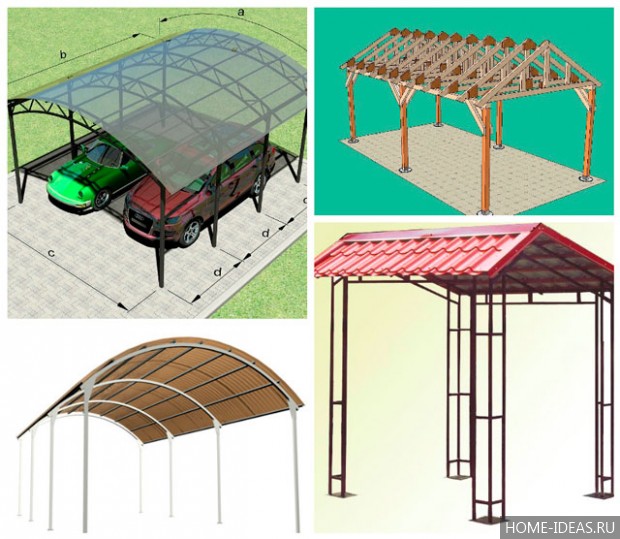
Carports by type of frame
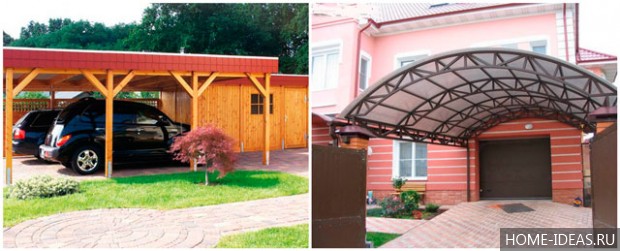
Wooden awnings
 A car shelter made of wood can be built very quickly, is quite durable and practical, capable of serving for more than ten years, with the condition that it is treated with protective solutions. The wooden frame for the car can be covered with:
- ondulin;
- polycarbonate;
- slate;
- tiles.
This is a building of medium complexity, and therefore almost any owner of a summer house can do it with his own hands who wants to protect the car from the weather.
Metal canopies
 Perhaps the most common basis for the construction of these shelters is a profile and ordinary pipe, channel and corner. You can install a roof from lightweight and inexpensive materials, under an ondulin or an awning, or give the structure solidity and rigidity when the shelter is made under a metal tile or euro slate. Metal structures are quite reliable, and therefore, having spent money on it once, you can only update some parts of it and tint it for a very long time.
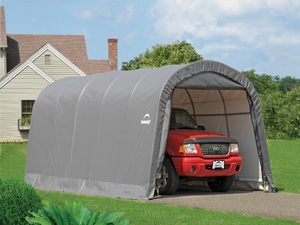
prefabricated structures
 Today, ready-made, prefabricated or collapsible carports are quite popular. They have standard size and are completely ready for installation in any part of the territory, you just need to choose the right one, transport the structure to the dacha and install it. design can be matched to almost any type of covering, but you definitely need to consult with the manufacturer or seller at the place of purchase, what is the best way to cover the frame of your choice.
The design of the canopy makes it possible to build it in a very short time on an area with small financial costs, since the entire base has already been prepared, you only need to put a canopy on your site and cover it with the necessary material.
Wrought iron awnings
 Maybe, the most popular type of awnings among the owners of country villas and cottages. A rather expensive construction that will require not only the appropriate material for covering, but also assistance in installing a professional team of installers who can do everything with the highest quality and accuracy.
Of course, it makes no sense to install a wrought-iron canopy in an ordinary summer house, where you visit once a week or once a month in order to dine with barbecue or pick berries, in which case it will be enough to install a prefabricated carport. But that's when you have Vacation home on the outskirts of the forest, where you can hide from the bustle of the city for a long time, then installing a forged canopy under the car will be quite appropriate.
Having studied and considered some options for installing a canopy, having studied the photo, each of you must understand that when choosing this structure or even a conventional design, it is necessary to build on many correct factors - the size of the carport, the method of installing the frame, the material of the cover and the material of manufacture. Only by combining all these characteristics as much as possible, you can build a pretty durable and high quality canopy and for a very long time you will not think about what to build a carport from or how to replace the carport with a more modern one.


