How to make a foundation on bored piles on your own. Column foundation from bored piles
Tape and column foundations are more traditional and understandable for the construction of baths in Russia, however, a more modern bored foundation has a number of advantages over them. And for areas on slopes and with problematic soil, this is an ideal option. And for those places where the building is especially dense, the foundation on bored piles allows you to build even a two-story bathhouse without consequences for the soil and nearby buildings.
Features of the device of this design
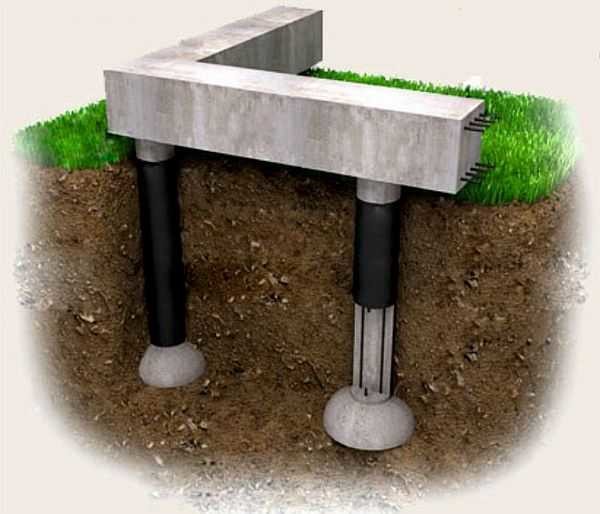
The whole idea of this miracle foundation is that the piles are not hammered into the ground with force and do not damage the layers - they seem to “grow” out of the ground. In simple terms, a well is drilled in the soil, a pipe is placed in it or removable formwork and all this is filled with mortar.
And for weak soils, a bored foundation with a grillage is completely unique possible option. After all, the main task of any piles and pillars is to rely on the hardest layer of soil - on the incompressible one, the one that is always below the level of freezing. ground water. And it can be quite deep due to the geology of some regions. It is just the bored piles that reach such a line - holding the entire newly erected bathhouse on it.

Today, such a more expensive, but reliable zero level is also practiced, such as pile foundation on the bored piles with a heater. For this, expanded polystyrene is used, which, as you know, has a rigid structure. It is fixed directly on the waterproofing and covered with soil. In addition, polystyrene foam itself is an excellent shock absorber for soil heaving forces.
And most importantly, even a strip foundation on bored piles does not violate the communications that were installed on the site even earlier. And the fact that you can’t make a basement in such a building later cannot be considered a problem for a bath, because such a room is simply not traditional for it. Pleased with the service life of such a foundation - more than a hundred years!
The procedure for performing construction work
Build this durable and solid foundation you can at any time of the year - and this is a valuable moment. But during construction, it is necessary to strictly observe the technology, otherwise even small miscalculations will lead to serious consequences - and the strength of the structure itself will be the first to suffer.
Step 1. Calculation of the future foundation
The width of such a foundation is calculated depending on the thickness of the future walls of the bath. So, for a frame structure, a particularly powerful zero level is not needed, because. such walls are both light and thin. But for a real Russian steam room from a bar, a bored foundation with your own hands will have to be done more by 20-40 mm, so that the entire load is distributed evenly.
Step 2. Marking the site
The arrangement of piles on the site can be very different - both in the form of a solid wall, and in a checkerboard pattern or under certain sections of the bath.
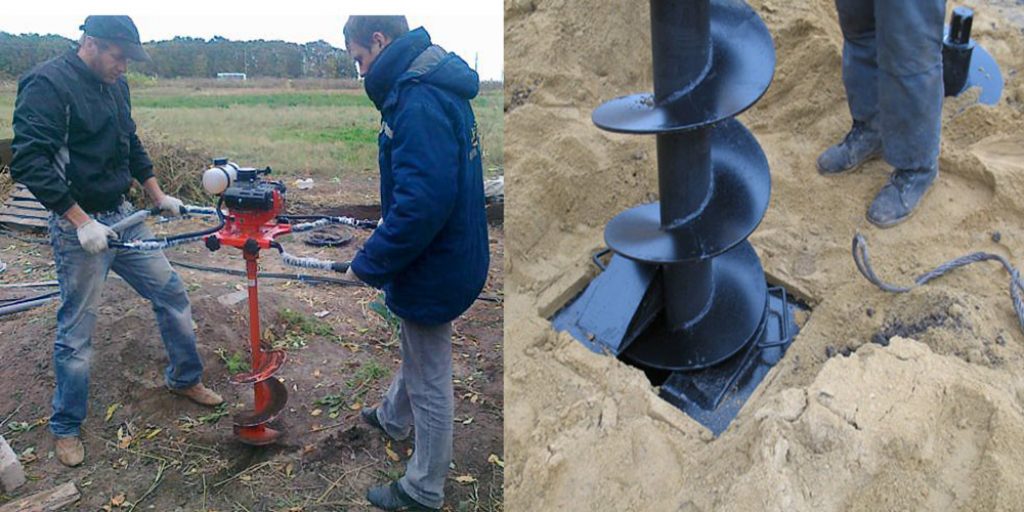
Step 3. Well drilling
A drilling machine can make one well in just a few hours. So far, Korean and Japanese pit drills have been recognized as the most productive in Russia, allowing the construction of bored pile foundations in a short time.
Step 4. Making formwork
The next step is building a formwork to create a well. It is necessary when the soil is not dense enough and can crumble. But under normal geological conditions, you can do without formwork, pouring concrete directly into the created well - which greatly facilitates the whole process. It will only be necessary to make a small formwork on the surface of the earth - it will then become the head for the pile. Such a formwork may well be a roofing material rolled into a pipe.
Step 5. Choosing piles
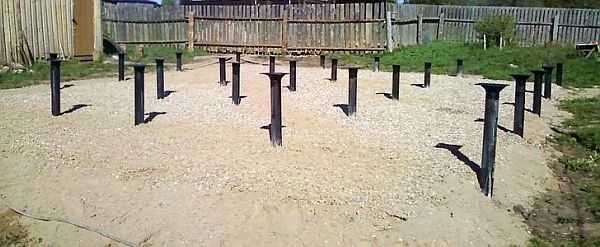
The piles themselves also need to be strong and durable - in terms of their bearing capacity, they should be much better than conventional driven ones. Due to the simplicity of the designs of bored piles, earthworks can be significantly limited, and the piles themselves do not need to be installed too much - not even on every square meter.
You can make piles with your own hands. Moreover, the piles are made right on the spot - and therefore there is no need to worry about the place of their storage. Bored piles are also popular in construction, the base of which is expanded to 50 cm. This is facilitated by special technological methods that allow such piles to have a bearing capacity of as much as 5 tons. On such a foundation, you can safely build a solid brick bath - with all the architectural delights.
Piles for the foundation can be from the very different material- it all depends on the available density of the soil. So, if the soil on the site is clayey and oversaturated with moisture, then during the installation of piles, the walls of the wells will have to be strengthened with special casing pipes, in extreme cases, when the budget is very limited - at least with clay mortar. Thanks to these casing forms, the horizons of quicksand soils overlap and the foundation is absolutely safe. After all, both the depth and the width of the wells remain unchanged and not subject to deformations.
Step 6: Making the Pillow
A pillow for such a foundation is a must. It is usually made from sand, gravel or just a concrete mixture. The pillow is well compacted and then the well is already filled with the base material.
Step 7. Foundation reinforcement
For additional strength of bored piles, reinforcement is often used, which is knitted into a single structure with the help of a grillage.
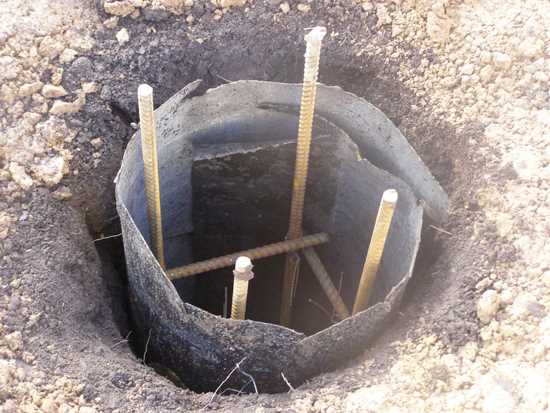
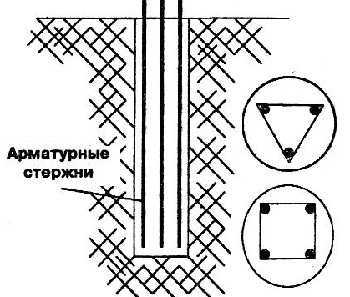
In order for the bored piles to be strong, reinforcing cages are made for them in advance - from rods with a diameter of 10-12 mm, connected in a special way. You can also use ready-made triangular frames, which are usually taken for floor beams.
Step 8. Installation of piles
Now piles are being prepared - their thickness and location directly depend on the project of the future bath. To accurately determine the length of the pile, special equipment is used - a hand drill or a motor drill.
The depth of such piles should be at least 1.5 meters and more than the depth of soil freezing. But be sure to 10-15 cm more than the normative depth of soil freezing in a certain area. Why do we need the correct calculation of such a foundation. By the way, the depth of freezing of a certain area can be found on the geological map, or consult with local experts. This is important: if the base of the piles is below the freezing depth of the soil, then the entire foundation will not “squeeze out” as soon as the snow falls.
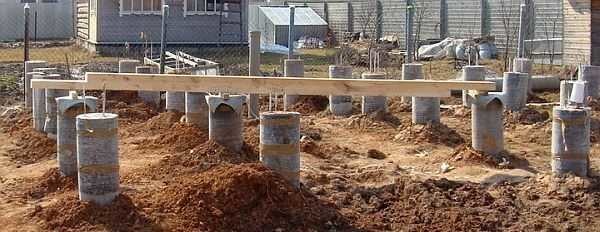
Another important point: about half a meter of piles will remain above the ground. They are filled with concrete, and as soon as it hardens, all piles are finished with roofing material and combined with strapping.
Step 9. Well waterproofing
To prevent cement milk from being absorbed into the soil, the walls of such wells must be lined in advance with a strong plastic film or roofing material, which is even better. If the first option is used, then it is better to weld the film first and make a cover out of it - it will become a good waterproofing for the foundation. But this method is only suitable for really solid ground. In all other cases, metal, cardboard and asbestos-cement pipes are more suitable as formwork.
Step 10. Pouring concrete into the wells
The most convenient way is to pour concrete from a mixer. After all, in a day you can cope with quite large volumes.
The bored foundation is poured with traditionally fast-hardening cement, which is diluted in small portions - each time the previous layer is rammed.
It is possible to fill wells in bored foundations with concrete or concrete mixed with stone: cobblestone, limestone or sandstone. There is only one requirement for such a filler: that it be strong and even, i.e. rubble stone.
And in order for the concrete in the well to be compacted more densely, a special drill is used - it creates the necessary mechanical vibration. After all, the main thing during construction is to completely eliminate even the smallest voids in piles. For which only high-quality hydraulic engineering concrete is used, and it is fed into the shape of piles by a special hydraulic machine - it is it that provides the required level of pressure.
That's all - it remains only to make a high-quality grillage, and you can safely build a solid bath!
It is cost-effective to install bored piles only on clay soils with a low groundwater level, the occurrence of the bearing layer, not lower than 3 m. Already at 5 m, drilling wells with a diameter of 0.5 m or more becomes more expensive than manufacturing a pile-screw foundation or floating slab.
Initially, in the literature and construction, piles were clearly distinguished by the method of their immersion:
- pile-support - the formwork is mounted on the bottom of the pit / pit, after stripping concrete structure falls asleep;
- pile-pillar - a composite, wooden, reinforced concrete element is installed in the well;
- borehole injection - supply of small-diameter concrete with fine aggregate under pressure into the well;
- stuffed - the well was made not by drilling, but by compacting the soil with a special tool, reinforced, filled with concrete;
- drilling - a drilled well is filled with concrete with reinforcement installed inside;
- driven - the reinforced concrete product is pressed in, driven in or immersed in a vibrational way.
Currently, the installation of bored piles in private housing construction is carried out according to the drilling method, and such piles should be called drilling piles, but among individual developers the name bored pile has taken root. Therefore, we will continue to use the accustomed concept - bored piles, but keep in mind that from a professional point of view, this name is not correct.
Geological surveys and calculation
According to the code of building rules SP 24.13330 in relation to pile foundations, drilling and sounding are mandatory operations for geological surveys for any cottage. An exploratory well is needed to take soil samples from different depths. The type of sounding (dynamic or static) is chosen based on the specific conditions of the project.
In the presence of technogenic, loose, organic, weak, subsiding soils, an exploratory well must pass through them. Unlike an expensive geological survey (budget from 30 thousand rubles), there is a technology for test screwing a screw pile with your own hands. In this case, it will not be possible to determine the thickness of each layer and the composition of the soil. But it is possible to determine the depth of the formation with the bearing capacity.
If it does not exceed 3 m, piles-pillars can be laid in the project, when calculating, only the soil resistance under the heel of the pile should be taken into account. Substitute the minimum possible coefficient into the soil resistance formula on the lateral surface, ensuring the margin of safety of the foundation.
Unlike a strip foundation, grillage technology does not allow communications to pass through it. Engineering systems are launched under the foundation, at least 0.5 m from the piles. If it is not possible to maintain the specified distance, the pipeline is laid in a cage, concreted in a trench for a length equal to three pile diameters in each direction.
Ground grillage technology is the simplest:
- the lower deck is missing;
- for laying concrete, it is enough to rest the side shields on the ground, strengthening them with braces and struts.
However, in this case, the foundation can be destroyed by heaving forces that try to raise the beams of the grillage in winter. To avoid this, a fertile layer is taken out under them to a depth of 10 - 20 cm, the trench is filled with sand. After demoulding, sand is removed from under the grillage, the space is protected with sheet material to prevent filling with earth in case of accidental shedding. This free space guarantees protection against heaving forces.

With a shallow grillage, it is very inconvenient to remove sand after demoulding - you have to dig out the foundation from both sides. Therefore, another technology is used - a 5 cm layer of foam with a minimum density. During swelling of soils, this material is compressed, later partially restores its shape.
According to the above technology, the home master will independently build a foundation from bored piles with a tape grillage without errors. The technology allows you to save 30 - 40% of the budget compared to other foundations.
Advice! If you need contractors, there is a very convenient service for their selection. Just send in the form below detailed description work that needs to be done and offers with prices from construction teams and firms will come to your mail. You can see reviews of each of them and photos with examples of work. It's FREE and there's no obligation.
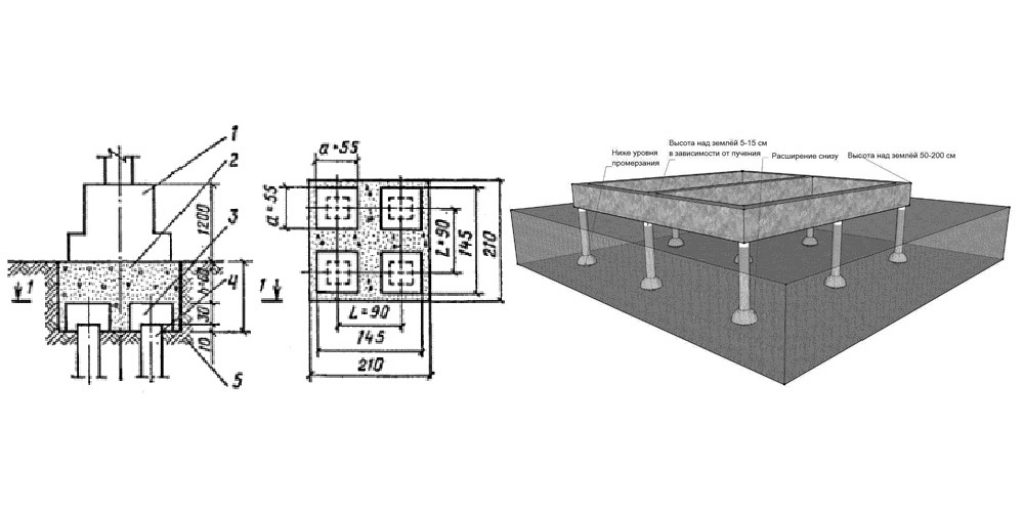
The standards SP 22.13330, SP 50.13330 for the design and construction of the foundation include a round and square section of a vertical rod for a columnar foundation. Therefore, in addition to panel formwork, it is allowed to use plastic, asbestos-cement pipes, which are more convenient when making structures with your own hands.
Column Foundation outwardly similar to a bored pile, however, roofing material formwork in this case is unacceptable. Piles are always supported by a layer with a bearing capacity, the pillars are deepened to a maximum below the freezing mark, which does not guarantee that this level will be reached. Therefore, backfilling with non-metallic material (sand or gravel) is a prerequisite. The roofing material is not able to provide neither the spatial rigidity of the formwork, nor the high-quality waterproofing of reinforced concrete.
Monolithic columnar foundation technology in various formwork
The columnar foundation is used on non-porous soils with a low level of GWL. Due to the small depth and low surface support, the structure is excessively mobile under the tangential forces of freezing soils.
Therefore, a prerequisite is free access to the broadening of the column in the lower part for waterproofing the sole, backfilling the sinuses of the pit or trench with sand, gravel. In these non-metallic materials, the heaving forces are minimal, the column is not subjected to pull-out loads even when the adjacent layers get wet and freeze. Construction technology looks like:
- excavation of soil from a pit or making trenches with your own hands under load-bearing walls;
- backfilling of 20 cm of a layer of sand, 20 cm of a layer of crushed stone with layer-by-layer compaction with a vibrating plate every 10 cm;
- pouring footings - 5 - 7 cm of concrete screed to level the pillow, protect rolled waterproofing from damage by crushed stone, reduce the protective layer of reinforcement in the upper reinforced concrete structures;
- waterproofing with Bikrost or TechnoNIKOL (2 - 3 layers) to protect against groundwater;
- concreting the sole into the formwork with the installation of a reinforcing cage (horizontal mesh + vertical rods tied with clamps);
- installation of asbestos-cement, plastic pipes or shield formwork for a pole;
- pouring the structure with concrete with vibration compaction every 40 - 60 cm in height;
- strapping with a monolithic or beam grillage to give the structure spatial rigidity, stable geometry.
The advantage of plastic pipes is the lack of roughness of the outer surface. In the event of tangential forces from freezing soils, there is practically no friction, the pole cannot be pulled out.
Marking and earthworks
When installing cast-offs with your own hands, you must consider the following factors:
- in the building spot, it is necessary to stretch the cords along the axes of the bearing walls;
- the diagonals must match;
- additional marking will be required to develop trenches or pits.
To increase the supporting surface, the columnar foundation is expanded with slabs, for which formwork will need to be installed. The perimeter of the sole is usually twice the section of the column. Along the perimeter of the building, it is necessary to lay drains, backfill with rubble. Typically, 11 cm corrugated, smooth pipes are used, so the trench will be 30 cm wide, 30 cm deep with a slope of 7 to 10 degrees to one side.
Thus, when using asbestos-cement pipes for pouring pillars, it is necessary to retreat from the outer surface of the walls 0.7 - 1 m. For panel formwork 1.2 m along the perimeter.
If polyethylene pipes serve as formwork, bored pile technology can be used. Soil excavation is not required. Wells are made in the ground with a widening of the sole with a special tool (for example, a TISE drill), a reinforcing cage is mounted, the structure is poured into the pipe, the formwork remains on the body for the entire period of operation. In this case, it is enough to pull the cords along the cast-offs (two pegs with a horizontal jumper) on both sides of the pipe on each wall.
Sole
The classic columnar foundation has a slab sole, which is made by hand in stages:
- pillow backfill - 40 cm of crushed stone at a high GWL to ensure drainage with layered compaction of every 10 cm with a vibrating plate, 40 cm of sand at a low GWL, 20 cm of sand + 20 cm of crushed stone on loams, sandy loams;
- pouring the footing - square formwork, size 100 x 100 cm for a column with a section of 40 x 40 cm, screed thickness 5 - 10 cm;
- waterproofing - 2 - 3 layers of rolled material (glass fiber with a double-sided bituminous coating) with an overlap of 10 cm, sealing the joints with mastic;
- pouring the sole - formwork 80 x 80 cm 30 or 60 cm high with mesh reinforcement (reinforcement 10 - 16 mm of a periodic profile), the release of vertical rods of the same diameter to the height of the column + 30-40 cm for connection with the grillage armored belt.

For asbestos-cement pipes as fixed formwork, the technology is completely identical to the above method. In the case of using plastic pipes, the sole is concreted using a different method. The widening in the well is filled with concrete, a reinforcing cage is lowered into it, consisting of vertical rods (10 - 16 mm), tied with clamps (6 - 8 mm). The lower ends of the bars are bent at a right angle to connect the sole with the body of the pole. The structure is positioned in the center to provide a protective layer of reinforcement of 2 cm.
Formwork installation and reinforcement
Shields made of plywood, edged boards, OSB boards are installed with their own hands on the sole, which has gained at least 50% strength. The specificity of the columnar foundation lies in the phased pouring of several elements of the same structure. The column can be reinforced together with the sole at the stage of its pouring or have a separate frame. The first option is preferable, therefore, in traditional technology, the shields are assembled around the reinforcing structure installed at the previous stage.
Panel formwork
This do-it-yourself technology is used most often, provides high quality, resource. Panel formwork is assembled for a columnar foundation in stages:
- cut - boards from OSB, plywood are cut to size or knocked together from edged boards;
- installation - after vertical placement around the armo-belt, the alignment with respect to the walls is checked, the braces in two levels (at the sole, in the middle part) are attached to the shields, trench walls, pegs driven into the ground;
- fixation - additionally, studs can be used, with which the shields are attracted to each other.

AT without fail 15 - 30 cm protective layer of metal elements is controlled. Closer than this distance from the inner walls of the formwork, it is forbidden to place bars, clamps.
When using polyethylene pipes, it is enough to put a piece of a suitable diameter (from 30 cm) on the reinforcing cage, inside the well. The pipe is protected from lateral displacement by earthen walls, so additional fixation is not required. It is enough to check that the rods, clamps do not fit closer than 2 cm to the inner walls.

Formwork from asbestos pipes can be installed in any of the above ways with minor differences:
- fixation from lateral displacements is mandatory;
- the diameter of the well should be 20 cm larger than the outer size of the pipe.
The last condition is due to the material of the pipe. If the heaving forces move upward along the slippery surface of the polyethylene without causing damage to the column, the soil is guaranteed to push the asbestos pipe outward. Filling the sinuses with sand is a prerequisite for normal operation. It is almost impossible to make a well with a diameter of 45 cm or more with a hand drill or a power drill. Therefore, asbestos pipe formwork is more often used in trenches, pits, by analogy with panel formwork.
Why you can not use ruberoid
Individual developers who do not have a specialized education often use roofing material formwork. This option is designed exclusively for bored piles lying at great depths. With spontaneous compaction of heaving soil after several years of operation, this leads to the following consequences:
- in winter, the adjacent layer near the columnar foundation freezes;
- heaving forces are directed upward tangentially to the column body;
- the structure is pulled out of the ground, rising a few centimeters;
- earth is stuffed under the slab or the sole of an unrelated column;
- the column cannot lower to the design level;
- the building warps, the walls crack, the roof breaks the chimneys.
Roofing material formwork inside the well cannot provide sufficient sinuses for backfilling with sand. Concrete has serious weight and bursts roll material close to the walls of the mine. Therefore, roofing felt formwork is only suitable for bored piles.
fill
When laying concrete inside the panel formwork the best option is a concrete pump hose. However, the rental of special equipment is expensive, and manual filling is more often used. The size of the panel formwork allows you to dump the mixture out of the bucket without additional devices. If formwork is used from asbestos pipes, an impromptu funnel is first made from sheet steel, roofing material, paronite.
The internal vibrator is used as soon as the length of the hose is sufficient to submerge the nozzle. After that, they are compacted every 40 - 60 cm of concrete. The appearance of cement laitance, the rapid closure of the funnel after removing the tip, the absence of bubbles indicate the normal quality of concrete mixing.
Grillage
![]()
Pillars are a budget option for a do-it-yourself foundation, but they have unstable geometry. Therefore, rigid tying of the head of the columnar foundation is a prerequisite at the final stage of the construction of the zero cycle. Depending on the location of the beams relative to the surface of the earth, the grillage can be hanging, ground, buried. In any case, the beams should be 7–15 cm from the ground, depending on the clay content in it. In practice, two methods are used:
- backfilling a 15 cm layer of sand into the ground / recessed formwork, removing it from under the beams after the concrete has cured, protecting the side surfaces with sheet materials from spontaneous filling of the air gap with earth;
- laying a 5 cm layer of foam under the grillage between the posts
In the first case, the swollen soil does not reach the base of the grillage, and cannot tear the beams from the pillars. In the second option, the foam is compressed by heaving forces, preventing the filling of the lower space with earth.
The formwork for the hanging grillage is built by hand using the technology:
- deck manufacturing - panels along the width of the walls with square or round holes for posts;
- deck installation - shields are put on poles so that the heads are embedded 20 - 30 cm, the bottom of the deck is supported by tables (two pegs with a horizontal jumper in increments of 0.5 - 0.7 m);
- installation of side shields - they are attached to the deck on both sides, the height of the sides is 5 - 7 cm above the design level;
- reinforcement - a classic scheme of longitudinal bars tied with square, rectangular clamps, at the corners, at the junctions of the walls, the bars are bent onto an adjacent tape;
- concreting - laying the mixture, vibrocompaction in one direction along the ring.
For a ground, buried grillage, the lower deck is not needed, only side shields are used. The expansion joint is provided by backfilling a 15 cm layer of sand, after which reinforcement is made, the structure is poured. After stripping, removing the poured sand, the lower level is protected - the installation of vertically arranged asbestos sheets along the inner, outer perimeter.
Thus, when choosing various formwork you can reduce the budget for the construction of a columnar foundation or maximize its resource. In the first case, it is necessary to use polymer pipes using the technology of bored piles. In the second option, it is worth choosing panel formwork or asbestos-cement pipes.
Advice! If you need contractors, there is a very convenient service for their selection. Just send in the form below a detailed description of the work to be done and you will receive offers with prices from construction teams and firms by mail. You can see reviews of each of them and photos with examples of work. It's FREE and there's no obligation.
Bored pile foundation
During the construction of a private house, in the presence of at least one of the factors: a high level of groundwater, a weak bearing capacity of the soil, a slight slope at the building site, a large depth of freezing of the soil, a large weight of the building under construction - more than 350 tons - it becomes impossible to install a conventional strip monolithic reinforced concrete foundation. Also, if the site has very heavy soils and the installation of a strip foundation is associated with a high labor intensity of earthworks, the installation of pile foundations becomes preferable. The only disadvantage of the device pile foundations under the house is the lack of a basement.
Pile foundation calculation
When designing a pile foundation, it must be calculated for the expected loads. To do this, you need to know the weight of the entire building, the soil composition of the base and its bearing capacity to a depth of at least 4 meters. If the base consists of weak soil, then it is desirable to go through it to a stronger layer of soil. If the piles do not reach a solid layer, they are called hanging piles, if they reach it, - rack piles. According to the accepted diameter of the pile, and its length is determined by its load bearing capacity in this soil.
When designing a pile foundation, a calculation is necessarily carried out for the expected loads.
Further, knowing the total load on the ground and the bearing capacity of one pile, you can find the number of piles for a given house. Piles are installed under load-bearing walls with a step of at least 2 m. A reinforced concrete grillage is arranged on top of the piles, which can be either shallow or completely elevated above the ground.
Types of pile foundations
At the moment, there is a wide variety of pile foundations. According to the method of device, they are divided into the following main types:
- driving;
- screw;
- bored.
Driven piles can be metal, wood and reinforced concrete. They are mounted with special shock-driving mechanisms, hammers. The most common piles of this type are reinforced concrete square or polygonal sections, the end of such piles has a pointed appearance. Piles of this type are commonly used in industrial construction, as well as during the construction large buildings cultural and household purposes.
Screw piles are usually steel pipes with helical blades at the end. They are covered with strong anti-corrosion protection, which ensures their durability. Such piles are used in many types of construction, they have also become very popular in the construction of private houses and other not very large structures. A distinctive feature of this type of piles is that they can be mounted independently without resorting to complex construction equipment.
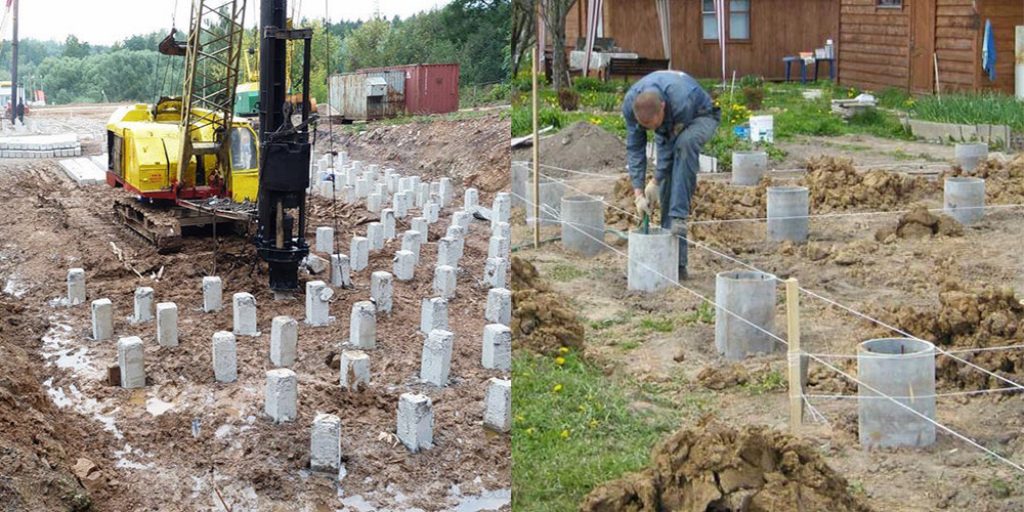
Bored piles are the name of bored piles, which are made by drilling wells and filling them monolithic concrete with sealing with pre-installed reinforcing cages. The attractiveness of this type of piles lies in the possibility of their installation on their own and with low cost. Modern bored piles for a private house can be installed by two workers within a few days.
The tool used for piling
To make a bored foundation with your own hands, you will need a certain tool:
- laser level;
- roulette 10 and 50 m;
- manual drill TISE-F or gas drill;
- mortar mixer;
- deep mace vibrator;
- box for prepared concrete;
- wheelbarrow;
- shovels and buckets;
- mason's cord;
- grinder and welding machine;
- knitting wire;
- wooden formwork for grillage;
- circular saw or jigsaw for formwork;
- hammer, axe, crowbar, knife for roofing material.
In addition to this tool for each specific case something else may be needed. Usually, when building a private house, every home craftsman has most of such a set of tools.
Technology of foundation construction from bored piles
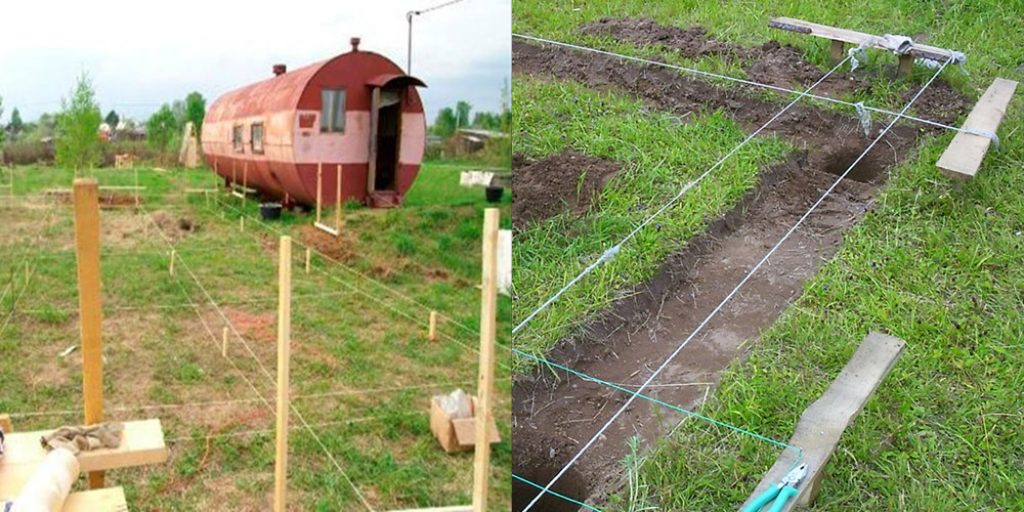
Almost always, work on the foundation of any building, including a private house, begins with transferring the dimensions from the drawing to the building site. To do this, you must have certain skills in working with drawings and measuring devices. In the simplest case, if the building has a rectangular plan, you must first find the corner extreme points and fix them on the ground with wooden pegs. It is very important, in addition to the dimensions of the sides in meters, which are measured with a tape measure, that all the angles formed by the sides of the house on the plan are straight, that is, 90 degrees. In geodesy, this is done using a theodolite, and in the construction of a private house, they use the measurement of the diagonals of our rectangle. They must be the same with high accuracy, then all angles will be 90 degrees. It's very simple and effective method laying out a building in plan without using a theodolite.
How is the marking of the pile foundation
After fixing the four corners of a rectangular building on the ground, a cord is pulled between them - this can be done using a thick fishing line or thin stainless steel wire. Then, using a tape measure, determine the location of each pile, according to the construction drawing of the plan. pile field, which is included in the overall project of a private house.
Before construction begins, the project for the entire building under construction must be in hand. After determining the points for all piles, the axes of the building are rigidly fixed in two mutually perpendicular directions. This is done using the so-called cast-off, which is located 1.5–2 m further from the marked points for piles. A cast-off device is a p-shaped structure, two legs of which are dug into the ground, a horizontal crossbar is attached to them. The location of the axis of the building is fixed on it with a nail or pin. Such a cast-off is carried out from all four sides of the building opposite each center line. By pulling the axial cords between the pins on the cast-offs, we get the location on the ground of all the piles that need to be installed.
Before starting drilling, the diameter of the piles, the depth of penetration into the ground and the method of drilling should be determined. In private housing construction, both hand drills and mechanical drills are used, which are installed on specialized machines. In addition, there are also gas drills, which greatly speed up the drilling process using gasoline engines. However, the simplest option is a TISE manual drill, which makes it possible to drill a well under a pile with a diameter of 280 mm and a length of up to 2 m. For the construction of an ordinary two-story house, this drill is quite enough. In this manual drill, which was invented by a designer from Moscow, there is an additional device called a plow that allows you to make an extension at the bottom of the pile - the heel - up to 500 mm in diameter.
Of course, the manual drilling process is rather slow, which also depends on the strength of the soil. In one shift, it is possible to drill from 2 to 6 wells up to 2 m deep. However, this type of foundation is much easier to perform, including from an economic point of view, than the traditional deep-laid tape.
Formwork installation
After earthworks have been completed - drilling wells for all piles - they begin to manufacture and install formwork for piles. Usually the most economical option is used - this is a roofing material rolled up into a tube and fixed with tape. Such pipes are made for all wells. For sections of piles located above the ground to a height of 300–400 mm, roofing material is used, tied on the outside with a knitting wire or plaster mesh, and can also be used plastic pipes the corresponding diameter. Throughout the entire period of time from drilling wells to the installation of formwork, the accuracy of the location of piles according to the marking is strictly controlled using axes. So that during the concreting process the upper part of the pile, which is located above the ground, does not go to the side, two guides made of wooden bars are used, which are fixed to the cast-offs with nails at the ends and are guides for the upper parts of the pile formwork. Before concreting, formwork can be prepared for one row of piles. After their concreting, move on to the next row.
Pile reinforcement
All bored piles are monolithic reinforced concrete structures which are made directly at the construction site. Each pile is reinforced with a frame of steel reinforcement of class AIII, usually longitudinal reinforcement has a diameter of 10 to 14 mm, and transverse distribution reinforcement from 5 to 6 mm. Transverse reinforcement can be made of smooth wire in the form of clamps. Frames are usually welded and made in parallel with well drilling, so that after the formwork is installed, the reinforcement is quickly installed and ready for concreting. The frames are made in such a way that there is a rebar extension of approximately 350-400 mm over the concrete surface after concreting. This is necessary to connect the frames of the grillage and piles.

Reinforcement and formwork of foundation piles
Pouring concrete
For concreting the foundation on the site in a concrete mixer, a concrete mixture is prepared from sand, crushed stone and cement with water in proportion to obtain M300 concrete. Proportions are easy to find in reference books or the Internet. The ready-made concrete is brought to the piles with a wheelbarrow and, with the help of a ladle or trowel, the concrete is thrown into the formwork, while vibrating with the help of a deep needle vibrator - this applies to that part of the pile that is located in the ground. Part of the pile above the ground is concreted without vibration. In order for the concreting process to be successful, it is better to install piles in spring, summer or autumn at a positive outside temperature.
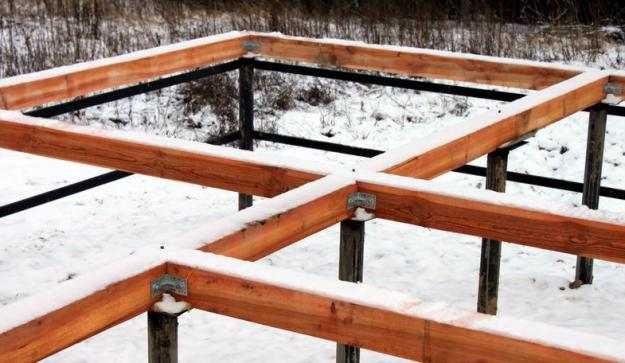
grillage device
All pile foundations during the construction of a house are completed with a grillage on the top of the piles. In this case, the reinforcing cage of the grillage is connected by welding with the working reinforcement of the piles. The grillage formwork is made of wooden panels. The width and height are taken from the project. At the same time, the width is 400-500 mm, so that along the upper cut of the grillage it is possible to perform brickwork bearing walls of the house. Such a foundation, in terms of the consumption of concrete and reinforcement, is more economical than a conventional strip foundation with a laying below the freezing level of the soil. If the grillage is made shallow, the formwork is installed on both sides - internal and external. If the grillage according to the project should be located above the ground, then the formwork is also placed on the lower part of the grillage. After the formwork is installed, the reinforcing cages are mounted with reference to the pile frames. After all work on the installation of the formwork and frame, the upper level of concrete is beaten. After that, the M300 concrete mixture is prepared and poured with vibration. After curing the concrete for at least a week, the formwork is dismantled and the coating waterproofing grillage with bituminous mastic. Now almost everything is ready for the construction of walls and floors of the first floor. Thus, a do-it-yourself bored foundation is made.
The pile foundation is a fairly simple to manufacture and reliable type of foundation for a bath. On suitable soils, it is good for light buildings, which are almost all baths (except brick ones). This type of blade is popular because it takes the least amount of materials, time and effort, and a lot less money. It is easy to make it with your own hands, even without any special skills in construction. But you can not put them on all soils. Designers do not like them very much, because on heaving soils the effect of horizontal heaving forces on piles is poorly calculated.
If you still decide to make a foundation on piles, it’s better to play it safe and take into account the worst forecasts. Consider the most pessimistic data on soil freezing (you need to drill below the freezing depth) and loads. By drilling holes more often, by making the distance between adjacent supports smaller, you will spend more money, but get a stable foundation. Having laid a certain margin of safety, it will be possible to hope that it will stand for a long time.
On unstable, loose, peaty and swampy soils, a pile foundation is the only possible option. It allows you to transfer the load from the house to the dense layers of soil located below
Most often, a pile foundation is made on soils that cannot ensure the stability of the building. These are quicksand, sands, peat bogs, unstable loams saturated with moisture. In this case, the piles are lowered to the level of dense layers of soil. All load from the building is transferred to these layers.
It is recommended to use this base on soils with a freezing depth of more than 1.5 meters. The device of the strip foundation in this case is associated with large volumes of land work. Putting piles is much easier and cheaper.
Another option when it is convenient to use this type of base is areas with complex terrain. Sometimes leveling a site for a house is too expensive. Then piles also help out.
The third option for using a pile foundation is soils that are too dense, difficult to process. Digging a pit in them is very difficult and expensive. Drilling wells - you need less pitchfork and time.
Design
In places of frequent flooding, on the banks of reservoirs, they tried to raise houses above ground level. To do this, logs pointed at one end were driven in, which were located at each corner of the building, and also supported walls and partitions. This was the pile foundation. They used hardwoods for piles, which for a long time could resist the effects of water. The best wood for this is larch, because it only becomes stronger from water. Palaces and houses of Venice have been standing on larch trunks for several centuries.
Today, wooden piles are used very rarely, although it turns out the cheapest, but at the same time a reliable foundation. Moreover, even where larch is not uncommon.
Types of piles
In total, builders distinguish twelve types of piles. But in low-rise construction, only three are used:

Reinforced concrete columns are rarely used for the construction of a bath or cottage: a technique is needed that will drive them into the ground. But the foundation is solid.
Screw iron piles are good because they can even be screwed in manually. Their disadvantage is that steel is an excellent conductor of heat. With an uninsulated subfloor, they take away heat, the floor underfoot always remains cold.
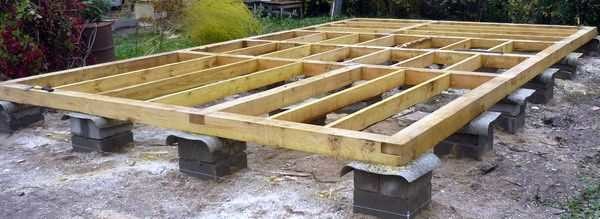
If the pile foundation is made by hand, then in most cases the supports are made bored. Although it requires the most labor costs, it allows you to save on materials.
Location
The supports must necessarily stand in key places: at the corners, at the junctions with the walls. Intermediate piles are then installed between these nodes. The distance is selected based on the type of soil and the planned loads, but it cannot be more than 2 meters. There should be supports along the perimeter of the walls, as well as under all the walls.

Dimensions
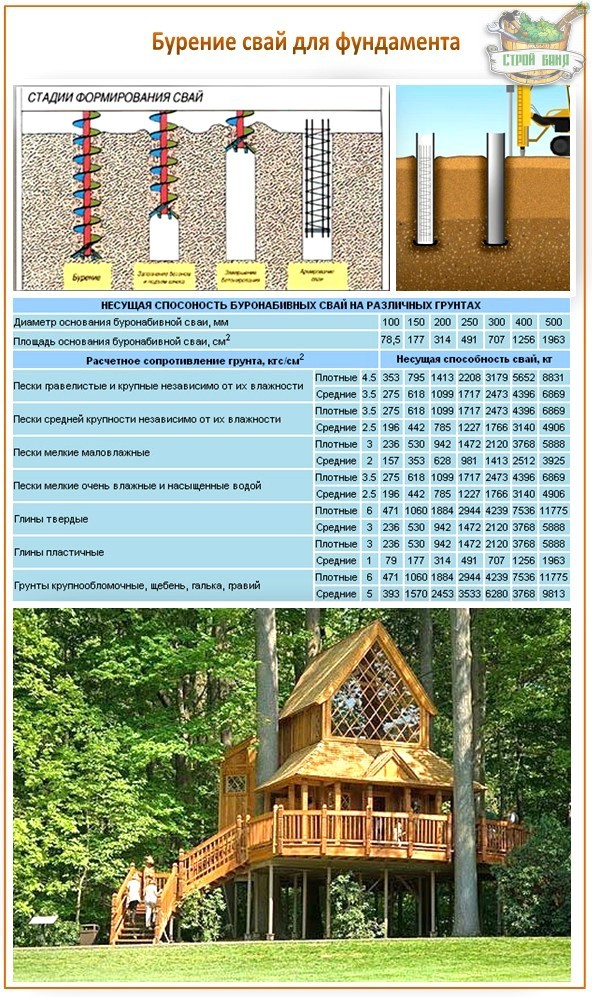
The most common pile diameter is 20 cm. It is undesirable to make them smaller, since their bearing capacity becomes much smaller. Larger diameter - greater bearing capacity, but also increases the area to which winter heaving forces will be applied (on heaving soils). There are two options for determining the required pile depth:
In each locality and even in each area, the depth will be different. If the level of freezing is determined by region, then the dense layers can be arranged in any way. If necessary, test drilling is carried out nearby, below the reached level, to make sure that there are no cavities and pockets below and the support will be reliable.
With grillage and without
In some cases, the piles are interconnected into a single structure using wooden beams or a square steel pipe (sometimes a corner). This harness is called a grillage, and the foundation is called a pile-grillage. This strapping is needed if the walls are made of blocks, bricks or frame, and is not at all necessary if there is a log house.
How to make a foundation on bored piles
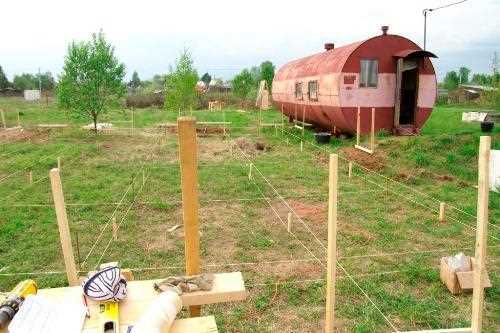
The first step is to mark the perimeter of the future building on the site. Then it is very desirable to remove the top layer of soil with vegetation over the entire area and fill it with rubble. Many do not do this, as a result, under the house, the plants rot and spread "aromas". Worse, parts of the rot can get on the wood, and this contributes to its spread (maybe the impregnation will protect, but why risk it).
Then, with the help of pegs and cords stretched between them, mark all the lines along which the piles will be located. In this case, you need to monitor the vertical positioning of the marking pegs (usually using). You also need to check that the laces are stretched horizontally (this is already with the help). Having arranged everything, measure the diagonals of all rooms. Deviations should be minimal - a few millimeters, no more. This is the only way to be sure that during the construction everything will be as it should be.

It all starts with earthworks - removing the soil, then you need to mark the plan of the house with pegs and cords
Calculation of the number of piles
To lay the foundation along the perimeter, wells are drilled, into which piles are then installed (filled / hammered). The number of piles for each project will be different. When building and planning with your own hands, proceed from the following rules:
- The distance between piles should not be more than 2 meters.
- Be sure the supports must be at the corners of the building, as well as in places where partitions depart. Next, place supports between these nodes, based on the fact that the distance between them should be less than 2 meters.
But 2 meters is for a one-story bath made of light materials. If you are going to put a bath on two floors, the supports must be installed more often. The bearing capacity of the soil also affects the distance. If it is dense, you can put it less often, if loose or unreliable (peat, wooded soils), put it more often.
The depth of wells on heaving soils is calculated based on the depth of freezing of the soil in winter: 30-50 cm must be added to this value. When constructing a pile foundation on unstable soils, the installation depth of the supports depends on the depth of the dense layer that is able to withstand the load. The support should enter it by at least the same 30-50 cm.
Well preparation
Wells are made at the locations of the piles. When building private small houses / cottages and baths, they do this with the help of hand drills. Their diameter is about 20-30 cm. Choose the one you see fit. The handle of the drill is usually composite, which is why it is possible to make holes up to 4-6 meters deep with it.

Bored piles are made of two designs: with an expanded base (heel) and without. The “heel” located below increases the chances that the building will not budge when heaving. Therefore, it is desirable to make such an extension. To do this, there are drills with a folding knife. When you reach the desired depth, release the wide knife by pulling the special lever.
Several buckets of crushed stone and sand are poured into the drilled wells, they are rammed (alternately, first crushed stone, then sand). On top of the sand layer is concrete with gravel backfill, which will serve as a support (sole or heel - whoever says it).
Before the solution hardens, a formwork is immersed in it, into which a reinforcing frame is then inserted and all this is poured with concrete.
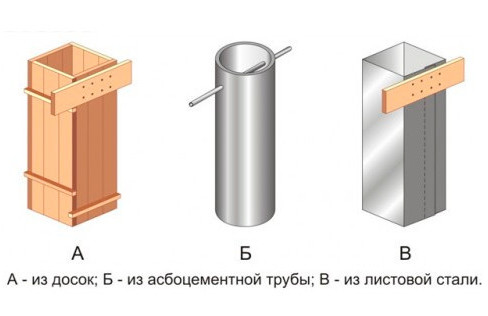
Formwork for bored piles
It is not so important what material the frame will be made of, into which the concrete will be poured. The most common option is asbestos-cement pipes (diameter greater than 200 mm).
The use of an asbestos-cement pipe is not necessary, but desirable: they do not rot, have sufficient strength, and their outer surface is smooth enough, which allows the piles not to change their position when the soil swells (i.e. your bath will not squint).
Advice:it is desirable to cover the underground part of the asbestos-cement pipe with a mineral-based (construction) lubricant. This will prevent the pipe from freezing to the ground.
Instead of an asbestos pipe, you can put a steel pipe (you never know, maybe someone has a lot of them), but they must be well primed and painted over, otherwise they will quickly rust and collapse.
Some use plastic as formwork sewer pipes suitable diameter. The choice is not bad: they normally tolerate being in concrete and are not afraid of moisture. The surface is very smooth and slippery, which will not allow horizontal heaving forces to move them.
There is another option for piles: to make formwork from roofing material. This material is wound in two or three layers, fastened and used as a frame. To make it easier to work, you didn’t have to suffer every time with the diameter of the pipe, find yourself a template. It is more convenient to wrap the roofing material on the eggplant from under the water of a large displacement. The main thing is to find the right diameter. Having screwed several layers, fix the roofing material, and take out the “pattern” by the handle and you can make the next pillar.

Only fastening the roofing material is not very convenient. Previously, they used wire, but it is easy to pinch it, and its area is small. Better with tape. Only he does not want to stick to the sprinkles. Helping the trouble is simple: with a stiff brush in the right places, clean off the crumbs (if any), then wipe with white spirit. After drying, the adhesive tape sticks perfectly.
You can use a sliding formwork. To do this, a pipe with a diameter of at least 20 cm is formed from a sheet of iron, plastic, thick cardboard or roofing. Handles are attached to its upper part. The formwork is lowered into the pit, reinforcement is inserted, the space around it is covered with coarse sand, and it is carefully compacted. Concrete is poured inside the formwork. Shaking the formwork, lift it up by 40 centimeters by the handles. Sprinkle sand outside, ram it, pour the next batch of concrete. So the pile is prepared for the entire length. This, of course, is a very economical option, but in terms of strength and reliability, it is much inferior to piles with any formwork. The fact is that without a protective layer, cement milk can (and usually does) go into the soil. As a result, concrete has insufficient strength.
Reinforcement
To give the piles greater strength, three or four bars of reinforcement are inserted inside. Diameter 8-10 mm (you can play it safe and take 12 mm, but this is a clear overkill). They are tied together with thinner reinforcement and knitting wire, so that a frame is obtained. The distance between the longitudinal bars is chosen so that they are all at least 5 cm from the wall. (How to knit reinforcement).
Pouring concrete
This structure is installed inside the pipe. The space around the pipe is covered with soil or crushed stone with sand, carefully compacting it and making sure that the pipe is vertical.
The last stage in the manufacture of a bored pile is the filling of the pipe with concrete. To do this, usually make a cement-sand mortar. Its composition is as follows: for 1 part of cement (grades not lower than M300), take 3 parts of medium-grained sand, dry it all mixed. Then water is gradually added. Its quantity is slightly less than 1 part: the solution should be like thick sour cream.
To increase the strength of concrete, it is necessary to remove air that could get into the solution. To do this, take a long pin (bar of reinforcement), pierce a freshly poured solution, then shake the bar from side to side. Do this on each support several times. As a result, air escapes, the solution settles a little, it must be added to the required level.
Immediately try to make piles of the same height - then there will be less work. It is much easier to remove / add a little bit of fresh mortar than to knock / cut off the excess. After making them all the same, level the surface. Grinding hardened concrete is also not the greatest pleasure.
It is better to process the solution in piles using a submersible. In addition to increased strength, it will also become frost-resistant.
Finishing work
On top of the finished pile, a head is installed - a sheet of steel, on which roofing material can then be laid. Actually, everything. Do-it-yourself pile foundation is ready. If necessary, a grillage is attached to the finished supports (beam 200 * 200 mm or more, impregnated with antiseptics). After a few days, you can start building walls.
If necessary, the tops of the piles are tied with a grillage. It is needed if it will be built, block or
To fix the grillage or the first crown of the log house was easier, studs are inserted into the concrete before it hardens. After the mortar has set, holes are drilled in the right places of the beam / log, and it is simply mounted on these studs. There is another option - steel heads with a U-shaped plate are installed. But such a mount is more expensive, and they do not differ in strength. Unless, to put adjustable heads, so that during the subsidence of certain piles, the difference can be corrected.
If you are going to make the grillage iron, then you need to use steel pipes as formwork. In this case, it would be more convenient to put screw piles, but they are expensive, and it is also necessary to monitor the quality of their manufacture and painting. In this case, it is better to take galvanized ones - they last longer.
The distance between the finished piles is then filled with concrete or concrete / wooden beams are installed, which are fastened together. This is done so that the wind does not walk under the floor.
Pillars of bricks
Piles / pillars for the foundation of the bath can also be made of bricks or rubble, which are interconnected using concrete mortar. Then the foundation is called columnar. The choice of location and the distance between the supports are similar. The manufacturing technique is changing - they put bricks on the mortar.
They are placed in the corners with a square section (at least 38 * 38 cm), intermediate ones are made rectangular 38 * 25 cm. To save on brick (rubble stone), half the depth of the pit can be filled with coarse sand. Sand is covered in layers of 10-15 centimeters, each layer is filled with water and carefully rammed.
Brick piles / pillars are made 30-40 cm above the ground level. The space between them is then laid with brick (thickness - brick or half a brick). These brick walls you need to deepen 25-30 cm into the ground. Piles and walls are leveled with a mortar, covered with a layer of roofing material to provide waterproofing.


