Prices for the installation of screw piles, the cost of installation. Screw piles.
This page contains information about the pile-screw foundation: calculation of the foundation, materials for construction, we build a pile-screw foundation with our own hands, videos and prices are shown on the page. We will tell you where you can order a foundation in Moscow.
Pile-screw foundations- this is a type of foundations that is rapidly gaining popularity, which is characterized by high construction speed, economy and excellent performance. it best option foundation for wooden houses, buildings made of foam concrete and gas silicate, as well as for small brick buildings.
The page discusses in detail the technology for calculating the pile-screw foundation, the features of its construction by one's own hands and the current prices for the construction of pile foundations when contacting the services of construction companies.
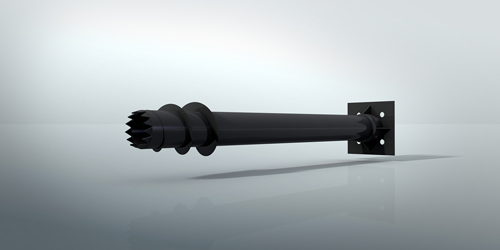
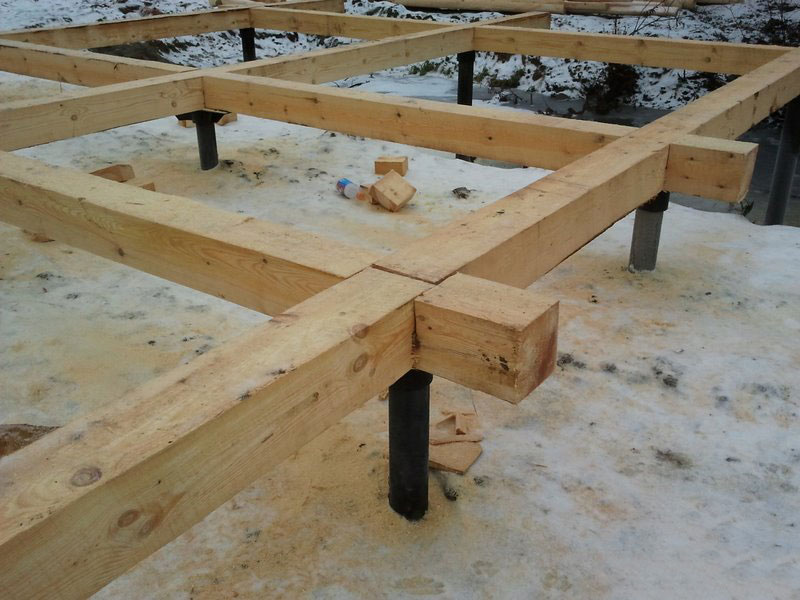
Fig 1.0: Construction of a frame house on a pile-screw foundation
Calculation of the pile-screw foundation
Correct calculation - necessary condition reliability and durability of the pile-screw foundation, therefore, its implementation must be approached with the utmost responsibility.
First you need to determine which type of pile is suitable for the type of soil on which you plan to start construction.
Figure 1.1: Piles with a widened foot
Figure 1.1 depicts piles intended for use in problematic soils - floating, loose and prone to heaving. They differ in a broadened heel, which helps to improve the fixation of the structure in the soil and increase its bearing capacity. The wall thickness in such piles can vary from 4 to 16 mm, length - 3-15 meters, diameter - 159-325 mm.
One pile with a wide heel, depending on the size, has a bearing capacity of 1-3.5 tons. They are placed with a step of 3 meters from each other. The estimated cost of the pile is around 3500 rubles.
Rice. 1.2: Standard screw piles
Figure 1.2 depicts piles used in ordinary soils. This is the best option in terms of price-performance ratio, which can be used for the construction of light houses made of wood or aerated concrete, one-story brick buildings and fences.
The length of such screw piles varies from 2.5 to 15 meters, diameter - from 47 to 325 mm, load bearing capacity- from 0.7 to 2.5 tons. According to the requirements of SNiP, they must be placed in increments of 2.5 meters. The cost of one pile starts from two thousand rubles.
Rice. 1.3: Hollow screw piles
Figure 1.3 you can see screw piles for compact soils, sandstones and permafrost. Such designs differ from other types in the absence of a tapering tip, they are hollow inside and at the same time have open ends. In the process of immersion, such piles are filled with a column of soil, which provides additional fixation.
Hollow piles, as a rule, are not subject to concreting. However, if it is necessary to give the pile foundation maximum bearing capacity, after immersion, the soil from the pile is removed by a bailer and concrete mortar is poured into the pipe. This technology makes it possible to build pile-screw foundations large brick buildings (3-5 floors) even in marshy areas or permafrost.
Rice. 1.4: Hollow piles for permafrost soils
The wall thickness of hollow screw piles can be 8-20 mm, the diameter is either 219 or 325 mm. Length - 4-16 meters, carrying capacity up to 4.5 tons. The cost of one hollow pile starts from 4.5 thousand rubles.
If you plan to build on a pile-screw foundation wooden house, piles must be completed headroom. You can see it in image 1.2:
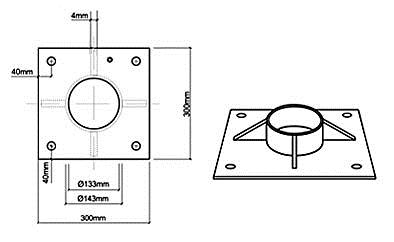
Rice. 1.5: Head for screw piles
The dimensions of the head are the same for all types of screw piles, only the size of the seat differs depending on their diameter.

Fig 1.7: Types of pile-screw foundation grillages
Related materials
Method for calculating the pile-screw foundation
The calculation of the pile-screw foundation for the construction of 1-2 storey wooden and brick houses is carried out according to the following algorithm:
- We determine the mass of individual elements of the future building;
- We calculate the load from precipitation (snow and wind) that will be applied to the building;
- We calculate the total load of the building on the pile-screw base;
- Based on the construction area and the standard distance between individual piles, we determine the number of required piles;
- By bearing capacity different types piles determine the appropriate size of piles;
- We draw up a drawing of a pile field based on the standard step between piles;
- Based on the standard size of the selected piles and the calculated load from the building, we determine the parameters of the grillage.
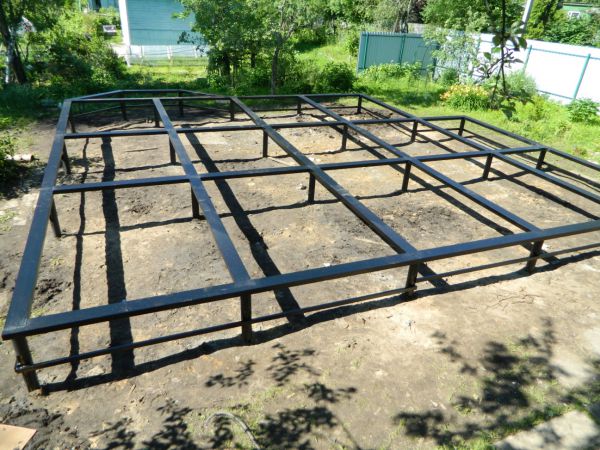
Fig 1.6: Pile-screw foundation with a metal grillage
How to determine the weight of individual parts of a structure?
This is done on the basis of the normative weight of the materials used in construction and the total area of \u200b\u200bthe building.
Walls:
- From a bar - 600 kg / m3;
- From brick - 600-1200 kg / m3 (depending on which brick is used - monolithic or hollow);
- From aerated concrete and foam block - 400-900 kg / m3;
- From frame panels (up to 150 mm thick) - 20-30 kg/m3.
Roof:
- From slate - 60-80 kg / m2;
- From tin or sheet steel - 20-30 kg / m2;
Interfloor floors:
- Wooden - 70-100 kg / m2;
- Basement - 100-150 kg / m2;
- From monolithic concrete slab- 500 kg/m2;
- From a hollow concrete slab - 350 kg / m2.
The average indicator of household load on the foundation is 100 kg / m2.
How to determine the atmospheric load on a building?
- h is the total height of the building (from the bottom point to the ridge);
- S - building area.
The load from snow depends on the climatic conditions of a particular region. Here are the averaged data for different areas:
- Chernozem region and southern regions - 50 kg per m2;
- Middle band - 100 kg/m2;
- Latitude from Arkhangelsk to Novgorod - 150 kg/m2;
- North of Arkhangelsk - 200 kg/m2;
- Siberia - 350 kg/m2.
We determine the number, diameter and required length of piles
When calculating the actual number of piles, the area and weight of the building must be taken into account. The minimum step between piles on ordinary soils of medium latitude should be at least 1.7.
The maximum step is determined by the type of building:
- For log houses or houses made of timber and frame buildings - 3 meters;
- For buildings made of aerated concrete, cinder block and foam block - 2.5 meters;
- For brick buildings - 2 m.
If the step is less than the norm, the foundation will lead, since the soil will not be able to evenly distribute the load coming from the piles, if the norm is exceeded, there is a high risk of foundation settlement under the weight of the house.
It is also necessary to take into account that one pile must be installed at each corner of the house and at the intersections of the walls.
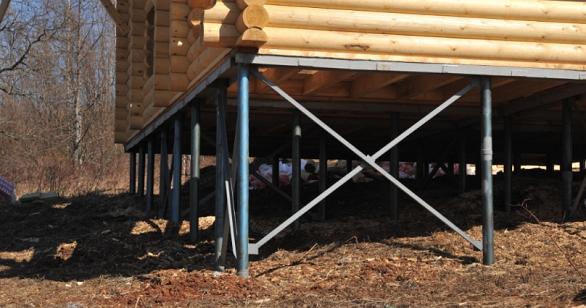
Fig 1.7: Log house on a pile-screw foundation
The required bearing capacity of piles is determined by dividing the total mass of the building and the load from precipitation by the number of piles. Knowing what bearing capacity piles should have, it becomes possible to choose the appropriate diameter of screw structures.
For building foundations one-story frame houses , as a rule, screw piles of the 89th are used diameter, for houses made of timber and foam concrete - the 108th, and for one-story brick buildings - the 133rd.
Pile length is determined based on the characteristics of the construction site - the type of soil, the depth of its freezing and the height differences at the construction site.
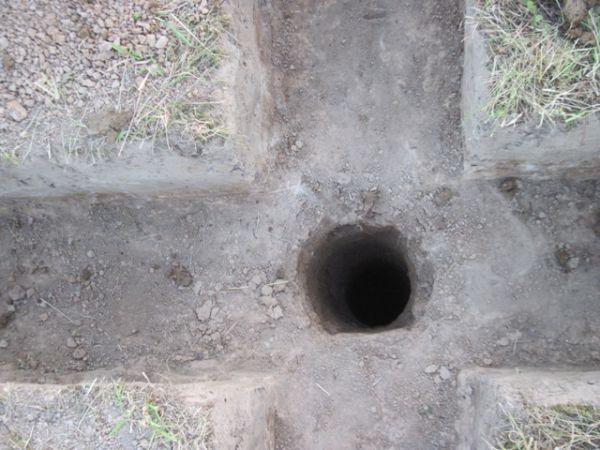
According to the requirements of SNiP, a geological study must be carried out for this, however, at home, you can use an ordinary garden drill (you need to drill until you start to remove dense lumps of yellowish clay from the hole).

Fig 1.8: The correct location of the pile in the soil
It is also necessary to take into account the height differences at the construction site. It is possible that in order to ensure the same height of the heads, it is necessary to use piles of different lengths.
Preparatory work, materials, tools
To perform the installation of a pile-screw foundation with your own hands, you will need the following tools:
- Scrap and cuttings of metal pipes (50 mm in diameter, 2.5 m long), which will be used as levers for screwing the pile;
- Hose and magnetic level;
- Garden drill for creating guide holes, its diameter must be less than the diameter of the screwed piles;
- Shovel and trolley for removal of soil from the construction site;
- Bulgarian for trimming piles;
- Roulette and marker;
- Welding for fastening a metal grillage or heads.
Of the materials, in addition to the screw piles themselves and the grillage, you will need a wear-resistant primer for metal. Priming of metal piles provides their protection from the aggressive effects of groundwater. If this point is neglected, over time, the bearing capacity of piles will greatly decrease.
Preparatory work before starting work consists in clearing the construction site of vegetation and debris, after which all necessary tools and materials are delivered to the construction site.
Related materials
Fences on screw piles
In suburban construction, when constructing fences for summer cottages, forestries, farms and agricultural enterprises, laying a concrete foundation, as a rule, is not required. Pillars on screw piles are used as fence posts.
Do-it-yourself pile-screw foundation
The construction of a pile-screw foundation is carried out in the following sequence:
- The position of the piles is marked according to the design data. Reinforcing pegs are used to mark the places for screwing in piles, either wooden blocks connected to each other with twine. First of all, a "starting line" is created, which is one of the walls of the building, based on it, further marking is performed

Fig 1.9: Marking the place of screwing piles
- Next, the piles are primed in 2 layers, after the coating has dried, work begins on screwing them in. First of all, the installation of the corner pile is carried out at the highest point of the construction site, then - diagonal to it and the rest of the piles in the corners. A garden drill creates a guide hole at the place where the pile is screwed in, its depth should be half a meter less than the length of the pile.
Rice. 2.0
- A pile with a magnetic level fixed on it is placed in the well. Scrap is threaded into the holes on the pile, on the ends of which pipe trimmings are put on. Using a crowbar as a perpendicular lever, the pile is screwed, for this you need at least 2 people.
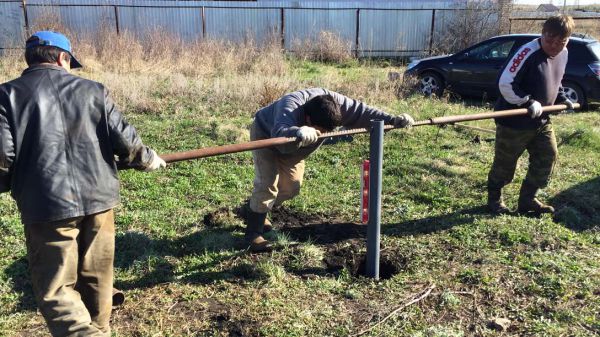
Figure 2.1: Screw pile screwing process
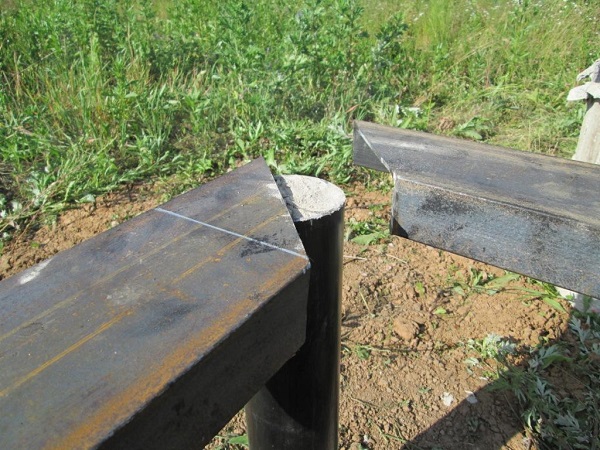
- After all the piles are immersed in the soil to the required depth, the trunks are trimmed. A hose level is used to determine the exact cutting height.

Rice. 2.2: Trimming the pile shaft with a grinder
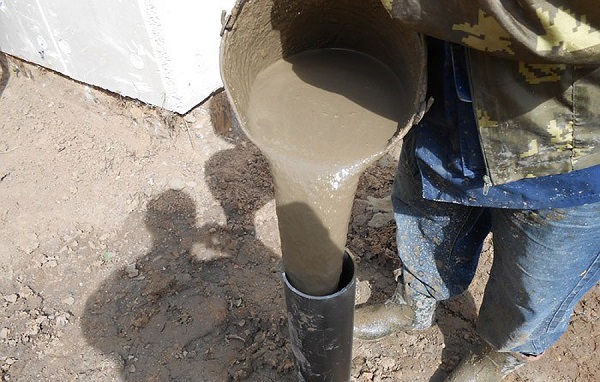
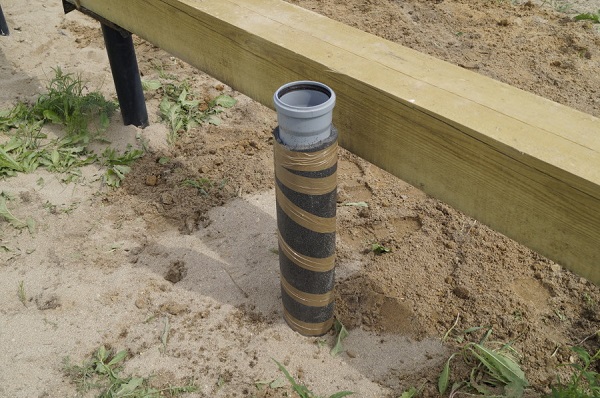
- Concrete screw piles or not - it's up to you. If the diameter and length of the piles are chosen correctly, their bearing capacity will be enough even without concreting, in which case you will only incur unnecessary costs. If you still decide to concrete - to prepare a solution poured into the cavity of the pile, use cement of a class not lower than M300.

Rice. 2.3: Screw pile shaft concreting
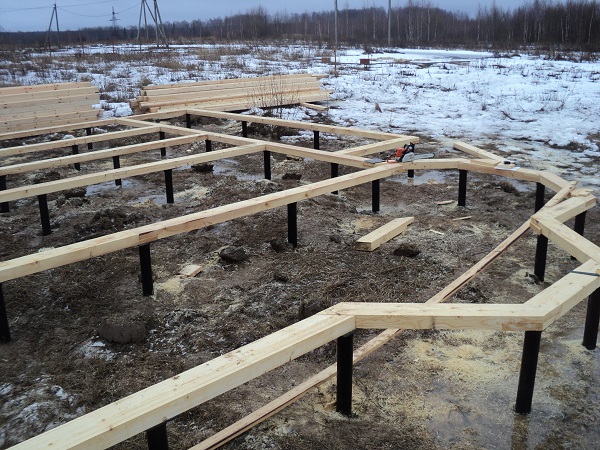
- To create a grillage pile-screw foundation can be used I-beams or a channel, in the construction of light frame houses - timber, for brick houses - a monolithic concrete grillage. If the grillage is metal, it must be primed to avoid corrosion in the future. The binding is carried out by welding the grillage to the pile shafts. To give the structure greater rigidity, reinforcing bars are welded to the junction of the grillage and piles.

Figure 2.4: Fastening the grillage from the channel to the shaft of the screw pile
Pile screw foundation video
For a better understanding of the technology of building a pile-screw foundation, check out the videos that explain the most important points of construction.
Video #1- How to mark the places for screwing piles on a construction site
Video #2- We twist the screw piles with our own hands
Video #3- How to properly mark piles before cutting
Video #4- Features of the installation of a concrete grillage
Part 1
Part 2
Pile-screw foundation - prices
The cost of such a foundation depends on the number and size of piles used to create the foundation. For reference, here are the average prices for foundations of different sizes:
| Foundation size | Number of piles | Cost (thousand rubles) |
| Under a wooden bath 6 * 6 m. | 9 | 30 |
| Under frame house 6*4 m. | 12 | 40 |
| Under a log house 6 * 9 m. | 18 | 63 |
| Under the house of foam blocks 6.5 * 6.5 m | 16 | 66 |
| Under the brick house 8*8 m | 24 | 95 |
Pile-screw foundation reviews
We bring to your attention reviews of people with experience in self-construction of pile-screw foundations.
 Oleg, 30 years old, Moscow:
"I recently completed the construction of a wooden bathhouse on a pile-screw foundation. All the work was done by myself, two friends helped. I can only say positive things about the foundation - it was not expensive, all the piles were twisted within two days. We were pleased with the pace of construction, because we had to wait for the concrete to harden strip foundation would take a very long time. I recommend!"
Dmitry, 35 years old, Zelenograd:
"I have been working in a company that has been building pile-screw foundations for 10 years already. They are ordered, as a rule, for light wooden and foam concrete houses, less often for brick ones. Among the advantages of such a foundation, I can single out the speed of arrangement and low cost. Among the disadvantages - the complexity of erecting with your own hands.If you want the pile-screw foundation to be reliable and durable, it is better to entrust its construction to specialists"
Reasons to contact us for a screw foundation
If, when reading this article, you have the impression that it is extremely difficult to equip a pile-screw foundation with your own hands, you are not far from the truth, in practice it is.
Firstly- direct construction should be preceded by detailed calculations, which can only be fully performed by specialists.
Secondly- how reliable the pile foundation will be, strongly depends on compliance with all the norms and rules of its construction technology, which, without proper experience, is simply impossible to take into account.
If you do not want to risk your money and time, and want to get a well-made pile-screw foundation, contact the Bogatyr construction company.

We guarantee that:
- The foundation will be built in the shortest possible time - the mechanization of the workflow makes it possible to implement any project within several work shifts;
- Only high-quality materials will be used to create the foundation - we have been working with one manufacturer of piles for a long time, the quality of its products has been repeatedly tested in practice and does not raise any doubts;
- All calculations, from the analysis of the bearing capacity of the soil to the determination of the required pile size, will be carried out by the best designers.
"What about the prices?" - you ask? Our prices are more than reasonable. In Moscow and the region there is not a single construction company engaged in the construction of pile-screw foundations at prices lower than those offered by Bogatyr.
With a limited construction budget, a pile-screw foundation (SVF) is a rational choice for a prudent owner. If you have time and energy, you can make a screw foundation with your own hands; for this, you need to immerse the piles to a layer with a bearing capacity. The technology does not depend on the weather, a cottage or garden house is guaranteed to be built in the same season, since there is no need to wait for the strength of the concrete elements of the base.
In comparison with all known technologies, a do-it-yourself screw foundation is the most economical foundation for any ground structures. The advantages of SVF are:
- construction in difficult conditions - hilly, swampy terrain, coastal zone, dense buildings, the presence of trees on the site, the passage of third-party communications;
- minimum budget - almost complete absence of concrete, earthworks, formwork, waiting for curing concrete structures, rental of special equipment;
- variability of construction technologies - a screw foundation is suitable for log cabins, brick, panel buildings, panel, half-timbered frame buildings, house ground loops, fences, MAF;
- maximum number of storeys - three-story buildings with an attic allowed in individual construction are allowed;
- high resource - with normal anti-corrosion treatment, the service life of screw piles is 75 - 100 years.
Please note that grounding is a separate structure, and not the connection of the ground wire to the body of the foundation pile field. Piles for the ground loop should not have non-conductive protective coatings.
The only disadvantage of SHS is that it is unsuitable for basement/basement projects. Manual installation of screw piles is not only acceptable, but also recommended by experts. When these structures are immersed with special equipment, it is more difficult to control the tightening force when reaching the bearing layers.
Step-by-step foundation technology on screw piles
Due to a fairly simple design, with the necessary tools, equipment ( welding machine, gas cutter) screw foundation can be made at home. Installation is carried out according to the technology:
- control screwing;
- design;
- markup;
- production of guide wells;
- SHS dive;
- cutting according to the level of pipes rising above the ground;
- pouring concrete;
- installation of heads;
- tying a pile field with a grillage;
- input of communications.
To plan the time of work, it is enough to measure the pitch of the propeller blades. With each revolution, the pile will sink to this depth, allowing the time of each cycle to be calculated. For example, with a step of 5 cm, 40 circles are required to screw in the SHS to a depth of 2 m. A professional team mounts 15 - 25 SHS per shift, creating a field for a 100 m² cottage.
Calculation of the pile-screw foundation

The technology has been sufficiently developed in all regions of the Russian Federation, for calculating the SVF, you can use the joint venture of 2011, number 24. 13330 for pile foundations. The main calculations are:
- the bearing capacity of the formation at the depth of the pile blade, from this parameter the bearing capacity of one pile is calculated;
- Quantity - SHS pitch on straight sections, positioning at wall junctions, laying piles under individual structures (boiler / furnace, porch / internal stairs, emergency generator / pumping equipment.
In order not to order expensive geological surveys of the site, in 75% of cases test screwing is used, which allows calculating the data necessary for the project:
- the depth of the bearing layer (mandatory below the freezing level of the region);
- soil composition (locating large stones, gravel, limestone slabs in different layers);
- GWL level (very conditional).
The main characteristics of the piles are indicated by the manufacturers. For example, the dimensions of the SHS are selected based on the type of structure for which a foundation is needed:
- berth / pier - pipe 89 - 108 mm, wall 3 - 4 mm, screw 20 - 25 cm;
- base reinforcement - pipe 89 - 108 mm, wall 3 - 4 mm, blade 20 - 25 cm;
- retaining wall - 54 - 89 pipe (2 - 3 mm wall), screw 15 - 20 cm;
- MAF, gazebos, fences - 54 - 76 mm pipe with a wall of 2 - 3 mm, propeller blade 15 - 20 cm;
- combination with tape MZLF - pipe 108 - 168 mm, wall 4 - 8 mm, blade 25 - 40 cm;
- block, brick cottage - wall 6 - 10 mm, body diameter 168 - 270 mm, 40 - 80 cm blades;
- panel, half-timbered, panel, frame, log house - 89 - 114 mm pipe with 3 - 5 mm wall, 20 - 30 cm blade.
Thus, after calculating the combined loads (operational + wind + structural + snow), the figure is divided by the bearing capacity of the pile to calculate the required amount of SHS.
Site preparation and marking

Due to the lack of planning and excavation, the marking of the building spot is simplified as much as possible. It is enough to bring the axes of walls, partitions and additional heavy equipment (boiler, ladder, pump, etc.) onto the terrain. To do this, a little farther than the corners of the house, pegs are installed along which the cords are pulled. Instead, you can use a more complex design of two stakes with a horizontal jumper, which allows you to install two cords on the outer dimensions of the pile.
pile driving

Step-by-step instructions for screwing in the SHS, regardless of the type of blades, tip, level ground water, other factors, is as follows:
- production of pits - pilot holes are created to a depth of 0.5 - 0.7 m with a manual or motor drill, they allow you to accurately position the piles, facilitate the entry of the blade into the ground, the diameter of the leader hole should be slightly smaller than the size of the SHS blade;
- pile immersion - scrap is brought into the holes inside the pipe body, tubular levers are put on it, two workers move them in a circle, creating a torque, the third one controls the vertical of the trunk with a bubble level, with a sharp increase in tightening force (necessarily below the freezing mark), work stops;
There is a technology for mechanical immersion of SHS without the involvement of special equipment, which slightly increases the construction budget:
- a torque amplifying device (reducer) is put on the upper end of the SHS;
- an electric drill is mounted on it (power from 1.5 kW);
- the structure is installed in a vertical position above the pilot well;
- the drill is connected to the mains.
The torque booster device is a gearbox with a gear ratio of 1/60. Instead of levers, an electric drive of the tool is used, the operation can be performed by two workers.
Alignment of the SHS in the horizontal plane
The pile field must be tied with a grillage in the form of concrete, metal or wooden beams located on the heads. To do this, pipes protruding from the ground must be brought back to normal. The alignment technology looks like this:
- mark of a single level - a level, theodolite or laser plane builder, level is used;
- trimming - the body of the pipe is cut off by the angle grinder according to the marking.
On this, the pile field device is considered complete when using a monolithic or metal grillage. If a frame, log house, panel or panel house is being built, it is necessary to mount the heads on which the beam, calibrated log can rest. The header has several modifications:
- square - 10 x 10 - 30 x 30 cm plate welded to the pile;
- reinforced - the size is similar to the previous case, the plate is welded to a pipe, the inner size of which is equal to the outer diameter of the pile, there are 4 stiffeners (kerchiefs);
- U-shaped - internal dimension between shelves 17 cm for laying timber 15 x 15 cm.
This element is put on the SHS body and attached to it by welding (rarely by bolts). Holes in the plate allow you to fix wooden beams grillage to obtain a single spatial structure.
pouring concrete
The pile, even with a hermetically welded head, is covered with moisture from the inside. To prevent this phenomenon, special protection is used - filling the pile body with concrete after immersion to the design depth. Usually several technologies are used:
- dry mix - packaged sand concrete M 300, which, upon contact with condensate, is independently cemented inside the product;
- ready-mixed concrete - classic pouring through a funnel, the technology has a significant drawback - the presence of voids, cavities inside the mixture;
- sand concrete - grades M 300 - M 400, due to the absence of large fillers, there are practically no voids in concrete;
In addition, concrete injections make it possible to increase the spatial rigidity of the structure, which is important for thin-walled piles.
Tying piles with grillage
On straight sections, the recommended height of the sole of the grillage from the ground is 0.5 - 0.7 m. This is the optimal size for the location of ventilation ducts in the intake. Without it, the floors of the lower floor will be a source of heat loss, in the absence of natural ventilation the power frame will quickly become unusable. For each type of grillage, there are installation features.
Monolithic grillage

The technology is the most complex, more expensive than other options, but it is the only one possible for brick cottages on difficult terrain, in the coastal strip and in swamps. The device of a monolithic grillage according to technology:
- formwork assembly - the lower shields are put on the pipes, supported by jumpers fixed on two pegs, the side shields are attached to the bottom, interconnected by spacers and ties;
- reinforcement - two belts of bars of a periodic section (12 - 16 mm corrugated) are connected with horizontal and vertical 6 mm jumpers or clamps;
- a bunch with piles - holes are burned or drilled in the pipes, into which additional reinforcement is launched, joined with a knitting wire to the armored belts of the structure;
- pouring - the formwork is filled with concrete mixture to the design level, compacted with reinforcement bars or internal vibrators.
On a monolithic grillage, all types of masonry for the walls of a brick house and any other construction technologies are allowed.
Wooden grillage
The technology of building wooden houses makes it easier for the developer who needs to tie the pile field with long elements to ensure the spatial rigidity of the house. The lower rims of the log house (calibrated log), the framing of the “framework” are a finished grillage.
Manufacturing technology looks like:
- installation of flat heads - necessary to increase the area of \u200b\u200bthe supporting surface;
- laying beams - a beam, a log is joined into half a tree, attached to the heads with self-tapping screws, bolts or nails.
This is the fastest grillage device, however, the technology is not suitable for brickwork, high-rise projects. The height of the building cannot exceed one floor with an attic.
metal grillage
If the height of the log house, the "framework" exceeds the standard floor, the wooden grillage may not withstand prefabricated loads. It is economically unprofitable to pour monolithic beams for wooden buildings, you can use a grillage made of rolled metal. The technology looks like:
- laying pieces of the channel with shelves down, wall up on SHS pipes or an I-beam on the bottom shelf in exactly the same way;
- docking of grillage elements, tacking in several places;
- scalding with a double seam of each joint.
A metal grillage is suitable for one-story brick buildings only when the pile pitch is reduced to 1 - 1.5 m. This is due to the large structural mass of the material - for example, the channel begins to bend under its own weight already in 3 m spans.
Entering engineering systems into the building on screw piles
Most often, SHS pipes protrude slightly above the ground. This makes it difficult to lay communications underground 0.5 - 1 m in height. Therefore, it is more reasonable to implement the introduction of life support systems at the foundation stage. Later, for this, it will be necessary to open the subfloor, to carry out earthworks in a confined space. For the normal operation of the building, it is necessary to bring:
- water supply - in the frozen underground, pipes must be insulated, both in the ground to the freezing mark, and above its surface with polystyrene shells or mineral wool (2 - 3 layers) and a heating cable, respectively;
- sewerage - drains enter the external sewer circuit warm, therefore it is enough to wind the air pipes with one layer of basalt wool, underground pipelines with polystyrene foam shells to a depth of 1–1.5 m;
- house grounding - SHS can be used minimum diameter in the form of a triangular contour immersed at a mark of 2 m, tied with thick wire or tires from a metal strip, while the piles should not have a protective coating that does not transmit current;
- power cable - sometimes used underground input necessarily in a protective cover.
After wiring the engineering systems, you can install a pick-up. If the project includes brick walls, the false base is made at the stage of finishing the facade. Because in this case, there is a high probability of damage to the facing materials by a random stone or mortar.
Pickup on screw piles

Complete plinth in pile foundations absent, to protect against blowing, penetration of precipitation into the underground, a pick-up is made. For the construction of a false basement, several technologies can be used:
- frame system - a timber or a galvanized profile is attached to the piles, the lattice is sheathed with basement siding, corrugated board, panels;
- masonry - ceramic, clay brick, rubble stone.
The pick-up is supplemented by a blind area for the removal of storm and flood drains. The facing materials of these structures must be waterproofed. For this you need:
- install the frame crate;
- fix roofing material vertically on it;
- run it under a horizontally located blind area;
- install siding and paving slabs.
Natural ventilation of the underground is carried out due to the products left in the false plinth, total area which should be equal to 1/400 of the surface of the sample. There is no need to insulate the structure, since there is no heating inside the underground.
Screw pile resource
To increase the service life of SHS, anti-corrosion treatment of each product is necessary in accordance with GOST R 9.905, 9.908, 5272. Manufacturers use the following anti-corrosion technologies:
- cold galvanizing - it peels off almost completely even when the pile is immersed due to the abrasives contained in the ground;
- hot galvanized - lasts a little longer, does not provide the declared 75 year resource;
- powder coating - serves 30 - 50 years after installation, is destroyed by walking currents in the ground;
- painting with bituminous compositions - protects against groundwater, regardless of the height of the groundwater level, provides 50 - 70 years of operation
- primer VL 05 + cold galvanizing (enamel IR 02) + fiberglass - resource 300 - 400 years in extreme conditions, no electrochemical corrosion;
- enamel IR02 or Zinga Metall + polyurethane or epoxy two-component enamel - created to protect oil pipelines (air, underground), have a 50 - 100 year resource;
- primer VL 05 + polyurethane enamel Hempel, Masco - a standard level of protection for the bottoms of icebreakers, submarines, fuel and lubricant tanks, 30 - 70 years of service life.
Even when buying SHS with a factory anti-corrosion layer, it is necessary to cover the piles with the indicated compositions for reliability.
Appointment of screw piles
The first pile structures with screw tips in the Russian Federation began to be used exclusively for the needs of the army in the middle of the 19th century. They could be used for temporary structures or in difficult operating conditions. The declared resource was 100 - 180 years, which modern manufacturers cannot boast of. Currently, SHS and other pile modifications are used for:
- building a house in a swamp, slope, in dense buildings, forest zone, on soils with high groundwater level, low bearing capacity;
- budgetary construction of fences, IAF, gazebos, outbuildings;
- reinforcement of tape, slab bases;
- manufacturing engineering systems, such as grounding a house, a water intake well.
The height of the SHS is practically unlimited - when the lower element with the auger blades is immersed to the ground level, the next piece or several can be welded to the pipe to guarantee the achievement of layers with load-bearing properties. For installation, three people are enough or one master with a powerful electric drive with a gearbox.
This step-by-step instruction suitable for installation of screw piles under a building erected using any technology from different wall materials. Recommendations will help to avoid mistakes, increase the operational life of the home.
Advice! If you need contractors, there is a very convenient service for their selection. Just send in the form below detailed description work that needs to be done and offers with prices from construction teams and firms will come to your mail. You can see reviews of each of them and photos with examples of work. It's FREE and there's no obligation.
The topic of this article is the calculation of the cost of screw piles. We will try to cover all the main stages - from assessing the mass of the building to the cost of individual construction work. Important point: the actual cost of materials and work in your region may differ markedly from that given by the author.
A house starts with a foundation. Our goal is to estimate the cost of it.
Calculation steps
Let's start by making a list of the steps in our calculation.
- It is necessary to at least roughly estimate the mass of the structure for which we plan to create a foundation. It is tied to the material: it is clear that a wall of 2.5 bricks and a wall of sip panels have very different weight running meter.
- Taking into account the mass of the house, we need to choose the diameter and number of piles.
- If all the work on screwing the piles is planned to be done by hand, the calculations will end there; however, more often you also need to find out the cost of installing screw piles. In addition, some additional work may be required.
Calculation of the load on the foundation
How to find out how much the future house weighs? The obvious solution is to know the average density of the wall material, multiply it by the total cubic capacity and make adjustments for the weight of the ceilings, roofing, internal utensils, snow on the roof, etc.
An important point: even if the load on the foundation is calculated very accurately, it is recommended to leave a margin for the bearing load of at least 30% - for soil heterogeneity, inevitable pile corrosion and other unaccounted for corrections.
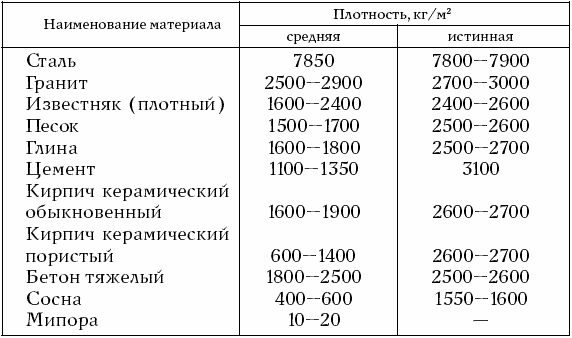
Here is the reference density of some popular building materials.
- Brickwork (red solid brick) - 1800 kg / m3.
- Reinforced concrete - 2500.
- Foam concrete - 300-1400 depending on the brand.
- Pine beam - 500.
- Expanded polystyrene - 45-150.
It is rather problematic to calculate the total mass of floors, internal partitions, roofs and household items. A simple rule will help here: for a balanced structure, the mass of the walls is approximately equal to the load on the foundation from all other structures, snow, etc. The exception is frame buildings and houses made of sip panels: in them it is better to multiply the estimated mass of the walls by 3.
As an example, let's calculate the mass of a house measuring 8 * 8 meters in two floors. The material of the walls is a beam 25 centimeters thick; ceiling height is 3 meters.
- The total volume of the outer walls is (8+8+8+8)*6*0.25=48m3.
- Their mass at a density of 500 kg/m3 is 48*0.5=24 tons.
- We take the total mass of all other elements of the house equal to the mass of the walls. Thus, the building will weigh 48 tons.
- Taking into account a 30% margin of safety, we will calculate the foundation based on a peak load of 48 * 1.3 = 62.4 tons.
Calculation of the number of piles
To obtain required amount supports, you just need to divide the calculated load by the bearing capacity of one pile. The instruction is simple, but some reference data is missing to implement our plan.
Let's bring them:
- Piles with a pipe diameter of 76 mm are designed for light terraces, fences and playgrounds. They are designed for loads up to 350 kilograms.
- Products with a pipe diameter of 89 mm and blades with a cross section of 250 mm can already become the basis for light one-story residential buildings. Their bearing capacity is estimated at 1500 kg.
- Pile 108/300 mm is designed for two-three-storey structures made of sip-panels. The estimated load for her is 2100 kg.
- The size of 133/350 mm will make it possible, with a sufficiently strong grillage, to build walls of brick, foam and aerated concrete, timber 40 cm and thicker. The maximum load for her is 2900 kg.
It is clear that the larger the diameter of the pile, the higher its price; besides, installing it manually is also much more difficult. Our obvious choice is 108/300 millimeters. The length is determined on the basis of geological studies: the pile blades must rest on dense soil layers.
In our case, 62.4 / 2.1 = 30 piles will be required.
Clarification: the real bearing capacity of one screw pile 108/300 mm on dense soils is estimated at 4-10 tons. Understated values are usually given by manufacturers for reasons of reinsurance against lawsuits and to increase profits.

Cost calculation
Prices
What is the cost of a screw pile for a house? How much will the installation work cost? Here is an excerpt from the price list of a St. Petersburg construction company (in order to avoid accusations of hidden advertising, we will do without specific names).
Products
- Pile 108/300 with a welded tip with a length of 1650 mm costs 1550 rubles, with a length of 3000 mm - 2050 rubles.
- A three-meter pile of the same diameter, but with a cast tip and galvanization, will rise in price to 3,200 rubles.
- A cap that allows you to tie the supports with a grillage from a bar or steel channel, costs 300 rubles.
- A welded tip and size 133/350 with a length of 1650 mm will provide the cost of one pile equal to 1900 rubles.
- The same product, but with a length of 3000 mm, will cost 2350 rubles.
Works
The cost of work on screw piles depends on their length, soil density and a number of other factors. Here are indicative estimates for popular sizes.
Cost estimation is not always objective. When using heavy equipment, the time and effort costs are little dependent on the diameter of the pile.
Prices for additional work on the device are given already taking into account the cost of materials:
- Tying the supports with a channel 160 * 80 * 5 mm will cost 900 rubles per linear meter.
- strapping profile pipe dimensions 60 * 30 * 3 mm will reduce costs to 500 rubles per linear meter.
Useful: of course, with such a width, the professional pipe will not replace the grillage. It only provides a strictly vertical arrangement of piles for any subsidence and soil movements. An additional measure to ensure the rigidity of the foundation can be the installation of slopes: the triangle is a rigid figure, and any horizontal displacements will become impossible.
- Tying with a beam of 150 * 150 mm will cost 700 rubles / meter.
- With an increase in the cross section of the beam to 200 * 200 mm, the cost of a running meter of grillage will increase to 900 rubles.
- Drilling a hole in a solid base (it is mandatory if the pile is not deepened by at least 1.5 meters) costs from 300 rubles for each. The exact cost is again determined by the type of soil: on limestone and granite, the time spent on drilling will be very different.
- Trial twisting, necessary to assess the density and structure of the soil, costs 2000 rubles.
- Renting a generator where the existing electrical network cannot provide five kilowatts of power will cost an additional 2,500 rubles per day.
It is worth clarifying: for different companies, the cost of installing screw piles can be assessed not only according to different tariffs, but also according to different criteria.
For example, many companies use different rates for manual and mechanized installation; tying with a grillage can be evaluated separately from the cost of materials and amount, for example, to 600 rubles per pile for a beam and 800 for a channel.
In most of the price lists, the cost of installation is calculated without taking into account the pouring of the pile body with concrete. However, this operation has a more than positive effect on the strength of the foundation, and, most importantly, on its durability: the concrete pillar will hold the grillage even with through corrosion of the pipe.
Clarification: galvanized pipe, it would seem, is invulnerable to dampness and rust. However, it is worth considering the inevitable violation of the zinc layer during screwing. Each damage to the protective anti-corrosion layer is, in perspective, a through hole in the pipe.

counting
So, let's do a test calculation for our case.
- For our purposes, supports with a size of 108/300/3000 millimeters are guaranteed to fit. The shorter 1650 mm are used only on very dense soils. For dry and not too dense soil, you can prefer more cheap option— piles without galvanization with welded tips.
- The cost of one product without installation according to the price list given by us is 2050 rubles. The cap will cost 300 rubles, the installation will cost 1850. Total - 2050 + 300 + 1850 = 4200 rubles.
- The total cost of piles will be 30 * 4200 = 126000 rubles. Another two thousand is the cost of test drilling.
- Suppose that the beam is not included in the cost of tying with a grillage. Thus, when calculating costs, only the cost of work can be taken into account: it will be 600 rubles per pile, or 18,000 rubles.
- In total, all foundation costs will amount to 126,000 + 2,000 + 18,000 = 146,000 rubles.

Conclusion
Dear reader, we have shown only the calculation scheme. Once again, the prices shown may not be relevant for your region.
Successes in construction!
|
TYPES AND TYPES OF SCREW PILES |
||||||||||
|
Screw pile tip type |
Screw pile shaft thickness, mm |
Screw pile length, mm |
Steel and pipe type |
Number of screw pile blades |
Blade diameter, mm |
Blade thickness, mm |
Number and diameter of mounting holes |
Coating type |
Additional protection |
|
|
Welded tip cast tip Tip for permafrost Cast tip for permafrost Screw tip |
57 76 89 108 133 159 219 325 |
3 mm to 20 mm |
From 1.5 to 10-12m |
New - Steel 3sp5 Used pipe - steel unknown - not used by us Remanufactured pipe - unknown steel - not used by us |
1 2 3 |
From 200mm to 850mm |
4 mm to 20 mm |
Any quantity and diameter |
Cheap, household black finish – not used by us |
Heat shrink tubing for ground-air transition |
|
Two-component primer-enamel |
||||||||||
|
Cold galvanizing - we do not use |
||||||||||
|
Cold galvanizing + two-component primer-enamel |
||||||||||
|
hot dip galvanizing |
||||||||||
In more detail
Screw pile tip type:
- Welded tip- the most common type of tip. It is optimal in terms of "price-quality" ratio, provided that it is manufactured at a specialized enterprise. Note! The purchase of screw piles from “dubious comrades” is fraught with problems during installation - the pile does not enter the ground, the pile deviates from the vertical position (the pile “beats”) during installation, the blade breaks off during installation, the decrease in the bearing capacity of the screw pile with poor penetration of the blade, irregular geometry blades, reduced service life.
- cast tip- a more expensive version of the tip compared to the welded one. Manufactured by casting. Differs in the increased thickness of the blade (does not affect the bearing capacity). There are no fakes on the market of screw piles. A good choice, but more expensive than a welded one, other things being equal (the service life of the piles is the same - after 100 years, it is not the tip that is in a dense layer without oxygen that will rot, but the shaft at the soil / air boundary).
Permafrost tip (cast/welded)- used in soils with "permafrost", see above for the difference between cast and welded.
Screw tip- is used, as a rule, for fence posts made of chain-link mesh, 3d panels. Manufactured by casting. In terms of bearing capacity and wind load, it slightly exceeds pillars of the same diameter hammered to the same depth. There is casting Russian and Chinese.

Screw pile shaft diameter, Screw pile shaft thickness, Blade diameter, Blade thickness - these parameters must be considered together. their combination gives such concepts as "bearing capacity" and, in part, the estimated service life. In the screw pile market, 90% use the following standard sizes:
|
Screw pile shaft diameter, mm |
Screw pile shaft thickness |
Blade diameter, mm |
Blade thickness, mm |
Estimated service life |
Application |
|
|
80 years - when coated with high-quality two-component primer-enamel in compliance with the requirements of the paint manufacturer |
Lightweight structures - greenhouses, low poles for lanterns, decking, country toilet etc |
|||||
|
Heavier structures - greenhouses, greenhouses, posts for fences made of chain-link mesh, 3D panels. |
||||||
|
Euro picket fences, gates, change houses, construction trailers, light piers, gazebos, terraces, brick and decorative stone pillar supports. |
||||||
|
90% of produced piles are exactly 108mm. Suitable for almost all 1-1.5-storey buildings made of wood, timber, SIP panels (houses, baths), change houses, piers, garages, piers, pedestrian bridges |
||||||
|
Hangars, houses made of aerated concrete, houses made of logs and beams from 200 mm, piers, bridges, flyovers, industrial sheds, slope strengthening |
||||||
|
These piles are practically not used in private housing construction. Suitable for: bridges, piers, road screens, industrial hangars, sheds, greenhouses, as supports for towers cellular communication, pipeline supports. * - Production under the order and any configuration (according to the project). |
||||||
Note! Changing at least one of the parameters leads to unpredictable changes in the output parameters: "bearing capacity" and "service life". The most common change in the thickness of the pile shaft is 108mm (as the most common) - instead of the calculated 4mm, the pile is made from a 3.5mm pipe. This can be announced to the customer (in small print), or maybe not ... (it’s almost impossible to distinguish 3.5 mm from 4 mm by eye. There are only a few customers who check the thickness of the pile with a caliper)
The use of "non-standard" sizes indicates the possible use of used or refurbished pipes (although "not a fact" - we will not indiscriminately throw mud at competitors - from time to time we received offers of stale, defective, off-gauge pipes at very "tasty" prices).
Steel and pipe type
 New pipe - Steel 3sp5– we guarantee that all our piles are made from new pipe. "The best car is new car" Henry Ford. And that's it.
Used pipe - unknown steel, Remanufactured pipe - not used by us.
Before purchasing piles from a used pipe, answer the following questions:
What product was this pipe used to convey? (if steam or water is a layer of rust and limescale inside the pile cavity will not allow limiting the access of oxygen by pouring concrete - the service life will be reduced several times, if gas condensate, oil, oil products and oil distillation - then this is a “lottery”: some products of the “oil industry” not only accelerate corrosion, but are also “not entirely useful” for humans and environment)
How was the dismantling done? (operation, as well as the process of installation, dismantling, transportation is carried out by special equipment - which inevitably leads to geometry violations - the pile can be “curved”, with dents - although you may be lucky)
How many years has the pipe been used? What is the residual thickness of the pile shaft in the center? Has a pipeline joint hit your pile?

IF YOU ARE SATISFIED WITH EVERYTHING, THEN YOU ARE NOT TO US.
Number of screw pile blades:
 Single-bladed screw pile - "standard" is suitable for almost all tasks.
Two and three bladed piles are used for objects with increased wind load: fences, hangars, sheds, noise barriers.
Number and diameter of mounting holes:
You can not "bother" - everything is the same for everyone (two holes with a diameter of 50mm). But there are also special orders - for mechanized installation - for a specific hole drill nozzle (although the "normal" hole drill nozzle fits any pile) or for piles with a diameter of more than 159 mm when installing in difficult conditions.
Coating type:
Cheap, household black finish - not used by us. To reduce the cost of a screw pile, unscrupulous manufacturers can use a cheap pile coating - THIS IS NOT OUR METHOD. We give a guarantee for our products. We count on you to recommend us to your friends and colleagues. In a year, we won't have to be looked for - all our phones "will be in touch."
Two-component primer-enamel. To ensure the barrier protection of the pile against corrosion, we use a high-quality two-component primer-enamel based on epoxy resins, designed specifically for painting screw piles. The coating has high adhesion to metal surfaces and is highly resistant to mechanical damage. This coating was developed by the joint efforts of the "giants" of the screw pile market - the SvayBur Plant, the Ostankino Screw Piles Plant, Fundament LLC and the Ecopol paintworks plant with the LKIZ Promtekhkolor company. This coating is not on open sale, if you purchased it at retail - it's a fake!
Its characteristics are similar to Hempel paint (Pay attention! Hempel paint is a very good paint (honestly), but after the jump in the euro exchange rate, it became very expensive and is not used today for painting screw piles. How to check the manufacturer of screw piles? Original Hempel paint comes only in original drums (see Hempel website) - ask to see the production and ask to see the paint :). I didn't tell you this.
Cold galvanizing – as a separate coating we do not use.
To protect screw piles using the "cold galvanizing" method, we can use the zinc-filled primer-enamel "SvayBur-Zinga". This coating is a thin-film zinc coating that effectively protects ferrous metals from corrosion, has excellent protective properties and high adhesion to metal surfaces. "SvayBur-Zinga" provides both active (cathodic) and passive (barrier) protection against corrosion. Liquid zinc can be used as a stand-alone coating or as a primer in complex protection systems.
The use of materials refers to the "cold galvanizing" method. During the tests, the coating of piles by the method of "cold galvanizing" showed (unfortunately) insufficient resistance to mechanical stress and we do not use it as a separate coating.
Cold galvanizing + two-component primer-enamelFor additional barrier protection of a screw pile painted by the “cold galvanizing” method, the finished product is painted with an additional layer of SvayBur-Polymer primer-enamel. This allows you to increase the service life and protects the zinc coating from mechanical stress during twisting.
hot dip galvanizing
Have you seen galvanized buckets? - this is exactly what "hot galvanizing" is. Produced in accordance with GOST, thickness 80-120 microns. No additional advertising is needed. It can be used as a stand-alone coating or as part of a complex coating.
An additional “+” of hot-dip galvanizing is the coating of the “pile shaft cavity” with a zinc layer.
Minus one - the price.
Hot dip galvanized + two-component primer-enamel
Well, our best complex of coatings is Hot-dip galvanizing + two-component primer-enamel "SvayBur-Polymer". Soviet GOST for hot dip galvanizing + latest developments in the field of barrier protection. Welcome!
Additional protection for screw piles:
Heat shrink tubing for ground-air transition.
Everyone is concerned about the durability of pile-screw foundations. We are also concerned about this issue, and we asked ourselves: where is the weakest point of the pile? Where will rust appear first?
 Answer: As everyone knows, the corrosion process is nothing more than the oxidation of iron (ie, the addition of an oxygen molecule O in an iron Fe molecule). And the rate of corrosion depends on the aggressiveness of the environment. The metal rusts most intensively in wet places - where there is oxygen and water. We can do a little experiment: let's put, say, metal bolts in different environments: water, water + air (we wrap the bolts with a damp cloth) and air. We expect the result: bolts in a wet rag in 2 days!! covered with a rusty coating, there were signs of corrosion on the bolts in the water, in the air - everything is fine (so far). And so, the most "hot" place for rust on a screw pile is the air-to-ground transition. This place has both water and air. “But what about the vaunted pile covering?” you ask, and here such a concept as “frost heaving of the soil” comes into play. That is, every late autumn, the soil saturated with moisture freezes and the ice in the soil expands, and every early spring the ice melts and, accordingly, the soil decreases in volume - an additional mechanical effect acts on the screw twice a year in the upper layers of the soil. And so every year.
Agree unpleasant situation- it is not known how strong the impact will be on each of the piles and how it will end. And in order to further protect this “dangerous place”, we suggest installing Heat Shrink Tubing at the ground-air transition. Heat shrink tubing technology has long been successfully used for sealing joints in the energy sector.
In pile-screw foundations, a heat-shrinkable (heat-shrinkable) tube 30 cm long is put on an installed pile in the area of the ground-air transition and heated with a building hair dryer or gas burner. In the process of heating, the heat shrinkage decreases in diameter and tightly fits the pile. Thus, we additionally protect the most corrosive place from water, air and mechanical influences.

Heat shrink tubing on the screw pile shaft from the tip to the mounting holes
If you carefully read the previous paragraph, you understand that the next corrosive place (after the soil-air transition) is the pile shaft immersed in the ground. For additional protection of the entire pile shaft, we suggest using heat shrink tubing from the tip of the screw pile to the mounting holes. This is not only beautiful - it is an additional 1 mm of metal protection with a composition based on polyolefin !!!


