Frame house step by step. Why "framework"? Construction feasibility and cost.
Frame houses are usually built either from wood or metal. metal frame walls much easier because they are made from a lightweight profile. Assembly of prefabricated steel structures is made according to pre-planned drawings that are designed at the factory.
You can assemble such a house with your own hands in a few days. Despite the fact that this design reduces the load on the foundation, the price of such a house will be almost twice as much as a similar timber frame. Any structure can be built from wood, it can be a bathhouse or a beautiful two-story frame house.
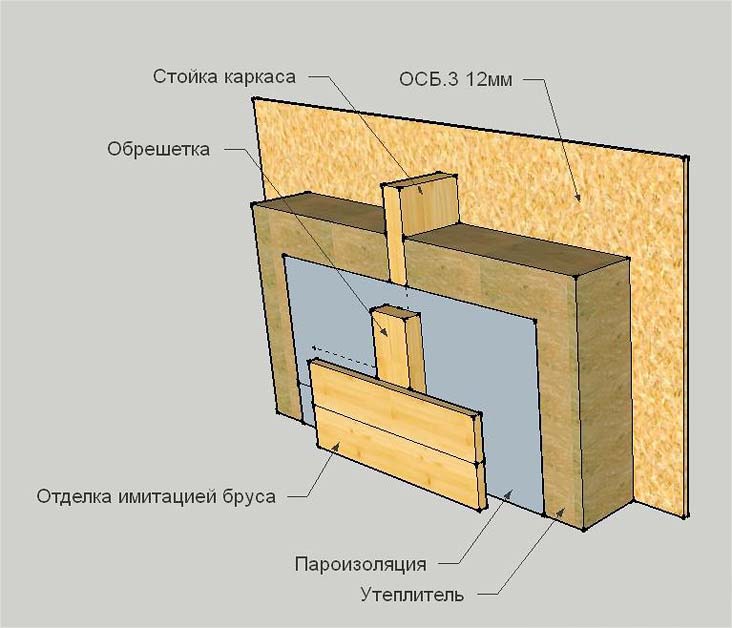
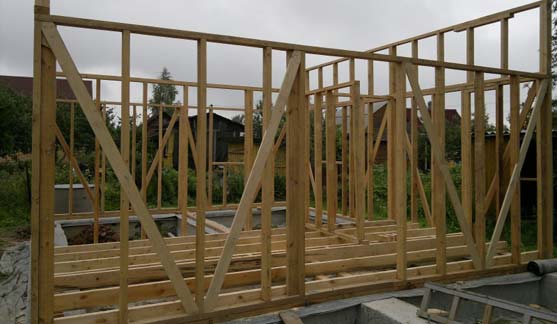
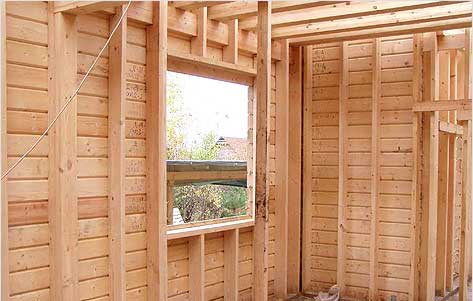
Walls frame house are webs of load-bearing racks, battens, insulation, vapor barrier and finishing material. The initial work on the construction of the walls can begin only after the floor of the building is completely ready. At the same time, the floor structure must be precisely aligned in a horizontal plane in order to avoid distortions of the walls.
Before you make a frame, you need to calculate the height of the ceiling, taking into account the entire interior decoration. It is difficult to heat a floor that is too high, and no one needs an overrun of materials. A small height will create an uncomfortable atmosphere indoors.
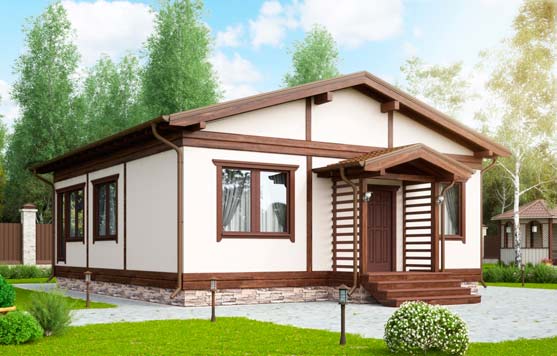
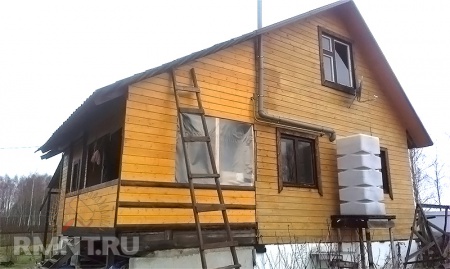
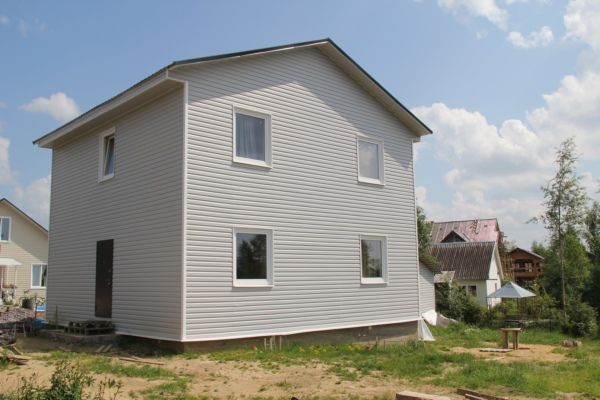
Externally, frame houses look very attractive due to the use of natural materials and the correct proportions. Several beautiful two-story frame houses, which were made by the owners themselves, are shown in the photo.
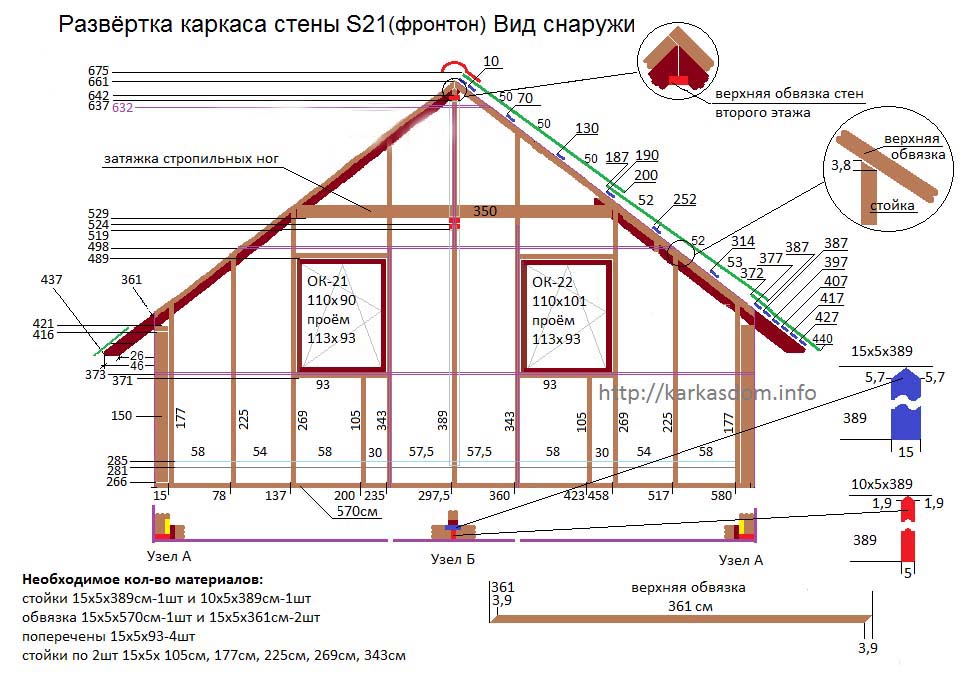
To build a residential building, you must have a project on hand, or at least a preliminary sketch. These data are needed in order to calculate the consumption of materials, order the required volume and correctly perform all nodal connections.
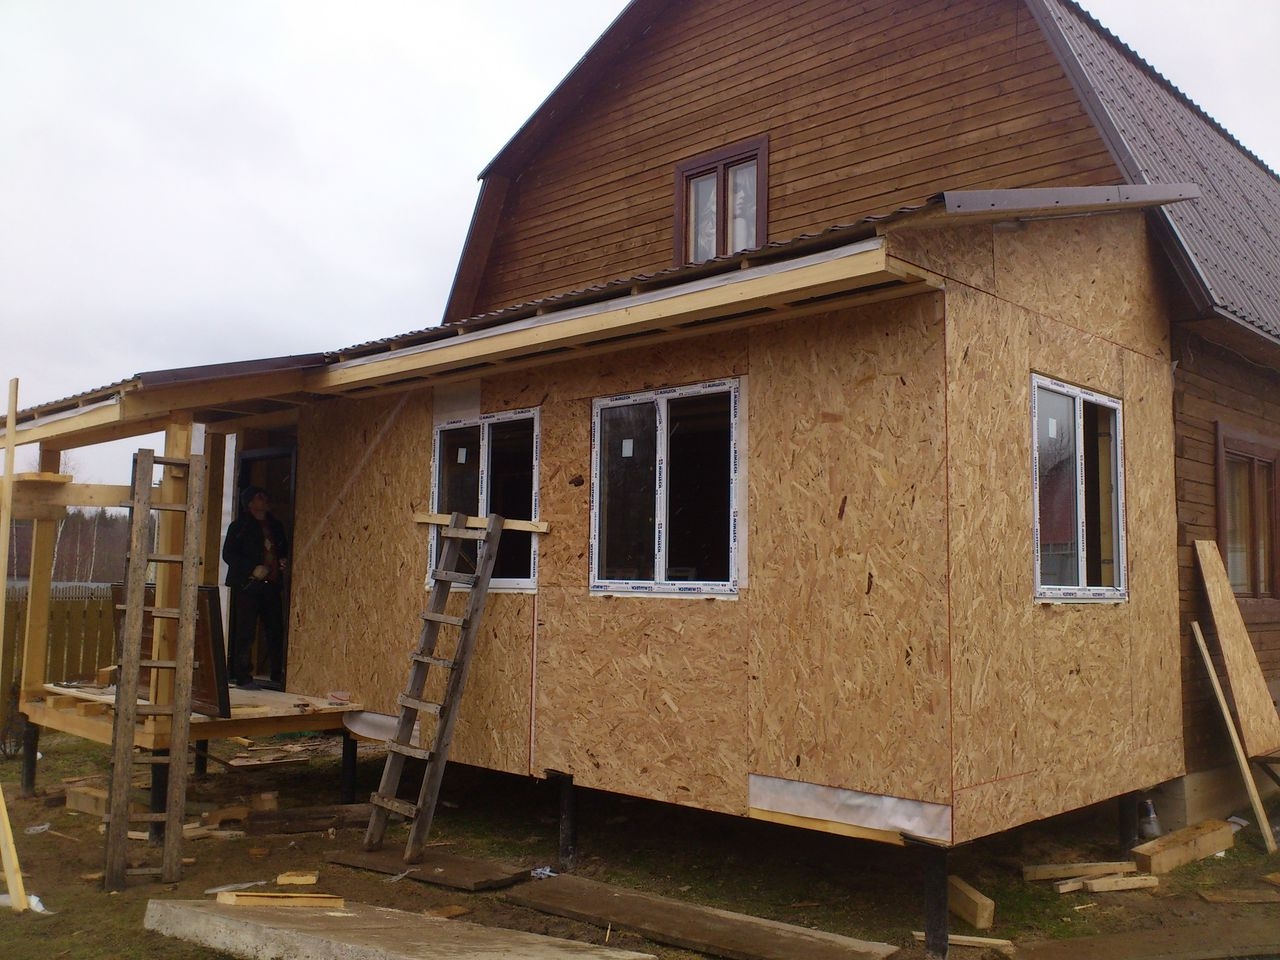
OSB boards serve to level the inner or outer surface of the walls and are used as a base for finishing. It is impossible to build a frame from OSB; load-bearing structures must be made of durable timber.
Sheathing with OSB boards is done end-to-end. The seams between the plates can be filled with sealant. The slabs are fastened with nails so that the outgoing end of the nail enters the crate or frame at a distance not less than the thickness of the slab.
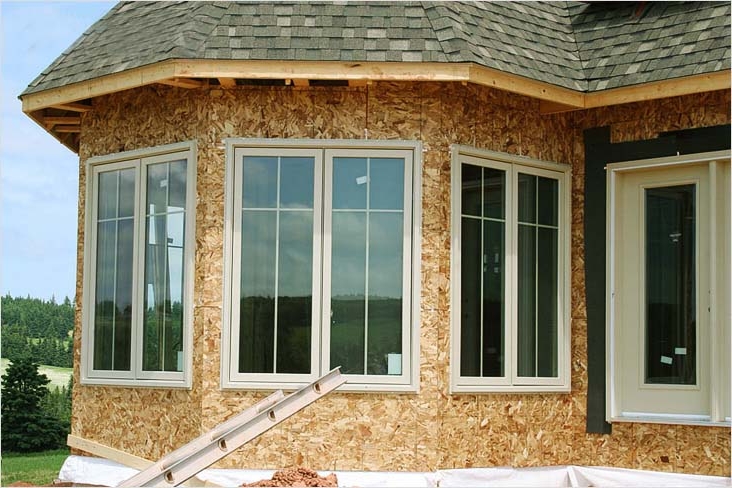
If you build a light house with your own hands, a wooden frame with OSB boards is one of the best options. In order for the frame house to function properly, it is necessary to provide for the correct thermal insulation and vapor barrier. In a frame house, especially with the use OSB boards- this is the most important link, without which the house will quickly collapse.
Despite the fact that the frame house is assembled with whole walls, like an ordinary designer, during construction one cannot do without additional costs for unforeseen situations. Independent work significantly reduce the budget, the main thing is to save not on the quality of materials, but on their cost.
Before you build a frame, you need to study the drawings. The location of the bearing racks is carried out depending on the load from the elements of the building located above. The smaller the distance between the posts, the stronger the wall will be for vertical loads.
Vertical racks are attached to the floor with special pins. To provide the racks with the necessary stability, temporary braces are mounted on both sides, which are fastened with nails to the elements of the floor and the rack.
After the main racks are installed, it is necessary to check their compliance with the design position. Next, retaining bars are mounted that hold strapping beam on top. In places where interior partitions are provided, supports should also be installed and sheathed with either OSB sheets or crates.
The fastening of short bars is always done with a tongue and groove on half the board. This ensures the tensile strength of the connection. The vertical frame must be untied with horizontal bars.
After installing all the elements of the frame, temporary braces are gradually removed and replaced with permanent ones from a durable beam. These slopes must be in the plane of the wall. They give the frame additional stability.
To build a house with your own hands, you need to learn the correct technological sequence. First, a project is developed, the terrain and the ability of the soil to perceive the load are studied. Some soils are so weak that ordinary houses cannot be built on them.
After that, the type of foundation is selected. Here it is important to determine the depth of soil freezing and lay the base of the foundation below this mark, so that in winter the soil, swelling, does not squeeze out the base structure.
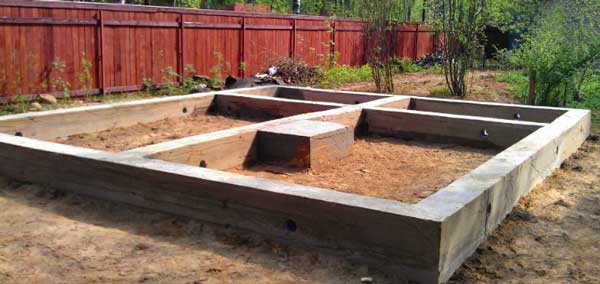
Under the frame house is most often done pile foundations with grillage. The upper edge of the grillage must be carefully aligned, if this was not achieved the first time, beacons should be installed and a layer of leveling mortar should be laid along the guides.
Then the floor is laid, the space between the lags is filled with insulation. On the finished floor, the installation of walls begins. On top, a strapping beam is laid around the perimeter of the building. If the building is not being built one-story, they make an overlap and repeat the procedure in the same way as the first floor.
The final stage of construction load-bearing structures home is the construction of the roof. After that, you can start finishing work.
Insulation in a frame house should be performed only after a heat engineering calculation. The selection of materials determines how cozy and comfortable it will be inside the house. The insulation is placed between the crate, to which the exterior trim will be attached. A frame house should be built after the selection of materials for thermal insulation.
The installed insulation must be protected from moisture, otherwise after a couple of years its effectiveness will completely disappear and the house will quickly collapse. Every day the deterioration of the insulation will increase the cost of heating the entire building.
You need to know how to properly protect the insulation. This information is always indicated on insulating products. In most cases, it is enough to install a vapor barrier on top of the insulation, before the exterior finish.
It is important to use specialized materials for vapor barrier here, because they have a layered structure and are able to pass air, but not moisture. The use of ordinary polyethylene destroys the entire system of proper construction. The film does not allow the building to "breathe". This leads to the appearance of condensation and fungus on wooden structures, even if they are impregnated with special protective solutions.
The Build and Live program is becoming popular in our country. Having plunged a little into the construction technology, you can do all the work yourself and in a few months call in your own house.
Building a house with whole walls begins with the preparation of the base and the supporting frame. Finished walls are not load-bearing elements, but only hinged. The load on the foundation is transferred by the racks of the frame. It is desirable to make the walls themselves as light as possible in order to reduce the pressure on the foundation part.
The assembly of finished walls is carried out on a separate rack, which has a flat surface. Particular attention should be paid to the butt joints, they must be carefully fitted so that during the installation process, the formation of open areas that will subsequently have to be sealed with sealant is excluded.
The assembly of entire walls is carried out only according to pre-prepared drawings. Otherwise, it will not be possible to correctly provide bearing capacity frame. The weight of each finished wall is summed up, part of it acts on the racks, the rest of the pressure is transferred to the foundation.
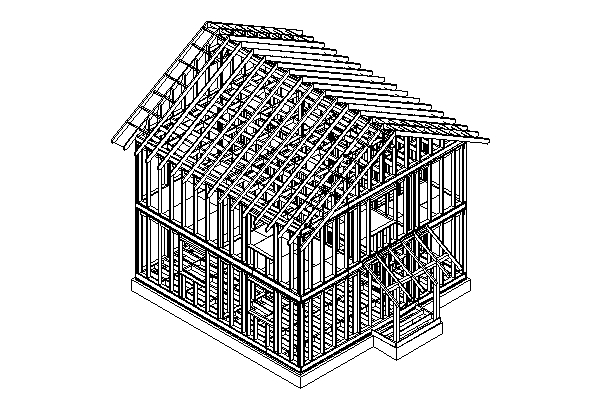
Drawings are developed individually for each construction. Even existing standard projects must be tied to the terrain, taking into account the features of the soil and relief.
A set of drawings is peer-reviewed for quality and correctness decisions taken. Only after that construction according to drawing recommendations is allowed.
The drawings give a complete picture of where which elements need to be installed, how to fix, at what distance to connect. A small sketch from a full-fledged project is shown in the photo.
Not only the architect is involved in the development of the project, but also the design engineer, who calculates the structures for strength and stability. This ensures that the building will last a long time and reliably.
Frame construction is rapidly gaining popularity among individual developers. If in Canada it is a government program. In Russia, this means solving housing problems on your own, and in the shortest possible time with the lowest possible costs.
It is possible to build a frame with your own hands, even in the absence of special construction education, skills, and experience. To do this, you will have to make an effort, understand the technology, and also acquire the simplest skills to perform construction works. As a result, you can build a frame house with your own hands , and get it at an affordable price individual house according to your special requests, needs, needs.
Let's bring detailed description technological operations. Using the technology, you will be able to follow step-by-step instructions (6x6 m 2 - the dimensions of the house that we took as a basis) qualitatively.
DIY frame house: step by step instructions
We list the main steps that must be completed sequentially in order to build a new house.
Scheme of the wall of a frame house
- Design - planning, thinking over the design of the house, the layout of the walls and rooms, doors and windows, plumbing fixtures, plumbing, sewerage, electrical wiring, heating. In the design process, a diagram of a frame house is drawn , which indicate the location of engineering networks and plumbing, heating devices. Do-it-yourself frame house scheme , utility rooms, it is important to consider how the house will be heated - choose a heating system, a scheme for laying its elements. According to the finished scheme, step-by-step construction will be carried out.
- Ground work is the preparation of a pit for the foundation and the actual construction of the foundation.
- Assembling the frame of the walls and roof.
- Construction of walls and subfloor.
- External doors, windows and walls.
- Interior decoration and internal doors.
Now let's get straight to the question. , how to make a frame house with your own hands, what to consider for high-quality construction and the correct execution of work.
DIY frame house: step by step preparation
Preparatory work is necessary for any construction. If you thought over the project of the house on your own, then you took into account the peculiarities of the location of the building on the site. If you bought finished project and decided to implement it on the spot, then you will need to “attach” the building to your relief.
Convenient location of the frame house on its site
Site preparation
What you need to do on the site:
- Clean it from old buildings, if any, on the site, from construction debris and from stumps, snags.
- Provide transportation options building materials, clear the way for the car and a place for a U-turn.
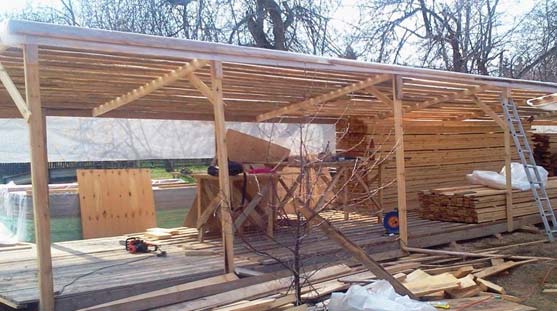
Canopy for storage of frame house boards
- Consider places for storing building materials; if the terrain is uneven, they should be located on elevations.
- Perhaps the site needs to be leveled, for this you need to call construction equipment.
- For some construction sites, it is important to build a fence to prevent the theft of materials.
Frame house step by step: marking the site
Marking is understood as the designation of the location of the future structure on the ground. The plan of the house is transferred to the area with the help of pegs and ropes. Pegs are driven into the ground and a rope is pulled between them, indicating the location of future outer walls.
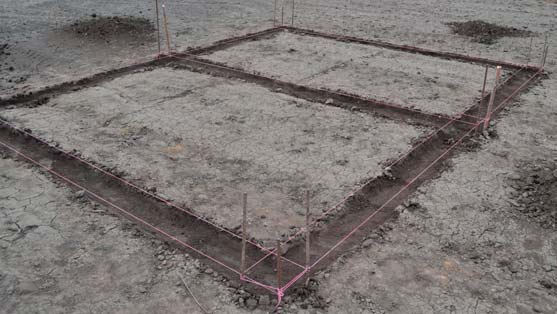
Marking the site for a frame house
Carefully measure all angles, observe degrees (clearly marked 90 °) and the length of the walls. Deviations of at least a few degrees are not allowed. They lead to the curvature of the structure and improper distribution of loads. As a result, it can reduce the strength of the entire structure and reduce its reliability.
We build a frame house step by step instructions for the foundation
The phased construction of a frame house with your own hands begins with the foundation. This is the foundation of the house, a large, even and durable “stand” on which the entire frame structure rests. It can be poured from concrete or assembled from ready-made concrete blocks.
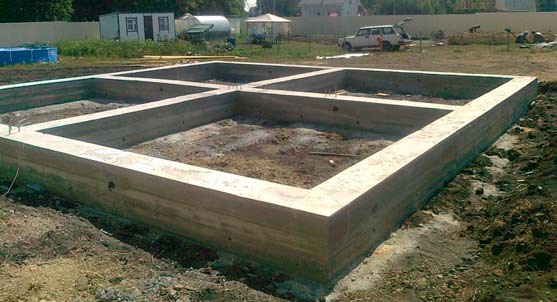
Strip foundation for a frame house
Frame construction is called "light". The walls of the skeleton put much less pressure on the surface of the earth than capital structures made of bricks or monoliths made of concrete. The frame is also lighter than timber wooden house. Therefore, your building will need a small, shallow foundation.
On a note
When deciding how to build a frame house yourself with your own hands, you invariably face the question of choosing structures and materials. For frame structures, shallow strip foundations or slabs are constructed. In some cases, foundations are made deep for frame builders.
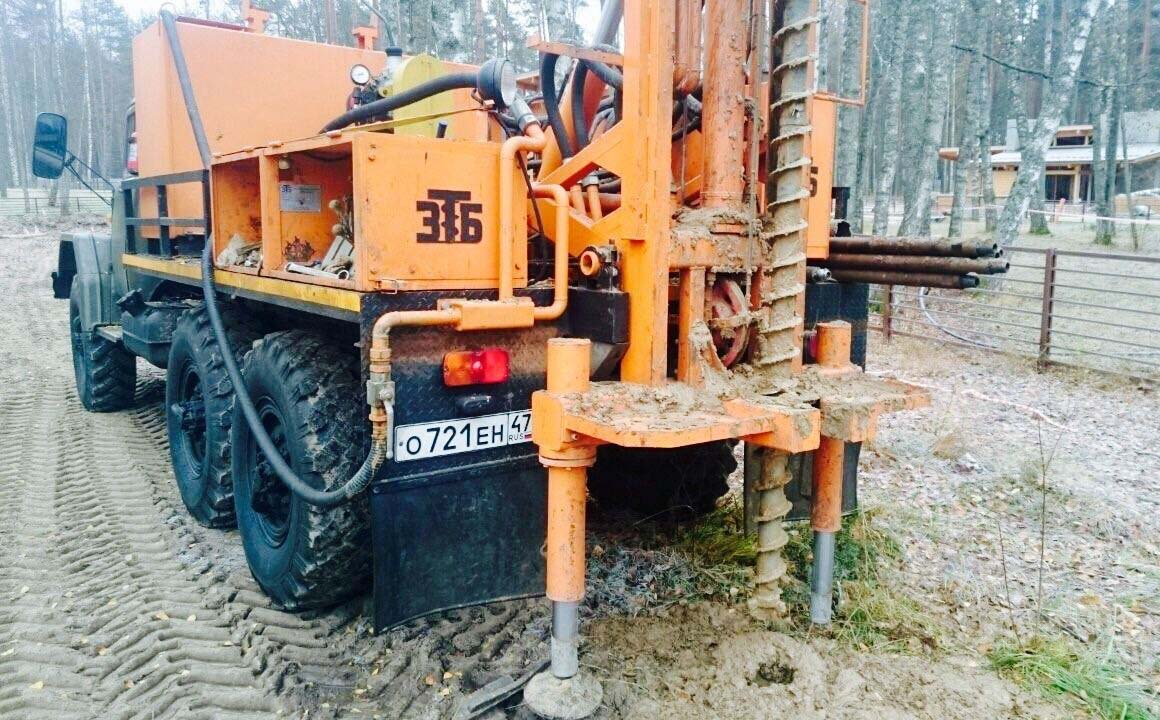
This happens when the soil is unsteady, mobile, loose and the building is planned on the shore of the reservoir. In this case, a pile-screw foundation is used, which will be based on deep and fixed layers of soil.
Tape
It is a stone tape, a path buried in the ground by 400 mm. Above the ground, the foundation rises by 100-200 mm. Thus, the total height of the strip foundation for a frame house is 500-600 mm.
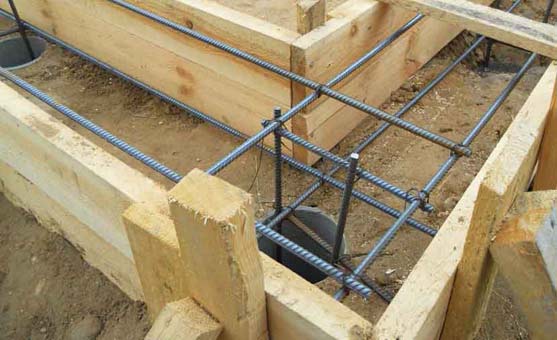
Strip foundation formwork with reinforcing mesh
On a note
You can make the foundation deeper and higher - but this is up to you, if you want to spend more building materials and get a more massive structure of the base of the house.
The foundation tape is poured into trenches prepared in advance. Concrete for pouring can be kneaded independently. Before pouring, a layer of sand is poured into the trenches and thereby a so-called sand cushion is made (thickness up to 100 mm) and metal reinforcement is laid.
slab
The slab foundation is also called floating. The frame house will rise and fall with it, with seasonal expansions of the soil. Therefore, the plate must be strong enough.
The slab foundation is poured from concrete and reinforcement, while the reinforcement is tied with wire. The reinforcing mesh provides the frame house slab with the necessary strength.
The foundation is filled with a monolithic slab
The slab base can be minimally buried in the ground, by 100 or 200 mm. The total height of the slab should be 200-300 mm.
For the foundation slab, it is important to ensure resistance to the rise of ground moisture. Therefore, when mixing concrete, a water-resistant additive is added to it. This will ensure water resistance. concrete slab and dry floor inside the future premises. And also extend the durability of the foundation and the entire structure.
Pile screw foundation
For getting pile screw foundation you can use asbestos pipes or metal finished piles. For asbestos pipes, pits are prepared in which the pipe is installed and concrete is poured into it. Pre-reinforce, i.e. put metal fittings inside the pipe. Metal piles are screwed into the ground without excavating the soil, without digging a hole.
In order to make it easier and clearer, how to build the foundation of a frame house with your own hands – Here is a step by step photo.
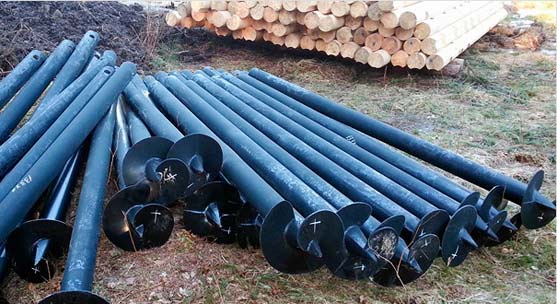
Set of piles for screw foundation
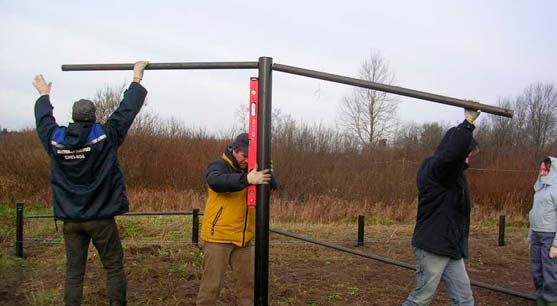
Screwing piles for the foundation manually
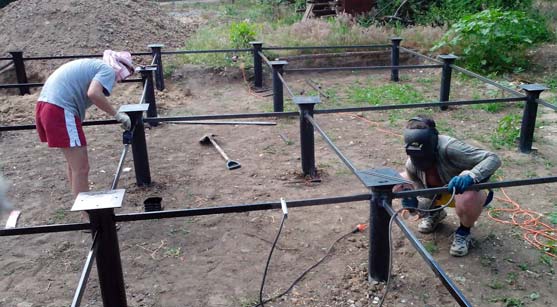
Connection of screw piles of the foundation to each other
Pile screw foundation
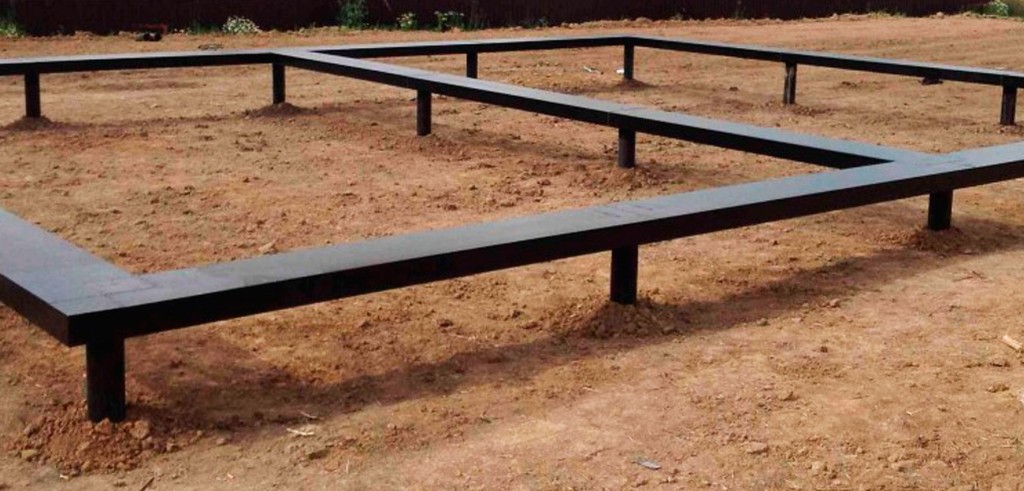
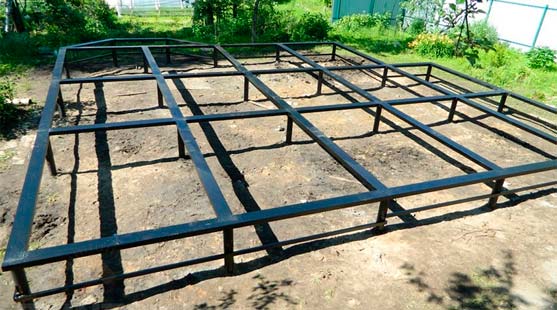
Beam strapping
Horizontal beams are laid on top of the finished piles. This design is called a grillage. When constructing a frame house, the grillage is also the lower trim of the frame, on which vertical supports will be attached.
For the lower trim, a wooden beam with a section of 150x150 mm is chosen. This is the load-bearing element of the building, which must have sufficient strength and hold the walls, roof, trim and internal household appliances on itself.
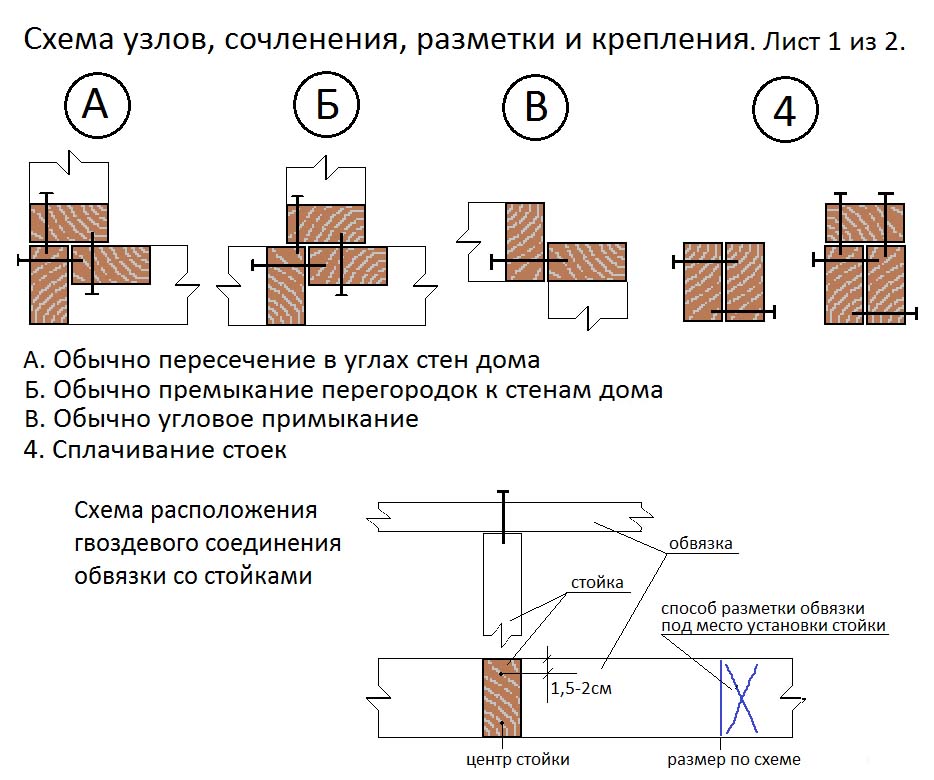
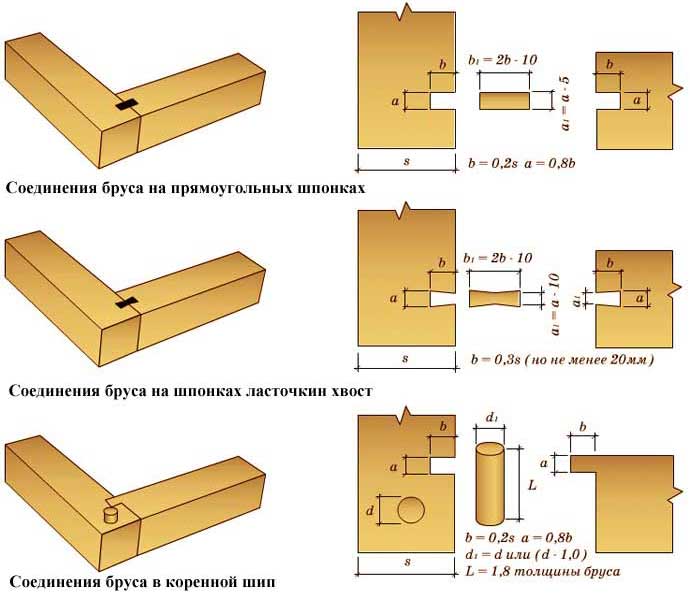
To connect the corners of the strapping, choose one of the methods proposed in the picture - in half a tree or in a half paw.
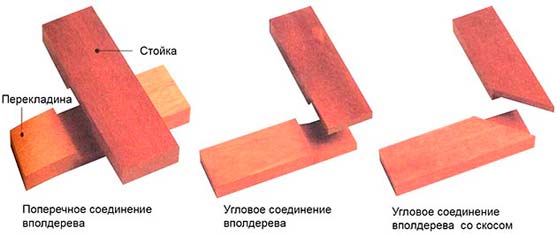
Half tree connection options
Connection in half-tree and in half-paw
They differ in the thickness of the wood cut for the corner connection. Half-tree - exactly half the thickness of the beam is cut, half-paw - the beam is cut at an angle to each other. From above, the connection is strengthened with a metal bracket or plate. After that, the strapping angle is fixed to the foundation with a metal anchor. After the installation is completed, the timber is treated with an antiseptic.
How to build a frame house: instructions for the subfloor
The floor of the building consists of a draft layer and a finishing coating. The subfloor is made of concrete or wood. Finishing coating of wood, laminate, linoleum and other finishing materials.
Concrete subfloor
The concrete floor is poured over the ground. It is a multi-layer structure, in which there is a layer of waterproofing, thermal insulation, reinforcing mesh.
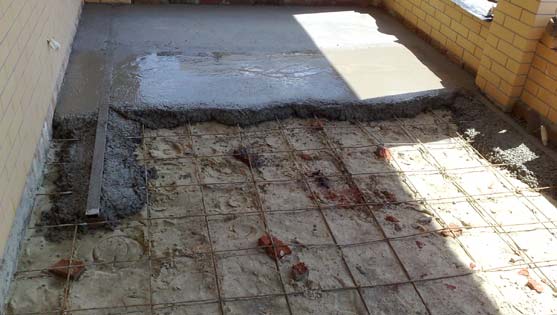
Draft concrete floor - concrete screed
The bottom layer is sand 10 mm. On top - expanded clay insulation, sawdust with clay - the so-called adobe, foam. Further concrete with a waterproofing additive.
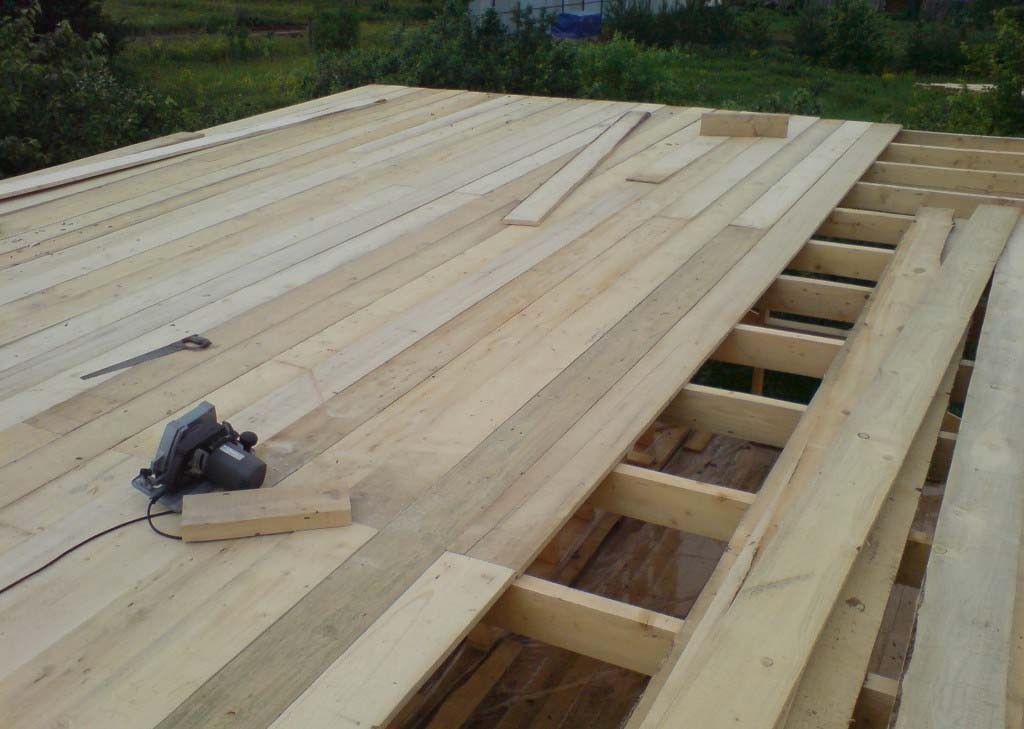
Wooden subfloor
If a tree is used to build a subfloor, then an empty space is formed under it.
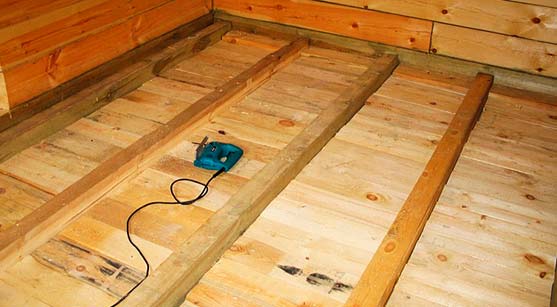
Draft floor between lags
Wooden logs are laid on top of the bottom strapping and are used as a base, to which subfloor boards are nailed from below. Insulation is laid on the subfloor boards. Then it spreads on the logs flooring: laminate, linoleum, OSB, parquet.
Frame construction: instructions for the construction of the frame
In the step-by-step construction of a frame house, the construction of a frame is one of the most important construction operations. It is important to choose the right beams and boards (size and section) and connect them correctly. What features of the installation of frame supports, beams, oarlocks and crossbars should a novice builder take into account?
- The locations of the racks and the junction of the wooden elements are measured with a ruler and marked with a pencil.
- Carefully check the verticality of the supports, the horizon of the beams and the angle of the connection. The angles between supports and beams should be 90°.
- For the connections of frame elements, the most reliable options are used - metal brackets and corners.
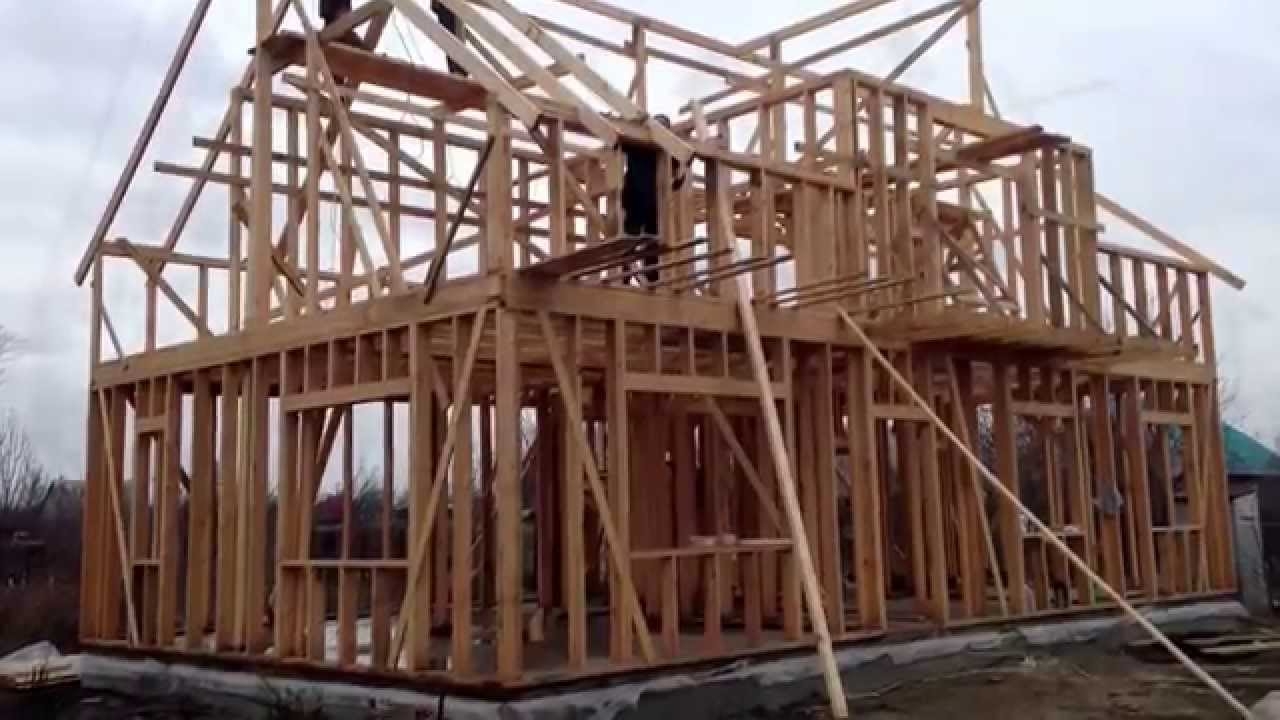
- The installation of a frame house is carried out from elements assembled in advance on the ground - wall templates, trusses. They are lifted, installed, temporarily supported by oblique beams and then fixed with connecting elements.
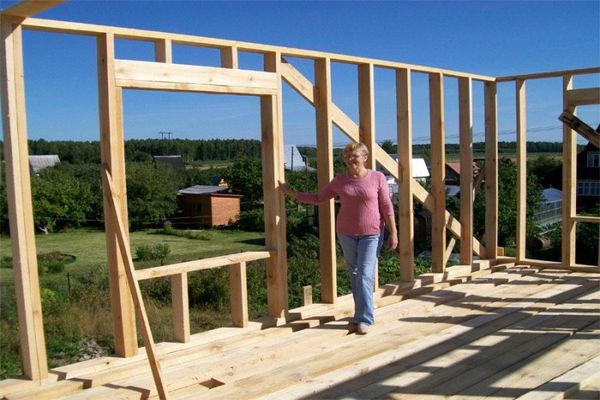
Installation of walls in a frame house
The wall frame assembly technology is as follows:
- Install the bottom trim.
- The frame of each wall is assembled separately (lower, upper and vertical elements) - the so-called wall template. After the assembled template is completely lifted and installed on the lower harness.
- On top of the wall templates, the upper trim is laid, on which the rafters for the roof are then placed.
On a note
It will take three people to lift the 6 m long wall template. The three of us to raise such a template is quite realistic. Longer walls are assembled from several templates and their joints are connected with special perforated plates.
The assembly of the frame house in the photo shows the progress of construction operations - the assembly of the template and its installation in the place of the future wall.
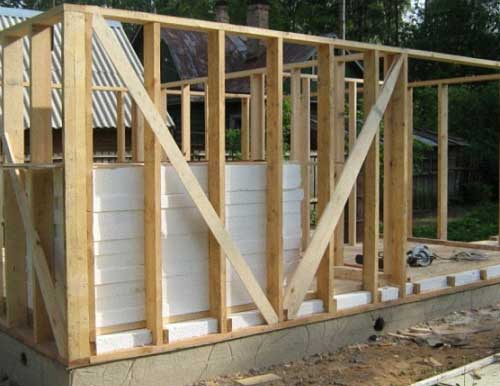
jib
In some schemes for mounting a frame house, not only vertical and horizontal frame elements are used, but also inclined ones - the so-called jibs. They enhance the strength of the frame structure. They are made from boards 150-50 mm or 100-50 mm.
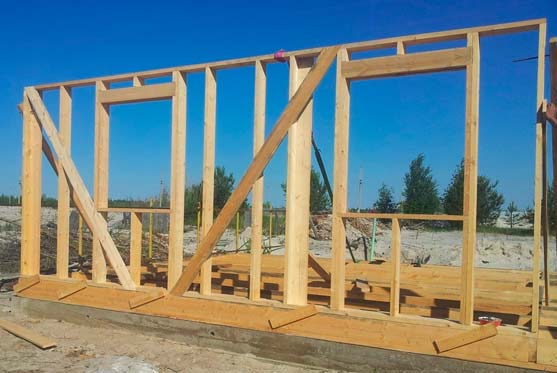
The correct location of the jibs
Rigel
A crossbar is a horizontal beam, which is attached next to the beam of the upper trim. The crossbar is attached to the template during the assembly process on the ground. For crossbars, wooden boards with a thickness of 50 mm or more are used.
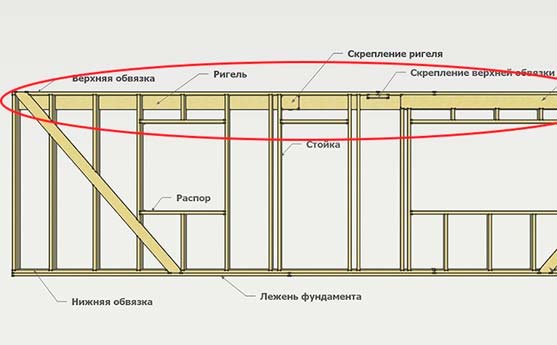
Crossbar in the entire wall of a frame house
A crossbar is also called a horizontal support between sloping roof trusses. In general, a crossbar is any beam that works in compression.
corners
The corners of the frame bear the maximum load. Therefore, they are made from a thicker beam or assembled from two or three support boards.
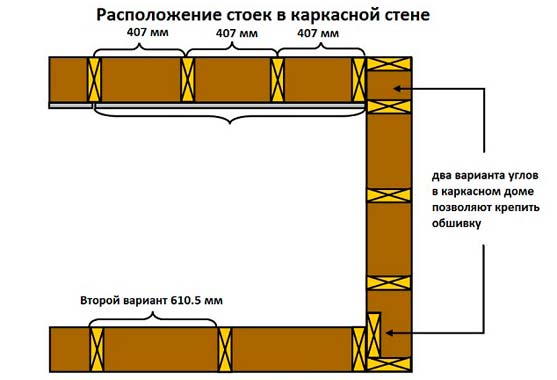
Options for fixing the corners of the frame wall
Internal walls
The frame of the inner walls is assembled from wall templates in the same way as the outer walls. Internal piers do not carry a large load, and therefore may be of a smaller cross section.
The main requirement for interior walls is sound insulation. Therefore, their thickness should ensure the installation of soundproofing material during the subsequent arrangement of walls and their insulation.
Windows and doors
After assembling the frame, windows and doors are installed in the openings provided for by the scheme. This work is easier to order from the manufacturer - a finished window along with installation in a window opening. As for the doors, their box can be successfully assembled independently from wooden boards 25-30 mm thick.
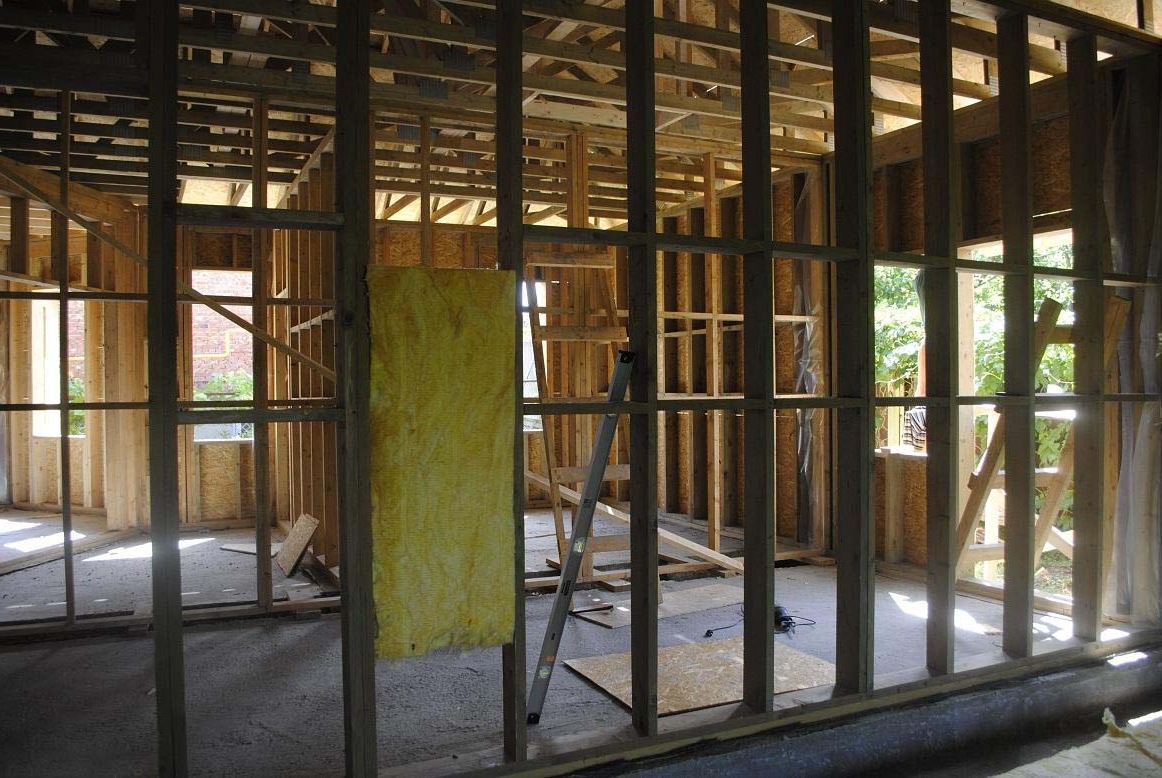
Frame house: instructions for proper insulation
Insulating your home ensures its ability to maintain a comfortable temperature during the winter and also determines your future winter heating costs. Therefore, it is better to overdo it and insulate too well than to save money and insufficiently insulate the walls of the building. What is used for insulation:
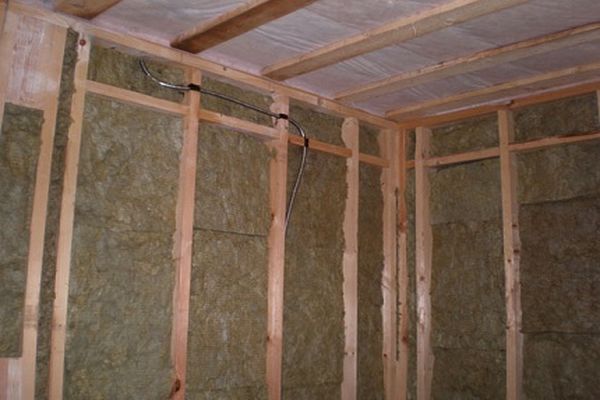
- Mineral wool in the form of pressed mats – best option frame structure insulation. It allows air to pass through, provides air exchange, limits heat loss due to the fact that it does not conduct heat from the house to the street, does not cake and does not lose its properties over time. When installing - it shrinks a little and then straightens out, which ensures the absence of assembly seams, slots through which heat losses also usually occur.
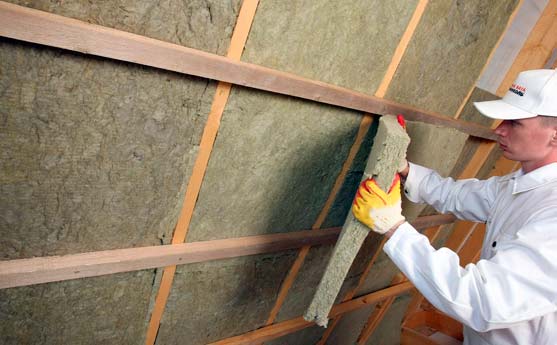
Wall insulation with mineral wool
- Styrofoam- rigid polyurethane foam boards. They have one advantage over mineral wool mats - they are cheaper in price. In all other respects they are inferior to cotton insulation. They do not shrink during installation and leave small gaps that must be blown out with foam. They do not let air through and do not provide air exchange. Require buildings exhaust ventilation, with permanent residence in a residential building.
Since thermal insulation with mineral wool mats has clear advantages, let's turn to this technology.
- Mineral wool- Moisture-wicking material. Therefore, when installed inside the wall, it is closed from the outside with a special film. This film must be made of a membrane that will not stop air exchange. That is, the structure of the membrane must pass wet steam only on one side, i.e. keep moisture out of atmospheric air and release from within.
On a note
The use of polyethylene instead of a membrane negates the effort of building a "breathable" house wall. With the same success, you can insulate the wall with airtight foam.
- An external finishing material can also block the removal of moisture. Therefore, an air gap is provided between the membrane and the outer plates - a void or a layer of air with a thickness of 50 mm. Through it will come out wet air that went through the wall. For the construction of such a gap, a wooden crate is used - wooden planks 50x50 mm wide. They are mounted along the supports on top of the insulation. After that, the panels of the outer wall are attached to the crate.
How to build a frame house with your own hands: step by step finishing
After mounting the walls, proceed to the interior wall decoration. The basis for finishing are panels of wall material, which were installed during the installation of the wall from the inside of the frame. The following materials are used as internal walls:
- Gypsum plasterboard- represents a natural material, environmentally friendly, with an absolutely flat surface, which does not need to be plastered and leveled in any way. It is necessary to close up with putty only the joints between adjacent drywall slabs.
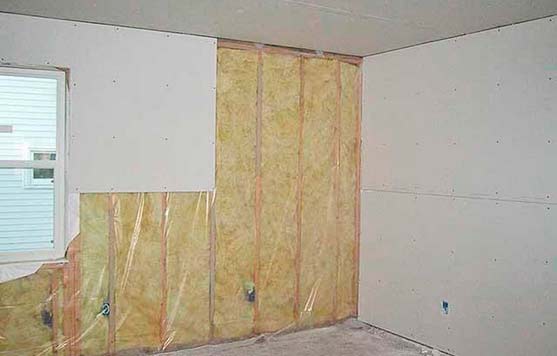
Finishing the walls of a frame house with drywall
- Gypsum boards GVL- a variant of a plasterboard wall with higher strength indicators.
- OSB– wood-based material, shavings connected with synthetic glue. It has a lower degree of environmental safety. In addition, it has a rough surface, requires plastering and puttying.
So, the sequence of operations when performing wall decoration is as follows:
- Mounting inner wall (Wall panels GKL or OSB).
- Seal joints between panels. If it is drywall, then puttying and gluing the joints with paper tape. If OSB - then plastering the surface of the wood board.
- Primer for the appropriate wall finish. For wallpapering - primer with glue. For painting - primer for paint.
- Direct execution of wall decoration - wallpapering, painting, decorative plastering of the walls of the room.
If wall panels (MDF, cork) are used as wall decoration, then they turn to another finishing technology. They do not make a draft wall, but immediately mount the interior finishing material.
Finally, we offer you an interesting educational video about building a frame house with your own hands (a video with a step-by-step demonstration of technological operations). It is important that the result is of high quality. If I build a frame house with my own hands, then I do everything reliably and correctly.
With this article we open a new section for our site "Personal experience", in which readers will share stories of their successful construction projects, completed repairs and other completed projects. Today, our regular author Evgeny Dubinin will begin a story about his experience in building a frame house on his own - from project development to its implementation.
If you have interesting and useful stories that you would like to share with our readers, our offer may interest you.
Five years ago, with a budget of 600,000 rubles. and one helper I built cottage with an attic area of 100 m 2 for permanent residence. Now, given all the mistakes made during construction, I will tell you how to build a house yourself, having only 700,000 rubles.
Why "framework"?
Some time ago I had a dream of my own house on my own land. There was no land, no money at that time, only a great desire. Desire, as you know, gives rise to opportunities, and now I am the owner of my own land plot not far from the city and the amount of money is about 600,000 rubles. Having some experience in construction, I began to explore options. At a certain stage, I came across information about frame houses, that is, houses assembled from ready-made SIP panels - essentially sandwiches, where between two layers of oriented strand boards (OSB) there is an effective insulation - most often polystyrene foam. As it turned out, this is one of the cheapest construction options. True, in this case, a house with an area of 100 m 2 will cost about 1,500,000 rubles. - the amount is too big for me. But this is only if the seller will build such a house. And how much will I save if I buy ready-made SIP panels and assemble the house myself? As it turned out, not much. But what if, understanding what SIP panels are, refuse to use ready-made ones and make them yourself, as they are being built, insulate them not with foam, but with something more environmentally friendly? It turned out that the cost of this option is much less! It remains only to convince the spouse that such a house is not only inexpensive, but also meets absolutely everything, even the most stringent requirements for houses for permanent residence. With my wife, I succeeded, though not on the first try. Now, having lived in such a house for 5 years, she periodically thanks me for the fact that at one time I was able to convince her of the “correctness” of this type of construction. Now I will try to convince you.
There are 4 characteristics that make a house not just a habitable building, but a place where you and your family will live, and where friends will visit. So:
1. The house must be warm. That's right, this is about frame houses, they are really very warm. So, for example, before connecting the gas, to heat the first floor of my house in frosts of -25 ° C, I used 3 electric heaters with a capacity of 1.5 kW each, at a temperature outside the window of -10 ° C - 2 heaters, if less, then generally periodically turned off all the heating devices - there was enough of the heat that is formed in the process of life.
2. The house must be strong. Among all wooden houses, frame houses are structurally the most durable. They are almost a monolithic structure. Theoretically, such a house can be picked up by a crane by the roof, lifted and even shaken, but nothing will happen to it. Neither a sagging foundation, nor natural disasters, nothing will damage such a house. The best proof of structural strength is that frame houses began to be built in Japan over 4,000 years ago and are still being built today, as they perfectly resist typhoons and earthquakes, which are not uncommon in this region.
3. The house must be durable. We look at the previous paragraph, we add here the opportunity to process each wooden element used in construction with appropriate impregnations, and we will end up with a house in which you, your children will live, and there will still be grandchildren. In fairness, it should be noted that the only problematic element may be a heater. That is, if you buy ready-made SIP panels with expanded polystyrene filler, then in a dozen years it will crumble inside the frame. Thus, voids are formed in the upper part of the walls that do not have insulation. It is clear that this is easily corrected by filling them through the drilled holes with mounting foam, but still, the nuance is unpleasant. As part of my articles, I will tell you how to insulate a frame house in order to avoid such problems.
4. The house must be environmentally friendly. The most slippery question. Although if we treat building materials impartially, then, perhaps, only log houses are more environmentally friendly than frame houses, and even those made of red brick (and even then it is doubtful - additives in the material for bricks and cement make such houses no longer so environmentally friendly, compared, for example, with houses 50 years old or more). In frame houses the most problematic elements are OSB boards and insulation. Let's look at it in order. Modern production of OSB panels implies maximum environmental safety, that is, the content of harmful substances is minimal (for most indicators, it is on the verge of capture). Again, if you use ready-made SIP panels, which have OSB boards on both, internal and external, sides, then this may have some meaning. I will tell you how to build a house in which OSB panels are used only as an outer layer. You can talk a lot about insulation, the main thing is to understand that you can insulate with polystyrene foam, mineral plate or, for example, ecowool. Lots of options. Combining various materials it is possible to achieve completely different results, both in terms of thermal insulation and environmental indicators. I will tell you how I insulated my house, based on my tasks.
Now I want to dwell on the characteristics that are peculiar only to frame houses.
1. Easy upgrade. It means that the frame house can be easily completed with any number of additional rooms, with a corresponding change in the location of windows and doors. So today I plan to add another room to my finished house, in which there will be a fireplace and something like a winter garden. In addition, this room will have a separate exit to the garden. Of completed restructuring finished house I can note the removal of one window and inserting it into another wall. I made this alteration after the completion of construction, although at that stage there was no fine finish yet. This operation took me about 2 hours.
2. And now the main thing that I already mentioned is the low cost of the house. A frame house is the most inexpensive house. Even if you buy ready-made SIP panels and use the labor of third-party workers, then in this case the finished house will cost you one and a half times cheaper than any other. But, if you have at least basic woodworking skills, a couple of months, and that is exactly how long it takes to build a frame house yourself, a couple of assistants and an amount of money of about 700,000 rubles, then you are already a potential owner of a house for permanent residence with an area of about 100 m2. I actually own this house.
So, if you have read up to this sentence, then at least you are interested, and as a maximum, you are looking forward to the author moving from water to specifics.
Project selection
Preparing a project is a very serious matter. It is not enough just to draw the house you like, arrange windows, doors and partitions. This is where I started too. It is very good that some doubts were constantly present, either I or my wife did not like something. In the process of changes, all the nuances were taken into account, the project was redone, sometimes radically. At the next stage, the understanding came that the house cannot have arbitrary dimensions. First of all, not even because of technological requirements - such as the length of the floor lag cannot be more than 3.5 m, if it does not have intermediate supports that prevent it from playing underfoot. This is just as easy to get around by providing retaining pillars and beams and planning load-bearing partitions in the right places. The most important thing is the initial dimensions of building materials. So the skeleton of the frame is made of timber. The length of the building beam is 6 m. Thus, when planning a house with dimensions that are multiples of 6 m or integer parts of 6, that is, 2 m or 3 m, you can save a lot on the purchase of material, since in this case there is a minimum of waste. Further, the dimensions of the OSB boards are 2.44x1.22 m. I draw your attention to this - this is the OSB of the American standard. There is an OSB of the European standard - 2.5x1.25 m. You can use them, only I made all the calculations with the Americans, since there is less waste from them. So, when comparing the sizes of the bars and OSB sheets, and taking into account the result obtained, the puzzle project was compiled. In addition, it immediately became clear how to calculate the estimate. The result was a one-story house with an attic with total area 100 m2.
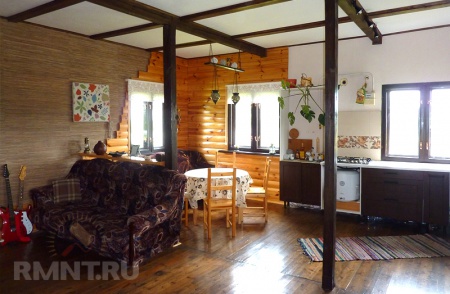
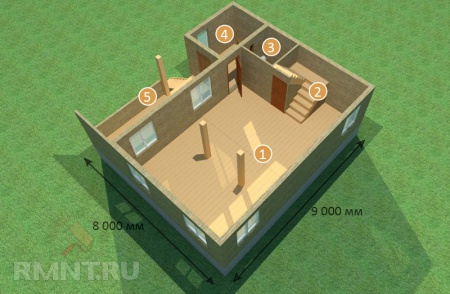 First floor. 1 - living room-dining room-kitchen 50 sq. m; 2 - stairs to the second floor; 3 - bathroom 5 sq. m; 4 - entrance hall 6 sq. m; 5 - open veranda at the floor level of the first floor
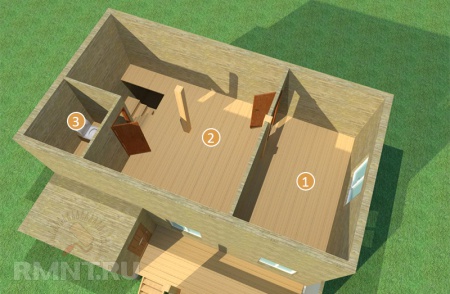 Attic floor. 1 - bedroom 14 sq. m; 2 - hall 17.5 sq. m; 3 - bathroom 5 sq. m
On these diagrams, I gave only general dimensions, without specifics such as the dimensions of windows, doors, ceiling heights, etc. Further, where I will tell you how the frame is built, all the necessary dimensions will be given. In addition, I indicated the north-south direction for the convenience of designating the walls - north, south, etc. As can be seen from the diagrams, such dimensions of the house allow the use of bars standard sizes 6 m and pieces of 3 and 2 m, not giving residues. It should be clarified that the house has an open veranda (on the first floor diagram). The rise from the ground level is carried out along the stairs to it, and from there through the door we get into the house. Now I have expanded the veranda from 2 m indicated in the diagram to 2.5 m. As I said, this is not a problem in frame houses, if you wish, you can easily do it yourself.

In addition, the location of the stairs to the second floor is due to two considerations:
- lifting is carried out in the highest part of the roof - ridge, which gives airiness to the structure;
- under this staircase, she herself is on the right, in the same way another one goes to the basement, hidden behind the door.
The appendix near the stairs is a small office, by me, until the second floor is ready, used as a bedroom. It is clear that if we refuse attic floor, then due to the stairs, the living area increases by 2.5 m. In principle, a little, but what prevents you from changing the project, abandoning the veranda in favor of the dwelling and thereby getting a house with an area of 72 m2. It seems to be not much either, but if you take into account that in the city I had a three-room apartment of 60 m 2 and this was somehow enough, then probably, in order to save money, such a step would be fully justified. For a while, one floor was enough for me. At the moment I am finishing the construction of the second one.
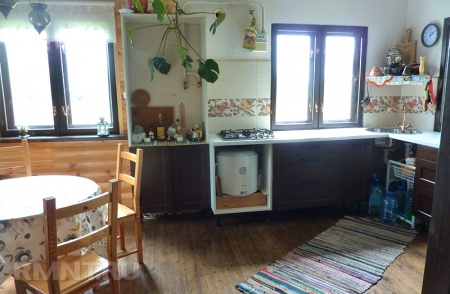
Separately, a few words on planning. Initially, it was planned to make two rooms with a kitchen on the ground floor. The kitchen is in the southwest corner and a separate room of approximately 11m2 is in the southeast corner. The rest of the room is the living room. Such a layout is absolutely necessary if only the first floor is left. However, the second floor, which will house the bedroom, allows you to get away from dividing the area into rooms, which, as practice has shown, is very, very good, especially for spending time together with friends, and the kitchen, dining room, living room and, at first, the bedroom, are quite coexist in a single room on the first floor.
Well, the project is approved, we start construction.
Foundation
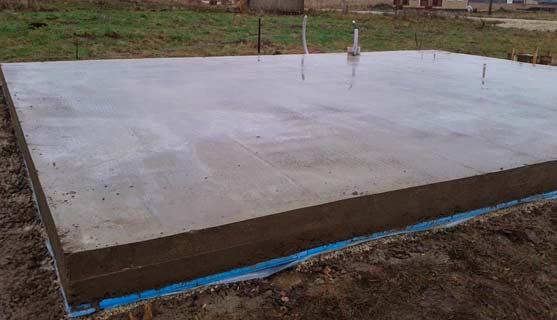
How to make a foundation for a frame house? The answer is yes to anyone. It can be a tape shallow foundation, it can be a concrete block foundation (my version), or it can be a monolithic reinforced concrete slab under the whole house (although you have to say goodbye to the dream of a basement).
When I calculated my foundation, I wanted to take into account a few nuances:
- Should be as cheap as possible.
- Should be produced as soon as possible.
- There should be a basement under the house.
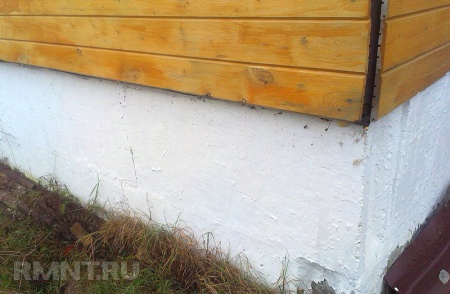
For the price, I’ll say right away that ready-made foundation blocks were cheaper than concrete for pouring a similar foundation. If you pour from a mixture prepared by yourself, it will be cheaper, but the timing conflicts with the second requirement. I put the blocks in two rows, on a prepared sand and gravel cushion, which raised the house above the ground to a height of 1 m. Thus, a basement immediately turned out. To keep the basement from freezing, it subsequently had to be insulated. In any case, even taking into account the insulation, this option was the cheapest and met all the requirements I put forward.
By the way, remember, I spoke about the extension. I plan to make it from this side, that is, in the space between the windows. The project has already been thought out, there is little left to do.
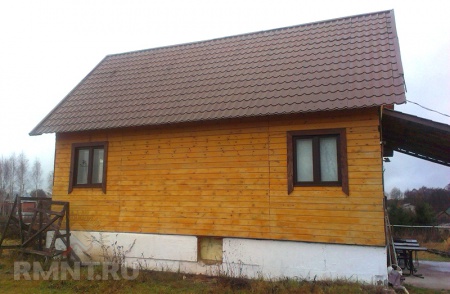
A close-up of the base can be seen in the next photo. By the way, white paint is not as simple as it seems at first glance. This is exactly a heater, ultra-thin - 3 mm - applied like paint and in terms of thermal insulation properties comparable to 100 mm polystyrene foam insulation, and most importantly, it is applied as it should be for a heater from the outside and is weather-resistant.
No matter how you make the foundation, in the end you should get this picture:
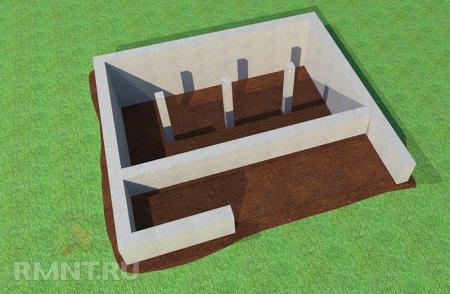 The absence of a jumper under the veranda allows you to use this space for storing various garden utensils
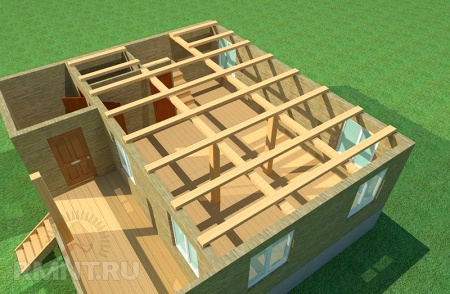
Why are poles needed? Do not forget - the house is wooden, and the ceilings in it are wooden. The two ends of the sex logs rest on the harness lying on the base. So that with a log length of 6 m, the floors do not walk underfoot, it is necessary to equip retaining beams (horizontal bars running under the logs and located perpendicular to them), and they, at one time, should lie on vertical retaining pillars. It is these pillars that are shown in the figure. Thus, when you make the basis for the floor of the first and, if necessary, the second floor, you will get something like this:
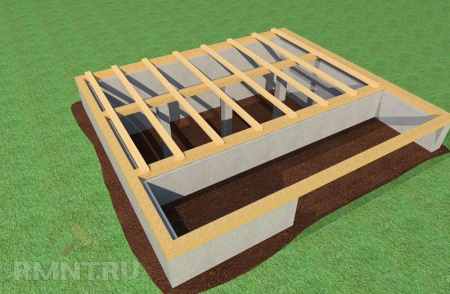 First floor
 Attic
Attic
I note right away that two retaining systems for the log of the second floor are necessary, based on strength considerations. Retaining pillars do not rest against the ground, but against the logs of the first floor, which makes the structure less durable. In the future, the vertical pillars in the middle of the room are easy to beat, as I did, for example.
What I draw your attention to again is that the standard length of the beam is 6 m. The vertical poles stand just under the junction of 6 m and 3 m of the beam-retaining beam. Feel the salt of the indicated sizes. But more about this later, and now we return to the foundation.
During the work on its arrangement, it is necessary to provide all the necessary openings for life support systems and make, if necessary, drainage. In addition, if you are planning a basement, then in order not to create problems for yourself, do it before the construction of the frame. This will require additional time and you will not meet the promised 2 months, but it will significantly reduce the labor and material costs of arranging the basement. I first built a house, and then I began to make a basement - this was, perhaps, the only serious mistake I made during construction. To date, the basement in my house is almost ready, but here's what it cost me...
Generally speaking, I will not describe in detail the work on the construction of the foundation. This was the only stage where I had to resort to the help of friends. Here, perhaps, it is better for you to use the experience of more knowledgeable people, as I did.
The house I built is not ready yet, though this does not prevent me from living in it for almost 5 years. The most important thing is the backbone, and the meat, that is, the corresponding interior, outbuildings, etc., will appear over time. The main thing is my home on my land, and this is exactly what I dreamed of.
With this, I would like to finish the first article. Next will be the most interesting - how much material will need to be bought, how much money will be required for this, and most importantly, how to build a house out of all this. All this I will tell in.
Evgeny Dubinin, rmnt.ru
The construction of frame houses came to us from abroad. These lightweight structures are the basis for the construction of country houses and cottages in Scandinavia and a number of European countries. The basis of the construction technology is assembled frames made of wood or a metal profile; mineral wool and basalt insulation are used for insulation. The wall takes on a finished look after it is closed. various plates, for example, DSP. The final version of the coating is already applied to these plates.
Which frame to choose - metal or wood?
As a material for the frame, a new dried timber of various sections, made of coniferous species, is used.
Undoubtedly, wood has a number of properties that give it advantages over stone and metal - this is the ability to breathe, and much more. But at the same time, wood has drawbacks, without appropriate treatment it is prone to the appearance of fungus or mold, in addition, under a number of conditions, it becomes possible for strains of harmful microorganisms to appear.
All of these factors lead to the fact that some developers prefer frame structures made of metal. The metal profile has a zinc coating, which can guarantee long-term corrosion protection. In addition, the necessary perforation has already been prepared on the metal profile for frame housing construction.
The difference between frame housing construction and panel housing construction is environmental friendliness. Only natural wood and the possibility of using natural insulation.
In addition, a frame house is possible without the help of a large team.
Now it is believed that a frame-panel house can only be a country house. However, the experience of many European countries, for example, Swedish or German technology, tells us about the good opportunity to use a frame house in winter and summer for year-round use. Reviews also confirm this.
So, let's start building a house with step by step, step by step instructions. We hope they help you.
Preparatory work
Buying a frame house is not difficult, just contact a specialized company selling such products or, having developed a project yourself, build your own home. The order of construction work can be displayed in the following list:
- research;
- Design;
- Foundation construction;
- Construction of a box, roof;
- Warming, finishing works and arrangement of engineering systems.
In the first two stages, the possibility of building a house in this place is clarified. If possible, then the type of foundation, its design is determined. As a result of these works, a specification and estimate appear, which contains a list of materials and tools, their estimated cost. Before starting all these preparatory work, the developer must draw up a technical task for the future home.
Laying the columnar base of the foundation
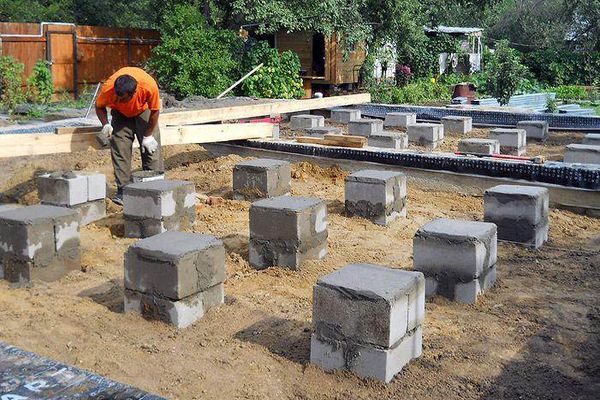
Depending on the condition of the soil and the mass of the future house, the developer determines the type of foundation. Practice shows that any type can be used as a foundation - a foundation on screw piles, tape, monolithic platform or columnar. During construction column foundation you must have on hand at least an approximate drawing of the location of the walls.
The essence of this foundation is that the pillars will be placed in the corners of the building and in places of maximum load on the structure. For the foundation of this type, concrete, brick is used.
Before starting work, it is necessary to mark the location of the pillars.
After its implementation and quality control, you can begin to manufacture the pillars themselves. To do this, you can use a separate formwork, or you can arrange their production directly on the site.
The first step is to make a pillar support, it is called a shoe. Look at the photo, it shows a pile with a shoe schematically. Its dimensions are up to 30 cm in height and 25–30 cm in cross section. The structure of its design includes a reinforcing mesh, which is located parallel to the surface of the earth, several vertical reinforcing bars can be installed - they will be the basis for the pillar. After the shoe hardens, you can make the main part of the foundation pillar. To do this, you can use either a pipe cut or build a wooden formwork. The height of the entire structure is equal to the sum of two terms - the depth of the pit (freezing height) and the value of the column above the ground (from 100 mm).
Some experts use traditional M300 concrete as a material, while others use sand concrete. In fact, the type of concrete used must be determined at the stage of calculation. The main thing to remember is that the material for making the shoe and the base must be the same. For further work, it is necessary to allow the finished parts to dry. This process will take at least 7 days, but if you use bricks or cinder blocks, the drying process is accelerated by several days.
After the poles are ready, you can start installing them. To do this, you need a hole drill, which will allow you to dig a hole under the pole. The size of the pit should exceed the size of the shoe. Installation of pillars is carried out in strict accordance with the layout of the foundation. The poles are installed at a distance of 1-2 m from each other in places of greatest load, for example, under a heating boiler. After installing the pillars, the space between them and the walls of the pit can be covered with rubble and sand.
Construction of the wall frame
Rostverk - platform for home
The completion of the construction of the foundation allows you to begin work on the construction of the main supporting structures. The basis of the walls and everything else in the frame house is the grillage. This is a wooden or metal structure that is laid on foundation pillars protruding from the ground. According to its contour, the grillage repeats the outlines of the future house. When laying it, it is imperative to use measuring instruments that allow you to control its horizontalness. The dimensions of a beam or a metal profile are determined by the weight of the building structure being erected.
Building a wall frame
After installing the grillage, you can begin to install the wall frame. To do this, you can use a beam with a section size of 150x50 or more. The beam must be made from coniferous trees and dried to a state of 12-18% moisture. Moreover, it must be remembered that all wooden structures must be treated with protective agents against mold, fungus and fire.
The wall frame can be assembled side by side on a flat piece of land; when assembling the frame, it is necessary to immediately prepare window and door openings. The finished frame of one wall can be installed on the grillage and secured with jibs. As with all assembly operations, builders must use a measuring tool to install wall frames in a strict plane orientation.
House roof installation
Creating a roof is one of the most important moments in building a house using frame technology. Errors that occur during its construction lead to deformation of the roof, violation of the thermal insulation regime. As a result, it may be destroyed. The ceiling ceiling is responsible for solving several problems, namely:
- Hanging a ceiling covering on it;
- Heat retention.
If the developer provides for a second floor or attic, then the ceiling must be reinforced. Depending on the load that the ceiling will take on, the size of the section of the ceiling beam is selected. For example, if the useful and non-residential load is 147 kg per square centimeter, then it is necessary to use beams with a section of 150 * 50 m with a step between them of 400 mm.
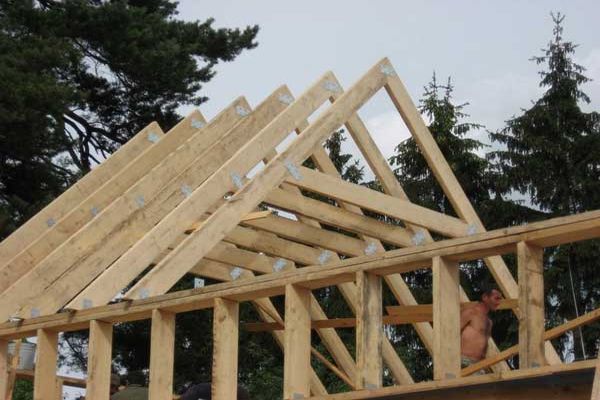
The process of installing logs and rafters for them does not differ from such a process carried out during the construction of a traditional house.
That is, after marking, the logs are nailed to the top bar of the wall frame in a vertical position.
In order to fix the log, it is enough to use three nails, two are driven in on one side, and one on the other, at both ends.
The rafters can be assembled on a flat area of the construction site and, after assembling them and checking its correctness, lift them up. The assembly of the roof begins with one of the facades, the use of a plumb line is mandatory. Having set the first rafter, it is necessary to fix it with jibs, and after installing the second, it is advisable to tie established structures. In addition to the fact that the rafters are interconnected, to increase the strength of the structure, it makes sense to connect the rafter and the log using a vertically lowered board. This is how the rafters are installed sequentially.
The installation of the lathing also does not differ from such an operation carried out during the construction of a roof on an ordinary house. Laying of hydro- and thermal insulation is carried out in accordance with the instructions attached to this product. As thermal insulation materials both artificial and natural materials are used. To reduce the weight of the structure, it is advisable to use foam, which is produced in sheets of different thicknesses.
Another positive property of a frame house can be called the fact that all finishing work can be carried out without waiting for it to shrink. They can be carried out immediately after the insulation is laid in the openings, and the wall frame itself is sheathed with slabs. Then the developer can start finishing the walls from the inside and outside.
Internal work in the house
The material that is used for wall cladding from the inside, and this can be DSP or its analogues, allows you to apply almost any finishing material on its surface - wallpaper, tiles and others. It all depends on the choice of the developer and the interior design of future premises.
outdoor work
With work on finishing the house outside, the situation is somewhat more complicated. Depending on the climate zone in which the frame house is built, additional insulation may be required. For these works, you will need a heater, a waterproofing film, as well as a wooden beam or a galvanized metal profile to create a crate. To insulate the walls, a crate is installed on them, made of a wooden beam or a metal profile.
The dimensions of the crate must correspond to the dimensions of the insulation that will be laid in it. Some experts recommend laying a layer of waterproofing film on top of the insulation. If the task is to create a ventilated facade, then it is necessary to fix smaller bars to the vertical bars of the installed lathing, and the siding will be attached to them. The formed space will serve for natural ventilation and prevent excess moisture from accumulating.
How much does it cost to build a house
The experience of building a frame house by those who rely only on their own strength shows that the entire cycle of work from the construction of the foundation to the start of finishing, with the correct organization of work, the absence of interruptions in materials and the presence of one or two assistants, can be three to four months.
Building a house with your own hands is also beneficial from an economic point of view. When buying a finished structure, the developer pays for the project, building materials, in addition, the labor of builders and installers is paid, by the way, who will build the house in about the same time frame. The price of the project is from 5-50 000 rubles. If you buy a finished house project, it will cost about 15,000 rubles, and if you order an individual house project from an architect, it will cost 30,000 - 50,000 rubles. Now many architectural workshops work remotely, so even being in Biysk they will be able to design a dream home project for you. In other words, with the cost of a finished house and work on its construction at about 1.5 million rubles, it must be understood that this figure depends on the region and configuration, building on your own will cost half as much. For example, some companies offer their customers country houses at a price of 1,115,000 rubles to 1,824,000, and cottages - within 300,000 rubles.
If you are not ready to build a house or you do not have the opportunity, then order a turnkey house using Canadian, Scandinavian or Finnish technologies.
Video
Watch a video about building a frame house with your own hands.
At present, frame houses have gained more and more fame and popularity in Russia. Moreover, the choice of technology during construction does not have of great importance. Both Canadian and Finnish technologies are used with equal regularity. During the construction of a low-rise frame house, it is possible to use the most modern building materials and the latest achievements of the industry quite effectively.
The need for the construction of such houses in recent times has grown very much, so many decide to start building a frame house on their own. Because the technology of its construction is not too complicated.
Insulation and its options
When planning the construction of a good one for your family, firstly, they determine its purpose. You need to clearly know what time of the year the family will live in it, all year round or only in the spring-summer season. The method of its insulation will depend on this choice. Initially, a frame house is an elementary simple structure, consisting of vertical racks and a certain number of horizontal strappings, which must be carefully and efficiently. During the construction process, all voids found are filled with special materials with low thermal conductivity. And then, already when facing internal and external walls, different building materials are used.
Based on this, we conclude that the appropriate type of insulation will directly depend on the time of operation of the house and on the weather conditions under which this frame house will be built. Glass wool or glass wool is used as a heater for walls and floors - these are universal materials.
Foundation work
As a rule, a frame house is built no higher than 2 floors. Moreover, it is worth noting that the second floor is of the attic type. Therefore, it makes no sense for such houses to build a deep foundation. in the best way for a frame house there will be an erection, prefabricated from reinforced concrete blocks.
All these types of foundations perfectly fulfill their main function: creating a strong and rigid frame. When laying a strip foundation, this is achieved due to rigid and reliable reinforcement, in columnar foundations - thanks to a prefabricated foundation - it is firmly attached to the lower piping blocks.
House frame and assembly
It is customary to make a frame house from structures that are made of metal or wood. It should be noted that the cost of the metal base will cost you much more (from 30 to 45%). That is why few decide on their own to build a metal frame house. But at the same time, the cost of manufacturing the foundation can be reduced, since the weight of the metal frame is relatively small. To build a wooden frame house with your own hands, most often they use an oak wood base. They are also often used with a section of 150x150 mm, from other hardwoods, but the main indicator should be high quality. Corner joints of the entire frame are connected using a tenon groove or a metal plate, while adjusting them so that not even the slightest gap remains.
When building a frame house with your own hands, it is not recommended to use metal fasteners. This can be explained very simply: when wood comes into contact with metal (a nail, a self-tapping screw, etc.), intense decay can begin, and this will significantly weaken the connection in this place and will contribute to the subsequent loosening of the connection. Therefore, for a long service life, it is customary to use joints such as wooden dowels, but this is ideal.
When building a house with your own hands, you can not do without fastening the frame with braces. After that, you can safely lay the insulation in the wall cavities between the braces.
Indeed, it is with their help that the spatial strength and rigidity of the structure is created, its preservation from skew and subsequent destruction under the action of external mechanical loads. For the production of braces, the same material is used as for the main racks of the house. From the outside, the frame is sheathed with clapboard or grooved board, while the slope should be from 30 to 60 °.
Floor device in a frame house
When building a frame house, one should not forget about laying. This is quite an important technological process. Starting to work, first of all, you need to put a roofing material on the foundation base and cover it on top with a special impregnation: an antiseptic. It is possible to fix the roofing material with the help of anchor bolts at regular intervals of length (1.5-2 meters).
The second stage is the location along the entire perimeter of a wooden beam with a section of 150x50 mm. Next, you need to use a special building level to set the corners very accurately. The misalignment tolerance must not exceed 10 mm. When building a frame house with your own hands, we recommend that you use the same materials for the manufacture of walls, floors and load-bearing structures in order to avoid subsequent distortion.
The rough floor is laid out from a raw board, as this is the most affordable of the cheapest materials. After installing the log (between which the insulation is laid), boards are laid on top. After the laying of the floor is completed, feel free to proceed with the construction of the walls.
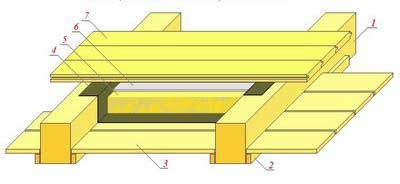
- floor beam
2. Roughing block
3. Subfloor boards
4. The flooring is waterproof
5. Filling from shavings or sawdust
6. Filling with lime milk "text"
7. Finished floor boards
Installing walls, roofs and windows
When building a house, it is necessary to assemble the frame on a dry and even surface, otherwise the walls of your house will warp over time. To assemble the frame of the walls, it is customary to use vertical boards of the same size. By their length, you can determine the height of your house under construction.
It is not necessary, when building a frame house with your own hands, to choose a standard height (2 m 275 mm). The amount of air and the optimal temperature regime depend on the height of the selected ceilings.
If you want to save on material - choose a wall height of at least 2400 mm. In rooms with such a height, you experience discomfort, it seems that the ceiling is literally pressing on you. But when installing a ceiling on the second floor, which will correspond to the slope of the roof, you can significantly save on the main material. As a result of the work, you will get an attic-type room, which, if desired, can be decorated very stylishly. After assembling the main frame and the frame of the walls, you can proceed to the main sheathing of the house.
 In the final calculation of the number, as well as the width of the wall sections, you must take into account all possible mechanical loads on the floor of the building. Beams are usually installed in increments of 30 cm to 60 cm. The choice of the width of the boards is selected in accordance with the finishing material. When sheathing, a distance (20-30 cm) is needed due to the plasticity of this material and its inability to withstand an insignificant load. Moreover, if you sheathe chipboard sheets, then the distance can be increased to 35-60 cm.
When installing windows () during the construction of a frame house with your own hands, it is necessary to comply with exact building codes. Firstly, the window area should occupy 18% of the entire wall area. Secondly, in a house where you plan to live only in the spring-summer period, there will be enough frames with single glazing. When living all year round, use frames with double, and preferably triple glazing.
The final stage of construction is the device and installation of the frame. In addition to external beauty, the role of distributing significant external loads falls on the roof. Here are the main elements of the supporting roof - rafters and rafter legs, they are divided into hanging and layered, diagonal connections, ridge run. At With When building a frame house with your own hands, sooner or later you will think about the material for the roof. Currently, a wide range of necessary materials is presented on the construction markets.
To summarize: building a frame house with your own hands is not an easy task! The main rule - when assembling the structure, strictly follow the building codes and established rules. And then your frame house will delight you and your descendants.


