How to install rafters on a gable roof. Do-it-yourself rafters for a gable roof: calculations, installation, fastening, assembly. chainsaw prices
Installation of rafters is one of the key stages in the construction of the roof. To prevent the rafter system from deforming and collapsing under high loads during operation, the rafters must be properly fixed.
Calculation of the pitch of the rafters
How far apart are the rafters? When designing the truss system, special attention is paid to this issue. The section of the rafters and the step of their installation depend strength characteristics roofing system.
The pitch of the rafters is the distance between adjacent rafters. The minimum pitch of the rafters is 60 cm, the maximum is more than 1 meter. A simplified version of the calculation of the pitch of the rafters involves the use of a table:

The length of the slope along the eaves must be divided by the rafter step selected in the table, then add one to the resulting value and round up to an integer. The resulting result means required amount rafter legs per slope. Then the length of the slope along the eaves should be divided by the calculated number of rafter legs - the final number corresponds to the value of the center distance between the rafters.

This calculation method is general, it does not take into account the specifics of roofing and the type of insulation used. If it is planned to lay a roll or slab heat insulator, it is recommended to adjust the pitch of the rafters to the size of the material. It should be noted that the width of the cotton insulation should be 1-1.5 cm more than the span between the rafter legs.
When determining how far to put the rafters, you should also pay attention to the recommendations for installing the selected roofing.
Material preparation
Do-it-yourself installation of rafters requires not only knowledge of the process technology, but also proper preparation wooden elements of the system for installation. Rafters are made of edged boards or timber, the section of lumber is selected at the design stage of the roof. The tree should not have cracks, wormholes or other damage.
Rafter legs should be made of well-dried softwood to prevent their deformation. 
Wooden elements must be treated with fire retardant and bioprotective compounds. Before proceeding with the installation, it is necessary to decide on the method of attaching the rafters to the Mauerlat or beams, with the type of ridge connection. In accordance with the project, metal and wooden fasteners are selected, including:
- plates (made of metal or wood);
- bolts or studs with nuts and wide washers;
- nails, self-tapping screws, staples, etc.;
- wire rod.
Types of rafters and features of their installation
When erecting the roof of a house, hanging or layered rafters are used. In some cases, a combination of both may be used. Hanging ones rely only on the walls of the building, and layered ones require the installation of additional supporting structures, so this option is primarily used if there is an average load-bearing wall or supporting pillars inside the building box.
The lower part of the rafters abuts against the Mauerlat, respectively, the walls of the structure must have sufficient width for the installation of a special supporting structure from a bar with a section of 150 × 150 mm. The upper part of the layered rafters rests on the ridge run. Thus, the installation of roof rafters requires the installation of a run, for which racks should be mounted on the middle wall or pillars.

Hanging rafters rest only on the walls. This design can be mounted both on the Mauerlat and on thin walls without laying the Mauerlat. In this case, the floor beams protruding beyond the plane of the wall on both sides of the building serve as a support for the lower part of the legs. Hanging rafters are connected by a jumper (puff, crossbar) which relieves bursting forces. When covering large runs, truss trusses are reinforced with additional elements to enhance the rigidity of the structure. When installing hanging rafters on a Mauerlat, a low puff can serve as a floor beam.
 Before you put the rafters, you need to mount the scaffolding. This makes it possible to provide the necessary safety and convenience of work.
Installation of the upper ends of the rafters
When choosing how to install rafters, it is important to evaluate the complexity of the work and the weight of the truss structures. If the assembled truss has a relatively low weight, or it is possible to use lifting equipment, then it is easier to assemble the structures on the ground, and then lift and mount on the roof. If the elements of the system are heavy and have to be lifted manually, then the trusses are assembled on the roof.
The connection of the upper ends of the rafters can be performed in different ways. First of all, this is a butt mount. On the opposite rafter legs, cuts are made at the desired angle. Then the rafters are docked with the resulting ends and fastened to two nails. The connection is additionally reinforced with a wooden or metal lining.
The overlap of the rafter legs is carried out using bolts or studs with wide washers and nuts. In this case, the rafters are in contact with planes.

If the rafter system is mounted on a wooden house with gables made of timber or logs, it is required to install the rafters on the walls using sliding fasteners in order to avoid deformation of the roof during shrinkage of the structure. Accordingly, in the ridge part, the rafters must be connected in a special way: the rafter legs must be located with a gap, and they are fastened with a special movable connecting element from metal.
In the presence of a ridge beam, installation of truss trusses on the ground is not required - the rafter legs are installed one at a time and attached to the ridge run.
The ridge run must be located strictly horizontally so that the rafter system evenly distributes the load experienced by the roof.
Methods for installing rafters on walls
The lower ends of the rafters are attached to beams or mauerlats. Hanging rafter trusses mounted according to the template rise to the roof. First of all, extreme farms are installed. In the tightening, two or three holes are required to attach the rafters to the beams laid on the upper crown of the log house.
If hanging rafters are mounted on a stone building, it is required to use special fasteners - the so-called "ruff", made of durable steel. This fastener is driven into every fourth row brickwork. With the help of loops extending from the ruff, you can fix the beams. It is recommended to use a solid beam as a Mauerlat - in this case, the load will be evenly transferred to the walls.

On buildings made of brick or other material that is not prone to shrinkage, the rafters should be fixed rigidly. To do this, a cutout is made in the rafter leg, the lower part of which must lie firmly on the Mauerlat. The rafter is fixed with three nails (two are driven in on both sides at an angle, and the third is vertically on top) and tied with wire. A connection can also be used with the help of corners and a support bar that prevents the rafters from shifting.
Proper installation of rafters involves making a fire break at the point where the chimney passes through the roof. If, during its arrangement, the installation of a special rafter system is provided, this should be taken into account when installing a shortened rafter leg (from the Mauerlat to the chimney structure). The distance between the structural elements and the pipe must be at least 130 mm.
If the rafter leg rests on the Mauerlat without an overhang, then special boards - fillies - should be installed to create a roof overhang.
Installation of rafters during the installation of a broken line mansard roof has its own characteristics. In this case, first of all, a rectangular frame of racks and girders is mounted. Then, hanging truss trusses with a crossbar strut are attached to the girders, mounted on racks. Next, each rack is connected by a short rafter to the Mauerlat.
Do-it-yourself installation of rafters: how to set it correctly and over what distance
Learn how to install rafters with your own hands. Choosing the right distance and how to install the rafters along with the video.
Installation of rafters: the specifics of sawing and the rules for installing the truss system
The truss frame sets the geometric and operational parameters of the pitched roof. Due to violations in the installation technology, due to flaws in the manufacture of its elements, distortions of the system, traditional leaks, holes in the coating appear, threatening emergency situations. In order to build a reliable and stable roof structure, you need to clearly know how the sawing and installation of rafters is performed, followed by fixation to the supporting elements.
Classification of rafter legs
Rafters, or rafter legs, are called wooden or metal beams installed on the house box at a given angle. They determine the configuration of the roof structure, take on and steadfastly resist the sum of permanent and temporary loads acting on the upper enclosing system of the building.

The structural simplicity of the rafter legs is extremely deceptive. In fact, these are quite complex elements that require careful marking and accurate cutting. Inconsistencies in the connections of the rafter legs with the Mauerlat, with each other and other components of the system lead to a change in the shape of the slopes, a violation of the integrity of the coating and the destruction of nodes.
On the other hand, the competent installation of rafter legs can correct some errors in the construction of the house box, and not aggravate the situation by clearly repeating and increasing the wall height differences. True, in such situations, the frame elements are made individually and scrupulously adjusted in fact directly at the facility.

However, before dealing with the specifics of installation, you need to find out what their design differences are, according to which the rafter legs are divided into two groups, these are:
- Hanging. Type of rafters that do not have an upper support. At the top of the roof, the rafter legs rest against each other with their ends. So that under the weight of the components of the roofing cake and snow, such a design does not burst the Mauerlat beam, the hanging rafters are connected with a horizontally installed puff.
- Layered. A kind of rafter legs, stacked on two supports of different heights. At the top, they most often rely on a ridge run installed in the cross to the rafters, less often they rest against each other, cut down at an angle. The bottom rests on the Mauerlat beam or rests against it.
The scope of their application and installation technology depend on which group the rafter legs belong to. The hanging variety is collected on the ground, and the trusses, made in the form of peculiar triangles, are raised to the roof and mounted in a form completely prepared for installation.

The advantage of building a truss frame using hanging technology lies in the safety of work and the ability to perform nodal connections as accurately as possible. If the simplest version of a hanging truss with a puff at the bottom is used in the construction of the roof, you can abandon the Mauerlat device, in place of which a narrow leveling board is quite suitable.
The disadvantages of hanging technology are accompanied by advantages. For example, a truss assembled on the ground is much more difficult to transport to the installation site than boards and timber for layered rafters. There are restrictions on overlapping spans: the limit is considered to be 14 m, above which it is unreasonable to install sag-prone wooden beams without intermediate supports.
The rafter legs of the layered group both top and bottom are based on independent structures. Their top is laid on a purlin structure, which is mounted on the floor beams or on the bed, replacing the Mauerlat with inner wall. The bottom is either installed on the Mauerlat, or rests against it, catching on the bar with a tooth or a support bar sewn instead of a tooth.

The advantage of layered systems is rightfully recognized as the possibility of overlapping almost any span in size. It’s just that with an increase in the overlapped space, the design becomes more complicated: it is supplemented with struts for a couple with racks, additional runs, coupled with beds, fights.
The layered structure is assembled and mounted longer, because. it is built not from farms, but from individual elements. However, just this scheme has more opportunities to correct the shortcomings of a box or an unevenly settled log house. Because layered rafters are stacked individually, it is possible to slightly change the position and size of the node, in order to eventually form a perfectly aligned slope plane.

The specifics of the manufacture and installation of rafters
It is clear that for the construction of the truss system, lumber will be needed - long-length products of timber processing enterprises with clear geometric parameters. You will need a board or timber, on which, of course, there are no mounting cuts and cuts for installation.
Why are cuts and cuts needed? The fact is that when placed on an edge, boards and beams have too little support area. They are in contact with the Mauerlat with only one vestma in a thin line, because of which, at the slightest load from above, they can tritely “move out” from their position and drag the entire structure with them.
In order to increase the area of \u200b\u200bsupport in the junction of the rafter and Mauerlat, or it and an additional run, a corner cut is selected in a beam or board, a tooth is cut out or sewn support bar. If the top of the rafter is paired with a mirror-opposite counterpart, then for a reliable stop, you will need a gash, the plane of which must be clearly perpendicular to the horizon.

The basic rule in the construction of truss frames is that the support sites selected in the lumber are strictly horizontal and vertical. At the slightest violation of horizontality with verticality, stability is lost, structural parts are displaced under their own weight and load, up to the complete destruction of the system.
Note that the nodes of the truss systems are entrusted with the obligation to ensure the possibility of a slight displacement and rotation when the load is exceeded. These movements are necessary in order for the structure to bend slightly, move slightly, but not collapse and remain stable.
These subtleties should be known both to the master who decided to do the manufacture and installation of rafters with his own hands, and to the owner of the house under construction, who does not want to pay for the poor-quality labor efforts of the builders' team. Let's analyze the common options to understand the essence of the process.

Hanging roof frame construction
Consider an example of the construction of a truss system over a log cabin of a bath. The span between the walls is small, it is easier and more reasonable to block it with a hanging structure, the installation of which will be carried out on the bypasses of the ceiling beams - matrices.
The log base is an almost ideal option for installing hanging systems, because. it is easiest to cut it into the horizon, eliminating the need to adjust the rafters in case of a violation of the geometry of the foot. There is no need for a Mauerlat device. However, the puff will have to be moved up in order to bypass the upper crown of the log house and form a useful attic space.

Before performing the installation of the rafters, a phased preparation of the log house is carried out. On both sides of the foot, we align the bypasses according to the lace tied to the nails hammered into the two extreme beams. On top of the bypasses, we cut off the slab so that the edge of each beam ends with a flat horizontal platform.
The surface formed after squeezing the upper bulge of the log along the edges of the beams is aligned to the horizon according to the level. We apply the specified control tool to three or more beams at the same time. If the level is not long enough to carry out such a check, use a long rail or board instead.

After squeezing all the excess, we mark the nests for the rafter tooth. To do this, we again use nails and lace. Note that it is possible to draw nest sampling sites on the bypasses both before the construction of hanging trusses and after. However, it is much more convenient to make nests before making rafters. They will help to carry out the fitting with higher accuracy.
To facilitate your work, it is advisable to find the center of the log house from the side of future tongs. At these points, it is recommended to nail along the control rail, one of the edges of which will indicate the axis of symmetry. You can do without rails if you already have some experience in the construction of roofs.

- We sew two inch boards 10–15 cm longer than the designed length of the rafters at the top with a nail or bolt so that they can rotate around this connecting point.
- On the rail installed in the center of the future tongs, we mark the design height of the truss system. We put one more mark above it - this is the height of the tooth, more precisely, the length of the vertical laid off from the base of the tooth to its top.
- We set the boards sewn at one point to the extreme bypasses so that the corner of each board rests against the future socket under the tooth.
- We combine the connection point of the boards with the upper mark on the rail, which determines the length of the rafters with the tooth.
- From the lower corner of both rafters, we set aside the height of the tooth, return with the template blank to the ground and cut out the tooth according to the markup.
- We return the template blank to its place, install it by inserting the teeth into the sockets intended for them. It may happen that after installation, the top of the workpiece does not match the directions of the rail. Then you need to pull out the nail and adjust the position of the top, be sure to mark a new point.
- After fitting the top, we draw a vertical line of their upcoming joint on both boards, measure the size of the crossbar and mark on the trimmings of the board the shape of the overlays for the upper joint of the rafters.
If everything turned out exactly and no more adjustments are required, the template is ready. We return with him to the ground. We disassemble the workpiece and make cuts along the marked lines. The parts obtained as a result of fitting and fitting will serve as a standard for the practically in-line production of roof trusses in the required quantity.

We will assemble hanging farms on the ground. Their installation, as well as fitting, should be carried out by at least two people. One master simply can not cope with such work. The performer at the top will install the truss, and the second one will change its position according to the plumb line. The position of each leveled and installed truss should be fixed with temporary struts.

To increase the stability of the system, we will install racks under the rafters:
- Let's mark the matrices under the place of installation of additional supports in an already proven way: we will hammer in a nail from opposite sides and pull the cord.
- We will hollow out nests in the logs according to the markings.
- Let's try a piece of a bar to the installation site. We mark on it the line washed down, taking into account the height of the spike.
- We will make a rack and two linings for attaching it to the rafter.
- Install the support made and fix the position of the truss truss on the other side in the same way. According to the verified scheme, we continue to work until we equip each rafter with an additional support.
To ensure the rigidity of the hanging system, the truss trusses are connected by wind ties - boards, poles or slats nailed from the inside of the structure. On the outside of the truss frame, rigidity will increase due to the construction of the crate.

The rafter legs are attached to the matrices with 200 mm nails or angle brackets. In this regard, metal corners and plates with perforation for fasteners significantly lose to traditional methods. To the sidewalls of the rafters we nail fillies made of a board, the width of which is half less material used in the manufacture of rafters.
The length of the filly should be 70 - 80 cm more than the designed width of the overhang. This distance is necessary for their reliable connection with the rafter legs. The fillies can be cut in advance, or without preliminary cuts, you can nail the trimmings of a narrow board to the rafters, and then draw up the line of the eaves. However, the first option is more convenient and economical.
In most cases, as in the example above, fillies must be partially buried in the mats bypass, for this:
- We note in fact the width of the filly at the bypass.
- We make two cuts with a saw according to the markup for 2/3 of the thickness of the filly. We also saw the log between the extreme cuts with a saw. We refine the recess with a chisel, accompanied by a hammer.
- We install the fillies in the formed recesses, sew them with rafters with nails 100 mm long.
Upon completion of the installation of all fillies in the last ones, we hammer in a nail. We pull the control cord and mark where to saw off the excess.

The device of the layered roof frame
In the construction of a truss frame using layered technology, there is much in common with the installation of a hanging structure. The fitting is carried out in almost the same sequence, so it makes no sense to describe the actions twice. The main difference is in the methods of forming the upper node, because the tops of the layered rafters have a support - a ridge run.
If at the top the layered rafters are tritely based on a ridge run, they are laid either with a run, i.e. parallel to each other, or with a strictly vertical joint, similar to the docking of hanging legs. However, in most cases, they try to fix the upper part with a notch or a vertical cut with a tight fit to the ridge beam.
There are schemes according to which the layered rafters are based not on the ridge, but on the side run. In such situations, the top is formed according to the hanging principle, and the point of support on the girder is made out with a corner cut.
Let us analyze the most popular option in private construction for the construction of rafter legs with support on the lower corner cut and on the ridge run through a vertical gash. Note that the maximum depth of the cut should not exceed 1/3 of the width of the board.

Option for marking with a construction square:
- On the square, we mark the height of the roof and half the span on a scale. These values reflect the slope of the slopes and set the main angles. The proportions must be exactly maintained.
- If further use the square is not planned, then the delayed points can be marked with screwed bosses or short screws with screws, if planned, it is better with paint that is removed with a solvent.
- We apply a square to the board laid flat with the side on which the height of the roof is marked. We draw a line according to the indications of the square - this is the line of the upper cut of the rafter - the section of its interface with the ridge run.
- Cut along the marked line with a circular saw. Lay the board for sawing flat, as it should be when cutting in width. Longitudinal cuts are made with setting on the edge.
- From the top of the formed angle, we set aside the length of the so-called diagonal. This is the distance from the junction point with the run to the outer edge of the Mauerlat or upper trim, if equipped frame house.
- We move the square to this point. We draw a line parallel to the first.
- We turn the square over, move it along the workpiece so that 2/3 of the total distance is on the left, and 1/3 on the right. In the picture, these are 8ʺ and 4ʺ.
- The line of a smaller segment will just designate a cut for us.
At the end, we draw the outline of the cornice overhang on the board, cut it along the outlined lines and use the rafter blank made by ourselves to saw the rest of the roof elements.

You can apply the described method without a building square and marking the parameters of the roof on it. It is enough to imagine the process in order to set aside the necessary distances with a conventional drawing tool. However, without experience, you can get confused in the calculations of angles and segments.
To help novice builders, a template has been developed with options for forming corner cuts. It will help you navigate the manufacture of rafter legs from the most common lumber in this area.

In cases of laying rafter legs with notches in the upper and lower parts, it should be remembered that the depth of both notches must be the same so that the roof slope does not change during construction work. Usually, for the device of two equal cuts, an auxiliary bar is used, the thickness of which is not more than 1/3 of the thickness of the board.
The rafter blank is then installed with an edge on the Mauerlat and on the run. The bar is applied on the side in the area of the lower and upper nodes to outline the cut.
If the cut is needed only in the lower part of the rafter, and the top will be based on the run with a cut, the board is installed at the bottom on the Mauerlat, and at the top on the run and the bar, so that as a result of cutting, the slope of the slope does not change. At the bottom, a second bar of the same size is applied to the future node and the outline of the future cutting is outlined with it.

The same methods are used to form cuts with a tooth. The difference is only in the form washed down.
The installation of layered rafters begins with the installation of two extreme trusses. The elements are mounted one at a time, their position is carefully checked using a plumb line. Most often, extreme farms are arranged from paired boards, because. they carry more load. They are fixed with temporary spacers, then connected with a cord or rail to indicate the plane of the slope.
Ordinary rafters located between the extreme load-bearing trusses are installed according to the instructions of the laces. If necessary, correct the position of the legs according to the actual situation.

Installation of rafters: how to make and lay rafters for the roof with your own hands
We understand how the rafters are installed. An overview of the technologies that you need to follow for those who want to properly make roof rafters with their own hands.
Do-it-yourself rafters and installing them on the roof

The truss system is the basis of the roof. Therefore, the installation of rafters with your own hands must be approached with a great deal of responsibility. The durability of the roof will depend on how well you perform the calculation and assembly of the rafters.
Rafters take on all the loads: from the roof, snow, wind. Therefore, it is important that the wood for them is ideal. There should be no chips, cracks on it, there should be no knots, traces of rot and other flaws.
Types of truss systems
 There are hanging and layered rafters.
The slopes form the slopes of the roof. Supports for them are internal and external walls. Rafters are used mainly for roofing with one slope.
For a gable roof, they are used only when there is an additional supporting wall in the house structure.
 Hanging rafters are good because they can be used for large spans without additional supports. Additionally, crossbars are mounted, which reduce the load on the roof from snow.
Do-it-yourself hanging rafters on the roof are installed if the span is not more than seven meters.
For larger values, it is necessary to additionally mount a vertical spacer (headstock). With a distance between spans of more than nine meters, struts are nailed to the rafter legs at an angle.
It is impossible to imagine a roof truss without additional spacers. Keep this in mind when installing a truss system with your own hands. For example, tightening prevents the rafter legs from spreading, which can occur due to pressure exerted on the roof. But one puff is not enough. The bars under load will begin to sag and may break. To avoid this, crossbars are installed, as well as "grandmothers".
 And these conditions apply to the construction of any roof. Even the roof frame house built with your own hands, it needs various fortifications, despite the fact that the construction of such a roof is one of the lightest.
But before proceeding to the construction of the roof, it is necessary to build a house. You can read about how to build a frame house here. Houses using this technology quickly became popular not only in our country. They are built in a short time, do not require huge cash costs, have good performance characteristics, and are environmentally friendly.
The main thing that you should pay special attention to when assembling rafters yourself is the quality of the connections. Let's talk about this in more detail.
Hard connection
 To join the rafter legs with the Mauerlat, a rigid connection is often used. Its essence is that at the end of the rafter leg, a cutting is made at an angle of 90 degrees. With this part, the leg rests securely on the Mauerlat.
For a stronger connection, the rafter is fixed to a horizontal beam with a metal corner or three nails: two at an angle, one on top.
sliding joint
With a sliding joint in the Mauerlat, a groove is made into which the rafter leg is inserted. Fastening is carried out using a "sled" with self-tapping screws or nails.
Connecting rafters to each other
You can attach the rafters to each other at the top in several ways. 1 way - butt fastening. To do this, the ends of the rafter legs are overlapped on top of each other. Next is a vertical cut. After that, the rafters are applied end-to-end to each other and fixed with two nails at an angle. Additionally, you can use a metal plate, which is mounted between the rafter legs at the top.
Building rafters: timber
You can build up rafters from a bar by cutting down. To do this, cuts are made at the ends of the bars, with a length equal to twice the height of the section. The height of the cuts should be equal to 1/5 of the height of the timber.
After joining the bars, a bolt hole is drilled in them, the bars are connected.
Rafter extension: board
 There are more connection options here. You can overlap the boards. The length of the overlap is approximately the same as half the length of the board.
A secure connection is made using ten nails driven in at a 45 degree angle.
You can join the boards end-to-end, and nail a board on the seam on both sides.
When installing rafters with your own hands, you must constantly ensure that they are located exactly on the same level. It is better to collect farms directly in the attic, as they are very heavy, and it is rather difficult to lift them without special equipment. The dimensions and shape of the rafters are also acquired already at the top.
 Before proceeding with the construction of the roof, it is necessary to separate the floor with a ceiling. Ceilings in a foam block house are part of general design house, which in importance is not inferior to the foundation and the roof.
If you have already made ceilings, then think about it, maybe you want to make a roof under the room. Houses in which part of the volume under the roof is equipped as a living space are called houses with an attic.
Features of the construction of the roof of the house from foam blocks are described in this article. When erecting a roof, it is necessary to strive to reduce its weight so that the load on the walls is small. However, if the house has a reinforced concrete frame, then this recommendation can be deviated from.
Self-installation of the truss system
 Installing a truss system is a simple process. First, you need to assemble a farm on the roof. You can do this in any way, depending on its type.
It is convenient to make a truss with a puff at the bottom.
First, a timber or board of the required length is cut off. They will play the role of a puff. To do this, the distance between the walls of the house is measured with a call to the walls themselves. Next, a vertical beam (board) is prepared, which will stand between the puff and the rafter legs. Its length must be adjusted so that when the rafter legs are connected to it at the top point, the necessary slope of the slopes is obtained. Make calculations taking into account the fact that the roof should hang at least half a meter over the eaves.
The first farm should be used as a template. A second farm is immediately made on it. All calculations must be recorded. After you have built the rafters with your own hands, you need to install the assembled structures along the edges of the roof and pull the rope between them. When installing intermediate trusses, it is necessary to control their height on it.
Before installing intermediate trusses, it is necessary to make markings along the perimeter of the roof in order to accurately maintain the step between the rafters during installation. When all the roof trusses are mounted, you can proceed with the installation of the battens, counter battens, lay the roofing material and insulate the roof.
Do-it-yourself construction of rafters and the process of installing them on the roof of your house
The rafter system is the skeleton of the roof. So that it does not crumble, you must follow the elementary rules for making wood for rafters and be able to assemble them correctly and
How to put rafters on a gable roof: expert advice
 If a decision is made to build a house or a small outbuilding, then it is necessary to protect the building from moisture, and for this you need to make a roof. The roof in its design can be different, but in most cases a gable roof is used. Proven for centuries, it is easy to install and compatible with any type of roofing. Its installation is carried out on the crate, and it is stuffed on the rafters. In order for the roof to last for a long time, you need to know exactly how to properly put the rafters on the roof.
The most actively used material from which rafters are made is wood. Coniferous blanks are usually used, since the structure impregnated with resin allows the wood to retain its qualities for a long time and has a low weight. When choosing a material, it is desirable to avoid boards with knots and large cracks. It is not recommended to use freshly sawn boards and beams for the manufacture of a truss frame, the tree should be dried.
Rafters need to be assembled into a triangular truss, this design allows for optimal rigidity, and it affects the bearing capacity of the entire building.
Components of the roof structure

Rafter systems are divided into two types:
- Hanging. They are used if the width of the wall along the pediment does not reach 10 m. When using a hanging system, the rafters are leaned on the side walls, and to equalize the load, they are connected by tightening.
- Layered. They are used in the presence of load-bearing walls, if the width of the wall along the pediment is greater than 10 m. In order to strengthen the rafter system, a vertical beam is placed in the middle, through which the entire load is distributed on the walls, as well as the bed.
 The installation of the truss system must begin with the Mauerlat. The place for its installation is planned in the process of building the walls. To do this, you need to lay out a ledge on the outside of the wall, and lay the Mauerlat at the inner edge. For its fastening use:
- binding wire;
- anchor bolts;
- corks made of wood;
- rebar cut into pieces.
The intended place for laying the Mauerlat must be waterproofed, and the beam must be treated with an antiseptic. To reduce the number of joints, the beam must be chosen to the maximum length. If suddenly the length of the beam turned out to be small, you need to make an oblique washed down, and then connect the two parts using self-tapping screws, nails and staples. The length of the cut should be up to 1 meter.
For the manufacture of rafter legs, you need to cut the boards of the required length. A 50 × 20 beam is well suited for this. The connection should not be located in the middle, the required offset is 1/3 of the entire length of the rafters.
For small buildings, truss trusses are easier to assemble on the ground and then lift to the roof.
You need to start putting rafters from the extreme gable trusses. The building level controls the verticality of their installation. And for the precise installation of intermediate trusses, it is desirable to pull the cord from above and below.
The rafter legs are installed in increments of 0.6 to 1.2 m, and the trusses are fixed to each other with a temporary fixator.
After installing all the trusses, they are fastened with a board in the upper belt, and the latches are removed.
If the span is more than 6 m, and there is a load-bearing wall in the center of the house, then the rafters must be installed differently. Supports are installed in the center, and a ridge beam is mounted on them. Rafters are alternately attached to it. Installation, as usual, begins with the extreme supports. Between them it is necessary to pull the cord to install the remaining rafters in the same plane. An additional beam can be installed between the internal supports, it will reinforce the ridge beam.
 Having decided on the angle of inclination and the height of the roof, a template can be made to facilitate marking work. All rafters are of the same length, so you can wash down on the ground, and assemble the prepared structure at the top.
If the rafters are placed without a central run, then they can be overlapped between themselves. The upper points must be fixed rigidly, and a bolt should be installed below.
Having familiarized yourself with how to install rafters, on a small building you can correctly do this work on your own.
How to put rafters on a gable roof: expert advice
How to put rafters on a gable roof correctly: expert advice
Do-it-yourself gable roof truss system - device instructions
A gable roof or gable roof is a roof with two slopes, i.e. having 2 inclined surfaces (slopes) of a rectangular shape.
frame gable roof by virtue of design features perfectly combines ease of installation and maintenance with reliability and durability. These and many other parameters make the construction of a gable roof practical and rational decision for private and commercial housing construction.
In this article, we'll look at how to do truss system do-it-yourself gable roof. For effective perception of the material, it is presented in the form of a step-by-step instruction from A to Z, from selection and calculations, to installation of a Mauerlat and a crate under the roof. Each stage is accompanied by tables, diagrams, drawings, drawings and photos.
The popularity of the roof with a house is due to a number of advantages:
- design variability;
- simplicity in calculations;
- natural flow of water;
- the integrity of the design reduces the likelihood of leaks;
- profitability;
- preservation of the useful area of the attic or the possibility of arranging an attic;
- high maintainability;
- strength and wear resistance.
Types of gable roof
The installation of a gable roof truss system depends primarily on its design.
There are several options for gable roofs (types, types):
1. Simple gable roof- symmetrical
 Simple gable roof - symmetrical The most common version of the roof device due to its simplicity and reliability. Due to the symmetry, a uniform distribution of loads on the load-bearing walls and the Mauerlat is achieved. The type and thickness of the insulation do not affect the choice of material.
The cross section of the beam makes it possible to provide a margin of bearing capacity. There is no possibility of bending the rafters. Supports and spacers can be placed almost anywhere.
A clear drawback is the impossibility of arranging a full-fledged attic floor. Due to sharp corners, “blind” zones appear that are unsuitable for use.
2. Simple asymmetrical gable roof
 Simple asymmetric gable roof The construction of one angle greater than 45° leads to a reduction in the amount of unused area. There is an opportunity to make living rooms under the roof. At the same time, the requirements for the calculation are increasing, because. the load on the walls and foundation will be distributed unevenly.
3. Broken gable roof, with external and / or internal fracture
 Broken gable roof, with an external and / or internal fracture This roof design allows you to equip a full-fledged second floor under the roof.
Naturally, a simple gable truss roof differs from a broken one, not only visually. The main difficulty lies in the complexity of the calculations.
The design of the gable roof truss system
Building a roof of any complexity with your own hands involves knowledge of the purpose of the main structural elements.
The locations of the elements are shown in the photo.
 Elements of the truss system of a gable roof
  Elements of the gable roof truss system - scheme 2
  Elements of the gable roof truss system - scheme 3
- Mauerlat. Designed to distribute the load from the truss system to the load-bearing walls of the building. For the arrangement of the Mauerlat, a beam of durable wood is selected. Preferably larch, pine, oak. The cross section of the beam depends on its type - solid or glued, as well as on the estimated century of construction. The most popular sizes are 100x100, 150x150 mm.
Truss truss silhouette defines appearance buildings. Examples of farms in the photo.
 Roof truss options
Rafter parameters are important. They will be discussed below.
- puff- connects the rafter legs and gives them rigidity.
- Run:
- Skate run, mounted at the junction of one rafter to another. In the future, a roof ridge will be installed on it.
- Side runs, they provide the truss with additional rigidity. Their number and size depend on the load on the system.
- Rafter rack- a vertically located beam. It also takes on part of the load from the weight of the roof. In a simple gable roof, it is usually located in the center. With a significant span width - in the center and on the sides. In an asymmetrical gable roof - the installation location depends on the length of the rafters. With a sloping roof and the arrangement of one room in the attic attic, the racks are located on the sides, leaving free space for movement. If there are supposed to be two rooms, the racks are located in the center and on the sides.
The location of the rack depending on the length of the roof is shown in the figure.
 Location of the rack depending on the length of the roof
In regions with a significant wind and snow load, not only longitudinal struts (located in the same plane with the rafter pair) are installed, but also diagonal ones.
- Sill. Its purpose is to serve as a support for the rack and a place for attaching the strut.
- crate. It is intended for movement during construction works and fixing of roofing material. It is installed perpendicular to the rafter legs.
The presence of a drawing and a diagram indicating the location of all the listed structural elements will help in the work.
The choice of material for rafters
When calculating the material for a gable roof, you need to choose high-quality wood without damage and wormholes. The presence of knots for beams, Mauerlat and rafters is not allowed.
For boards, there should be a minimum of knots, and they should not fall out. Wood must be durable and treated with the necessary preparations that will enhance its properties.
Calculation of the truss system of a gable roof
The calculation of material parameters is an important stage, so we present the calculation algorithm step by step.
 Calculation of the truss system It is important to know: the entire truss system consists of many triangles, as the most rigid element. In turn, if the slopes have a different shape, i.e. are an irregular rectangle, then you need to divide it into separate components and calculate the load and the amount of materials for each. After calculations, summarize the data.
1. Calculation of the load on the truss system
The load on the rafters can be of three types:
- Permanent loads. Their action will always be felt by the truss system. Such loads include the weight of the roof, lathing, insulation, films, additional elements of the roof, finishing materials for the attic floor. The weight of the roof is the sum of the weight of all its constituent elements, it is easier to take into account such a load. On average, the value of the constant load on the rafters is 40-45 kg / sq.m.
For reference: The weight of some roofing materials per 1 sq.m. presented in the table

- Variable loads. Valid in different periods and with different strengths. Such loads include: wind load and its strength, snow load, precipitation intensity.
In fact, the roof slope is like a sail and, given the wind load, the entire roof structure can be destroyed.
 Wind load on the roof
The calculation is carried out according to the formula: wind load is equal to the indicator for the region, multiplied by the correction factor. These indicators are contained in the SNiP "Loads and Impacts" and are determined not only by the region, but also by the location of the house. For example, to a private house surrounded by high-rise buildings, there are fewer loads. Standing separately Vacation home or cottage experience increased wind loads.
2. Calculation of the snow load on the roof
The calculation of the roof for snow load is carried out according to the formula:
The total snow load is equal to the weight of the snow multiplied by the correction factor. The coefficient takes into account wind pressure and aerodynamic influence.
The weight of snow, which falls on 1 sq.m. roof area (according to SNiP 2.01.07-85) is in the range of 80-320 kg / sq.m.
The coefficients showing the dependence on the slope angle are shown in the photo.
 The scheme for calculating the snow load on the roof
- Special loads. Accounting for such loads is carried out in places with high seismic activity, tornadoes, storm winds. For our latitudes, it is enough to make a safety margin.

Assessment of the condition and bearing capacity of walls and foundations
It should be borne in mind that the roof has a significant weight that can harm the rest of the building.
Determination of the roof configuration:
- simple symmetrical;
- simple asymmetric;
- broken line.
The more complex the shape of the roof, the greater the number of roof trusses and sub-rafter elements is needed to create the necessary margin of safety.
3. Calculation of the angle of the roof
The angle of inclination of a gable roof is determined primarily by the roofing material. After all, each of them puts forward their own requirements.
It should be noted that increasing the angle increases the area of \u200b\u200bthe space under the roof, but also the amount of material. What affects the overall cost of work.
 Calculation of the angle of the roof
5. Calculation of the pitch of the rafters
The pitch of the rafters of a gable roof for residential buildings can be from 60 to 100 cm. The choice depends on the roofing material and the weight of the roof structure. Then the number of rafter legs is calculated by dividing the length of the slope by the distance between the rafter pairs plus 1. The resulting number determines the number of legs per slope. For the second number, you need to multiply by 2.
6. Calculation of the length of the roof rafters
The length of the rafters for the attic roof is calculated using the Pythagorean theorem.

Parameter "a"(roof height) is set independently. Its value determines the possibility of arranging a dwelling under the roof, the convenience of being in the attic, the consumption of material for the construction of the roof.
Parameter "b" equal to half the width of the building.
Parameter "c" is the hypotenuse of the triangle.
It should be noted that the maximum length of the beam is 6 r.m. Therefore, if necessary, the timber for the rafters can be spliced (building, joining, joining).
The method of splicing the rafters along the length is shown in the photo.
 Methods for splicing rafters along the length
The width of the rafters for the roof depends on the distance between opposite load-bearing walls.
7. Calculation of the section of the rafters
The cross section of the gable roof rafters depends on several factors:
- load, we already wrote about it;
- type of material used. For example, a log can withstand one load, a beam - another, a glued beam - a third;
- rafter leg length;
- type of wood used in construction;
- distance between rafters (rafter pitch).
You can determine the cross section of the beam for the rafters, knowing the distance between the rafters and the length of the rafters, using the data below.
Rafter cross section - table

Dimensions of lumber (beams and boards) for a gable truss system:
- thickness (section) of the Mauerlat - 10x10 or 15x15 cm;
- the thickness of the rafter leg and puffs is 10x15 or 10x20 cm. Sometimes a beam of 5x15 or 5x20 cm is used;
- run and strut - 5x15 or 5x20. Depending on the width of the leg;
- rack - 10x10 or 10x15;
- lying down - 5x10 or 5x15 (depending on the width of the rack);
- thickness (section) of the roof lathing - 2x10, 2.5x15 (depending on the roofing material).
Types of gable roof truss system
For the considered roof structure, there are 2 options: layered and hanging rafters.
 Types of roof system: with layered and hanging rafters
Consider each type in detail in order to make an informed choice.
hanging rafters
They are used with a roof width of not more than 6 r.m. The installation of hanging rafters is carried out by attaching the legs to the load-bearing wall and the ridge run. The design of hanging rafters is special in that the rafter legs are under the influence of a bursting force. Hanging rafters with a puff installed between the legs can reduce its influence. The puff in the truss system can be wooden or metal. Often puffs are placed at the bottom, then they play a role bearing beams. It is important to ensure that the puff is securely fastened to the rafter leg. Because a bursting force is also transmitted to it.
The higher the puff is located, the greater the strength it should have.
If the puff is not installed, the load-bearing walls can simply “disperse” from the pressure created by the truss system.
Rafters
They are used in the arrangement of roofs of any size. The design of the layered rafters provides for the presence of a bed and a rack. Lying lying parallel to the Mauerlat takes on part of the load. Thus, the rafter legs seem to be inclined towards each other and are supported by the rack. The rafter legs of the layered system work only for bending. And the ease of installation also tips the scales in their favor. The only downside is the stand.
Combined
Due to the fact that modern roofs are distinguished by a large variety of shapes and complexity of configurations, a combined type of truss system is used.
 Combined view of the truss system
After choosing the type of truss system, you can accurately calculate the amount of materials. Record the calculation results. At the same time, professionals recommend drawing up drawings for each element of the roof.
Installation of a gable roof truss system
After the gable roof rafters are calculated, installation can begin. We break the process into stages and give a description of each of them. Get a kind step-by-step instruction, which contains additional information for each step.
1. Attaching the Mauerlat to the wall

The beam is installed along the length of the wall on which the rafters will rest.
In log cabins, the role of the Mauerlat is played by the upper crown. In buildings built from porous material (aerated concrete, foam concrete) or brick, the Mauerlat is installed along the entire length of the load-bearing wall. In other cases, it can be installed between the rafter legs.
 Splicing the Mauerlat to each other (direct lock with bolts) Since the length of the Mauerlat exceeds standard sizes lumber, it has to be spliced.
The connection of the Mauerlat with each other is done as shown in the figure.
How to connect the Mauerlat?
Washed down the bars is made only at an angle of 90 °. Connections are made using bolts. Nails, wire, wooden dowels are not used.
How to fix the Mauerlat?
The Mauerlat is installed on top of the wall. Mounting technology provides for several ways to mount the Mauerlat:
- strictly in the center of the bearing wall;
- offset to one side.
Mauerlat cannot be placed closer than 5 cm to the outer edge of the wall.
To protect the timber for the Mauerlat from damage, it is laid on a layer of waterproofing material, which most often acts as an ordinary roofing material.
The reliability of fastening the Mauerlat is an important aspect of construction. This is due to the fact that the roof slope is like a sail. That is, it experiences a strong wind load. Therefore, the Mauerlat must be firmly fixed to the wall.
Methods for attaching the Mauerlat to the wall and rafters
 Mauerlat fastenings with anchors Anchor bolts. Ideal for monolithic construction.
 Mauerlat fastenings with wooden dowels Wooden dowels. Are used for fellings from a log and a bar. But, they are always used with additional fasteners.
 Mauerlat fastenings with brackets Staples.
 Mauerlat mounts on studs or fittings Stud or fittings. It is used if the cottage is built of porous materials (aerated concrete, foam concrete).
 Mauerlat mounts with a sliding mount Sliding mount (hinged). The bundle in this way allows you to ensure the displacement of the rafter legs when the house shrinks.
 Mauerlat fastenings with wire Annealed wire (knitting, steel). It is used as an additional fastening in most cases.
2. Production of roof trusses or pairs
Installation is carried out in two ways:
- installation of bars directly on the roof. It is not used often, since it is problematic to perform all the work, measurements, trimming at a height. But it allows you to completely do the installation yourself;
- assembly on the ground. That is, individual elements (triangles or pairs) for the truss system can be assembled at the bottom, and then raised to the roof. The advantage of such a system is faster work at height. And the disadvantage is that the weight of the assembled roof truss structure can be significant. To lift it, you need special equipment.
3. Installation of rafter legs
The collected pairs rise up and are installed on the Mauerlat. To do this, at the bottom of the rafter legs, you need to make a drink.
Methods for attaching the rafter leg are shown in the figure.
 Methods for attaching the rafter leg
You need to start installing rafter pairs from opposite ends of the roof.
 A twine is stretched between the rafter pairs A twine is stretched between the fixed pairs. It will simplify the installation of subsequent rafter pairs. And also, will indicate the level of the skate.
If the rafter system is mounted directly on the roof of the house, then after installing the two extreme rafter legs, the ridge support is installed. Further, half of the rafter pairs are attached to it.
It is worth noting that the opinions of professionals differ on this issue. Some advise using a staggered mounting order, which will evenly distribute the increasing load on the walls and foundation more evenly. This order involves the installation of one rafter in a checkerboard pattern. After part of the rafter legs is installed, the missing parts of the pair are mounted. Others insist that you need to do a consistent installation of each pair. Depending on the size of the structure and the configuration of the truss, the reinforcement of the rafter legs is carried out with props and racks.
 Fixing with rafter brackets Nuance. Additional structural elements are connected by cutting. It is preferable to fix them with building brackets.
If necessary, you can lengthen the rafter leg.
Methods for splicing rafter legs are shown in the photo.
 Methods for splicing rafter legs

4. Installing the gable roof ridge
The ridge knot of the roof is made by connecting the rafter legs at the top.
Roof ridge device:
- Method without using a support bar (see fig.).
 Installation of the roof ridge without the use of a support beam
- A method using a rafter bar. Timber is needed for large roofs. In the future, it can become a support for the rack.
- The method of laying on the beam.
Installation of the roof ridge by laying on the beam Installation of the roof ridge by laying on the beam
- More modern variety manufacturing a ridge knot can be considered the method shown in the photo.
 Method for making a ridge knot
- Cutting method.
Installation of the roof ridge by cutting
After the truss system is installed, we make a major fixing of all structural elements.
5. Mounting the roof sheathing
The crate is mounted in any case, and is designed for more convenient movement along the roof during work, as well as for fixing roofing material.
The step of the lathing depends on the type of roofing material, for example:
- under the metal tile - 350 mm (the distance between the two lower boards of the crate should be 300 mm).
- under corrugated board and slate - 440 mm.
- under soft roof we lay a continuous crate.
Conclusion
As you can see, despite the seeming simplicity, the installation of a gable roof truss system contains many pitfalls. But, based on the above recommendations, you can easily build a reliable structure with your own hands.
Gable roof truss system - calculation, installation, do-it-yourself installation of rafters
Double pitched roof system. The technology of the truss system for a gable roof. Calculation of load and elements (rafters). Installation of the truss system (installation of the Mauerlat,
The truss system is one of the essential components of any roof. In order for this system to perform the functions assigned to it, it is necessary to think over its design in advance and carry out competent installation. About how to put the rafters with your own hands, and will be discussed in this article.
Correct calculation of rafters
Before you put the rafters, you need to determine two parameters at the design stage of the structure:
- The thickness of the rafter legs;
- Rafter installation step.

To simplify your task, you can use the following data:
- The length of the rafters is 3 m. With a section of 8x10 cm, the optimal pitch of the rafters is 120 cm, and for bars with a section of 9x10 cm, the pitch should be increased to 180 cm.
- The length of the rafters is 4 m. The section is 8x16 cm - a step of 100 cm, 8x18 - a step of 140 cm, 9x18 - a step is 180 cm.
- The length of the rafters is 6 m. If beams with a section of 8x20 cm are used, then the step between them should be 100 cm, and for beams with a section of 10x20 cm, a step of 140 cm is best suited.
To determine the number of rafters per slope, you need to do the following: first, the length of the slope along the cornice is divided by the pitch of the rafters, the resulting value is increased by one and rounded up to whole numbers. By dividing the length of the slope by the calculated number of rafters, you can find out the center distance between the rafter legs.
The calculation technology described above is not universal - for example, it does not take into account the features of the selected roofing and thermal insulation material. When using slab or roll insulation, the rafter pitch should be adjusted to the standard dimensions of the material. For materials based on mineral wool, it is necessary to reduce the distance between the rafters by 1-1.5 cm - such materials are held between the rafters due to bursting force.
Preparation of materials
In order for the truss frame to be of sufficient quality and reliability, it is necessary not only to properly install it, but also to correctly approach the issue of choosing materials for its arrangement. Typically, rafters are made from edged boards or timber with a pre-calculated thickness. Knowing how to properly put the roof on the house, and choosing high-quality material, you can independently install the truss system.
When choosing lumber, you need to pay attention to their quality - wood should not have noticeable structural damage, such as cracks or deep scratches. In addition, a good tree must be sufficiently dried so that excess moisture does not further accelerate the process of destruction of the truss system.

Before you mount the rafters, you need to impregnate them with antiseptic and flame retardants to increase protection. The next step, which indirectly concerns the technology of mounting rafters, is the choice of the method of their fastening.
The following materials can act as fasteners for installing rafters:
- Metal or wooden plates;
- Bolts or studs complete with nuts and washers;
- Self-tapping screws, nails or staples;
- Rolled wire.
Types of rafters for the roof
There are two main types of truss systems - hanging and layered. The rafters used in them are called exactly the same, and in some situations both types of rafters are combined to create the most effective design.

Peculiarities different types rafters can be described as follows:
- hanging. Hanging type rafters rest exclusively on the walls of the building. When fastening the rafters to the wall, as a rule, to reduce the load, a Mauerlat is mounted on the upper part of the walls, which acts as a supporting element for the rafter legs. However, you can do without it if there are reliable floor beams protruding beyond the perimeter of the building. The reduction of bursting loads in hanging rafters is provided by various jumper options. In the case of large spans, the truss frame can be further reinforced to increase rigidity.
- Layered. Slanted rafters, unlike the previous ones, are installed using additional supports, which imposes certain restrictions - such a structure can only be created if there is a load-bearing wall or other supporting elements inside the building. The lower part of the layered rafters, however, rests on the Mauerlat, so the walls must be thick enough for its installation. The upper part of this type of rafter is attached to the ridge run, mounted on vertical racks.
Installing the top edge of the rafters
Thinking through the design of the truss system, it is imperative to keep in mind its total weight and the complexity of installation. If the frame in the end is not very heavy, then it will be much easier to assemble it on the ground, and then raise it to the roof on your own or with the help of special equipment. A structure that has a lot of weight will be much more expedient to assemble directly on the roof.

You can connect the upper parts of the rafters in the following ways:
- Butt mount. This fastening method assumes the presence of cuts on the joined edges of the rafters. The rafter legs are connected in these incisions and fixed with two nails. In the future, the connection must be reinforced with a plate.
- Lap fastening. Such a connection is carried out by means of bolts or studs, which are tightened with nuts and wide washers. The rafters converge at one point and are brought to each other by the edges so that they can be fastened.
- sliding mount. This mounting method is used in wooden houses. The fact is that buildings made of logs or beams shrink, and sliding fasteners allow you to compensate for it without damage and distortions of the truss system. The rafters in the upper part are installed with a small gap and are connected by movable metal fasteners.
- Fasteners for a skate. If a ridge run has already been mounted on the building, then it is not necessary to assemble a solid frame - the installation process of the rafters in this case comes down to their alternate fastening to the ridge. The ridge beam must be horizontal so that the existing loads are distributed evenly.
How to put the lower parts of the rafters with your own hands
The lower edges of the rafter legs are installed on beams or Mauerlat. According to the installation technology of wooden buildings, the assembled frame is dragged onto the roof and installed, and first of all, it is necessary to fix the trusses located along the edges of the building. In order for the rafters to be attached to the beams located on the walls of the building, the tightening will have to be drilled at several points.
When arranging a roof on a stone house, special metal fasteners, the so-called "ruffs", will be required to attach the rafters. These fasteners are hammered into every fourth row of brickwork, after which they can be used to mount rafter legs.

If the building is made of materials that do not shrink, then the rafters must be fixed in a rigid manner. Before you put the rafters evenly, a cutout is made in each rafter, thanks to which they will all rest securely on the Mauerlat. The rafters are fixed with three nails and wire. To prevent the rafter legs from moving in the future, you can use the connection from the corners and the support beam.
All the nuances of how to properly fix the roof rafters should be considered and taken into account at the design stage. For example, if there is chimney care must be taken that it does not pass in the immediate vicinity of the truss frame. Sometimes in this case, shortened rafter legs are used, located between the Mauerlat and the chimney. The minimum distance from the wooden structural elements to the pipe is 13 cm.
Conclusion
Installation of the truss system is a feasible task, but only if all the nuances are taken into account. That is why, before putting the roof on the house, you need to carefully consider the future design, select high-quality materials and study the installation technology. Competent execution of each stage of work will create a reliable and durable truss frame.
Building a home is a complex and lengthy process. It contains many pitfalls that await the novice builder at every stage. The roof is an important part of any home. We will dwell on the types of roofs and roofing materials separately in another article. Today we will talk about how to make rafters on a gable (gable) roof, we will touch on the topic of calculation and selection of material.
Design features
The traditional option for Rus' is a gable roof. Slopes are called flat parts of the roof, having a constant slope to the horizon. The angle of inclination must be accurately calculated, it can vary from 10-15 to 60-80 degrees. Failure to comply with the specified parameters leads to negative consequences:
- As the angle of inclination increases, the length of the rafters changes and, accordingly, the height of the roof. This, in turn, leads to an increase in the load on the frame of the house and fastenings. In addition, due to the high windage, the sharp roof is highly exposed to wind. In regions where powerful wind gusts prevail, such a structure can collapse and harm people's health.
- A roof with a slope of less than 10 degrees is also not recommended: the roof will not withstand the pressure of snow accumulating on its surface. In places with heavy rainfall, the optimal slope angle is 45-60 degrees.
Thus, the correct slope will ensure the gable roof durability and safety. The basis for calculating this indicator is the corresponding tables of wind and snow load for a particular region.
In recent years, a device called attic has gained popularity for private housing construction. Such a gable design allows you to organize a full-fledged living space of a large area and height in the under-roof space, as well as equip a spacious balcony from the side of one of the facades of the house.

At the same time, roof trusses for the attic structure are more complex and massive, require careful calculation and fastening.
Roof device: getting acquainted with the main elements
Structurally, a gable roof is represented by a rigid wooden frame, which is mainly made from coniferous lumber of a certain section. The specific size of the frame elements and the fastening step are calculated based on the dimensions of the house and the load on the roof.
The main components of a gable roof include:

Types of truss systems: choose the right one
Gable roofs according to the type of truss system are divided into layered and hanging. The former involve the installation of racks and a common bed attached to the Mauerlat, the latter are characterized by the presence of a puff between the base of the rafters.
Hanging rafters are used for small buildings without internal load-bearing walls, layered - for buildings with a load-bearing middle partition. The choice of truss system depends on the size of the house, the estimated angle of inclination of the slope and roofing materials, which together determine the amount of load on the entire structure. Only a professional builder can choose the right type of system and make an accurate calculation.
Roof parameters
Immediately before the start of construction work, at the design stage, they perform the calculation optimal parameters roofs: the angle of inclination of the slopes, the dimensions of the section, the frequency of the installation step and the layout of the rafters.
Wind and snow loads in different regions of our country are uneven. SNiP 2.01.07-85 will help calculate them for a specific area. At the same time, experts recommend making a certain margin of safety for the roof frame, taking into account possible peak loads.

In addition, there is still a constant force of influence on the truss system - the pressure of the roofing material. The table shows the weight of popular coatings per 1 m 2 of surface.

Different types of materials also have different requirements for the optimal slope angle of the slopes. This aspect must also be taken into account when designing the roof.

Roof slope depending on the material
No less important is the calculation of the installation step and fastening of the rafters to the Mauerlat, that is, the distance between adjacent trusses. Usually this value is 0.6-1 m. A change in this indicator upwards leads to an increase in the load on the rafters and, as a result, an increase in their cross-sectional area. It is necessary to set the supports so that the fastening step is the same for all pairs.
The section of the rafters directly depends on the above indicators. By the way, the strength characteristics of wood of different species are different (laminated timber has the greatest strength). Here is a table for calculating the dimensions of the section for rafters from coniferous varieties, depending on the installation step and the length of the support.

Preparation and processing of lumber for the frame
Installation of the truss system is easy to perform, having at hand a drawing of the roof, the necessary materials and having experience with carpentry and carpentry tools.
When choosing wood for the roof frame, preference should be given to pre-dried boards without rot and with a minimum number of knots.
If desired, rafters, racks, mauerlat and other elements can be pre-cut. Treatment with antiseptic compounds and flame retardants in two layers is required.
Applying liquid mordants with a brush or roller is difficult and time consuming. It is much more efficient to use dipping. To do this, a trough is made from edged boards with a section of 200x25 and a length of 6 meters, inside which a plastic film is spread in one piece and fixed along the edges with a construction stapler.

Several antiseptic canisters are poured into the resulting container, the lumber is immersed in the solution and, thus, the treatment is carried out at a time. According to the instructions, it is forbidden to mix compounds with different actions to speed up the impregnation.
Assembly of roof trusses
Builders have no consensus on where to assemble trusses from rafters. Some make them on the ground and lift the finished structures up for installation, others prefer to do all the work on the site of the future roof. Both methods are acceptable. The first option is safer, the second option is less expensive, since a crane-manipulator is required to lift large-sized farms, which is associated with additional costs.
Regardless of the place of work, the first step is to prepare templates for sawing the ends of the parts at a certain angle or the required shape. Taking into account the specified parameters, measure the desired length of lumber and cut it with a carpentry saw or a circular saw.
Scheme of the truss system
The next rafter pair is attached taking into account the installation step. In order not to measure the required value each time, pieces of boards of a given length are prepared in advance and fixed to the Mauerlat between trusses. After installing all the rafters, the upper part of the supports is connected with a ridge run. To increase the strength of the structure, longitudinal bars are mounted on the sides.
This completes the installation of the rafters. It remains only to sheathe the trusses from the outside with a crate of unedged boards, bars or sheets of plywood and OSB, laying insulation and vapor barrier. Read more about this in other articles.
The roof is a complex and important architectural element of any building. Its construction should be treated with special attention, it must be remembered that the installation of a truss system requires considerable experience in performing such work and a special tool. You should not take on the creation of a roof for those who hold a carpentry and measuring tool in their hands for the first time - the results of the activity can be very negative.
There are two types of roofs depending on the number and placement of rafter support points, but each developer can, at his own discretion, slightly change the specific design of the truss system. This takes into account the operating conditions of the building, the purpose of the attic, the climatic zone of location, the technical parameters of lumber and roofing. Of course, the type of truss system is influenced by the personal experience and preferences of developers.
Before proceeding with the manufacture of rafters, you should decide on their type, method of attachment and linear dimensions. Only in this case, you can be sure of the strength and safety of the structure.
How do various factors affect the parameters of the rafters?
| physical factor | Brief description of the influence on the parameters of the rafters |
|---|---|
| Rafters must withstand snow and wind loads. During the calculations, it is necessary to take the actual maximum values of snow cover from the tables of building codes and rules, take into account the strength and rose of the winds. The data allows you to find out the total load on the roof slope, depending on its area and angle of inclination. Further, it is already possible to determine the dimensions of the rafters, their number and step. In this case, a safety factor is necessarily laid down. The fact is that lumber does not have stable and identical strength values, too many unforeseen factors affect these indicators. For most cases, 50 × 150 mm or 50 × 200 mm boards are used for the manufacture of rafter legs. |
| Gable roofs can be layered and hanging. For hanging roofs, you need to make rafters from more durable boards. This takes into account the method of fixing the elements to the Mauerlat. If a cut is made, then the width of the boards should increase by the size of the cut. The fact is that the cut in this place automatically reduces the width of the material that receives the load. If a cross cut 60 mm long is made on a board with a thickness of 200 mm, then only the remaining width of 140 mm is taken into account. Accordingly, if rafters from 200 mm boards are selected when calculating loads, but unforeseen cuts of 60 mm are made during fastening, then the width of the blanks for rafters increases to 260 mm. This remark is made for those who like to abuse various notches and cuts for the thrust areas of the ends of the rafters. There are currently many special devices, allowing you to firmly fix the rafter in the desired position without sawing. |
| For residential buildings, rafters must have a safety margin of at least 1.4 of the calculated values. For non-residential structures, the coefficient is reduced to 1.2. Conclusion - the dimensions of the rafters on the houses are larger than on garages and other outbuildings. |
| Residential attics (mansards) must have an insulated roof. The width of the rafters must correspond to the thickness of the insulation layer. At the same time, it is necessary to adjust the step between the rafter legs, depending on the standard width of the insulation. If in this climatic zone the optimal thickness of the roof insulation is 200 mm, then it is recommended to choose the same width for rafters. Various extensions of narrow rafter legs during roof insulation are not considered the right solution. |


This knowledge will help right decisions both during the manufacture of rafters, and during their fixation directly in place. Mistakes in the construction of the truss system are too expensive, you should not show excessive self-confidence.
What influences the choicesizes andwaysmountsrafter
A very important point. The task of any fixation is to ensure the stability of the connection node, while it can be fixed or have one or more degrees of freedom. This cannot be achieved without knowledge of the loads affecting the rafter legs. Loads can be permanent and temporary, dynamic and static, unidirectional and multidirectional.
- Constant vertical forces. Arise due to the impact of roofing and roof insulation materials. Due to the fact that the rafter legs are located at an angle to the vertical force, they are subject to bending and bursting loads. The magnitude of the forces is determined after the construction of the diagram, on the basis of specific bending and bursting forces, the thickness and width of the boards for the rafters are selected. Fasteners must prevent the spreading of the truss system.
- Variable vertical forces. Appear in winter, the value depends on the height of the snow cover.
- Lifting wind forces. As a result of gusts of wind, lifting forces act on the roof. They do not affect the dimensions of the rafter legs, efforts are taken into account only when choosing the type of fixation, it must provide for and hold such loads.
- Lateral efforts. The value depends on the windage of the roof. As a result of gusts of wind, lateral forces act on the truss system. They increase bending and tearing loads. This feature must also be taken into account during the manufacture and installation of rafter legs.

There are options for rigid fastenings of truss trusses; for this, metal plates, corners, self-tapping screws and nails are used.

Sometimes it is required to use floating rafter connections to compensate for changes in the size of wooden houses. For floating connections, special fasteners and bolts are used. The second allows the rafter legs at the top to turn a little.

Another example of a free rafter connection is a sliding one. It is used on wooden log cabins and makes it possible to compensate for the natural shrinkage of the house.

What elements are used to increase the stability and bearing capacity of the rafters
As a result right choice rafter system and methods of fixing its elements, the structure must be stable, compensate for natural fluctuations in linear parameters and withstand various loads that occur during operation. To fulfill the conditions during the fixation of the rafters, additional fixation elements can be used.
Runs
Most often they are mounted in the ridge part of the system, the upper ends of the rafter legs rest on them. To increase stability, cuts may be provided. The top connection is rigid or floating on bolts. On large roofs, girders can be installed in the middle of the rafter legs or in other places with critical loads.

vertikAflax racks
They are installed to strengthen the rafters; due to the use of racks, elements can be made from thinner lumber. Vertical racks with their upper end abut against the rafters, and with their lower end against the bed or ceiling beams.

cornerOpores
Retain bending and expansion forces, universal use. Corner stops can be placed in any places of the rafter leg that cause concerns about strength. Due to such stops, the resistance of the rafters to bending and tearing forces is significantly increased.

Puffs(crossbars)
Purpose - to keep the rafter legs from sprawling, they are used on hanging rafter systems. Most often they are placed in the upper part of the truss; boards with a thickness of about 20–25 mm can be used for manufacturing. The fact is that they work in tension, lumber holds such efforts well. Boards do not work well in compression, quickly bend and lose their original strength indicators.

Knuckleadki
They are used in the upper ridge part of the rafters, due to the use of puffs, the strength of the knot connection increases. Puffs can be made of wood, plywood, OSB or metal.


Bosses(stops)
They have many specific names. They are ordinary pieces of boards 30–40 cm long and 40–50 mm thick, fixed at the bottom of the rafters. They rest against the Mauerlat and do not allow the structure to slip. The use of bosses allows you to perform a rigid connection of elements without sawing the rafters. We talked about the problems that arise in connection with sawing in this article above.

Prices for various types of timber
Options for connecting the ridge knot of the rafter legs
The horse is one of the main and most loaded elements of the truss system. The node has several connection options, you should choose a specific one depending on the general parameters of the roof.

With a large length of slopes, it is better not to use a ridge beam, but instead to put two parallel runs and puff crossbars. This design is easier to do, it is more stable and safe.
For a hanging roof, you should choose the most reliable ways to connect the rafter legs, these systems have a minimum number of additional stops.
Prices for various types of fasteners for rafters
Fasteners for rafters
step by stepWithTruction of the mouthAnew rafters
For rafter legs, coniferous boards 50 × 200 mm, first-class lumber, are used. The boards must not have traces of rot or fungus, significant malformations and deep cracks. It is strictly forbidden to use low-quality lumber for the manufacture of the truss system.

To increase the protection of roof elements from decay, it is recommended to use fire protection.

Rafter blanks should be impregnated at least twice, while the material must be dry and clean. Processing is done on a flat area in dry and clear weather.

It can be impregnated with a roller, brush or air gun. It is not recommended to use household hand sprayers - too long and hard. Boards can be lifted up after complete drying of the impregnation.


Our gable roof has a ridge run, vertical supports rest against a bed located on a load-bearing wall in the middle of the building.
Practical advice. If the house is quite high and the boards are heavy, then it is recommended to make an elementary device to protect window openings from damage. To do this, two boards are knocked down in the form of a square, the length and width are selected taking into account the parameters of the opening. The device is installed on the windowsill, and the rafter boards do not damage the foam blocks during lifting.

Prices for fire-retardant impregnations
Preparatory operations
The manufacture of rafters begins with preparatory operations.
Step 1. Raise the rafter boards into the attic. For convenience, place them evenly along the length of the building, put one end on the Mauerlat, and the other on the run bed. First you need to install the extreme rafters on both sides of the roof of the house, pull a thread between them and install and align all the remaining ones along it.
Step 2 Check again the position of the ridge run. It should be located exactly in the middle of the roof. Its displacement by 1–2 centimeters will not affect the strength of the roof as a whole, but it will somewhat complicate the manufacture of rafters and the laying of roofing materials. In addition, an experienced builder may notice a mismatch in the size of the slopes and, accordingly, the asymmetry of the roof. It is recommended to achieve a situation so that the ridge run is located along the line of symmetry, if this is not associated with great difficulties. The final decision is made by the foreman on site and depends on the magnitude of the offset and the amount of work to correct the error.

How to straighten a run?
- Attach a batten board to the Mauerlat, it is lighter, easier to lift and fix. The second end should lie on the run. The board is nailed to the Mauerlat with an ordinary smooth nail or screwed with a self-tapping screw.
- Climb to the top of the run and use a tape measure to check the distance from the edge of the run to the Mauerlats installed on opposite walls. Work very carefully, it is advisable to use insurance. Unfortunately, in practice, few people follow the safety rules, but in vain. Falls from height can cause very serious injury.
- Align the purlin to the center and secure the board. To increase rigidity, fix the same board on the other side of the run.

Now everything is ready, you can proceed to the manufacture and installation of rafters.
Installationrafter legs
If you work alone, then you need to fasten a piece of rail to the run at the place where the first rafter is fixed. A rafter board will be temporarily fixed to it to prevent it from slipping down.

And at this time, you can perform work on the manufacture and preparation for connecting the upper part of the rafters.
Step 1. Lift and install the rafter board in place, clamp it to the previously fixed rail with a clamp.

Step 2 Draw lines to cut out the thrust pad. This is done in two stages. First, draw a horizontal line. To do this, press the rail, square or other even object firmly against the horizontal surface of the run.

Second, draw a vertical line. Now the ruler or square should be pressed against the side surface of the run.

Important. The width of the ruler should be no more than 2-3 cm, it is not necessary to make deep cuts and significantly reduce the width of the rafter leg, it loses its maximum design strength.
Make the same markup at the bottom of the rafter. Only now the ruler needs to be pressed against the Mauerlat surfaces.
Step 3 Remove the board and carefully cut out the seats. You can work with a hacksaw or an electric circular hand saw.

Practical advice. If the cuts are made with an electric circular saw, then it is better to cut in two steps. First cut to the mark, then turn the board over and cut again to the mark. Knock out the cut piece with a hammer, and remove the remaining protrusion with a chisel or chisel. No need to go behind the line with a saw and try to cut off the ledge in one go. This method increases the cut by 3–5 cm, depending on the diameter of the disk, which significantly reduces the bearing performance of the rafter.
Step 4 Install the prepared rafter in place and check the correctness of its manufacture. Do the same operations with the second leg of the farm.


Step 5 Place the rafters with an emphasis on the Mauerlat and the run, pull them together with a clamp in the upper part. Find the middle of the run and transfer the line to the rafters, use a level or building square (only if the plane of the run is strictly horizontal).


Step 6 Saw through two rafters at the same time along a vertical line. The boards must be tightly clamped with a clamp. Pay maximum attention, the saw blade should be perpendicular to the plane of the rafters. If you cut it obliquely, then the ridge joint will not fit tightly, and this reduces the stability of the truss system and is considered an obvious construction defect.

With a lack of practical experience in performing such work, the first leg may have a gap in the ridge part, if it is within 1–2 mm, then there is nothing to worry about. If it is more than 4 millimeters, then you need to correct the element. See which planes of the thrust pads do not allow the upper cut to fit tightly. Approximately indicate the amount of additional cut. Remove the rafter and remove the interfering protrusions. Check the connection again, if there are gaps, repeat the operation. As practice shows, experience appears on the second or third rafter and no further corrections need to be made.
Step 8 Secure the rafter legs firmly in place. For this, it is recommended to use metal plates and corners, it is simple and easy to work with them, the strength fully meets the requirements for the truss system.

For each pair of rafters, you will need one large reshaped plate to connect the ridge knot, two 50x50mm corners for fixing to the run and two 60x80mm corners for screwing to the Mauerlat. The thickness of the metal is at least two millimeters.

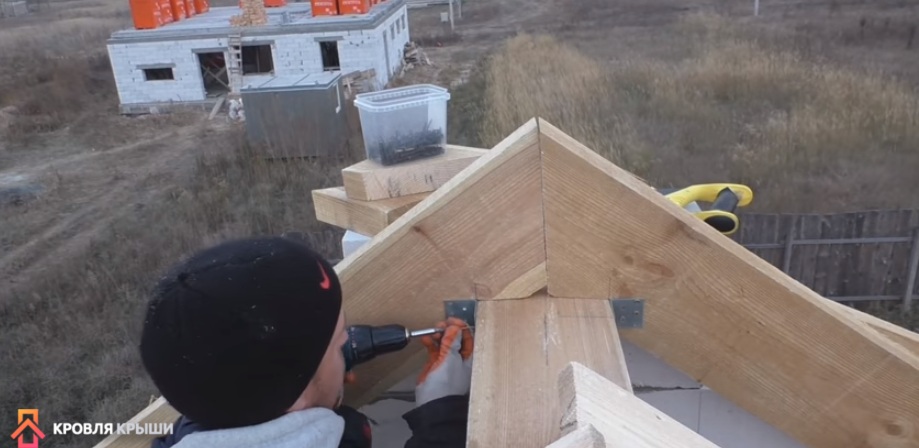

In the same way, install the extreme rafters on the other side of the house, pull the threads between them. One at the top and bottom and one in the middle. So that they do not interfere during the manufacture of rafters, make a gap between the thread and the plane of about one centimeter.
Real professionals never make one rafter in the attic of a house. Such an algorithm of work significantly increases the construction time, complicates the process itself and makes it unsafe. It is very dangerous to work with electric tools on unsuitable sites, injuries from them are severe, often causing disability.

If the house is delivered with high quality with exact observance of dimensions and rules, then the rafter legs are made according to one template on the ground. Finished elements are assembled on the roof. This technology increases labor productivity by 3-5 times, at the same time the quality of the rafter system is improved, it is more reliable and durable. Of course, the wages of builders also increase proportionally. They work from the development and receive money not for the time spent in the attic, but for the assembled roof.
Prices for popular models of screwdrivers
Screwdrivers
Video - Manufacturing and installation of rafters on a gable roof
The arrangement of a gable roof is considered a very practical and right decision in the construction of a residential or commercial building. This option combines the relative simplicity of execution and reliability, ease of maintenance and long service life. In this material, we will talk about how to install a gable roof truss system with your own hands, what are its varieties, and how to calculate the dimensions of its individual elements. Our step-by-step instructions will allow you to deal with any complications that may arise in the process.
A roof with two slopes has a whole list of advantages:
- ease of calculation;
- various versions;
- saving materials;
- the possibility of natural outflow of water;
- low probability of water leakage due to the integrity of the structure;
- the possibility of arranging an attic or attic;
- reliability and long service life;
- ease of preventive maintenance.
Varieties of gable roofs
Consider the main types of roofs with two slopes, the truss system in which will differ slightly in execution.
Symmetrical gable roof
This is the simplest gable roof, however, the most reliable and in demand. Symmetrical slopes allow you to distribute the load on the Mauerlat and load-bearing walls evenly. In this case, the type and thickness of the insulation layer do not affect the choice of roofing material. Thick beams of rafters have a sufficient margin of safety, so they will not sag. In addition, spacers can be installed at your discretion.

Among the disadvantages of this option, one can only note a too sharp angle of the slopes, which makes it difficult to use the attic floor and creates "deaf" zones that have no use.
Roof with two asymmetrical slopes
If the angle of inclination of the slopes is made more than 45º, some unused areas of space can be used. It will even be possible to equip a living space in the attic. However, some additional calculations will be required, as the load on the walls will become uneven.
Broken roof with external or internal break
This configuration makes it possible to place a spacious attic or attic under the roof. However, in this case, more complex engineering calculations will be required.
The design of rafters for arranging a roof with two slopes
The design of the gable roof truss system assumes the presence of such components:
- Mauerlat. It is a durable bar made of oak, pine, larch or other strong wood, which is laid around the perimeter on the bearing walls of the building. The purpose of the Mauerlat is to evenly distribute the load. The cross section of the bars is chosen based on their structure - solid or glued, as well as on the age of the building. The most commonly used beams are 100 × 100 or 150 × 150 mm.
- rafters. The whole structure is created from such elements (read also: ""). Connecting at the top point, two rafters form a farm. They are made from logs or durable bars.
- puff. This part serves to grip the rafters and ensure their rigidity.
- Runs. In those places where the rafter legs are joined, a ridge run is attached, on which the skate will subsequently be mounted. And with the help of side runs, the frame of the rafters is given additional strength. The expected load determines the size and number of such elements.
- Rafter rack. This is a vertical beam that partially takes over the weight of the roof. If the gable roof scheme is simple, then one such beam is placed in the center. For a long span, three bars may be required - one in the center and two on the sides. If an asymmetrical roof is being erected, then the location of such a beam is determined by the length of the rafter legs. Under the rafters for a sloping roof, racks are placed on the sides to make room for movement. Beams are placed in the center and sides if there are two rooms.
- Struts. These are rack supports. If significant winds and precipitation are expected in the winter, longitudinal as well as diagonal racks are installed.
- Sill. A rack for rafters rests on it, and struts are also attached.
- crate. The selected roofing material is attached to it, and you can also move along it during work. Fix the crate perpendicular to the rafters. Please note that the crate allows you to evenly distribute the mass of roofing material over the rafter system.

The installation scheme of the gable roof truss system will greatly facilitate everything construction works. How such a roof scheme will look depends on the type of roof.
Please note that the material for the truss system must be of the highest quality, treated with flame retardant and antiseptic agents. There should be no knots or cracks on the beams for rafters, Mauerlat and racks. Only a small number of knots are allowed on the crate, firmly seated in the wood.
Calculation of frame elements for a gable roof
Laying Mauerlat on the walls
This element is mounted on a load-bearing wall along its entire length. If we are talking about a log house, then the upper crown can serve as a Mauerlat. For buildings made of aerated concrete or brick, a Mauerlat equal to the length of the wall will be required. Sometimes this detail can be laid between the rafters.
With a lack of material length for the Mauerlat, several pieces can be spliced. At the same time, the edges are sawn at 90º and joined with bolts - wire, dowels or nails are not suitable.

There are two ways to lay a Mauerlat on top of a load-bearing wall:
- symmetrically in the center;
- offset in the desired direction.
Mounting of the Mauerlat is carried out on a pre-laid waterproofing layer of roofing material. This will protect the wood from rotting.
It is worth taking a responsible attitude to the process of attaching the Mauerlat, since in strong winds it must withstand a particularly heavy load.
As fasteners for Mauerlat, you can use the following consumables:
- Anchors, which are indispensable for monolithic materials.
- Wooden dowels. These parts are used in houses made of timber and logs, although they require additional fastenings.
- Staples.
- Reinforcement or special studs. This option is preferable for buildings made of foam or aerated concrete.
- Knitting or steel wire is an auxiliary fastener that is used almost always.
Assembly of trusses or trusses
Farm assembly can be done using one of the following methods:
- Beams for rafters are assembled and mounted directly on the roof of the building. This process is quite laborious, since all measurements, trimming and coupling of the bars will have to be done at a height. However, you can do it on your own, without the involvement of technology.
- Trusses or truss pairs can be fixed to the ground, and then the finished elements can be raised to the roof of the building. On the one hand, this simplifies the process of installing the rafters, and on the other hand, due to the large weight of the structure, lifting it up will require special equipment.
Please note that it is worth starting the assembly of truss pairs only after marking. And if you make a template in advance, for which you take two boards equal to the length of the rafters, and connect them together, then all pairs will turn out to be exactly the same.
Installation of rafters
After assembly and lifting to a height, the installation of gable roof rafters is carried out wooden house. To fix them on the Mauerlat, cuts are made at the bottom of the rafters. The first to install two trusses from opposite ends of the roof.
After that, a rope is pulled between the starting pairs, along which all the other truss trusses will be aligned and the ridge will be installed.

Now you can mount the remaining pairs in compliance with the calculated step between them. In cases where pairs are assembled directly on the roof, a ridge run is attached between the two end trusses. Subsequently, rafters are installed on it.
The order of installation of halves of rafters according to the opinions of professionals may differ. Some prefer to lay the bars in a checkerboard pattern so as not to overload the foundation and walls during work. Others tend to install pairs of rafters in series. Be that as it may, rafter legs may need props and racks - it all depends on the size of the roof and the shape of the trusses.
Skate mount
A ridge is an element that is formed by attaching rafters at the top point. As soon as all the details of the truss system for a gable roof are installed, it is necessary to perform a major fixing of all structural elements.
Lathing installation
The presence of lathing is mandatory in the construction of any roof. It not only supports the roofing material and allows it to be securely fastened, but also makes it possible to move along the roof during work.

The distance between the individual boards is chosen based on the type of roofing material:
- soft roofing is laid on a continuous crate without gaps;
- for a metal tile, a crate is needed with a step of 35 cm (between the two lower rows - 30 cm);
- slate and corrugated board can be laid on the crate in increments of 44 cm.
Results
Thus, in order to assemble a truss system for a roof with two slopes, many nuances should be taken into account and any possible complications should be foreseen. We hope that our advice will help you cope with this difficult task and create a high-quality and durable roof for your home.